European ASP.NET 4.5 Hosting BLOG

BLOG about ASP.NET 4, ASP.NET 4.5 Hosting and Its Technology - Dedicated to European Windows Hosting Customer

European ASP.NET Core 8.0.1 Hosting - HostForLIFE :: Recognizing OLTP versus OLAP Techniques

clock May 16, 2024 09:04 by author Peter

Two key methodologies stand out in the field of data management and analytics: online transaction processing, or OLTP, and online analytical processing, or OLAP. These approaches address various facets of data processing, storage, and analysis and have diverse functions. It is essential to comprehend the distinctions between OLTP and OLAP in order to construct efficient data management systems and make wise decisions across a range of industries, including e-commerce and banking.

1. History and Evolution
OLTP

OLTP traces its origins back to the 1960s with the emergence of early database management systems (DBMS). It primarily focuses on managing transaction-oriented tasks, such as recording sales, processing orders, and updating inventory levels in real time. OLTP systems are designed for high concurrency and rapid response times, ensuring efficient handling of numerous short online transactions.

OLAP
On the other hand, OLAP gained prominence in the late 1980s and early 1990s as organizations recognized the need for advanced analytics and decision support systems. OLAP systems are optimized for complex queries, ad-hoc reporting, and multidimensional analysis. They provide a consolidated view of data from various sources, enabling users to gain insights through interactive analysis and reporting.

2. Purpose and Need

OLTP: The primary goal of OLTP systems is to support the day-to-day transactional operations of an organization. These transactions are typically characterized by short response times and high throughput. For example, when a customer places an order on an e-commerce website, the OLTP system ensures that the order is processed promptly, inventory is updated, and the transaction is recorded in the database.

OLAP: In contrast, OLAP systems are designed to facilitate decision-making by providing a comprehensive view of historical and aggregated data. They enable users to analyze trends, identify patterns, and make informed strategic decisions. For instance, a retail company might use OLAP to analyze sales data across different regions, product categories, and time periods to optimize inventory management and marketing strategies.

3. Evolution to Address Modern Challenges

As technology evolves and data volumes continue to grow exponentially, both OLTP and OLAP systems have undergone significant transformations to address modern challenges:

  • Scalability: With the advent of cloud computing and distributed databases, OLTP and OLAP systems have become more scalable and resilient. They can handle massive volumes of data and support high levels of concurrency, ensuring optimal performance even under heavy workloads.
  • Real-time Analytics: The demand for real-time analytics has led to the integration of OLTP and OLAP functionalities in hybrid transactional/analytical processing (HTAP) systems. These systems combine the benefits of both OLTP and OLAP, allowing organizations to perform analytics on live transactional data without the need for separate data warehouses.
  • In-memory Computing: In-memory computing has emerged as a game-changer for both OLTP and OLAP systems, enabling faster data processing and analysis by storing data in memory rather than on disk. This approach significantly reduces latency and enhances overall system performance, making it ideal for time-sensitive applications and interactive analytics.

Demonstration in C#
Below is a simplified C# code snippet demonstrating the difference between OLTP and OLAP queries using a hypothetical e-commerce scenario:
// OLTP Query: Retrieve order details for a specific customer
public Order GetOrderDetails(int customerId)
{
    using (var dbContext = new OLTPDbContext())
    {
        return dbContext.Orders
            .Include(o => o.OrderItems)
            .SingleOrDefault(o => o.CustomerId == customerId);
    }
}

// OLAP Query: Analyze sales data by product category
public Dictionary<string, int> GetSalesByCategory()
{
    using (var dbContext = new OLAPDbContext())
    {
        return dbContext.OrderItems
            .GroupBy(oi => oi.Product.Category)
            .ToDictionary(g => g.Key, g => g.Sum(oi => oi.Quantity));
    }
}


In this example, the OLTP query retrieves order details for a specific customer in real time, while the OLAP query analyzes sales data by product category for strategic decision-making.

OLTP and OLAP practices play complementary roles in modern data management and analytics. By understanding their differences and capabilities, organizations can design robust systems that meet their transactional and analytical needs effectively.

HostForLIFE ASP.NET Core 8.0.4 Hosting

European best, cheap and reliable ASP.NET hosting with instant activation. HostForLIFE.eu is #1 Recommended Windows and ASP.NET hosting in European Continent. With 99.99% Uptime Guaranteed of Relibility, Stability and Performace. HostForLIFE.eu security team is constantly monitoring the entire network for unusual behaviour. We deliver hosting solution including Shared hosting, Cloud hosting, Reseller hosting, Dedicated Servers, and IT as Service for companies of all size.


European ASP.NET Core 8.0.1 Hosting - HostForLIFE :: Putting Role-Based and Policy-Based Authorization into Practice with .NET Core

clock May 7, 2024 09:03 by author Peter

The focus of this essay is on utilizing.NET Core for policy-based authorization. If you want to understand the fundamentals of authorization techniques, please click the link. Let's dissect the essential elements:

Configuring Authentication

  • Initially, configure your application's authentication. By doing this, users' identity and authentication are guaranteed.
  • To handle user logins and token issuance, you will usually employ a third-party authentication provider (such as Microsoft Identity Platform).

Authorization Policies

  • Next, define authorization policies. These policies determine who can access specific parts of your application.
  • Policies can be simple (e.g., “authenticated users only”) or more complex (based on claims, roles, or custom requirements).

Default Policy

  • Create a default policy that applies to all endpoints unless overridden.
  • For example, you might require users to be authenticated and have specific claims (like a preferred username).

Custom Policies

  • Add custom policies for specific scenarios. These allow fine-grained control over access.
  • For instance, you can create policies based on permissions (e.g., “create/edit user” or “view users”).

Permission Requirements

  • Define permission requirements (e.g., PermissionAuthorizationRequirement). These represent specific actions or features.
  • For each requirement, check if the user has the necessary permissions (based on their roles or other criteria).

Role-Based Authorization

  • Optionally, incorporate role-based authorization.
  • Roles group users with similar access levels (e.g., “admin,” “user,” etc.). You can assign roles to users.

Authorization Handlers

  • Implement custom authorization handlers (e.g., AuthorizationHandler).
  • These handlers evaluate whether a user meets the requirements (e.g., has the right permissions or roles).

Controller Actions

  • In your controller actions, apply authorization rules.
  • Use [Authorize] attributes with either policies or roles.

Middleware Result Handling

  • Customize how authorization results are handled (e.g., 401 Unauthorized or 403 Forbidden responses).
  • You can create an AuthorizationMiddlewareResultHandler to manage this behavior

Let's go ahead will the actual coding for your Web API:

Program.cs: User Azure AD authentication as it is. Decide your Permission Keys for Authorization.
Only one policy in the AddPolicy method
//In Program.cs file, add the below code

        var builder = WebApplication.CreateBuilder(args);

        // Authentication using Microsoft Identity Platform
        services.AddAuthentication(JwtBearerDefaults.AuthenticationScheme)
            .AddMicrosoftIdentityWebApi(builder.Configuration.GetSection("AzureAd"));

        // Default policy-based authorization
        services.AddAuthorizationCore(options =>
        {
            options.DefaultPolicy = new AuthorizationPolicyBuilder()
                .RequireAuthenticatedUser()
                .RequireClaim("preferred_username")
                .RequireScope("user_impersonation")
                .Build();

            options.AddPolicy("Permission1", policy =>
                policy.Requirements.Add(new PermissionAuthorizationRequirement("Permission1")));

            options.AddPolicy("Permission2", policy =>
                policy.Requirements.Add(new PermissionAuthorizationRequirement("Permission2")));
        });

        // Authorization handler
        services.AddScoped<IAuthorizationHandler, AuthorizationHandler>();

        // Middleware result handler for response errors (401 or 403)
        services.AddScoped<IAuthorizationMiddlewareResultHandler, AuthorizationMiddlewareResultHandler>();

        // Other services and configurations...


PermissionAuthorizationRequirement .cs: Just copy and paste the requirement
//Create new PermissionAuthorizationRequirement.cs file for Custom requirement for permission-based authorization
    public class PermissionAuthorizationRequirement : IAuthorizationRequirement
    {
        public PermissionAuthorizationRequirement(string allowedPermission)
        {
            AllowedPermission = allowedPermission;
        }

        public string AllowedPermission { get; }
    }


AuthorizationHandler.cs: (Just copy and paste the code. Make sure to hit the DB call to get the permissions list by using App Manager)
// Custom authorization handler to check user permissions
    public class AuthorizationHandler : AuthorizationHandler<PermissionAuthorizationRequirement>
    {
        // Business layer service for user-related operations
        private readonly IAppManager _appManager;

        public AuthorizationHandler(IAppManager appManager)
        {
            _appManager= appManager;
        }

        protected override async Task HandleRequirementAsync(AuthorizationHandlerContext context, PermissionAuthorizationRequirement requirement)
        {
            // Find the preferred_username claim
            var preferredUsernameClaim = context.User.Claims.FirstOrDefault(c => c.Type == "preferred_username");

            if (preferredUsernameClaim is null)
            {
                // User is not authenticated
                context.Fail(new AuthorizationFailureReason(this, "UnAuthenticated"));
                return;
            }

            // Call the business layer method to check if the user exists
            var user = await _appManager.GetUserRolesAndPermissions(preferredUsernameClaim);

            if (user is null || !user.IsActive)
            {
                // User does not exist or is inactive
                context.Fail(new AuthorizationFailureReason(this, "UnAuthenticated"));
                return;
            }

            // Select the list of permissions that the user is assigned
            // Here you will fetch the Permission1 and Permission2
            var userPermissions = user.UserPermissions?.Select(k => k.PermissionKey);

            // Get the current permission key from the controller's action method
            string allowedPermission = requirement.AllowedPermission;


            // Check if the current request carries this permission
            if (userPermissions.Any(permission => permission == allowedPermission))
            {
                // Permission granted
                context.Succeed(requirement);
                return;
            }

            // Permission denied
            context.Fail();
        }
    }


AuthorizationMiddlewareResultHandler.cs: Just copy and paste. No changes are required.

// AuthorizationMiddlewareResultHandler to decide response code (401 or success)
public class AuthorizationMiddlewareResultHandler : IAuthorizationMiddlewareResultHandler
{
    private readonly ILogger<AuthorizationMiddlewareResultHandler> _logger;
    private readonly Microsoft.AspNetCore.Authorization.Policy.AuthorizationMiddlewareResultHandler _defaultHandler = new();

    public AuthorizationMiddlewareResultHandler(ILogger<AuthorizationMiddlewareResultHandler> logger)
    {
        _logger = logger;
    }

    public async Task HandleAsync(
        RequestDelegate next,
        HttpContext context,
        AuthorizationPolicy policy,
        PolicyAuthorizationResult authorizeResult)
    {
        var authorizationFailureReason = authorizeResult.AuthorizationFailure?.FailureReasons.FirstOrDefault();
        var message = authorizationFailureReason?.Message;

        if (string.Equals(message, "UnAuthenticated", StringComparison.CurrentCultureIgnoreCase))
        {
            // Set response status code to 401 (Unauthorized)
            context.Response.StatusCode = "401";
            _logger.LogInformation("401 failed authentication");
            return;
        }

        // If not unauthorized, continue with default handler
        await _defaultHandler.HandleAsync(next, context, policy, authorizeResult);
    }
}

Controller.cs: Finally, in the dashboard controller, add the attributes [Authorize] and [Policies]. Here you will define Permission1 and Permission2
// Dashboard controller
[Authorize]
[Route("api/[controller]")]
[ApiController]
public class DashboardController : ControllerBase
{
    [HttpGet]
    [Route("get-dashboardDetails")]
    [Authorize(Policy = "Permission1")]
    public async Task GetAllDashboardDetailsAsync()
    {
        // Your logic for fetching all user details
        return await GetAllDashboardDetailsAsync();
    }

    [HttpGet]
    [Route("create-product")]
    [Authorize(Policy = "Permission2")]
    //[Authorize(Policy = nameof(Read string from ENUM))]
    public async Task CreateProductAsync([FromBody] Product product)
    {
        // Your logic for creating a new product
    }
}

Now if you want to combine with Roles based authorization in your Web API code. Follow the below steps or you can avoid moving forward. It is almost the same steps as we did with the policy-based authorization with a small difference that you will figure out in the code.

1. Register the RoleAuthorizationHandler: In your Program.cs file, just add the following line to register the RoleAuthorizationHandler
builder.Services.AddScoped<IAuthorizationHandler, RoleAuthorizationHandler>();

2. RoleAuthorizationHandler: Below is the RoleAuthorizationHandler.cs one that checks whether the user has the required roles. Create one more handler
public class RoleAuthorizationHandler : AuthorizationHandler<RolesAuthorizationRequirement>
{
    private readonly IAppManager _appManager;

    public RoleAuthorizationHandler(IAppManager appManager)
    {
        _appManager= appManager;
    }

    protected override async Task HandleRequirementAsync(AuthorizationHandlerContext context, RolesAuthorizationRequirement requirement)
    {
        // Find the preferred_username claim
        Claim claim = context.User.Claims.FirstOrDefault(c => c.Type == "preferred_username");

        if (claim is not null)
        {
            // Get user details
            var userRoles = await _appManager.GetUserRolesAndPermissions(claim.Value);

            // Check if the user's roles match the allowed roles
            var roles = requirement.AllowedRoles;
            if (userRoles .Any(x => roles.Contains(x)))
            {
                context.Succeed(requirement); // User has the required roles
            }
            else
            {
                context.Fail(); // User does not have the required roles
                return;
            }
        }
        await Task.CompletedTask;
    }
}


3. Usage in DashboardController: In your DashboardController, you can use both roles and policies for authorization. For example:
[HttpGet]
[Route("get-dashboardDetails")]
[Authorize(Roles = "Super_Admin, Role_Administrator")] // Can have multiple roles. You can choose either Roles or Policy or both
[Authorize(Policy = "Permission1")] // Can have only one policy per action to accept.
public async Task GetAllDashboardDetailsAsync()
{
    // Your logic for fetching all user details
    return await GetAllDashboardDetailsAsync();
}


That's all. Your Web API will work like magic.
Stay tuned for more learning.

HostForLIFE ASP.NET Core 8.0.4 Hosting

European best, cheap and reliable ASP.NET hosting with instant activation. HostForLIFE.eu is #1 Recommended Windows and ASP.NET hosting in European Continent. With 99.99% Uptime Guaranteed of Relibility, Stability and Performace. HostForLIFE.eu security team is constantly monitoring the entire network for unusual behaviour. We deliver hosting solution including Shared hosting, Cloud hosting, Reseller hosting, Dedicated Servers, and IT as Service for companies of all size.


European ASP.NET Core 8.0.1 Hosting - HostForLIFE :: FluentValidation's Dynamic Registration in the.NET Minimal API

clock April 30, 2024 09:49 by author Peter

Validation plays a crucial role in the.NET development environment in guaranteeing data integrity and robustness of applications. A popular package called FluentValidation offers a clear and expressive method for defining validation rules in.NET applications. We will look at how to make the process of dynamically registering FluentValidation classes in.NET Minimal APIs more efficient in this blog post. This method improves the maintainability of your apps' validation mechanism while lowering manual overhead.

Understanding Dynamic Registration
Dynamic registration refers to the process of automatically discovering and registering components at runtime, based on predefined conventions or criteria. In the context of FluentValidation and .NET Minimal APIs, dynamic registration allows us to scan assemblies, identify validator classes, and register them with the dependency injection container without explicit manual intervention.

Benefits of Dynamic Registration with FluentValidation

  • Reduced Boilerplate Code: With dynamic registration, developers no longer need to manually register each validator class. This reduces boilerplate code and makes the registration process more concise and maintainable.
  • Improved Scalability: As your application grows and evolves, dynamic registration accommodates new validator classes seamlessly. Adding or modifying validation logic becomes simpler and requires minimal changes to the registration code.
  • Enhanced Flexibility: Dynamic registration enables developers to adhere to conventions or patterns for validator class naming and structure. This promotes consistency and simplifies maintenance across the codebase.

Implementing Dynamic Registration
To implement dynamic registration of FluentValidation classes in .NET Minimal APIs, follow these steps.

  • The tools that we are leveraging here are.
  • FluentValidation
  • Microsoft.Extensions.DependencyInjection.Abstractions
  • .NET 8.0
  • Visual Studio 2022 Community Edition
  • Web API

Scanning Assemblies: Utilize reflection to scan assemblies at runtime and identify classes that implement the IValidator<T> interface. This involves iterating through types, filtering out validator classes, and extracting generic type arguments.Registering Validators: Once validator classes are identified, register them with the dependency injection container using the appropriate service lifetime scope (e.g., scoped, transient). Map each validator interface (IValidator<T>) to its corresponding concrete implementation.Integration with Startup Logic: Integrate the dynamic registration logic into the startup/configuration code of your .NET 6 Minimal API project. This typically involves invoking the scanning mechanism during application startup and configuring the dependency injection container accordingly.Code Snippet//Person Domain Model

public class Person
 {
     public string Name { get; set; }
     public int Age { get; set; }
     public string Email { get; set; }

 }

//PersonValidation.cs
public class PersonValidation:AbstractValidator<Person>
{
    public PersonValidation()
    {
        RuleFor(x => x.Name).NotEmpty().WithMessage("Name is required");
        RuleFor(x => x.Age).GreaterThan(0).WithMessage("Age must be greater than 18");
        RuleFor(x => x.Email).EmailAddress().WithMessage("Email is not valid");
    }
}

//Create Person Action
app.MapPost("Person",([FromBody] Person person, IValidator<Person> validator) =>
{
    var personValidation = validator.Validate(person);
    if (!personValidation.IsValid)
    {
        return Results.BadRequest(personValidation.ToDictionary());
    }
    return Results.Ok("Person created successfully");
})
    .WithName("CreatePerson")
    .WithOpenApi();

//TypeExtension.cs

/*
This extension method is designed to check whether a given type or any of its base types implement a generic type or generic interface specified by genericType. It handles both interface and inheritance hierarchies, recursively checking base types until a match is found or until there are no more base types to check.

*/

public static class TypeExtensions
{
    public static bool IsAssignableToGenericType(this Type givenType, Type genericType)
    {
        var interfaceTypes = givenType.GetInterfaces();

        foreach (var it in interfaceTypes)
        {
            if (it.IsGenericType && it.GetGenericTypeDefinition() == genericType)
                return true;
        }

        if (givenType.IsGenericType && givenType.GetGenericTypeDefinition() == genericType)
            return true;

        var baseType = givenType.BaseType;
        if (baseType == null) return false;

        return IsAssignableToGenericType(baseType, genericType);
    }
}

//FluentValidationServiceCollections.cs
public static class FluentValidationServiceCollections
{
    public static void AddFluentValidationValidators(this IServiceCollection services)
    {
        var validatorTypes = Assembly.GetExecutingAssembly()
            .GetTypes()
            .Where(t => !t.IsAbstract && t.IsAssignableToGenericType(typeof(AbstractValidator<>)))
            .ToList();

        foreach (var validatorType in validatorTypes)
        {
            var genericArg = validatorType.BaseType!.GetGenericArguments().FirstOrDefault();
            if (genericArg != null)
            {
                var serviceType = typeof(IValidator<>).MakeGenericType(genericArg);
                services.AddScoped(serviceType, validatorType);
            }
        }
    }
}

//register the fluent validation validators in Program.cs
builder.Services.AddFluentValidationValidators();

HostForLIFE ASP.NET Core 8.0.1 Hosting

European best, cheap and reliable ASP.NET hosting with instant activation. HostForLIFE.eu is #1 Recommended Windows and ASP.NET hosting in European Continent. With 99.99% Uptime Guaranteed of Relibility, Stability and Performace. HostForLIFE.eu security team is constantly monitoring the entire network for unusual behaviour. We deliver hosting solution including Shared hosting, Cloud hosting, Reseller hosting, Dedicated Servers, and IT as Service for companies of all size.


European ASP.NET Core 8.0.1 Hosting - HostForLIFE :: How to Implementing Long Polling in .NET for Real-Time Communication?

clock April 23, 2024 07:45 by author Peter

In-depth polling in.NET
A method for achieving real-time communication between a client and a server is called long polling. Long polling lowers latency and boosts efficiency by keeping the connection open until the server has new data to share, in contrast to regular polling, which involves the client requesting updates from the server often. We'll look at how to add lengthy polling for real-time updates to a.NET application in this blog post.

Benefits of Long Polling

  • Real-Time Updates: Long polling allows for near-real-time communication between clients and servers, enabling instant updates and notifications.
  • Reduced Latency: By keeping connections open until new data is available, long polling reduces latency compared to traditional polling techniques.
  • Efficiency: Long polling minimizes unnecessary requests and server load by only retrieving data when updates are available.
  • Simplicity: Implementing long polling in .NET is straightforward and requires minimal configuration, making it accessible for developers.

Use Cases

  • Chat Applications: Long polling is commonly used in chat applications to deliver messages and notifications to users in real time.
  • Live Updates: Websites or applications that require live updates, such as stock tickers, news feeds, or sports scores, can benefit from long polling.
  • Collaborative Tools: Long polling enables collaborative editing tools, where multiple users can see changes made by others in real time.

Drawbacks of Long polling

  • Connection Overhead: Long polling requires maintaining open connections, which can lead to increased server resource consumption and potential scalability challenges.
  • Resource Consumption: Long-lived connections may tie up server resources, impacting the overall performance and scalability of the application.
  • Timeouts: If a long-polling request times out before new data is available, the client must initiate a new request, potentially introducing delays.

Avoiding Drawbacks

  • Connection Pooling: Use connection pooling to efficiently manage long-lived connections and prevent resource exhaustion on the server.
  • Timeout Management: Implement appropriate timeout settings to ensure that long-polling requests do not remain open indefinitely, balancing responsiveness with resource usage.
  • Scalability Planning: Monitor server performance and scalability to identify potential bottlenecks and optimize resource allocation as needed.

Alternatives

  • WebSockets: WebSockets provide full-duplex communication channels over a single, long-lived connection, offering real-time, bi-directional communication between clients and servers.
  • Server-Sent Events (SSE): SSE is a standard allowing servers to push updates to clients over HTTP connections, providing a simpler alternative to WebSockets for one-way communication.

1. Setting Up a .NET Web Application
Initiate a new.NET web application project using your IDE of choice. ASP.NET Core can be used to create a contemporary, cross-platform online application.
dotnet new web -n LongPollingDemo
cd LongPollingDemo


2. Implementing Long Polling Controller
In order to manage lengthy polling requests from clients, create a controller in your.NET application.
using Microsoft.AspNetCore.Mvc;
using System;
using System.Threading;
using System.Threading.Tasks;

[Route("api/[controller]")]
[ApiController]
public class UpdatesController : ControllerBase
{
    [HttpGet]
    public async Task<IActionResult> LongPoll()
    {
        // Simulate long-running operation
        await Task.Delay(5000);

        // Generate random data or fetch updates from database
        var randomUpdate = new { Message = $"Update received at {DateTime.UtcNow}" };

        return Ok(randomUpdate);
    }
}

3. Client-Side Implementation
Implement a lengthy polling mechanism on the client side (using JavaScript, for example) to make many requests for updates from the server.
function longPoll() {
    fetch('/api/updates')
        .then(response => response.json())
        .then(data => {
            // Process received update
            console.log(data);
            // Initiate next long poll request
            longPoll();
        })
        .catch(error => {
            console.error('Long poll request failed', error);
            // Retry long poll after a delay
            setTimeout(longPoll, 3000);
        });
}

// Start long polling
longPoll();

4. Configuring Server-Side Settings

Make sure the server-side program is set up to deal with timeouts and persistent connections in the right way. Modify the server configuration to support extended polling requests without disconnecting connections too soon.

5. Testing and Deployment

Test your long polling implementation locally to verify real-time updates between the client and server. Once tested, deploy your .NET web application to a production environment to provide real-time communication capabilities to users.

Conclusion

By implementing long polling in a .NET web application, you can achieve real-time communication between clients and servers, enabling instant updates and notifications without the overhead of constant polling. Long polling is particularly useful for applications requiring timely updates, such as chat applications, real-time monitoring dashboards, and collaborative editing tools. With the flexibility and scalability of .NET, you can build robust and responsive web applications that meet the demands of modern users.

HostForLIFE ASP.NET Core 8.0.1 Hosting

European best, cheap and reliable ASP.NET hosting with instant activation. HostForLIFE.eu is #1 Recommended Windows and ASP.NET hosting in European Continent. With 99.99% Uptime Guaranteed of Relibility, Stability and Performace. HostForLIFE.eu security team is constantly monitoring the entire network for unusual behaviour. We deliver hosting solution including Shared hosting, Cloud hosting, Reseller hosting, Dedicated Servers, and IT as Service for companies of all size.


European ASP.NET Core 8.0.1 Hosting - HostForLIFE :: Using xUnit for Unit Testing in.NET 8

clock April 17, 2024 07:07 by author Peter

A common option in.NET 8 for creating and running unit tests in C# is the xUnit testing framework, which is essential to the software development process. In this thorough tutorial, we will go over key ideas and offer code samples as we examine the foundations of unit testing using xUnit.

Establishing a Model Project
The first step is to use xUnit to construct a small console application in C# and a unit test project for it.

# Create a new console application
dotnet new console -n PeterConsoleApp

# Create a new xUnit test project
dotnet new xunit -n PeterConsoleApp.Tests

Write Our Console Application
We just printed this article's title and my name, Peter, in the Program.cs file. as demonstrated by the code example below.

Console.WriteLine("Hi and Welcome to Peter Article on Unit Testing with xUnit in .NET 8: A Comprehensive Guide");

Create Our Calculator Class

We just create a simple Calculator class with simple functions such as Add, Subtract, Multiply, Divide, and the key one Dispose of as the code example below.
namespace PeterConsoleApp
{
    public class Calculator : IDisposable
    {
        // Add method
        public int Add(int a, int b)
        {
            return a + b;
        }

        // Subtract method
        public int Subtract(int a, int b)
        {
            return a - b;
        }

        // Multiply method
        public int Multiply(int a, int b)
        {
            return a * b;
        }

        // Divide method
        public double Divide(int a, int b)
        {
            if (b == 0)
            {
                throw new ArgumentException("Cannot divide by zero.");
            }

            return (double)a / b;
        }

        private bool disposed = false;

        protected virtual void Dispose(bool disposing)
        {
            if (!disposed)
            {
                if (disposing)
                {
                    // Dispose of managed resources here go here
                }

                // Dispose of unmanaged resources goes here , if any
                disposed = true;
            }
        }

        public void Dispose()
        {
            Dispose(true);
            GC.SuppressFinalize(this);
        }

        ~Calculator()
        {
            Dispose(false);
        }
    }
}


Data Source
We will create two files for our Data Source one is an interface and the other is a class as code example below.
namespace PeterConsoleApp
{
    public interface IDataSource
    {
        string GetData();
    }
}


namespace PeterConsoleApp
{
    public class DataService
    {
        private readonly IDataSource _dataSource;

        public DataService(IDataSource dataSource)
        {
            _dataSource = dataSource;
        }

        public string ProcessData()
        {
            return _dataSource.GetData().ToUpper();
        }
    }
}


Now we are all set to create our Unit Tests 😊

Writing Our First Test

Our preferred code editor should open the PeterConsoleApp.Tests project. XUnit automatically creates a test file named UnitTest1.cs. To replace UnitTest1.cs with the following code example, please refer to the below code example. As an example, we will create a simple test method named TestAddition. The [Fact] attribute indicates that this method is a test.
namespace PeterConsoleApp.Tests
{
    public class PeterConsoleAppTests
    {
        [Fact]
        public void TestAddition()
        {
           // Arrange
           int a = 2;
           int b = 3;

           // Act
           int result = a + b;

           // Assert
           Assert.Equal(5, result);
        }
    }
}


Arrange

Putting the required things and circumstances in place.

Act

Executing the operation or calling the tested procedure.

Assert
Confirming that the outcome meets expectations.

Running the Tests

Now, let's run our unit tests.
# Navigate to the test project directory
cd PeterConsoleApp.Tests

# Run the tests
dotnet test
# Navigate to the test project directory
cd PeterConsoleApp.Tests

# Run the tests
dotnet test


There should be an output indicating that one test has been run and passed.

Writing More Tests
Let's add a few more tests to cover different scenarios. Let's replace UnitTest1.cs with the following code example. We will add a subtraction test and a parameterized multiplication test using the [Theory] and [InlineData] attributes.
namespace PeterConsoleApp.Tests
{
    public class PeterConsoleAppTests
    {
        [Fact]
        public void TestSubtraction()
        {
            // Arrange
            int a = 5;
            int b = 3;

            // Act
            int result = a - b;

            // Assert
            Assert.Equal(2, result);
        }

        [Theory]
        [InlineData(2, 3, 6)]
        [InlineData(5, 4, 20)]
        [InlineData(0, 7, 0)]
        public void TestMultiplication(int a, int b, int expected)
        {
            // Act
            int result = a * b;

            // Assert
            Assert.Equal(expected, result);
        }
    }
}


Advanced Concepts

Test Fixture

Generally, a test fixture contains one or more test methods. It can be used to share setup and cleanup code between tests.
namespace PeterConsoleApp
{
    public class CalculatorFixture : IDisposable
    {
        public Calculator Calculator { get; private set; }

        public CalculatorFixture()
        {
            // Initialize resources, create instances, etc.
            Calculator = new Calculator();
        }

        public void Dispose()
        {
            // Clean up resources, dispose of instances, etc.
            Calculator.Dispose();
        }
    }
}


namespace PeterConsoleApp.Tests
{
    public class CalculatorTests : IClassFixture<CalculatorFixture>
    {
        private readonly CalculatorFixture _fixture;

        public CalculatorTests(CalculatorFixture fixture)
        {
            _fixture = fixture;
        }

        [Fact]
        public void TestAddition()
        {
            // Arrange
            Calculator calculator = _fixture.Calculator;
            int a = 5;
            int b = 10;

            // Act
            int result = calculator.Add(a, b);

            // Assert
            Assert.Equal(15, result);
        }
    }
}

Mocking
The use of mocking libraries, such as Moq, can help isolate code units for testing.
using Moq;

namespace PeterConsoleApp.Tests;
public class DataServiceTests
{
    [Fact]
    public void TestDataProcessing()
    {
        // Arrange
        var mockDataSource = new Mock<IDataSource>();
        mockDataSource.Setup(d => d.GetData()).Returns("HELLO, I AM Peter");

        var dataService = new DataService(mockDataSource.Object);

        // Act
        string result = dataService.ProcessData();

        // Assert
        Assert.Equal("HELLO, I AM Peter", result);
    }
}

HostForLIFE ASP.NET Core 8.0.1 Hosting

European best, cheap and reliable ASP.NET hosting with instant activation. HostForLIFE.eu is #1 Recommended Windows and ASP.NET hosting in European Continent. With 99.99% Uptime Guaranteed of Relibility, Stability and Performace. HostForLIFE.eu security team is constantly monitoring the entire network for unusual behaviour. We deliver hosting solution including Shared hosting, Cloud hosting, Reseller hosting, Dedicated Servers, and IT as Service for companies of all size.


European ASP.NET Core 8.0.1 Hosting - HostForLIFE :: Explain StackLayout in.NET MAUI

clock April 1, 2024 06:57 by author Peter

In this tutorial, we'll look at the StackLayout in.NET MAUI. If you are new to.NET MAUI, I recommend that you read the following topics in this series. StackLayout is a layout that allows us to organize the child views in a one-dimensional stack horizontally or vertically. The StackLayout's default orientation is vertical, however it can be modified to horizontal.

Let's look at few instances to better grasp StackLayout.

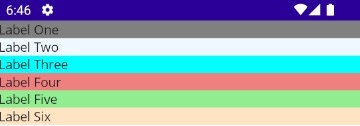
Stack layout with vertical orientation

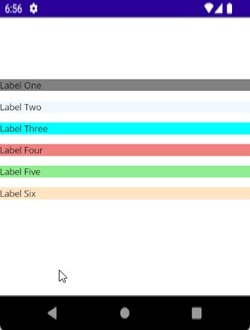
In the first example, I added many Labels to the StackLayout and organized them vertically because the StackLayout's default orientation is 'Vertical'.
<StackLayout>
        <Label x:Name="lblOne" Text="Label One" BackgroundColor="Gray"></Label>
        <Label x:Name="lblTwo" Text="Label Two" BackgroundColor="AliceBlue"></Label>
        <Label x:Name="lblThree" Text="Label Three" BackgroundColor="Aqua"></Label>
        <Label x:Name="lblFour" Text="Label Four" BackgroundColor="LightCoral"></Label>
        <Label x:Name="lblFive" Text="Label Five" BackgroundColor="LightGreen"></Label>
        <Label x:Name="lblSix" Text="Label Six" BackgroundColor="Bisque"></Label>
</StackLayout>


Preview

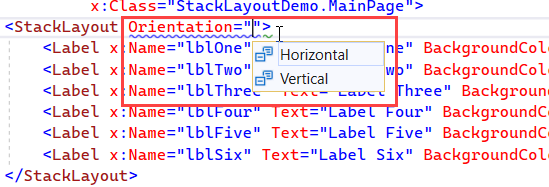
StackLayout with Horizontal orientation
Let’s change the orientation property of the StackLayout to ‘Horizontal’.

<StackLayout Orientation="Horizontal">
        <Label x:Name="lblOne" Text="Label One" BackgroundColor="Gray"></Label>
        <Label x:Name="lblTwo" Text="Label Two" BackgroundColor="AliceBlue"></Label>
        <Label x:Name="lblThree" Text="Label Three" BackgroundColor="Aqua"></Label>
        <Label x:Name="lblFour" Text="Label Four" BackgroundColor="LightCoral"></Label>
        <Label x:Name="lblFive" Text="Label Five" BackgroundColor="LightGreen"></Label>
        <Label x:Name="lblSix" Text="Label Six" BackgroundColor="Bisque"></Label>
</StackLayout>

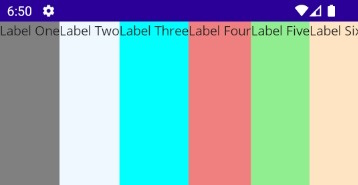
After changing the orientation, all the child elements under the StackLayout are arranged horizontally.

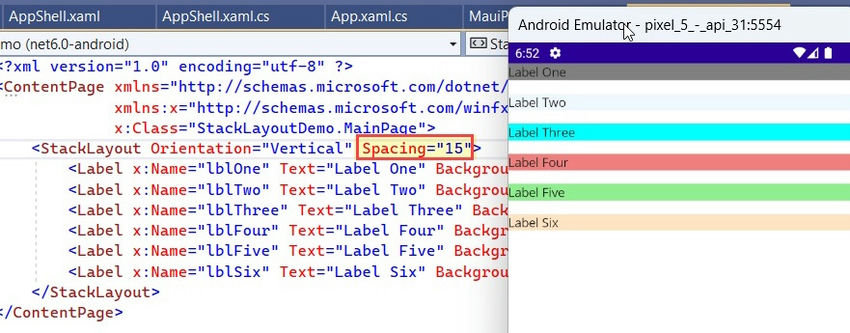
Spacing property in StackLayout
Another property of StackLayout is ‘Spacing’ which is of type double, and specifies the amount of space between the child views. Its default value is 0. For demonstration purposes, I am changing this value to 15.

HorizontalOptions and VerticalOptions in StackLayout
The HorizontalOptions and VerticalOptions properties of the StackLayout are of type LayoutOptions and are used to specify how a view should be aligned or positioned within its parent layout when there is unused space available. In the below example, I am changing the VerticalOptions of the StackLayout to Center.
<StackLayout Orientation="Vertical" Spacing="15" VerticalOptions="Center">
        <Label x:Name="lblOne" Text="Label One" BackgroundColor="Gray"></Label>
        <Label x:Name="lblTwo" Text="Label Two" BackgroundColor="AliceBlue"></Label>
        <Label x:Name="lblThree" Text="Label Three" BackgroundColor="Aqua"></Label>
        <Label x:Name="lblFour" Text="Label Four" BackgroundColor="LightCoral"></Label>
        <Label x:Name="lblFive" Text="Label Five" BackgroundColor="LightGreen"></Label>
        <Label x:Name="lblSix" Text="Label Six" BackgroundColor="Bisque"></Label>
</StackLayout>


Preview

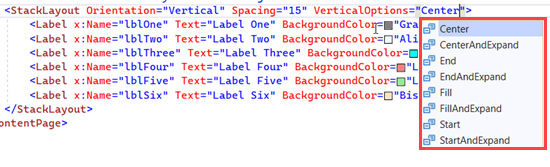
There are 8 Layout options (Center, CenterAndExpand, End, EndAndExpand, Fill, FillAndExpand, Start, StartAndExpand) that you can use in HorizontalOptions and VerticalOptions based on the layout you are planning to design. It is important to understand that the behavior of the horizontal options and vertical options can vary depending on the parent layout.

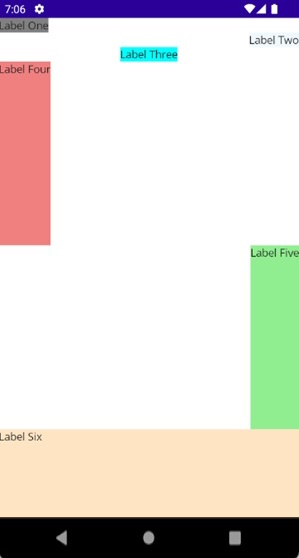
In the below example, I have changed the HorizontalOptions & VerticalOptions properties to demonstrate the position of the Label object position within the StackLayout.
<StackLayout Orientation="Vertical" Spacing="15">
        <Label x:Name="lblOne" Text="Label One"
               BackgroundColor="Gray"
               HorizontalOptions="Start"></Label>
        <Label x:Name="lblTwo" Text="Label Two"
               BackgroundColor="AliceBlue"
               HorizontalOptions="End"></Label>
        <Label x:Name="lblThree" Text="Label Three"
               BackgroundColor="Aqua"
               HorizontalOptions="Center"></Label>
        <Label x:Name="lblFour" Text="Label Four"
               BackgroundColor="LightCoral"
               HorizontalOptions="Start"
               VerticalOptions="FillAndExpand"></Label>
        <Label x:Name="lblFive" Text="Label Five"
               BackgroundColor="LightGreen"
               HorizontalOptions="End"
               VerticalOptions="FillAndExpand"></Label>
        <Label x:Name="lblSix" Text="Label Six"
               BackgroundColor="Bisque"
               VerticalOptions="FillAndExpand"></Label>
</StackLayout>


Preview

Nested StackLayout Objects
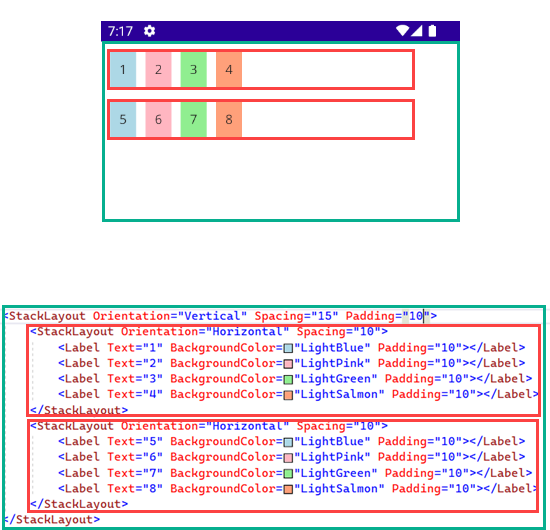
We can create complex UI Structures by using nested StackLayout objects. In the below example, I have used the combination of Vertical and Horizontal orientation, as well as the nested StackLayout.

<StackLayout Orientation="Vertical" Spacing="15" Padding="10">
        <StackLayout Orientation="Horizontal" Spacing="10">
            <Label Text="1" BackgroundColor="LightBlue" Padding="10"></Label>
            <Label Text="2" BackgroundColor="LightPink" Padding="10"></Label>
            <Label Text="3" BackgroundColor="LightGreen" Padding="10"></Label>
            <Label Text="4" BackgroundColor="LightSalmon" Padding="10"></Label>
        </StackLayout>
        <StackLayout Orientation="Horizontal" Spacing="10">
            <Label Text="5" BackgroundColor="LightBlue" Padding="10"></Label>
            <Label Text="6" BackgroundColor="LightPink" Padding="10"></Label>
            <Label Text="7" BackgroundColor="LightGreen" Padding="10"></Label>
            <Label Text="8" BackgroundColor="LightSalmon" Padding="10"></Label>
        </StackLayout>
</StackLayout>


Implementing StackLayout using C#

In all the above examples, I have designed the layout using the XAML. Now let’s see How we can achieve the same using the c#. For demonstration purposes, I am creating a Simple StackLayout containing multiple Labels.
public partial class MainPage : ContentPage
{
    public MainPage()
    {
        InitializeComponent();

        StackLayout stackLayout = new StackLayout()
        {
            Orientation = StackOrientation.Vertical,
            VerticalOptions = LayoutOptions.Center,
            Spacing = 10
        };

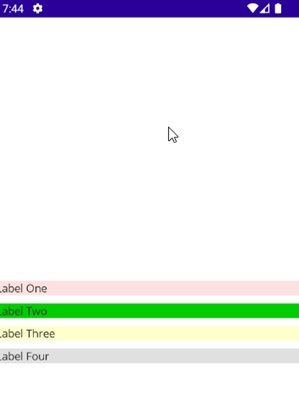
        stackLayout.Add(new Label() { Text = "Label One", BackgroundColor = Color.FromRgb(255, 225, 225) });
        stackLayout.Add(new Label() { Text = "Label Two", BackgroundColor = Color.FromRgb(0, 204, 0) });
        stackLayout.Add(new Label() { Text = "Label Three", BackgroundColor = Color.FromRgb(255, 255, 204) });
        stackLayout.Add(new Label() { Text = "Label Four", BackgroundColor = Color.FromRgb(224, 224, 224) });

        Content= stackLayout;

    }
}


Preview

There are two other Layouts, i.e., HorizontalStackLayout and VerticalStackLayout, which are more performant alternatives to the StackLayout. However, implementation-wise, they are quite similar to StackLayout. To learn more about them, you may refer to the official Microsoft documentation.

HostForLIFE ASP.NET Core 8.0.1 Hosting

European best, cheap and reliable ASP.NET hosting with instant activation. HostForLIFE.eu is #1 Recommended Windows and ASP.NET hosting in European Continent. With 99.99% Uptime Guaranteed of Relibility, Stability and Performace. HostForLIFE.eu security team is constantly monitoring the entire network for unusual behaviour. We deliver hosting solution including Shared hosting, Cloud hosting, Reseller hosting, Dedicated Servers, and IT as Service for companies of all size.


European ASP.NET Core 8.0.1 Hosting - HostForLIFE :: Background Services in .NET Core

clock March 26, 2024 08:05 by author Peter

Many current software applications rely on background processes or services to complete numerous functions asynchronously without interfering with the user experience. Background services, whether they're processing data, sending emails, or conducting routine maintenance activities, are critical to keeping applications responsive and efficient. Background services in the.NET Core ecosystem make it easy and efficient to implement asynchronous operations.

What are Background Services?
Background services in.NET Core are long-running processes that operate independently of the main application thread. They run in the background and often conduct activities like data processing, monitoring, or periodic actions without interfering with the main application's execution flow. These services are built on the BackgroundService base class supplied by the.NET Core framework, making it easy to manage their lifecycle and execution.

Benefits of Background Services

  • Improved Performance: By offloading tasks to background services, the main application thread remains responsive, providing a smoother user experience.
  • Scalability: Background services can be scaled independently, allowing applications to handle varying workloads efficiently.
  • Asynchronous Processing: Background services enable asynchronous processing of tasks, enabling applications to perform multiple operations concurrently.
  • Modular Design: Separating background tasks into services promotes modular and maintainable code, enhancing the overall codebase's readability and manageability.

Implementing Background Services in.NET Core
Let's look at an example to learn how to develop background services in.NET Core.

using Microsoft.Extensions.Hosting;
using Microsoft.Extensions.Logging;
using System;
using System.Threading;
using System.Threading.Tasks;

public class ExampleBackgroundService : BackgroundService
{
    private readonly ILogger<ExampleBackgroundService> _logger;

    public ExampleBackgroundService(ILogger<ExampleBackgroundService> logger)
    {
        _logger = logger;
    }

    protected override async Task ExecuteAsync(CancellationToken stoppingToken)
    {
        while (!stoppingToken.IsCancellationRequested)
        {
            _logger.LogInformation("Background service is running at: {time}", DateTimeOffset.Now);
            // Perform your background task here

            await Task.Delay(5000, stoppingToken); // Delay for 5 seconds before the next iteration
        }
    }
}


In this example

  • We create a class ExampleBackgroundService that inherits from BackgroundService.
  • In the constructor, we inject an instance of ILogger to log messages.
  • We override the ExecuteAsync method, where the actual background task logic resides. Inside this method, we have a loop that runs until cancellation is requested.
  • Within the loop, we perform the background task, in this case, logging the current time.
  • We use Task. Delay to introduce a 5-second delay before the next iteration.

Registering Background Services
To use background services in your .NET Core application, you need to register them with the Dependency Injection container in your Startup. cs file.
public void ConfigureServices(IServiceCollection services)
{
    services.AddHostedService<ExampleBackgroundService>();
}

Background services in .NET Core offer a powerful mechanism for implementing asynchronous tasks in applications. By leveraging the BackgroundService base class, developers can easily create and manage long-running background tasks, enhancing application responsiveness and scalability. With the provided example and insights, you should now have a solid understanding of how to implement and utilize background services effectively in your .NET Core applications.

HostForLIFE ASP.NET Core 8.0.1 Hosting

European best, cheap and reliable ASP.NET hosting with instant activation. HostForLIFE.eu is #1 Recommended Windows and ASP.NET hosting in European Continent. With 99.99% Uptime Guaranteed of Relibility, Stability and Performace. HostForLIFE.eu security team is constantly monitoring the entire network for unusual behaviour. We deliver hosting solution including Shared hosting, Cloud hosting, Reseller hosting, Dedicated Servers, and IT as Service for companies of all size.


European ASP.NET Core 8.0.1 Hosting - HostForLIFE :: What is difference between .NET and .NET Framework?

clock March 19, 2024 08:03 by author Peter

The ".NET Framework" and ".NET" (previously known as ".NET Core") are two distinct implementations of the.NET platform, each having a different purpose and addressing various scenarios. However, they share a similar ancestor and are part of the larger.NET ecosystem.

Differences

  • .NET Framework: The .NET Framework is the original implementation of the .NET platform, introduced in the early 2000s. It is primarily designed for building Windows-based applications, including desktop applications, web applications, and services. It includes libraries such as Windows Forms, ASP.NET Web Forms, and WPF.
  • .NET (formerly .NET Core): .NET (or ".NET 5" and later versions) is a modern, cross-platform implementation of the .NET platform. It is designed to be lightweight, modular, and highly scalable, with support for building applications on Windows, Linux, and macOS. It includes libraries such as ASP.NET Core, Entity Framework Core, and ML.NET.

Evolution: For many years, the.NET Framework served as the platform's foundation. However, as the computing landscape developed, Microsoft introduced.NET Core as a modern, cross-platform alternative to the.NET Framework's restrictions. In November 2020, Microsoft combined.NET Core,.NET Framework, and Xamarin into a single.NET platform dubbed ".NET."

Migration Path:
Although.NET Core and.NET Framework have different implementations, Microsoft has given tools and guidelines to help developers move their existing.NET Framework programs to.NET Core and, eventually, to.NET.

HostForLIFE ASP.NET Core 8.0.1 Hosting

European best, cheap and reliable ASP.NET hosting with instant activation. HostForLIFE.eu is #1 Recommended Windows and ASP.NET hosting in European Continent. With 99.99% Uptime Guaranteed of Relibility, Stability and Performace. HostForLIFE.eu security team is constantly monitoring the entire network for unusual behaviour. We deliver hosting solution including Shared hosting, Cloud hosting, Reseller hosting, Dedicated Servers, and IT as Service for companies of all size.


European ASP.NET Core 8.0.1 Hosting - HostForLIFE :: How to Write .NET IL/MSIL Code?

clock March 14, 2024 07:11 by author Peter

The.NET runtime employs IL (Intermediate Language) as a bridging language. It combines all high-level.NET languages into a single language. This is why you can create multilingual applications in.NET. You can write a portion of your program in F# while utilizing an entirely different.NET language for the remainder. Behind the scenes, there is only one language: IL. In our previous tutorial, we talked about the compilation process. It's now time to start creating small programs in the.NET IL language.

Benefits of Learning.NET IL

  • Before we begin, let's grasp the importance of learning.NET IL:
  • Deeper Understanding: IL can assist you in understanding what happens "under the hood" when you run your.NET software. This can be useful for troubleshooting complex problems or improving performance.
  • Specific Tasks: Understanding IL is useful in some sophisticated applications, such as dynamic code generation.

Setting Up the Environment
There is no need to install any specialized programs! You can use a basic text editor such as Notepad++ (but Notepad++ is preferred). Visual Studio lacks a built-in template for writing IL code.

Launch your choice text editor and begin development.

.assembly extern mscorlib {}
.assembly firstILProject {}
.module firstILProject.exe

.class public Program extends [mscorlib]System.Object
{
 .method public static void MyMain(string[] args) cil managed
  {
  .entrypoint
  ldstr "Hello from IL code"
  call void [mscorlib]System.Console::WriteLine(string)
  call string [mscorlib]System.Console::ReadLine()
  pop
  ret
  }

}

Compiling Your Application
To compile your program, simply save it in any folder with the.il extension. Then, launch the "developer command prompt" and execute ilasm to compile your program.
Developer command prompt for Visual Studio.

Sample Code Structure
Here's a breakdown of a typical IL code structure:

External Reference
.assembly extern mscorlib {}

This line references the external mscorlib library, which provides functionalities your application might need.

Main Assembly
.assembly firstILProject {}

This line defines your application assembly and gives it a unique name (firstILProject in this case).

Module Definition
.module firstILProject.exe

This line defines a module named "firstILProject.exe." A module can represent an executable file (.exe) or a Dynamic-link library (DLL).

Class Definition
.class public extends [System.Object] firstILProject


This line creates a public class named firstILProject that inherits from System.Object (all classes in .NET inherit from System.Object by default).

Entry Point Method
.method static public void Main()

This line declares the Main method, the entry point for your console application.

Stack Operations

method static public void Main()

  .entrypoint

  ldstr "Hello, World!"  // Load string "Hello, World!" onto the stack
  call void [mscorlib]System.Console::WriteLine(string)  // Call the WriteLine method to print the string

  pop                     // Remove the string from the stack
  ret                      // Return from the method


  ldstr: This operator loads a string onto the stack.
  call: This keyword is used to call existing methods.
  pop: This removes the top element from the stack.
  ret: This returns from the current method.


Conclusion
This is a basic overview of writing .NET IL code. By understanding these concepts, you can begin creating simple applications and delve deeper into the world of .NET internals.

HostForLIFE ASP.NET Core 8.0.1 Hosting

European best, cheap and reliable ASP.NET hosting with instant activation. HostForLIFE.eu is #1 Recommended Windows and ASP.NET hosting in European Continent. With 99.99% Uptime Guaranteed of Relibility, Stability and Performace. HostForLIFE.eu security team is constantly monitoring the entire network for unusual behaviour. We deliver hosting solution including Shared hosting, Cloud hosting, Reseller hosting, Dedicated Servers, and IT as Service for companies of all size.


European ASP.NET Core 8.0.1 Hosting - HostForLIFE :: Implementing Rate-Limiting Middleware in ASP.NET Core

clock March 8, 2024 07:34 by author Peter

Rate limitation is an important feature of web application security and performance management since it helps to prevent misuse and guarantee that resources are used fairly. In ASP.NET Core, rate restriction can be implemented using middleware, which provides a centralized way for controlling the rate of incoming requests. This blog discusses rate-limiting middleware, its implementation in ASP.NET Core, and its importance in online application development.

What is Rate Limiting?
Rate limitation is a mechanism that limits the amount of requests a client can make to a web server during a given time period. It aids in the prevention of misuse, protects against denial-of-service (DoS) assaults, and ensures equal resource access.

Rate-Limiting Middleware for ASP.NET Core
The rate-limiting middleware in ASP.NET Core intercepts incoming requests and enforces rate limitations based on predefined constraints. It lies between the client and the application, monitoring request rates and returning appropriate HTTP status codes when limitations are reached.

1. Install Required Packages
Install the AspNetCoreRateLimit package from NuGet:
dotnet add package AspNetCoreRateLimit

2. Configure Rate-Limiting Middleware
In the Startup.cs file, add the rate-limiting middleware to the request processing pipeline:
using AspNetCoreRateLimit;

public void Configure(IApplicationBuilder app, IHostingEnvironment env)
{
    // Other middleware configurations

    app.UseIpRateLimiting();
    app.UseClientRateLimiting();
}


3. Configure Rate-Limiting Options
Configure rate-limiting options in the appsettings.json file:

{
  "IpRateLimiting": {
    "EnableEndpointRateLimiting": true,
    "StackBlockedRequests": true,
    "RealIpHeader": "X-Real-IP",
    "HttpStatusCode": 429,
    "QuotaExceededResponse": {
      "Content-Type": "application/json",
      "Content": "{\"error\": \"Rate limit exceeded\"}"
    },
    "GeneralRules": [
      {
        "Endpoint": "*",
        "Period": "1s",
        "Limit": 5
      }
    ]
  },
  "ClientRateLimiting": {
    "EnableEndpointRateLimiting": true,
    "StackBlockedRequests": true,
    "HttpStatusCode": 429,
    "QuotaExceededResponse": {
      "Content-Type": "application/json",
      "Content": "{\"error\": \"Rate limit exceeded\"}"
    },
    "GeneralRules": [
      {
        "Endpoint": "*",
        "Period": "1s",
        "Limit": 100
      }
    ]
  }
}


4. Test Rate Limiting
Test the rate-limiting middleware by sending requests to your ASP.NET Core application and observing the behavior when rate limits are exceeded.

Rate-limiting middleware in ASP.NET Core is a useful tool for controlling request rates and protecting online applications from misuse and overload. Rate limitation allows developers to improve the security, stability, and performance of their ASP.NET Core apps while also assuring fair and equitable access to resources for all users. Accept rate restriction as an essential component of web application development to protect your apps from malicious actions and resource depletion threats.

Conclusion
Rate-limiting middleware in ASP.NET Core is a useful tool for controlling request rates and protecting online applications from misuse and overload. Rate limitation allows developers to improve the security, stability, and performance of their ASP.NET Core apps while also assuring fair and equitable access to resources for all users. Accept rate restriction as an essential component of web application development to protect your apps from malicious actions and resource depletion threats.

Happy coding!

HostForLIFE ASP.NET Core 8.0.1 Hosting

European best, cheap and reliable ASP.NET hosting with instant activation. HostForLIFE.eu is #1 Recommended Windows and ASP.NET hosting in European Continent. With 99.99% Uptime Guaranteed of Relibility, Stability and Performace. HostForLIFE.eu security team is constantly monitoring the entire network for unusual behaviour. We deliver hosting solution including Shared hosting, Cloud hosting, Reseller hosting, Dedicated Servers, and IT as Service for companies of all size.


About HostForLIFE

HostForLIFE is European Windows Hosting Provider which focuses on Windows Platform only. We deliver on-demand hosting solutions including Shared hosting, Reseller Hosting, Cloud Hosting, Dedicated Servers, and IT as a Service for companies of all sizes.

We have offered the latest Windows 2019 Hosting, ASP.NET 5 Hosting, ASP.NET MVC 6 Hosting and SQL 2019 Hosting.


Month List

Tag cloud

Sign in