European ASP.NET 4.5 Hosting BLOG

BLOG about ASP.NET 4, ASP.NET 4.5 Hosting and Its Technology - Dedicated to European Windows Hosting Customer

ASP.NET Core 3.1.9 Hosting - HostForLIFE.eu :: Converting HTML to Plain Text in ASP.NET

clock December 1, 2020 08:40 by author Peter

Sometimes you want to remove tags from HTML and get only plain text. In general, this is simple task but there are few drawbacks in some scenarios. The simplest solution is to just remove all tags from given HTML without any formatting.

You can do it with code like this:

[ C# ]

public string RemoveHTMLTags(string HTMLCode)
{
 return System.Text.RegularExpressions.Regex.Replace(
   HTMLCode, "<[^>]*>", "");
}

[ VB.NET ]

Public Function RemoveHTMLTags(ByVal HTMLCode As String) As String
 Return System.Text.RegularExpressions.Regex.Replace( _
   HTMLCode, "<[^>]*>", "")
End Function

Better HTML to plain text conversion\

Example above removes any tag from HTML. This is good enough in some scenarios, but there are some issues too:

- Text inside HEAD tag will be visible too
- Empty spaces &nbsp; and new lines <br /> or paragraph <p> will be lost
- Unwanted empty spaces that are invisible in HTML will show in plain text, and that will distract text even more
- Special characters like &amp; or &copy etc. will not be translated etc

To solve all these problems, you need a little more processing of input HTML. Next function will provide better HTML to text conversion:

[ C# ]

// This function converts HTML code to plain text
// Any step is commented to explain it better
// You can change or remove unnecessary parts to suite your needs

public string HTMLToText(string HTMLCode)
{
 // Remove new lines since they are not visible in HTML
 HTMLCode = HTMLCode.Replace("\n", " ");

 
 // Remove tab spaces
 HTMLCode = HTMLCode.Replace("\t", " ");
 
 // Remove multiple white spaces from HTML
 HTMLCode = Regex.Replace(HTMLCode, "\\s+", " ");
 
 // Remove HEAD tag
 HTMLCode = Regex.Replace(HTMLCode, "<head.*?</head>", ""
                     , RegexOptions.IgnoreCase | RegexOptions.Singleline);

 
 // Remove any JavaScript
 HTMLCode = Regex.Replace(HTMLCode, "<script.*?</script>", ""
   , RegexOptions.IgnoreCase | RegexOptions.Singleline);

 
 // Replace special characters like &, <, >, " etc.
 StringBuilder sbHTML = new StringBuilder(HTMLCode);

// Note: There are many more special characters, these are just
// most common. You can add new characters in this arrays if needed
 string[] OldWords = {"&nbsp;", "&amp;", "&quot;", "&lt;",
   "&gt;", "&reg;", "&copy;", "&bull;", "&trade;"};
 string[] NewWords = {" ", "&", "\"", "<", ">", "®", "©", "•", "â„¢"};
 for(int i = 0; i < OldWords.Length; i++)
 {
   sbHTML.Replace(OldWords[i], NewWords[i]);
 }

 
 // Check if there are line breaks (<br>) or paragraph (<p>)
 sbHTML.Replace("<br>", "\n<br>");
 sbHTML.Replace("<br ", "\n<br ");
 sbHTML.Replace("<p ", "\n<p ");

 
 // Finally, remove all HTML tags and return plain text
 return System.Text.RegularExpressions.Regex.Replace(
   sbHTML.ToString(), "<[^>]*>", "");
}

[ VB.NET ]

' This function converts HTML code to plain text
' Any step is commented to explain it better
' You can change or remove unnecessary parts to suite your needs

Public Function HTMLToText(ByVal HTMLCode As String) As String
 ' Remove new lines since they are not visible in HTML
 HTMLCode = HTMLCode.Replace("\n", " ")
 
 ' Remove tab spaces
 HTMLCode = HTMLCode.Replace("\t", " ")
 
 ' Remove multiple white spaces from HTML
 HTMLCode = Regex.Replace(HTMLCode, "\\s+", "  ")
 
 ' Remove HEAD tag
 HTMLCode = Regex.Replace(HTMLCode, "<head.*?</head>", "" _
   , RegexOptions.IgnoreCase Or RegexOptions.Singleline)

 
 ' Remove any JavaScript
 HTMLCode = Regex.Replace(HTMLCode, "<script.*?</script>", "" _
   , RegexOptions.IgnoreCase Or RegexOptions.Singleline)
 

 ' Replace special characters like &, <, >, " etc.
 Dim sbHTML As StringBuilder = New StringBuilder(HTMLCode)

 ' Note: There are many more special characters, these are just
 ' most common. You can add new characters in this arrays if needed

 Dim OldWords() As String = {"&nbsp;", "&amp;", "&quot;", "&lt;", _
    "&gt;", "&reg;", "&copy;", "&bull;", "&trade;"}
 Dim NewWords() As String = {" ", "&", """", "<", ">", "®", "©", "•", "â„¢"}
 For i As Integer = 0 To i < OldWords.Length
   sbHTML.Replace(OldWords(i), NewWords(i))
 Next i

 
 ' Check if there are line breaks (<br>) or paragraph (<p>)
 sbHTML.Replace("<br>", "\n<br>")
 sbHTML.Replace("<br ", "\n<br ")
 sbHTML.Replace("<p ", "\n<p ")

 
 ' Finally, remove all HTML tags and return plain text
 Return System.Text.RegularExpressions.Regex.Replace( _
    sbHTML.ToString(), "<[^>]*>", "")
End Function

HTML to plain text ASP.NET example

Now, you can build an example that convert HTML to plain text. Create new web page with one Button control and two TextBox controls, like on image bellow:

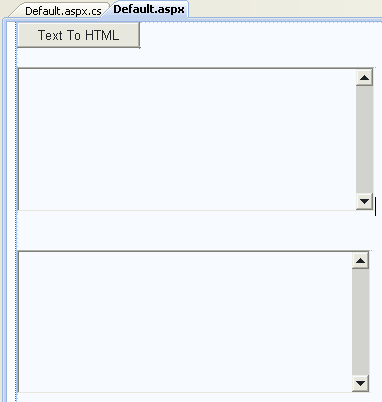
First TextBox control ID will be tbHTML and second TextBox control ID set to tbPlainText. On button's click write this code:

[ C# ]

protected void btnTextToHTML_Click(object sender, EventArgs e)
{
 tbPlainText.Text = HTMLToText(tbHTML.Text);
}


[ VB.NET ]

Protected Sub btnTextToHTML_Click(ByVal sender As Object, ByVal e As System.EventArgs) Handles btnTextToHTML.Click
 tbPlainText.Text = HTMLToText(tbHTML.Text)
End Sub

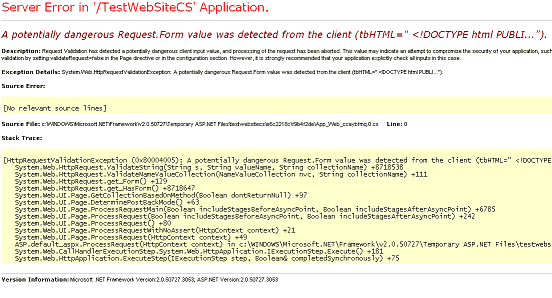
Please note that HTML is considered as dangerous input. To make this example works you need to add ValidateRequest="false" part to @Page directive. Otherwise, you'll get an error "A potentially dangerous Request.Form value was detected from the client...)" like on next image.


When you set ValidateRequest parameter to false, you can run an example. Place some HTML code to tbHTML TextBox control and click on Button. Plain text will be extracted from given HTML and shown in tbPlainText.

As you see, there are few different options when converting HTML to plain text. Depending of your needs you can only remove tags or provide additional formatting. Suggested HTMLToText function is not perfect. You can make it better if you add all symbols or add line breaks for new table rows, or add tab spaces for evey new table cell etc. Be aware that with every new option included this function becomes slower. If you overdo the conversion could be unsatisfactory, especially if you have large HTML files. Happy coding!

HostForLIFE.eu ASP.NET 5 Hosting
HostForLIFE.eu is European Windows Hosting Provider which focuses on Windows Platform only. We deliver on-demand hosting solutions including Shared hosting, Reseller Hosting, Cloud Hosting, Dedicated Servers, and IT as a Service for companies of all sizes. We have customers from around the globe, spread across every continent. We serve the hosting needs of the business and professional, government and nonprofit, entertainment and personal use market segments.


ASP.NET Core 3.1.9 Hosting - HostForLIFE.eu :: Implement Global Exception Handling In ASP.NET Core Application

clock November 17, 2020 07:55 by author Peter

Today, in this article we will discuss the exception handling concept in any ASP.NET Core application. Exception handling is one of the most import functionality or part for any type of application which always need to be taken care and implement properly. Exceptions are mainly means for the run time errors which occur during the execution time of the application. So, if this type of error is not properly handled, then the application will be terminated.

In ASP.NET Core, the concept of exception handling has been changed, and rather to say, now it is in very much in better shape to implement exception handling. For any API projects implementing exception handling against every action, the method is quite time-consuming and it also requires extra efforts. So, for this purpose, we can implement the Global Exception handler so that all types of unhandled exceptions can be caught in this handler. The benefit of implementing a global exception handler is that we need to define this in one place. Through this handler, any exception that occurs in our application will be handled, even we ann new methods or controllers. So, in this article, we will discuss how to implement global exception handling in the ASP.NET Core Web API.

Create ASP.NET Core Web API Projects in Visual Studio 2019
So, before going to discuss the global exception handler, first, we need to create an ASP.NET Web API project. For this purpose, follow the steps mentioned below,

Now open the Microsoft Visual Studio and Click on Create a New Project
In the Create New Project dialog box, select ASP.NET Core Web Application for C# and then click on the Next Button.

In the Configure your new project window, provide the project name and then click on the Create button.
In the Create a New ASP.NET Core Web Application dialog, select API, and then click on Create Button.
Ensure that the checkboxes “Enable Docker Support” and “Configure for HTTPS” are unchecked. We won’t be using these features.
Ensure that “No Authentication” is selected as we won’t be using authentication either.
Click OK

Use the UseExceptionHandler middleware in ASP.NET Core

So, to implement the global exception handler, we can use the benefits of the ASP.NET Core build-in Middleware. A middleware is indicated as a software component inserted into the request processing pipeline which handles the requests and responses. We can use the ASP.NET Core in-build middleware UseExceptionHandler to use as a global exception handler. The ASP.NET Core request processing pipeline includes a chain of middleware components. This pipeline in turn contains a series of request delegates that are invoked one after another. While the incoming requests flow through each of the middleware components in the pipeline, each of these components can either process the request or pass the request to the next component in the pipeline.

Through this middleware, we can get all the detailed information of the exception object like the Stack trace, inner exception, message, etc., and also return that information through the API to return as an output. We need to put the exception handler middleware inside the configure() of a startup.cs file. If we use any MVC based application, then we can use the exception handler middleware just as below. This code snippet demonstrates how we can configure the UseExceptionHandler middleware to redirect the user to an error page when any type of exception has occurred.
public void Configure(IApplicationBuilder app, IWebHostEnvironment env)  
{  
app.UseExceptionHandler("/Home/Error");  
app.UseMvc();  
}  


Now, we need to check this exception message. For that purpose, open the WeatherForecastController.cs file and add the below action method to throw an exception –
[Route("GetExceptionInfo")]  
[HttpGet]  
public IEnumerable<string> GetExceptionInfo()  
{  
string[] arrRetValues = null;  
if (arrRetValues.Length > 0)  
{ }  
return arrRetValues;  
}  


If we want to capture the details of the exception objects – i.e. like the stack trace, message, etc then we use the below code as the exception middleware –
app.UseExceptionHandler(  
    options =>  
    {  
        options.Run(  
            async context =>  
            {  
                context.Response.StatusCode = (int)HttpStatusCode.InternalServerError;  
                context.Response.ContentType = "text/html";  
                var exceptionObject = context.Features.Get<IExceptionHandlerFeature>();  
                if (null != exceptionObject)  
                {  
                    var errorMessage = $"<b>Exception Error: {exceptionObject.Error.Message} </b> {exceptionObject.Error.StackTrace}";  
                    await context.Response.WriteAsync(errorMessage).ConfigureAwait(false);  
                }  
            });  
    }  
);  


For checking the output, just execute the API endpoint in any browser:

Define a Custom Exception Middleware to handle Exceptions in ASP.NET Core API
Also, we can write our custom middleware to handle any type of exceptions. In this section, we demonstrate how to create a typical custom middleware class. Custom middleware also provides much more flexibility to handle exceptions. We can add a stack trace, an exception type name, error code, or anything else which we want to include as a part of the error message. The below code snippet shows the typical custom middleware class:
    using Microsoft.AspNetCore.Http;    
    using Newtonsoft.Json;    
    using System;    
    using System.Collections.Generic;    
    using System.Linq;    
    using System.Net;    
    using System.Threading.Tasks;    
        
    namespace API.DemoSample.Exceptions    
    {    
        public class ExceptionHandlerMiddleware    
        {    
            private readonly RequestDelegate _next;    
        
            public ExceptionHandlerMiddleware(RequestDelegate next)    
            {    
                _next = next;    
            }    
        
            public async Task Invoke(HttpContext context)    
            {    
                try    
                {    
                    await _next.Invoke(context);    
                }    
                catch (Exception ex)    
                {    
                        
                }    
            }    
        }    
    }    


In the above class, a request delegate is passed to any middleware. The middleware either processes this or passes it to the next middleware in the chain. If the request is unsuccessful, then an exception will be thrown, and then the HandleExceptionMessageAsync method will be executed within the catch block. So, let's update the Invoke method code as shown below:
    public async Task Invoke(HttpContext context)  
            {  
                try  
                {  
                    await _next.Invoke(context);  
                }  
                catch (Exception ex)  
                {  
                    await HandleExceptionMessageAsync(context, ex).ConfigureAwait(false);  
                }  
            }  


Now, we need to implement the HandleExceptionMessageAsync method, as shown below:
    private static Task HandleExceptionMessageAsync(HttpContext context, Exception exception)  
            {  
                context.Response.ContentType = "application/json";  
                int statusCode = (int)HttpStatusCode.InternalServerError;  
                var result = JsonConvert.SerializeObject(new  
                {  
                    StatusCode = statusCode,  
                    ErrorMessage = exception.Message  
                });  
                context.Response.ContentType = "application/json";  
                context.Response.StatusCode = statusCode;  
                return context.Response.WriteAsync(result);  
            }  


Now, in the next step, we need to create a static class named ExceptionHandlerMiddlewareExtensions and add the below code within that class,
    using Microsoft.AspNetCore.Builder;  
    using System;  
    using System.Collections.Generic;  
    using System.Linq;  
    using System.Threading.Tasks;  
      
    namespace API.DemoSample.Exceptions  
    {  
        public static class ExceptionHandlerMiddlewareExtensions  
        {  
            public static void UseExceptionHandlerMiddleware(this IApplicationBuilder app)  
            {  
                app.UseMiddleware<ExceptionHandlerMiddleware>();  
            }  
        }  
    }  


Now, in the last step, we need to turn on our custom middleware within the Configure method of the startup class, as shown below:
    app.UseExceptionHandlerMiddleware();  

Conclusion

Exception handling is a mainly cross-cutting concept for any type of application. In this article, we discuss the implementation process of the global exception handling concept. We can take the benefits of global exception handling in any ASP.NET Core application to ensure that every exception will be caught and return the proper details related to that exception. With the global exception handling, we just need to write the exception handling related code for our entire application just in one place. Any suggestions or feedback or query related to this article are most welcome.


ASP.NET Core 3.1.9 Hosting - HostForLIFE.eu :: Creating Text Editor Using ASP.Net and jQuery

clock November 10, 2020 07:51 by author Peter

This article explains how to create a Text Editor using ASP.NET and jQuery. First of all, add a new application to your Visual Studio and name it "ASPNet Text Editor".

Now in this application we will add two TextBoxes, one Button and a Hidden Field.
    <asp:TextBox ID="TextBox1" TextMode="MultiLine" runat="server" CssClass="textBox" onblur="Test()"></asp:TextBox>  
    <asp:Button ID="Button1" runat="server" Text="Show it Below" />  
    <asp:HiddenField ID="hdField" runat="server" />  
    <asp:TextBox ID="textBox2" TextMode="MultiLine" runat="server" CssClass="textBox2"></asp:TextBox>

As you can see, I provided the CSS Classes in the code above. That's because I had already created the CSS and then I passed its name to these controls.
You can check the CSS code by downloading the Zip Code provided at the start of the article.
 

After creating the CSS, provide their reference in the Head section of the page like this:
    <link href="CSS/demo.css" rel="stylesheet" type="text/css" />  
    <link href="CSS/demo2.css" rel="stylesheet" type="text/css" />


Now you need to add two jQuery files to your application named jquery-1.10.2.min.js and jquery-te-1.4.0.min.js. You will get these files from my application code provided in the Zip.
 
Provide this code after the Body tag:
    <script src="JS/jquery-1.10.2.min.js" type="text/javascript"></script>  
    <script src="JS/jquery-te-1.4.0.min.js" type="text/javascript"></script>  
    <script language="javascript" type="text/javascript">  
    $('.textEditor1').jqte();  
    $(".textBox2").jqte({  
         blur: function() {  
              document.getElementById('<%=hdField.ClientID %>').value = document.getElementById('<%=txtBox2.ClientID %>').value;  
         }  
    });  
    </script>


On the Button click pass this code:
    protected void btnText_Click(object sender, EventArgs e) {    
        textbox2.Text = hdFieldt.Value;    
    }   


Now your complete code will look like this:
    <head runat="server">  
        <title>ASP.NET Text Editor</title>  
        <link href="CSS/demo.css" rel="stylesheet" type="text/css" />  
        <link href="CSS/demo2.css" rel="stylesheet" type="text/css" />  
    </head>  
      
    <body>  
        <form id="Editor" runat="server">  
            <div>  
                <asp:TextBox ID="TextBox1" TextMode="MultiLine" runat="server" CssClass="textBox" onblur="Test()"></asp:TextBox>  
                <asp:Button ID="Button1" runat="server" Text="Show it Below" />  
                <asp:HiddenField ID="hdField" runat="server" />  
                <asp:TextBox ID="textBox2" TextMode="MultiLine" runat="server" CssClass="textBox2"></asp:TextBox>  
            </div>  
        </form>  
    </body>  
    <script src="JS/jquery-1.10.2.min.js" type="text/javascript"></script>  
    <script src="JS/jquery-te-1.4.0.min.js" type="text/javascript"></script>  
    <script language="javascript" type="text/javascript">  
    $('.textEditor1').jqte();  
    $(".textBox2").jqte({  
        blur: function() {  
            document.getElementById('<%=hdField.ClientID %>').value = document.getElementById('<%=txtBox2.ClientID %>').value;  
        }  
    });  
    </script>

Output


ASP.NET Core 3.1.9 Hosting - HostForLIFE.eu :: Health Monitoring In ASP.NET Core

clock November 4, 2020 09:13 by author Peter

The dream of every software engineer is to write a code in such a way that there won’t be any defects and none of the infrastructure will ever go down. But, that is not the case in the real world and with the Microservices architecture it has become even more difficult to identify the state of the container.

In fact, we need a mechanism in place to quickly identify and fix the issue at the earliest unless it turns out to be a bigger problem. This is where Health Monitoring comes into picture.

Health Monitoring in ASP.NET Core allows you to get near real-time state of the container. These monitoring mechanisms are handy when your application is dealing with components such as database, cache, url, message broker etc.

Implementing basic health monitoring
When developing ASP.NET Core Microservices, you can use a built-in health monitoring feature by using a nuget package Microsoft.Extension.Diagnostic.HealthCheck. These health monitoring features can be enabled by using a set of services and middleware.
public void ConfigureServices    
       (IServiceCollection services)    
{    
   services.AddControllers();    
   services.AddHealthChecks();    
}     
public void Configure(IApplicationBuilder app,    
IWebHostEnvironment env)    
{    
   if (env.IsDevelopment())    
   {    
      app.UseDeveloperExceptionPage();    
   }    
      app.UseHttpsRedirection();    
      app.UseRouting();    
      app.UseAuthorization();    
      app.UseEndpoints(endpoints =>    
      {    
        endpoints.MapControllers();    
        endpoints.MapHealthChecks("/api/health");    
      }    
}   


When you run the application, you will see the output as Healthy

Health Monitoring In ASP.NET Core
For two lines of code, not too bad. However, we can do much better.

Returning status in JSON format
By default, the output of the health monitoring is in “plain/text”. Therefore, we can see the health status as Healthy or UnHealthy. In order to see the detailed output with all the dependencies, the application has to be customized with “ResponseWriter” property which is available in AspNetCore.HealthChecks.UI.Client

Firstly, add the nuget package
dotnet add package AspNetCore.HealthChecks.UI    
dotnet add package AspNetCore.HealthChecks.UI.Client    


Now, let’s configure the application
endpoints.MapHealthChecks("/api/health",     
new HealthCheckOptions()    
 {    
    Predicate = _ => true,    
    ResponseWriter = UIResponseWriter.     
                WriteHealthCheckUIResponse    
 });   


Now, run the application and you will see the output in json format
{    
  "status": "Healthy",    
  "totalDuration": "00:00:00.0038176"    
}  


Health Status for URI’s

You can easily verify the status of the endpoints/uri’s by using nuget package

dotnet add package AspNetCore.HealthChecks.uris    

Now, let's modify our code to accommodate the uri’s
public void ConfigureServices    
     (IServiceCollection services)    
{    
     
   services.AddControllers();    
   services.AddHealthChecks()    
     .AddUrlGroup(new Uri    
            ("https://localhost:5001/weatherforecast"),    
             name: "base URL", failureStatus:     
             HealthStatus.Degraded)    
}   


You need to use AddUrlGroup method to verify the uri’s and in case of failure, the status of the url will be displayed as Degraded.

Now, run the application and the output will look similar.
{    
  "status": "Healthy",    
  "totalDuration": "00:00:00.1039166",    
  "entries": {    
    "base URL": {    
      "data": {},    
      "duration": "00:00:00.0904980",    
      "status": "Healthy",    
      "tags": []    
    }    
}   

Health Status for SQL Server
In order to verify the status of SQL Server database, I did database installation in docker; however, you can use local instance of database server.

You can install SQL Server in docker using below commands
//Docker pull command to install    
docker pull mcr.microsoft.com/mssql/server    
     
//Docker Run command     
docker run --privileged -e 'ACCEPT_EULA=Y'     
-e 'SA_PASSWORD=Winter2019' -p 1433:1433     
--name=MSSQL -d     
mcr.microsoft.com/mssql/server:latest    


Once the database is up and running, add the below nuget package.
dotnet add package AspNetCore.HealthChecks.SqlServer    
public void ConfigureServices    
 (IServiceCollection services)    
        {    
     
            services.AddControllers();    
            services.AddHealthChecks()    
                .AddUrlGroup(new Uri("https://localhost:5001/weatherforecast"), name: "base URL", failureStatus: HealthStatus.Degraded)              .AddSqlServer(Configuration.GetConnectionString("DefaultConnection"),    
                healthQuery: "select 1",    
                failureStatus: HealthStatus.Degraded,    
                name: "SQL Server");    
        }  


Note
In the HealthQuery, don’t use any fancy queries to verify the Database connection. The main purpose of using “Select 1” is that it takes less execution time.

Now run the application and your output will look similiar.
{    
  "status": "Healthy",    
  "totalDuration": "00:00:00.1039166",    
  "entries": {    
    "base URL": {    
      "data": {},    
      "duration": "00:00:00.0904980",    
      "status": "Healthy",    
      "tags": []    
    },    
    "SQL Server": {    
      "data": {},    
      "duration": "00:00:00.0517363",    
      "status": "Healthy",    
      "tags": []    
    }    
  }    
}   


Custom Health Check
Custom Health Check can be easily implemented by using IHealthCheck interface.
public class TodoHealthCheck : IHealthCheck    
    {    
        public Task<HealthCheckResult> CheckHealthAsync(HealthCheckContext context, CancellationToken cancellationToken = default)    
        {    
            //Implement you logic here    
            var healthy = true;    
            if (healthy)    
                return Task.FromResult(HealthCheckResult.Healthy());    
            return Task.FromResult(HealthCheckResult.Unhealthy());    
        }    
    }    


The AddCheck method in Configure services is used to add health check with the specified name.
public void ConfigureServices(IServiceCollection services)    
       {    
           services.AddControllers();    
           services.AddHealthChecks()    
               .AddUrlGroup(new Uri("https://localhost:5001/weatherforecast"), name: "base URL", failureStatus: HealthStatus.Degraded)    
               .AddSqlServer(Configuration.GetConnectionString("DefaultConnection"),    
               healthQuery: "select 1",    
               failureStatus: HealthStatus.Degraded,    
               name: "SQL Server")    
               .AddCheck<TodoHealthCheck>("Todo Health Check",failureStatus:HealthStatus.Unhealthy);    
       }  


Now, run the application

{  
    "status": "Healthy",  
    "totalDuration": "00:00:00.0544065",  
    "entries": {  
        "base URL": {  
            "data": {},  
            "duration": "00:00:00.0527285",  
            "status": "Healthy",  
            "tags": []  
        },  
        "SQL Server": {  
            "data": {},  
            "duration": "00:00:00.0386450",  
            "status": "Healthy",  
            "tags": []  
        },  
        "Todo Health Check": {  
            "data": {},  
            "duration": "00:00:00.0001681",  
            "status": "Healthy",  
            "tags": []  
        }  
    }  
}  


Let’s visualize.

Display the output in the JSON format looks reasonable; however, visualizing the UI makes more sense and can be easily understandable for non-technical background people as well.

Add nuget package.

dotnet add package AspNetCore.HealthChecks.UI.InMemory.Storage    

To visualize the UI health check, you need to amend changes in services and middleware.
public void ConfigureServices(IServiceCollection services)    
        {    
     
            services.AddControllers();    
            services.AddHealthChecks()    
                .AddUrlGroup(new Uri("https://localhost:5001/weatherforecast"), name: "base URL", failureStatus: HealthStatus.Degraded)    
                .AddSqlServer(Configuration.GetConnectionString("DefaultConnection"),    
                healthQuery: "select 1",    
                failureStatus: HealthStatus.Degraded,    
                name: "SQL Server")    
                .AddCheck<TodoHealthCheck>("Todo Health Check",failureStatus:HealthStatus.Unhealthy);    
     
            services.AddHealthChecksUI(opt =>    
            {    
                opt.SetEvaluationTimeInSeconds(10); //time in seconds between check    
                opt.MaximumHistoryEntriesPerEndpoint(60); //maximum history of checks    
                opt.SetApiMaxActiveRequests(1); //api requests concurrency    
                opt.AddHealthCheckEndpoint("default api", "/api/health"); //map health check api    
            })    
            .AddInMemoryStorage();    
        }   

The Health Check UI endpoint comes by default as “/healthchecks-ui“. You can change this value by customizing it through the MapHealthCheckUI method.

In the code, I have set the polling interval as 10 seconds. It checks whether all the endpoints/databases etc within the application are working as expected.

Now run the application.

Health Monitoring In ASP.NET Core

Now, let’s stop the SQL Server from Docker container and verify the output
//Get Container ID    
docker ps    
     
//Stop Docker container for SQL Server    
docker stop <Container Id here>   


Health Monitoring In ASP.NET Core

Other Health checksFeatures.


About HostForLIFE

HostForLIFE is European Windows Hosting Provider which focuses on Windows Platform only. We deliver on-demand hosting solutions including Shared hosting, Reseller Hosting, Cloud Hosting, Dedicated Servers, and IT as a Service for companies of all sizes.

We have offered the latest Windows 2019 Hosting, ASP.NET 5 Hosting, ASP.NET MVC 6 Hosting and SQL 2019 Hosting.


Month List

Tag cloud

Sign in