This is only brief tutorial about how to use AutoMapper in Asp Net Core 3.0 application. Automapper is a very popular Object-to-Object mapping library that can be used to map objects.
How to use automapper in Asp.Net Core 3.0 application
Let’s see how to use automapper in Asp Net Core 3.0 application using a very simple example.
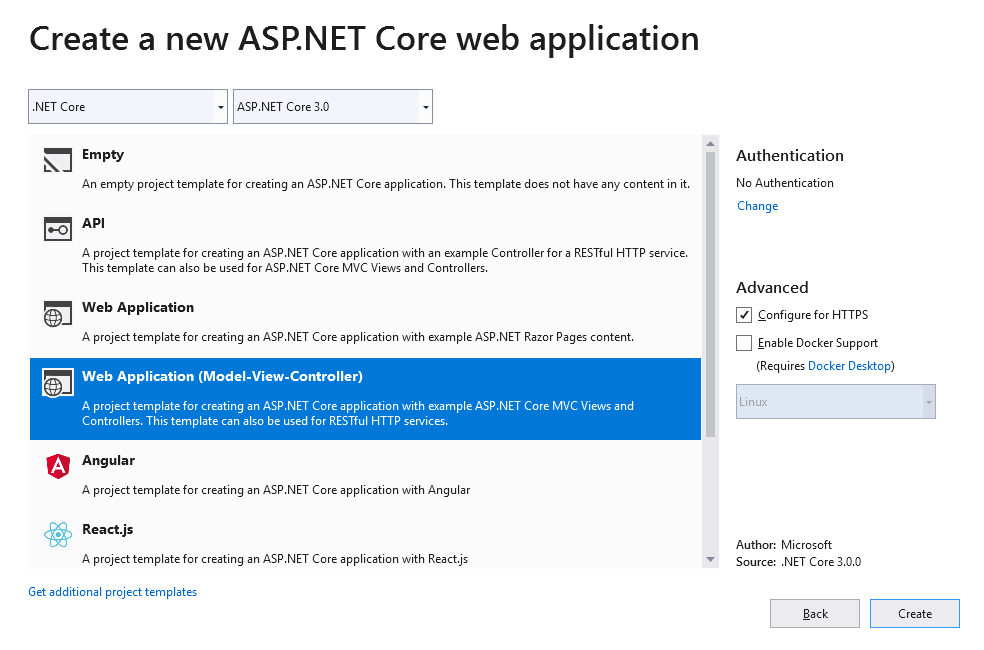
1. First step you need to do is please make sure you install Asp.net Core 3.0 application à Create a new project button à then choose “ASP.NET Core Web Application” template à click “Next” button and then enter your Project name. Please see the image below for further information
2. Install AutoMapper in Asp.Net Core 3.0 Application
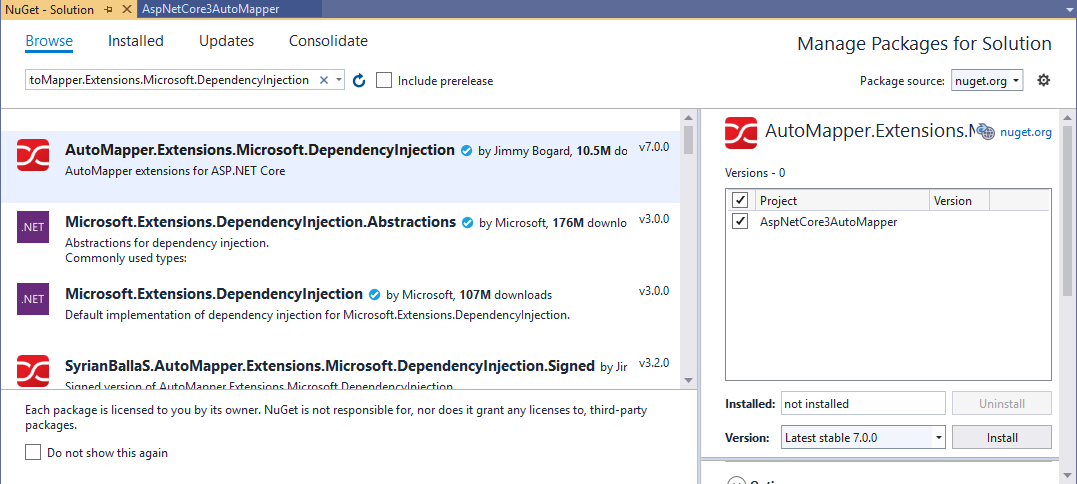
Now, in this step, we will install AutoMapper in our project. So, go to visual studio and then go to “Tools” from the menu and then select “NuGet Package Manager” and then choose “Manager NuGet Packages for Solution”. Now, go to “Browse” tab and then install this below package as you do see below in the screenshot.
Install-Package AutoMapper.Extensions.Microsoft.DependencyInjection
3. Configure AutoMapper in Asp.net Core 3.0 Application
Go to project folder structure, and then go to Startup class and then add some changes as you do see below in the code file’s Line # 11 and Line # 26.
using System;
using System.Collections.Generic;
using System.Linq;
using System.Threading.Tasks;
using Microsoft.AspNetCore.Builder;
using Microsoft.AspNetCore.Hosting;
using Microsoft.AspNetCore.HttpsPolicy;
using Microsoft.Extensions.Configuration;
using Microsoft.Extensions.DependencyInjection;
using Microsoft.Extensions.Hosting;
using AutoMapper;
namespace AspNetCore3AutoMapper
{
public class Startup
{
public Startup(IConfiguration configuration)
{
Configuration = configuration;
}
public IConfiguration Configuration { get; }
// This method gets called by the runtime. Use this method to add services to the container.
public void ConfigureServices(IServiceCollection services)
{
services.AddControllersWithViews();
services.AddAutoMapper(typeof(Startup));
}
// This method gets called by the runtime. Use this method to configure the HTTP request pipeline.
public void Configure(IApplicationBuilder app, IWebHostEnvironment env)
{
if (env.IsDevelopment())
{
app.UseDeveloperExceptionPage();
}
else
{
app.UseExceptionHandler("/Home/Error");
// The default HSTS value is 30 days. You may want to change this for production scenarios, see https://aka.ms/aspnetcore-hsts.
app.UseHsts();
}
app.UseHttpsRedirection();
app.UseStaticFiles();
app.UseRouting();
app.UseAuthorization();
app.UseEndpoints(endpoints =>
{
endpoints.MapControllerRoute(
name: "default",
pattern: "{controller=Home}/{action=Index}/{id?}");
});
}
}
}
4. Create a Model Class and Data Transfer Object Class
Now, in this step , we will create two classes. One is Model class and the other one is Dto(Data Transfer Object) class. So, go to Models’ folder and then right click on the folder name and then add a new class with the name of “Employee” and then write some properties as you do see below in the code.
public class Employee
{
public int Id { get; set; }
public string Name { get; set; }
public string Department { get; set; }
}
Now, again add a new class with the name of “EmployeeDto” as you do see below in the file.
public class EmployeeDto
{
public int Id { get; set; }
public string Name { get; set; }
public string Department { get; set; }
}
5. Add relation of Employee class with EmployeeDto class
Now, in this step, we will see how to add relation between a domain class and a Dto class. So, again add a new class (E.g. AutoMapping.cs) and then write some code as you do see below in the code.
using System;
using System.Collections.Generic;
using System.Linq;
using System.Threading.Tasks;
using AutoMapper;
namespace AspNetCoreAutoMapper.Models
{
public class AutoMapping : Profile
{
public AutoMapping()
{
CreateMap<Employee, EmployeeDto>();
}
}
}
Let’s understand the above code.
Line # 9: In this line, we are inheriting AutoMapping class from Profile.
Line # 13: In this line, we are mapping our Employee and EmployeeDto Classes.
6. Map Employee class with EmployeeDto Controller
We will see how to map Employee class with EmployeeDto class within the Home Controller. So, go to HomeController and then go to Index method and then write some code as you do see below in the file.
using System;
using System.Collections.Generic;
using System.Diagnostics;
using System.Linq;
using System.Threading.Tasks;
using Microsoft.AspNetCore.Mvc;
using Microsoft.Extensions.Logging;
using AspNetCore3AutoMapper.Models;
using AutoMapper;
namespace AspNetCore3AutoMapper.Controllers
{
public class HomeController : Controller
{
private readonly IMapper _mapper;
public HomeController(IMapper mapper)
{
_mapper = mapper;
}
public IActionResult Index()
{
var empObj = new Employee();
empObj.Id = 1;
empObj.Name = "Scott";
empObj.Department = "MM";
var employeeDto = _mapper.Map<EmployeeDto>(empObj);
return View(employeeDto);
}
}
}
Let’s understand the above code.
Line # 15 to 19: In this block of code, we are injecting IMapper interface. This will help us to use our configured mappings.
Line # 22 to 25: In this block of code, we are initializing Employee object.
Line # 26: In this line, we are using IMapper interface that we have injected into our constructor to call the Map method. And we are giving the type that we want to map and the object that we want to map from.
Line # 27: In this line, we are returning the EmployeeDto object to the view.
Now, go to Index view and access the returning values from the Index method as you do see below in the file.
@model EmployeeDto
@{
ViewData["Title"] = "Home Page";
}
<div>
<h1>ID: @Model.Id</h1>
<h1>Name: @Model.Name</h1>
<h1>Department: @Model.Department</h1>
</div>
Now, run your project by pressing f5 and then you will see the output
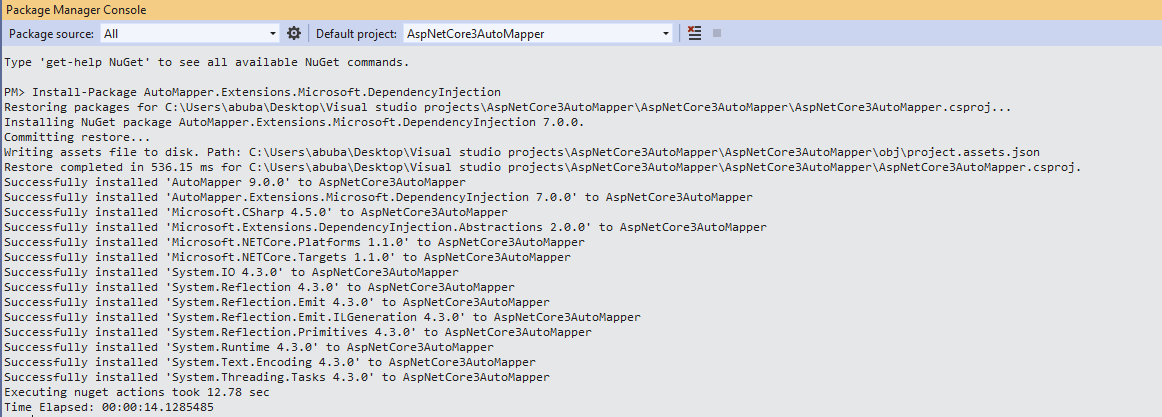
Or you can install this package by using this below command in Package Manager Console as you do see below in the screenshot.