European ASP.NET 4.5 Hosting BLOG

BLOG about ASP.NET 4, ASP.NET 4.5 Hosting and Its Technology - Dedicated to European Windows Hosting Customer

European ASP.NET Core Hosting - HostForLIFE :: What's New In ASP.NET Core 7.0?

clock December 23, 2022 06:58 by author Peter

ASP.NET Core is a free, open-source, and cross-platform framework for building modern web applications. It was first released in 2016 and has since gone through several major updates, with the latest version being ASP.NET Core 7.0. This version was released in November 2021 and brings a number of new features and improvements to the framework. In this article, we will explore some of the key features and changes introduced in ASP.NET Core 7.0, along with beginner-friendly examples of how to use them in your own applications.


1 .NET MAUI (Multi-platform App UI)
One of the biggest changes in ASP.NET Core 7.0 is the inclusion of .NET MAUI (Multi-platform App UI), which is a new framework for building cross-platform applications with a single codebase. It allows developers to build applications for Windows, macOS, Linux, iOS, and Android using the same codebase and tools.

To build a cross-platform mobile application with .NET MAUI, you will need to install the latest version of Visual Studio or Visual Studio for Mac. Then, create a new .NET MAUI project and select the platforms you want to target (e.g. iOS, Android). You can then use XAML or razor syntax to design the user interface and C# to write the business logic.

Here is a simple example of how to use .NET MAUI to build a cross-platform mobile application that displays a list of items,
@using System.Collections.Generic

<StackLayout>
  <Label Text="Welcome to .NET MAUI!" />
  <ListView ItemsSource="@Items">
    <ListView.ItemTemplate>
      <DataTemplate>
        <TextCell Text="{Binding Name}" />
      </DataTemplate>
    </ListView.ItemTemplate>
  </ListView>
</StackLayout>

@code {
  public List<Item> Items { get; set; } = new List<Item>
  {
    new Item { Name = "Item 1" },
    new Item { Name = "Item 2" },
    new Item { Name = "Item 3" },
  };

  public class Item
  {
    public string Name { get; set; }
  }
}

2. Improved Blazor support
Blazor is a framework for building client-side web applications with C# and Razor syntax. In ASP.NET Core 7.0, Blazor has received several improvements, including support for native mobile apps, improved integration with server-side Blazor, and new features such as lazy loading and improved performance.

To use lazy loading in a Blazor application, you can use the new Lazy component. For example,
<Lazy Load="@LoadData">
  <Loading>Loading data...</Loading>
  <NotLoaded>Error loading data</NotLoaded>
  <Loaded>
    <table>
      <thead>
        <tr>
          <th>ID</th>
          <th>Name</th>
        </tr>
      </thead>
      <tbody>
        @foreach (var item in Data)
        {
          <tr>
            <td>@item.Id</td>
            <td>@item.Name</td>
          </tr>
        }
      </tbody>
    </table>


3. Enhanced performance and scalability
ASP.NET Core 7.0 has been optimized for performance and scalability, with improvements such as faster startup time, lower memory consumption, and better resource utilization. These improvements make it easier to build high-performance and scalable applications with ASP.NET Core.

4. New JSON APIs
ASP.NET Core 7.0 introduces several new JSON APIs, including JSON Text Sequences and JSON Lines, which allow developers to work with large JSON datasets more efficiently.

5. Improved security
ASP.NET Core 7.0 includes several security enhancements, including support for the latest security standards and protocols, such as TLS 1.3 and HTTP/3. It also includes new features such as certificate pinning, which helps protect against man-in-the-middle attacks.

ASP.NET Core 7.0 is a major release that introduces a number of new features and improvements. Some of the key highlights include support for ARM64, improved performance and scalability, support for C# 9 and F# 5, and support for HTTP/3. Additionally, ASP.NET Core 7.0 includes a number of new features and improvements to the Razor syntax, the Blazor framework, and the MVC framework. Overall, ASP.NET Core 7.0 is a significant update that offers a range of new capabilities for developers building web applications using the .NET platform.

HostForLIFE.eu ASP.NET Core Hosting

European best, cheap and reliable ASP.NET hosting with instant activation. HostForLIFE.eu is #1 Recommended Windows and ASP.NET hosting in European Continent. With 99.99% Uptime Guaranteed of Relibility, Stability and Performace. HostForLIFE.eu security team is constantly monitoring the entire network for unusual behaviour. We deliver hosting solution including Shared hosting, Cloud hosting, Reseller hosting, Dedicated Servers, and IT as Service for companies of all size.


European ASP.NET Core Hosting - HostForLIFE :: CQRS And MediatR Pattern Implementation Using .NET Core 6 Web API

clock December 20, 2022 07:29 by author Peter

In this article, we are going to discuss the working of CQRS and MediatR patterns and step-by-step implementation using .NET Core 6 Web API.

Introduction of CQRS Pattern
    CQRS stands for Command and Query Responsibility Segregation and uses to separate read(queries) and write(commands).
    In that, queries perform read operation, and command perform writes operation like create, update, delete, and return data.

As we know, in our application we mostly use a single data model to read and write data, which will work fine and perform CRUD operations easily. But, when the application becomes a vast in that case, our queries return different types of data as an object so that become hard to manage with different DTO objects. Also, the same model is used to perform a write operation. As a result, the model becomes complex.
Also, when we use the same model for both reads and write operations the security is also hard to manage when the application is large and the entity might expose data in the wrong context due to the workload on the same model.
CQRS helps to decouple operations and make the application more scalable and flexible on large scale.

When to use CQRS
We can use Command Query Responsibility Segregation when the application is huge and access the same data in parallel. CQRS helps reduce merge conflicts while performing multiple operations with data.
In DDD terminology, if the domain data model is complex and needs to perform many operations on priority like validations and executing some business logic so in that case, we need the consistency that we will by using CQRS.

MediatR
MediatR pattern helps to reduce direct dependency between multiple objects and make them collaborative through MediatR.
In .NET Core MediatR provides classes that help to communicate with multiple objects efficiently in a loosely coupled manner.

Step-by-step Implementation

Step 2
Configure your application


Step 3
Provide additional information


Step 4
Project Structure


Step 5
Install the following NuGet Packages
<Project Sdk="Microsoft.NET.Sdk.Web">

  <PropertyGroup>
    <TargetFramework>net6.0</TargetFramework>
    <Nullable>disable</Nullable>
    <ImplicitUsings>enable</ImplicitUsings>
  </PropertyGroup>

  <ItemGroup>
    <PackageReference Include="MediatR.Extensions.Microsoft.DependencyInjection" Version="8.0.0" />
    <PackageReference Include="Microsoft.EntityFrameworkCore" Version="6.0.8" />
    <PackageReference Include="Microsoft.EntityFrameworkCore.Design" Version="6.0.8">
      <PrivateAssets>all</PrivateAssets>
      <IncludeAssets>runtime; build; native; contentfiles; analyzers; buildtransitive</IncludeAssets>
    </PackageReference>
    <PackageReference Include="Microsoft.EntityFrameworkCore.SqlServer" Version="6.0.8" />
    <PackageReference Include="Microsoft.EntityFrameworkCore.Tools" Version="6.0.8">
      <PrivateAssets>all</PrivateAssets>
      <IncludeAssets>runtime; build; native; contentfiles; analyzers; buildtransitive</IncludeAssets>
    </PackageReference>
    <PackageReference Include="Swashbuckle.AspNetCore" Version="6.2.3" />
  </ItemGroup>

</Project>


Step 6
Create a Student Details class inside the model folder
namespace CQRSAndMediatRDemo.Models
{
    public class StudentDetails
    {
        public int Id { get; set; }
        public string StudentName { get; set; }
        public string StudentEmail { get; set; }
        public string StudentAddress { get; set; }
        public int StudentAge { get; set; }
    }
}


Step 7
Next, add DbContextClass inside the Data folder
using CQRSAndMediatRDemo.Models;
using Microsoft.EntityFrameworkCore;

namespace CQRSAndMediatRDemo.Data
{
    public class DbContextClass : DbContext
    {
        protected readonly IConfiguration Configuration;

        public DbContextClass(IConfiguration configuration)
        {
            Configuration = configuration;
        }
        protected override void OnConfiguring(DbContextOptionsBuilder options)
        {
            options.UseSqlServer(Configuration.GetConnectionString("DefaultConnection"));
        }

        public DbSet<StudentDetails> Students { get; set; }
    }
}


Step 8
Create one student repository and a class related to that.

IStudentRepository

using CQRSAndMediatRDemo.Models;

namespace CQRSAndMediatRDemo.Repositories
{
    public interface IStudentRepository
    {
        public Task<List<StudentDetails>> GetStudentListAsync();
        public Task<StudentDetails> GetStudentByIdAsync(int Id);
        public Task<StudentDetails> AddStudentAsync(StudentDetails studentDetails);
        public Task<int> UpdateStudentAsync(StudentDetails studentDetails);
        public Task<int> DeleteStudentAsync(int Id);
    }
}


StudentRepository
using CQRSAndMediatRDemo.Data;
using CQRSAndMediatRDemo.Models;
using Microsoft.EntityFrameworkCore;
using System;
using System.Numerics;

namespace CQRSAndMediatRDemo.Repositories
{
    public class StudentRepository : IStudentRepository
    {
        private readonly DbContextClass _dbContext;

        public StudentRepository(DbContextClass dbContext)
        {
            _dbContext = dbContext;
        }

        public async Task<StudentDetails> AddStudentAsync(StudentDetails studentDetails)
        {
            var result = _dbContext.Students.Add(studentDetails);
            await _dbContext.SaveChangesAsync();
            return result.Entity;
        }

        public async Task<int> DeleteStudentAsync(int Id)
        {
            var filteredData = _dbContext.Students.Where(x => x.Id == Id).FirstOrDefault();
            _dbContext.Students.Remove(filteredData);
            return await _dbContext.SaveChangesAsync();
        }

        public async Task<StudentDetails> GetStudentByIdAsync(int Id)
        {
            return await _dbContext.Students.Where(x => x.Id == Id).FirstOrDefaultAsync();
        }

        public async Task<List<StudentDetails>> GetStudentListAsync()
        {
            return await _dbContext.Students.ToListAsync();
        }

        public async Task<int> UpdateStudentAsync(StudentDetails studentDetails)
        {
            _dbContext.Students.Update(studentDetails);
            return await _dbContext.SaveChangesAsync();
        }
    }
}


Step 9
After that, add read queries

GetStudentListQuery
using CQRSAndMediatRDemo.Models;
using MediatR;

namespace CQRSAndMediatRDemo.Queries
{
    public class GetStudentListQuery :  IRequest<List<StudentDetails>>
    {
    }
}

GetStudentByIdQuery
using CQRSAndMediatRDemo.Models;
using MediatR;

namespace CQRSAndMediatRDemo.Queries
{
    public class GetStudentByIdQuery : IRequest<StudentDetails>
    {
        public int Id { get; set; }
    }
}

Step 10
Next, create different commands

CreateStudentCommand
using CQRSAndMediatRDemo.Models;
using MediatR;

namespace CQRSAndMediatRDemo.Commands
{
    public class CreateStudentCommand : IRequest<StudentDetails>
    {
        public string StudentName { get; set; }
        public string StudentEmail { get; set; }
        public string StudentAddress { get; set; }
        public int StudentAge { get; set; }

        public CreateStudentCommand(string studentName, string studentEmail, string studentAddress, int studentAge)
        {
            StudentName = studentName;
            StudentEmail = studentEmail;
            StudentAddress = studentAddress;
            StudentAge = studentAge;
        }
    }
}

UpdateStudentCommand
using MediatR;

namespace CQRSAndMediatRDemo.Commands
{
    public class UpdateStudentCommand : IRequest<int>
    {
        public int Id { get; set; }
        public string StudentName { get; set; }
        public string StudentEmail { get; set; }
        public string StudentAddress { get; set; }
        public int StudentAge { get; set; }

        public UpdateStudentCommand(int id, string studentName, string studentEmail, string studentAddress, int studentAge)
        {
            Id = id;
            StudentName = studentName;
            StudentEmail = studentEmail;
            StudentAddress = studentAddress;
            StudentAge = studentAge;
        }
    }
}


DeleteStudentCommand
using MediatR;

namespace CQRSAndMediatRDemo.Commands
{
    public class DeleteStudentCommand : IRequest<int>
    {
        public int Id { get; set; }
    }
}

Step 11
Now, add Query and Command Handlers

GetStudentListHandler
using CQRSAndMediatRDemo.Models;
using CQRSAndMediatRDemo.Queries;
using CQRSAndMediatRDemo.Repositories;
using MediatR;
using System.Numerics;

namespace CQRSAndMediatRDemo.Handlers
{
    public class GetStudentListHandler :  IRequestHandler<GetStudentListQuery, List<StudentDetails>>
    {
        private readonly IStudentRepository _studentRepository;

        public GetStudentListHandler(IStudentRepository studentRepository)
        {
            _studentRepository = studentRepository;
        }

        public async Task<List<StudentDetails>> Handle(GetStudentListQuery query, CancellationToken cancellationToken)
        {
            return await _studentRepository.GetStudentListAsync();
        }
    }
}


GetStudentByIdHandler
using CQRSAndMediatRDemo.Models;
using CQRSAndMediatRDemo.Queries;
using CQRSAndMediatRDemo.Repositories;
using MediatR;
using System.Numerics;

namespace CQRSAndMediatRDemo.Handlers
{
    public class GetStudentByIdHandler : IRequestHandler<GetStudentByIdQuery, StudentDetails>
    {
        private readonly IStudentRepository _studentRepository;

        public GetStudentByIdHandler(IStudentRepository studentRepository)
        {
            _studentRepository = studentRepository;
        }

        public async Task<StudentDetails> Handle(GetStudentByIdQuery query, CancellationToken cancellationToken)
        {
            return await _studentRepository.GetStudentByIdAsync(query.Id);
        }
    }
}

C#

CreateStudentHandler

using CQRSAndMediatRDemo.Commands;
using CQRSAndMediatRDemo.Models;
using CQRSAndMediatRDemo.Repositories;
using MediatR;

namespace CQRSAndMediatRDemo.Handlers
{
    public class CreateStudentHandler: IRequestHandler<CreateStudentCommand, StudentDetails>
    {
        private readonly IStudentRepository _studentRepository;

        public CreateStudentHandler(IStudentRepository studentRepository)
        {
            _studentRepository = studentRepository;
        }
        public async Task<StudentDetails> Handle(CreateStudentCommand command, CancellationToken cancellationToken)
        {
            var studentDetails = new StudentDetails()
            {
                StudentName = command.StudentName,
                StudentEmail = command.StudentEmail,
                StudentAddress = command.StudentAddress,
                StudentAge = command.StudentAge
            };

            return await _studentRepository.AddStudentAsync(studentDetails);
        }
    }
}


UpdateStudentHandler
using CQRSAndMediatRDemo.Commands;
using CQRSAndMediatRDemo.Repositories;
using MediatR;

namespace CQRSAndMediatRDemo.Handlers
{
    public class UpdateStudentHandler : IRequestHandler<UpdateStudentCommand, int>
    {
        private readonly IStudentRepository _studentRepository;

        public UpdateStudentHandler(IStudentRepository studentRepository)
        {
            _studentRepository = studentRepository;
        }
        public async Task<int> Handle(UpdateStudentCommand command, CancellationToken cancellationToken)
        {
            var studentDetails = await _studentRepository.GetStudentByIdAsync(command.Id);
            if (studentDetails == null)
                return default;

            studentDetails.StudentName = command.StudentName;
            studentDetails.StudentEmail = command.StudentEmail;
            studentDetails.StudentAddress = command.StudentAddress;
            studentDetails.StudentAge = command.StudentAge;

            return await _studentRepository.UpdateStudentAsync(studentDetails);
        }
    }
}


DeleteStudentHandler
using CQRSAndMediatRDemo.Commands;
using CQRSAndMediatRDemo.Repositories;
using MediatR;

namespace CQRSAndMediatRDemo.Handlers
{
    public class DeleteStudentHandler : IRequestHandler<DeleteStudentCommand, int>
    {
        private readonly IStudentRepository _studentRepository;

        public DeleteStudentHandler(IStudentRepository studentRepository)
        {
            _studentRepository = studentRepository;
        }

        public async Task<int> Handle(DeleteStudentCommand command, CancellationToken cancellationToken)
        {
            var studentDetails = await _studentRepository.GetStudentByIdAsync(command.Id);
            if (studentDetails == null)
                return default;

            return await _studentRepository.DeleteStudentAsync(studentDetails.Id);
        }
    }
}

Step 12
Configure the database connection string inside the appsettings.json file
{
  "Logging": {
    "LogLevel": {
      "Default": "Information",
      "Microsoft.AspNetCore": "Warning"
    }
  },
  "AllowedHosts": "*",
  "ConnectionStrings": {
    "DefaultConnection": "Data Source=DESKTOP-8RL8JOG;Initial Catalog=CQRSAndMediatRDemoDB;User Id=sa;Password=database@1;"
  }
}


Step 13

Register a few services inside the program class
using CQRSAndMediatRDemo.Data;
using CQRSAndMediatRDemo.Repositories;
using MediatR;
using Microsoft.AspNetCore.Hosting;
using System.Reflection;

var builder = WebApplication.CreateBuilder(args);

// Add services to the container.
builder.Services.AddMediatR(Assembly.GetExecutingAssembly());
builder.Services.AddDbContext<DbContextClass>();
builder.Services.AddScoped<IStudentRepository, StudentRepository>();

builder.Services.AddControllers();
// Learn more about configuring Swagger/OpenAPI at https://aka.ms/aspnetcore/swashbuckle
builder.Services.AddEndpointsApiExplorer();
builder.Services.AddSwaggerGen();

var app = builder.Build();

// Configure the HTTP request pipeline.
if (app.Environment.IsDevelopment())
{
    app.UseSwagger();
    app.UseSwaggerUI();
}
app.UseHttpsRedirection();
app.UseAuthorization();
app.MapControllers();
app.Run();


Step 14

Next, perform database migration and update commands
add-migration “initial”
update-database

Step 15
After that, create Students Controller and inject MediatR service inside that to send query and command
using CQRSAndMediatRDemo.Commands;
using CQRSAndMediatRDemo.Models;
using CQRSAndMediatRDemo.Queries;
using CQRSAndMediatRDemo.Repositories;
using MediatR;
using Microsoft.AspNetCore.Http;
using Microsoft.AspNetCore.Mvc;
using System;

namespace CQRSAndMediatRDemo.Controllers
{
    [Route("api/[controller]")]
    [ApiController]
    public class StudentsController : ControllerBase
    {
        private readonly IMediator mediator;

        public StudentsController(IMediator mediator)
        {
            this.mediator = mediator;
        }

        [HttpGet]
        public async Task<List<StudentDetails>> GetStudentListAsync()
        {
            var studentDetails = await mediator.Send(new GetStudentListQuery());

            return studentDetails;
        }

        [HttpGet("studentId")]
        public async Task<StudentDetails> GetStudentByIdAsync(int studentId)
        {
            var studentDetails = await mediator.Send(new GetStudentByIdQuery() { Id = studentId });

            return studentDetails;
        }

        [HttpPost]
        public async Task<StudentDetails> AddStudentAsync(StudentDetails studentDetails)
        {
            var studentDetail = await mediator.Send(new CreateStudentCommand(
                studentDetails.StudentName,
                studentDetails.StudentEmail,
                studentDetails.StudentAddress,
                studentDetails.StudentAge));
            return studentDetail;
        }

        [HttpPut]
        public async Task<int> UpdateStudentAsync(StudentDetails studentDetails)
        {
            var isStudentDetailUpdated = await mediator.Send(new UpdateStudentCommand(
               studentDetails.Id,
               studentDetails.StudentName,
               studentDetails.StudentEmail,
               studentDetails.StudentAddress,
               studentDetails.StudentAge));
            return isStudentDetailUpdated;
        }

        [HttpDelete]
        public async Task<int> DeleteStudentAsync(int Id)
        {
            return await mediator.Send(new DeleteStudentCommand() { Id = Id });
        }
    }
}

Step 16
Finally, run your application and access different endpoints using swagger UI.

HostForLIFE.eu ASP.NET Core Hosting

European best, cheap and reliable ASP.NET hosting with instant activation. HostForLIFE.eu is #1 Recommended Windows and ASP.NET hosting in European Continent. With 99.99% Uptime Guaranteed of Relibility, Stability and Performace. HostForLIFE.eu security team is constantly monitoring the entire network for unusual behaviour. We deliver hosting solution including Shared hosting, Cloud hosting, Reseller hosting, Dedicated Servers, and IT as Service for companies of all size.


European ASP.NET Core Hosting - HostForLIFE :: Post Multiple File And Data With The Use Of Single Model API Call In .NET Core With Angular

clock December 12, 2022 06:59 by author Peter

In this article, we will learn about how to post file and data with the use of .Net Core WebAPI And Angular.

We can better understand this step by step.

Step 1
First we will create one model in Angular Application like,    
export interface CreateDocument {
    Id: number,
    firstName: string,
    lastName: string,
    uploadedPhotoorDocName: string[]
}


Step 2
Now first of all selected file put into file array like

2.1 Create File Array,        
public filecontent: File[] = [];

2.2 Angular Html template bind event,
<input id="file" class="form-control" type="file" multiple name="uploadedDocumentFile" [(ngModel)]="createDocument.uploadedDocumentFile" (change)="onFileSelected($event)" />

2.3 Selected File put into filecontent array when user select multiple files,    
onFileSelected(e: any) {
    for (var i = 0; i < e.target.files.length; i++) {
        this.filecontent.push(e.target.files[i]);
    }
}


Step 3

All file and model data put into FormData object

3.1 First create FormData object like,        
let myFormData: FormData = new FormData();

3.2 Now one by one push all model value into FormData Object        
myFormData.append("Id", "1001");
myFormData.append("firstName", "xyz");
myFormData.append("lastName", "abc");


3.3 All push selected file into FormData Object like
let files: File[] = this.filecontent;
for (let i = 0; i < files.length; i++) {
    let file: File = files[i];
    myFormData.append("files", file, file.name); // the filed name is `files` because the server side declares a `Files` property
}

3.4 If pass array value in FormData object then convert as JSON.stringify() array like
let docname = ["testing.doc", "testing1.doc", "testing2.doc"];
myFormData.append("uploadedPhotoorDocName", JSON.stringify(docname));


Step 4. Call API Form Angular

4.1 Pass Formdata into service.    
this.servicename.CreateOrUpdate(myFormData).subscribe((dataResult: CommonResponse) => {
    if (dataResult && dataResult.status == true) {}
});

4.2 Service call API like,    
createOrUpdate(createDocument:FormData): Observable<CommonResponse> {
return this.http.post<CommonResponse>(`${environment.apiUrl}` + this.getUrl + "/Save",createDocument)
    .pipe(
        catchError(this.handleError('Error', []))
    );
}


Step 5
Now we implement POST API .NET Core                 

5.1 First of all create model,
public class DemoModel {
    public int Id {
        get;
        set;
    }
    public string ? FirstName {
        get;
        set;
    }
    public string ? LastName {
        get;
        set;
    }
    public string[] UploadedPhotoorDocName {
        get;
        set;
    }
    public IList < IFormFile > Files {
        get;
        set;
    }
}
[HttpPost]
[Route("SaveSiteDocument")]
public IActionResult SaveSiteDocument([FromForm] DemoModel demoModel) {
    string webRootPath = new CommonHelper(_webHostEnvironment).GetRootPath();
    string saveFilePath = webRootPath + "//" + basePath + "//" + siteName + "_" + demoModel.FirstName;
    SiteDocumentServices siteDocumentServices = new SiteDocumentServices();
    siteDocumentServices.CreateDirectory(saveFilePath);
    for (int i = 0; i < demoModel.uploadedPhotoorDocName.Length; i++) {
        string strDocumentFile = demoModel.UploadedPhotoorDocName[i];
        string fileName = System.IO.Path.GetFileName(strDocumentFile);
        bool result = siteDocumentServices.SaveFile(strDocumentFile, saveFilePath, fileName);
        demoModel.Id = demoModel.Id;
        demoModel.FirstName = demoModel.FirstName;
        demoModel.LastName = demoModel.LastName;;
        demoModel.UploadedPhotoorDocName = demoModel.UploadedPhotoorDocName[i];;
        _siteDocumentManager.SaveSiteDocument(siteDocumentModel);
    }
    var response = new {
        Message = "records saved successfully",
            Status = true,
            HasException = false,
            data = message
    };
    return (IActionResult) Ok(response);
}

Conclusion
Nowadays some applications require post data with some documents, Images. So this article is very helpful to save data and file from database and store files in server folder.
Enjoy Coding !!!!

HostForLIFE.eu ASP.NET Core Hosting

European best, cheap and reliable ASP.NET hosting with instant activation. HostForLIFE.eu is #1 Recommended Windows and ASP.NET hosting in European Continent. With 99.99% Uptime Guaranteed of Relibility, Stability and Performace. HostForLIFE.eu security team is constantly monitoring the entire network for unusual behaviour. We deliver hosting solution including Shared hosting, Cloud hosting, Reseller hosting, Dedicated Servers, and IT as Service for companies of all size.


European ASP.NET Core Hosting - HostForLIFE :: Unit Of Work With Generic Repository Implementation Using .NET Core 6 Web API

clock December 5, 2022 06:00 by author Peter

We are going to discuss the Unit of work design pattern with the help of a generic repository and step-by-step implementation using .NET Core 6 Web API.

Repository Pattern
    The repository pattern is used to create an abstraction layer between the data access layer and the business layer of an application
    This pattern helps to reduce code duplication and follows the DRY principle.
    It also helps to create loose coupling between multiple components, when we want to change something inside the data access layer that time does not need to change another layer where we consume that functionality.
    Separation of concern makes things easier to maintain the code.
    Implementing repository patterns helps us write unit test cases efficiently and easily.

Unit of Work
    Repository pattern helps us create an abstraction, decouple the code, and avoid redundant code.

  • But sometimes it could partially update data because when the application is huge and repositories share the same database context throughout the application and perform operations like insert, update and read. So, in that case, there might be a chance fail some transactions and few are executed successfully due to concurrency issues. So, for this reason, we use a unit of work to maintain the data integrity inside the application.
  • Also, the unit of work manages an in-memory database when we perform CRUD operations on some entity classes as one transaction and if there are some database operations will fail then that case all operations will roll back.
  • It also helps to make layers loosely coupled using dependency injection and follow Test Driven Development (TDD) principles.

Step-by-step Implementation
Step 1


Create a new .NET Core Web API

Step 2
Configure your application


Step 3
Provide some additional details

Project Structure


Step 4
Create three class library projects inside the main solution

Step 5
Next, add one model class inside UnitOfWorkDemo.Core project and also add some interfaces.

ProductDetails.cs
namespace UnitOfWorkDemo.Core.Models
{
    public class ProductDetails
    {
        public int Id { get; set; }
        public string ProductName { get; set; }
        public string ProductDescription { get; set; }
        public int ProductPrice { get; set; }
        public int ProductStock { get; set; }
    }
}


IGenericRepository.cs
using System;
using System.Collections.Generic;
using System.Linq;
using System.Text;
using System.Threading.Tasks;

namespace UnitOfWorkDemo.Core.Interfaces
{
    public interface IGenericRepository<T> where T : class
    {
        Task<T> GetById(int id);
        Task<IEnumerable<T>> GetAll();
        Task Add(T entity);
        void Delete(T entity);
        void Update(T entity);
    }
}


IProductRepository.cs

using UnitOfWorkDemo.Core.Models;

namespace UnitOfWorkDemo.Core.Interfaces
{
    public interface IProductRepository : IGenericRepository<ProductDetails>
    {
    }
}

IUnitOfWork
namespace UnitOfWorkDemo.Core.Interfaces
{
    public interface IUnitOfWork : IDisposable
    {
        IProductRepository Products { get; }

        int Save();
    }
}

Step 6
Now, we are going to add an implementation of all repositories which we created earlier and also create one DbContextClass inside that.


Project file
<Project Sdk="Microsoft.NET.Sdk">

  <PropertyGroup>
    <TargetFramework>net6.0</TargetFramework>
    <ImplicitUsings>enable</ImplicitUsings>
    <Nullable>enable</Nullable>
  </PropertyGroup>

  <ItemGroup>
    <ProjectReference Include="..\UnitOfWorkDemo.Core\UnitOfWorkDemo.Core.csproj" />
    <PackageReference Include="Microsoft.EntityFrameworkCore" Version="6.0.8" />
    <PackageReference Include="Microsoft.EntityFrameworkCore.SqlServer" Version="6.0.8" />
    <PackageReference Include="Microsoft.EntityFrameworkCore.Tools" Version="6.0.8" />
  </ItemGroup>

</Project>

GenericRepository.cs
using Microsoft.EntityFrameworkCore;
using System;
using System.Collections.Generic;
using System.Linq;
using System.Text;
using System.Threading.Tasks;
using UnitOfWorkDemo.Core.Interfaces;

namespace UnitOfWorkDemo.Infrastructure.Repositories
{
    public abstract class GenericRepository<T> : IGenericRepository<T> where T : class
    {
        protected readonly DbContextClass _dbContext;

        protected GenericRepository(DbContextClass context)
        {
            _dbContext = context;
        }

        public async Task<T> GetById(int id)
        {
            return await _dbContext.Set<T>().FindAsync(id);
        }

        public async Task<IEnumerable<T>> GetAll()
        {
            return await _dbContext.Set<T>().ToListAsync();
        }

        public async Task Add(T entity)
        {
            await _dbContext.Set<T>().AddAsync(entity);
        }

        public void Delete(T entity)
        {
            _dbContext.Set<T>().Remove(entity);
        }

        public void Update(T entity)
        {
            _dbContext.Set<T>().Update(entity);
        }
    }
}

ProductRepository.cs
using UnitOfWorkDemo.Core.Interfaces;
using UnitOfWorkDemo.Core.Models;

namespace UnitOfWorkDemo.Infrastructure.Repositories
{
    public class ProductRepository : GenericRepository<ProductDetails>, IProductRepository
    {
        public ProductRepository(DbContextClass dbContext) : base(dbContext)
        {

        }
    }
}


UnitOfWork.cs
using System;
using System.Collections.Generic;
using System.Linq;
using System.Text;
using System.Threading.Tasks;
using UnitOfWorkDemo.Core.Interfaces;

namespace UnitOfWorkDemo.Infrastructure.Repositories
{
    public class UnitOfWork : IUnitOfWork
    {
        private readonly DbContextClass _dbContext;
        public IProductRepository Products { get; }

        public UnitOfWork(DbContextClass dbContext,
                            IProductRepository productRepository)
        {
            _dbContext = dbContext;
            Products = productRepository;
        }

        public int Save()
        {
            return _dbContext.SaveChanges();
        }

        public void Dispose()
        {
            Dispose(true);
            GC.SuppressFinalize(this);
        }

        protected virtual void Dispose(bool disposing)
        {
            if (disposing)
            {
                _dbContext.Dispose();
            }
        }

    }
}


DbContextClass.cs
using Microsoft.EntityFrameworkCore;
using Microsoft.Extensions.Configuration;
using System;
using System.Collections.Generic;
using System.Linq;
using System.Text;
using System.Threading.Tasks;
using UnitOfWorkDemo.Core.Models;

namespace UnitOfWorkDemo.Infrastructure
{
    public class DbContextClass : DbContext
    {
        public DbContextClass(DbContextOptions<DbContextClass> contextOptions) : base(contextOptions)
        {

        }

        public DbSet<ProductDetails> Products { get; set; }
    }
}


After that, create one extension class which we are used to registering DI services, and configure that inside the Program.cs file inside the root project.

ServiceExtension.cs
using Microsoft.EntityFrameworkCore;
using Microsoft.Extensions.Configuration;
using Microsoft.Extensions.DependencyInjection;
using System;
using System.Collections.Generic;
using System.Linq;
using System.Text;
using System.Threading.Tasks;
using UnitOfWorkDemo.Core.Interfaces;
using UnitOfWorkDemo.Infrastructure.Repositories;

namespace UnitOfWorkDemo.Infrastructure.ServiceExtension
{
    public static class ServiceExtension
    {
        public static IServiceCollection AddDIServices(this IServiceCollection services, IConfiguration configuration)
        {
            services.AddDbContext<DbContextClass>(options =>
            {
                options.UseSqlServer(configuration.GetConnectionString("DefaultConnection"));
            });
            services.AddScoped<IUnitOfWork, UnitOfWork>();
            services.AddScoped<IProductRepository, ProductRepository>();

            return services;
        }
    }
}


Next, add migration and update the database inside the infrastructure project using following command
add-migration “v1”
update-database


Step 5

Next, create a product service inside the Services project which we inject and consume inside the main controller

IProductService.cs
using System;
using System.Collections.Generic;
using System.Linq;
using System.Text;
using System.Threading.Tasks;
using UnitOfWorkDemo.Core.Models;

namespace UnitOfWorkDemo.Services.Interfaces
{
    public interface IProductService
    {
        Task<bool> CreateProduct(ProductDetails productDetails);

        Task<IEnumerable<ProductDetails>> GetAllProducts();

        Task<ProductDetails> GetProductById(int productId);

        Task<bool> UpdateProduct(ProductDetails productDetails);

        Task<bool> DeleteProduct(int productId);
    }
}


ProductService.cs
using System;
using System.Collections.Generic;
using System.Linq;
using System.Text;
using System.Threading.Tasks;
using UnitOfWorkDemo.Core.Interfaces;
using UnitOfWorkDemo.Core.Models;
using UnitOfWorkDemo.Services.Interfaces;

namespace UnitOfWorkDemo.Services
{
    public class ProductService : IProductService
    {
        public IUnitOfWork _unitOfWork;

        public ProductService(IUnitOfWork unitOfWork)
        {
            _unitOfWork = unitOfWork;
        }

        public async Task<bool> CreateProduct(ProductDetails productDetails)
        {
            if (productDetails != null)
            {
                await _unitOfWork.Products.Add(productDetails);

                var result = _unitOfWork.Save();

                if (result > 0)
                    return true;
                else
                    return false;
            }
            return false;
        }

        public async Task<bool> DeleteProduct(int productId)
        {
            if (productId > 0)
            {
                var productDetails = await _unitOfWork.Products.GetById(productId);
                if (productDetails != null)
                {
                    _unitOfWork.Products.Delete(productDetails);
                    var result = _unitOfWork.Save();

                    if (result > 0)
                        return true;
                    else
                        return false;
                }
            }
            return false;
        }

        public async Task<IEnumerable<ProductDetails>> GetAllProducts()
        {
            var productDetailsList = await _unitOfWork.Products.GetAll();
            return productDetailsList;
        }

        public async Task<ProductDetails> GetProductById(int productId)
        {
            if (productId > 0)
            {
                var productDetails = await _unitOfWork.Products.GetById(productId);
                if (productDetails != null)
                {
                    return productDetails;
                }
            }
            return null;
        }

        public async Task<bool> UpdateProduct(ProductDetails productDetails)
        {
            if (productDetails != null)
            {
                var product = await _unitOfWork.Products.GetById(productDetails.Id);
                if(product != null)
                {
                    product.ProductName= productDetails.ProductName;
                    product.ProductDescription= productDetails.ProductDescription;
                    product.ProductPrice= productDetails.ProductPrice;
                    product.ProductStock= productDetails.ProductStock;

                    _unitOfWork.Products.Update(product);

                    var result = _unitOfWork.Save();

                    if (result > 0)
                        return true;
                    else
                        return false;
                }
            }
            return false;
        }
    }
}


Step 6
Now, we create Products Controller inside the main project and add multiple endpoints.

ProductsController.cs
using Microsoft.AspNetCore.Mvc;
using UnitOfWorkDemo.Core.Models;
using UnitOfWorkDemo.Services.Interfaces;

namespace UnitOfWorkDemo.Controllers
{
    [Route("api/[controller]")]
    [ApiController]
    public class ProductsController : ControllerBase
    {
        public readonly IProductService _productService;
        public ProductsController(IProductService productService)
        {
            _productService = productService;
        }

        /// <summary>
        /// Get the list of product
        /// </summary>
        /// <returns></returns>
        [HttpGet]
        public async Task<IActionResult> GetProductList()
        {
            var productDetailsList = await _productService.GetAllProducts();
            if(productDetailsList == null)
            {
                return NotFound();
            }
            return Ok(productDetailsList);
        }

        /// <summary>
        /// Get product by id
        /// </summary>
        /// <param name="productId"></param>
        /// <returns></returns>
        [HttpGet("{productId}")]
        public async Task<IActionResult> GetProductById(int productId)
        {
            var productDetails = await _productService.GetProductById(productId);

            if (productDetails != null)
            {
                return Ok(productDetails);
            }
            else
            {
                return BadRequest();
            }
        }

        /// <summary>
        /// Add a new product
        /// </summary>
        /// <param name="productDetails"></param>
        /// <returns></returns>
        [HttpPost]
        public async Task<IActionResult> CreateProduct(ProductDetails productDetails)
        {
            var isProductCreated = await _productService.CreateProduct(productDetails);

            if (isProductCreated)
            {
                return Ok(isProductCreated);
            }
            else
            {
                return BadRequest();
            }
        }

        /// <summary>
        /// Update the product
        /// </summary>
        /// <param name="productDetails"></param>
        /// <returns></returns>
        [HttpPut]
        public async Task<IActionResult> UpdateProduct(ProductDetails productDetails)
        {
            if (productDetails != null)
            {
                var isProductCreated = await _productService.UpdateProduct(productDetails);
                if (isProductCreated)
                {
                    return Ok(isProductCreated);
                }
                return BadRequest();
            }
            else
            {
                return BadRequest();
            }
        }

        /// <summary>
        /// Delete product by id
        /// </summary>
        /// <param name="productId"></param>
        /// <returns></returns>
        [HttpDelete("{productId}")]
        public async Task<IActionResult> DeleteProduct(int productId)
        {
            var isProductCreated = await _productService.DeleteProduct(productId);

            if (isProductCreated)
            {
                return Ok(isProductCreated);
            }
            else
            {
                return BadRequest();
            }
        }
    }
}


Also, add a database connection string inside the appsetting.json file
{
  "Logging": {
    "LogLevel": {
      "Default": "Information",
      "Microsoft.AspNetCore": "Warning"
    }
  },
  "ConnectionStrings": {
    "DefaultConnection": "Data Source=DESKTOP;Initial Catalog=UnitOfWorkDemoDB;User Id=sa;Password=database;"
  }
}


After that, register some services inside the Program class
using UnitOfWorkDemo.Infrastructure.ServiceExtension;
using UnitOfWorkDemo.Services;
using UnitOfWorkDemo.Services.Interfaces;

var builder = WebApplication.CreateBuilder(args);

// Add services to the container.
builder.Services.AddDIServices(builder.Configuration);
builder.Services.AddScoped<IProductService, ProductService>();

builder.Services.AddControllers();
// Learn more about configuring Swagger/OpenAPI at https://aka.ms/aspnetcore/swashbuckle
builder.Services.AddEndpointsApiExplorer();
builder.Services.AddSwaggerGen();

var app = builder.Build();

// Configure the HTTP request pipeline.
if (app.Environment.IsDevelopment())
{
    app.UseSwagger();
    app.UseSwaggerUI();
}
app.UseHttpsRedirection();
app.UseAuthorization();
app.MapControllers();
app.Run();


Finally, run the project

Here we discussed repository patterns and units of work. Also, the benefits and step-by-step implementation using .NET Core Web API.
Happy Coding!

HostForLIFE.eu ASP.NET Core Hosting

European best, cheap and reliable ASP.NET hosting with instant activation. HostForLIFE.eu is #1 Recommended Windows and ASP.NET hosting in European Continent. With 99.99% Uptime Guaranteed of Relibility, Stability and Performace. HostForLIFE.eu security team is constantly monitoring the entire network for unusual behaviour. We deliver hosting solution including Shared hosting, Cloud hosting, Reseller hosting, Dedicated Servers, and IT as Service for companies of all size.


European ASP.NET Core Hosting - HostForLIFE :: New File Scope Feature In .NET 7

clock November 28, 2022 07:55 by author Peter

Microsoft has just released .NET 7 on 14th November 2022. In the previous article, we looked at improvements in string literals. Today, we will look at another feature introduced with .NET 7 and that is the file access modifier. Let us begin.

The file access modifier keyword
Let us create a console application using Visual Studio 2022 Community edition.


Now, add a new class as below,

Next, add the below code to the new class,
namespace DotNet7File {
    public class FileTest {
        public void PrintDateCall() {
            Console.WriteLine("Printed from the FileTest.cs file");
        }
    }
}


Then, add another class as below,


And add the below code to it,
namespace DotNet7File {
    public class FileTest {
        public void PrintDateCall() {
            Console.WriteLine("Printed from the AnotherFileTest.cs file");
        }
    }
}

You will see the below errors,


The reason is that the same class has already been defined in this namespace. Now change the code in the second file to the below,
namespace DotNet7File {
    file class FileTest {
        public void PrintDateCall() {
            Console.WriteLine("Printed from the AnotherFileTest.cs file");
        }
    }
}


All will compile fine. This is because the scope of the class in the second file has been changed to file and hence it is accessible at the file level only.

Add the below code to the “Program.cs” file,
using DotNet7File;
FileTest fileTest = new ();
fileTest.PrintDateCall();

Run the application and you will see the below output,


As expected, the class with the public modifier was created and called. So, how do we call the file level class. It can be called from within the file. Change your code in the second file as below,
namespace DotNet7File {
    file class FileTest {
        public void PrintDateCall() {
            Console.WriteLine("Printed from the AnotherFileTest.cs file");
        }
    }
    public class ToCallExternally {
        public void CallTheFileLevelClass() {
            FileTest fileTest = new();
            fileTest.PrintDateCall();
        }
    }
}

And update the code in the Program.cs file as below,
using DotNet7File;
ToCallExternally toCallExternally = new ();
toCallExternally.CallTheFileLevelClass();


Now, run the application and you will see the below,


Here, we see the class at the file level is used.

In this article, we looked at a new feature that has been introduced with .NET 7. The usage of the file modifier would probably be helpful in the design of compiler-related features in order to avoid conflict with user-defined classes. In the next article, we will look into another feature of .NET 7.

HostForLIFE.eu ASP.NET Core Hosting

European best, cheap and reliable ASP.NET hosting with instant activation. HostForLIFE.eu is #1 Recommended Windows and ASP.NET hosting in European Continent. With 99.99% Uptime Guaranteed of Relibility, Stability and Performace. HostForLIFE.eu security team is constantly monitoring the entire network for unusual behaviour. We deliver hosting solution including Shared hosting, Cloud hosting, Reseller hosting, Dedicated Servers, and IT as Service for companies of all size.


European ASP.NET Core Hosting - HostForLIFE :: Minimal API Using .NET Core 6 Web API

clock November 21, 2022 08:05 by author Peter

We will discuss minimal APIs in .NET Core 6, their purpose, and step-by-step implementation.

Minimal APIs Implementation using .NET Core 6

Step 1
Create a new .NET Core Web API

Step 2
Configure your project

Step 3
Provide additional information as I showed below


Step 4
Install the following NuGet packages

Project structure

Step 5
Create a Product class inside the entities folder
namespace MinimalAPIsDemo.Entities
{
    public class Product
    {
        public int ProductId { get; set; }
        public string ProductName { get; set; }
        public string ProductDescription { get; set; }
        public int ProductPrice { get; set; }
        public int ProductStock { get; set; }
    }
}

Step 6

Next, create DbContextClass inside the Data folder
using Microsoft.EntityFrameworkCore;
using MinimalAPIsDemo.Entities;

namespace MinimalAPIsDemo.Data
{
    public class DbContextClass : DbContext
    {
        protected readonly IConfiguration Configuration;

        public DbContextClass(IConfiguration configuration)
        {
            Configuration = configuration;
        }
        protected override void OnConfiguring(DbContextOptionsBuilder options)
        {
            options.UseSqlServer(Configuration.GetConnectionString("DefaultConnection"));
        }

        public DbSet<Product> Product { get; set; }
    }
}


Step 7

Register the Db Context service in the DI container inside the Program class which is the entry point of our application
// Add services to the container.
builder.Services.AddDbContext<DbContextClass>();


Step 8
Add database connection string inside the app settings file
{
  "Logging": {
    "LogLevel": {
      "Default": "Information",
      "Microsoft.AspNetCore": "Warning"
    }
  },
  "AllowedHosts": "*",
  "ConnectionStrings": {
    "DefaultConnection": "Data Source=DESKTOP;Initial Catalog=MinimalAPIDemo;User Id=sa;Password=database;"
  }
}


Step 9
Later on, add different API endpoints inside the Program class with the help of Map and specified routing pattern as I showed below
using Microsoft.EntityFrameworkCore;
using MinimalAPIsDemo.Data;
using MinimalAPIsDemo.Entities;

var builder = WebApplication.CreateBuilder(args);

// Add services to the container.
builder.Services.AddDbContext<DbContextClass>();

// Learn more about configuring Swagger/OpenAPI at https://aka.ms/aspnetcore/swashbuckle
builder.Services.AddEndpointsApiExplorer();
builder.Services.AddSwaggerGen();

var app = builder.Build();

// Configure the HTTP request pipeline.
if (app.Environment.IsDevelopment())
{
    app.UseSwagger();
    app.UseSwaggerUI();
}

//get the list of product
app.MapGet("/productlist", async (DbContextClass dbContext) =>
{
    var products = await dbContext.Product.ToListAsync();
    if (products == null)
    {
        return Results.NoContent();
    }
    return Results.Ok(products);
});

//get product by id
app.MapGet("/getproductbyid", async (int id, DbContextClass dbContext) =>
{
    var product = await dbContext.Product.FindAsync(id);
    if (product == null)
    {
        return Results.NotFound();
    }
    return Results.Ok(product);
});

//create a new product
app.MapPost("/createproduct", async (Product product, DbContextClass dbContext) =>
{
    var result = dbContext.Product.Add(product);
    await dbContext.SaveChangesAsync();
    return Results.Ok(result.Entity);
});

//update the product
app.MapPut("/updateproduct", async (Product product, DbContextClass dbContext) =>
{
    var productDetail = await dbContext.Product.FindAsync(product.ProductId);
    if (product == null)
    {
        return Results.NotFound();
    }
    productDetail.ProductName = product.ProductName;
    productDetail.ProductDescription = product.ProductDescription;
    productDetail.ProductPrice = product.ProductPrice;
    productDetail.ProductStock = product.ProductStock;

    await dbContext.SaveChangesAsync();
    return Results.Ok(productDetail);
});

//delete the product by id
app.MapDelete("/deleteproduct/{id}", async (int id, DbContextClass dbContext) =>
{
    var product = await dbContext.Product.FindAsync(id);
    if (product == null)
    {
        return Results.NoContent();
    }
    dbContext.Product.Remove(product);
    await dbContext.SaveChangesAsync();
    return Results.Ok();
});

app.Run();


Step 10
Run the following entity framework command to create migration and update the database
add-migration "initial"
update-database


Step 11
Finally, run your application


European ASP.NET Core 7.0 Hosting - HostForLIFE :: Using NCache As IdentityServer4 Cache And Store

clock November 16, 2022 08:48 by author Peter

Identity Server4 is an open-source authentication provider with OpenID connect and OAuth2.0 framework for ASP.NET Core. It acts as a centralized authentication provider or security token server (STS). It will be ideal to go through layers when you have multiple API/microservices applications and you should have single security token server to handle the authentication so that you really don’t have to define the Authentication in each and every application.   

Identity server4 is a simple and straightforward STS. The user uses the clients (ASP.NET MVC or angular or react application and so on) to access the data, these users are authenticated by Identity Server to use the client. After successful authentication, the Identity server will send a token to client. Then client should use this token to access the data from the APIs.

Identity server4 provides the flexibility to use external storage like relational database, NoSQL, or in-memory data storage. NCache, being a distributed and scalable in-memory key-value data store is a great fit for IdentityServer4. In this article, you will learn how to use NCache as external in-memory storage for identityServer4. The main advantage of using external in-memory storage is to improve the application performance
Advantages of using Identity Server4  

    Secure your resources
    Authenticate users either using a local account store or an external provider
    Validate tokens  

What is NCache?
NCache is an Open Source in-memory distributed cache for .NET, Java, and Node.js. NCache is extremely fast and linearly scalable and caches application data to reduce expensive database trips. Use NCache to remove performance bottlenecks related to your data storage and databases and scale your .NET, Java, and Node.js applications to extreme transaction processing (XTP).
Using NCache as IdentityServer4

 NCache can be used with IdentityServer in the following ways.

     NCache as IdentityServer4 Store
     NCache as IdentityServer4 Cache

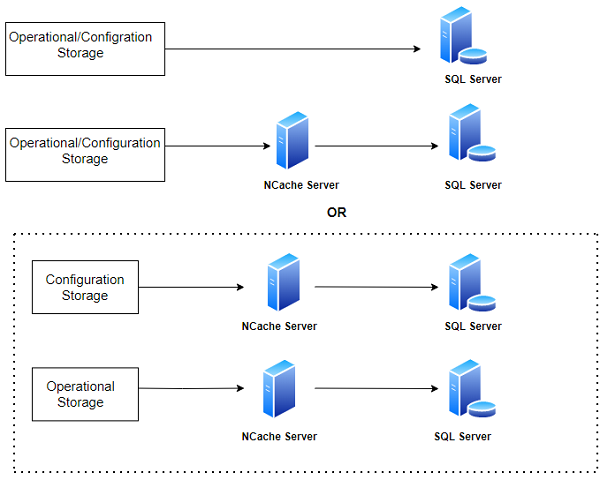
1. NCache as an In-Memory IdentityServer4 Store
NCache acts as a caching layer on top of the IdentityServer 4 persistence configuration and operational stores to speed up the operation through in-memory caching and also reduce the frequent database hits.

NCache as an IdentityServer4 Store, stores information about the clients, Identity resources and APIs etc. You have an option to choose NCache as one store or both of them.

The below figure will give you a complete understanding of NCache as an In-Memory IdentityServer4 Store.
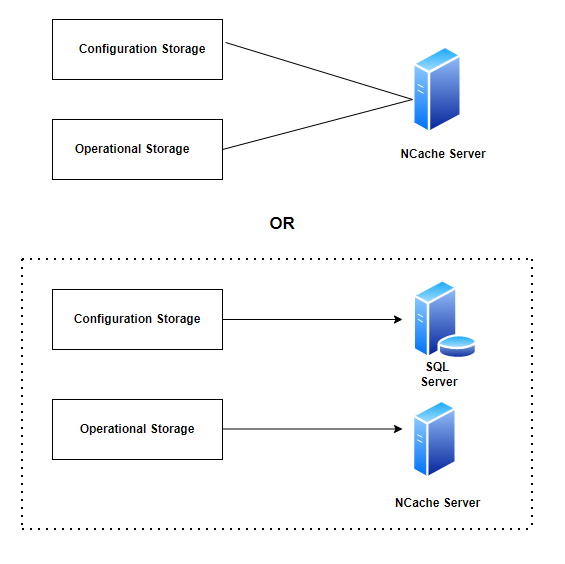
Option 1
NCache store acts as both a configuration and operational store

Option 2
Configuration Storage as a SQL Server or some other storage and the Operational storage as an NCache Server.

Note: Both cache and store roles of NCache with IdentityServer4 can also be a mix and match using the implementation from IIdentityServerBuilder NCache extension for ASP.NET Core.  

What is configuration store?

A store where the static data is stored which doesn’t change frequently.

What is an operational store?
A store where the operational data is kept on which operations are performed and the changes are applied more frequently.

Configure NCache as IdentityServer4 Store    
For a demo, I have used my existing ASP.NET Core IdentityServer4 application, you can download it from GiHub.
    Download and install “Alachisoft.NCache.IdentityServer4” package from NuGet Package Manager
    Create a new Startup file “StartupNCache.cs” and add the following code.

public void ConfigureServices(IServiceCollection services) {
    services.AddControllersWithViews();
    var builder = services.AddIdentityServer().AddTestUsers(TestUsers.Users)
        /// Add NCache as a configuration store
        .AddNCacheConfigurationStore(options => {
            options.CacheId = _configuration["NCacheConfiguration:CacheId"];
            var serverList = _configuration["Servers"].Split(',').Select(x => x.Trim()).ToList().Select(y => new NCacheServerInfo(y, 9800)).ToList();
            options.ConnectionOptions = new NCacheConnectionOptions {
                ServerList = serverList,
                    EnableClientLogs = true,
                    LogLevel = NCacheLogLevel.Debug
            };
        })
        /// Add NCache as an operational store
        .AddNCachePersistedGrantStore(options => {
            options.CacheId = _configuration["NCacheConfiguration:CacheId"];
            var serverList = _configuration["NCacheConfiguration:Servers"].Split(',').Select(x => x.Trim()).ToList().Select(y => new NCacheServerInfo(y, 9800)).ToList();
            options.ConnectionOptions = new NCacheConnectionOptions {
                ServerList = serverList,
                    EnableClientLogs = true,
                    LogLevel = NCacheLogLevel.Debug
            };
        }).AddNCacheDeviceCodeStore(options => {
            options.CacheId = _configuration["NCacheConfiguration:CacheId"];
            var serverList = _configuration["NCacheConfiguration:Servers"].Split(',').Select(x => x.Trim()).ToList().Select(y => new NCacheServerInfo(y, 9800)).ToList();
            options.ConnectionOptions = new NCacheConnectionOptions {
                ServerList = serverList,
                    EnableClientLogs = true,
                    LogLevel = NCacheLogLevel.Debug
            };
        })
}


In appsettings.json file, modify the value of the CacheId key to the name of the cluster cache you are using. For multiple Servers keys, use a comma separated list of one or more IP addresses belonging to the NCache servers.
"NCacheConfiguration": {
  "CacheId": "demoCache",
  "Servers": "[your server adddress]"
},


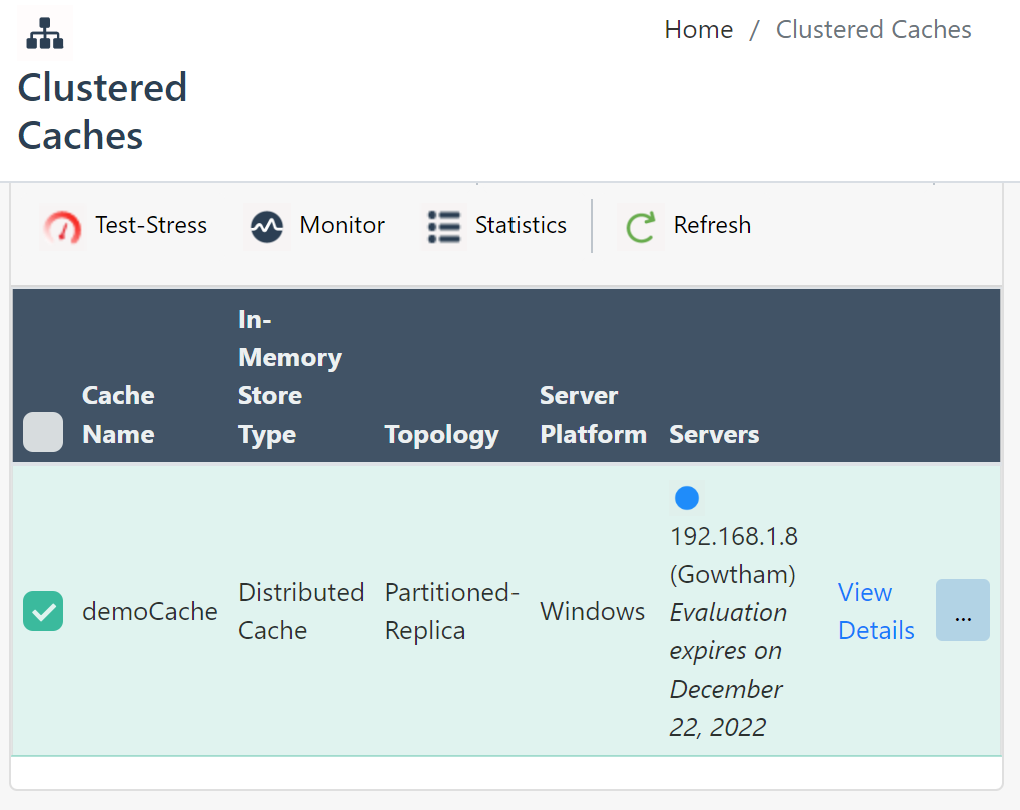
Replace [your server address] with your server address used for Clustred Caches in my case it is 192.168.1.2

Define the new startup file in program.cs file
webBuilder.UseStartup<StartupNCache>();

Run the application, let's test the token generation from postman.

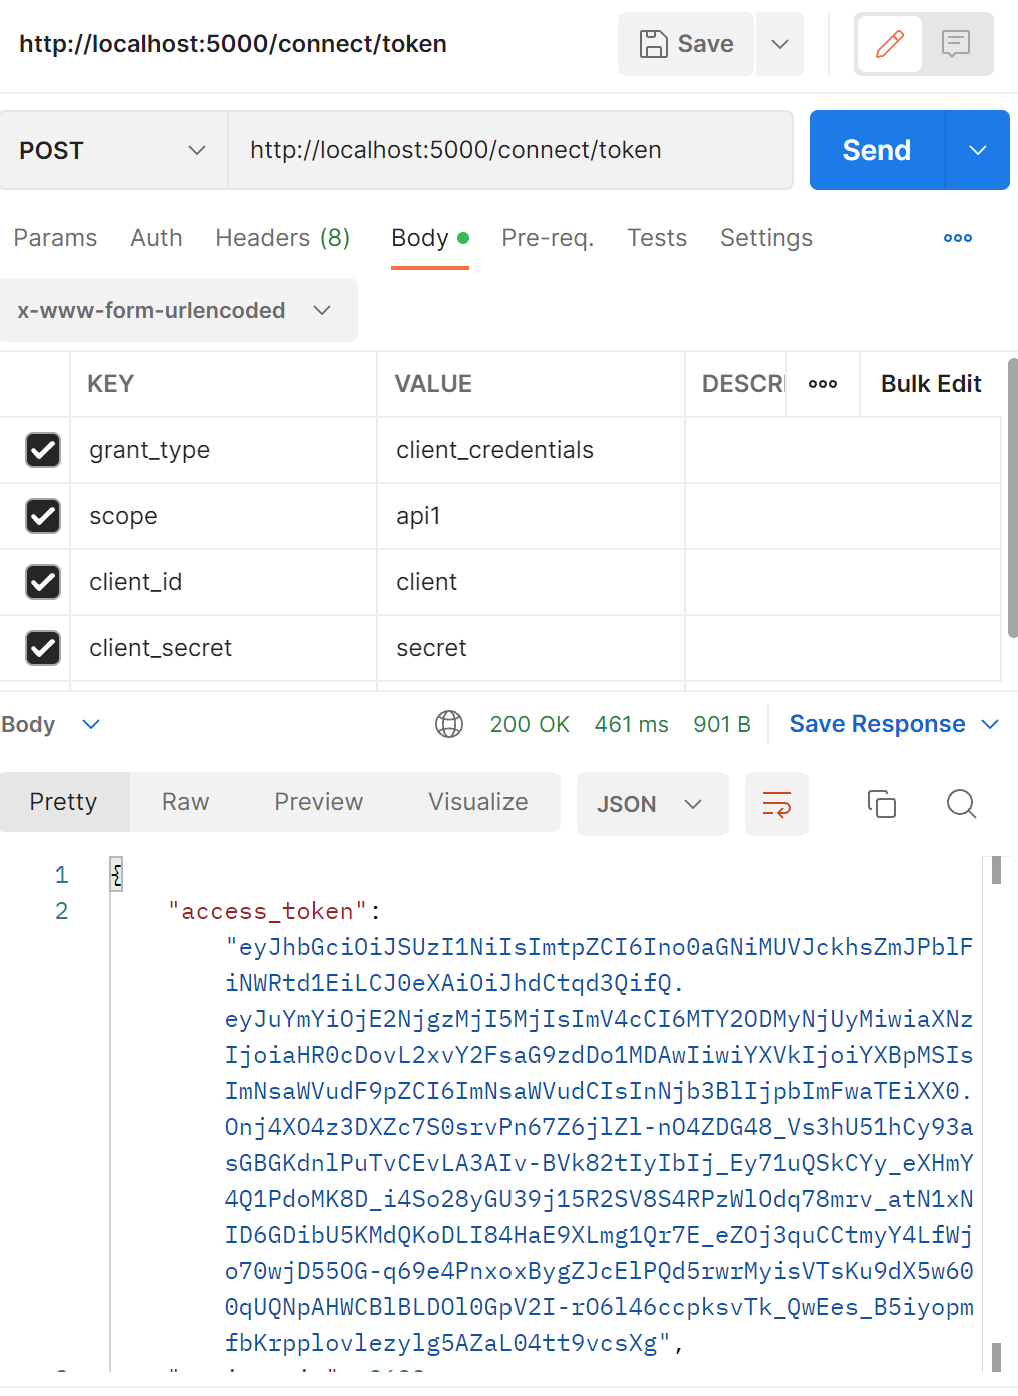
From the above figure you can observe, the ASP.NET Core application with NCache as IdentityServer4 running under port 5000 and the token has been successfully generated from Postman tool. Now open NCache web manager to check the statistics.


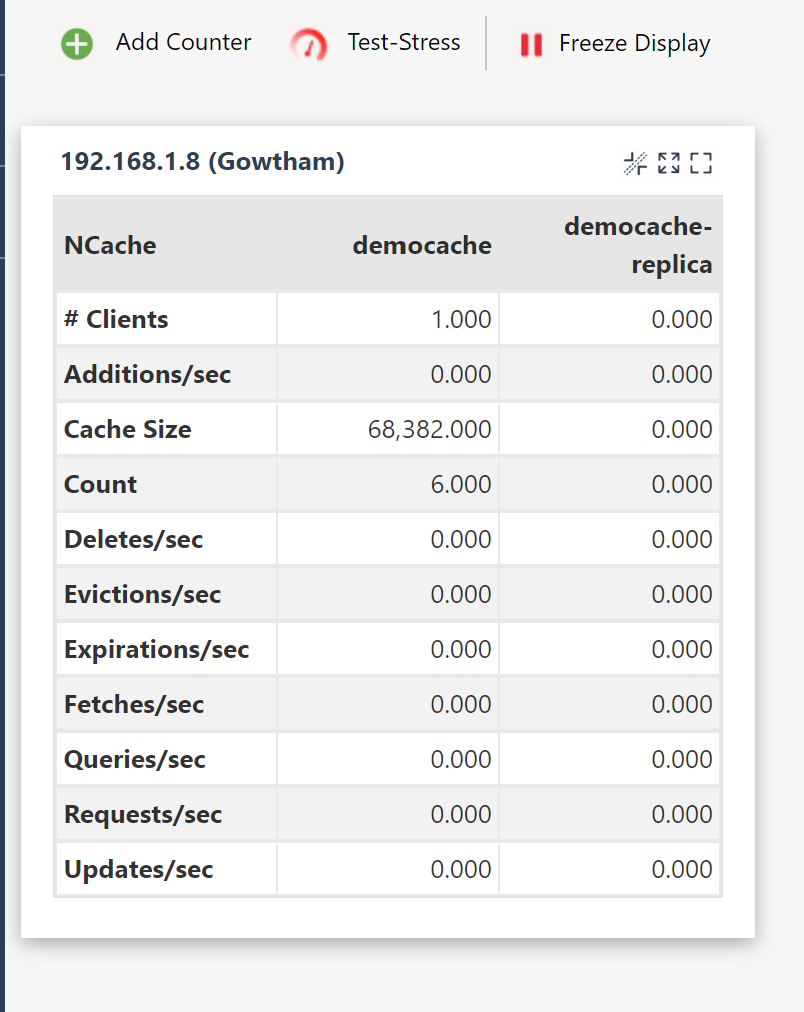
From the above statistics, the clients parameter gives you the no of connection established count, In my case, I have connected only one application to the NCache clustered cache, so the count is 1.

The count parameter gives you the number of key value pair cached.

2. NCache as an In-Memory IdentityServer4 Cache Implementation
NCache can be used as a configuration and persistent grant store, which increases performance by removing the bottleneck to get data from a disk. The in-memory content of the cache can then be periodically persisted to disk, this will reduce the average time taken to get the data.

NCache’s core functionality is to cache data persisting in your data source for faster access and better performance. While you can use NCache as your data store, you can also use it between your data store and the application by caching the configuration and/or the operational data in NCache.

The below figure will give you a complete understanding of NCache as an In-Memory IdentityServer4 Cache.


Install the following NuGet package to your application:
"Alachisoft.NCache.IdentityServer4""

Create a new file StartupEFCore and add the following code,

Download and install “IdentityServer4.NCache.Options” package from NuGet package manager.
public void ConfigureServices(IServiceCollection services) {
    ...
    var builder = services.AddIdentityServer().AddTestUsers(TestUsers.Users)
        /// Add NCache as a configuration store
        .AddNCacheCaching(options => {
            options.CacheId = _configuration["NCacheConfiguration:CacheId"];
            var serverList = _configuration["Servers"].Split(',').Select(x => x.Trim()).ToList().Select(y => new NCacheServerInfo(y, 9800)).ToList();
            options.ConnectionOptions = new NCacheConnectionOptions {
                ServerList = serverList
            };
            options.DurationOfBreakInSeconds = 120;
        })
        /// Add NCache as a persisted operational grant store
        .AddClientStoreCache < ClientStore > ().AddResourceStoreCache < ResourceStore > ().AddNCacheCorsPolicyCache < CorsPolicyService > ().AddNCachePersistedGrantStoreCache < PersistedGrantStore > (options => {
            options.CacheId = _configuration["NCacheConfiguration:CacheId"];
            var serverList = _configuration["Servers"].Split(',').Select(x => x.Trim()).ToList().Select(y => new NCacheServerInfo(y, 9800)).ToList();
            options.ConnectionOptions = new NCacheConnectionOptions {
                ServerList = serverList
            };
            options.DurationOfBreakInSeconds = 120;
        })
        /// NCache as an IProfileService default implementation
        .AddNCacheProfileServiceCache < TestUserProfileService > (options => {
            options.Expiration = TimeSpan.FromMinutes(10);
            options.KeyPrefix = "NCache-";
            options.KeySelector = (context) => context.Subject.Claims.First(_ => _.Type == "sub").Value;
            options.ShouldCache = (context) => true;
        });
}


In appsettings.json file, modify the value of the CacheId key to the name of the cluster cache you are using. For multiple Servers keys, use a comma separated list of one or more IP addresses belonging to the NCache servers.
{
    "NCacheConfiguration": {
        "CacheId": "demoCache",
        "Servers": "192.168.1.8"
    },
    "ConnectionStrings": {
        "db": "server=;database=IdentityServerNCacheLocal;UserId=userid;Password=password;"
    }
}


Run the application, the client information are stored in the database. Since we have NCahce with configurational and operational storage the data will be cached by NCache Clustered cache, so that we can skip the database transaction to improve our application performance.
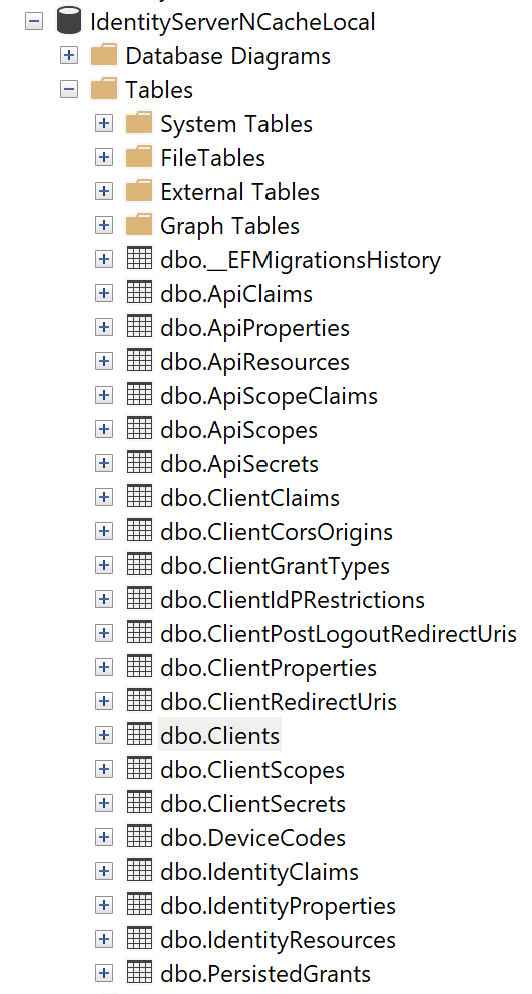
Database tables


Get the token using Postman


Trace of the database transaction given below, while getting a token using Postman.


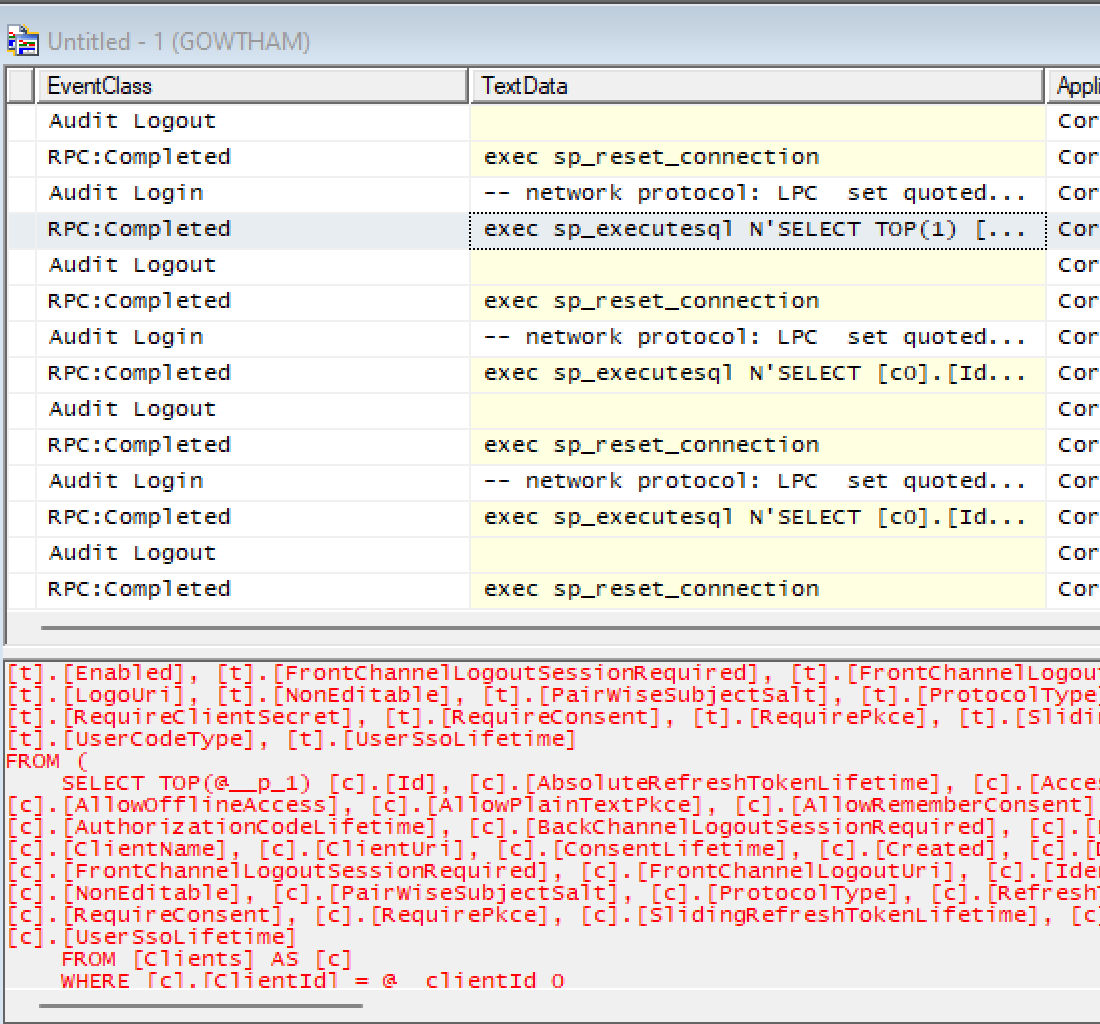
First time it will hit a database to generate a new token.
Check the Cache count in NCache web Manager

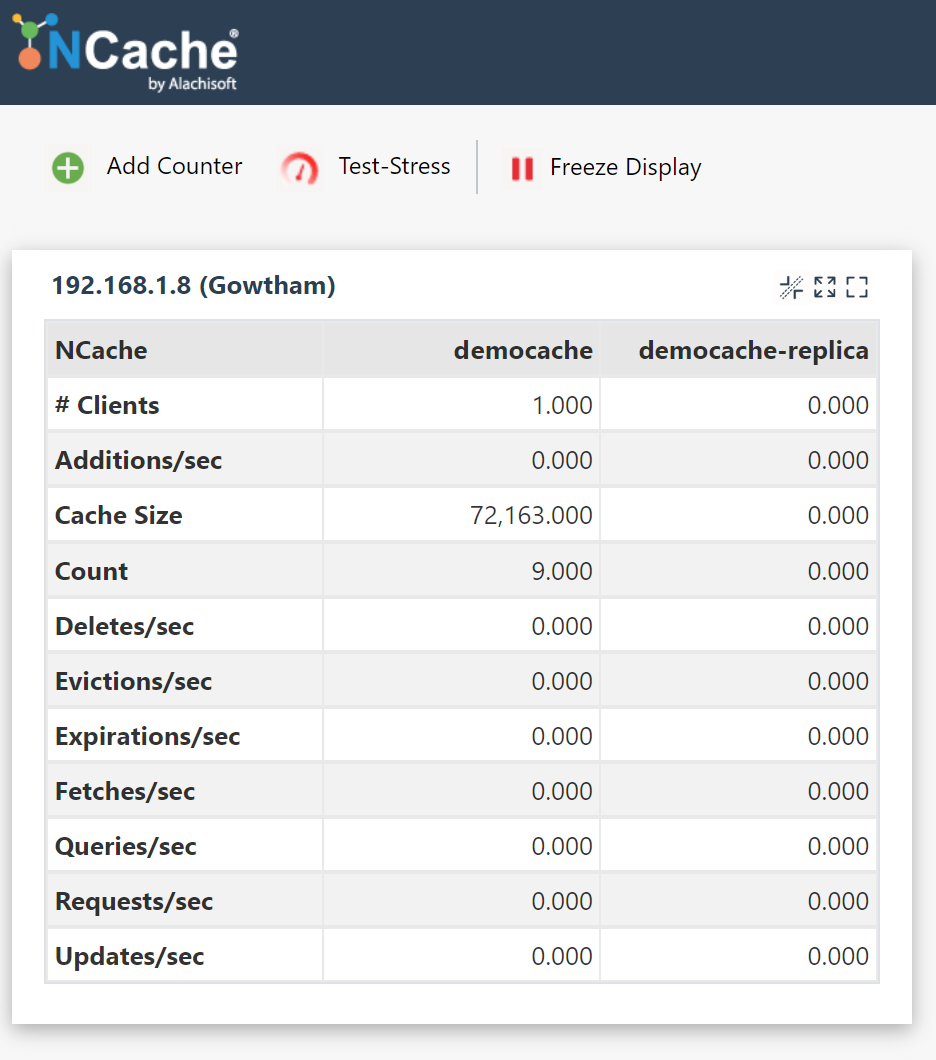
Previously the count is 6, and now the count is 9 and the cache size also increased, which means the token has been cached to NCache Clustered cache. Next time when you try to get a token, there won't be any database transaction

Once again get the token from Postman, now the token and other details are from NCacher server. 


In the profiler no transaction has been recorded, which means no database transaction had happened when you try to get the token for second time. This approach will help us to improve the application performance by reducing the database trips.

Implementing the OpenId Connect using IdentitServer4 will secure our application by authenticating the user, on top of it by integrating the NCache as an external storage will improve your application performance and also, it’s provided you a lot of features by acting as IdentityServer Cache and store.

HostForLIFE.eu ASP.NET Core Hosting

European best, cheap and reliable ASP.NET hosting with instant activation. HostForLIFE.eu is #1 Recommended Windows and ASP.NET hosting in European Continent. With 99.99% Uptime Guaranteed of Relibility, Stability and Performace. HostForLIFE.eu security team is constantly monitoring the entire network for unusual behaviour. We deliver hosting solution including Shared hosting, Cloud hosting, Reseller hosting, Dedicated Servers, and IT as Service for companies of all size.


About HostForLIFE

HostForLIFE is European Windows Hosting Provider which focuses on Windows Platform only. We deliver on-demand hosting solutions including Shared hosting, Reseller Hosting, Cloud Hosting, Dedicated Servers, and IT as a Service for companies of all sizes.

We have offered the latest Windows 2019 Hosting, ASP.NET 5 Hosting, ASP.NET MVC 6 Hosting and SQL 2019 Hosting.


Month List

Tag cloud

Sign in