European ASP.NET 4.5 Hosting BLOG

BLOG about ASP.NET 4, ASP.NET 4.5 Hosting and Its Technology - Dedicated to European Windows Hosting Customer

European ASP.NET Core Hosting :: Getting Started With .NET 6.0 Console Application

clock February 23, 2022 08:02 by author Peter

As we know .NET 6 is the latest version of .NET and is generally available with lots of improvement in performance, security, code quality, developer experience and provides long-term support. It is recommended for beginners or newbies who want to start their .NET learning journey using the latest framework and latest Visual Studio IDE. Additionally, sooner or later we need to upgrade our existing solutions to the latest framework.

This article describes how to get started with .NET 6 and what is new in .NET 6 with comparison to .NET5. We will create a console application in .NET6 and .NET 5 and compare the differences between them. Additionally, the article will show how to add more classes in .NET 6 console application and call it from the Program.cs.

Let’s move on.
Create Console App in .NET 6

Step 1
Open Visual Studio 2022 and click Create a new project.

Step 2
Select Console App and click Next.

Step 3
Give the project name and location of the project.

Step 4
Select framework: .NET 6.0 (Long-term support).

This creates the console app which looks like below.

Default Program.cs file is listed below.

// See https://aka.ms/new-console-template for more information
Console.WriteLine("Hello, World!");

The project.csproj file is given below.

Now, let’s compile and run the program. Click on Strat without debugging option or press Ctrl+F5 as illustrated below.

You can see the FirstConsoleApp.exe is created in the folder location of the project under the directory: “E:\SampleProject\FirstConsoleApp\bin\Debug\net6.0” as shown below.

We can run this .exe file which displays the “Hello, World!” message.
Create Project in .NET 5

Let’s create a console application in Visual Studio using .NET 5. Follow all steps as per previous, only choose framework .NET 5 in Step 4.

Below is Program.cs of console app using .NET 5

Comparing .NET6 and .NET 5

We can see here, Program.cs of .NET 5 contains:

    Using system
    Namespace
    class keyword
    Main method

If we compare both the Program.cs file from the above two console apps, these are not available in .NET 6. so, this is the difference between .NET5 and .NET6.
Extending .NET 6 Console Application

Add New Class
Right-click on the project—Go to Add-->Class and click add.

We have added a class with the name: Class1.

Now, will create a public void method named Sum: in this Class1.

public void Sum() {
    int a = 5;
    int b = 6;
    int Sum = a + b;
    Console.WriteLine("Sum : {0}", Sum);
}

Complete code of Class1.cs

namespace FirstConsoleApp {

    internal class Class1 {
        public void Sum() {
            int a = 5;
            int b = 6;
            int Sum = a + b;
            Console.WriteLine("Sum : {0}", Sum);
        }
    }
}

You might have noticed that this class contains:

  • the namespace
  • internal Class
  • using statements (by default)

Whereas Program.cs doesn’t contain those and you can write logic directly.

Call Sum() Method

In Program.cs class we will call the sum method of the Class1.cs. Furthermore, to call a method from class, here we need to add namespace: using FirstConsoleApp;

using FirstConsoleApp; //need to call method from Class1
Class1 class1 = new Class1();
class1.Sum();

Now, if we run the app then we will get Sum:11 in the console.

Complete code of Program.cs

// See https://aka.ms/new-console-template for more information
using FirstConsoleApp;
Console.WriteLine("Hello, World!");
Class1 class1 = new Class1();
class1.Sum();

When we run the console application, the output looks like below.

Hence, in this article, we created our first Console application in .NET 6 and also created a console app in .NET 5 and compared the differences between them. Additionally, we added the new class in .NET 6 console application and learned to call the method from class in Program.cs file. I hope it helps you to understand the differences between .NET 5 and .NET 6 and get start your journey in the latest .NET framework.

HostForLIFE.eu ASP.NET Core Hosting

European best, cheap and reliable ASP.NET hosting with instant activation. HostForLIFE.eu is #1 Recommended Windows and ASP.NET hosting in European Continent. With 99.99% Uptime Guaranteed of Relibility, Stability and Performace. HostForLIFE.eu security team is constantly monitoring the entire network for unusual behaviour. We deliver hosting solution including Shared hosting, Cloud hosting, Reseller hosting, Dedicated Servers, and IT as Service for companies of all size.


European ASP.NET Core Hosting :: Easily Do Web Scraping In .NET Core 6.0

clock February 21, 2022 07:49 by author Peter

Web scraping is a programmed strategy to get enormous amounts of information from websites. Most of this information is unstructured information in an HTML format which is at that point changed over into organized information in a spreadsheet or a database so that it can be used in different applications. There are many distinctive ways to perform web scraping to get information from websites. These incorporate using online administrations, specific API’s or indeed making your code for web scraping from scratch. Many websites allow you to get to their information in an organized format. This is often the most excellent choice, but there are other sites that do not allow users to get massive amounts of information in an organized format or they are not that innovatively progressed. In that circumstance, it is best to use web scraping to scrape the site for information.

Python is the most popular language in the current days used for web scraping. Python has various libraries available for web scraping. At the same time, we can use .NET also for web scraping. Some third-party libraries allow us to scrape data from various sites.  

HtmlAgilityPack is a common library used in .NET for web scraping. They have recently added the .NET Core version also for web scraping. 

We will use our C# Corner site itself for web scraping. C# Corner gives RSS feeds for each author. We can get information like articles / blogs link, published date, title, feed type, author name from these RSS feeds. We will use HtmlAgilityPack library to crawl the data for each article / blog post and get required information. We will add this information to an SQL database. So that we can use this data for future usage like article statistics. We will use Entity Framework and code first approach to connect SQL server database. 

Create ASP.NET Core Web API using Visual Studio 2022
We can use Visual Studio 2022 to create an ASP.NET Core Web API with .NET 6.0.


We have chosen the ASP.NET Core Web API template from Visual Studio and given a valid name to the project.


We can choose the .NET 6.0 framework. We have also chosen the default Open API support. This will create a swagger documentation for our project.  

We must install the libraries below using NuGet package manger.
HtmlAgilityPack
Microsoft.EntityFrameworkCore.SqlServer
Microsoft.EntityFrameworkCore.Tools


We can add database connection string and parallel task counts inside the appsettings.  

appsettings.json
{
"Logging": {
"LogLevel": {
  "Default": "Information",
  "Microsoft.AspNetCore": "Warning"
}
},
"AllowedHosts": "*",
"ConnectionStrings": {
"ConnStr": "Data Source=(localdb)\\MSSQLLocalDB;Initial Catalog=AnalyticsDB;Integrated Security=True;ApplicationIntent=ReadWrite;MultiSubnetFailover=False"
},
"ParallelTasksCount": 20
}


Database connection string will be used by entity framework to connect SQL database and parallel task counts will be used by web scraping parallel foreach code.  

We can create a Feed class inside a Models folder. This class will be used to get required information from C# Corner RSS feeds.

Feed.cs
namespace Analyitcs.NET6._0.Models
{
public class Feed
{
    public string Link { get; set; }
    public string Title { get; set; }
    public string FeedType { get; set; }
    public string Author { get; set; }
    public string Content { get; set; }
    public DateTime PubDate { get; set; }

    public Feed()
    {
        Link = "";
        Title = "";
        FeedType = "";
        Author = "";
        Content = "";
        PubDate = DateTime.Today;
    }
}
}


We can create an ArticleMatrix class inside the Models folder. This class will be used to get information for each article / blog once we get after web scraping.  

ArticleMatrix.cs
using System.ComponentModel.DataAnnotations.Schema;

namespace Analyitcs.NET6._0.Models
{
public class ArticleMatrix
{
    public int Id { get; set; }
    public string? AuthorId { get; set; }
    public string? Author { get; set; }
    public string? Link { get; set; }
    public string? Title { get; set; }
    public string? Type { get; set; }
    public string? Category { get; set; }
    public string? Views { get; set; }
    [Column(TypeName = "decimal(18,4)")]
    public decimal ViewsCount { get; set; }
    public int Likes { get; set; }
    public DateTime PubDate { get; set; }
}
}


We can create our DB context class for Entity framework.  

MyDbContext.cs
using Microsoft.EntityFrameworkCore;

namespace Analyitcs.NET6._0.Models
{
public class MyDbContext : DbContext
{
    public MyDbContext(DbContextOptions<MyDbContext> options)
        : base(options)
    {
    }
    public DbSet<ArticleMatrix>? ArticleMatrices { get; set; }

    protected override void OnModelCreating(ModelBuilder builder)
    {
        base.OnModelCreating(builder);
    }
}
}


We will use this MyDbContext class later for saving data to the database.  

We can create our API controller AnalyticsController and add web scraping code inside it.

AnalyticsController.cs
using Analyitcs.NET6._0.Models;
using HtmlAgilityPack;
using Microsoft.AspNetCore.Http;
using Microsoft.AspNetCore.Mvc;
using System.Globalization;
using System.Net;
using System.Xml.Linq;

namespace Analyitcs.NET6._0.Controllers
{
[Route("api/[controller]")]
[ApiController]
public class AnalyticsController : ControllerBase
{
    readonly CultureInfo culture = new("en-US");
    private readonly MyDbContext _dbContext;
    private readonly IConfiguration _configuration;
    public AnalyticsController(MyDbContext context, IConfiguration configuration)
    {
        _dbContext = context;
        _configuration = configuration;
    }

    [HttpPost]
    [Route("CreatePosts/{authorId}")]
    public async Task<ActionResult> CreatePosts(string authorId)
    {
        try
        {
            XDocument doc = XDocument.Load("https://www.c-sharpcorner.com/members/" + authorId + "/rss");
            if (doc == null)
            {
                return BadRequest("Invalid Author Id");
            }
            var entries = from item in doc.Root.Descendants().First(i => i.Name.LocalName == "channel").Elements().Where(i => i.Name.LocalName == "item")
                          select new Feed
                          {
                              Content = item.Elements().First(i => i.Name.LocalName == "description").Value,
                              Link = (item.Elements().First(i => i.Name.LocalName == "link").Value).StartsWith("/") ? "https://www.c-sharpcorner.com" + item.Elements().First(i => i.Name.LocalName == "link").Value : item.Elements().First(i => i.Name.LocalName == "link").Value,
                              PubDate = Convert.ToDateTime(item.Elements().First(i => i.Name.LocalName == "pubDate").Value, culture),
                              Title = item.Elements().First(i => i.Name.LocalName == "title").Value,
                              FeedType = (item.Elements().First(i => i.Name.LocalName == "link").Value).ToLowerInvariant().Contains("blog") ? "Blog" : (item.Elements().First(i => i.Name.LocalName == "link").Value).ToLowerInvariant().Contains("news") ? "News" : "Article",
                              Author = item.Elements().First(i => i.Name.LocalName == "author").Value
                          };

            List<Feed> feeds = entries.OrderByDescending(o => o.PubDate).ToList();
            string urlAddress = string.Empty;
            List<ArticleMatrix> articleMatrices = new();
            _ = int.TryParse(_configuration["ParallelTasksCount"], out int parallelTasksCount);

            Parallel.ForEach(feeds, new ParallelOptions { MaxDegreeOfParallelism = parallelTasksCount }, feed =>
            {
                urlAddress = feed.Link;

                var httpClient = new HttpClient
                {
                    BaseAddress = new Uri(urlAddress)
                };
                var result = httpClient.GetAsync("").Result;

                string strData = "";

                if (result.StatusCode == HttpStatusCode.OK)
                {
                    strData = result.Content.ReadAsStringAsync().Result;

                    HtmlDocument htmlDocument = new();
                    htmlDocument.LoadHtml(strData);

                    ArticleMatrix articleMatrix = new()
                    {
                        AuthorId = authorId,
                        Author = feed.Author,
                        Type = feed.FeedType,
                        Link = feed.Link,
                        Title = feed.Title,
                        PubDate = feed.PubDate
                    };

                    string category = "Uncategorized";
                    if (htmlDocument.GetElementbyId("ImgCategory") != null)
                    {
                        category = htmlDocument.GetElementbyId("ImgCategory").GetAttributeValue("title", "");
                    }

                    articleMatrix.Category = category;

                    var view = htmlDocument.DocumentNode.SelectSingleNode("//span[@id='ViewCounts']");
                    if (view != null)
                    {
                        articleMatrix.Views = view.InnerText;

                        if (articleMatrix.Views.Contains('m'))
                        {
                            articleMatrix.ViewsCount = decimal.Parse(articleMatrix.Views[0..^1]) * 1000000;
                        }
                        else if (articleMatrix.Views.Contains('k'))
                        {
                            articleMatrix.ViewsCount = decimal.Parse(articleMatrix.Views[0..^1]) * 1000;
                        }
                        else
                        {
                            _ = decimal.TryParse(articleMatrix.Views, out decimal viewCount);
                            articleMatrix.ViewsCount = viewCount;
                        }
                    }
                    else
                    {
                        articleMatrix.ViewsCount = 0;
                    }
                    var like = htmlDocument.DocumentNode.SelectSingleNode("//span[@id='LabelLikeCount']");
                    if (like != null)
                    {
                        _ = int.TryParse(like.InnerText, out int likes);
                        articleMatrix.Likes = likes;
                    }

                    articleMatrices.Add(articleMatrix);
                }

            });

            _dbContext.ArticleMatrices.RemoveRange(_dbContext.ArticleMatrices.Where(x => x.AuthorId == authorId));

            foreach (ArticleMatrix articleMatrix in articleMatrices)
            {
                await _dbContext.ArticleMatrices.AddAsync(articleMatrix);
            }

            await _dbContext.SaveChangesAsync();
            return Ok(articleMatrices);
        }
        catch
        {
            return BadRequest("Invalid Author Id / Unhandled error. Please try again.");
        }
    }

}
}


We have created a “CreatePosts” method inside the API controller. We are passing C# Corner author id to this method and get all the author post details from RSS feeds.
XDocument doc = XDocument.Load("https://www.c-sharpcorner.com/members/" + authorId + "/rss");
            if (doc == null)
            {
                return BadRequest("Invalid Author Id");
            }
            var entries = from item in doc.Root.Descendants().First(i => i.Name.LocalName == "channel").Elements().Where(i => i.Name.LocalName == "item")
                          select new Feed
                          {
                              Content = item.Elements().First(i => i.Name.LocalName == "description").Value,
                              Link = (item.Elements().First(i => i.Name.LocalName == "link").Value).StartsWith("/") ? "https://www.c-sharpcorner.com" + item.Elements().First(i => i.Name.LocalName == "link").Value : item.Elements().First(i => i.Name.LocalName == "link").Value,
                              PubDate = Convert.ToDateTime(item.Elements().First(i => i.Name.LocalName == "pubDate").Value, culture),
                              Title = item.Elements().First(i => i.Name.LocalName == "title").Value,
                              FeedType = (item.Elements().First(i => i.Name.LocalName == "link").Value).ToLowerInvariant().Contains("blog") ? "Blog" : (item.Elements().First(i => i.Name.LocalName == "link").Value).ToLowerInvariant().Contains("news") ? "News" : "Article",
                              Author = item.Elements().First(i => i.Name.LocalName == "author").Value
                          };

            List<Feed> feeds = entries.OrderByDescending(o => o.PubDate).ToList();


After that we use a parallel foreach statement to loop entire article / blog detail and scrape the data from each post.  

We will get article / blog category from below code.
string category = "Uncategorized";
                    if (htmlDocument.GetElementbyId("ImgCategory") != null)
                    {
                        category = htmlDocument.GetElementbyId("ImgCategory").GetAttributeValue("title", "");
                    }

                    articleMatrix.Category = category;

We will get article / blog views from the code below.
var view = htmlDocument.DocumentNode.SelectSingleNode("//span[@id='ViewCounts']");
                    if (view != null)
                    {
                        articleMatrix.Views = view.InnerText;

                        if (articleMatrix.Views.Contains('m'))
                        {
                            articleMatrix.ViewsCount = decimal.Parse(articleMatrix.Views[0..^1]) * 1000000;
                        }
                        else if (articleMatrix.Views.Contains('k'))
                        {
                            articleMatrix.ViewsCount = decimal.Parse(articleMatrix.Views[0..^1]) * 1000;
                        }
                        else
                        {
                            _ = decimal.TryParse(articleMatrix.Views, out decimal viewCount);
                            articleMatrix.ViewsCount = viewCount;
                        }
                    }
                    else
                    {
                        articleMatrix.ViewsCount = 0;
                    }


We will get article / blog user likes from below code.
var like = htmlDocument.DocumentNode.SelectSingleNode("//span[@id='LabelLikeCount']");
                    if (like != null)
                    {
                        _ = int.TryParse(like.InnerText, out int likes);
                        articleMatrix.Likes = likes;
                    }


After getting all this information from each article / blog using parallel foreach statement, we have saved entire information to database using below code.
_dbContext.ArticleMatrices.RemoveRange(_dbContext.ArticleMatrices.Where(x => x.AuthorId == authorId));

           foreach (ArticleMatrix articleMatrix in articleMatrices)
           {
               await _dbContext.ArticleMatrices.AddAsync(articleMatrix);
           }

           await _dbContext.SaveChangesAsync();


We must change the Program.cs class with the code change below. So that, the Entity framework connection must be established.

We can create the SQL database and table using migration commands.

We can use the command below to create migration scripts in Package Manager Console.  
PM > add-migration InititalScript


Above command will create a new migration script. We can use this script to create our database and table.

We can use the command below to update the database.
PM> update-database

If you look at the SQL server explorer, and you can see that our new database and table is created now.


We can run our application and use swagger to execute the CreatePosts method.


We must use our correct C# corner author id. You can easily get your author id from the profile link
Above is my profile link. sarath-lal7 is my author id.  

We can use the above user id in the swagger and get all the article / blog details.

You can see that authors’ post details received in the swagger. Please note that, currently C# Corner returns maximum 100 posts details only. 

If you look at the database, you can see that 100 records are available in the database as well.

If you enter the same author id again, the earlier data in the database will be removed and new data will be inserted. Hence, for a particular author a maximum of 100 records will be available on the database at any time. We can use this data to analyze the post details using any of the client-side applications like Angular or React.  

I have already created a client application using Angular 8 and hosted it on Azure. You may try this Live App. I will create an Angular 13 version of this application soon.  

In this post, we have seen how to scrape data from websites in .NET 6.0 application using HtmlAgilityPack library. We have used C# Corner site to scrape data from and we have scraped all the post information for a particular author using his author id. C# Corner allows us RSS feeds for each author, and we will get maximum of 100 posts for a user.

HostForLIFE.eu ASP.NET Core Hosting

European best, cheap and reliable ASP.NET hosting with instant activation. HostForLIFE.eu is #1 Recommended Windows and ASP.NET hosting in European Continent. With 99.99% Uptime Guaranteed of Relibility, Stability and Performace. HostForLIFE.eu security team is constantly monitoring the entire network for unusual behaviour. We deliver hosting solution including Shared hosting, Cloud hosting, Reseller hosting, Dedicated Servers, and IT as Service for companies of all size.


European ASP.NET Core Hosting :: How To Send One Time Password On Registered Mobile Number Using C#?

clock February 17, 2022 07:32 by author Peter

In this article, you will learn how to send a One Time Password[OTP] on registered mobile number using C# and asp.net.

Step 1
First create one web page in your Visual Studio and design it. Design is given below,
<asp:Panel ID="pnl1" runat="server">
  <table>
    <tr>
      <td>Enter Your Mobile Number:</td>
      <td>
        <asp:TextBox ID="txtmobileNo" runat="server"></asp:TextBox>
      </td>
    </tr>
    <tr>
      <td></td>
      <td>
        <asp:Button ID="btnsendOtp" runat="server" Text="Send OTP" OnClick="btnsendOtp_Click" />
      </td>
    </tr>
  </table>
</asp:Panel>
<asp:Panel ID="pnl2" runat="server" Visible="false">
  <table>
    <tr>
      <td>Enter Your OTP:</td>
      <td>
        <asp:TextBox ID="txtverifyMobileNO" runat="server"></asp:TextBox>
      </td>
    </tr>
    <tr>
      <td></td>
      <td>
        <asp:Button ID="btnverify" runat="server" Text="Verify" OnClick="btnverify_Click" />
      </td>
    </tr>
  </table>
</asp:Panel>


Step 2
Add below namespace in .cs page,
using System.Data.SqlClient;
using System.Data;
using System.Net;
using System.Web.ClientServices;
using System.Collections.Specialized;
using System.Configuration;


Step 3
For sending OTP you need API Key. Register your details for API KEY and get 10 SMS.

Step 4
After registering successfully go to setting option and click on API Key for API key generatiton

Step 5
Click on create API Key and no need to enter IP address and notes just save it.

Step 6
Write the below code on btnOtp_click
protected void btnsendOtp_Click(object sender, EventArgs e) {
    pnl1.Visible = false;
    pnl2.Visible = true;
    Random random = new Random();
    int value = random.Next(1001, 9999);
    string destinationaddress = "+91" + txtmobileNo.Text;
    string message = "Your OTP is " + value + "(Send by R.R.Research and development founder is Ramesh Chandra)";
    string message1 = HttpUtility.UrlEncode(message);
    using(var wb = new WebClient()) {
        byte[] response = wb.UploadValues("https://api.textlocal.in/send/", new NameValueCollection() {
            {
                "apikey",
                "here is enter your API Key"
            }, {
                "numbers",
                destinationaddress
            }, {
                "message",
                message1
            }, {
                "sender",
                "TXTLCL"
            }
        });
        string result = System.Text.Encoding.UTF8.GetString(response);
        Session["OTP"] = value;
    }
}


Step 6
Verify your OTP. Write the below code on verify button.

protected void btnverify_Click(object sender, EventArgs e) {
    if (txtverifyMobileNO.Text == Session["OTP"].ToString()) {
        pnl2.Visible = false;
        ScriptManager.RegisterStartupScript(this, typeof(string), "Message", "confirm('Your Mobilenumber has been verify sccessfully.');", true);
    } else {
        ScriptManager.RegisterStartupScript(this, typeof(string), "Message", "confirm('Your OTP is not correct please enter correct OTP');", true);
        pnl2.Visible = true;
    }
}


Step 7
Now run the project.

Step 8
After entering the mobile number and click on send OTP first panel will be false and the second panel will be true.

Step 9
Enter OTP and click on verify button, you will get the below message.
"Your Mobile number has been verified sccessfully."

HostForLIFE.eu ASP.NET Core Hosting

European best, cheap and reliable ASP.NET hosting with instant activation. HostForLIFE.eu is #1 Recommended Windows and ASP.NET hosting in European Continent. With 99.99% Uptime Guaranteed of Relibility, Stability and Performace. HostForLIFE.eu security team is constantly monitoring the entire network for unusual behaviour. We deliver hosting solution including Shared hosting, Cloud hosting, Reseller hosting, Dedicated Servers, and IT as Service for companies of all size.


European ASP.NET Core Hosting :: How To Get Weather Information And Seasonal Images Using Plugin?

clock February 15, 2022 08:24 by author Peter

Have you ever wanted the weather info for your app without all of the HttpClient stuff?

You are in the right place.

I've got an amazing yet beautiful plugin for you!

Let's get started!

Open up a new project or use the project which you are currently working on.

Today I am going to use a console project.

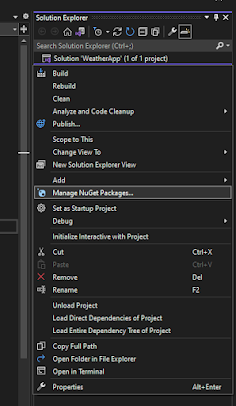
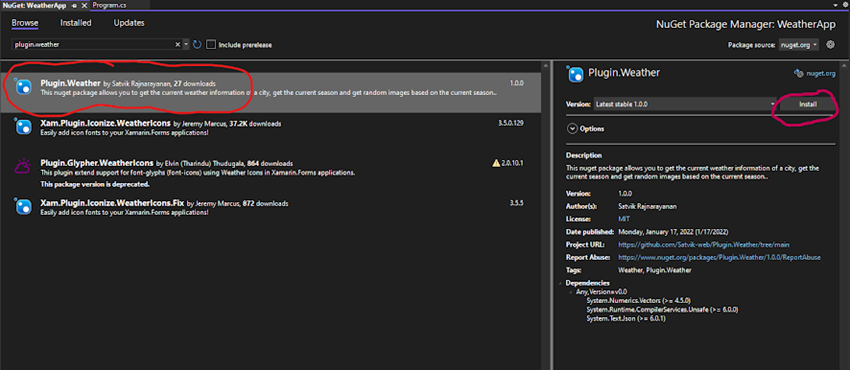
As always right click on the solution and click on manage nuget packages.

Search for plugin.weather and install the first package.

Add the following namespaces to your file.
using Plugin.Weather;

Let's first get the weather of current time using the city.

For that use the following code.
Weather weather = Api.GetWeatherByCity("City Name");

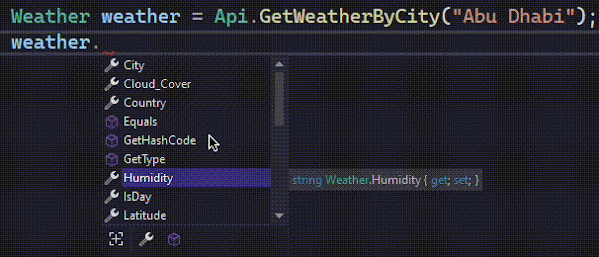
Now we can access all the weather information using the "weather" object.

The below image shows the information which we can access using the weather object.

Now I am going to write all the information to the console. You can also get the weather image URL and save the image as Png/Jpg/Gif Format.

Code

Weather weather = Api.GetWeatherByCity("City Name");
Console.WriteLine($"Temperature: {weather.Temperature}, " +
$"Humidity: {weather.Humidity}, Looks like Day? {weather.IsDay}," +
$" Latitude: {weather.Latitude}, Longitude: {weather.Longitude}, " +
$"State: {weather.State}, Country: {weather.Country}," +
$" Weather: {weather.Weather_Current}, Cloud Cover {weather.Cloud_Cover}," +
$" Time Zone: {weather.TimeZone}, Wind Speed {weather.Wind_Speed}," +
$" Wind Degree {weather.Wind_Degree}, Wind Direction: {weather.Wind_Direction}, " +
$"Pressure: {weather.Pressure}, Icon Url: {weather.Weather_Icon_url}");
weather.Save_Weather_Icon_As_Jpg("C:\\weather");
Console.WriteLine("Press Enter to continue...");
Console.Read();

Let's take a city. Example: Wellington.

Output

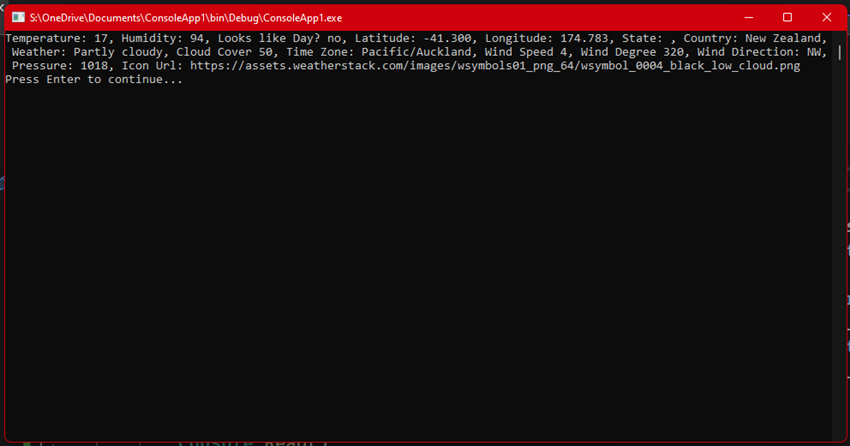
We have got the following information for Wellington, New Zealand.
    Temperature: 17,
    Humidity: 94,
    Looks like Day? no,
    Latitude: -41.300,
    Longitude: 174.783, State: ,
    Country: New Zealand,
    Weather: Partly cloudy,
    Cloud Cover 50,
    Time Zone: Pacific/Auckland,
    Wind Speed 4,
    Wind Degree 320,
    Wind Direction: NW, Pressure: 1018,
    Icon Url: https://assets.weatherstack.com/images/wsymbols01_png_64/wsymbol_0004_black_low_cloud.png

Let's take a look at a city in the northern hemisphere. Example: Seoul

Output

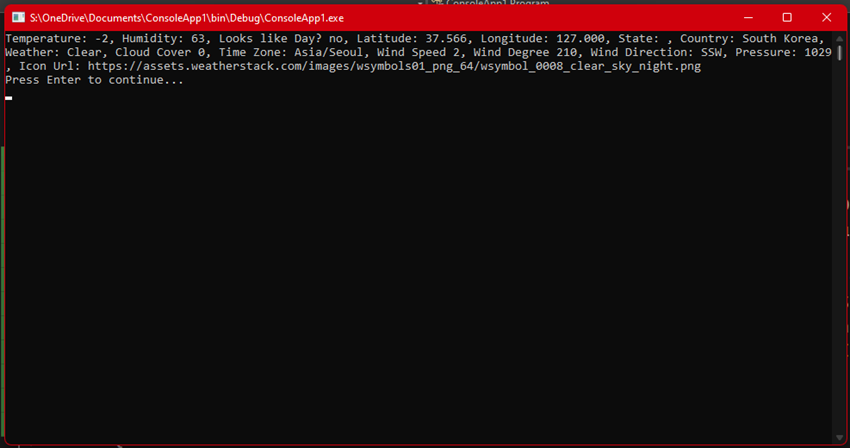
We have got the following information for Seoul, South Korea.
    Temperature: -2,
    Humidity: 63,
    Looks like Day? no,
    Latitude: 37.566,
    Longitude: 127.000,
    State: null,
    Country: South Korea,
    Weather: Clear,
    Cloud Cover 0,
    Time Zone: Asia/Seoul,
    Wind Speed 2,
    Wind Degree 210,
    Wind Direction: SSW,
    Pressure: 1029,
    Icon Url: https://assets.weatherstack.com/images/wsymbols01_png_64/wsymbol_0008_clear_sky_night.png

Now let's take a look at the other functions of this package.

We can get the current season in the north/south hemisphere.

Code
Console.WriteLine(Api.Get_Curent_Season_Northern_Hemisphere_As_String());
Console.WriteLine(Api.Get_Curent_Season_Southern_Hemisphere_As_String());

Output

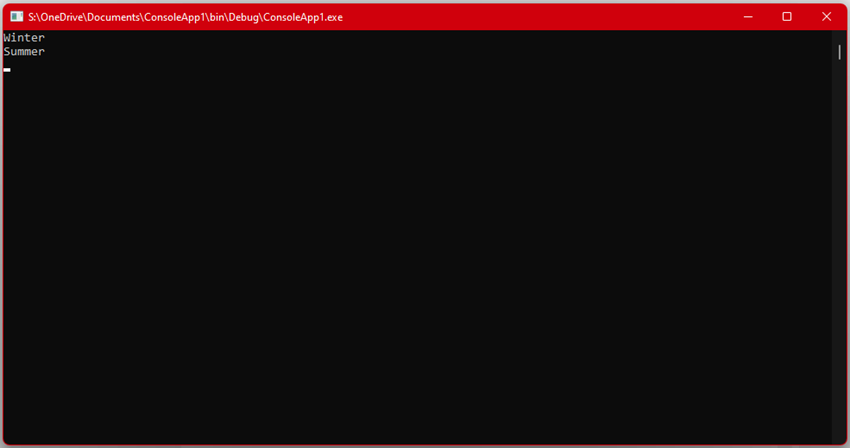
At the time of writing the article, it's Winter in the north and summer in the south.

We can also get images of various seasons using the following code.

You will have to pass a random value between 1 to 5.

Image image = Api.GetSummerImage(2);
Image winter = Api.GetWinterImage(3);
Image autumn = Api.GetAutumnImage(5);
Image spring = Api.GetSpringImage(4);
image.Save("C:\\test\\Summer.png");
winter.Save("C:\\test\\Winter.png");
autumn.Save("C:\\test\\autumn.png");
spring.Save("C:\\test\\Spring.png");
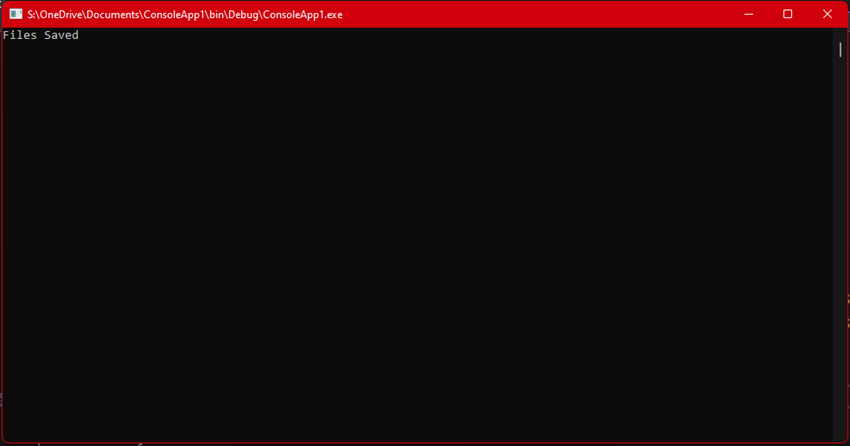
Console.WriteLine("Files Saved..");
Console.Read();


Let's check the folder.
There are a few files created!

And they show pics of the different seasons of nature.

You can also get an image based on the season in the northern and the southern hemisphere.

Use this code:
Again you will need to specify a random number between 5 to get the image.
Image image_north = Api.Get_Curent_Season_Image_Northern_Hemisphere(4);
Image image_south = Api.Get_Curent_Season_Image_Southern_Hemisphere(2);
image_north.Save("C:\\North.png");
image_south.Save("C:\\South.png");

Output

There are two files created.

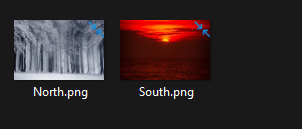
At the time of writing the season in the north it is Winter and it's summer in the south.
By using just two lines of code we can get a random image based on the current season and the value given.

It's easy right.

In this article, we have learned how to get the weather info and how to get not only the current season but also how to get the image of a season or get the image using the current season using C#.

This works on all the .net core projects such as ASP.NET, Xamarin.Forms, WinForms, WPF, .NET MAUI.

Please download the nuget package used in this article.

Link:  https://www.nuget.org/packages/Plugin.Weather/

(OR)

Execute the following command in the package console.
PM> Install-Package Plugin.Weather -Version 2.0.0

HostForLIFE.eu ASP.NET Core Hosting

European best, cheap and reliable ASP.NET hosting with instant activation. HostForLIFE.eu is #1 Recommended Windows and ASP.NET hosting in European Continent. With 99.99% Uptime Guaranteed of Relibility, Stability and Performace. HostForLIFE.eu security team is constantly monitoring the entire network for unusual behaviour. We deliver hosting solution including Shared hosting, Cloud hosting, Reseller hosting, Dedicated Servers, and IT as Service for companies of all size.


European ASP.NET Core Hosting :: Guards In .NET

clock February 14, 2022 08:25 by author Peter

What are Guards?
Guard, is a check of integrity preconditions used to avoid errors during execution. The main purpose and use of this is to avoid unnecessary nested branching conditions and give meaningful errors and hence to simplify the code.

In simple language we can say that the code that validates your method's input is called a Guard clause. It makes your code more understandable and it protects you from bugs and unexpected behaviors.

The if block act as a guard clause by protecting the GetStudent method against any null _student arguments. But the main drawback is even though we have null check over here but to reuse this across the code we need to have multiple null checks in order to escape the crash or unexpected behavior.

public Students GetStudents(StudentModel _students) {
    if (_strudents != null) {
        // Write the code.
    } else {
        Console.WriteLine("Student model do not contain any data");
    }
}

How to handle guard clauses exceptions?
"Guard clauses exceptions should never be caught."

This means that most of the time, we should let the caller hit those exceptions as most of the time, guard clauses will guard against scenarios that should never happen like null arguments. We all must have encountered the time when the bug is caused because of the null reference exception. So should we catch a bug and take the chance of never discover it? The answer is No! Instead, we should let the application fail immediately so that we can discover the bug before deploying it to production during the development process.

But what if we have preconditions that don't rely on bugs? What if we have preconditions that could occur sometimes like business logic preconditions? The solution is to expose your guard clauses!

How to use Guard clause?
We can write our own defensive code to use the guards or one library which is simple to understand and solves this problem is Dawn.Guard library.

The below example is one step solution of getting rid of nested if conditions. So let's say if the condition is not fulfilled the code will throw exception so that the developer can get to know the error and can fix it. This library is not limited to null check. There are guards like Equality guards, Boolean guards, Comparison guards, etc. which makes our task easy when it comes to validation conditions.
public Students GetStudentsData(StudentsModel _students) {
    _students = Guard.Argument(_students, nameof(_students)).NotNull().Value;
    //This will let the user know if the _student is null before navigating to next step.
}

Let's take an example and explore more. Suppose we want to check if the Student's name is not null and length should not exceed more than 25 characters.

Code without using Dawn.Guards Library

public Student(string studentName) {
    if (studentName == null) throw new ArgumentNullException(nameof(studentName), "studentName cannot be null.");
    if (studentName.Length > 25) throw new ArgumentException("studentName cannot exceed more than 25 characters.", nameof(studentName));
}


That if expression is a Guard Clause. However, we can do better than that, since repeating this code over and over in all of our methods is a bad practice.

Code using Guards(Dawn.Guards library)

Guard needs to know the argument's value to test it against preconditions and its name to include in a potential exception. There are three ways to initialize a guarded argument,
// First, by specifying the argument value and name separately.
Guard.Argument(arg, nameof(arg));
// Second, omitting the optional argument name.
Guard.Argument(arg);
// Third, creating a MemberExpression via a lambda expression.
Guard.Argument(() => arg);


    The first sample initializes a guarded argument by specifying both the argument's value and name.
    The second sample does not specify the argument name. This is allowed but not recommended since the argument name proves a valuable piece of information when you try to identify the cause of an error from logs or crash dumps.
    The third sample initializes a MemberExpression that provides both the argument's value and name. Although compiling an expression tree is an expensive operation, it is a convenient alternative that can be used in applications that are not performance-critical.

With Guard, if you want to guard an argument against null or max length, you just write NotNull and MaxLength and that's it
public Student(string StudentName) {
    Guard.Argument(StudentName, nameof(StudentName)).NotNull().MaxLength(25);
}


If the argument is passed null, you'll get an ArgumentNullException thrown with the correct parameter name and a clear error message out of the box. Similarly, it will throw an exception if the criteria for max length is not met. By pulling out all of the validation checks from throughout the method we can remove a number of nested conditionals. This definitely improves the readability of the code and makes the code easier to maintain in the future.

The above example illustrates the use of the Dawn.Guard library. We can extend the guard class to handle our own custom exceptions as well.

Exception Messages

Guard creates a meaningful exception message that contains the argument name and a description specific to the validation when a precondition can't be satisfied. Additionally, every validation in Guard accepts an optional parameter letting the user specify a custom error message.

// Throws an ArgumentException if the arg is not null.
Guard.Argument(() => arg).Null(a => "The argument must be null but it is: " + a);
// Throws an ArgumentNullException if the arg is null.
Guard.Argument(() => arg).NotNull("The argument cannot be null.");

In this article, we have seen how guards clause can help us to discover the bugs before deploying in production and to make our code more readable. We have also learned about Dawn. Guard library and how to use it.


European ASP.NET Core Hosting :: Implement Singleton DBManager In ASP.NET Core And C#

clock February 11, 2022 06:09 by author Peter

This article talks about the Singleton Design Pattern, why it is important and then demonstrates how to build a singleton DBManager (a class that wraps all calls to the database) using dotConnect for PostgreSQL and C#. It also discusses the pros and cons of this approach.
Pre-requisites

You’ll need the following tools to deal with code examples:
    Visual Studio 2019 Community Edition (download)
    dotConnect for PostgreSQL (download)

Introduction to Design Patterns
Design patterns can be used to solve recurring problems or complexities in software development. They are divided into three categories: structural, behavioral, and creational. Creational patterns can be used to create instances of classes and to manage them. However, structural patterns define the types and their relationships and help to understand the relationships between the entities. Behavioral design patterns emphasize on how objects collaborate and how responsibilities are delegated between them.
What is a Singleton Design Pattern?

The Singleton Design Pattern, as the name suggests, restricts the instantiation of a class to one object only. In other words, a class that follows the Singleton Design Pattern will not allow more than one instance of it to be created.

Use Cases
The typical use cases of the Singleton Design Pattern are:
    LogManager
    DbManager
    ServiceRegistry

Create a new ASP.NET Core Web API Project
Earlier, we mentioned the necessary tools to proceed to the practical scenarios. The time has come to use those tools.
First, we need to create a new ASP.NET Core Web API project:
    Open Visual Studio 2019.
    Click Create a new project.
    Select ASP.NET Core Web Application and click Next.
    Specify the project name and location to store that project in your system. Optionally, checkmark the Place solution and project in the same directory checkbox.
    Click Create.
    In the Create a new ASP.NET Core Web Application window, select API as the project template.
    Select ASP.NET Core 5 or later as the version.
    Disable the Configure for HTTPS and Enable Docker Support options (uncheck them).
    Since we won’t use authentication in this example, specify authentication as No Authentication.
    Click Create to finish the process.

We’ll use this project in this article.

Implement a Singleton DBManager in ASP.NET Core and C#
In this section we’ll implement a simple DBManager class that follows the Singleton Design Pattern.

Create a Database Table
Create a new database table using the following script:
CREATE TABLE books(
   book_id serial PRIMARY KEY,
   book_title VARCHAR (255) UNIQUE NOT NULL,
   book_pages INT NOT NULL
);


We’ll use this database table throughout this article to store and retrieve data.

Install NuGet Packages
To get started you should install the dotConnect for PostgreSql package in your project. You can install it either from the NuGet Package Manager tool inside Visual Studio or, from the NuGet Package Manager console using the following command:

    PM> Install-Package Devart.Data.PostgreSql

If the installation is successful, you're all set to get started using dotConnect for PostgreSQL in your application.

Configuring the Application
You should specify the database connection string in a config file, i.e., appsettings.json and then read the connection string in your application. Replace the default generated code of the appsettings.json with the following code:
{
    "PostgreSqlConnectionString": {
      "DefaultConnection": "UserId = postgres; Password =
       mypass;host=localhost;database=Test;"
  },
  "AllowedHosts": "*"
}


You should also add the IConfiguration instance to the services container so that you can access it from anywhere in the application.
public void ConfigureServices(IServiceCollection services)
{
    services.AddSingleton(Configuration);
    services.AddControllers();
}


Create the DBManager Class

To keep things simple, we'll build a DBManager with minimal features. Now, create a class called DBmanager inside a fie having the same primary name with a .cs extension and write the following code in there:
public class DBManager
{
   public int ExecuteNonQuery(string commandText)
   {
      return 1;
   }
   public int ExecuteReader(string commandText)
   {
       return 1;
   }
}


Read Data from the Database
To read data from the database using dotConnect for PostgreSQL, we can create a PgSqlDataAdapter instance and then use it to fill a data table and return it. The ExecuteReader method shown in the following code snippet illustrates how this can be achieved:

public DataTable ExecuteReader(string commandText)
{
    DataTable dataTable = new DataTable();
    using (PgSqlConnection pgSqlConnection = new
    PgSqlConnection(ConnectionString))
    {
        using (PgSqlCommand pgSqlCommand = new PgSqlCommand())
        {
            pgSqlCommand.CommandText = commandText;
            pgSqlCommand.Connection = pgSqlConnection;
            if (pgSqlConnection.State != ConnectionState.Open)
                pgSqlConnection.Open();
            PgSqlDataAdapter pgSqlDataAdapter = new
                PgSqlDataAdapter(pgSqlCommand);
            pgSqlDataAdapter.Fill(dataTable);
            if(dataTable.Rows.Count > 0)
                return dataTable;
            return null;
        }
    }
}


The ExecuteReader method of the DBManager class returns an instance of a DataTable. Now, add the following property in the DBManager class to store the database connection string:
public string ConnectionString
{
    get;set;
}

Return a List from the ExecuteReader Method
You can also return a List from the ExecuteReader method. Create a class named Book with the following content in there:
public class Book
{
    public int book_id { get; set; }
    public string book_title { get; set; }
    public int book_pages { get; set; }
}


Replace the source code of the ExecuteReader method of the DBManager class with the following code:
public List<Book> ExecuteReader(string commandText)
{
    DataTable dataTable = new DataTable();
    using (PgSqlConnection pgSqlConnection = new
    PgSqlConnection(ConnectionString))
    {
        using (PgSqlCommand pgSqlCommand = new PgSqlCommand())
        {
            pgSqlCommand.CommandText = commandText;
            pgSqlCommand.Connection = pgSqlConnection;
            if (pgSqlConnection.State != ConnectionState.Open)
                pgSqlConnection.Open();
            PgSqlDataAdapter pgSqlDataAdapter = new
            PgSqlDataAdapter(pgSqlCommand);
            pgSqlDataAdapter.Fill(dataTable);
            return dataTable.ToList<Book>();
        }
    }
}


Note that the return type has been changed from DataTable to List<Book> and how an instance of List<Book> is created using an extension method called ToList<T>().

The following code listing illustrates a class named Extensions that contains the ToList extension method.
public static class Extensions
{
    public static List<T> ToList<T>(this DataTable dataTable) where T : new()
    {
        List<T> data = new List<T>();
        foreach (DataRow row in dataTable.Rows)
        {
            T item = GetItemFromDataRow<T>(row);
            data.Add(item);
        }
        return data;
    }
    public static T GetItemFromDataRow<T>(DataRow dataRow)
    {
        Type temp = typeof(T);
        T obj = Activator.CreateInstance<T>();
        foreach (DataColumn column in dataRow.Table.Columns)
        {
            foreach (PropertyInfo propertyInfo in temp.GetProperties())
            {
                if (propertyInfo.Name == column.ColumnName)
                    propertyInfo.SetValue(obj, dataRow[column.ColumnName], null);
            }
        }
        return obj;
    }
}


Note how an instance of a DataTable is converted to an instance of List<T>. The GetItemFromDataRow method returns an instance of the Book class.

Insert Data to the Database
To insert data to the PostgreSQL database using dotConnect for PostgreSQL, you can use the following method:
public int ExecuteNonQuery(string commandText)
{
    using (PgSqlConnection pgSqlConnection = new
    PgSqlConnection(ConnectionString))
    {
        using (PgSqlCommand pgSqlCommand = new PgSqlCommand())
        {
            pgSqlCommand.CommandText = commandText;
            pgSqlCommand.Connection = pgSqlConnection;
            if (pgSqlConnection.State != ConnectionState.Open)
                pgSqlConnection.Open();
            return pgSqlCommand.ExecuteNonQuery();
        }
    }
}

The Complete Source Code
The complete source code of the DBManager class is given below:
public class DBManager
{
    public string ConnectionString
    {
        get;set;
    }
    public List<Book> ExecuteReader(string commandText)
    {
        DataTable dataTable = new DataTable();
        using (PgSqlConnection pgSqlConnection = new
        PgSqlConnection(ConnectionString))
        {
            using (PgSqlCommand pgSqlCommand = new PgSqlCommand())
            {
                pgSqlCommand.CommandText = commandText;
                pgSqlCommand.Connection = pgSqlConnection;
                if (pgSqlConnection.State != ConnectionState.Open)
                    pgSqlConnection.Open();
                PgSqlDataAdapter pgSqlDataAdapter = new
                   PgSqlDataAdapter(pgSqlCommand);
                pgSqlDataAdapter.Fill(dataTable);
                return dataTable.ToList<Book>();
            }
        }
    }
    public int ExecuteNonQuery(string commandText)
    {
        using (PgSqlConnection pgSqlConnection = new
        PgSqlConnection(ConnectionString))
        {
            using (PgSqlCommand pgSqlCommand = new PgSqlCommand())
            {
                pgSqlCommand.CommandText = commandText;
                pgSqlCommand.Connection = pgSqlConnection;
                if (pgSqlConnection.State != ConnectionState.Open)
                    pgSqlConnection.Open();
                return pgSqlCommand.ExecuteNonQuery();
            }
        }
    }
}


The Singleton DBManager Class
To make the DBManager class a singleton class, you should have a private constructor. A private constructor would prevent the class from being extended or instantiated. Since we don't want more than one instance of this class, a private constructor is needed.

You should then create an instance of the DBManager inside a static property as shown in the code snippet given below:
public class DBManager
{
    private static DBManager instance;
    private DBManager() { }
    public static DBManager Instance
    {
        get
        {
           if (instance == null)
           {
               instance = new DBManager();
           }
           return instance;
        }
   }
   //Other methods removed for brevity
}


Since the DBManager instance is static, you would have only one instance throughout the lifetime of the application. You can access the DBManager class, and its methods as shown in the following code snippet:

DBManager.Instance.ConnectionString = connectionString;
return DBManager.Instance.ExecuteReader("select * from public.books");

Make the DBManager Class ThreadSafe
But what if you would like to make it thread safe so that no two threads can have access to the critical section? To make this class thread safe, you can take advantage of the lock keyword as illustrated in the following code snippet:
public class DBManager
{
   private static object lockObj = new object();
   private static DBManager instance;
   private DBManager() { }
   public static DBManager Instance
   {
       get
       {
           lock(lockObj)
           {
               if (instance == null)
               {
                   instance = new DBManager();
               }
           }
           return instance;
       }
   }
   //Other methods removed for brevity
}


Use the DBManager Class in Controller Classes
You can now use the DBManager instance in your controller class like this:
[Route("api/[controller]")]
[ApiController]
public class BooksController : ControllerBase
{
    readonly IConfiguration _configuration;
    readonly string connectionString;
    public BooksController(IConfiguration configuration)
    {
        _configuration = configuration;
        connectionString =
        _configuration["PostgreSqlConnectionString:DefaultConnection"];
    }
    [HttpGet]
    public List<Book> Get()
    {
        DBManager.Instance.ConnectionString = connectionString;
        return DBManager.Instance.ExecuteReader("select * from public.books");
    }
}

A DBManager class serves as a helper to connect to databases and perform required CRUD operations. Ideally it should be a singleton since you don’t need multiple instances of it in your application. This article has demonstrated how we can build a thread-safe DBManager class in C# and use it in an ASP.NET Core application.


European ASP.NET Core Hosting :: How To Post Data In ASP.NET Using AJAX Without JSON Form Serializer?

clock February 7, 2022 06:56 by author Peter

This article demonstrates how to send form data from the ASP.net web application using the Ajax post method without the form serialization.

We have already created the project in the previous part so we will use the same project, same view Model, and same form layout; however only send the data to the controller without the form serialization. So if you are new to this article you can refer to the previous article for detail and can follow up to step 6 to create the project.

This article is an extension of the previous part, hence here we will use the previous solution and start directly by adding the Action Method in the Home controller.

Step 1 – Add Action Method in Home Controller
Add Action Method named as CreateStudent1 in Home Controller which we will use to create a view for Student Form submission without form serialization.

Below is the code for the CreateStudent1 Action Method.
public IActionResult CreateStudent1() {
    return View();
}

Step 2 – Add View
Right-click on the CreateStudent1 IActionResult method and add View for it as depicted below.


Select the Razor page and click on add.


CreateStudent1.cshtml code.
<h4>Add Student Deatils using Ajax Post without Form Serialization</h4>
<hr />
<div class="row">
    <div class="col-md-4">
        <form id="studenteForm" novalidate class="needs-validation">
            <div asp-validation-summary="ModelOnly" class="text-danger"></div>
            <div class="form-group">
                <label asp-for="Name" class="control-label"></label>
                <input asp-for="Name" class="form-control" id="name" required />
                <span asp-validation-for="Name" class="text-danger"></span>
            </div>
            <div class="form-group">
                <label asp-for="Email" class="control-label"></label>
                <input asp-for="Email" type="email" class="form-control" id="email" />
                <span asp-validation-for="Email" class="text-danger"></span>
            </div>
            <div class="form-group">
                <label asp-for="Phone" class="control-label"></label>
                <input asp-for="Phone" class="form-control" id="phone" />
                <span asp-validation-for="Phone" class="text-danger"></span>
            </div>
            <div class="form-group">
                <button type="button" class="btn btn-primary" onclick="submitStudent()">Add </button>
            </div>
        </form>
    </div>
</div>

@section Scripts {
    @{await Html.RenderPartialAsync("_ValidationScriptsPartial");}
}

Then, we will use the below JavaScript on the form submission button click event using Ajax in CreateStudent.cshtml page. Here we will not use a form serializer. In the previous part, we have used a form serializer.
<script type="text/javascript">
    function submitStudent() {
//below we are binding the input data (json format) in a variable inorder to post it.
        var data = {
            Name: $("#name").val(),
            Email: $("#email").val(),
            Phone: $("#phone").val()
        }
        console.log(data);
        $.ajax({
            type: 'POST',
            url: '/Home/AddStudent',
            contentType: 'application/json; charset=utf-8',
            data: JSON.stringify(data),
            success: function (result) {
                alert('Successfully received Data ');
                console.log(result);
            },
            error: function () {
                alert('Failed to receive the Data');
                console.log('Failed ');
            }
        })
    }
</script>

You can find complete CreateStudent.cshtml code below:
@model Sample.ASPDotNETCore.Models.StudentModel

@{
    ViewData["Title"] = "CreateStudent1";
}

<script type="text/javascript">
    function submitStudent() {
        var data = {
            Name: $("#name").val(),
            Email: $("#email").val(),
            Phone: $("#phone").val()
        }
        console.log(data);
        $.ajax({
            type: 'POST',
            url: '/Home/AddStudent',
            contentType: 'application/json; charset=utf-8',
            data: JSON.stringify(data),
            success: function (result) {
                alert('Successfully received Data ');
                console.log(result);
            },
            error: function () {
                alert('Failed to receive the Data');
                console.log('Failed ');
            }
        })
    }
</script>

<h4>Add Student Deatils using Ajax Post without Form Serialization</h4>
<hr />
<div class="row">
    <div class="col-md-4">
        <form id="studenteForm" novalidate class="needs-validation">
            <div asp-validation-summary="ModelOnly" class="text-danger"></div>
            <div class="form-group">
                <label asp-for="Name" class="control-label"></label>
                <input asp-for="Name" class="form-control" id="name" required />
                <span asp-validation-for="Name" class="text-danger"></span>
            </div>
            <div class="form-group">
                <label asp-for="Email" class="control-label"></label>
                <input asp-for="Email" type="email" class="form-control" id="email" />
                <span asp-validation-for="Email" class="text-danger"></span>
            </div>
            <div class="form-group">
                <label asp-for="Phone" class="control-label"></label>
                <input asp-for="Phone" class="form-control" id="phone" />
                <span asp-validation-for="Phone" class="text-danger"></span>
            </div>
            <div class="form-group">
                <button type="button" class="btn btn-primary" onclick="submitStudent()">Add </button>
            </div>
        </form>
    </div>
</div>

@section Scripts {
    @{await Html.RenderPartialAsync("_ValidationScriptsPartial");}
}

Step 3 - Add post method in Home Controller for Submit button click Event
Then we will write the Post method in HomeController for the Form Submit event. Below is the code of the HTTP post method in HomeController with Model validation.

[HttpPost]
public async Task < IActionResult > AddStudent([FromBody] StudentModel student) {
    if (!ModelState.IsValid) return BadRequest("Enter required fields");
    //Insert code;
    return this.Ok($ "Form Data received!");
}

Now, it’s time to build and run the project. Fill in the Student Form data and test it.

Below is the home page design:


Design of created Student page for data submission.

When the user clicks on Submit button, data will be sent to the controller like below.


Hence, we have submitted the form data to the controller from the Student Details form.

To recapitulate, in this article we have learned to submit the data using Ajax in the ASP.NET Core application without JSON form serializer. This is how we can send the form data using these different methods that we have learned in this article series.

HostForLIFE.eu ASP.NET Core Hosting

European best, cheap and reliable ASP.NET hosting with instant activation. HostForLIFE.eu is #1 Recommended Windows and ASP.NET hosting in European Continent. With 99.99% Uptime Guaranteed of Relibility, Stability and Performace. HostForLIFE.eu security team is constantly monitoring the entire network for unusual behaviour. We deliver hosting solution including Shared hosting, Cloud hosting, Reseller hosting, Dedicated Servers, and IT as Service for companies of all size.


European ASP.NET Core Hosting :: Guards In .NET

clock February 4, 2022 06:05 by author Peter

What are Guards?
Guard, is a check of integrity preconditions used to avoid errors during execution. The main purpose and use of this is to avoid unnecessary nested branching conditions and give meaningful errors and hence to simplify the code.

In simple language we can say that the code that validates your method's input is called a Guard clause. It makes your code more understandable and it protects you from bugs and unexpected behaviors.

The if block act as a guard clause by protecting the GetStudent method against any null _student arguments. But the main drawback is even though we have null check over here but to reuse this across the code we need to have multiple null checks in order to escape the crash or unexpected behavior.
public Students GetStudents(StudentModel _students) {
    if (_strudents != null) {
        // Write the code.
    } else {
        Console.WriteLine("Student model do not contain any data");
    }
}


How to handle guard clauses exceptions?
"Guard clauses exceptions should never be caught."

This means that most of the time, we should let the caller hit those exceptions as most of the time, guard clauses will guard against scenarios that should never happen like null arguments. We all must have encountered the time when the bug is caused because of the null reference exception. So should we catch a bug and take the chance of never discover it? The answer is No! Instead, we should let the application fail immediately so that we can discover the bug before deploying it to production during the development process.

But what if we have preconditions that don't rely on bugs? What if we have preconditions that could occur sometimes like business logic preconditions? The solution is to expose your guard clauses!

How to use Guard clause?
We can write our own defensive code to use the guards or one library which is simple to understand and solves this problem is Dawn.Guard library.

The below example is one step solution of getting rid of nested if conditions. So let's say if the condition is not fulfilled the code will throw exception so that the developer can get to know the error and can fix it. This library is not limited to null check. There are guards like Equality guards, Boolean guards, Comparison guards, etc. which makes our task easy when it comes to validation conditions.
public Students GetStudentsData(StudentsModel _students) {
    _students = Guard.Argument(_students, nameof(_students)).NotNull().Value;
    //This will let the user know if the _student is null before navigating to next step.
}


Let's take an example and explore more. Suppose we want to check if the Student's name is not null and length should not exceed more than 25 characters.

Code without using Dawn.Guards Library
public Student(string studentName) {
    if (studentName == null) throw new ArgumentNullException(nameof(studentName), "studentName cannot be null.");
    if (studentName.Length > 25) throw new ArgumentException("studentName cannot exceed more than 25 characters.", nameof(studentName));
}


That if expression is a Guard Clause. However, we can do better than that, since repeating this code over and over in all of our methods is a bad practice.

Code using Guards(Dawn.Guards library)
Guard needs to know the argument's value to test it against preconditions and its name to include in a potential exception. There are three ways to initialize a guarded argument,
// First, by specifying the argument value and name separately.
Guard.Argument(arg, nameof(arg));
// Second, omitting the optional argument name.
Guard.Argument(arg);
// Third, creating a MemberExpression via a lambda expression.
Guard.Argument(() => arg);

  • The first sample initializes a guarded argument by specifying both the argument's value and name.
  • The second sample does not specify the argument name. This is allowed but not recommended since the argument name proves a valuable piece of information when you try to identify the cause of an error from logs or crash dumps.
  • The third sample initializes a MemberExpression that provides both the argument's value and name. Although compiling an expression tree is an expensive operation, it is a convenient alternative that can be used in applications that are not performance-critical.


With Guard, if you want to guard an argument against null or max length, you just write NotNull and MaxLength and that's it.
public Student(string StudentName) {
    Guard.Argument(StudentName, nameof(StudentName)).NotNull().MaxLength(25);
}


If the argument is passed null, you'll get an ArgumentNullException thrown with the correct parameter name and a clear error message out of the box. Similarly, it will throw an exception if the criteria for max length is not met. By pulling out all of the validation checks from throughout the method we can remove a number of nested conditionals. This definitely improves the readability of the code and makes the code easier to maintain in the future.

The above example illustrates the use of the Dawn.Guard library. We can extend the guard class to handle our own custom exceptions as well.

Exception Messages
Guard creates a meaningful exception message that contains the argument name and a description specific to the validation when a precondition can't be satisfied. Additionally, every validation in Guard accepts an optional parameter letting the user specify a custom error message.
// Throws an ArgumentException if the arg is not null.
Guard.Argument(() => arg).Null(a => "The argument must be null but it is: " + a);
// Throws an ArgumentNullException if the arg is null.
Guard.Argument(() => arg).NotNull("The argument cannot be null.");


In this article, we have seen how guards clause can help us to discover the bugs before deploying in production and to make our code more readable. We have also learned about Dawn.Guard library and how to use it.

That's all from my side. Happy coding!

HostForLIFE.eu ASP.NET Core Hosting

European best, cheap and reliable ASP.NET hosting with instant activation. HostForLIFE.eu is #1 Recommended Windows and ASP.NET hosting in European Continent. With 99.99% Uptime Guaranteed of Relibility, Stability and Performace. HostForLIFE.eu security team is constantly monitoring the entire network for unusual behaviour. We deliver hosting solution including Shared hosting, Cloud hosting, Reseller hosting, Dedicated Servers, and IT as Service for companies of all size.


About HostForLIFE

HostForLIFE is European Windows Hosting Provider which focuses on Windows Platform only. We deliver on-demand hosting solutions including Shared hosting, Reseller Hosting, Cloud Hosting, Dedicated Servers, and IT as a Service for companies of all sizes.

We have offered the latest Windows 2019 Hosting, ASP.NET 5 Hosting, ASP.NET MVC 6 Hosting and SQL 2019 Hosting.


Month List

Tag cloud

Sign in