European ASP.NET 4.5 Hosting BLOG

BLOG about ASP.NET 4, ASP.NET 4.5 Hosting and Its Technology - Dedicated to European Windows Hosting Customer

European ASP.NET Core Hosting - HostForLIFE :: Getting Started With .NET 7.0

clock November 11, 2022 07:46 by author Peter

Microsoft has released .NET 7 preview 1 last week Feb 17th, 2022. In this write-up, we will learn what’s new in .NET 7 preview and create a sample project in .NET 7. As per Microsoft, it is built on the foundation of .NET 6 that includes a unified set of base libraries, runtime, and SDK, an effortless development experience, and high-pitched developer productivity. Mainly, .NET 7 has brought enhanced support for cloud-native scenarios, tools to make it easier to upgrade legacy projects, and simplifying the developer experience by making it easier to work with containers. To know more about .NET 7 Preview 1 and its features, you can check the official announcement.

Prerequisites
    .NET 7 Preview
    Visual Studio 2022 17.2 Preview1

You can download and install .NET 7 preview from here. Additionally, you need to download and install Visual Studio 2022 17.2 Preview1 (VS2022 17.2 Preview 1) from Official Microsoft here.

If you have already installed the visual studio 2022 17.1.0 version then, installing the above two prerequisites will be enough for you. You can directly configure from Visual Studio 2022 17.1.0 to Visual Studio 2022 17.2 Preview1 by changing the update setting. For this, you can follow the article Enable Preview version in Visual Studio 2022.

Now, Let’s create a console application in .NET 7.

Step 1
Open Visual Studio 2022 and click Create a new project.

Step 2
Select Console App as shown below and click Next.

Step 3
Give the project name, location of the project, and click on Next.

Step 4
Then, select Framework: .NET 7.0(Preview) as illustrated below and click Create.

Then it will create a project which looks like it as depicted below. You can see, there are no differences in Program.cs file of .NET 6.0 and .NET 7.0 preview. You can refer to the previous article on Getting Started with .NET6 to learn .NET 6.0.


Project.csproj file looks like below.

If you go to the bin folder-->debug, then you will see .net7.0 folder. Inside this folder files including dll, exe, and all relevant files to your project will be available there.


You can run the .exe and launch your application. When you launch the app, it will display the “Hello, World!” message.

Hence, we have created a console application in .NET 7.0.

Summary
In this article, we learned what is needed to get started with .NET 7.0 preview and its features. Additionally, we created the console application in .NET 7. Microsoft has released .NET 7 preview 1 recently which is based on the foundation set up by .NET 6. It is available in Visual Studio 2022 version 17.2 Preview 1 with improvement in Web Tools, Git Tooling, Productivity, Razor (ASP.NET Core) Editor, debugging and Diagnostics, and so on.

HostForLIFE.eu ASP.NET Core Hosting

European best, cheap and reliable ASP.NET hosting with instant activation. HostForLIFE.eu is #1 Recommended Windows and ASP.NET hosting in European Continent. With 99.99% Uptime Guaranteed of Relibility, Stability and Performace. HostForLIFE.eu security team is constantly monitoring the entire network for unusual behaviour. We deliver hosting solution including Shared hosting, Cloud hosting, Reseller hosting, Dedicated Servers, and IT as Service for companies of all size.


European ASP.NET Core Hosting - HostForLIFE :: HTTP Best Practices Using ASP.NET Core?

clock November 7, 2022 08:43 by author Peter

Past few years, we are using Httpclient but are we using it properly? Recently, I came across the code of a senior developer from the other team. The developer was trying to communicate with the microservices by using HttpClient and has implemented his own logic of retry.

Implementing the own logic for retry is not wrong but understanding what overhead it could bring is more important.

The logic that he has written has some major drawbacks

    Usage of HttpClient  
    Usage of retry using loops

In this article, we’ll be covering only about drawbacks of HttpClient and how to fix the issues related to it.

Please find the source code here.
Usage of HttpClient

HttpClient is used to send the HTTP request or receive the HTTP response from the desired endpoint specified.

Internally, HttpClient uses HttpMessageInvoker class.  HttpMessageInvoker class allows the applications to call the SendAsync method(send the HTTP request as an async operation). However, HttpMessageInvoker uses an IDisposable interface to release unmanaged resources.
//
  // Summary:
  //     Provides a class for sending HTTP requests and receiving HTTP responses from
  //     a resource identified by a URI.
  public class HttpClient : HttpMessageInvoker
  {
      //
      // Summary:
      //     Gets or sets the base address of Uniform Resource Identifier (URI) of the Internet
      //     resource used when sending requests.
      //
      // Returns:
      //     The base address of Uniform Resource Identifier (URI) of the Internet resource
      //     used when sending requests.
      public Uri? BaseAddress
      {
          [System.Runtime.CompilerServices.NullableContext(2)]
          get
          {
              throw null;
          }
          [System.Runtime.CompilerServices.NullableContext(2)]
          set
          {
          }
      }

      //
      // Summary:
      //     Gets or sets the global Http proxy.
      //
      // Returns:
      //     A proxy used by every call that instantiates a System.Net.HttpWebRequest.
      //
      // Exceptions:
      //   T:System.ArgumentNullException:
      //     The value passed cannot be null.
      public static IWebProxy DefaultProxy
      {
          get
          {
              throw null;
          }
          set
          {
          }
      }

//
// Summary:
//     A specialty class that allows applications to call the System.Net.Http.HttpMessageInvoker.SendAsync(System.Net.Http.HttpRequestMessage,System.Threading.CancellationToken)
//     method on an HTTP handler chain.
public class HttpMessageInvoker : IDisposable
{
    //
    // Summary:
    //     Initializes an instance of a System.Net.Http.HttpMessageInvoker class with a
    //     specific System.Net.Http.HttpMessageHandler.
    //
    // Parameters:
    //   handler:
    //     The System.Net.Http.HttpMessageHandler responsible for processing the HTTP response
    //     messages.
    public HttpMessageInvoker(HttpMessageHandler handler)
    {
    }

    //
    // Summary:
    //     Initializes an instance of a System.Net.Http.HttpMessageInvoker class with a
    //     specific System.Net.Http.HttpMessageHandler.
    //
    // Parameters:
    //   handler:
    //     The System.Net.Http.HttpMessageHandler responsible for processing the HTTP response
    //     messages.
    //
    //   disposeHandler:
    //     true if the inner handler should be disposed of by Dispose(), false if you intend
    //     to reuse the inner handler.
    public HttpMessageInvoker(HttpMessageHandler handler, bool disposeHandler)
    {
    }

    //
    // Summary:
    //     Releases the unmanaged resources and disposes of the managed resources used by
    //     the System.Net.Http.HttpMessageInvoker.
    public void Dispose()
    {
    }

    //
    // Summary:
    //     Releases the unmanaged resources used by the System.Net.Http.HttpMessageInvoker
    //     and optionally disposes of the managed resources.
    //
    // Parameters:
    //   disposing:
    //     true to release both managed and unmanaged resources; false to releases only
    //     unmanaged resources.
    protected virtual void Dispose(bool disposing)
    {
    }

    //
    // Summary:
    //     Sends an HTTP request with the specified request and cancellation token.
    //
    // Parameters:
    //   request:
    //     The HTTP request message to send.
    //
    //   cancellationToken:
    //     The cancellation token to cancel operation.
    //
    // Returns:
    //     The HTTP response message.
    //
    // Exceptions:
    //   T:System.ArgumentNullException:
    //     The request was null.
    //
    //   T:System.NotSupportedException:
    //     For HTTP/2 and higher or when requesting version upgrade is enabled by System.Net.Http.HttpVersionPolicy.RequestVersionOrHigher.
    //     -or- If using custom class derived from System.Net.Http.HttpContent not overriding
    //     System.Net.Http.HttpContent.SerializeToStream(System.IO.Stream,System.Net.TransportContext,System.Threading.CancellationToken)
    //     method. -or- If using custom System.Net.Http.HttpMessageHandler not overriding
    //     System.Net.Http.HttpMessageHandler.Send(System.Net.Http.HttpRequestMessage,System.Threading.CancellationToken)
    //     method.
    [UnsupportedOSPlatform("browser")]
    public virtual HttpResponseMessage Send(HttpRequestMessage request, CancellationToken cancellationToken)
    {
        throw null;
    }

    //
    // Summary:
    //     Send an HTTP request as an asynchronous operation.
    //
    // Parameters:
    //   request:
    //     The HTTP request message to send.
    //
    //   cancellationToken:
    //     The cancellation token to cancel operation.
    //
    // Returns:
    //     The task object representing the asynchronous operation.
    //
    // Exceptions:
    //   T:System.ArgumentNullException:
    //     The request was null.
    public virtual Task<HttpResponseMessage> SendAsync(HttpRequestMessage request, CancellationToken cancellationToken)
    {
        throw null;
    }
}

Current Implementation
I’m using the default Web API template for both frontend and backend applications.

Backend
[ApiController]
[Route("[controller]")]
public class WeatherForecastController : ControllerBase
{
    private static readonly string[] Summaries = new[]
    {
        "Freezing", "Bracing", "Chilly", "Cool", "Mild", "Warm", "Balmy", "Hot", "Sweltering", "Scorching"
    };

    private readonly ILogger<WeatherForecastController> _logger;

    public WeatherForecastController(ILogger<WeatherForecastController> logger)
    {
        _logger = logger;
    }

    [HttpGet(Name = "GetWeatherForecast")]
    public IEnumerable<WeatherForecast> Get()
    {
        return Enumerable.Range(1, 5).Select(index => new WeatherForecast
        {
            Date = DateTime.Now.AddDays(index),
            TemperatureC = Random.Shared.Next(-20, 55),
            Summary = Summaries[Random.Shared.Next(Summaries.Length)]
        })
        .ToArray();
    }
}

You might have noticed, it’s a default weather controller that comes with a Web API template.
[ApiController]
[Route("[controller]")]
public class WeatherForecastController : ControllerBase
{
    private readonly ILogger<WeatherForecastController> _logger;
    [HttpGet(Name = "GetWeatherForecast")]
    public async Task Get()
    {
        for (int i = 0; i < 100; i++)
        {
            var httpClient = new HttpClient();
            var response = await httpClient.GetAsync("https://localhost:7054/WeatherForecast").Result.Content.ReadAsStringAsync();
        }
    }
}


I’m iterating the HTTPClient 100 times and sending the request to the backend application. All works and everything is right.

But wait, there’s more!

Let’s use the netstat tool to understand the state of the socket on the machine running.

Huh, that’s weird. The application has exited but still, there are a bunch of connections open. They are in the time_wait state which means the connection has been closed on one side(ours) but still waiting for the additional packets coming in on it because of the network delay.

As discussed before, HttpClient internally uses an IDisposable interface. Try the Using keyword to release the socket after completing our operation.
public async Task Get() {
    for (int i = 0; i < 100; i++) {
        using
        var httpClient = new HttpClient();
        var response = await httpClient.GetAsync("https://localhost:7054/WeatherForecast").Result.Content.ReadAsStringAsync();
    }
}


Now, let us perform netstat again,

Even after applying Using keyword, the results are the same then what is the use of Disposable interface – not able to release the sockets even after completion.  When dispose of is called, the connection will stay open for 4 mins to handle the network traffic.
 
Unlike Monolithic architecture, usage of HttpClient has increased in the new era of microservice architecture. Microservice or container-based applications ideally have limited resources. Ex: 400 MB of Memory and  400 MI of CPU

Now imagine, the socket remaining open for 4 mins with the container of limited resources. The sockets will exhaust soon and the application starts throwing a socket exhaustion error.

Enough about drawbacks, solution time
HttpClientFactory has been introduced in .Net Core 2.1 and it’s been around for quite a while.
HttpClientFactory manages the life cycle of the HTTP instance. All the life cycle management is taken care of by the factory class and provides a nice way of configuring the HTTP client in the startup. You have the option to implement factory class either by using Named clients or typed clients.

Named Client
Named clients are useful when,
App uses HttpClient for different components/services
Many HttpClient instances have different configurations. Ex: One HttpClient instance for Order service and another instance for Product service.
public class WeatherForecastController : ControllerBase
{
    private readonly ILogger<WeatherForecastController> _logger;
    private readonly IHttpClientFactory _httpClientFactory;

    public WeatherForecastController(ILogger<WeatherForecastController> logger,IHttpClientFactory httpClientFactory)
    {
        _logger = logger;
        _httpClientFactory = httpClientFactory;
       }
    #endregion

    [HttpGet(Name = "GetWeatherForecast")]
    public async Task Get()
    {
        for (int i = 0; i < 100; i++)
        {
            using var httpClient = _httpClientFactory.CreateClient("weatherForecast");
            string url = $"{httpClient.BaseAddress}WeatherForecast";
            var response = await httpClient.GetAsync(url).Result.Content.ReadAsStringAsync();
            _logger.LogInformation(response);
        }
    }
}

Changes in Program.cs,
builder.Services.AddHttpClient("weatherForecast", client =>
{
   client.BaseAddress = new Uri("https://localhost:7054");
    client.DefaultRequestHeaders.Add("Accept", "application/json");
});


AddHttpClient method is used to register the HTTP instance for HttpClientFactory. The parameter/name to invoke the HTTP instance of the weather forecast class is “weatherForecast”.

Let us perform a similar test using netstat again,

Unlike HttpClient, a single socket is created with the status “Established” and the lifetime of the socket will be completed and managed by HttpClientFactory.

Typed Client
Typed clients are better than Named clients

  • Typed clients are strongly typed and no need to inject IHttpClientFactory
  • Typed clients can be injected directly into your classes.

Create a service layer to properly utilize the typed client
public interface IWeatherService

{
    Task<string> GetWeatherAsync();
}
public class WeatherService : IWeatherService
{
    private readonly ILogger<WeatherService> logger;
    private readonly HttpClient httpClient;

    public WeatherService(ILogger<WeatherService> logger,HttpClient httpClient)
    {
        this.logger = logger;
        this.httpClient = httpClient;
    }

    public async Task<string> GetWeatherAsync()
    {
        string url = $"{httpClient.BaseAddress}WeatherForecast";
        var response = await httpClient.GetAsync(url).Result.Content.ReadAsStringAsync();
        logger.LogInformation(response);
        return response;
    }
}


Changes in the program.cs

builder.Services.AddHttpClient<IWeatherService,WeatherService>(client =>
{
    client.BaseAddress = new Uri("https://localhost:7054");
    client.DefaultRequestHeaders.Add("Accept", "application/json");
});

Changes in the WeatherForecast Controller

[ApiController]
[Route("[controller]")]
public class WeatherForecastController: ControllerBase {
    private readonly ILogger < WeatherForecastController > _logger;
    private readonly IWeatherService weatherService;
    public WeatherForecastController(ILogger < WeatherForecastController > logger, IWeatherService weatherService) {
            _logger = logger;
            this.weatherService = weatherService;
        }
        [HttpGet(Name = "GetWeatherForecast")]
    public async Task Get() {
        for (int i = 0; i < 100; i++) {
            var response = await weatherService.GetWeatherAsync();
            _logger.LogInformation(response);
        }
    }
}

Let us perform a similar test using netstat again

The result remains the same for Named and Typed Clients.
Like the Named client, a single socket is created with the status “Established” and the lifetime of the socket will be completed and managed by HttpClientFactory.

What’s next
In the next article, we’ll discuss resiliency for HTTP calls such as Retry and Circuit breakers using Polly.

HostForLIFE.eu ASP.NET Core Hosting

European best, cheap and reliable ASP.NET hosting with instant activation. HostForLIFE.eu is #1 Recommended Windows and ASP.NET hosting in European Continent. With 99.99% Uptime Guaranteed of Relibility, Stability and Performace. HostForLIFE.eu security team is constantly monitoring the entire network for unusual behaviour. We deliver hosting solution including Shared hosting, Cloud hosting, Reseller hosting, Dedicated Servers, and IT as Service for companies of all size.


European ASP.NET Core Hosting - HostForLIFE :: REST In Depth Or What Exactly REST Is?

clock November 4, 2022 07:30 by author Peter

In this article, we’ll go through the details and meaning of REST. It will help you to better understand REST and use it with its best practices.

What is an API?
When developing software, we write API (Application Programming Interface) in order not to perform some tasks over and over again. The API insulates us from the difficulties of the environment and domain area where we work and ensures the encapsulation of complex processes and our abstraction from the domain area. Due to this, we stay away from low-level design architectural solutions and communicate with the environment only through the provided interface. For example, when using the framework, we can see all the DLLs (packages) whose functionality we benefit from as APIs.

What exactly is a web-based API?

Web Based API is just a variation of API. Web Based API is a form of API used to enable data exchange between applications using web standards and protocols. Typically, these types of APIs manifest themselves as REST APIs and SOAP services. Due to this, by creating a channel between different web resources (site, service, etc.), it is possible to build a large infrastructure (microservice, etc.) or simply an exchange mechanism.

The main topic of today's article will be RESTful Services, one of the forms of Web Based API.

What exactly REST is?

REST (Representational State Transfer) is an architectural style used to develop loosely-coupled applications over the HTTP protocol. REST is just an architectural style. The architectural style is: although the high-level architectural design of any work is given, the low-level design is kept free for the implementing party (vendor, provider).

REST is not a standard. Although REST is not a standard, it is implemented through web standards in modern days.

REST is not a protocol. Although REST is not a protocol, it has been implemented through web protocols (HTTP) nowadays. But REST is protocol-independent. The fact that it is implemented with the HTTP protocol doesn’t mean that it can only work with this protocol.

You can think of REST as a kind of ISO/OSI model. Although it is an ideal model, in real practice the TCP/IP model is used, and ISO/OSI remains a kind of theory. Although REST does not remain in theory, it is not excluded that it may be implemented in another format in the future.

If we express the work of REST in a short, we can say that "The client sends a request to the server, and the server changes the state of the client according to the response".

As for the core of the word REST. REST is based on the concepts of Resource, Representation, State, and Transfer. First, the client requests a resource from the server. The server keeps the original resource in itself and sends the Representation, which is just a copy of it, to the client. If the resource changes tomorrow, the client must request again and get the latest state of the resource again. The transfer of the resource from the server to the client is just a Transfer.

Why do we need REST
    It isolates the Client and Server from each other and eliminates the dependency between them.
    It does not depend on any platform
    It does not depend on any programming language. Whether you use PHP, C#, Node.js, etc. you can write REST services with all of them.
    It is not tied to a specific format. You can receive data in either XML or JSON (maybe in other formats).
    Allows building distributed systems
    It has the Discoverable feature. Resources can be easily identified
    Very easy to use
    Can use HTTP cache

What are REST constraints?
The main mechanism that indicates whether a service is a REST is its constraints.

REST has 6 (5 mandatories, 1 optional) constraints.
1) Uniform-Interface Constraint
This constraint is perhaps the most important constraint among REST constraints. If it is necessary to briefly list the main ideas on which it is based, we can say:
    Different devices, equipment, and programs must use resources over the same URL
    A URL can provide different representations. This is usually given as Content Negation in services. That is, by referring to the same URL, depending on the configuration, you can receive information in both XML and JSON format.
    We can make both GET and POST requests to the same URL

The above brief overview is not complete. Because the Uniform-interface constraint itself consists of 4 sub-parts. If we don't know them, it's hard to fully understand what this limitation does:

1.1 Identification of Resources
Identification of resources should be done over URL. That is, it should be easy to know what type of resource is used when looking at the URL. Example: If the URL https://website.com/api/students is given, here students are our called and used as a resource. The name of the resource must be represented in the URL.

1.2 Manipulating Resources through representation
If the requesting client has permission to manipulate (edit, delete) the resource, there should be metadata about how to manipulate the resource together with the returned representation. Through these metadata links, the called resource can be changed or deleted.

1.3 Self-descriptive messages
Each sent request should be complete in itself, no additional commands should be needed to do any atomic work. Typically, metadata (additional credentials, HTTP method information, meta info) is sent via HTTP headers.

1.4 HATEOAS – (Hypermedia As The Engine of Application State)

During each request, it should be possible to receive documentation information, like a WSDL in WCF services. The point is that the client side should easily know where other resources are located (discoverable).

2) Client-Server constraint (Client Server constraint)
This constraint allows us to isolate the client and the server from each other.
    There must be a client and a server for data exchange
    They should be accompanied and expanded independently
    They should not depend on each other
    The client should not need to know anything about the architecture of the server
    The server should not need to know anything about the client's UI

3) Stateless constraint
Due to this limitation, the server and client should communicate without having information about each other.
    The server should not store any session (data) about the client
    The relationship between the client and the server is performed stateless, and all requests must be completely independent requests, not dependent on the results of other requests

4) Cachable constraint
The goal is to save the network and increase the exchange speed

    If possible, the request from the server should be cached
    During each response, it should be possible to manage the cache through the header

5) Layered system
The goal is to reduce complexity.

    Server architecture is divided into the hierarchical layer (cover-abstraction level).
    Each layer only knows about the middle layer

6) Code on demand constraint
This constraint is optional.
    In addition to simple data, the server can provide the client with the opportunity to execute some executable code examples. For example, to execute JS code. Just because this type of restriction is relatively dangerous, there is no obligation to implement it.

HostForLIFE.eu ASP.NET Core Hosting

European best, cheap and reliable ASP.NET hosting with instant activation. HostForLIFE.eu is #1 Recommended Windows and ASP.NET hosting in European Continent. With 99.99% Uptime Guaranteed of Relibility, Stability and Performace. HostForLIFE.eu security team is constantly monitoring the entire network for unusual behaviour. We deliver hosting solution including Shared hosting, Cloud hosting, Reseller hosting, Dedicated Servers, and IT as Service for companies of all size.


European ASP.NET Core Hosting - HostForLIFE :: Options Pattern In .NET 6.0

clock October 6, 2022 08:09 by author Peter

In this tutorial, we are going to cover an approach through which we can read the configuration data in .NET Core - the options pattern.

Why the Options Pattern?

   Options pattern gives the below features
    It can be used to bind configuration data to strongly typed objects.
    It adheres to two important software engineering principles - Encapsulation and Separation of Concerns.
    It provides a mechanism to validate configuration data.

Please refer to the Microsoft documentation for more details.

Tools which I have used for this tutorial:
    Visual Studio 2022 Community Edition – Preview version 17.4 (Preview 2)
    .NET 6.0
    Web API
    Swagger

To begin with, let us create a sample project. The source code can be downloaded from GitHub.

Let us assume that we have the below configuration in appsettings.json
"OptionsTutorial": {
    "InterfaceName" : "IOptions"
}

Create the following class:
public class OptionsTutorial
{
    public const string Position = "OptionsTutorial";
    public string InterfaceName { get; set; }
}

Rules which need to be followed to create this class:
    Must be non-abstract with a public parameterless constructor.
    All public read-write properties of the type are bound.
    Fields are not bound. In the preceding code, “Position” is not bound.
    The “Position” field is used so the string " OptionsTutorial " doesn't need to be hard coded in the app when binding the class to a configuration provider.

Bind the configuration data to strongly typed objects.

In Program.cs class, we need to add the below line to bind the configuration data.
builder.Services
    .Configure< OptionsTutorial>(builder.Configuration.GetSection(OptionsTutorial.Position));

Use IOptions<T> Interface
This interface is registered as a Singleton and can be injected into any service lifetime.

This does not support:
    Read configuration data after the application has started.
    Named Options -  Refer to the Microsoft documentation for more details.

Let us make a few code changes in WeatherForecastController.cs

Add the below variable at the beginning of the class.
private OptionsTutorial _optionsTutorial;

make the below code changes in Constructor.
public WeatherForecastController(ILogger<WeatherForecastController> logger, IOptions<OptionsTutorial> options)
{
    _logger = logger;
    this._optionsTutorial = options.Value;
}


Introduce a new action method as below
[HttpGet]
[Route("optionspattern")]
public IActionResult OptionsPattern()
{
    var interfaceName = this._optionsTutorial.InterfaceName;
    var message = $"interface name from OptionsTutorial - {interfaceName}";
    return Ok(message);
}


Let us debug the action method and the result.

We can see that; the configuration data has been bound to the strongly typed object.

Use IOptionsSnapshot<T> Interface
    This interface is useful in scenarios where options need to be recomputed on every request. Please refer to the Microsoft documentation for more details on this.
    This interface has been registered as Scoped; hence it cannot be injected into Singleton Services.
    It supports Names Options.

Add the below settings in Appsettings.json
"SnapShot": {
    "InterfaceName": "IOptionsSnapshot"
}


Add the below interface and classes
public class SnapShot
{
    public const string Position = "Snapshot";
    public string InterfaceName { get; set; }
}

I have created two interfaces - ISnapShotCheckWithScope.cs and ISnapShotCheckWithSingleton.cs for validating the Singleton as well as Scoped service lifetime

Make the necessary changes in Program.cs
builder.Services.AddScoped<ISnapShotCheckWithScope, SnapShotCheckWithScope>();
/// UnComment this line and see whether the code executed or not.
/// you will get a runtime error
//builder.Services.AddSingleton<ISnapShotCheckWithSingleton, SnapShotCheckWithSingleton>();


As IOptionsSnapshot interface has been registered as Scoped, it cannot be injected into Singleton Services. Please look at the source code available in GitHub to understand more on this.

Let us go ahead and execute the Scoped controller.

Now change from Scoped to Singleton in Program.cs and see how this behaves.
//builder.Services.AddScoped<IOptionsMonitorCheck, OptionMonitorCheck>();
//Uncomment each of the below one at a time and see how this behaves
builder.Services.AddSingleton<IOptionsMonitorCheck, OptionMonitorCheck>();
//builder.Services.AddTransient<IOptionsMonitorCheck, OptionMonitorCheck>();

Successfully execute.

Now let us change to Transient in Program.cs and see.
//builder.Services.AddScoped<IOptionsMonitorCheck, OptionMonitorCheck>();
//Uncomment each of the below one at a time and see how this behaves
//builder.Services.AddSingleton<IOptionsMonitorCheck, OptionMonitorCheck>();
builder.Services.AddTransient<IOptionsMonitorCheck, OptionMonitorCheck>();

Execute successfully.

We have seen how to read configuration data using Options pattern in .NET 6.0. This approach will ensure two engineering principles – encapsulation and separation of concerns.  Hope this article helps you to understand the Options pattern at high level. Thank you for reading my article and please leave your comments in the comment box below.


European ASP.NET Core Hosting - HostForLIFE :: gRPC Introduction And Implementation Using .NET Core 6

clock September 26, 2022 09:24 by author Peter

We are going to discuss the gRPC and its implementation using .NET Core 6

Agenda
    Introduction of gRPC
    Different scenarios in which we use gRPC
    Pros and Cons of gRPC
    Implementation of gRPC

Prerequisites

    Visual Studio 2022
    Basic Knowledge of C#

Introduction

    gRPC stands for Google Remote Procedure Calls
    gRPC is a modern open-source high-performance Remote Procedure Call (RPC) framework that can run in any environment. It can efficiently connect services in and across data centers with pluggable support for load balancing, tracing, health checking, and authentication. It is also applicable in the last mile of distributed computing to connect devices, mobile applications, and browsers to backend services. – gRPC Page


    gRPC is the framework that is used to implement APIs using HTTP/2
    Basically, gRPC uses the protobuf for serialization and HTTP2 protocol which provides lots more advantages than HTTP
    gRPC clients and servers intercommunicate using a variety of environments and machines, It Also supports many languages like Java, C#, Go, Ruby and Python.
    The Binary layer of gRPC will do all data operations like encoding and it also uses protobuf as an intermediator between client and server, improving performance.
    It is also used for communication between multiple microservices efficiently

Different scenarios in which we use gRPC

    When we use microservice architecture and we use that for internal communication from one or more servers
    It is also useful when performance is on high priority and low latency
    When we require duplex communication between services with different types of data

Pros and Cons of gRPC
Pros
    High Performance - faster than REST and SOAP
    Lightweight Message - gRPC Message is more lightweight than other types like JSON
    High Efficiency than other type
    Duplex data streaming

Cons
    Limited Browser Support
    It uses Binary Data due that it’s not easily readable like JSON and XML

Implementation of gRPC

Step 1
Create a new gRPC project

Step 2
Configure the project


Step 3
Provide additional information

Step 4
Project Structure

Here you will see the default project structure with greet proto and Greeter Service

syntax = "proto3";

option csharp_namespace = "GrpcService";

package greet;

// The greeting service definition.
service Greeter {
  // Sends a greeting
  rpc SayHello (HelloRequest) returns (HelloReply);
}

// The request message containing the user's name.
message HelloRequest {
  string name = 1;
}

// The response message containing the greetings.
message HelloReply {
  string message = 1;
}

    Protobuf is Interface Definition Language (IDL) for gRPC and uses to store data and contracts between clients and servers
    Line No 1 to 5 as you see there we declare types of protobuf syntax, namespace, and package
    Line No 7 to 11 there is a Unary Service Definition which takes a single request and the server sends back the response and it works as a function
    There are also many service definitions like Server Streaming, Client Streaming, and Bidirectional streaming RPCs. If you want to learn more about then read the grpc.io document
    Later on, there is a request and response function in order

using Grpc.Core;
namespace GrpcService.Services
{
    public class GreeterService : Greeter.GreeterBase
    {
        private readonly ILogger<GreeterService> _logger;
        public GreeterService(ILogger<GreeterService> logger)
        {
            _logger = logger;
        }

        public override Task<HelloReply> SayHello(HelloRequest request, ServerCallContext context)
        {
            return Task.FromResult(new HelloReply
            {
                Message = "Hello " + request.Name
            });
        }
    }
}


This is the Greeter Service which inherits from Greeter.GreeterBase and inside that we inject ILogger and there is one method which takes the message to send by the client and send back as a response

(Note: Build Application whenever you add a new proto and Service)

Also, make sure the proto property is configured properly as shown below

Here we can see Build Action Protobuf compiler and gRPC Stub Classes are Server only

Let’s create a Client Console Application

Step 1
Create a new console application


Step 2
configure your project

Step 3
provide additional information

Step 4

Copy greet proto file from the server and change the gRPC Stub Classes to Client only and build it

Step 5
Add client code inside the Program file

using Grpc.Net.Client;
using GrpcService;
using GrpcService.Protos;
var message = new HelloRequest {
    Name = "Jaydeep"
};
var channel = GrpcChannel.ForAddress("http://localhost:5045");
var client = new Greeter.GreeterClient(channel);
var srerveReply = await client.SayHelloAsync(message);
Console.WriteLine(srerveReply.Message);
Console.ReadLine();

    Here we create a channel after configuring the server’s URL and create a channel
    Later on, call the method after passing a parameter to the server and print the response message inside the console

Step 6
Finally, run your code after configuring your both project as startup projects in proper order

This is the final output
Now we are going to add our new proto and service related to the product application in that we pass the product id from the client and the server will send the particular product details back to the client

Step 1
Create a new product proto file and change properties to Protobuf compiler and Servers only after that build the project
syntax = "proto3";

option csharp_namespace = "GrpcService.Protos";

package product;

service Product {
    rpc GetProductsInformation (GetProductDetail) returns (ProductModel);
}

message GetProductDetail{
    int32 productId = 1;
}

message ProductModel{
    string productName = 1;
    string productDescription = 2;
    int32 productPrice = 3;
    int32 productStock = 4;
}

Here you can see, that we define service which takes product id as a parameter and send product details to the client

Step 2
Next, create a Product Service
using Grpc.Core;
using GrpcService.Protos;

namespace GrpcService.Services
{
    public class ProductService : Product.ProductBase
    {
        private readonly ILogger<ProductService> _logger;
        public ProductService(ILogger<ProductService> logger)
        {
            _logger = logger;
        }

        public override Task<ProductModel> GetProductsInformation(GetProductDetail request, ServerCallContext context)
        {
            ProductModel productDetail = new ProductModel();
            if (request.ProductId == 1)
            {
                productDetail.ProductName = "Samsung TV";
                productDetail.ProductDescription = "Smart TV";
                productDetail.ProductPrice = 35000;
                productDetail.ProductStock = 10;
            }
            else if (request.ProductId == 2)
            {
                productDetail.ProductName = "HP Laptop";
                productDetail.ProductDescription = "HP Pavilion";
                productDetail.ProductPrice = 55000;
                productDetail.ProductStock = 20;
            }
            else if (request.ProductId == 3)
            {
                productDetail.ProductName = "IPhone";
                productDetail.ProductDescription = "IPhone 12";
                productDetail.ProductPrice = 65000;
                productDetail.ProductStock = 30;
            }

            return Task.FromResult(productDetail);
        }
    }
}


Here you can see we create Product Service which inherits from Product.ProductBase and after that, we inject ILogger of type Product Service and create one method and inside that whatever product details client wants that we check and return as a response corresponding to the particular product which is sent by the client

Step 3
Map the Product Service inside the Program class
using GrpcService.Services;
var builder = WebApplication.CreateBuilder(args);
// Additional configuration is required to successfully run gRPC on macOS.
// For instructions on how to configure Kestrel and gRPC clients on macOS, visit https://go.microsoft.com/fwlink/?linkid=2099682
// Add services to the container.
builder.Services.AddGrpc();
var app = builder.Build();
// Configure the HTTP request pipeline.
app.MapGrpcService < GreeterService > ();
app.MapGrpcService < ProductService > ();
app.MapGet("/", () => "Communication with gRPC endpoints must be made through a gRPC client. To learn how to create a client, visit: https://go.microsoft.com/fwlink/?linkid=2086909");
app.Run();


Step 4
Build Server Project

Step 5
Copy the Product protobuf file inside the client and change the properties to the client only
syntax = "proto3";
option csharp_namespace = "GrpcService.Protos";
package product;
service Product {
    rpc GetProductsInformation(GetProductDetail) returns(ProductModel);
}
message GetProductDetail {
    int32 productId = 1;
}
message ProductModel {
    string productName = 1;
    string productDescription = 2;
    int32 productPrice = 3;
    int32 productStock = 4;
}

Step 6
Next, add client functionality inside the Program class
using Grpc.Net.Client;
using GrpcService;
using GrpcService.Protos;
//var message = new HelloRequest { Name = "Jaydeep" };
//var channel = GrpcChannel.ForAddress("http://localhost:5045");
//var client = new Greeter.GreeterClient(channel);
//var srerveReply = await client.SayHelloAsync(message);
//Console.WriteLine(srerveReply.Message);
//Console.ReadLine();
var channel = GrpcChannel.ForAddress("http://localhost:5045");
var client = new Product.ProductClient(channel);
var product = new GetProductDetail {
    ProductId = 3
};
var serverReply = await client.GetProductsInformationAsync(product);
Console.WriteLine($ "{serverReply.ProductName} | {serverReply.ProductDescription} | {serverReply.ProductPrice} | {serverReply.ProductStock}");
Console.ReadLine();


Here we create a channel after configuring the server’s URL and after that create a model object with a user id and pass it to the method which gets the product details as a response. Finally, we just print the product details in the console

Step 7

Build and run your both projects after setting up as a startup project

So, this is the output of our service.

In this section, we just understand the basic working of gRPC with Product Application. But, in real-time scenarios, there are many ways to implement that like using Background service and some different gRPC streaming techniques that we discussed in upcoming articles

Conclusion
In this article, we discussed gRPC, Pros, and Cons of gRPC. Also, the scenarios in which gRPC plays an important role and step-by-step implementation using .NET Core 6

HostForLIFE.eu ASP.NET Core Hosting

European best, cheap and reliable ASP.NET hosting with instant activation. HostForLIFE.eu is #1 Recommended Windows and ASP.NET hosting in European Continent. With 99.99% Uptime Guaranteed of Relibility, Stability and Performace. HostForLIFE.eu security team is constantly monitoring the entire network for unusual behaviour. We deliver hosting solution including Shared hosting, Cloud hosting, Reseller hosting, Dedicated Servers, and IT as Service for companies of all size.


European ASP.NET Core Hosting - HostForLIFE :: Feature Flag In .NET 6.0

clock September 21, 2022 09:22 by author Peter

Feature flags also referred to as Feature Toggles are a powerful way to modify applications behavior without making any changes in the code. It allows features to be turned on and off dynamically.

In this tutorial, we are going to look at the below,

    Feature Management Library in .NET
    How can we use Feature Management Library in ASP.NET Core applications
    How to add a simple Boolean feature flag.
    Advanced Feature Flag filters.
    Custom Feature Flag Filter.

Feature Management Library

The .NET Core Feature Management Library extends the framework with comprehensive feature flag support. These libraries are built on top of the .NET Core Configuration system. Any .NET Core configuration provider can act as a backbone for feature flags.

The definition which I copied from GitHub.

“The Microsoft.FeatureManagement library enables developers to use feature flags and dynamic features inside of their applications. Feature flags can be used to turn features on or off dynamically. Developers can use feature flags in simple use cases like conditional statements to more advanced scenarios like conditionally adding routes or MVC filters. Dynamic features can be used to select different variants of a feature's configuration. This enables the possibility of using one version of a feature for one set of users, and another version of the feature for the remaining users”
Use Feature Management Library in ASP.NET Core

The tools which I have used for this tutorial are below

    VS 2022 Community Edition Preview Version 17.4 - Preview 2.0
    .NET 6.0
    Web API
    Swagger

Without any further delay, let us create an ASP.NET Core API project. Then add the below package from the NuGet.

Microsoft.FeatureManagement.AspNetCore
Add a simple Boolean Feature Flag

As we have successfully installed the NuGet package, let us go ahead and Feature flag into the Controller “WeatherForecastController”
To add the Feature flag, we need to inject an interface called “IFeatureManager”. This interface belongs to the NuGet package “Microsoft.FeatureManagement.AspNetCore”

The WeatherForecastController constructor would be looks like below
private readonly IFeatureManager _featureManager;
public WeatherForecastController(ILogger < WeatherForecastController > logger, IFeatureManager featureManager) {
    _logger = logger;
    this._featureManager = featureManager;
}


Now, we are going to add the Feature flag in the endpoint method –“GetWeatherForecast”
By default, this method returns list of WeatherForecast with properties Date, TemperatureC, and Summary. The GetWeatherForecast method given below
[HttpGet(Name = "GetWeatherForecast")]
public IEnumerable < WeatherForecast > Get() {
    return Enumerable.Range(1, 5).Select(index => new WeatherForecast {
        Date = DateTime.Now.AddDays(index),
            TemperatureC = Random.Shared.Next(-20, 55),
            Summary = Summaries[Random.Shared.Next(Summaries.Length)]
    }).ToArray();
}

Let us go ahead and add a new feature called “TemperatureF” into the Model – “WeatherForecast”
public class WeatherForecast {
    public DateTime Date {
        get;
        set;
    }
    public int TemperatureC {
        get;
        set;
    }
    public string ? Summary {
        get;
        set;
    }
    //New Feature
    public int TemperatureF {
        get;
        set;
    }
}


While building this feature, we need to feature flag this new property as we are not sure when this is going to be deployed into production. So, we need to provide an ability to on and off this feature as we develop it. Let us start using the Feature Manager to determine this.

The updated GetWeatherForecast endpoint method is given below
[HttpGet(Name = "GetWeatherForecast")]
public async Task < IEnumerable < WeatherForecast >> Get() {
    //Feature Flag - this needs to be configure in AppSettings.json
    var isTemperatureFEnabled = await _featureManager.IsEnabledAsync("TemperatureF");
    return Enumerable.Range(1, 5).Select(index => new WeatherForecast {
        Date = DateTime.Now.AddDays(index),
            TemperatureC = Random.Shared.Next(-20, 55),
            //check whether the Feature Flag is enabled
            TemperatureF = isTemperatureFEnabled ? (int)(Random.Shared.Next(-20, 55) * 1.8) + 32 : null,
            Summary = Summaries[Random.Shared.Next(Summaries.Length)]
    }).ToArray();
}

Now we need to configure this Feature flag in any of the configuration source. In this tutorial, we are going to configure in AppSettings.json
"FeatureManagement": {
    "TemperatureF": true
}


The next step – we need to register the IFeatureManagement interface into dependency container. Now let us go to Program.cs and add the below line of code
builder.Services.AddFeatureManagement();

We have completed the configuration. Let us go ahead and execute the Endpoint GetWeatherForecast, we will get the below response
[{
        "date": "2022-09-17T23:08:43.4688307-04:00",
        "temperatureC": 25,
        "summary": "Balmy",
        "temperatureF": 37
    }, {
        "date": "2022-09-18T23:08:43.4693542-04:00",
        "temperatureC": 44,
        "summary": "Warm",
        "temperatureF": 44
    }, {
        "date": "2022-09-19T23:08:43.4693578-04:00",
        "temperatureC": -14,
        "summary": "Mild",
        "temperatureF": 91
    }

We can see that the new Feature “TemparatureF” has been returned.

Now let us go to disable this feature in AppSettings.json and execute the endpoint
"FeatureManagement": {
    "TemperatureF": false
}


Now execute the endpoint and look at the response.
[{
        "date": "2022-09-17T23:11:51.823846-04:00",
        "temperatureC": -17,
        "summary": "Hot",
        "temperatureF": null
    }, {
        "date": "2022-09-18T23:11:51.8238573-04:00",
        "temperatureC": 28,
        "summary": "Chilly",
        "temperatureF": null
    }, {
        "date": "2022-09-19T23:11:51.8238577-04:00",
        "temperatureC": 29,
        "summary": "Freezing",
        "temperatureF": null
    }


The TemperatureF has been displayed with “null” value. This property can be turned off altogether when it is null. To do that, go to Startup.cs and add the below lines of code.
//Ignore Null Values
builder.Services.AddControllers().AddJsonOptions(option => {
    option.JsonSerializerOptions.DefaultIgnoreCondition = System.Text.Json.Serialization.JsonIgnoreCondition.WhenWritingNull;
});


Now, let us go ahead and execute the code and see what the response would be.
[{
        "date": "2022-09-17T23:21:36.5978036-04:00",
        "temperatureC": 20,
        "summary": "Chilly"
    }, {
        "date": "2022-09-18T23:21:36.5981674-04:00",
        "temperatureC": 19,
        "summary": "Freezing"
    }, {
        "date": "2022-09-19T23:21:36.5981699-04:00",
        "temperatureC": -19,
        "summary": "Bracing"
    }


TemperatureF property is not visible

Feature Flag Filters
Let us go ahead and add a new endpoint as below
[HttpGet("newfeature")]
public async Task < IEnumerable < WeatherForecast >> GetNewEndPoint() {
    //Feature Flag - this needs to be configure in AppSettings.json
    var isTemperatureFEnabled = await _featureManager.IsEnabledAsync("TemperatureF");
    return Enumerable.Range(1, 5).Select(index => new WeatherForecast {
        Date = DateTime.Now.AddDays(index),
            TemperatureC = Random.Shared.Next(-20, 55),
            //check whether the Feature Flag is enabled
            TemperatureF = isTemperatureFEnabled ? (int)(Random.Shared.Next(-20, 55) * 1.8) + 32 : null,
            Summary = Summaries[Random.Shared.Next(Summaries.Length)]
    }).ToArray();
}

We are going to add feature flag to this method. Let us see how this can be achieved. Rather than we do an event check insider the method, we can simply add the below attribute at the method level to flag this method as a feature.
[FeatureGate("NewFeature")] – here “NewFeature” is the value of the feature flag

This attribute belongs to the namespace – “Microsoft.FeatureManagement.Mvc”

The updated method looks like below,
[HttpGet("newfeature")]
[FeatureGate("NewFeature")]
public async Task < IEnumerable < WeatherForecast >> GetNewFeature() {
    //Feature Flag - this needs to be configure in AppSettings.json
    var isTemperatureFEnabled = await _featureManager.IsEnabledAsync("TemperatureF");
    return Enumerable.Range(1, 5).Select(index => new WeatherForecast {
        Date = DateTime.Now.AddDays(index),
            TemperatureC = Random.Shared.Next(-20, 55),
            //check whether the Feature Flag is enabled
            TemperatureF = isTemperatureFEnabled ? (int)(Random.Shared.Next(-20, 55) * 1.8) + 32 : null,
            Summary = Summaries[Random.Shared.Next(Summaries.Length)]
    }).ToArray();
}

Now, let us go ahead and add this feature flag in AppSettings.json
"FeatureManagement": {
    "TemperatureF": false,
    "NewFeature": true
}


Let us go ahead and execute the endpoint
WeatherForecast/newfeature
[{
        "date": "2022-09-19T00:19:43.2623594-04:00",
        "temperatureC": 1,
        "summary": "Freezing"
    }, {
        "date": "2022-09-20T00:19:43.2651919-04:00",
        "temperatureC": 7,
        "summary": "Cool"
    }, {
        "date": "2022-09-21T00:19:43.2652001-04:00",
        "temperatureC": 26,
        "summary": "Scorching"
    }

Now update the “NewFeature” flag in AppSettings.json as below,
"FeatureManagement": {
    "TemperatureF": false,
    "NewFeature": false
} {
    "type": "https://tools.ietf.org/html/rfc7231#section-6.5.4",
    "title": "Not Found",
    "status": 404,
    "traceId": "00-4a24d9885877e1d886949c330cd2dd16-35b5ed50d738cba3-00"
}


We got the 404 error.

In the upcoming tutorial, I will be explaining Advanced Feature Flag and Custom Feature flag.

Thank you for reading my article.

HostForLIFE.eu ASP.NET Core Hosting

European best, cheap and reliable ASP.NET hosting with instant activation. HostForLIFE.eu is #1 Recommended Windows and ASP.NET hosting in European Continent. With 99.99% Uptime Guaranteed of Relibility, Stability and Performace. HostForLIFE.eu security team is constantly monitoring the entire network for unusual behaviour. We deliver hosting solution including Shared hosting, Cloud hosting, Reseller hosting, Dedicated Servers, and IT as Service for companies of all size.


European ASP.NET Core Hosting :: Create Window Service In .NET Core

clock September 12, 2022 10:40 by author Peter

In this article, we will learn how to create a window service with .NET Core using Quartz Cron expression. And host an application as a windows service on the server machine.

Step 1
To begin, make a project with the.NET core console application template.

Step 2
Install Required packages for Host Builder using Nuget Package Manager.

Host Builder Introduction
Host Builder is the new “generic” Host which enables developers to easily set up cross-cutting concerns such as logging, configuration, and dependency injection for non-web-focused applications. The team realized that having the host tied to the concern of HTTP was perhaps not an ideal solution since many of these are common requirements in other application types.

An example of where this could be used is in a console application that needs to run background processing tasks, perhaps handling messages on a queue for example. These types of services are now pretty common in a cloud-native, container-based architecture.

Step 3
Install the required package for Quartz using Nuget Package Manager.

Also, install Quartz using the Package Manager Console as below:
NuGet\Install-Package Quartz -Version 3.4.0

Step 4
Once package install is completed we can write code for the scheduler which will run after a specific amount of time. Please find below sample code to write in program.cs file to write log at specific amount of time.
class Program {
    static async Task Main(string[] args) {
        IHost Host = CreateHostBuilder(args).Build();
        await Host.RunAsync();
    }
    public static IHostBuilder CreateHostBuilder(string[] args) => Host.CreateDefaultBuilder(args).ConfigureServices(services => {
        ConfigureQuartzService(services);
        services.AddScoped < ITaskLogTime, TaskLogTime > ();
    });
    private static void ConfigureQuartzService(IServiceCollection services) {
        // Add the required Quartz.NET services
        services.AddQuartz(q => {
            // Use a Scoped container to create jobs.
            q.UseMicrosoftDependencyInjectionJobFactory();
            // Create a "key" for the job
            var jobKey = new JobKey("Task1");
            // Register the job with the DI container
            q.AddJob < Task1 > (opts => opts.WithIdentity(jobKey));
            // Create a trigger for the job
            q.AddTrigger(opts => opts.ForJob(jobKey) // link to the Task1
                .WithIdentity("Task1-trigger") // give the trigger a unique name
                .WithCronSchedule("0/5 * * * * ?")); // run every 5 seconds
        });
        // Add the Quartz.NET hosted service
        services.AddQuartzHostedService(q => q.WaitForJobsToComplete = true);
    }
}


Cron Trigger Introduction
As we utilize quartz we can use a cron trigger. Cron is nothing but it is a UNIX tool that has been around for a long time, so its scheduling capabilities are powerful and proven. The CronTrigger class is based on the scheduling capabilities of cron.

As for POC added cron trigger for 5 seconds with the below expression

"0/5 * * * * ?"

Create a trigger and added to quartz like the below code,
private static void ConfigureQuartzService(IServiceCollection services) {
    // Add the required Quartz.NET services
    services.AddQuartz(q => {
        // Use a Scoped container to create jobs.
        q.UseMicrosoftDependencyInjectionJobFactory();
        // Create a "key" for the job
        var jobKey = new JobKey("Task1");
        // Register the job with the DI container
        q.AddJob < Task1 > (opts => opts.WithIdentity(jobKey));
        // Create a trigger for the job
        q.AddTrigger(opts => opts.ForJob(jobKey) // link to the Task1
            .WithIdentity("Task1-trigger") // give the trigger a unique name
            .WithCronSchedule("0/5 * * * * ?")); // run every 5 seconds
    });
    // Add the Quartz.NET hosted service
    services.AddQuartzHostedService(q => q.WaitForJobsToComplete = true);
}


Step 5
Build and Run the application using exe file. Please find attached the full source code which will write the log to log.txt file for a current time after every 5 sec as per our cron expression.

Start exe


Check Log folder for the result

Step 6
As we run our application manually using exe file. Now sit back and think on server do we run our application like this is a good practice. Not a good idea. So below is the solution.

Host dotnet core console application as a window service

Please follow the below steps to host a console application as a window service.

Required Code changes
To support the window service console application, need to allow UseWindowsService in

CreateHostBuilder met method.

To use window service need to install the NuGet package
‘Microsoft.AspNetCore.Hosting.WindowsServices’

To install it by command use “Install-Package Microsoft.AspNetCore.Hosting.WindowsServices - Version”

Note
Need to install the package as per your .NET core version compatibility.

Change in Program.cs file.
public static IHostBuilder CreateHostBuilder(string[] args) => Host.CreateDefaultBuilder(args).UseWindowsService().ConfigureServices(services => {
    ConfigureQuartzService(services);
    services.AddScoped < ITaskLogTime, TaskLogTime > ();
});


Once code changes are done Publish the application in Release mode.

After publishing the application, open Command Prompt in administrator mode.

Command To Create Service > SC CREATE "ServiceName" binpath="D:\Published \application\path\application.exe"

Command To Remove Service > SC DELETE ServiceName

Once the service is created. Open press win + R > Type services.msc > Enter.

Service should be visible here by the name you have entered during creation.

Start and stop service from here and change the configuration as per requirement. (I.e. login by another user, automatic or manual)

Advantage
    The server admin is not required to run an exe file on the server manually.
    Server admin can set different credentials as per requirement.
    It can be set as an automatic or manual start. so whenever the server is down and restarted no need to check it will automatically start service as per configuration.

HostForLIFE.eu ASP.NET Core Hosting

European best, cheap and reliable ASP.NET hosting with instant activation. HostForLIFE.eu is #1 Recommended Windows and ASP.NET hosting in European Continent. With 99.99% Uptime Guaranteed of Relibility, Stability and Performace. HostForLIFE.eu security team is constantly monitoring the entire network for unusual behaviour. We deliver hosting solution including Shared hosting, Cloud hosting, Reseller hosting, Dedicated Servers, and IT as Service for companies of all size.


European ASP.NET Core Hosting :: JWT Token Creation, Authentication And Authorization In ASP.NET Core 6.0 With Postman

clock September 6, 2022 07:38 by author Peter

In this article, I will explain how to create the JWT token and how to Authenticate and Authorize it in very simple steps. We will follow the below steps to JWT token creation, authentication and authorization.

  • ASP.Net Core API Application
  • Add required packages.
  • Add Key, Issuer and Audience in appsettings.cs
  • Register JWT Token for Authentication in Startup.cs file.
  • Create Models (UserLogin, UserModel and UserConstant)
  • Create Login API Controller (Authenticate user and generate token)
  • Create User API Controller to authorize user role.
  • Test the API endpoint in Postman with Token.

1. Add ASP.Net Core API Application
Open visual studio 2022 click on create new project --> Select ASP.Net Core Web API --> Next

Give desired project and solution name --> Next --> select framework .Net 6.0 --> Create

2. Add Nuget Packages
Add the following packages from nuget package manager.
    Microsoft.AspNetCore.Authentication.JwtBearer
    Microsoft.IdentityModel.Tokens
    System.IdentityModel.Tokens.Jwt


3. Add setting in appsetting.json
Open appsetting.json and add following Key, Issuer and Audience

* To generate the random key use
https://www.random.org/strings

* For issuer and audience local URL follow the below steps
Project properties --> Debug --> General --> Open Debug Launch Profile UI


Select IIS Express and pick the App URL

"Jwt": {
    "Key": "ACDt1vR3lXToPQ1g3MyN", //Generate random String from https://www.random.org/strings
    "Issuer": "http://localhost:28747/", //Project Property-> Debug-> IIS-->App URL (you can local host url as well)
    "Audience": "http://localhost:28747/"
  },

4. Register JWT token for Authentication in Program.cs file

using Microsoft.AspNetCore.Authentication.JwtBearer;
using Microsoft.IdentityModel.Tokens;
using System.Text;
var builder = WebApplication.CreateBuilder(args);
// Add services to the container.
builder.Services.AddControllers();
// Learn more about configuring Swagger/OpenAPI at https://aka.ms/aspnetcore/swashbuckle
builder.Services.AddEndpointsApiExplorer();
builder.Services.AddSwaggerGen();
//JWT Authentication
builder.Services.AddAuthentication(JwtBearerDefaults.AuthenticationScheme).AddJwtBearer(options => {
    options.TokenValidationParameters = new TokenValidationParameters {
        ValidateIssuer = true,
            ValidateAudience = true,
            ValidateLifetime = true,
            ValidateIssuerSigningKey = true,
            ValidIssuer = builder.Configuration["Jwt:Issuer"],
            ValidAudience = builder.Configuration["Jwt:Audience"],
            IssuerSigningKey = new SymmetricSecurityKey(Encoding.UTF8.GetBytes(builder.Configuration["Jwt:Key"]))
    };
});
var app = builder.Build();
// Configure the HTTP request pipeline.
if (app.Environment.IsDevelopment()) {
    app.UseSwagger();
    app.UseSwaggerUI();
}
app.UseHttpsRedirection();
app.UseAuthentication();
app.UseAuthorization();
app.MapControllers();
app.Run();

5. Create Models (UserLogin, UserModel and UserConstant)
Add a new folder with Models name and create UserLogin, UserModel and UserConstant classes.

namespace JWTLoginAuthenticationAuthorization.Models
{
    public class UserModel
    {
        public string Username { get; set; }
        public string Password { get; set; }
        public string Role { get; set; }
    }
}

namespace JWTLoginAuthenticationAuthorization.Models
{
    public class UserLogin
    {
        public string Username { get; set; }
        public string Password { get; set; }
    }
}

namespace JWTLoginAuthenticationAuthorization.Models
{
    // We are not taking data from data base so we get data from constant
    public class UserConstants
    {
        public static List<UserModel> Users = new()
            {
                    new UserModel(){ Username="naeem",Password="naeem_admin",Role="Admin"}
            };
    }
}

6. Create LoginAPI Controller (Authenticate user and generate token)
Add a new Empty API controller name “LoginController” in controller folder.


Here creates one Post Action method for Login and two methods for Authenticating the user credentials and Generate the token (if user is authenticated).

using JWTLoginAuthenticationAuthorization.Models;
using Microsoft.AspNetCore.Authorization;
using Microsoft.AspNetCore.Mvc;
using Microsoft.IdentityModel.Tokens;
using System.IdentityModel.Tokens.Jwt;
using System.Security.Claims;
using System.Text;

namespace JWTLoginAuthenticationAuthorization.Controllers
{
    [Route("api/[controller]")]
    [ApiController]
    public class LoginController : ControllerBase
    {
        private readonly IConfiguration _config;
        public LoginController(IConfiguration config)
        {
            _config = config;
        }

        [AllowAnonymous]
        [HttpPost]
        public ActionResult Login([FromBody] UserLogin userLogin)
        {
            var user = Authenticate(userLogin);
            if (user != null)
            {
                var token = GenerateToken(user);
                return Ok(token);
            }

            return NotFound("user not found");
        }

        // To generate token
        private string GenerateToken(UserModel user)
        {
            var securityKey = new SymmetricSecurityKey(Encoding.UTF8.GetBytes(_config["Jwt:Key"]));
            var credentials = new SigningCredentials(securityKey, SecurityAlgorithms.HmacSha256);
            var claims = new[]
            {
                new Claim(ClaimTypes.NameIdentifier,user.Username),
                new Claim(ClaimTypes.Role,user.Role)
            };
            var token = new JwtSecurityToken(_config["Jwt:Issuer"],
                _config["Jwt:Audience"],
                claims,
                expires: DateTime.Now.AddMinutes(15),
                signingCredentials: credentials);


            return new JwtSecurityTokenHandler().WriteToken(token);

        }

        //To authenticate user
        private UserModel Authenticate(UserLogin userLogin)
        {
            var currentUser = UserConstants.Users.FirstOrDefault(x => x.Username.ToLower() ==
                userLogin.Username.ToLower() && x.Password == userLogin.Password);
            if (currentUser != null)
            {
                return currentUser;
            }
            return null;
        }
    }
}

7. Create User API Controller to authorize user role
Add new empty API controller named “UserController.cs” in controller folder.
Here we will authorize the endpoint on the behalf of role.

namespace JWTLoginAuthenticationAuthorization.Controllers
{
    [Route("api/[controller]")]
    [ApiController]
    public class UserController : ControllerBase
    {
        //For admin Only
        [HttpGet]
        [Route("Admins")]
        [Authorize(Roles = "Admin")]
        public IActionResult AdminEndPoint()
        {
            var currentUser = GetCurrentUser();
            return Ok($"Hi you are an {currentUser.Role}");
        }
        private UserModel GetCurrentUser()
        {
            var identity = HttpContext.User.Identity as ClaimsIdentity;
            if (identity != null)
            {
                var userClaims = identity.Claims;
                return new UserModel
                {
                    Username = userClaims.FirstOrDefault(x => x.Type == ClaimTypes.NameIdentifier)?.Value,
                    Role = userClaims.FirstOrDefault(x => x.Type == ClaimTypes.Role)?.Value
                };
            }
            return null;
        }
    }
}

8. Test the API endpoint in Postman with Token
Run the application and copy the URL domain from the browser.
Now open the Postman, give the URL with correct API route and select post request --> Body --> Json --> give the value of Username and Password
.

After clicking on send button we will get the JWT token in response.

Now copy this token and add a new Get request in postman and add the JWT token Authorization Tab --> Select Bearer --> Insert token and click on send button to test the authorization with given token. If the token is not valid token then we will get 401 Error otherwise will get the bolow result.

So we created the token and did the authentication on the behalf of username and password then check the user authorization.

HostForLIFE.eu ASP.NET Core Hosting

European best, cheap and reliable ASP.NET hosting with instant activation. HostForLIFE.eu is #1 Recommended Windows and ASP.NET hosting in European Continent. With 99.99% Uptime Guaranteed of Relibility, Stability and Performace. HostForLIFE.eu security team is constantly monitoring the entire network for unusual behaviour. We deliver hosting solution including Shared hosting, Cloud hosting, Reseller hosting, Dedicated Servers, and IT as Service for companies of all size.


European ASP.NET Core Hosting :: Web API With ASP.NET 6 And MySQL

clock September 5, 2022 10:30 by author Peter

In this tutorial article, we will learn how to build a web API from ASP.NET 6 to handle CRUD operations with a database in MySQL.

Resources required
To follow this article step by step or run the included demo, it is necessary to have the following tools in operation:
    MySQL.
    .NET 6 SDK.
    Visual Studio 2019/2022.
    The web development workload and ASP.NET for Visual Studio 2019/2022.

The process to follow,
In the tutorial, we will have three important parts:
    Review the database we are going to use.
    Establish database access from ASP.NET through the Entity Framework.
    Set the handlers and their methods for the web service.

As a case study for this tutorial, user data will be handled through CRUD (Create, Read, Update, and Delete) operations.

1. The database for the application domain.
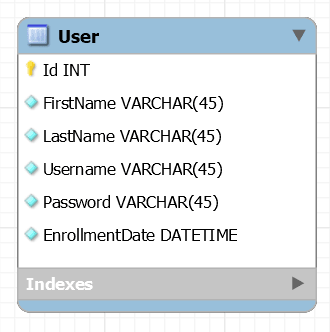
The database that we will use in this example is made up of a single table called: User, with the attributes: Id, FirstName, LastName, Username, Password, and EnrrollmentDate; in MySQL.

SQL statements for the creation of the User table are as follows:
CREATE TABLE `user` (
  `Id` INT NOT NULL PRIMARY KEY,
  `FirstName` VARCHAR(45) NOT NULL,
  `LastName` VARCHAR(45) NOT NULL,
  `Username` VARCHAR(45) NOT NULL,
  `Password` VARCHAR(45) NOT NULL,
  `EnrollmentDate` datetime NOT NULL
);


Very well, with the database established, we can already start with the implementation of our first project for the development of API Rest services.

SQL statements for the creation of the User table are as follows:
CREATE TABLE `user` (
  `Id` INT NOT NULL PRIMARY KEY,
  `FirstName` VARCHAR(45) NOT NULL,
  `LastName` VARCHAR(45) NOT NULL,
  `Username` VARCHAR(45) NOT NULL,
  `Password` VARCHAR(45) NOT NULL,
  `EnrollmentDate` datetime NOT NULL
);

Very well, with the database established, we can already start with the implementation of our first project for the development of API Rest services.

2. Establish database access from ASP.NET through Entity Framework.
ASP.NET 6 Web API project.

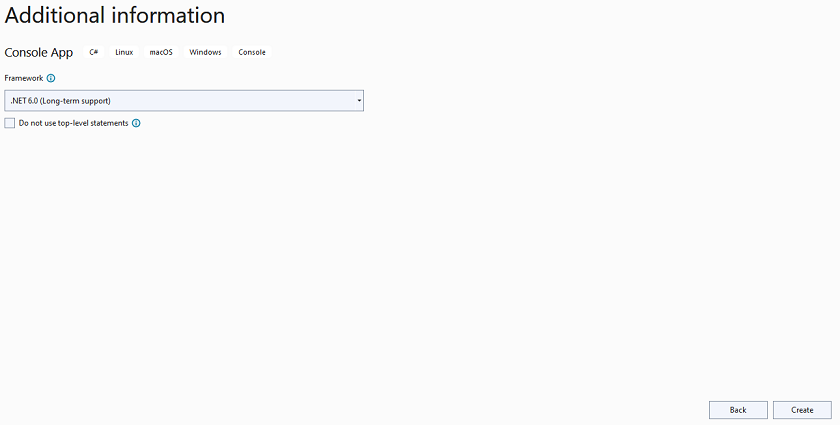
In Visual Studio, the first thing we'll do is create a new project of the type ASP.NET Core Web API:

Then, in the following steps, we can specify the Framework.

With this project, we'll create access to the database and implement a corresponding controller to work with that data and provide the web API.

Database access with Entity Framework.
To establish the entities through classes and the connection of the database, we can use the Database First approach of the Entity Framework, which allows us to scaffold from the database to the project, that is, generate classes automatically according to the entities established in the database and the connection in the project.

For this purpose, it's necessary to install three NuGet packages,
    Microsoft.EntityFrameworkCore.Design
    Microsoft.EntityFrameworkCore.Tools
    MySql.EntityFrameworkCore

In case you are working with SQL Server, the NuGet package to install will be: Microsoft.EntityFrameworkCore.SQLServer.

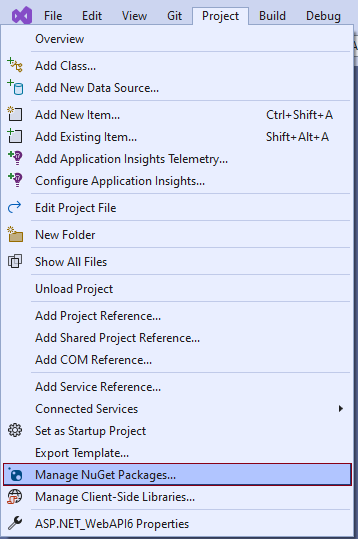
Note: To find the admin center of NuGet packages, we can go to the option: Menu -> Project -> Manage NuGet Packages...

With the installation of these NuGet packages, we'll now open the package manager console to write a command that will allow us to perform scaffolding from the database:


Command
Scaffold-DbContext "server=servername;port=portnumber;user=username;password=pass;database=databasename" MySql.EntityFrameworkCore -OutputDir Entities -f

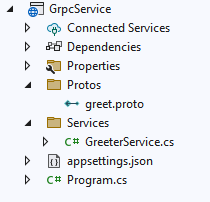
The result is as follows:


Here, the User class is defined as follows,
public partial class User
{
    public int Id { get; set; }
    public string FirstName { get; set; }
    public string LastName { get; set; }
    public string Username { get; set; }
    public string Password { get; set; }
    public DateTime EnrollmentDate { get; set; }
}

And the DBContext, which has the configuration with the database, whose main method OnConfiguring will look something like this,
protected override void OnConfiguring(DbContextOptionsBuilder optionsBuilder)
{
  if (!optionsBuilder.IsConfigured)
  { optionsBuilder.UseMySQL("server=localhost;port=3306;user=root;password=;database=database");
  }
}


Now, it's not the most appropriate that the connection string to the database is specified in the OnConfiguring method. For this, within our project, we can find the appsettings.json file, in which we can define this configuration,
"AllowedHosts": "*",
"ConnectionStrings": {
  "DefaultConnection": "server=localhost;port=3306;user=root;password=;database=demo;"
}


Then, in the Program class, we'll add as a service to the DBContext, and then we must reference the DefaultConnection the property specified in the appsettings.json file:
builder.Services.AddEntityFrameworkMySQL().AddDbContext < DBContext > (options => {
    options.UseMySQL(builder.Configuration.GetConnectionString("DefaultConnection"));
  });
});

In this case, returning to the class of the DBContext, we delete the connection string specified in the OnConfiguring method.
protected override void OnConfiguring(DbContextOptionsBuilder optionsBuilder)
{}


With these steps, we have already ready the connection and the necessary configurations to work with the database in ASP.NET with the help of Entity Framework.


3. Set the controllers and their methods for the web service.
In order to transport the data between the processes for the management of the database and the processes for working with web services, it's advisable to establish DTO classes for each entity of the project, in this case, a DTO for the entity User.

To do this, we'll create a new folder within the project called DTO and create a class called UserDTO, whose attributes will be the same as the User class defined in the Entities section above:
public class UserDTO
{
    public int Id { get; set; }
    public string FirstName { get; set; }
    public string LastName { get; set; }
    public string Username { get; set; }
    public string Password { get; set; }
    public DateTime EnrollmentDate { get; set; }
}


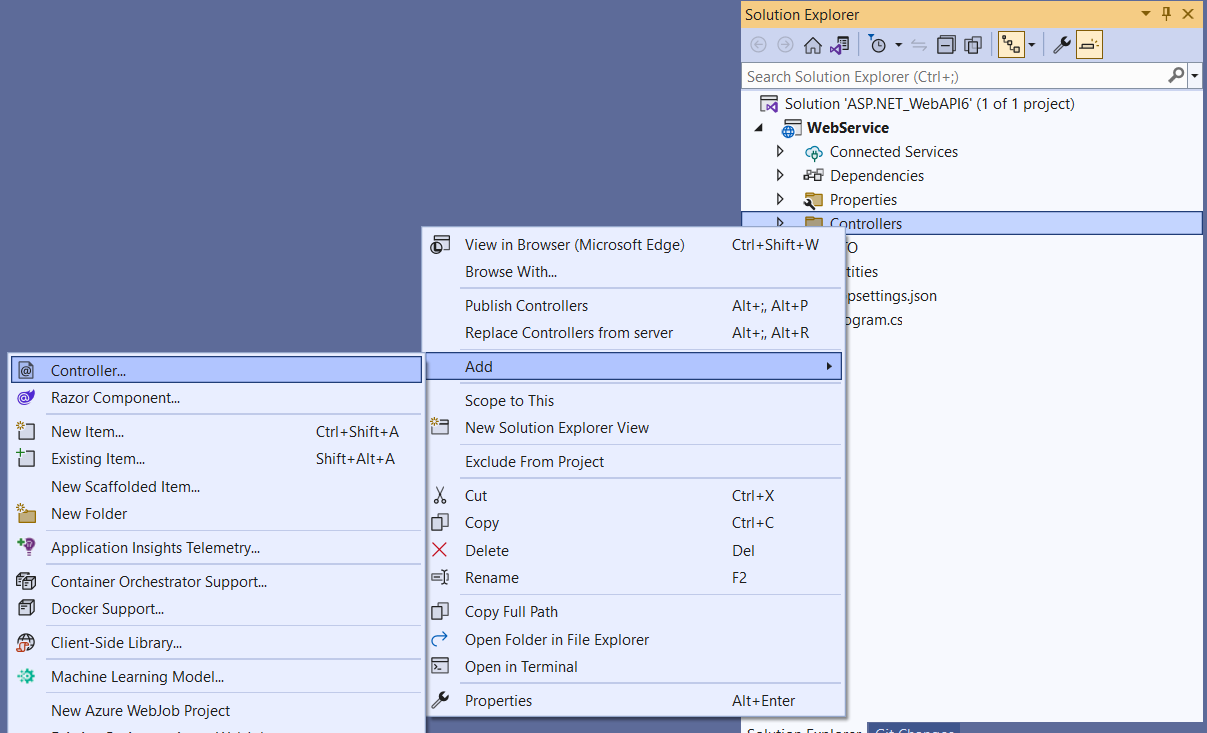
Controllers for the Web API.

Now what we'll do is add the controllers, in this case, the controller for the user, which will allow establishing methods to perform CRUD operations on the tables of the database and expose them through the Web API. On the Controllers folder, we'll add a controller called UserController:

The definition of the class and its constructor will look like this:
[ApiController]
[Route("api/[controller]")]
public class UserController : ControllerBase
{
    private readonly DBContext DBContext;

    public UserController( DBContext DBContext)
    {
        this.DBContext = DBContext;
    }
    ...
}

Now, the goal is to perform CRUD operations. In this sense, we'll use methods to access the information (Get), insert data (Post), modify (Put), and delete a record (Delete).

The following is the final code for each of the methods:

A. Get the list of all registered users.
[HttpGet("GetUsers")]
public async Task<ActionResult<List<UserDTO>>> Get()
{
    var List = await DBContext.User.Select(
        s => new UserDTO
        {
            Id = s.Id,
            FirstName = s.FirstName,
            LastName = s.LastName,
            Username = s.Username,
            Password = s.Password,
            EnrollmentDate = s.EnrollmentDate
        }
    ).ToListAsync();

    if (List.Count < 0)
    {
        return NotFound();
    }
    else
    {
        return List;
    }
}


B. Obtain the data of a specific user according to their Id.
[HttpGet("GetUserById")]
public async Task < ActionResult < UserDTO >> GetUserById(int Id) {
    UserDTO User = await DBContext.User.Select(s => new UserDTO {
        Id = s.Id,
            FirstName = s.FirstName,
            LastName = s.LastName,
            Username = s.Username,
            Password = s.Password,
            EnrollmentDate = s.EnrollmentDate
    }).FirstOrDefaultAsync(s => s.Id == Id);
    if (User == null) {
        return NotFound();
    } else {
        return User;
    }
}


C. Insert a new user.
[HttpPost("InsertUser")]
public async Task < HttpStatusCode > InsertUser(UserDTO User) {
    var entity = new User() {
        FirstName = User.FirstName,
            LastName = User.LastName,
            Username = User.Username,
            Password = User.Password,
            EnrollmentDate = User.EnrollmentDate
    };
    DBContext.User.Add(entity);
    await DBContext.SaveChangesAsync();
    return HttpStatusCode.Created;
}


D. Update the data of a specific user.
[HttpPut("UpdateUser")]
public async Task < HttpStatusCode > UpdateUser(UserDTO User) {
    var entity = await DBContext.User.FirstOrDefaultAsync(s => s.Id == User.Id);
    entity.FirstName = User.FirstName;
    entity.LastName = User.LastName;
    entity.Username = User.Username;
    entity.Password = User.Password;
    entity.EnrollmentDate = User.EnrollmentDate;
    await DBContext.SaveChangesAsync();
    return HttpStatusCode.OK;
}

E. Delete a user based on their Id.
[HttpDelete("DeleteUser/{Id}")]
public async Task < HttpStatusCode > DeleteUser(int Id) {
    var entity = new User() {
        Id = Id
    };
    DBContext.User.Attach(entity);
    DBContext.User.Remove(entity);
    await DBContext.SaveChangesAsync();
    return HttpStatusCode.OK;
}


With these methods and the steps followed up to this point, the web service is ready to run.

Test the implemented web API
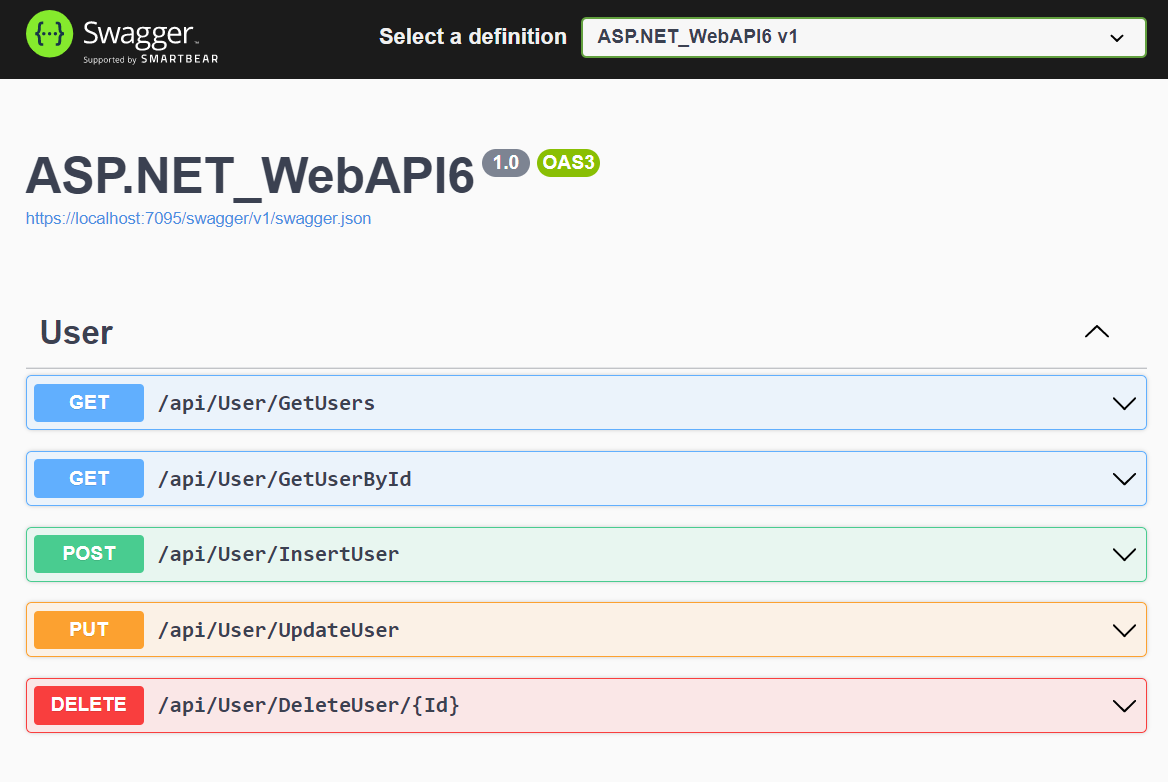
To test the implemented API we can use Swagger UI, a visual tool that allows us to interact with the methods of our service, and that in turn is already integrated into our ASP.NET 6 project.

For testing, we need to build and run the application:

Next, we can see the Swagger interface so that we can perform the corresponding tests according to the methods defined in our controller and in an interactive way:


As this is a RestFul service, we may use any other program or application to consume these services. For example, here we can see a call to the GetUsers method from the Postman tool:


HostForLIFE.eu ASP.NET Core Hosting

European best, cheap and reliable ASP.NET hosting with instant activation. HostForLIFE.eu is #1 Recommended Windows and ASP.NET hosting in European Continent. With 99.99% Uptime Guaranteed of Relibility, Stability and Performace. HostForLIFE.eu security team is constantly monitoring the entire network for unusual behaviour. We deliver hosting solution including Shared hosting, Cloud hosting, Reseller hosting, Dedicated Servers, and IT as Service for companies of all size.


European ASP.NET Core Hosting :: Telemtery Converter Was Not Found Error

clock August 29, 2022 09:11 by author Peter

If you are using serilog 4.0, the latest GitHub documentation mentioned the depreciation of telemetry configuration active and future removal support of instrumentation Key.

They adjusted their namespaces, which cause the serilog configuration binding not able to find the type.

    GitHub

you have to replace instrumentation Key with 'connection string' and add correct namespace for telemetry converter in your appsetting.json.

"Serilog": {
    "MinimumLevel": {
        "Default": "Information",
        "Override": {
            "Microsoft": "Warning",
            "System": "Warning"
        }
    },
    "WriteTo": {
        "0": {
            "Name": "ApplicationInsights",
            "Args": {
                "connectionString": "",
                "telemetryConverter": "Serilog.Sinks.ApplicationInsights.TelemetryConverters.TraceTelemetryConverter, Serilog.Sinks.ApplicationInsights"
            }
        },
        "1": {
            "Name": "Console"
        }
    },
    "Enrich": ["FromLogContext", "WithMachineName", "WithProcessId", "WithThreadId"],
    "Properties": {
        "ApplicationName": "<application_name>"
    },
    "AllowedHosts": "*"
},

You just need to paste connection string in Args section which you can find on application insights of azure monitor.

Program.cs

public static void Main(string[] args) {
    Activity.DefaultIdFormat = ActivityIdFormat.W3C;
    var env = Environment.GetEnvironmentVariable(Env);
    var config = new ConfigurationBuilder().AddJsonFile("appsettings.json", true).AddJsonFile($ "appsettings.{env}.json", true).Build();
    //Initialize Logger
    Log.Logger = new LoggerConfiguration().ReadFrom.Configuration(config).CreateLogger();
    try {
        Log.Information("application starting up...");
        CreateHostBuilder(args).Build().Run();
        Log.Information("application has started... running host");
    } catch (Exception ex) {
        Log.Fatal(ex, " application failed to start...");
    } finally {
        Log.CloseAndFlush();
    }
}
public static IHostBuilder CreateHostBuilder(string[] args) => Host.CreateDefaultBuilder(args).UseSerilog().ConfigureWebHostDefaults(webBuilder => {
    webBuilder.UseStartup < Startup > ();
});

Initialize Logger before calling CreateHostBuilder.

HostForLIFE.eu ASP.NET Core Hosting

European best, cheap and reliable ASP.NET hosting with instant activation. HostForLIFE.eu is #1 Recommended Windows and ASP.NET hosting in European Continent. With 99.99% Uptime Guaranteed of Relibility, Stability and Performace. HostForLIFE.eu security team is constantly monitoring the entire network for unusual behaviour. We deliver hosting solution including Shared hosting, Cloud hosting, Reseller hosting, Dedicated Servers, and IT as Service for companies of all size.


About HostForLIFE

HostForLIFE is European Windows Hosting Provider which focuses on Windows Platform only. We deliver on-demand hosting solutions including Shared hosting, Reseller Hosting, Cloud Hosting, Dedicated Servers, and IT as a Service for companies of all sizes.

We have offered the latest Windows 2019 Hosting, ASP.NET 5 Hosting, ASP.NET MVC 6 Hosting and SQL 2019 Hosting.


Month List

Tag cloud

Sign in