European ASP.NET 4.5 Hosting BLOG

BLOG about ASP.NET 4, ASP.NET 4.5 Hosting and Its Technology - Dedicated to European Windows Hosting Customer

European ASP.NET Core Hosting :: HTTPRequest Class In ASP.NET

clock September 29, 2021 08:20 by author Peter

The HttpRequest class is present in the System.Web namespace. During a web request, the HttpRequest class enables ASP.NET to read the HTTP values sent by a client. The method of this class is used to get the path information and save requests on the disk.

Properties and Methods of HTTPRequest Class
Following are some of the important properties of the HttpRequest class

Path
This property retrieves the virtual path of the current request.
public string Path { get; }

Code retrieves the path of the requested URL.
esponse.Write(“Path is :”+Request.Path);

Here Request.Path retrieves the path of the current URL request. The method Response.Write() displays the retrieved path.

PathInfo
This property retrieves the additional path information of the current request. It retrieves the information only for resources that have a URL extension.
Syntax is,
public string PathInfo { get };


Source code
if (Request.PathInfo == String.Empty) {
    Response.Write(”PathInfo property has no info...”);
} else {
    Response.Write(“ < br > PathInfo contains: < br > ”+Request.PathInfo);
}

Here String.Empty represents an empty string. The if condition checks whether PathInfo is empty. If there is no path information of the current request, Response.Write() method displays a message stating that the PathInfo property contains no information. If path information is available, the Request.PathInfo retrieves the path and Response.Write() method displays it on the web page.

UserAgent
This property retrieves the user agent string of the client browser. Consider the following example of a user agent string returned by the UserAgent property.
Mozilla/5.0(Windows;U;Windows NT 5.1; en-IN; rv:1.7.2) Geco/20050915 Firefox/2.0.6

In this example, the user agent string indicates which browser the user is using, its version number, and details about the system such as operating system and version. The web server can use this information to provide content that is defined for a specific browser. Also identifies the user’s browser and provides certain system details to servers.

The syntax for using the UserAgent property is,
public string UserAgent { get; }

For example,
Response.Write(“User Agent is :” +Request.UserAgent);

The code UserAgent property retrieves the user agent string of the client browser for the current URL request. This string is displayed on the web page using the Response.Write() method.

UserHostAddress
This property retrieves the host Internet Protocol (IP) address of the remote client who makes the request.

The IP address is a unique address used to identify a computer on a network. This address helps computers on the network to communicate with each other. 102.169.2.1 is an example of an IP address. The property UserHostAddress is used to retrieve the IP address of the client computer.

The syntax for using the UserHostAddress property is,
public string UserHostAddress { get;}

For example,
Response.Write(“User Host Address is:”+Request.UserHostAddress);

The code Request.UserHostAddress retrieves the host IP address of the remote client making the current URL request. This IP host address is displayed on web page using Response.Write() method.

TotalBytes
This property retrieves the number of bytes in the current input stream. The syntax for using the TotalBytes property is,
public int TotalBytes {get;}

Code below demonstrate the use of the TotalBytes property,
if (Request.TotalBytes > 1000) {
    Response.Write(“The request is 1 KB or greater”);
}

The if condition checks if the total number of bytes in the input stream is greater than 1000. If the condition evaluates to true, Response.Write() method is displays the message “ The request is 1KB or greater” on the web page.

Following are some of the important methods of the HttpRequest class.

BinaryRead()
This method is used to retrieve the data sent to the server from the client.

The syntax is,
public byte[] BinaryRead(int count)

where count represents the number of bytes to be read. Code shows the use of the BinaryRead() method.
int intTotalBytes=Request.TotalBytes;
byte[] bCount=Request.BinaryRead(intTotalBytes);


In this code, intTotalBytes is declared as an integer variable that stores the total number of bytes in the current input stream. This number is retrieved using Request.TotalBytes. This value is then used by the BinaryRead() method to perform a binary read of the input stream and store the data that is read into a byte array named bCount.

GetType()
This method retrieves the type of the current instance.

Syntax
public Type GetType()

Where, Type is the class that represents various type declarations such as class types, array types, and interface types.

For example,
Response.Write(“<br>Type:” +Request.GetType());

The GetType() method retrieves the Type of the instance and it is displayed using the Response.Write() method.

Expectations of HttpRequest Class
Exceptions are runtime errors that occur due to certain problems encountered at the time of execution of code. When working with ASP.NET using C# , exception handling is achieved using the try-catch-finally construct. The try block encloses the statements that might throw an exception and the catch block handles the exception. The code is finally block is always executed, regardless of whether an exception occurred or not, and this code contains cleanup routines for exception situations.

When calling the BinaryRead() method of the HttpRequest class, an exception of type ArgumentException can possibly occur. This exception occurs when calling a method, if at least one of the arguments passed to the method does not meet the parameter specification.

The Path property of the HttpRequest class retrieves the virtual path of the current request. The UserHostAddress property of HttpRequest class retrieves the host IP address of the remote client making the request. GetType() also retrieves the type of the current instance.

HostForLIFE.eu ASP.NET Core Hosting

European best, cheap and reliable ASP.NET hosting with instant activation. HostForLIFE.eu is #1 Recommended Windows and ASP.NET hosting in European Continent. With 99.99% Uptime Guaranteed of Relibility, Stability and Performace. HostForLIFE.eu security team is constantly monitoring the entire network for unusual behaviour. We deliver hosting solution including Shared hosting, Cloud hosting, Reseller hosting, Dedicated Servers, and IT as Service for companies of all size.


European ASP.NET Core Hosting :: How To Upgrade ASP.NET Core 2.1 To ASP.NET Core 3.1 version?

clock September 28, 2021 07:34 by author Peter

This article provides the guidelines to upgrade ASP.NET Core 2.1/2.0 (or lower versions) to 3.1. .Net Core 3.1 has long-term support and if you are using a 2.0/2.1 or lower .NET Core application and need to upgrade it, this write-up will help you. The very first step for migration is changing the target framework. For this: right-click on Project-> properties and then in project properties select the target framework to 3.1. Alternatively, you can change the target framework from .csproj file changing the target framework to netcoreapp3.1.

Right-click on the project and then click on Edit project file.

Then change the target framework to netcoreapp3.1.

Once you change the .net core version from 2.1 to 3.1 from Solution properties, then build the solution. Some packages will be restored and upgraded automatically. You may get number of errors in the solution but with that, there will be some suggestions showing what you need to do after upgrading the solution framework. Based on the suggestion, you can resolve the issue; however, in this article basically, we will discuss the Startup. cs file changes which are very crucial, and will throw errors even if you have no errors after building the solution too.

Guideline 1
You may get the below error while running the application even if your solution builds successfully.

When we continue to run the project, the page will be loaded with the below error message.

Let’s move to the solution of the above error. Thing is after migration to ASP.NET Core 3.1, we have to use UseEndPoints() instead of UseMVC();

Inside Configuration() method of Startup.cs file, we need to change the below code.
app.UseMvc(routes => {
    routes.MapRoute(name: "default", template: "{controller=Home}/{action=Index}/{id?}");
});

To
app.UseEndpoints(endpoints => {
    endpoints.MapControllerRoute(name: "default", pattern: "{controller=Home}/{action=Index}/{id?}");
});


Guideline 2
You may get the below error,
Error: EndpointRoutingMiddleware matches endpoints setup by EndpointMiddleware and so must be added to the request execution pipeline before EndpointMiddleware

If you get an error like the above then, follow the below suggestion.
We have to use app.UseRouting(); inside the Configuration() method of Startup.cs file
app.UseRouting();//error message suggested to implement this


Guideline 3
Additionally, If you have implemented SignalR then you will get information or warning messages like this :

In ASP.NET Core 2.1 application, SignalR is written as shown below which resides inside the Configuration() method of Startup.cs file.
app.UseSignalR(routes => {
routes.MapHub < ChatUpdaterHub > ("/chat-updater");
});

However, in ASP.NET Core 3.1 it should be implemented with endpoints as illustrated in the below code.
app.UseEndpoints(endpoints => {
endpoints.MapHub < ChatUpdaterHub > ("/chat-updater"); //Signal R implementation
endpoints.MapControllerRoute(name: "default", pattern: "{controller=Home}/{action=Index}/{id?}");
});

Code of Startup.cs class of .NET Core 2.1 is
public class Startup {
public IConfiguration Configuration {
    get;
}
public Startup(IConfiguration configuration) {
    this.Configuration = configuration;
}
public void ConfigureServices(IServiceCollection services) {
    services.AddSingleton(defaultEndpointsSettings);
    services.AddDistributedMemoryCache();
    services.AddTransient < ApiRequester > ();
    services.AddHostedService < FetchingBackgroundService > ();
    services.AddMvc();
    services.AddSignalR();
}
public void Configure(IApplicationBuilder app, IHostingEnvironment env) {
    if (env.IsDevelopment()) {
        app.UseDeveloperExceptionPage();
    } else {
        app.UseExceptionHandler("/Home/Error");
    }
    var cachePeriod = env.IsDevelopment() ? "600" : "604800";
    app.UseStaticFiles(new StaticFileOptions {
        OnPrepareResponse = ctx => {
            ctx.Context.Response.Headers.Append("Cache-Control", $ "public, max-age={cachePeriod}");
        }
    });
    app.UseSignalR(routes => {
        routes.MapHub < DataUpdaterHub > ("/ws-updater");
    });
    app.UseMvc(routes => {
        routes.MapRoute(name: "default", template: "{controller=Home}/{action=Index}/{id?}");
    });
}
}


When we upgrade the same project to .Net Core 3.1 Startup.cs class should be like this,
public class Startup
{
   public IConfiguration Configuration { get; }
   public IWebHostEnvironment Environment { get; }
   public Startup(IConfiguration configuration, IWebHostEnvironment environment)
   {
       this.Configuration = configuration;
       Environment = environment;
   }

   public void ConfigureServices(IServiceCollection services)
   {

       services.AddSingleton(defaultEndpointsSettings);
       services.AddDistributedMemoryCache();
       services.AddTransient<ApiRequester>();
       services.AddHostedService<FetchingBackgroundService>();
       services.AddMvc();
       services.AddSignalR();

   }

   public void Configure(IApplicationBuilder app)
   {
       if (Environment.IsDevelopment())
       {
           app.UseDeveloperExceptionPage();
       }
       else
       {
           app.UseExceptionHandler("/Home/Error");
       }

       var cachePeriod = Environment.IsDevelopment() ? "600" : "604800";
       app.UseStaticFiles(new StaticFileOptions
       {
           OnPrepareResponse = ctx =>
           {
               ctx.Context.Response.Headers.Append("Cache-Control", $"public, max-age={cachePeriod}");
           }
       });
       app.UseRouting();

       app.UseEndpoints(endpoints =>
       {
           endpoints.MapHub<DataUpdaterHub>("/ws-updater");
           endpoints.MapControllerRoute(
               name: "default",
               pattern: "{controller=Home}/{action=Index}/{id?}");
       });
   }
}

Microsoft Recommendation
Microsoft’s recommendation for migration to .NET Core 3.1 is:
Add UseRouting()
Sequence of UseStatisFiles(), UseRouting(), UseAuthentication() and UseAuthorization(), UseCors() and UseEndPoints() should be in following order

This article described the guidelines to upgrade the .NET Core from 2.1 (or lower versions) to 3.1 with sample code and examples of errors and how to resolve them. I hope it will help you to update your application from lower framework to upper with long-term support.

HostForLIFE.eu ASP.NET Core Hosting

European best, cheap and reliable ASP.NET hosting with instant activation. HostForLIFE.eu is #1 Recommended Windows and ASP.NET hosting in European Continent. With 99.99% Uptime Guaranteed of Relibility, Stability and Performace. HostForLIFE.eu security team is constantly monitoring the entire network for unusual behaviour. We deliver hosting solution including Shared hosting, Cloud hosting, Reseller hosting, Dedicated Servers, and IT as Service for companies of all size.


European ASP.NET Core Hosting :: Create ASP.NET Core Web API With Entity Framework Code First Approach

clock September 27, 2021 08:28 by author Peter

In this article, we are going to create WEB API in ASP.Net core using Entity Framework Core’s Code first approach. In this, we are creating a simple CRUD operation of employees and test it using Swagger. In this API we are not going to use authentication, we will add this in my upcoming articles.
In this article,

    Create ASP.Net Core Web API Project
    Add Entity Framework and Create Tables
    Create Service to perform CRUD Operation
    Implement Service in Controller
    Test API Using Swagger

Create ASP.Net Core Web API Project
Step 1
Open Visual Studio and create a new project. Here I am using Visual Studio 2019. You can use as per your system and requirements.

Step 2
Find and select Asp.Net Core Web API and then click on the Next button.

Step 3
In the next wizard, you have to enter the following things and then click on the Next button
    Project Name
    Location of your project (Path where you want to save your project)

Step 4
In this wizard screen, you have to specify the following things and then click on create button.

  • Target Framework, here I am using the current version installed in my system which is 5.
  • Authentication type: Currently in this project, we are not using authentication so here I select none.
  • Configure HTTPS: If you host your API with a secure HTTPS connection then you can check this box. It will add a redirection in your project which helps to redirect the http request to HTTPS automatically.
  • Enable Docker: For this project, we are not using docker so leave unchecked
  • Enable Open AI Support: If you want to implement Swagger in your project then you have to check this box. In this project, we are going to use a swagger so I check this box.


Now your project is created and you can see the project structure in the below image. Remove extra files like weather controller and model if you don’t want it.

Add Entity Framework and Create Tables
For using the Entity Framework in our project and create a table using the code first approach we have to follow the below steps.

Step 1
Right-click on the project name and click on Manage NuGet Packages.


Step 2
Install the Following NuGet Packages.

Microsoft.EntityFrameworkCore.SqlServer: This package is used to interact with SQL Server from our C# and .Net Core.
Microsoft.EntityFrameworkCore.Tools: This package is contained various commands like Add-Migration, Drop-Database, Get-DbContext, Get-Migration, Remove-Migration, Scaffold-DbContext, Script-Migration, Update-Database. In this article, we use Add-Migration and Update-Database commands.
Microsoft.Extensions.Configuration: Using this NuGet package we can read data from our app setting file. We will get our connection string from the app setting file.

Step 3

Now we add a new folder in our solution to contain various classes. For adding a new folder in our solution right click on project name the click on Add then click on New Folder and gave the name as Models.

Step 4
In this Models folder, we will use our entity classes. Right-click in this folder then Add then Class. Give a suitable name for your class.

Step 5
Add fields as you want to create in your table. Here I create an Employee class with the following fields. Here key attribute defines that use this column as the primary key.

public class Employees {
    [Key]
    public int EmployeeId {
        get;
        set;
    }
    public string EmployeeFirstName {
        get;
        set;
    }
    public string EmployeeLastName {
        get;
        set;
    }
    public decimal Salary {
        get;
        set;
    }
    public string Designation {
        get;
        set;
    }
}

Step 6
Now we create a context class which use as a middleware to SQL Server. Add a new class in your Models folder and add constructor and Employee DbSet as seen below code.

public class EmpContext: DbContext {
    public EmpContext(DbContextOptions options): base(options) {}
    DbSet < Employees > Employees {
        get;
        set;
    }
}

Step 7
Now we have to connect SQL Server with our project, for that, we need a connection string, and for this string, we are going to add the in-app setting file. Add your connection string as showing below.

As see in the above code here I pass. (dot) as a server name because I used my local SQL Server. Then gave database name Tutorial, if this database does not exist then it will generate automatically. Here I have not given any username and password because I use windows authentication for this. If you want to use another method to login then pass username and password.

Step 8
Now we have to add Db Context in our startup file for this open startup file and add the following code.

services.AddDbContext<EmpContext>(x => x.UseSqlServer(Configuration.GetConnectionString("ConStr")));

In ConfigureService Method, we add our EmpContext class and pass connection string in it by getting from our appsetting file using Configure.GetConnectionString() method.

Step 9
Now open Package Manager Console by click on Tool Menu then NuGet Package Manager then Package Manager Console.


Step 10
Add the following command.

    Add-Migration Init

Here Init is our name of migration, you can give as per your choice. Hit enter.

Step 11
As you can see in your solution new folder named Migration is created and in this project, there are two files. One is EmpContextModelSnapshot and another one is *_Init, here * mean date time stamp.

Step 12
For now, our database and table are not created to make changes in the Server-side use below command.
    Update-Database

Now you can see in our SQL Server Employee table is created with the same fields as we add in our model.


Create New Response Model
To save and delete we are going to return a new model for send data to the user. To create a new folder called ViewModels In your solution because we want to store Entity classes and Other classes in a different place. Add a new class Called ResponseModel in this folder with the following properties as seen below code.

public class ResponseModel {
    public bool IsSuccess {
        get;
        set;
    }
    public string Messsage {
        get;
        set;
    }
}


European ASP.NET Core Hosting :: Hidden IDisposable Issues in Microsoft .NET

clock September 24, 2021 07:41 by author Peter

As an experienced .NET software engineer, whenever I am hired into a new team, I almost immediately get tasked to fix coding issues. I guess since I am dotNetDave and I wrote the only coding standards book for .NET. Out of all the millions of lines of code I have reviewed in the past 20 years of .NET, hands down the one issue are developers not properly disposing of objects that implement IDisposable. In some teams, it has taken me many months of hard work to fix these issues that will always lead to virtual memory leaks.

The problem I am seeing is that I see a lot of code like this:
public static TResult Deserialize<TResult>(string xml) where TResult : class
{
var xs = new XmlSerializer(typeof(TResult));
return (TResult)xs.Deserialize(new StringReader(xml));
}

The issue with this is the final line where a new StringReader is created. StringReader (and just about every type that ends in ‘Reader’) is one of those types that implement IDisposable to clean up the memory it uses. Since it does, it’s extremely important that the developer call .Dispose when it’s no longer needed or use the using code block.

I can prove that Dispose is not being called by looking at the IL for this method.

As you can see, there isn’t a call to Dispose in the IL.

The Solution

The following code, from my Spargine open-source project, properly codes this method as shown below:

public static TResult Deserialize<TResult>(string xml) where TResult : class
{
using var sr = new StringReader(xml);
var xs = new XmlSerializer(typeof(TResult));

return (TResult)xs.Deserialize(sr);
}

As you can see, this uses the new way of implementing the using code statement. This means that at the end of the code block, in this case the method, Dispose will be called on StringReader, and its memory will be cleaned up. Want proof? Here it is:

As you can see, a try/finally is created by the compiler and in the finally Dispose is being called. This should be the only way to code types that implement IDisposable and not the way that was first shown. Since these issues have been around ever since .NET was created, I wished Visual Studio would alert the coder that they are causing a memory leak! Until then, be careful or hire me to help your team!

HostForLIFE.eu ASP.NET Core Hosting

European best, cheap and reliable ASP.NET hosting with instant activation. HostForLIFE.eu is #1 Recommended Windows and ASP.NET hosting in European Continent. With 99.99% Uptime Guaranteed of Relibility, Stability and Performace. HostForLIFE.eu security team is constantly monitoring the entire network for unusual behaviour. We deliver hosting solution including Shared hosting, Cloud hosting, Reseller hosting, Dedicated Servers, and IT as Service for companies of all size.


European ASP.NET Core Hosting :: Send Push Notification To Android Device From .Net Core Web API

clock September 20, 2021 07:23 by author Peter

In this article, you will learn about how to send push notifications to android devices using FCM from .Net Core Web API.  You will also learn how to create a Firebase project and get Server Key and Sender ID step by step. Our main focus is how to handle send notification functionality on the API side.
What is FCM?

Firebase Cloud Messaging (FCM) is a free cloud service from Google that allows users to send notifications and messages to users.

It is a cross-platform messaging solution. You can send notifications and messages across a variety of platforms, including Android, iOS and web applications.
Create Firebase Project

Go to Firebase Console.
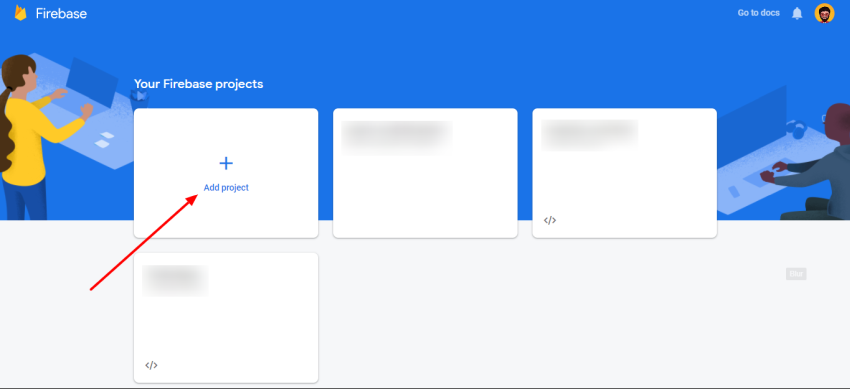
Follow the steps to set up the project.
After adding the project to the Firebase, add App to the same project.
Send Push Notification To Android Device From .Net Core Web API
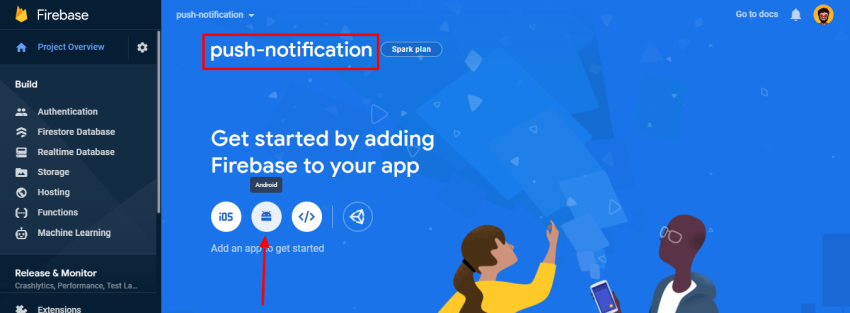
Enter package name, app name, and SHA-1 key of your Android Studio project. Follow all the steps to complete the add Firebase to your Android app. If you face any problem, you can refer to  Add Firebase to your Android Project.

Get FCM Sender ID & Server Key
Click on the “Gear” icon and access “Project settings”.

Go to the “Cloud Messaging” section and you will have access to the Sender ID and Server Key. We will use it later in the API.
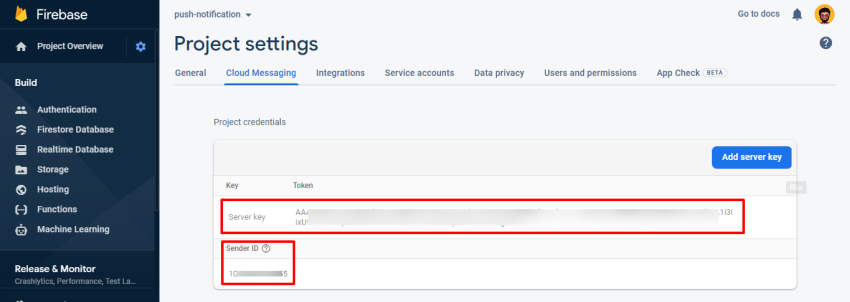
For setting up a Firebase Cloud Messaging client app on Android and getting FCM registration token or device token please refer to this Set up an Android client.
How to send FCM push notification from an ASP.NET Core Web API project.

What CorePush Package?

It’s very Lightweight .NET Core Push Notifications for Android and iOS. I used it in my project to send Firebase Android and Apple iOS push notifications. In this article just I focus on sending push notifications on Android devices Useful links,

  • NuGet package
  • Documentation

Step 1 – Create Project
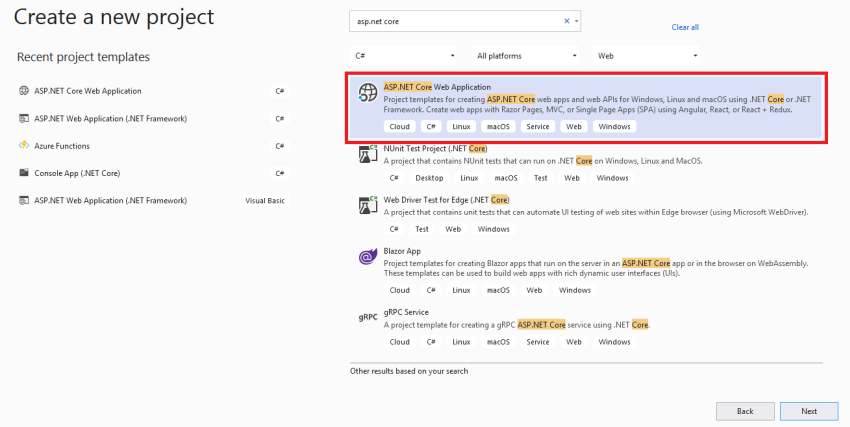
Open Visual Studio click on “Create a new project”.
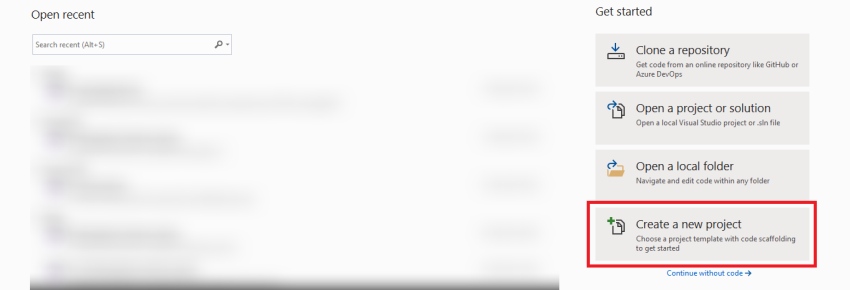
Select ASP.NET Core Web Application option.
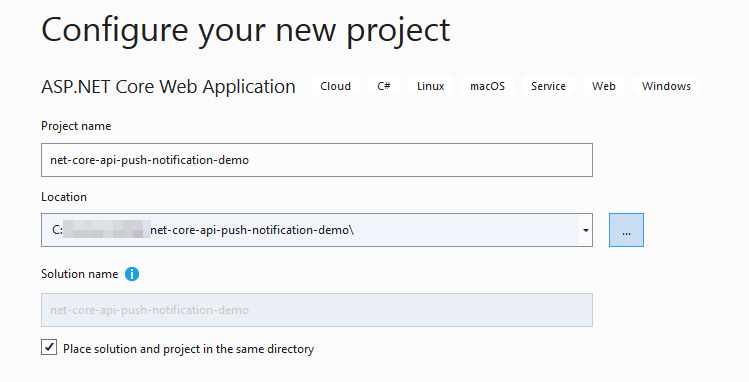
Add Project name and Solution name.
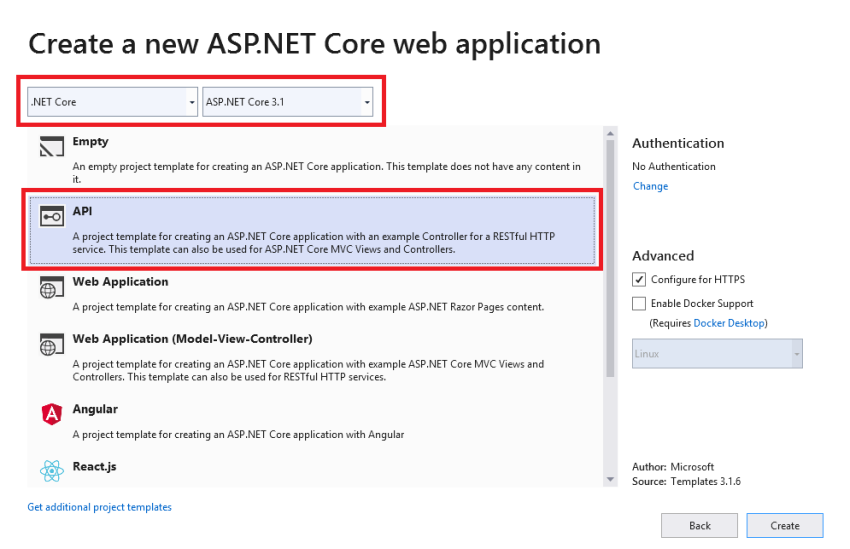
Select the “API” option with “.NET Core” and “ASP.NET Core 3.1” to create ASP.NET API.

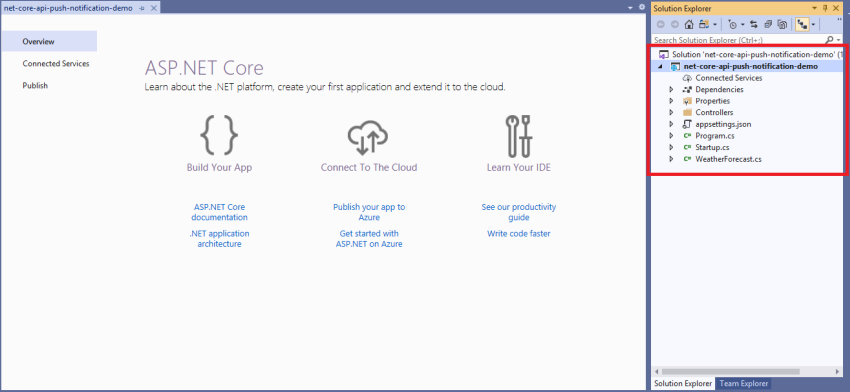
You can see the default folder structure.
Step 2 – Install NuGet Packages
Open Package Manager Console
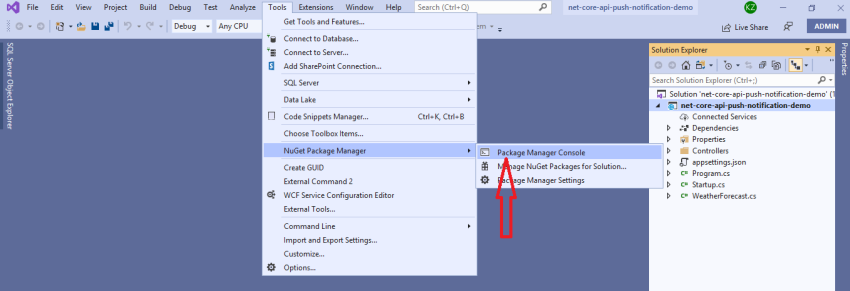

And run the below commands one by one:

  1. Install-Package CorePush
  2. Install-Package Newtonsoft.Json
  3. Install-Package Swashbuckle.AspNetCore

Step 3 – Create Models for the controller
Now, create a directory with name Models and add the following files

  • ResponseModel.cs
  • NotificationModel.cs
  • FcmNotificationSetting.cs

ResponseModel.cs will contain definitions for response models.
NotificationModel.cs will contain definitions for notification and google notification model
FcmNotificationSetting.cs will contain definitions for FCM notification settings.

Code for ResponseModel.cs file,
using Newtonsoft.Json;

namespace net_core_api_push_notification_demo.Models
{
    public class ResponseModel
    {
        [JsonProperty("isSuccess")]
        public bool IsSuccess { get; set; }
        [JsonProperty("message")]
        public string Message { get; set; }
    }
}


Code for NotificationModel.cs file,
using Newtonsoft.Json;

namespace net_core_api_push_notification_demo.Models
{
    public class NotificationModel
    {
        [JsonProperty("deviceId")]
        public string DeviceId { get; set; }
        [JsonProperty("isAndroiodDevice")]
        public bool IsAndroiodDevice { get; set; }
        [JsonProperty("title")]
        public string Title { get; set; }
        [JsonProperty("body")]
        public string Body { get; set; }
    }

    public class GoogleNotification
    {
        public class DataPayload
        {
            [JsonProperty("title")]
            public string Title { get; set; }
            [JsonProperty("body")]
            public string Body { get; set; }
        }
        [JsonProperty("priority")]
        public string Priority { get; set; } = "high";
        [JsonProperty("data")]
        public DataPayload Data { get; set; }
        [JsonProperty("notification")]
        public DataPayload Notification { get; set; }
    }
}


Code for FcmNotificationSetting.cs file,
namespace net_core_api_push_notification_demo.Models
{
    public class FcmNotificationSetting
    {
        public string SenderId { get; set; }
        public string ServerKey { get; set; }
    }
}


Step 4 – Update appsettings.Development.json file

Code for appsettings.Development.json file,

{
  "Logging": {
    "LogLevel": {
      "Default": "Information",
      "Microsoft": "Warning",
      "Microsoft.Hosting.Lifetime": "Information"
    }
  },
  "FcmNotification": {
    "SenderId": "*SENDER_ID*",
    "ServerKey": "*SERVER_KEY*"
  }
}

Replace *SENDER_ID* with your sender Id.
Replace *SERVER_KEY* with your server key.
Which we have found from the Cloud Messaging section of Firebase project settings.

Step 5 – Create Service
Now, create a directory with the name Services and add the following file.
Code for NotificationService.cs file,
using CorePush.Google;
using Microsoft.Extensions.Options;
using net_core_api_push_notification_demo.Models;
using System;
using System.Net.Http;
using System.Net.Http.Headers;
using System.Threading.Tasks;
using static net_core_api_push_notification_demo.Models.GoogleNotification;

namespace net_core_api_push_notification_demo.Services
{
    public interface INotificationService
    {
        Task<ResponseModel> SendNotification(NotificationModel notificationModel);
    }

    public class NotificationService : INotificationService
    {
        private readonly FcmNotificationSetting _fcmNotificationSetting;
        public NotificationService(IOptions<FcmNotificationSetting> settings)
        {
            _fcmNotificationSetting = settings.Value;
        }

        public async Task<ResponseModel> SendNotification(NotificationModel notificationModel)
        {
            ResponseModel response = new ResponseModel();
            try
            {
                if (notificationModel.IsAndroiodDevice)
                {
                    /* FCM Sender (Android Device) */
                    FcmSettings settings = new FcmSettings()
                    {
                        SenderId = _fcmNotificationSetting.SenderId,
                        ServerKey = _fcmNotificationSetting.ServerKey
                    };
                    HttpClient httpClient = new HttpClient();

                    string authorizationKey = string.Format("keyy={0}", settings.ServerKey);
                    string deviceToken = notificationModel.DeviceId;

                    httpClient.DefaultRequestHeaders.TryAddWithoutValidation("Authorization", authorizationKey);
                    httpClient.DefaultRequestHeaders.Accept
                            .Add(new MediaTypeWithQualityHeaderValue("application/json"));

                    DataPayload dataPayload = new DataPayload();
                    dataPayload.Title = notificationModel.Title;
                    dataPayload.Body = notificationModel.Body;

                    GoogleNotification notification = new GoogleNotification();
                    notification.Data = dataPayload;
                    notification.Notification = dataPayload;

                    var fcm = new FcmSender(settings, httpClient);
                    var fcmSendResponse = await fcm.SendAsync(deviceToken, notification);

                    if (fcmSendResponse.IsSuccess()) {
                        response.IsSuccess = true;
                        response.Message = "Notification sent successfully";
                        return response;
                    } else {
                        response.IsSuccess = false;
                        response.Message = fcmSendResponse.Results[0].Error;
                        return response;
                    }
                }
                else {
                    /* Code here for APN Sender (iOS Device) */
                    //var apn = new ApnSender(apnSettings, httpClient);
                    //await apn.SendAsync(notification, deviceToken);
                }
                return response;
            }
            catch (Exception ex) {
                response.IsSuccess = false;
                response.Message = "Something went wrong";
                return response;
            }
        }
    }
}

Step 6 – Update Startup.cs file
Code for Startup.cs file,

using CorePush.Apple;
using CorePush.Google;
using Microsoft.AspNetCore.Builder;
using Microsoft.AspNetCore.Hosting;
using Microsoft.Extensions.Configuration;
using Microsoft.Extensions.DependencyInjection;
using Microsoft.Extensions.Hosting;
using Microsoft.OpenApi.Models;
using net_core_api_push_notification_demo.Models;
using net_core_api_push_notification_demo.Services;

namespace net_core_api_push_notification_demo
{
    public class Startup
    {
        public Startup(IConfiguration configuration)
        {
            Configuration = configuration;
        }

        public IConfiguration Configuration { get; }

        // This method gets called by the runtime. Use this method to add services to the container.
        public void ConfigureServices(IServiceCollection services)
        {
            services.AddControllers();
            services.AddTransient<INotificationService, NotificationService>();
            services.AddHttpClient<FcmSender>();
            services.AddHttpClient<ApnSender>();

            // Configure strongly typed settings objects
            var appSettingsSection = Configuration.GetSection("FcmNotification");
            services.Configure<FcmNotificationSetting>(appSettingsSection);

            // Register the swagger generator
            services.AddSwaggerGen(c => {
                c.SwaggerDoc(name: "V1", new OpenApiInfo { Title = "My API", Version = "V1" });
            });
        }

        // This method gets called by the runtime. Use this method to configure the HTTP request pipeline.
        public void Configure(IApplicationBuilder app, IWebHostEnvironment env)
        {
            if (env.IsDevelopment()) {
                app.UseDeveloperExceptionPage();
            }

            // Enable middleware to serve generated Swagger as a JSON endpoint
            app.UseSwagger();
            // Enable the SwaggerUI
            app.UseSwaggerUI(c => {
                c.SwaggerEndpoint(url: "/swagger/V1/swagger.json", name: "My API V1");
            });

            app.UseHttpsRedirection();
            app.UseRouting();
            app.UseAuthorization();
            app.UseEndpoints(endpoints => {
                endpoints.MapControllers();
            });
        }
    }
}

Step 7 – Add Controller
Now, add the NotificationController.cs file in the Controllers folder
Code for NotificationController.cs file,

using System.Threading.Tasks;
using Microsoft.AspNetCore.Mvc;
using net_core_api_push_notification_demo.Models;
using net_core_api_push_notification_demo.Services;

namespace net_core_api_push_notification_demo.Controllers
{
    [Route("api/notification")]
    [ApiController]
    public class NotificationController : ControllerBase
    {
        private readonly INotificationService _notificationService;
        public NotificationController(INotificationService notificationService)
        {
            _notificationService = notificationService;
        }

        [Route("send")]
        [HttpPost]
        public async Task<IActionResult> SendNotification(NotificationModel notificationModel)
        {
            var result = await _notificationService.SendNotification(notificationModel);
            return Ok(result);
        }
    }
}

Step 8 – Running Web API
Now, press F5 to start debugging the Web API project, if everything is OK, we’ll get the following output in the browser.
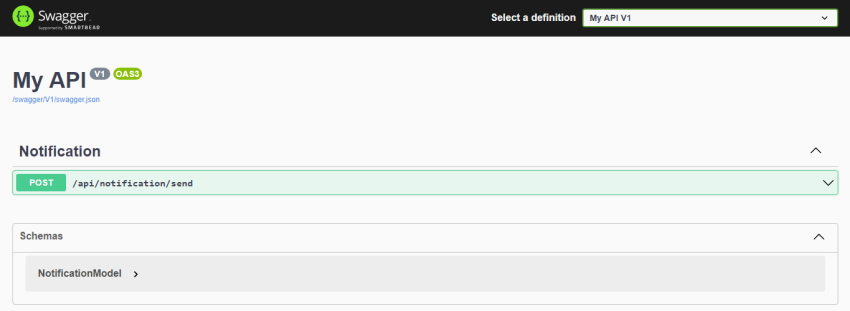

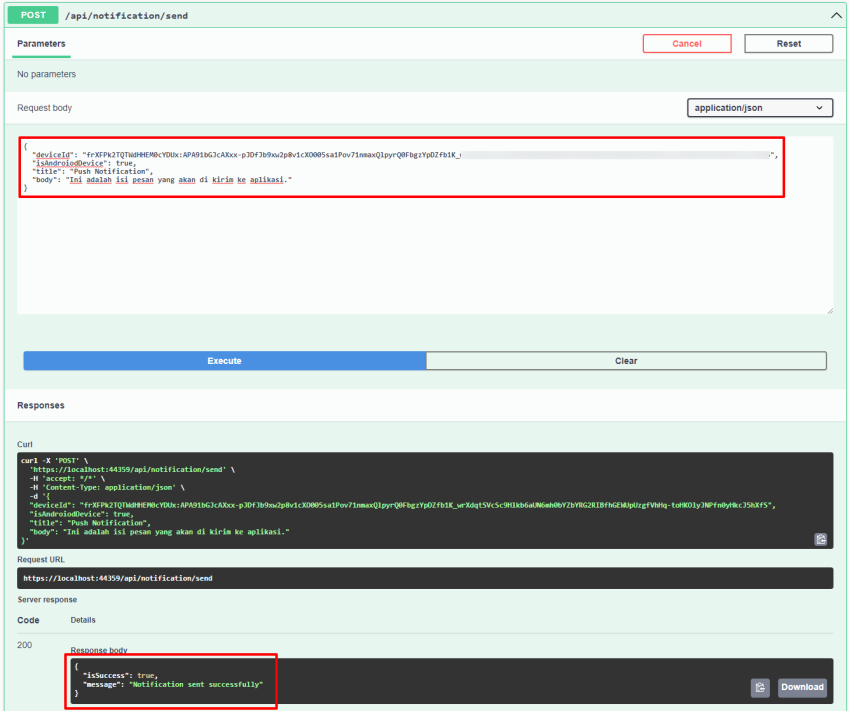
Now, we will call the send notification API and check whether the notification is sent or not. As per the below screenshot, enter all properties details and hit the Execute button. If everything is fine, then the value of isSuccess property is true and the value of the message property is “Notification sent successfully”.
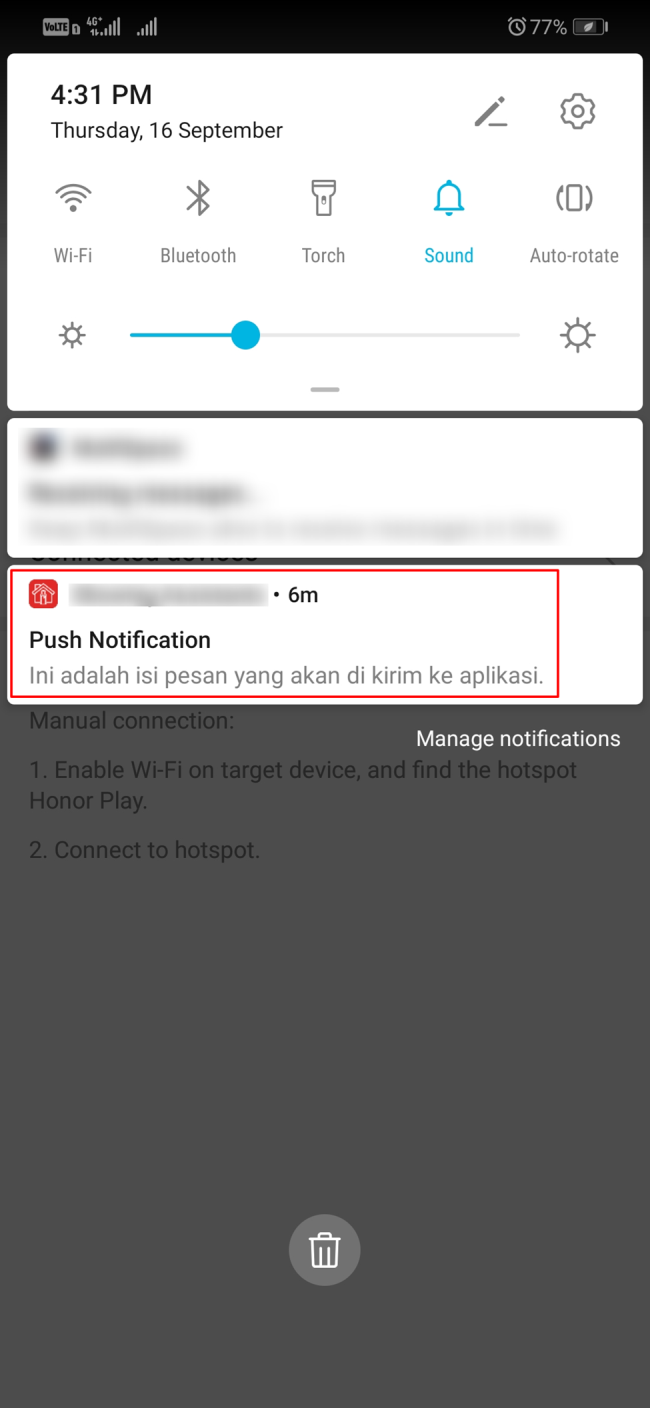
Wow, here is the notification!


European ASP.NET Core Hosting :: .NET 6 RC 1 Released

clock September 17, 2021 08:45 by author Peter

Microsoft has released .NET 6 RC 1, the first of two “go live” RC releases that are supported in production.

.NET 6 Release Candidate 1 has been tested and is supported with Visual Studio 2022 Preview 4. VS 2022 allows users to leverage the Visual Studio tools developed for .NET 6 like development in .NET MAUI, new Web Live Preview for WebForms, Hot Reload for C# apps, and other performance improvements in the IDE experience.

Microsoft said that for the last month or so, the .NET team has been focused exclusively on quality improvements that resolve functional or performance issues in new features or regressions in existing ones. RC 1 release doesn't focus on new goodies, but rather foundational features of .NET 6. Some of these features won't be fully realized for a while.

Talking about the foundational features in .NET 6, Microsoft wrote "In each release, we take on a few projects that take multiple years to complete and that do not deliver their full value for some time. Given that these features have not come to their full fruition, you’ll notice a bias in this post to what we’re likely to do with these features in .NET 7 and beyond."

Some of such features include Source build, Profile-guided optimization (PGO), Dynamic PGO, Crossgen2, Security mitigations, and SDK workloads.

Microsft revealed that it is very close to delivering a fully automated version of Source build, which is a scenario and also infrastructure. The deliverable for source build is a source tarball. The source tarball contains all the source for a SDK, and from there, Red Hat or another organization can build their own version of the SDK. In the Linux ecosystem both source and binary packages or tarballs are required for a given component. .NET already had binary tarballs available and now have source tarballs as well.

Profile Guided Optimization (PGO) is an important capability of most developer platforms. It improves the performance of applications by adding new information to the optimization process that is dependent on how the application executes, not just on the program's code. With .NET 6, Microsoft has rebuild the PGO system from scratch. This was motivated in large part by crossgen2 as the new enabling technology. The runtime libraries are compiled to ready-to-run format optimized with (the new form of) PGO data. This is all enabled with crossgen2. Currently, the team has not enabled anyone else to use PGO to optimize apps. That’s what will be coming next with .NET 7.

Dynamic PGO is the mirror image of the static PGO. Simliler to static PGO which is integrated with crossgen2, dynamic PGO is integrated with RyuJIT. Dynamic PGO is automatic and uses the running application to collect relevant data. This data is lost after every application run. Dynamic PGO is similar to a tracing JIT. With dynamic PGO the JIT can now do further instrumentation during tier 0, to track not just call counts but all of the interesting data it can use for profile-guided optimization, and then it can employ that during the compilation of tier 1.

Crossgen2 replaces crossgen: With this release, Crossgen2 has been enabled for all existing crossgen scenarios, and the .NET team has also removed (the old) crossgen from the SDK, making it no longer accessible and unable to be used. "Crossgen (1 and 2) enables pre-compiling IL to native code as a publishing step. Pre-compilation is primarily beneficial for improving startup. Crossgen2 is a from-scratch implementation that is already proving to be a superior platform for code generation innovation. For example, crossgen2 can generate code for a broader set of IL patterns than crossgen1."

The release adds preview support for two key security mitigations CET, and W^X. These will be enabled by default in .NET 7.

Control-flow Enforcement Technology (CET) from Intel is a security feature available, in some latest Intel and AMD processors, adds potential to the hardware that protect against some common types of attacks involving control-flow hijacking. CET shadow stacks enables the processor and operating system to track the control flow of calls and returns in a thread in the shadow stack in addition to the data stack, and detect unintended changes to the control flow. W^X blocks the simplest attack path by disallowing memory pages to be writeable and executable at the same time. It is available all operating systems with .NET 6 but only enabled by default on Apple Silicon. It will be enabled on all operating systems for .NET 7.

HostForLIFE.eu ASP.NET Core Hosting

European best, cheap and reliable ASP.NET hosting with instant activation. HostForLIFE.eu is #1 Recommended Windows and ASP.NET hosting in European Continent. With 99.99% Uptime Guaranteed of Relibility, Stability and Performace. HostForLIFE.eu security team is constantly monitoring the entire network for unusual behaviour. We deliver hosting solution including Shared hosting, Cloud hosting, Reseller hosting, Dedicated Servers, and IT as Service for companies of all size.


European ASP.NET Core Hosting :: Creating A .NET Application From The CLI

clock September 13, 2021 08:37 by author Peter

In today’s article, we will take a look at creating a .NET application from the command line interface (CLI). In the past, I have always created applications using Visual Studio. Today, we will create a simple console application using only the CLI and notepad. Finally, we will open this application in Visual Studio to verify all is compatible. So, let us begin.

The first step is to open the Command Prompt for the Visual Studio instance or simply open the command line. I would prefer to use the “Run as Administrator” option.

First, we create a folder for our application and move to that folder. Here we type “dotnet new console” to create the console application.


Next, we will create the solution using “dotnet new sln”.

We now want to modify the “Program.cs” file. For this, we will use notepad. Run the “notepad Program.cs” command.


Modify, the code as below.


Code is below,
var myName = Console.ReadLine();
Console.WriteLine($"Hello from {myName}");


We are now ready to build and run the code. Run “dotnet build” to build the code.

Finally, we run the code using “dotnet run”. Here we enter a string, and it is displayed to us with the Prefix “Hello from”.

Testing the application in Visual Studio 2022 community preview edition

Let us verify that the solution and project we just created works with Visual Studio. We will open the same solution using Visual Studio 2022 community preview edition.


When I ran it for the first time, I got the below error.


To fix this, I simply opened the project file, made a small change (adding a space and then removing it), and saved it. After that, all worked fine

HostForLIFE.eu ASP.NET Core Hosting

European best, cheap and reliable ASP.NET hosting with instant activation. HostForLIFE.eu is #1 Recommended Windows and ASP.NET hosting in European Continent. With 99.99% Uptime Guaranteed of Relibility, Stability and Performace. HostForLIFE.eu security team is constantly monitoring the entire network for unusual behaviour. We deliver hosting solution including Shared hosting, Cloud hosting, Reseller hosting, Dedicated Servers, and IT as Service for companies of all size.


European ASP.NET Core Hosting :: How to Block IP Address In ASP.NET Core Web API?

clock September 7, 2021 07:23 by author Peter

There are several articles and blogs on the subject that describe how to block or limit an IP address from making repeated requests in order to reduce server load.

So, why do we need another blog or article to add to that list? What makes this article stand out from others?
    It uses Session State, which is the most recent item in current Asp.Net Core 3.1, rather to keep the IP details in the database.
    It performs all operations outside of the action's logic, thus if the request exceeds the predetermined request count, the user will be denied access to the API's actions.
    It will become extremely fast in the process by utilizing session state and distributed memory concepts.

This post will go through a few key aspects that are commonly utilized while building APIs in ASP.Net Core. APIs are a sort of interface that connects a development system to a third-party system. APIs allow various programs to communicate with one another. On the other hand, as we all know, APIs are currently being used by single applications to manage frontend and backend communication. Overall, security is one of the most important characteristics to consider when creating APIs since no one knows who will use them or how they will be utilized.

This article will cover how to avoid a brute force attack and how to manage numerous requests from the client side. We'll also examine several key aspects of the ASP.Net Core Web API, such as Session State and built-in attributes. This article will show beginners and intermediates how to protect APIs from malicious third-party activity and reduce server load from repeated queries.

Step 1: Create a project

To begin, build a new project or add functionality to an existing project to manage or handle web API requests. Create a project with the most recent version of the.Net framework. ASP.Net Core 3.1 is the most recent and stable version.

Step 2: Add and configure session services
After successfully creating the project, the first step is to add session services to the Startup.cs file. As a result, we will be able to include session states into our app. Our goal is to detect client requests without relying on the database so that our program does not have to connect with the database every time. Also, we'll utilize session state storage, which will keep all client requests in distributed memory, making it incredibly fast, and preventing the user from entering the program if there are numerous requests in a particular time period. The following is a list of services that we'll need to include in our startup file.
services.AddDistributedMemoryCache();
services.AddSession();

Both of these will notify the system to keep the session items in memory for a long. We can also handle a session with a variety of settings such as timeout, httponly, and so on.

Now, in the Startup.cs file, add SessionMiddleware to the Configure section.
app.UseSession();


UseSession is a middleware component that enables the system to save items in session state.

Step 3: Add class to handle IP details.
Create a class that will handle and store request details. I've created a class called "IPDetailModel." This includes basic information about the incoming request.
public class IPDetailModel {
    public string IPAddress {
        get;
        set;
    }
    public DateTime Time {
        get;
        set;
    }
    public int Count {
        get;
        set;
    }
}

Step 4: Create a custom attribute class.
Now, in the project, create a class to handle the attribute logic. I named my class "TraceIPAttribute." After you've created a class, assign ActionFilterAttribute to it. Now, inside the class, add an "OnActionExecuting" method. The logic for handling an incoming request is shown below, and it determines if the request should go through the API logic or whether it has to be bypassed.

public class TraceIPAttribute: ActionFilterAttribute {
    IPDetailModel model = new IPDetailModel();
    public override void OnActionExecuting(ActionExecutingContext context) {
        var remoteIp = context.HttpContext.Connection.RemoteIpAddress.ToString();
        if (context.HttpContext.Session.GetString(remoteIp) == null) {
            model.Count = 1;
            model.IPAddress = remoteIp;
            model.Time = DateTime.Now;
            context.HttpContext.Session.SetString(remoteIp, JsonConvert.SerializeObject(model));
        } else {
            var _record = JsonConvert.DeserializeObject < IPDetailModel > (context.HttpContext.Session.GetString(remoteIp));
            if (DateTime.Now.Subtract(_record.Time).TotalMinutes < 1 && _record.Count > 1) {
                context.Result = new JsonResult("Permission denined!");
            } else {
                _record.Count = _record.Count + 1;
                context.HttpContext.Session.Remove(remoteIp);
                context.HttpContext.Session.SetString(remoteIp, JsonConvert.SerializeObject(_record));
            }
        }
    }
}


So, as you can see from the code snippet, I've created a one-minute time slot with a single request count. As a result, if two or more requests from the same IP address are received within a minute, logic will stop a user from accessing the API's operations. The same IP address can access the APIs after one minute has passed.

The supplied code saves the incoming request in the IPDetailModel and then serializes and deserializes the data to get it from the modal. We may use the Newtonsoft.Json package to serialize and deserialize data.

After creating a custom middleware class, add it to the Startup.cs file's ConfigureServices section. This will inform the system of the presence of this middleware.
public void ConfigureServices(IServiceCollection services) {
    services.AddControllers();
    services.AddDistributedMemoryCache();
    services.AddSession();
    services.AddScoped < TraceIPAttribute > ();
}

Step 5: Add custom middleware to the controller side.
On the controller side, add the TraceIPAttribute. Before calling the controller's operations, it will analyze the request.
[ApiController]
[Route("[controller]")]
[ServiceFilter(typeof(TraceIPAttribute))]
public class WeatherForecastController: ControllerBase {
    //All actions and APIs will placed here.
}

I've added the TraceIPAttribute to the controller because it'll be applied to all of the actions under it. However, if we want to use it for specific actions, we may assign it to those actions.

Understanding the flow of the process
When a request arrives, the TraceIPAttribute logic is executed first. If this is the first time the application has received a request, IPDetailModel will record the IP Address, time, and request count, and then it will give access to the controller's logic and return a response. However, if the same IP sends multiple requests, it will first go to the TraceIPAttribute logic, and if the request is from the same IP address and within the given time period, it will not allow the request to pass through the controller's actions, but will instead stop the request from moving forward, bypassing the requests from outside the controllers.

APIs are now the most common means of exchanging data between various systems and applications. Also, security attacks such as brute force attacks, man-in-the-middle attacks, and others are on the rise these days. As a result, this article will help to make your application secure against brute force attempts. Furthermore, if the server receives a large number of requests, the server's load might become extremely high, causing the application to go down. As a result, this approach will help in decreasing the load on the server as a result of the numerous requests from outside.

HostForLIFE.eu ASP.NET Core Hosting

European best, cheap and reliable ASP.NET hosting with instant activation. HostForLIFE.eu is #1 Recommended Windows and ASP.NET hosting in European Continent. With 99.99% Uptime Guaranteed of Relibility, Stability and Performace. HostForLIFE.eu security team is constantly monitoring the entire network for unusual behaviour. We deliver hosting solution including Shared hosting, Cloud hosting, Reseller hosting, Dedicated Servers, and IT as Service for companies of all size.


European ASP.NET Core Hosting :: Caching Mechanism In ASP.NET Core

clock September 6, 2021 07:08 by author Peter

Caching refers to the process of storing frequently used data so that those data can be served much faster for any future requests. So we take the most frequently used data and copy it into temporary storage so that it can be accessed much faster in future calls from the client. If we try to explain with a simple example, Let User-1 request some data and it takes 12-15 seconds for the server to fetch the data. While fetching, we will make a copy of our fetched data parallelly to any temporary storage. So now, when User-2 requests the same data, this time we will simply serve his from the cache and it will take only 1-2 seconds for the response as we already stored the response in our cache.

There are two important terms used with cache, cache hit and cache miss. A cache hit occurs when data can be found in a cache and a cache miss occurs when data can't be found in the cache.

Caching significantly improves the performance of an application, reducing the complexity to generate content. It is important to design an application so that it never depends directly on the cached memory. The application should only cache data that don't change frequently and use the cache data only if it is available.

ASP.NET Core has many caching features. But among them the two main types are,

    In-memory caching
    Distributed Caching

In-memory caching
An in-memory cache is stored in the memory of a single server hosting the application. Basically, the data is cached within the application. This is the easiest way to drastically improve application performance.

The main advantage of In-memory caching is it is much quicker than distributed caching because it avoids communicating over a network and it's suitable for small-scale applications. And the main disadvantage is maintaining the consistency of caches while deployed in the cloud.
Implementing In-memory Caching with ASP.NET Core

First create an ASP.NET Core web API application.

Now inside the Startup.cs file just add the following line. This will add a non-distributed in-memory caching implementation to our application.
public void ConfigureServices(IServiceCollection services)
{
    services.AddMemoryCache();
    //Rest of the code
}


Now let's create a new controller "EmployeeController". And in this controller we will implement our cache.
[Route("api/[controller]")]
[ApiController]
public class EmployeeController : ControllerBase
{
    private readonly IMemoryCache _memoryCache;
    private readonly ApplicationContext _context;
    public EmployeeController(IMemoryCache memoryCache, ApplicationContext context)
    {
        _memoryCache = memoryCache;
        _context = context;
    }

    [HttpGet]
    public async Task<IActionResult> GetAllEmployee()
    {
        var cacheKey = "employeeList";
        //checks if cache entries exists
        if(!_memoryCache.TryGetValue(cacheKey, out List<Employee> employeeList))
        {
            //calling the server
            employeeList = await _context.Employees.ToListAsync();

            //setting up cache options
            var cacheExpiryOptions = new MemoryCacheEntryOptions
            {
                AbsoluteExpiration = DateTime.Now.AddSeconds(50),
                Priority = CacheItemPriority.High,
                SlidingExpiration = TimeSpan.FromSeconds(20)
            };
            //setting cache entries
            _memoryCache.Set(cacheKey, employeeList, cacheExpiryOptions);
        }
        return Ok(employeeList);
    }
}


This is a pretty simple implementation. We are simply checking if any cached value is available for the specific cache key. If exists it will serve the data from the cache, if not we will call our service and save the data in the cache.

Explanation
Line 9: Injecting ImemoryCache to the constructor

Line 16: Creating a cache key. As we know that data will be saved as key-value pair.

Line 18: Checking if cache value is available for the specific key.

Line 24: Setting the cache. MemoryCacheEntryOptions is used to define crucial properties of cache. some of the properties are:

1. Priority - Priority defines the priority of keeping cache entry in the cache. The default value is set to Normal.

2. Sliding Expiration - A specific timespan within which the cache will expire if it is not used by anyone. As we set the sliding expiration to 20 seconds so it means after cache entry if there is no client request for 20 seconds the cache will be expired.

3. Absolute Expiration - It refers to the actual expiration of the cache entry without considering the sliding expiration. In our code, we set the absolute expiration to 50 seconds. So it means the cache will expire every 50 seconds for sure.

Now let's observe the performance boost of our application after implementing the In-memory caching.

For this run the application and send a get request to the web API using Postman. So the first time we send a request to our API it takes about 2061ms.

So for the first time when we call our API it directly fetches data from the database and parallelly we store the data to the cache.

Now if we request the same endpoint for the same data this time it will only take 20ms.

So this is a pretty amazing improvement. In my case, the dataset is small. If there is a big set of data on that case it will drastically improve our service.

Distributed Caching

Distributed cache is a cache that can be shared by one or more applications and it is maintained as an external service that is accessible to all servers. So distributed cache is external to the application.

The main advantage of distributed caching is that data is consistent throughout multiple servers as the server is external to the application, any failure of any application will not affect the cache server.

Here we will try to implement Distributed Caching with Redis.

Redis is an open-source(BSD licensed), in-memory data structure store, used as a database cache and message broker. It is really fast key-value based database and even NoSQL database as well. So Redis is a great option for implementing highly available cache.
Setting up Redis in Docker

Step 1
Pull docker Redis image from docker hub.
docker pull redis

Step 2
Run redis images by mapping Redis port to our local system port.
docker run --name myrediscache -p 5003:379 -d redis

Step 3
Start the container.
docker start myrediscache

As our Redis is set up now let's go for the implementation of Distributed caching with ASP.NET Core Application.
Implementation of Distributed Cache(Redis) with ASP.NET Core

Create an ASP.NET Core Web API project and install the following library using Nuget Package Manager.

As we have already added our required package, now register the services in Startup.cs file.
public void ConfigureServices(IServiceCollection services) {
    //Rest of the code
    services.AddStackExchangeRedisCache(options => {
        options.Configuration = Configuration.GetConnectionString("Redis");
        options.InstanceName = "localRedis_";
    });
}

Here, we set "options.InstanceName" it will just act as a prefix to our key name on the redis server. Ex. if we set a cache name employeelist in the redis server it will be something like localRedis_employeelist.

And we will provide the configuration-related settings for the Redis in appsettings.json.
{
  "AllowedHosts": "*",
  "ConnectionStrings": {
    "Redis": "localhost:5003",
    "DefaultConnection": "Data Source=.;Initial Catalog=BuildingDataDB;Integrated Security=True"
  }
}

Create a helper class "DistributedCacheExtensions" where we will Get and Set Values from and to Redis Cache.

public static class DistributedCacheExtension {
    public static async Task SetRecordAsync < T > (this IDistributedCache cache, string recodeId, T data, TimeSpan ? absoluteExpireTime = null, TimeSpan ? slidingExpirationTime = null) {
        var options = new DistributedCacheEntryOptions();
        options.AbsoluteExpirationRelativeToNow = absoluteExpireTime ?? TimeSpan.FromSeconds(60);
        options.SlidingExpiration = slidingExpirationTime;
        var jsonData = JsonSerializer.Serialize(data);
        await cache.SetStringAsync(recodeId, jsonData, options);
    }
    public static async Task < T > GetRecordAsync < T > (this IDistributedCache cache, string recordId) {
        var jsonData = await cache.GetStringAsync(recordId);
        if (jsonData is null) {
            return default (T);
        }
        return JsonSerializer.Deserialize < T > (jsonData);
    }
}

Here this code is pretty self-explanatory. In the "SetRecodeAsync" method we are saving the data to the Redis Cache. Here we have configured the IDistributedCache server with AbsoluteExpirationRelativeToNow and SlidingExpiration(Line 12 & Line 13) and we have already discussed these terms in our In-memory Caching section.

And in the "GetRecordAsync" we are getting the cached value depending on some recodeKey.

Now we will create a controller named "StudentController",

public class StudentController: ControllerBase {
    private readonly ApplicationContext _context = null;
    private readonly IDistributedCache _cache;
    public StudentController(ApplicationContext context, IDistributedCache cache) {
            _context = context;
            _cache = cache;
        }
        [HttpGet]
    public async Task < ActionResult < List < Student >>> Get() {
        var cacheKey = "GET_ALL_STUDENTS";
        List < Student > students = new List < Student > ();
        var data = await _cache.GetRecordAsync < List < Student >> (cacheKey);
        if (data is null) {
            Thread.Sleep(10000);
            data = _context.Student.ToList();
            await _cache.SetRecordAsync(cacheKey, data);
        }
        return data;
    }
}

Explanation
Line 5: Injecting the IDistributeCache in our constructor.

Line 15: creating a Cache key

Line 18: Trying to get the from the Redis cache server. If data is found on the cache server it will serve the client with the cached data.

Line 20: Checking if Cache data is available. If data are not cached then it will fetch the data from the database or other services. So to simulate it we intentionally put some delay using the Thread.Sleep() method.

So it's pretty simple.

Now let's run the application.

So for the first time, we call the Get method of the student controller it takes about 12 seconds to load the data. As for the first run, it didn't find the data in the cache so it goes to the database and fetches the data and parallelly it saves the fetched data to the Redis cache server.

But in the second run it fetches the data within 28 milliseconds. Because for the second time user request the same data application, found the data had been cached in the Redis server so it server the user with the cached data.

This is a super optimization of our application with a blazing fast speed.

So with this our journey to the introduction to Caching ends. Here I tried to keep the example as simple as possible and discussed its basic concepts. Hope you will find it helpful.

Happy coding!

HostForLIFE.eu ASP.NET Core Hosting

European best, cheap and reliable ASP.NET hosting with instant activation. HostForLIFE.eu is #1 Recommended Windows and ASP.NET hosting in European Continent. With 99.99% Uptime Guaranteed of Relibility, Stability and Performace. HostForLIFE.eu security team is constantly monitoring the entire network for unusual behaviour. We deliver hosting solution including Shared hosting, Cloud hosting, Reseller hosting, Dedicated Servers, and IT as Service for companies of all size.


European ASP.NET Core Hosting :: How To Configure Swagger UI In ASP.NET Core Web API?

clock September 3, 2021 07:29 by author Peter

Swagger is an open-source tool that is used to interact directly with the API through the Swagger UI. In this article, we will see how we can add Swagger in ASP.Net Core application and generate documentation for our web API.

Let's get started,
irst, create a sample Asp.net core web application.


Give a meaningful name to the application, here I have given the name as SwaggerDemoApplication.


Once the project is created let's add a new controller. I have added HomeController. Once the Controller is created add the following NuGet packages into the application,
Swashbuckle.AspNetCore
Swashbuckle.AspNetCore.Swagger
Swashbuckle.AspNetCore.SwaggerUI


Create new folder Model and add Employee class.
public class Employee {
    public int Id {
        get;
        set;
    }
    public string FirstName {
        get;
        set;
    }
    public string LastName {
        get;
        set;
    }
    public string EmailId {
        get;
        set;
    }
}


Now add below Actionmethod into Homecontroller.
public List < Employee > GetEmployee() {
    return new List < Employee > () {
        new Employee() {
                Id = 1,
                    FirstName = "Yogesh",
                    LastName = "Vedpathak",
                    EmailId = "[email protected]"
            },
            new Employee() {
                Id = 2,
                    FirstName = "Amit",
                    LastName = "Kanse",
                    EmailId = "[email protected]"
            }
    };
}


Configuring the Swagger Middleware
Now it's time to configure services inside a startup.cs class. Open startup.cs class and add the below line of code into configuring services method.
public void ConfigureServices(IServiceCollection services) {
    // Register the Swagger or more Swagger documents
    services.AddSwaggerGen(c => {
        c.SwaggerDoc("v1", new OpenApiInfo {
            Title = "SwaggerDemoApplication", Version = "v1"
        });
    });
    services.AddControllers();
}


Add the below line of code inside configure method. Basically we are going to enable middleware for swagger UI.
public void Configure(IApplicationBuilder app, IWebHostEnvironment env) {
        // Enable middleware Swagger for JSON endpoint.
        app.UseSwagger();
        app.UseSwaggerUI(c => {
                c.SwaggerEndpoint("/swagger/v1/swagger.json", SwaggerDemoApplication V1 ");
                });
        }   


Now it's time to check the result. Run the application and navigate to https://localhost:44338/swagger/Index.html.

Now click on Get action method, after that click on execute button.

HostForLIFE.eu ASP.NET Core Hosting

European best, cheap and reliable ASP.NET hosting with instant activation. HostForLIFE.eu is #1 Recommended Windows and ASP.NET hosting in European Continent. With 99.99% Uptime Guaranteed of Relibility, Stability and Performace. HostForLIFE.eu security team is constantly monitoring the entire network for unusual behaviour. We deliver hosting solution including Shared hosting, Cloud hosting, Reseller hosting, Dedicated Servers, and IT as Service for companies of all size.


About HostForLIFE

HostForLIFE is European Windows Hosting Provider which focuses on Windows Platform only. We deliver on-demand hosting solutions including Shared hosting, Reseller Hosting, Cloud Hosting, Dedicated Servers, and IT as a Service for companies of all sizes.

We have offered the latest Windows 2019 Hosting, ASP.NET 5 Hosting, ASP.NET MVC 6 Hosting and SQL 2019 Hosting.


Month List

Tag cloud

Sign in