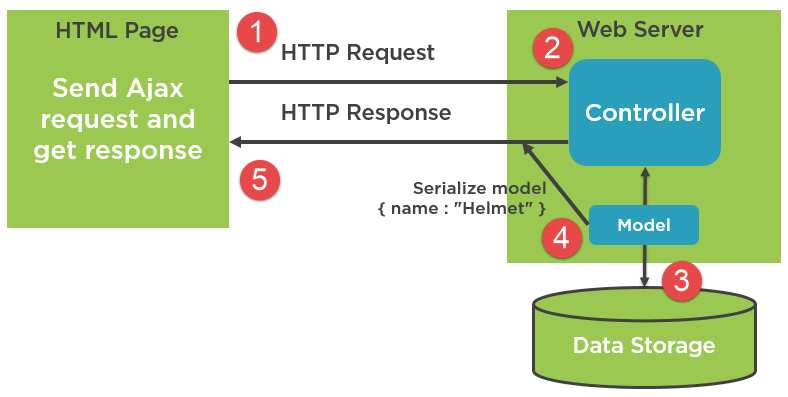
European ASP.NET 4.5 Hosting BLOG

BLOG about ASP.NET 4, ASP.NET 4.5 Hosting and Its Technology - Dedicated to European Windows Hosting Customer

European ASP.NET Core Hosting :: AJAX In .NET Core

clock May 30, 2022 07:39 by author Peter

What is Ajax?
Ajax stands for Asynchronous JavaScript and XML, the data transmitted can be JSON, XML, HTML, JavaScript, plain text, etc. Regardless of the type of data, Ajax can send and receive it. Ajax uses a built-in object of all modern browsers called XMLHttpRequest. This object is used to exchange data back and forth between your Web page and a Web server, as shown below.

Types of AJAX Call

Ajax Methods Description
get() Sends HTTP GET request to load the data from the server.
Post() Sends HTTP POST request to submit or load the data to the server.
Put() Sends HTTP PUT request to update data on the server.
Delete() Sends HTTP DELETE request to delete data on the server.
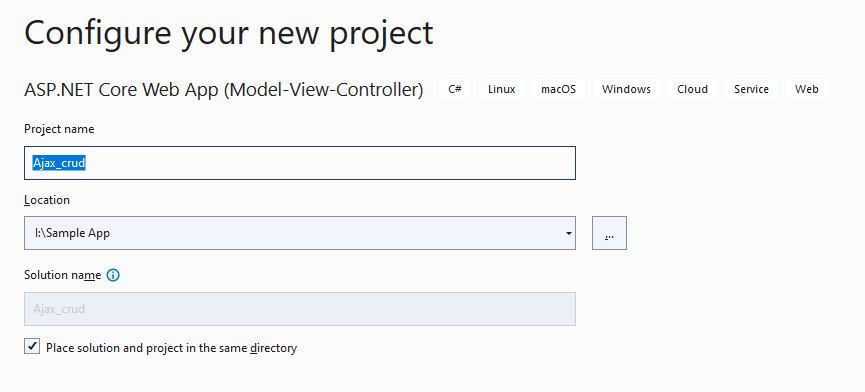
STEP 1
Open VS 2022 click on create project as shown below,
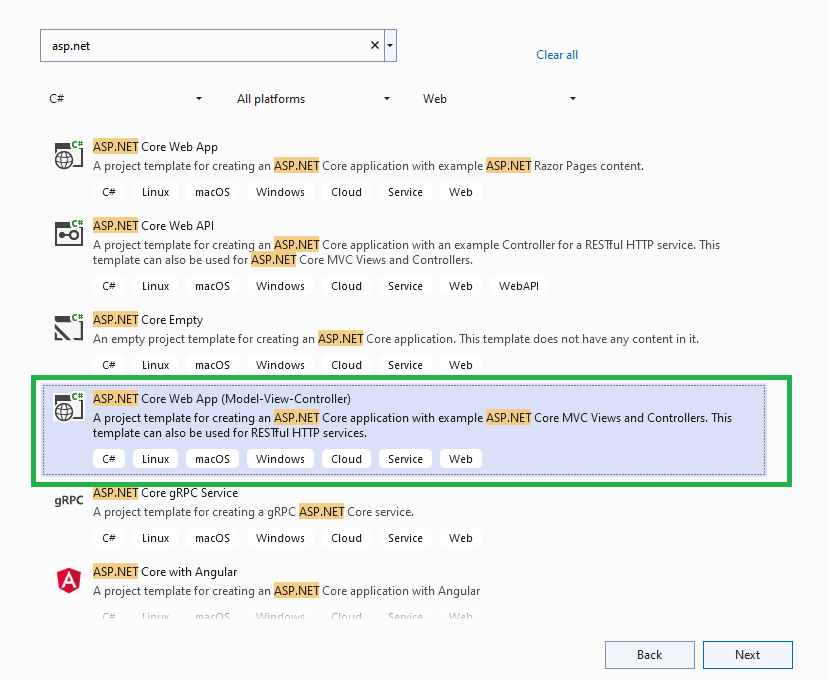


Step 2
Choose the below mentioned template


Step 3
Now open the Model folder and add the 2 classes

    JsonResponseViewModel
    Student Model

This model will be used to communicate during ajax request. Below is the source code defination for both the models

[Serializable]
public class JsonResponseViewModel
{
    public int ResponseCode { get; set; }

    public string ResponseMessage { get; set; } = string.Empty;
}

public class StudentModel
{
    public int Id { get; set; }
    public string Name { get; set; } = string.Empty;
    public string Email { get; set; } = string.Empty;
}

Step 4
Now add the GET|POST|PUT|DELETE function for the server so that we can perform operations

public class HomeController: Controller {
    private readonly ILogger < HomeController > _logger;
    public static List < StudentModel > students = new List < StudentModel > ();
    public HomeController(ILogger < HomeController > logger) {
        _logger = logger;
        students = new List < StudentModel > ();
        students.Add(new StudentModel() {
            Id = 1, Email = "[email protected]", Name = "Ankush"
        });
        students.Add(new StudentModel() {
            Id = 2, Email = "[email protected]", Name = "Rohit"
        });
        students.Add(new StudentModel() {
            Id = 3, Email = "[email protected]", Name = "Sunny"
        });
        students.Add(new StudentModel() {
            Id = 4, Email = "[email protected]", Name = "Amit"
        });
    }
    public IActionResult Index() {
        return View(students);
    }
    [HttpGet]
    public JsonResult GetDetailsById(int id) {
        var student = students.Where(d => d.Id.Equals(id)).FirstOrDefault();
        JsonResponseViewModel model = new JsonResponseViewModel();
        if (student != null) {
            model.ResponseCode = 0;
            model.ResponseMessage = JsonConvert.SerializeObject(student);
        } else {
            model.ResponseCode = 1;
            model.ResponseMessage = "No record available";
        }
        return Json(model);
    }
    [HttpPost]
    public JsonResult InsertStudent(IFormCollection formcollection) {
        StudentModel student = new StudentModel();
        student.Email = formcollection["email"];
        student.Name = formcollection["name"];
        JsonResponseViewModel model = new JsonResponseViewModel();
        //MAKE DB CALL and handle the response
        if (student != null) {
            model.ResponseCode = 0;
            model.ResponseMessage = JsonConvert.SerializeObject(student);
        } else {
            model.ResponseCode = 1;
            model.ResponseMessage = "No record available";
        }
        return Json(model);
    }
    [HttpPut]
    public JsonResult UpdateStudent(IFormCollection formcollection) {
        StudentModel student = new StudentModel();
        student.Id = int.Parse(formcollection["id"]);
        student.Email = formcollection["email"];
        student.Name = formcollection["name"];
        JsonResponseViewModel model = new JsonResponseViewModel();
        //MAKE DB CALL and handle the response
        if (student != null) {
            model.ResponseCode = 0;
            model.ResponseMessage = JsonConvert.SerializeObject(student);
        } else {
            model.ResponseCode = 1;
            model.ResponseMessage = "No record available";
        }
        return Json(model);
    }
    [HttpDelete]
    public JsonResult DeleteStudent(IFormCollection formcollection) {
        StudentModel student = new StudentModel();
        student.Id = int.Parse(formcollection["id"]);
        JsonResponseViewModel model = new JsonResponseViewModel();
        //MAKE DB CALL and handle the response
        if (student != null) {
            model.ResponseCode = 0;
            model.ResponseMessage = JsonConvert.SerializeObject(student);
        } else {
            model.ResponseCode = 1;
            model.ResponseMessage = "No record available";
        }
        return Json(model);
    }
}

Step 5
Switch to the view and add the AJAX Calls functions

@model IEnumerable<ajaxSample.Models.StudentModel>

@{
    ViewData["Title"] = "Home Page";
}
@section Scripts{
    <script>
        $(document).ready(function() {
            // GET BY ID
            $(".btn-get-student").on("click", function() {
                var formData = new FormData();
                var studentid = $(this).attr("data-studentid");
                var url = '@Url.Action("GetDetailsById", "Home")' + '/' + studentid;
                $.ajax({
                    type: 'GET',
                    url: url,
                    contentType: false,
                    processData: false,
                    cache: false,
                    data: formData,
                    success: function(response) {
                        if (response.responseCode == 0) {
                            var student = JSON.parse(response.responseMessage);
                            $("#email").val(student.Email);
                            $("#name").val(student.Name);
                            $("#hdn-student-id").val(student.Id);

                        }
                        else {
                            bootbox.alert(response.ResponseMessage);
                        }
                    },
                    error: errorCallback
                });
            });
            //SAVE
            $("#btn-insert-student").on("click", function() {
                var formData = new FormData();
                formData.append("name", $("#name").val());
                formData.append("email", $("#email").val());
                $.ajax({
                    type: 'POST',
                    url: '@Url.Action("InsertStudent", "Home")',
                    contentType: false,
                    processData: false,
                    cache: false,
                    data: formData,
                    success: successCallback,
                    error: errorCallback
                });
            });
            // UPDATE
            $("#btn-update-student").on("click", function() {
                var formData = new FormData();
                formData.append("id", $("#hdn-student-id").val());
                formData.append("name", $("#name").val());
                formData.append("email", $("#email").val());
                $.ajax({
                    type: 'PUT',
                    url: '@Url.Action("UpdateStudent", "Home")',
                    contentType: false,
                    processData: false,
                    cache: false,
                    data: formData,
                    success: successCallback,
                    error: errorCallback
                });
            });
            //DELETE
            $("#btn-delete-student").on("click", function() {
                var formData = new FormData();
                formData.append("id", $("#hdn-student-id").val());
                $.ajax({
                    type: 'DELETE',
                    url: '@Url.Action("DeleteStudent", "Home")',
                    contentType: false,
                    processData: false,
                    cache: false,
                    data: formData,
                    success: successCallback,
                    error: errorCallback
                });
            });
            function resetForm() {
                $("#hdn-student-id").val("");
                $("#name").val("");
                $("#email").val("");
            }
            function errorCallback() {
                bootbox.alert("Something went wrong please contact admin.");
            }
            function successCallback(response) {
                if (response.responseCode == 0) {
                    resetForm();
                    bootbox.alert(response.responseMessage, function() {

                        //PERFORM REMAINING LOGIC
                    });
                }
                else {
                    bootbox.alert(response.ResponseMessage);
                }
            };
        });
    </script>
}
    <div class="text-center">
        <h1 class="display-4">Welcome To ASP.NET CORE AJAX Demo</h1>
        <hr />
    </div>
    <div class="row">
        <div class="col-sm-12">
            <form>
                <input type="hidden" id="hdn-student-id" />
                <div class="row g-3">
                    <div class="col-sm-6">
                        <label for="email" class="form-label">Email</label>
                        <input type="email" class="form-control" id="email" placeholder="Enter your email">
                        <div class="invalid-feedback">
                            Please enter a valid email address for shipping updates.
                        </div>
                    </div>

                    <div class="col-sm-6">
                        <label for="lastName" class="form-label">Name</label>
                        <input type="text" class="form-control" id="name" placeholder="Enter Your Name" value="" required="">
                        <div class="invalid-feedback">
                            Name is required.
                        </div>
                    </div>

                </div>
                <table class="table">
                    <tbody>
                        <tr>
                            <td>  <a href="javascript:void(0)" class="btn btn-primary" id="btn-insert-student">Save Student</a></td>
                            <td>
                                <a href="javascript:void(0)" class="btn btn-info" id="btn-update-student">Update Student</a>
                            </td>
                            <td>
                                <a href="javascript:void(0)" class="btn btn-danger" id="btn-delete-student">Delete Student</a>
                            </td>
                        </tr>
                    </tbody>

                </table>
            </form>

        </div>
        <br />
    </div>
    <div class="row">
        <div class="col-md-12">
            <table class="table table-bordered">
                <thead>
                    <tr>
                        <td>#</td>
                        <td>Name</td>
                        <td>Email</td>
                        <td>Action</td>
                    </tr>
                </thead>
                <tbody id="student-list">
                    @{

                    foreach (var student in Model)
                    {
                        <tr>
                            <td>@student.Id</td>
                            <td>@student.Name</td>
                            <td>@student.Email</td>
                            <td>
                                <a href="javascript:void(0)" data-studentid="@student.Id" class="btn btn-success btn-get-student">Get Student</a>
                            </td>
                        </tr>
                    }
                }
            </tbody>
        </table>
    </div>
</div>

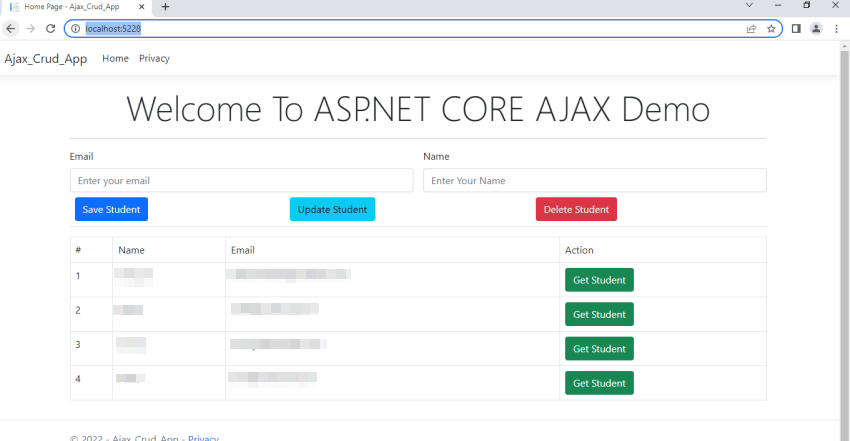
RUN the code and you will see the below mentioned O/P,

HostForLIFE.eu ASP.NET Core Hosting

European best, cheap and reliable ASP.NET hosting with instant activation. HostForLIFE.eu is #1 Recommended Windows and ASP.NET hosting in European Continent. With 99.99% Uptime Guaranteed of Relibility, Stability and Performace. HostForLIFE.eu security team is constantly monitoring the entire network for unusual behaviour. We deliver hosting solution including Shared hosting, Cloud hosting, Reseller hosting, Dedicated Servers, and IT as Service for companies of all size.


European ASP.NET Core Hosting :: Populating Dropdown Menu Using AJAX In ASP.NET Core

clock May 27, 2022 10:46 by author Peter

In this blog, we will study how to populate the dropdown menu using ajax call in asp.net net core step by step.

Step 1 - Add the jQuery CDN to your application
First of all, you need to add the jQuery CDN to your application that helps us to run the jQuery Code smoothly in the application.

Step 2 - Write the Ajax Call
The second step is to write the ajax call that is used to handle the asp.net Controller for bringing the data from the database in the form of JSON Object.

Add this Ajax call where you want to get the data from the database using the Asp.net Core Controller.
<script type = "text/javascript" > $(document).ready(function() {
    $.ajax({
        type: "GET",
        url: "/Bookings/FromLocation",
        data: "{}",
        success: function(data) {
            var s = '<option value="-1">Pickup Location</option>';
            for (var i = 0; i < data.length; i++) {
                console.log(data[i])
                s += '<option value="' + data[i].id + '">' + data[i].name + " " + data[i].address + '</option>';
            }
            $("#PickUpLocation").html(s);
        }
    });
});
</script>


Step 3 - Write the Asp.net Core Controller
The third step is to write the controller that is used to handle the HTTP request and bring the data from the database.

Note: the name of the controller should be the same as in the ajax call.
public Object FromLocation()
{
    return (_context.Locations.Select(x => new
    {
        Id = x.Id,
        Name = x.Name,
        Address = x.Address
    }).ToList().Where(x => x.Name != null && x.Address != null));
}


Step 4 - Pass the Data to Dropdown Menu

One thing that should be in your mind  is that the id of the select option should be the same as in the Ajax call.
<div class="form-group">
    <label asp-for="PickUpLocation" class="control-label"></label>
        <div class="form-group">
            <select class="form-control" asp-for="PickUpLocation" id="PickUpLocation" name="PickUpLocation"></select>
            <span asp-validation-for="PickUpLocation" class="text-danger"></span>
        </div>
</div>


Output
Now you can see that our data is now populated in the dropdown menu

HostForLIFE.eu ASP.NET Core Hosting

European best, cheap and reliable ASP.NET hosting with instant activation. HostForLIFE.eu is #1 Recommended Windows and ASP.NET hosting in European Continent. With 99.99% Uptime Guaranteed of Relibility, Stability and Performace. HostForLIFE.eu security team is constantly monitoring the entire network for unusual behaviour. We deliver hosting solution including Shared hosting, Cloud hosting, Reseller hosting, Dedicated Servers, and IT as Service for companies of all size.


European ASP.NET Core Hosting :: Minimal APIs In .NET 6

clock May 24, 2022 07:50 by author Peter

Today we will look at minimal APIs, a new feature in .NET 6. In the past, we created controllers in order to create an API which could be consumed by our clients. In .NET 6, a new feature called Minimal APIs has been introduced. This allows us to create an API with minimum code and plumbing. In fact, it is created directly in the Program.cs file. In .NET 6, the Startup.cs file is also not required anymore, and all initial plumbing is done inside the Program.cs file. We will create a simple Minimal API. So, let us begin.
Creating Minimal APIs

Let us start by opening Visual Studio 2022. I use the community edition which is free to download and use.

Select “Create a new project”.


Select “ASP.NET Core Web API”.


Remember to uncheck the highlighted option to use minimal APIs


Open the “Program.cs” file and update as below,

var builder = WebApplication.CreateBuilder(args);
// Add services to the container.
// Learn more about configuring Swagger/OpenAPI at https://aka.ms/aspnetcore/swashbuckle
builder.Services.AddEndpointsApiExplorer();
builder.Services.AddSwaggerGen();
var app = builder.Build();
// Configure the HTTP request pipeline.
if (app.Environment.IsDevelopment()) {
    app.UseSwagger();
    app.UseSwaggerUI();
}
app.UseHttpsRedirection();
var summaries = new [] {
    "Freezing",
    "Bracing",
    "Chilly",
    "Cool",
    "Mild",
    "Warm",
    "Balmy",
    "Hot",
    "Sweltering",
    "Scorching"
};
app.MapGet("/weatherforecast", () => {
    var forecast = Enumerable.Range(1, 5).Select(index => new WeatherForecast(DateTime.Now.AddDays(index), Random.Shared.Next(-20, 55), summaries[Random.Shared.Next(summaries.Length)])).ToArray();
    return forecast;
}).WithName("GetWeatherForecast");
app.MapGet("/welcomemessage", () => {
    return "Welcome to Minimal APIs";
}).WithName("GetWelcomeMessage");
app.Run();
internal record WeatherForecast(DateTime Date, int TemperatureC, string ? Summary) {
    public int TemperatureF => 32 + (int)(TemperatureC / 0.5556);
}

Running the application
We now run the application and see the swagger page as below,

Here, we can try both the minimal APIs we have in our code.


In this article, we looked at creating a minimal API, a new feature in .NET 6. The example here was a simple one but it gives an idea of the concept and more complex APIs can be added. Probably for more complex APIs, refactoring into a separate file is a good idea. Happy coding!

HostForLIFE.eu ASP.NET Core Hosting

European best, cheap and reliable ASP.NET hosting with instant activation. HostForLIFE.eu is #1 Recommended Windows and ASP.NET hosting in European Continent. With 99.99% Uptime Guaranteed of Relibility, Stability and Performace. HostForLIFE.eu security team is constantly monitoring the entire network for unusual behaviour. We deliver hosting solution including Shared hosting, Cloud hosting, Reseller hosting, Dedicated Servers, and IT as Service for companies of all size.


European ASP.NET Core Hosting :: Log Correlation In Microservices

clock May 17, 2022 07:45 by author Peter

Logging is one of the most important factors to trace any issue in the system. Multiple requests will reach the system at the same time. Each request will have its own way. In Microservices architecture the complexity will be more. The same request will get forwarded to multiple systems. Each layer in each system will add some logs to trace the issue. But we need to link all the logs belonging to the request. Then only we identify how the request is behaving on each system. To Link all the logs into a single link, that is why correlation is required.

There are multiple frameworks available to correlate all the logs.

Azure is providing azure app insights to link and showcase all the requests into a single pipeline. Kibana and Serilog also provide to link the logs. Here we are going to see to link the logs without any third-party components.
Setup the CorrelationId

The request will originate from any client application or any subsystem. Each request can be identified by its reuestId. So the origin system can send its requestId or we can create the Id in case the origin didn't send it.

public class CorrelationHeaderMiddleware {
    private readonly RequestDelegate _next;
    public CorrelationHeaderMiddleware(RequestDelegate next) {
        _next = next;
    }
    public async Task InvokeAsync(HttpContext context) {
        var correlationHeaders = context.Request.Headers["CorrelationId"];
        string correlationId;
        if (correlationHeaders.Any()) {
            correlationId = correlationHeaders[0];
        } else {
            correlationId = Guid.NewGuid().ToString();
            context.Request.Headers.Add("CorrelationId", correlationId);
        }
        context.Items["CorrelationId"] = correlationId;
        await _next(context);
    }
}

We have created new middleware that will fetch the correlation from the httpcontext or it will create the new id and set it into the request. Middleware is added into the request pipeline. All the requests will be processed and they will be added with CorrelationId.
Setup Logs

The request will get into multiple flows and add its logs. While adding the logs it will send the information alone to the log. While saving the logs we are fetching the CorrelationId from the request and adding it with the logs. So all the logs will get added with CorrelationId. After that, we can store the logs based on our format.

public class Logger: ILogType {
    private readonly ILogger < Logger > _logger;
    private readonly IHttpContextAccessor _httpContextAccessor;
    public Logger(ILogger < Logger > logger, IHttpContextAccessor httpContextAccessor) {
        _logger = logger;
        _httpContextAccessor = httpContextAccessor;
    }
    private string GetCorrelationId() {
        return _httpContextAccessor.HttpContext.Items["CorrelationId"] as string;
    }
    public void ProcessError(string message) {
        _logger.LogError(GetCorrelationId() + ": " + message);
    }
    public void ProcessLogs(string message) {
        _logger.LogInformation(GetCorrelationId() + ": " + message);
    }
    public void ProcessWarning(string message) {
        _logger.LogWarning(GetCorrelationId() + ": " + message);
    }
}


The request needs to be forwarded to multiple systems to complete it. To send the request to multiple subsystems, we need to use any protocol like HTTP or AMQP. In this case, we need to attach the CorrelationId as a header with the corresponding protocol. The corresponding subsystem will read the id and logs the stuff.

All the log data will be get stored in the same or multiple systems. But CorrelationId will be the key to linking all the logs. Using this id we can fetch the request flow order. It will help to understand the system's flow as well as to trace any issue in the system's behavior. Adding more logs will increase the system space. We need to ensure the log type on each log also.

HostForLIFE.eu ASP.NET Core Hosting

European best, cheap and reliable ASP.NET hosting with instant activation. HostForLIFE.eu is #1 Recommended Windows and ASP.NET hosting in European Continent. With 99.99% Uptime Guaranteed of Relibility, Stability and Performace. HostForLIFE.eu security team is constantly monitoring the entire network for unusual behaviour. We deliver hosting solution including Shared hosting, Cloud hosting, Reseller hosting, Dedicated Servers, and IT as Service for companies of all size.


European ASP.NET Core Hosting :: How To Migrate From .NET Core 3.1 To .NET 6.0?

clock May 9, 2022 07:54 by author Peter


.Net 6 is an LTS (Long Tern Support) Version. It will be supported for three years. It is the latest long-term support release. The previous version, .Net Core 3.1 support will be finalized in December 2022, and support for .Net 5 will be ended May 2022. This article describes how to upgrade the solution from .Net Core 3.1 to .NET 6.0 with an example of Console application and .Net Core 3.1 class library project. Upgrading console applications and class library project is almost similar. However, there is some difference between Upgrading ASP.NET Core Web app.

Prerequisites
    Visual Studio 2022

Step 1 - Upgrade the Target Framework
Right-click on the project then go to properties and change the target.

Then select the target framework to .NET 6.0 as depicted below and save it.

Alternatively from project.csproj file you can change the target Framework from netcore3.1 to net 6.0 as shown below.

<PropertyGroup>
    <OutputType>Exe</OutputType>
    <TargetFramework>net6.0</TargetFramework>
  </PropertyGroup>

Step 2 - Updating Package references
Update Package references if there are any. Go to Project.csproj file and upgrade packages as shown below.


For an instance upgrade the package Microsoft.AspNetCore.JsonPatch and Microsoft.EntityFrameworkCore.Tools and so on from version 3.1.6 to 6.0.0 as illustrated below.

<ItemGroup>
-    <PackageReference Include="Microsoft.AspNetCore.JsonPatch" Version="3.1.6" />
-    <PackageReference Include="Microsoft.EntityFrameworkCore.Tools" Version="3.1.6" />
-    <PackageReference Include="Microsoft.Extensions.Caching.Abstractions" Version="3.1.6" />
-    <PackageReference Include="System.Net.Http.Json" Version="3.2.1" />
+    <PackageReference Include="Microsoft.AspNetCore.JsonPatch" Version="6.0.0" />
+    <PackageReference Include="Microsoft.EntityFrameworkCore.Tools" Version="6.0.0" />
+    <PackageReference Include="Microsoft.Extensions.Caching.Abstractions" Version="6.0.0" />
+    <PackageReference Include="System.Net.Http.Json" Version="6.0.0" />
</ItemGroup>

Step 3 - Delete obj and bin folder

You may need to delete the existing bin and obj folder. Go to the respective project directory and delete those folders. Additionally, you can delete the NuGet cache by running the below command.
dotnet nuget locals --clear all

Step 4 - Build the solution

Then build the solution and see whether there are errors or your app is built successfully. If there are errors based on an error message correct the code and rebuild the solution. On successful build of the application, your app is upgraded to the .NET 6.0.

The above three steps are required to follow to upgrade the class library and console application to migrate from .NET Core 3.1 to .NET 6.0.

On the other hand, to update the Asp.NET Core 3.1 and Blazor application you need to follow more steps in addition to the above three.

Following are some changes you need to consider for upgrading ASP.NET Core 3.1 web application to .NET6

    Minimal hosting and statup.cs file changes
    Note that minimal hosting unifies the Startup.cs and Program.cs to a single Program.cs file. Moreover, the ConfigureServices and Configure are no longer used in .NET6.0.
    Model Binding
    Datetime values are model bound as UTC timezone. For applications build on ASP .NET Core 5 and later, model binding binds the DateTime as UTC timezone whereas, in applications built using ASP.NET Core 3.1 and earlier, Datetime values were model bound as local time and the timezone was determined by the server.
    Docker Image
    If your app uses docker then you need to pull a Docker image that consists of ASP.NET Core 6.0 runtime as well. The below command can be used for that.

docker pull mcr.microsoft.com/dotnet/aspnet:6.0

You can check the details on the below document.

In this article, we have learned how to upgrade the project from .NET Core 3.1 to .NET 6.0 with an example of a console application. This article will be useful while migrating your application from .NET Core 3.1 to .NET 6.0 without encountering any issues. Best of luck to migrate your application before the end of support.

HostForLIFE.eu ASP.NET Core Hosting

European best, cheap and reliable ASP.NET hosting with instant activation. HostForLIFE.eu is #1 Recommended Windows and ASP.NET hosting in European Continent. With 99.99% Uptime Guaranteed of Relibility, Stability and Performace. HostForLIFE.eu security team is constantly monitoring the entire network for unusual behaviour. We deliver hosting solution including Shared hosting, Cloud hosting, Reseller hosting, Dedicated Servers, and IT as Service for companies of all size.


About HostForLIFE

HostForLIFE is European Windows Hosting Provider which focuses on Windows Platform only. We deliver on-demand hosting solutions including Shared hosting, Reseller Hosting, Cloud Hosting, Dedicated Servers, and IT as a Service for companies of all sizes.

We have offered the latest Windows 2019 Hosting, ASP.NET 5 Hosting, ASP.NET MVC 6 Hosting and SQL 2019 Hosting.


Month List

Tag cloud

Sign in