European ASP.NET 4.5 Hosting BLOG

BLOG about ASP.NET 4, ASP.NET 4.5 Hosting and Its Technology - Dedicated to European Windows Hosting Customer

European ASP.NET Core Hosting :: Authorization In Razor Pages ASP.NET Core

clock May 31, 2021 07:03 by author Peter

Authorization is a process that determines what a user is able to do. For example, an Admin user is allowed to install/remove a software from a computer and a non-Admin user can use the software from the computer. It is independent and orthogonal from authentication. However, authorization requires an authentication mechanism. For applications, the first step is always authentication and then authorization.

Using AuthorizeFilter, we can control the access in our MVC / Web API application by specifying this attribute in controller or action method. Similarly, there is a way to control access in our Razor pages, i.e., to use authorization conventions at startup. These conventions allow us to authorize users to access individual pages or folders of the pages. In the same way, these conventions allow anonymous users to access individual pages or folders of pages.
 
To demonstrate the concept, I have created an application with ASP.NET Core Identity. For guidance on how to create an application with ASP.NET Core Identity, please refer to my article "Overview Of Identity In ASP.NET Core 2.0" .
 
Using AddRazorPagesOptions, we can add an AuthorizeFilter to the page at the specified path. With AddRazorPagesOptions, we have a couple of methods that can be used to authorize or allow anonymous access to the page or folder.
 
AuthorizePage
This adds an AuthorizeFilter to the specified page. There are two extension methods: one is "to accept the page name" and other one is " to accept page name and authorization policy".
    public static PageConventionCollection AuthorizePage(this PageConventionCollection conventions, string pageName)  
    public static PageConventionCollection AuthorizePage(this PageConventionCollection conventions, string pageName, string policy)  


AuthorizeFolder
This adds AuthorizeFilter to all pages under a specified folder. There are two extension methods - accept the folder path, and accept the folder path and authorization policy.
    public static PageConventionCollection AuthorizeFolder(this PageConventionCollection conventions, string folderPath)  
    public static PageConventionCollection AuthorizeFolder(this PageConventionCollection conventions, string folderPath, string policy)  


AllowAnonymousToPage
This adds AllowAnonymousFilter to the specified page.
    public static PageConventionCollection AllowAnonymousToPage(this PageConventionCollection conventions, string pageName)  

AllowAnonymousToFolder
This adds AllowAnonymousFilter to all the pages under the specified folder.
    public static PageConventionCollection AllowAnonymousToFolder(this PageConventionCollection conventions, string folderPath)  

AuthorizeAreaPage
This is the same as AuthorizePage method. It adds AuthorizeFilter to the specified page under the specified Area. It also has an extension method that accepts the authorization policy.
    public static PageConventionCollection AuthorizeAreaPage(this PageConventionCollection conventions, string areaName, string pageName)  
    public static PageConventionCollection AuthorizeAreaPage(this PageConventionCollection conventions, string areaName, string pageName, string policy)  

AuthorizeAreaFolder
This is the same as the AuthorizeFolder method. It adds AuthorizeFilter to the all the pages under the specified folder under the specified Area. It also has extension method that accepts the authorization policy.
    public static PageConventionCollection AuthorizeAreaFolder(this PageConventionCollection conventions, string areaName, string folderPath)  
    public static PageConventionCollection AuthorizeAreaFolder(this PageConventionCollection conventions, string areaName, string folderPath, string policy)  

AllowAnonymousToAreaPage

This adds AllowAnonymousFilter to the specified page that is located under the specified area.
    public static PageConventionCollection AllowAnonymousToAreaPage(this PageConventionCollection conventions, string areaName, string pageName)  

AllowAnonymousToAreaFolder

This adds AllowAnonymousFilter to all the pages that are located under the specified area folder.
    public static PageConventionCollection AllowAnonymousToAreaFolder(this PageConventionCollection conventions, string areaName, string folderPath)  

Example
To demonstrate the concept, I have created a few pages and the following snippet shows the folder structure of defined authorization in the project.


    public void ConfigureServices(IServiceCollection services)  
    {  
        ....  
        ....  
        services.AddMvc().AddRazorPagesOptions(options =>  
        {  
            options.Conventions.AuthorizePage("/Page3");  
            options.Conventions.AuthorizeFolder("/Public");  
            options.Conventions.AllowAnonymousToPage("/page4");  
            options.Conventions.AllowAnonymousToFolder("Private");  
      
            options.Conventions.AuthorizeAreaPage("MyFeature", "/AuthPage1");  
            options.Conventions.AllowAnonymousToAreaPage("MyFeature", "/AuthPage2");  
        })  
        .SetCompatibilityVersion(CompatibilityVersion.Version_2_1);  
    }  


The authorization conventions can be also applied to Razor class Library.

    public void ConfigureServices(IServiceCollection services)  
    {  
        ....  
        ....  
        services.AddMvc().AddRazorPagesOptions(options =>  
        {  
            ....  
            ....  
            //This page defined in Razor Class Library project  
            options.Conventions.AuthorizeAreaPage("MyFeature", "/Page1");  
            ....  
            ....  
        })  
        .SetCompatibilityVersion(CompatibilityVersion.Version_2_1);  
    }  

Combining authorized and anonymous access
 
We can also specify authorization for the folder and within this folder it allows anonymous access.

    services.AddMvc()  
        .AddRazorPagesOptions(options =>  
        {  
            ....  
            options.Conventions.AuthorizeFolder("/Private").AllowAnonymousToPage("/Private/page8");  
            ....  
        }).SetCompatibilityVersion(CompatibilityVersion.Version_2_1);  


The reverse case is not allowed; i.e., we cannot define folder for anonymous access and specify a page within it for authorization. In this case, AllowAnonymousFilter is always applied and AuthorizeFilter is ignored.

    .AllowAnonymousToFolder("/Private").AuthorizePage("/Private/page8");  

Summary
 
Using this authorization convention, we can apply authorization on Razor pages. This convention can also be applied to Razor class Library (RCL) project if we use it in our project. In the case of RCL, the conventions are defined in the project that used RCL.


European ASP.NET Core Hosting :: Email Send Using ASP.NET With C#

clock May 25, 2021 07:10 by author Peter

In this article, you will learn how to send email using ASP.NET C# through the various SMTP servers. In this article, I also explained the way of sending emails from the HostForLIFE server.


Below is the step to send an email using ASP.NET C#,
 
Step 1
Create a new website.
 
Step 2
Create a webform aspx page.
 
Step 3
Add CSS file as attached in source code.
 
Step 4
Add reference of AjaxToolKit as attached in source code.
 
Step 5
Design the webpage like below,
    <!DOCTYPE html>  
    <html  
        xmlns="http://www.w3.org/1999/xhtml">  
        <head id="Head1" runat="server">  
            <title>Email Send Sample</title>  
            <link href="bootstrap.min.css" rel="stylesheet" />  
        </head>  
        <body>  
            <form id="form1" runat="server">  
                <div class="container">  
                    <div class="row">  
                        <div class="col-md-4 col-md-offset-4">  
                            <div class="panel panel-primary">  
                                <div class="panel-heading">  
                                    <h3 class="panel-title">Send Email Sample</h3>  
                                </div>  
                                <div class="panel-body">  
                                    <label>Name</label>  
                                    <asp:TextBox ID="txtname" runat="server" CssClass="form-control" placeholder="Name"></asp:TextBox>  
                                    <asp:RequiredFieldValidator ID="RequiredFieldValidator1" runat="server" ErrorMessage="Please Provide Name" ControlToValidate="txtname" ForeColor="Red"></asp:RequiredFieldValidator>  
                                    <br />  
                                    <label>Subject</label>  
                                    <asp:TextBox ID="txtbody" runat="server" CssClass="form-control" placeholder="Subject"></asp:TextBox>  
                                    <asp:RequiredFieldValidator ID="RequiredFieldValidator2" runat="server" ErrorMessage="Please Provide Subject" ControlToValidate="txtbody" ForeColor="Red"></asp:RequiredFieldValidator>  
                                    <br />  
                                    <label>Email([email protected]</label>  
                                    <asp:TextBox ID="txtemail" runat="server" CssClass="form-control" placeholder="Email"></asp:TextBox>  
                                    <asp:RequiredFieldValidator ID="RequiredFieldValidator4" runat="server" ErrorMessage="Please Provide Email-ID" ControlToValidate="txtemail" ForeColor="Red"></asp:RequiredFieldValidator>  
                                    <br />  
                                    <asp:RegularExpressionValidator ID="RegularExpressionValidator1" runat="server" ErrorMessage="Please Proide Valid Email-ID" ControlToValidate="txtemail" ForeColor="Red" ValidationExpression="\w+([-+.']\w+)*@\w+([-.]\w+)*\.\w+([-.]\w+)*"></asp:RegularExpressionValidator>  
                                    <br />  
                                    <asp:Button ID="Button1" runat="server" Text="Send Email" CssClass="btn btn-block btn-primary" OnClick="Button1_Click" />  
                                    <asp:Button ID="Button2" runat="server" Text="Send Email from HostForLIFE" CssClass="btn btn-block btn-primary" OnClick="Button2_Click" />  
                                    <asp:Label ID="lblmsg" runat="server" Text=""></asp:Label>  
                                </div>  
                            </div>  
                        </div>  
                    </div>  
                </div>  
            </form>  
        </body>  
    </html>  


Step 6
Add Server-side validation for every field as name validation, email validation as written in the above webpage source code.
 
Step 7
Add Server-side RegularExpressionValidator to valid the correct email id.
 
Step 8
Added below namespace in .aspx.cs page,
    using System.Net;  
    using System.Net.Mail;  

Step 9
Add the below source code on button click event of the webpage.
 
Send email from local server,
    string to = txtemail.Text; //To address  
    string from = "[email protected]"; //From address  
    MailMessage message = new MailMessage(from, to);  
    string mailbody = message.Subject = "This article will help you on how to send email using asp.net c# code";  
    message.Body = mailbody;  
    message.IsBodyHtml = false;  
    SmtpClient client = new SmtpClient();  
    client.Host = "smtp.gmail.com";  
    client.Port = 587;  
    System.Net.NetworkCredential basicCredential1 = new  
    System.Net.NetworkCredential("[email protected]", "password");  
    client.EnableSsl = false;  
    client.UseDefaultCredentials = false;  
    // client.Credentials = basicCredential1;  
    try {  
        client.Send(message);  
        lblmsg.Text = "Email Send Successfully";  
    } catch (Exception ex) {}  

Send email from HostForLIFE Server,
    string to = txtemail.Text; //To address  
    string from = "[email protected]"; //From address  
    MailMessage message = new MailMessage(from, to);  
    string mailbody = "This article will help you on how to send email using asp.net c# code";  
    message.Subject = txtbody.Text;  
    message.Body = mailbody;  
    message.IsBodyHtml = false;  
    SmtpClient client = new SmtpClient();  
    client.Host = "relay-hosting.secureserver.net"; //This is code SMTP Host server name  
    client.Port = 25; //This is default port  
    client.EnableSsl = false;  
    client.UseDefaultCredentials = false;  
    try {  
        client.Send(message);  
        lblmsg.Text = "Email Send Successfully";  
    } catch (Exception ex) {}  

Step 10
Run the application.
If you get the below error then follow step 11.
 
WebForms UnobtrusiveValidationMode requires a ScriptResourceMapping for 'jquery'. Please add a ScriptResourceMapping named jquery(case-sensitive).
 
Step 11
Add the below code in web.config,
    <appSettings>  
       <add key="ValidationSettings:UnobtrusiveValidationMode" value="None" />  
    </appSettings>  


Step 12
Run the website and you will get the below screen. Fill in all the details and click on the button Send Email for Local server email like Gmail and Click on Send Email from HostForLIFE to send email from HostForLIFE server that will not work from local work only on the HostForLIFE server.

Step 13
Once you click on the button after filling in the data you get the message "Email Send Successfully".
 
Some of SMTP Class Properties,
    Host
    SMTP Server( Here you need to give the SMTP server name from where the email going to send).

    Enable SSL
    Check your host accepted SSL Connections Value is either True or False.

    Port
    SMTP Server Port (Here you need to give SMTP server port from where the email going to send).

    Credentials
    SMTP servers login credentials such as Email and Password.

    UseDefaultCredentials
    When we set to True in UseDefaultCredentials then that specifies to allow authentication based on the credentials of the account used to send emails.

In this article, we learned how to send email using ASP.NET C# through the SMTP server. I hope this article is useful for those who want to send email using ASP.NET C#.


European ASP.NET Core Hosting :: Elegant API Versioning In ASP.NET Core

clock May 17, 2021 07:37 by author Peter

In this tutorial, we are going to learn how to develop simple Asp Net Core 3.1 Web API and API Versioning techniques such as URL-based, header-based, and Query string-based versioning.

 
What Is Web API Versioning? And Why Do We Need It?
Assume that we have an API available in the production box and a few clients are already consuming it. Post-production deployment, we should be very careful with any new changes. These changes should not impact the existing customer applications that are already consuming our API. It is not a good practice to advise clients to change the API calls in each of their applications where our API has been integrated. In order to address such issues, API versioning came into the picture.
 
API versions ensure that the integrity and availability of data for our existing client applications.
 
To Begin with,
 
Step 1

Create a simple ASP.NET Core 3.1 API Project.
 
Step 2
Add a model ProductResponse.cs
    namespace AspNetCoreVersioning.Contracts {  
        public class ProductResponse {  
            public Guid Id {  
                get;  
                set;  
            }  
            public string Name {  
                get;  
                set;  
            }  
        }  
    }  

Step 3
Add a Controller ProductsController.cs
    namespace AspNetCoreVersioning.Controllers {  
        [ApiController]  
        [Route("api/products")]  
        public class ProductsController: ControllerBase {  
            [HttpGet("{productId}")]  
            public IActionResult GetProduct([FromRoute] Guid productId) {  
                var product = new ProductResponse {  
                    Id = productId,  
                        Name = "Sanitizer"  
                };  
                return Ok(product);  
            }  
        }  
    }  


Let us test this API, According to your environment, the port number will vary.
https://localhost:12345/api/products/00000000-0000-0000-0000-000000000000
 
Result
    {"id":"00000000-0000-0000-0000-000000000000","name":"Sanitizer"}   

We have received the expected result.
 
Assume that we need to make a breaking change on our API, but we don’t want to break anything in our existing API which our customers are already using. How can we achieve this? Let us go and resolve a NuGet package Microsoft.AspNetCore.Mvc.Versioning.
 
Use the below command from the package manager console,
 
Install-Package Microsoft.AspNetCore.Mvc.Versioning
 
Once the package installation complete, let us configure the API to support versioning. This package basically has everything that we need.
Without any delay, let us go to class Startup.cs, where we are going to update the method ConfigurationServices as below
    public void ConfigureServices(IServiceCollection services) {  
        services.AddControllers();  
        services.AddApiVersioning();  
    }  


By adding these services.AddApiVersioning() method, we have some sort of versioning. However, we haven’t really told ASP.NETCore how we versioning the API. Without making any additional changes, let us run the API, we will get the below error message
    {"error":{"code":"ApiVersionUnspecified","message":"An API version is required, but was not specified.","innerError":null}}   

This is because we haven’t configured our API versioning to a default version. For us the first version apparently V1 or V1.0. The default way of this works in ASP.NET Core is to have the “API-version” query string parameter as below.
https://localhost:12345/api/products/00000000-0000-0000-0000-000000000000?api-version=1
 
Result will as below,
    {"id":"00000000-0000-0000-0000-000000000000","name":"Sanitizer"}   

This would work fine. However, this is not ideal because if we make this “api-version” query string is mandatory, many of our consumers’ code break. What we want to do instead is we want to enable the API versioning default to a version. How we can achieve this? Let us to the Startup.cs class again and make the below changes.
    public void ConfigureServices(IServiceCollection services) {  
        services.AddControllers();  
        services.AddApiVersioning(options => {  
            options.AssumeDefaultVersionWhenUnspecified = true;  
        });  
    }  

Let us execute the API again,
https://localhost:12345/api/products/00000000-0000-0000-0000-000000000000

    Result: {"id":"00000000-0000-0000-0000-000000000000","name":"Sanitizer"}   


Assume that, if we want to have a different version instead of V1.0 or V1. How can we achieve this?
 
First, we will make the below changes in Startup.cs class as below,
    public void ConfigureServices(IServiceCollection services) {  
        services.AddControllers();  
        services.AddApiVersioning(options => {  
            options.AssumeDefaultVersionWhenUnspecified = true;  
            options.DefaultApiVersion = ApiVersion.Default;  
        });  
    }  


Then make the below two changes.
 
Step 1
Add the below models in ProductResponse.cs Class,
    namespace AspNetCoreVersioning.Contracts {  
        public class ProductResponseV1 {  
            public Guid Id {  
                get;  
                set;  
            }  
            public string Name {  
                get;  
                set;  
            }  
        }  
        public class ProductResponseV2 {  
            public Guid Id {  
                get;  
                set;  
            }  
            public string ProductName {  
                get;  
                set;  
            }  
        }  
    }  

Step 2
Make the below changes into ProductsController.cs Class
    namespace AspNetCoreVersioning.Controllers {  
            [ApiController]  
            [Route("api/products")]  
            public class ProductsController: ControllerBase {  
                [HttpGet("{productId}")]  
                public IActionResult GetProductV1([FromRoute] Guid productId) {  
                        var product = new ProductResponseV1 {  
                            Id = productId,  
                                Name = "Sanitizer"  
                        };  
                        return Ok(product);  
                    }  
                    [HttpGet("{productId}")]  
                public IActionResult GetProductV2([FromRoute] Guid productId) {  
                    var product = new ProductResponseV2 {  
                        Id = productId,  
                            ProductName = "Sanitizer"  
                    };  
                    return Ok(product);  
                }  
            }  

Now Run the API. You will get the below Exception.
 
An unhandled exception occurred while processing the request.
 
AmbiguousMatchException: The request matched multiple endpoints. Matches,
    AspNetCoreVersioning.Controllers.ProductsController.GetProductV2 (AspNetCoreVersioning)  
    AspNetCoreVersioning.Controllers.ProductsController.GetProductV1 (AspNetCoreVersioning)  
    Microsoft.AspNetCore.Routing.Matching.DefaultEndpointSelector.ReportAmbiguity(CandidateState[] candidateState)
 

In order to resolve this error message, we need to make some configuration changes at ProductsController.cs Class as below,
    namespace AspNetCoreVersioning.Controllers {  
        [ApiController]  
        [Route("api/products")]  
        [ApiVersion("1.0")]  
        [ApiVersion("2.0")]  
        public class ProductsController: ControllerBase {  
            [HttpGet("{productId}")]  
            public IActionResult GetProductV1([FromRoute] Guid productId) {  
                    var product = new ProductResponseV1 {  
                        Id = productId,  
                            Name = "Sanitizer"  
                    };  
                    return Ok(product);  
                }  
                [HttpGet("{productId}")]  
                [MapToApiVersion("2.0")]  
            public IActionResult GetProductV2([FromRoute] Guid productId) {  
                var product = new ProductResponseV2 {  
                    Id = productId,  
                        ProductName = "Sanitizer"  
                };  
                return Ok(product);  
            }  
        }  
    }  


Now Run the API as below,
https://localhost:12345/api/products/00000000-0000-0000-0000-000000000000?api-version=1

    Result: {"id":"00000000-0000-0000-0000-000000000000","name":"Sanitizer"}   

https://localhost:12345/api/products/00000000-0000-0000-0000-000000000000?api-version=2

    Result: {"id":"00000000-0000-0000-0000-000000000000","productName":"Sanitizer"}   

I will be covering URL based and Header based versioning in the upcoming sessions. Thanks for reading my article. I appreciate your feedback in the comment section below.


European ASP.NET Core Hosting :: JWT Authentication In ASP.NET Core

clock May 3, 2021 07:00 by author Peter

JWT in ASP.NET Core
JWT (JSON web token) has become more and more popular in web development. It is an open standard which allows transmitting data between parties as a JSON object in a secure and compact way. The data transmitting using JWT between parties are digitally signed so that it can be easily verified and trusted.

In this article, we will learn how to setup JWT with ASP.NET core web application. We can create an application using Visual Studio or using CLI (Command Line Interface).

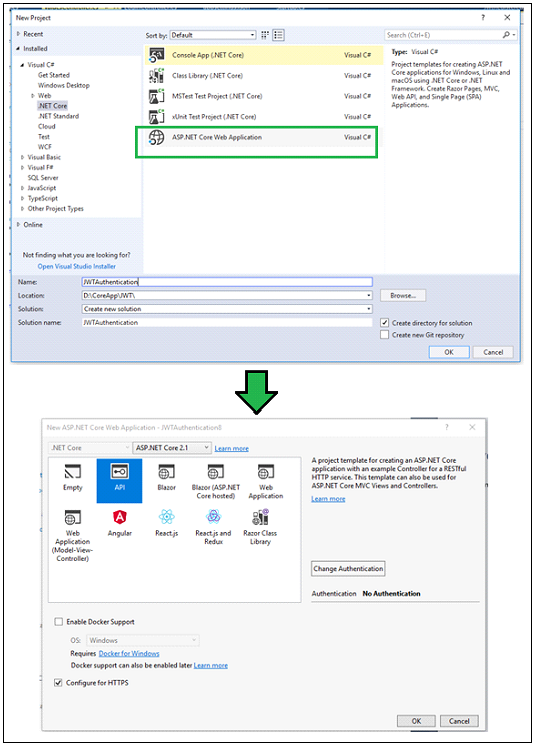
    dotnet new webapi -n JWTAuthentication   

Above command will create an ASP.NET Web API project with the name "JWTAuthentication" in the current folder.
 
The first step is to configure JWT based authentication in our project. To do this, we need to register a JWT authentication schema by using "AddAuthentication" method and specifying JwtBearerDefaults.AuthenticationScheme. Here, we configure the authentication schema with JWT bearer options.
    public void ConfigureServices(IServiceCollection services)    
    {    
        services.AddAuthentication(JwtBearerDefaults.AuthenticationScheme)    
        .AddJwtBearer(options =>    
        {    
            options.TokenValidationParameters = new TokenValidationParameters    
            {    
                ValidateIssuer = true,    
                ValidateAudience = true,    
                ValidateLifetime = true,    
                ValidateIssuerSigningKey = true,    
                ValidIssuer = Configuration["Jwt:Issuer"],    
                ValidAudience = Configuration["Jwt:Issuer"],    
                IssuerSigningKey = new SymmetricSecurityKey(Encoding.UTF8.GetBytes(Configuration["Jwt:Key"]))    
            };    
        });    
        services.AddMvc();    
    }   


In this example, we have specified which parameters must be taken into account to consider JWT as valid. As per our code,  the following items consider a token valid:

    Validate the server (ValidateIssuer = true) that generates the token.
    Validate the recipient of the token is authorized to receive (ValidateAudience = true)
    Check if the token is not expired and the signing key of the issuer is valid (ValidateLifetime = true)
    Validate signature of the token (ValidateIssuerSigningKey = true)
    Additionally, we specify the values for the issuer, audience, signing key. In this example, I have stored these values in appsettings.json file.

AppSetting.Json

    {    
      "Jwt": {    
        "Key": "ThisismySecretKey",    
        "Issuer": "Test.com"    
      }    
    }   

The above-mentioned steps are used to configure a JWT based authentication service. The next step is to make the authentication service is available to the application. To do this, we need to call app.UseAuthentication() method in the Configure method of startup class. The UseAuthentication method is called before UseMvc method.

    public void Configure(IApplicationBuilder app, IHostingEnvironment env)    
    {    
        app.UseAuthentication();    
        app.UseMvc();    
    }

Generate JSON Web Token
I have created a LoginController and Login method within this controller, which is responsible to generate the JWT. I have marked this method with the AllowAnonymous attribute to bypass the authentication. This method expects the Usermodel object for Username and Password.
 
I have created the "AuthenticateUser" method, which is responsible to validate the user credential and returns to the UserModel. For demo purposes, I have returned the hardcode model if the username is "Peter". If the "AuthenticateUser" method returns the user model, API generates the new token by using the "GenerateJSONWebToken" method.
 
Here, I have created a JWT using the JwtSecurityToken class. I have created an object of this class by passing some parameters to the constructor such as issuer, audience, expiration, and signature.
 
Finally, JwtSecurityTokenHandler.WriteToken method is used to generate the JWT. This method expects an object of the JwtSecurityToken class.
    using Microsoft.AspNetCore.Authorization;    
    using Microsoft.AspNetCore.Mvc;    
    using Microsoft.Extensions.Configuration;    
    using Microsoft.IdentityModel.Tokens;    
    using System;    
    using System.IdentityModel.Tokens.Jwt;    
    using System.Security.Claims;    
    using System.Text;    
        
    namespace JWTAuthentication.Controllers    
    {    
        [Route("api/[controller]")]    
        [ApiController]    
        public class LoginController : Controller    
        {    
            private IConfiguration _config;    
        
            public LoginController(IConfiguration config)    
            {    
                _config = config;    
            }    
            [AllowAnonymous]    
            [HttpPost]    
            public IActionResult Login([FromBody]UserModel login)    
            {    
                IActionResult response = Unauthorized();    
                var user = AuthenticateUser(login);    
        
                if (user != null)    
                {    
                    var tokenString = GenerateJSONWebToken(user);    
                    response = Ok(new { token = tokenString });    
                }    
        
                return response;    
            }    
        
            private string GenerateJSONWebToken(UserModel userInfo)    
            {    
                var securityKey = new SymmetricSecurityKey(Encoding.UTF8.GetBytes(_config["Jwt:Key"]));    
                var credentials = new SigningCredentials(securityKey, SecurityAlgorithms.HmacSha256);    
        
                var token = new JwtSecurityToken(_config["Jwt:Issuer"],    
                  _config["Jwt:Issuer"],    
                  null,    
                  expires: DateTime.Now.AddMinutes(120),    
                  signingCredentials: credentials);    
        
                return new JwtSecurityTokenHandler().WriteToken(token);    
            }    
        
            private UserModel AuthenticateUser(UserModel login)    
            {    
                UserModel user = null;    
        
                //Validate the User Credentials    
                //Demo Purpose, I have Passed HardCoded User Information    
                if (login.Username == "Peter")    
                {    
                    user = new UserModel { Username = "Peter", EmailAddress = "[email protected]" };    
                }    
                return user;    
            }    
        }    
    }   


Once, we have enabled the JWT based authentication, I have created a simple Web API method that returns a list of value strings when invoked with an HTTP GET request. Here, I have marked this method with the authorize attribute, so that this endpoint will trigger the validation check of the token passed with an HTTP request.
 
If we call this method without a token, we will get 401 (UnAuthorizedAccess) HTTP status code as a response. If we want to bypass the authentication for any method, we can mark that method with the AllowAnonymous attribute.
 
To test the created Web API, I am Using Fiddler. First, I have requested to "API/login" method to generate the token. I have passed the following JSON in the request body.
    {"username": "Peter", "password": "password"}

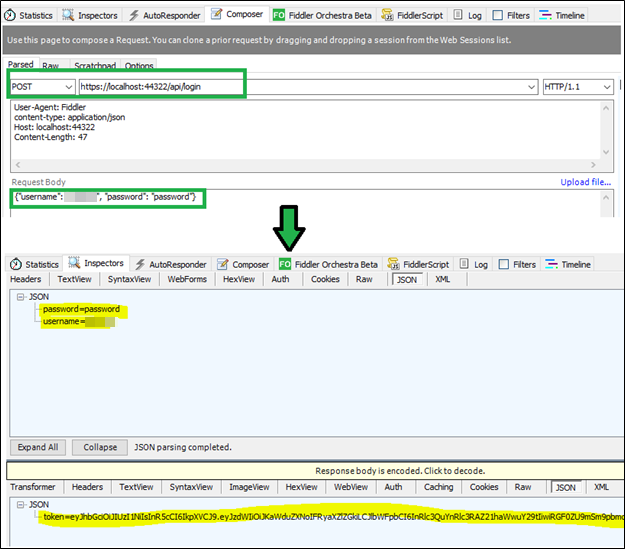
As a response, we will get the JSON like the following,
    {    
        "token" : "eyJhbGciOiJIUzI1NiIsInR5cCI6IkpXVCJ9.eyJzdWIiOiJKaWduZXNoIFRyaXZlZGkiLCJlbWFpbCI6InRlc3QuYnRlc3RAZ21haWwuY29tIiwiRGF0ZU9mSm9pbmciOiIwMDAxLTAxLTAxIiwianRpIjoiYzJkNTZjNzQtZTc3Yy00ZmUxLTgyYzAtMzlhYjhmNzFmYzUzIiwiZXhwIjoxNTMyMzU2NjY5LCJpc3MiOiJUZXN0LmNvbSIsImF1ZCI6IlRlc3QuY29tIn0.8hwQ3H9V8mdNYrFZSjbCpWSyR1CNyDYHcGf6GqqCGnY"    
    }  

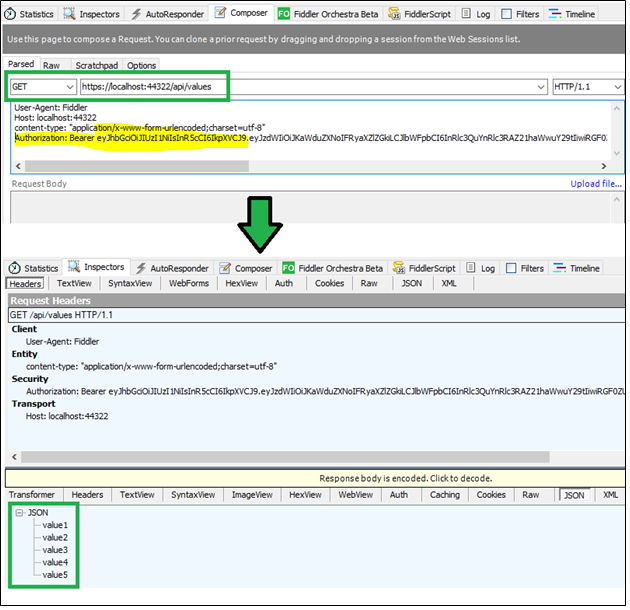
Now, we will try to get the list of values by passing this token into the authentication HTTP header. Following is my Action method definition.
    [HttpGet]    
    [Authorize]    
    public ActionResult<IEnumerable<string>> Get()    
    {    
        return new string[] { "value1", "value2", "value3", "value4", "value5" };    
    }  

    Authorization: Bearer eyJhbGciOiJIUzI1NiIsInR5cCI6IkpXVCJ9.eyJzdWIiOiJKaWduZXNoIFRyaXZlZGkiLCJlbWFpbCI6InRlc3QuYnRlc3RAZ21haWwuY29tIiwiRGF0ZU9mSm9pbmciOiIwMDAxLTAxLTAxIiwianRpIjoiYzJkNTZjNzQtZTc3Yy00ZmUxLTgyYzAtMzlhYjhmNzFmYzUzIiwiZXhwIjoxNTMyMzU2NjY5LCJpc3MiOiJUZXN0LmNvbSIsImF1ZCI6IlRlc3QuY29tIn0.8hwQ3H9V8mdNYrFZSjbCpWSyR1CNyDYHcGf6GqqCGnY 

Handle Claims with JWT
Claims are data contained by the token. They are information about the user which helps us to authorize access to a resource. They could be Username, email address, role, or any other information. We can add claims information to the JWT so that they are available when checking for authorization.
 
In the above example, if we want to pass the claims to our token then the claim information needs to add GenerateJSONWebToken method of Login controller. In the following example, I have added a username, email address, and date of joining as claimed into the token.

    private string GenerateJSONWebToken(UserModel userInfo)    
    {    
        var securityKey = new SymmetricSecurityKey(Encoding.UTF8.GetBytes(_config["Jwt:Key"]));    
        var credentials = new SigningCredentials(securityKey, SecurityAlgorithms.HmacSha256);    
        
        var claims = new[] {    
            new Claim(JwtRegisteredClaimNames.Sub, userInfo.Username),    
            new Claim(JwtRegisteredClaimNames.Email, userInfo.EmailAddress),    
            new Claim("DateOfJoing", userInfo.DateOfJoing.ToString("yyyy-MM-dd")),    
            new Claim(JwtRegisteredClaimNames.Jti, Guid.NewGuid().ToString())    
        };    
        
        var token = new JwtSecurityToken(_config["Jwt:Issuer"],    
            _config["Jwt:Issuer"],    
            claims,    
            expires: DateTime.Now.AddMinutes(120),    
            signingCredentials: credentials);    
        
        return new JwtSecurityTokenHandler().WriteToken(token);    
    }   

The claims are an array of key-value pair. The keys may be values of a JwtRegisteredClaimNames structure (it provides names for public standardized claims) or custom name (such as DateOfJoining in above example).
 
This claims can be used to filter the data. In the following example, I have to change the list of values if the user spends more than 5 years with the company.
    [HttpGet]    
    [Authorize]    
    public ActionResult<IEnumerable<string>> Get()    
    {    
        var currentUser = HttpContext.User;    
        int spendingTimeWithCompany = 0;    
        
        if (currentUser.HasClaim(c => c.Type == "DateOfJoing"))    
        {    
            DateTime date = DateTime.Parse(currentUser.Claims.FirstOrDefault(c => c.Type == "DateOfJoing").Value);    
            spendingTimeWithCompany = DateTime.Today.Year - date.Year;    
        }    
        
        if(spendingTimeWithCompany > 5)    
        {    
            return new string[] { "High Time1", "High Time2", "High Time3", "High Time4", "High Time5" };    
        }    
        else    
        {    
            return new string[] { "value1", "value2", "value3", "value4", "value5" };    
        }    
    }   

JWT is very famous in web development. It is an open standard that allows transmitting data between parties as a JSON object in a secure and compact way. In this article, we will learn how to generate and use JWT with ASP.NET core application.


About HostForLIFE

HostForLIFE is European Windows Hosting Provider which focuses on Windows Platform only. We deliver on-demand hosting solutions including Shared hosting, Reseller Hosting, Cloud Hosting, Dedicated Servers, and IT as a Service for companies of all sizes.

We have offered the latest Windows 2019 Hosting, ASP.NET 5 Hosting, ASP.NET MVC 6 Hosting and SQL 2019 Hosting.


Month List

Tag cloud

Sign in