European ASP.NET 4.5 Hosting BLOG

BLOG about ASP.NET 4, ASP.NET 4.5 Hosting and Its Technology - Dedicated to European Windows Hosting Customer

European ASP.NET Core Hosting - HostForLIFE :: How to build a multi-tenant applications with ASP.NET Core?

clock April 18, 2023 07:59 by author Peter

Tenant application in ASP.NET Core
First of all, we have to know what a tenant is. Simply tenant is a customer. Meaning each customer is called a tenant.

Multi-tenant application in ASP.NET Core
Multi-tenancy is an architecture in which a single software application instance serves multiple customers.

In this case, a single software will manage multiple customer databases. But you have needed a tenant database for multiple tenants. This process is also called SaaS (Software as a Service).

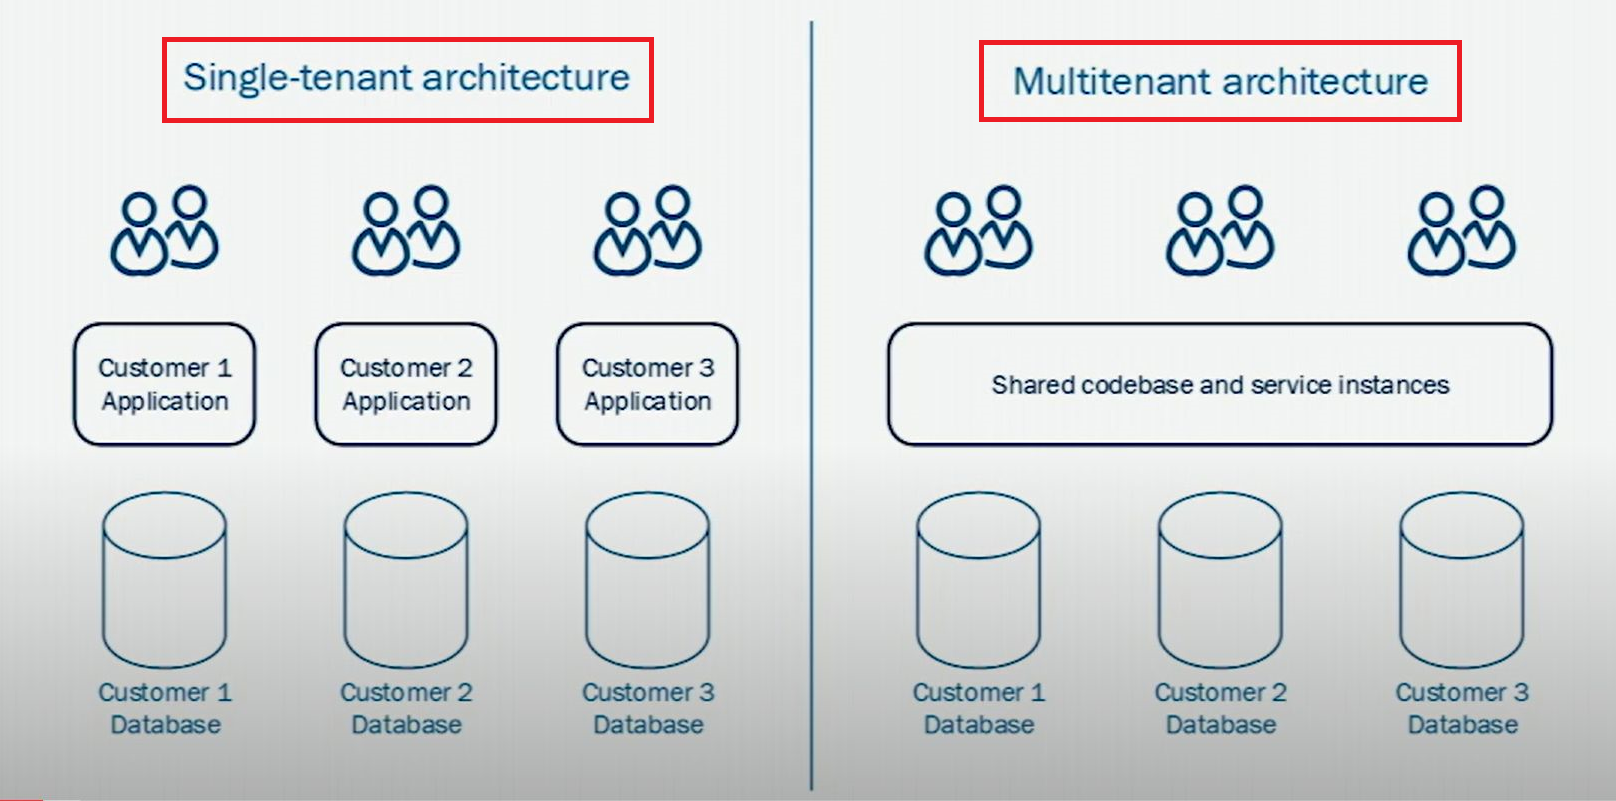
Moreover, you can also manage the software design style by multi-tenant architecture. In the case of a single tenant, every software-service instance has a separate database. Otherwise, in the case of multi-tenant only one software service instance, but there are multiple databases.
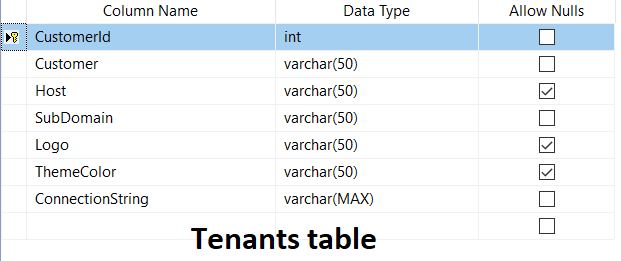
Tenant Database
I have to maintain a Tenant database to manage multiple customer Databases. I am using two tables, Like
CREATE DATABASE [TenantDB]


USE [TenantDB]
GO
SET ANSI_NULLS ON
GO
SET QUOTED_IDENTIFIER ON
GO
CREATE TABLE [dbo].[Tenants](
    [CustomerId] [int] NOT NULL,
    [Customer] [varchar](50) NOT NULL,
    [Host] [varchar](50) NULL,
    [SubDomain] [varchar](50) NOT NULL,
    [Logo] [varchar](50) NULL,
    [ThemeColor] [varchar](50) NULL,
    [ConnectionString] [varchar](max) NOT NULL,
 CONSTRAINT [PK_Customer] PRIMARY KEY CLUSTERED
(
    [CustomerId] ASC
)WITH (PAD_INDEX = OFF, STATISTICS_NORECOMPUTE = OFF, IGNORE_DUP_KEY = OFF, ALLOW_ROW_LOCKS = ON, ALLOW_PAGE_LOCKS = ON, OPTIMIZE_FOR_SEQUENTIAL_KEY = OFF) ON [PRIMARY]
) ON [PRIMARY] TEXTIMAGE_ON [PRIMARY]
GO

USE [TenantDB]
GO
SET ANSI_NULLS ON
GO
SET QUOTED_IDENTIFIER ON
GO
CREATE TABLE [dbo].[TenantUsers](
    [Id] [int] NOT NULL,
    [CustomerId] [int] NOT NULL,
    [Email] [varchar](50) NOT NULL,
 CONSTRAINT [PK_User] PRIMARY KEY CLUSTERED
(
    [Id] ASC
)WITH (PAD_INDEX = OFF, STATISTICS_NORECOMPUTE = OFF, IGNORE_DUP_KEY = OFF, ALLOW_ROW_LOCKS = ON, ALLOW_PAGE_LOCKS = ON, OPTIMIZE_FOR_SEQUENTIAL_KEY = OFF) ON [PRIMARY]
) ON [PRIMARY]
GO

USE [TenantDB]
GO
INSERT [dbo].[Tenants] ([CustomerId], [Customer], [Host], [SubDomain], [Logo], [ThemeColor], [ConnectionString]) VALUES (1, N'Red Customer', N'localhost:5057', N'rc', NULL, N'Red', N'Server=Rohol;Database=App-DB1; user id=sa; password=123456; MultipleActiveResultSets=true')
GO
INSERT [dbo].[Tenants] ([CustomerId], [Customer], [Host], [SubDomain], [Logo], [ThemeColor], [ConnectionString]) VALUES (2, N'Green Customer', N'localhost:5057', N'gc', NULL, N'Green', N'Server=Rohol;Database=App-DB2; user id=sa; password=123456; MultipleActiveResultSets=true')
GO
INSERT [dbo].[TenantUsers] ([Id], [CustomerId], [Email]) VALUES (1, 1, N'[email protected]')
GO
INSERT [dbo].[TenantUsers] ([Id], [CustomerId], [Email]) VALUES (2, 2, N'[email protected]')
GO

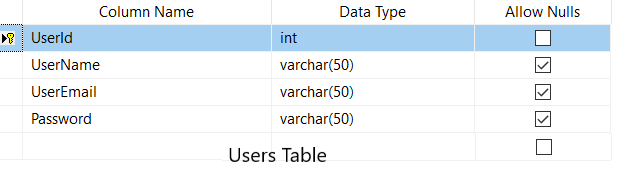
Application Database
Now I will add two application databases; these databases will access by a single web portal. Databases are like App-DB1 and App-DB2. Each database has one table, like Users.

CREATE Database [App-DB1]
GO
USE [App-DB1]
GO
SET ANSI_NULLS ON
GO
SET QUOTED_IDENTIFIER ON
GO
CREATE TABLE [dbo].[Users](
    [UserId] [int] NOT NULL,
    [UserName] [varchar](50) NULL,
    [UserEmail] [varchar](50) NULL,
    [Password] [varchar](50) NULL,
 CONSTRAINT [PK_User] PRIMARY KEY CLUSTERED
(
    [UserId] ASC
)WITH (PAD_INDEX = OFF, STATISTICS_NORECOMPUTE = OFF, IGNORE_DUP_KEY = OFF, ALLOW_ROW_LOCKS = ON, ALLOW_PAGE_LOCKS = ON, OPTIMIZE_FOR_SEQUENTIAL_KEY = OFF) ON [PRIMARY]
) ON [PRIMARY]
GO

USE [App-DB1]
GO
INSERT [dbo].[Users] ([UserId], [UserName], [UserEmail], [Password]) VALUES (1, N'Red Customer', N'[email protected]', N'123456')
GO

CREATE Database [App-DB2]
GO
USE [App-DB2]
GO
/****** Object:  Table [dbo].[Users]    Script Date: 04/15/23 5:26:26 PM ******/
SET ANSI_NULLS ON
GO
SET QUOTED_IDENTIFIER ON
GO
CREATE TABLE [dbo].[Users](
    [UserId] [int] NOT NULL,
    [UserName] [varchar](50) NULL,
    [UserEmail] [varchar](50) NULL,
    [Password] [varchar](50) NULL,
 CONSTRAINT [PK_User] PRIMARY KEY CLUSTERED
(
    [UserId] ASC
)WITH (PAD_INDEX = OFF, STATISTICS_NORECOMPUTE = OFF, IGNORE_DUP_KEY = OFF, ALLOW_ROW_LOCKS = ON, ALLOW_PAGE_LOCKS = ON, OPTIMIZE_FOR_SEQUENTIAL_KEY = OFF) ON [PRIMARY]
) ON [PRIMARY]
GO

USE [App-DB2]
GO
INSERT [dbo].[Users] ([UserId], [UserName], [UserEmail], [Password]) VALUES (1, N'Green Customer', N'[email protected]', N'123456')
GO

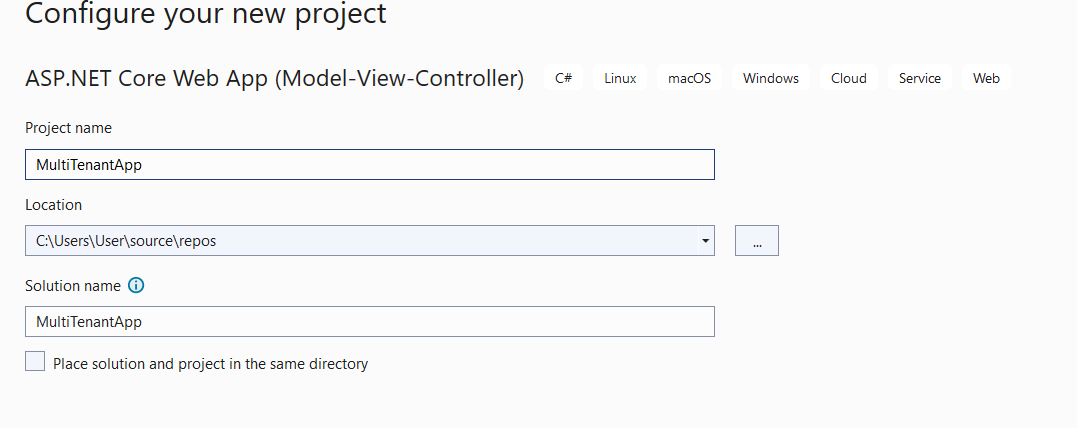
Create a Multi-tenant Application
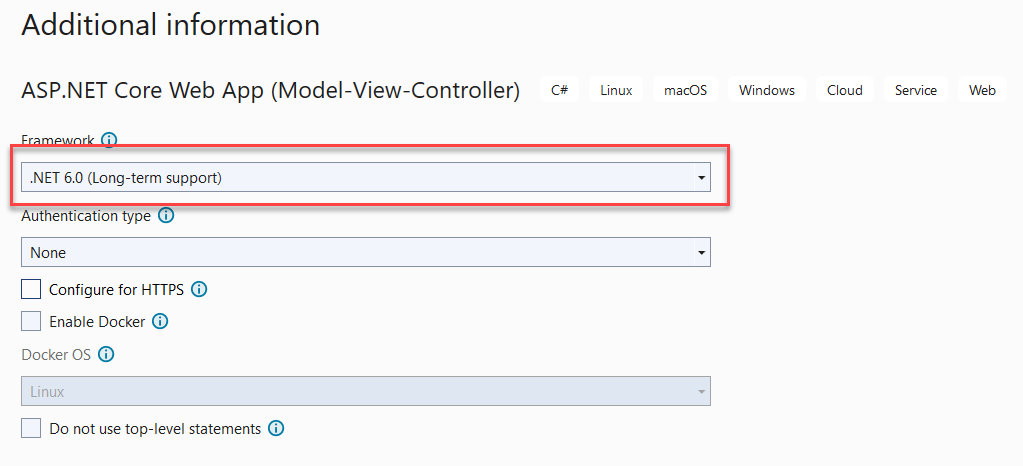
Open visual studio editor 2022 and choose an ASP.Net Core Web App (MVC).


Install SaasKit.Multitenancy
Go to the NuGet Package Manager and install the SaasKit.Multitenancypackage

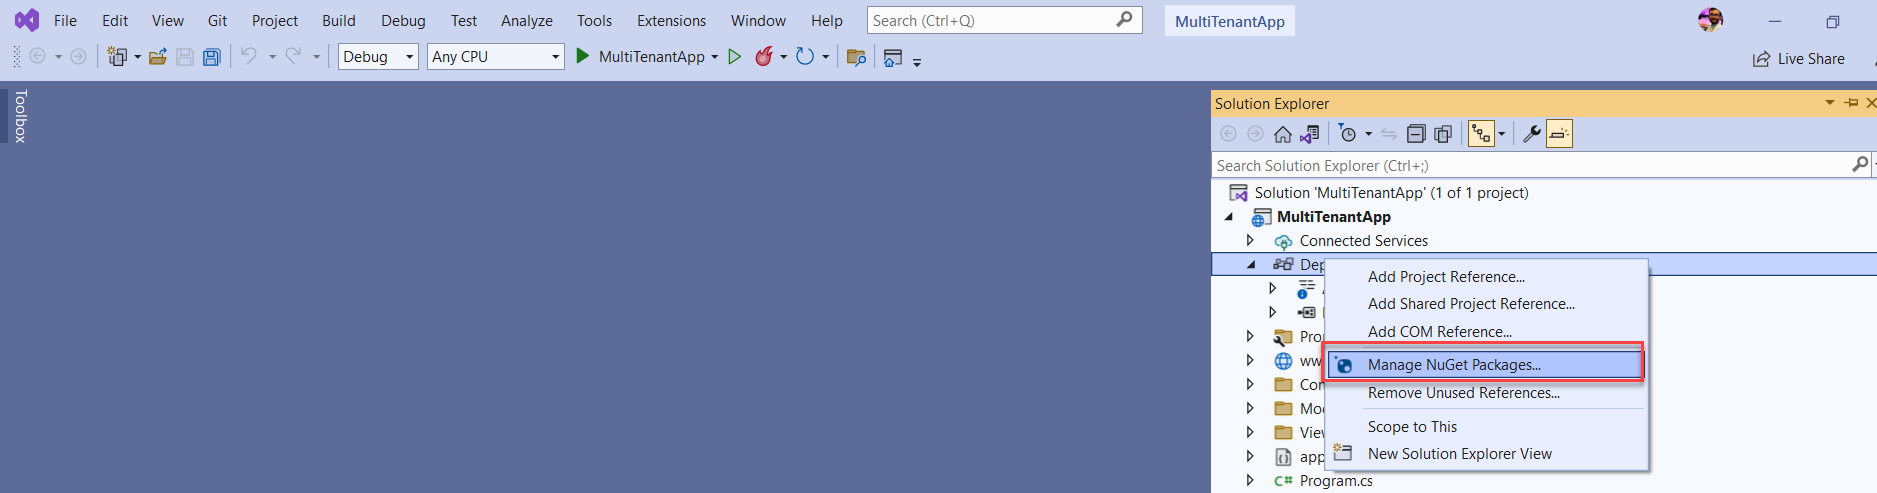
This SaasKit.Multitenancy package will manage a multi-tenancy strategy.

Now add two classes, Tenants and TenantUsers.
public class Tenants
    {
        [Key]
        public int CustomerId { get; set; }
        public string Customer { get; set; }
        public string Host { get; set; }
        public string SubDomain { get; set; }
        public string Logo { get; set; }
        public string ThemeColor { get; set; }
        public string ConnectionString { get; set; }
    }

C#

public class TenantUsers
   {
       [Key]
       public int Id { get; set; }
       public int CustomerId { get; set; }
       public string Email { get; set; }
   }


Now add another class like TenantResolver. Here I will use TenantContext, which is come from SaasKit.Multitenancy package.
public interface ITenantResolver
    {
        Task<TenantContext<Tenants>> ResolveAsync(HttpContext context);
    }
public class TenantResolver : ITenantResolver<Tenants>
    {
      public async Task<TenantContext<Tenants>> ResolveAsync(HttpContext context)
        {
         throw new NotImplementedException();
        }
    }

Service Registration
Go to the program file and register the Tenant class with TenantResolver class
// Multitenancy
builder.Services.AddMultitenancy<Tenants, TenantResolver>();

Middleware Setup
app.UseMuttitenancy<Tenant>();

This Tenant middleware will call with every HTTP request.

Install Entity Framework Core
I will useEFCore ORM to access SQL Database. So, we need to install the required packages. Like

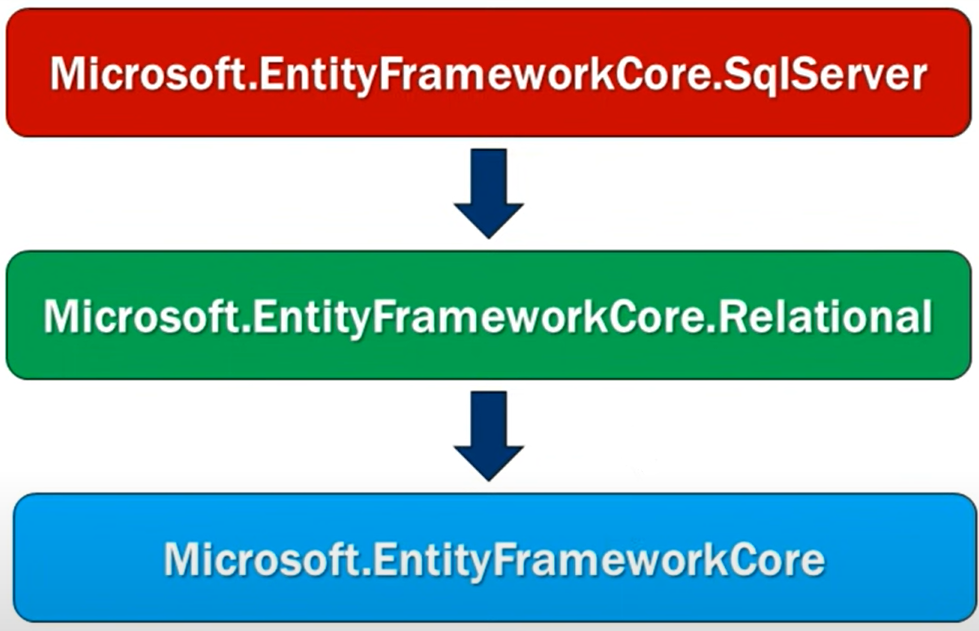
After installing these three packages, I will add Two database contexts. One context is for Tenant-Database and another for App-Database. Like

TenantDBConnection
{
  "ConnectionStrings": {
    "TenantConnection": "Server=Rohol;Database=TenantDB; user id=sa; password=123456; MultipleActiveResultSets=true"
  },
  "Logging": {
    "LogLevel": {
      "Default": "Information",
      "Microsoft.AspNetCore": "Warning"
    }
  },
  "AllowedHosts": "*"
}

// Sql Server TenantDb Connection
builder.Services.AddDbContextPool<TenantDbContext>(options => options.
        UseSqlServer(builder.Configuration.GetConnectionString("TenantConnection")));

Now add Signin and Users class in the Models folder. Like
public class Signin
    {
        [Required(ErrorMessage ="email address is required")]
        [EmailAddress]
        public string Email { get; set; }
        [DataType(DataType.Password)]
        public string? Password { get; set; }
    }


public class Users
    {
        [System.ComponentModel.DataAnnotations.Key]
        public int UserId { get; set; }
        [Required]
        public string UserName { get; set; }
        [Required]
        public string UserEmail { get; set; }
        [Required]
        public string Password { get; set; }

    }


DB context Implementation
Now time to implement Db contexts. Like
public class TenantDbContext : DbContext
    {
        public TenantDbContext(DbContextOptions<TenantDbContext> option) : base(option)
        {
        }

        public DbSet<Tenants> Tenants { get; set; }
        public DbSet<TenantUsers> TenantUsers { get; set; }

    }


public class AppDbContext : DbContext
    {
        private readonly Tenants tenant;

        public AppDbContext(DbContextOptions<AppDbContext> options, Tenants tenant):base(options)
        {
            this.tenant = tenant;
        }

        protected override void OnConfiguring(DbContextOptionsBuilder optionsBuilder)
        {
            optionsBuilder.UseSqlServer(tenant.ConnectionString);
        }

        public DbSet<Users> Users { get; set; }

    }

Add Services
I have used two services for this application. One for tenant operation and another for application operation.

namespace MultiTenantApp.Services
{
    public interface ITenantService
    {
       Tenants GetTenantBySubDomain(string subDomain);
       Tenants GetTenantByEmail(string email);
    }

    public class TenantService : ITenantService
    {
        private readonly TenantDbContext tdbc;

        public TenantService(TenantDbContext tdbc)
        {
            this.tdbc = tdbc;
        }

        public Tenants GetTenantByEmail(string email)
        {
         throw new NotImplementedException();
        }

        public Tenants GetTenantBySubDomain(string subdomain)
        {
         throw new NotImplementedException();
        }
    }
}

    GetTenantBySubDomain()- This method will return a tenant by sub-domain.
    GetTenantByEmail ()- This method will return a tenant by email.

namespace MultiTenantApp.Services
{
    public interface IAppUserService
    {
        public string GetTenantByEmail(string email);
        public string Signin(Signin model);
    }
    public class AppUserService : IAppUserService
    {
        private readonly AppDbContext adbc;
        private readonly ITenantService tenantService;
        private readonly IHttpContextAccessor httpContextAccessor;

        public AppUserService(AppDbContext adbc, ITenantService tenantService, IHttpContextAccessor httpContextAccessor)
        {
            this.adbc = adbc;
            this.tenantService = tenantService;
            this.httpContextAccessor = httpContextAccessor;
        }

        public string GetTenantByEmail(string email)
        {
            throw new NotImplementedException();
        }

        public string Signin(Signin model)
        {
            throw new NotImplementedException();
        }
    }
}


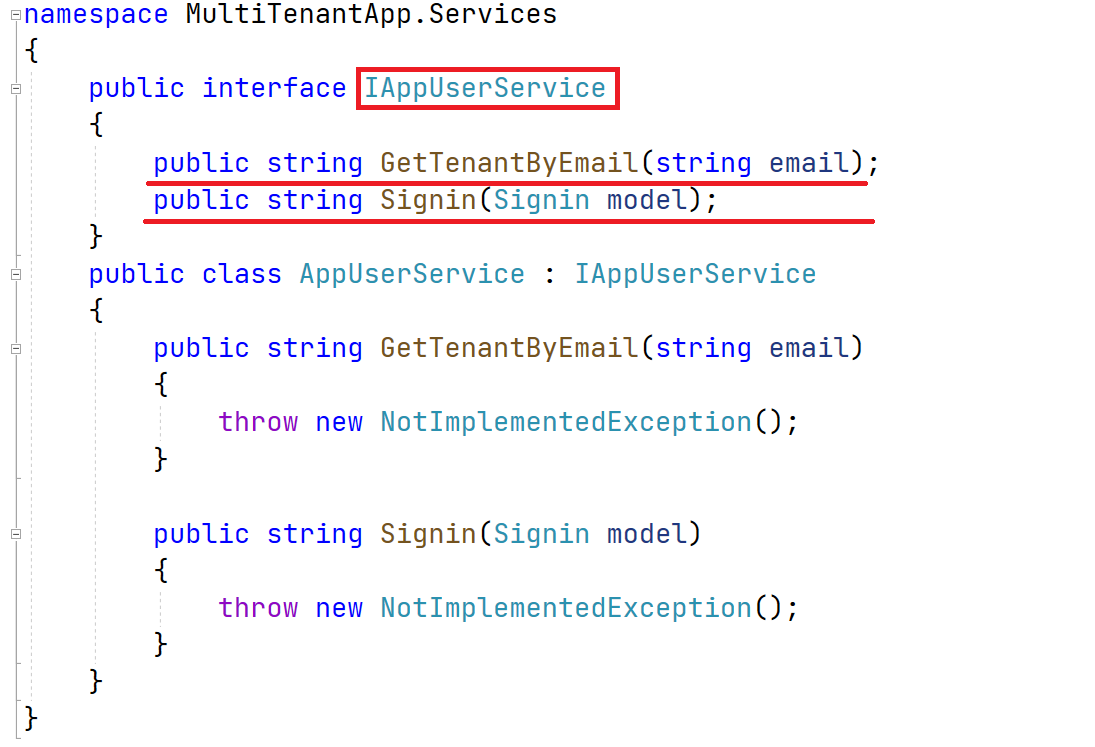
    GetTenantByEmail()- Here, this method will return a valid URL with a sub-domain.
    Signin()- This method is used to sign in to this portal. It will return a URL as a string.

TenantResolver implementation
public async Task<TenantContext<Tenants>> ResolveAsync(HttpContext context)
        {   // get sub-domain form browser current url. if sub-domain is not exists then will set empty string
            string subDomainFromUrl = context.Request.Host.Value.ToLower().Split(".")[0] ?? string.Empty;
            // checking has any tenant by current sub-domain.
            var result = this.tenantService.GetTenantBySubDomain(subDomainFromUrl);
            Tenants tenant = new();
            // checking has any subdomain is exists in current url
            if (!string.IsNullOrEmpty(result.SubDomain))
            {
                // checking orginal sub-domain and current url sub-domain
                if (!result.SubDomain.Equals(subDomainFromUrl)) return null; // if sub-domain is different then return null
                else
                {
                    tenant.CustomerId = result.CustomerId;
                    tenant.Customer = result.Customer;
                    tenant.Host = result.Host;
                    tenant.SubDomain = result.SubDomain;
                    tenant.Logo = result.Logo;
                    tenant.ThemeColor = result.ThemeColor;
                    tenant.ConnectionString = result.ConnectionString;
                    return await Task.FromResult(new TenantContext<Tenants>(tenant));
                }
            }
            else return await Task.FromResult(new TenantContext<Tenants>(tenant));

        }

This resolver will resolve a multitenant strategy in each HTTP request. If the tenant is valid, then the HTTP request will execute else. The application will show an error. Here I am checking the sub-domain in each request. So, if the sub-domain exists and is valid, the app will work fine; otherwise shows an error. This is a demo and my logic and implementation so anyone can implement his logic.

Controller Implementation
Now add a Signin action in HomeController for view. Like,
public IActionResult Signin(string emailid="")
        {
            ViewBag.Email = emailid;
            return View();
        }

Also, add Signin Post Action for Signin. Like,
[HttpPost]
        public IActionResult Signin(Signin model)
        {
            // checking model state
            if (ModelState.IsValid)
            {
                // checking email at first time
                if (model.Password is null)
                {
                    // retrieve tenant information by user email
                    var result = this.appUserService.GetTenantByEmail(model.Email);
                    // if valid email then redirect for password
                    if (result is not null) return Redirect(result + "?emailid=" + model.Email);
                    else // if email is invalid then clear Email-ViewBag to stay same page and get again email
                    {
                        ViewBag.Email = string.Empty;
                        ViewBag.Error = "Provide valid email";
                    }
                }
                else // this block for password verification, when user provide password to signin
                {
                    var result = this.appUserService.Signin(model);
                    if (result is null) // if password is wrong then again provide valid password
                    {
                        ViewBag.Email = model.Email;
                        ViewBag.Error = "Provide valid password";
                    }
                    else return Redirect(result); // if password is valid then portal will open for user access
                }
            }
            else ViewBag.Email = ""; // if email is invalid then clear Email-ViewBag to stay same page and get again email
            return View();
        }

The detail I have implemented the into the source code. So don't worry; I have provided the source file.

Logout action
public IActionResult Logout()
        {
            return Redirect("http://localhost:5057");
        }


Go to the master _Layout.cshtml page and inject the Tenant class to access the required property. I will use the ThemeColor property to change the theme according to the user's colour. Like,
@inject Tenants tenants;

<body style="background-color:@tenants.ThemeColor">


Same as the index and privacy files. I will use the Customer name from the tenant class. Like
@inject Tenants tenants;
@{
    ViewData["Title"] = "Home Page";
}

<h1>@ViewData["Title"]</h1>

<h4>of @tenants.Customer</h4>


Run the project and sign in by different users. Like
First, for the red user

and second for green user


HostForLIFE ASP.NET Core Hosting

European best, cheap and reliable ASP.NET hosting with instant activation. HostForLIFE.eu is #1 Recommended Windows and ASP.NET hosting in European Continent. With 99.99% Uptime Guaranteed of Relibility, Stability and Performace. HostForLIFE.eu security team is constantly monitoring the entire network for unusual behaviour. We deliver hosting solution including Shared hosting, Cloud hosting, Reseller hosting, Dedicated Servers, and IT as Service for companies of all size.


European ASP.NET Core Hosting - HostForLIFE :: Razor In ASP.NET Core

clock April 13, 2023 07:16 by author Peter

Razor expressions are used to generate HTML content in views dynamically. Razor is a syntax for combining HTML markup with C# code to produce dynamic web pages. Razor expressions are enclosed in the @ symbol, including C# code, HTML markup, and another Razor-specific syntax. Razor expressions can perform conditional logic, loop over collections, display data, and format content.

Examples of Razor expressions,
1. Display a value
<p>The value of x is @x</p>

This expression uses the @ symbol to output the value of the x variable.

Perform a conditional check,
// Controller
public IActionResult Index() {
    bool isAdmin = true;
    return View(isAdmin);
}
// View
@model bool

@if (Model)
{
    <h1>Welcome Admin</h1>
}
else
{
    <h1>Welcome Guest</h1>
}

If the Model variable is true, the view will display an <h1> element with the "Welcome Admin" text. Otherwise, it will display an <h1> element with the "Welcome Guest" text. The value is True to show Welcome Admin in H1 Font.

2. List Data Bind in Table
// Model Class
public class ProductM {
    public int Id {
        get;
        set;
    }
    public string Name {
        get;
        set;
    }
    public string Description {
        get;
        set;
    }
    public decimal Price {
        get;
        set;
    }
}
// Controller
public ActionResult Product() {
    List < ProductM > products = new List < ProductM > {
        new ProductM {
            Id = 1, Name = "Laptop", Description = "Hp 5262 I5 ", Price = 55000
        },
        new ProductM {
            Id = 2, Name = "Laptop", Description = "Dell 52 I5 ", Price = 58000
        },
        new ProductM {
            Id = 3, Name = "Laptop", Description = "Lenovo 3", Price = 45000
        },
        new ProductM {
            Id = 4, Name = "Mobile", Description = "Nokia ", Price = 5000
        },
        new ProductM {
            Id = 5, Name = "Mobile", Description = "RealMe", Price = 58000
        },
        new ProductM {
            Id = 6, Name = "Mobile", Description = "MI", Price = 45000
        }
    };
    return View(products);
}
// View page


@using CSharpCornerTest.Models
@model List<ProductM>
@{
        ViewBag.Title = "Product";
}

<h2>Product</h2>

<table class="table table-striped">
    <thead>
        <tr>
            <th>ID</th>
            <th>Name</th>
            <th>Description</th>
            <th>Price</th>
        </tr>
    </thead>
    <tbody>
        @foreach (var product in Model)
        {
            <tr>
                <td>@product.Id</td>
                <td>@product.Name</td>
                <td>@product.Description</td>
                <td>@product.Price.ToString("C")</td>
            </tr>
        }
    </tbody>
</table>

3 . Perform a Switch Case
// View Page
@using CSharpCornerTest.Models
@model StatusM
@{
    ViewBag.Title = "StatusCode";
}

<style>
    span.badge.badge-primary {
        font-size: 48px;
        margin: -73px 0 0 139px;
    }
</style>

@switch (Model.Status)
{
    case "Open":
        <h1>Status :  </h1>
        <span class="badge badge-primary">Open</span>
        break;
    case "Closed":
        <span class="badge badge-secondary">Closed</span>
        break;
    default:
        <span class="badge badge-danger">Invalid</span>
        break;
}
// Class
public class StatusM {
    public string Status {
        get;
        set;
    }
}
// Controller
public ActionResult StatusCode() {
    var model = new StatusM {
        Status = "Open"
    };
    return View(model);
}


HostForLIFE ASP.NET Core Hosting

European best, cheap and reliable ASP.NET hosting with instant activation. HostForLIFE.eu is #1 Recommended Windows and ASP.NET hosting in European Continent. With 99.99% Uptime Guaranteed of Relibility, Stability and Performace. HostForLIFE.eu security team is constantly monitoring the entire network for unusual behaviour. We deliver hosting solution including Shared hosting, Cloud hosting, Reseller hosting, Dedicated Servers, and IT as Service for companies of all size.


European ASP.NET Core Hosting - HostForLIFE :: ControllerBase Class In ASP.NET Core

clock April 10, 2023 07:33 by author Peter

ASP.NET Core is a cross-platform, high-performance, open-source framework for building modern, cloud-based, internet-connected applications. One of the core building blocks of an ASP.NET Core application is the ControllerBase class, which serves as the base class for controllers that handle HTTP requests.

What is the ControllerBase class?
The ControllerBase class is a base class for controllers in ASP.NET Core that handles HTTP requests. It provides a set of common properties and methods controllers use to handle HTTP requests and generate HTTP responses. The ControllerBase class does not implement any specific behavior or logic but instead provides a set of common methods and properties that derived classes can use.

The ControllerBase class is defined in Microsoft.AspNetCore.Mvc namespace is part of the ASP.NET Core MVC framework. It is derived from the Controller class and provides a simpler, lighter-weight alternative for building APIs and microservices.

Key Features of the ControllerBase Class
The ControllerBase class provides several key features and functionalities essential for building web applications and APIs in ASP.NET Core. Some of the most important features of the ControllerBase class are:

Action Results
The ControllerBase class provides methods for generating action results that can be returned to the client in response to an HTTP request. These action results include:ViewResult: Renders a view to generate an HTML response.

    ViewResult- Renders a view to generate an HTML response
    PartialViewResult- Renders a partial view to generate an HTML response
    JsonResult- Serializes an object to JSON format and returns it as the response
    ContentResult- Returns a string or content as the response
    StatusCodeResult- Returns an HTTP status code as the response
    RedirectResult- Redirects the request to a different URL
    FileResult- Returns a file as the response
    ObjectResult- Serializes an object to a specified format (e.g., JSON, XML) and returns it as the response.

Routing
The ControllerBase class provides a set of attributes and methods for configuring routing for controllers and actions. These include:

    RouteAttribute- Used to specify the URL pattern for a controller or action
    HttpGetAttribute, HttpPostAttribute, HttpPutAttribute, HttpDeleteAttribute- Used to specify the HTTP method for an action
    RouteData- A property that provides access to the routing data for the current request

Model Binding
The ControllerBase class provides methods for binding HTTP request data to action parameters. These include:

    FromQueryAttribute- Binds data from the query string
    FromRouteAttribute- Binds data from the URL segment
    FromHeaderAttribute- Binds data from an HTTP header
    FromBodyAttribute- Binds data from the request body

Example Usage of the ControllerBase class
To illustrate how the ControllerBase class can be used in practice, let's look at a simple example. Suppose we want to build an API that returns a list of users. We can create a UserController class that derives from the ControllerBase class, like so:
using Microsoft.AspNetCore.Mvc;
using System.Collections.Generic;

[ApiController]
[Route("api/[controller]")]
public class UserController: ControllerBase {
    private readonly List < string > users = new List < string > {
        "Lalji Dhameliya"
    };
    [HttpGet]
    public IActionResult GetUsers() {
        return new JsonResult(users);
    }
}


Conclusion
The ControllerBase class is a core building block for controllers in ASP.NET Core and provides a rich set of features and functionalities for handling HTTP requests and generating HTTP responses. By leveraging the capabilities of the ControllerBase class, developers can build powerful, high-performance web applications and APIs that are easy to maintain.

HostForLIFE ASP.NET Core Hosting

European best, cheap and reliable ASP.NET hosting with instant activation. HostForLIFE.eu is #1 Recommended Windows and ASP.NET hosting in European Continent. With 99.99% Uptime Guaranteed of Relibility, Stability and Performace. HostForLIFE.eu security team is constantly monitoring the entire network for unusual behaviour. We deliver hosting solution including Shared hosting, Cloud hosting, Reseller hosting, Dedicated Servers, and IT as Service for companies of all size.


European ASP.NET Core Hosting - HostForLIFE :: How To Use MQTT Client In .Net 7?

clock April 3, 2023 08:40 by author Peter

MQTT (Message Queue Telemetry Transport) is a lightweight messaging protocol that is designed to be used in resource-constrained environments. MQTT is widely used in the Internet of Things (IoT) and machine-to-machine (M2M) communication.

This article will discuss how to implement an MQTT consumer in .NET 7. We will use the MQTTnet library, a high-performance MQTT client library in C#.

Setting up the Environment
To get started with .NET 7, you must install it on your system. You can download and install .NET 7 from the official website of .NET.

To use MQTTnet, you need to add the MQTTnet NuGet package to your project. You can do this using the NuGet package manager in Visual Studio or the dotnet CLI.
dotnet add package MQTTnet

Implementing an MQTT Consumer

You need to create a new console application to implement an MQTT consumer in .NET 7. In this example, we will subscribe to a topic and receive messages from the MQTT broker.
using System;
using System.Threading;
using System.Threading.Tasks;
using MQTTnet;
using MQTTnet.Client;
using MQTTnet.Client.Options;
using MQTTnet.Client.Subscribing;
using MQTTnet.Protocol;
class Program {
    static async Task Main(string[] args) {
        var factory = new MqttFactory();
        var client = factory.CreateMqttClient();
        var options = new MqttClientOptionsBuilder().WithTcpServer("localhost", 1883).WithClientId("mqtt_consumer").Build();
        client.UseConnectedHandler(async e => {
            Console.WriteLine("Connected to MQTT broker.");
            var topicFilter = new MqttTopicFilterBuilder().WithTopic("test/topic").Build();
            await client.SubscribeAsync(new MqttClientSubscribeOptionsBuilder().WithTopicFilter(topicFilter).Build());
        });
        client.UseDisconnectedHandler(async e => {
            Console.WriteLine("Disconnected from MQTT broker.");
            await Task.Delay(TimeSpan.FromSeconds(5));
            try {
                await client.ConnectAsync(options, CancellationToken.None);
            } catch {
                Console.WriteLine("Reconnecting to MQTT broker failed.");
            }
        });
        client.UseApplicationMessageReceivedHandler(e => {
            Console.WriteLine($ "Received message on topic '{e.ApplicationMessage.Topic}': {Encoding.UTF8.GetString(e.ApplicationMessage.Payload)}");
        });
        try {
            await client.ConnectAsync(options, CancellationToken.None);
        } catch {
            Console.WriteLine("Connecting to MQTT broker failed.");
        }
        Console.ReadLine();
    }
}

The above code creates a new MQTT client and subscribes to the "test/topic" topic. When a message is received on this topic, the UseApplicationMessageReceivedHandler method is called, and the message is displayed on the console.

The UseConnectedHandler and UseDisconnectedHandler methods handle the connection and disconnection events. The UseConnectedHandler method is called when the client is connected to the MQTT broker, and the UseDisconnectedHandler method is called when the client is disconnected from the MQTT broker.

Conclusion

In this article, we discussed how to implement an MQTT consumer in .NET 7 using the MQTTnet library. We created a console application that subscribes to a topic and receives messages from the MQTT broker.

MQTT is a powerful messaging protocol that can be used in a variety of applications, including IoT and M2M communication. With the MQTTnet library, it is easy to implement an MQTT client in .NET 7, and the library provides a range of features.

HostForLIFE ASP.NET Core Hosting

European best, cheap and reliable ASP.NET hosting with instant activation. HostForLIFE.eu is #1 Recommended Windows and ASP.NET hosting in European Continent. With 99.99% Uptime Guaranteed of Relibility, Stability and Performace. HostForLIFE.eu security team is constantly monitoring the entire network for unusual behaviour. We deliver hosting solution including Shared hosting, Cloud hosting, Reseller hosting, Dedicated Servers, and IT as Service for companies of all size.


About HostForLIFE

HostForLIFE is European Windows Hosting Provider which focuses on Windows Platform only. We deliver on-demand hosting solutions including Shared hosting, Reseller Hosting, Cloud Hosting, Dedicated Servers, and IT as a Service for companies of all sizes.

We have offered the latest Windows 2019 Hosting, ASP.NET 5 Hosting, ASP.NET MVC 6 Hosting and SQL 2019 Hosting.


Month List

Tag cloud

Sign in