In this article, we build a secure REST API in ASP.NET Core using JWT Authentication. We begin with what essentially a JWT is and its structure.

Sections 1 - 4 of the article explain what a JWT token is, how to set it with .Net Core, Installing Required Packages, creating Application models, Migrations & Updating the Database
Sections 5 - 9 focus on generating Secure JWT tokens, making secure calls with and without the generated token, and registering users. Have used Postman for testing and firing Web requests to secure API.
1. JWT Structure
See the below JWT token. It is broken down and explained below as Header, Payload, Signature,
eyJhbGciOiJIUzI1NiIsInR5cCI6IkpXVCJ9.eyJzdWIiOiI1Njc3OCIsIm5hbWUiOiJSYWp1IEt1bWFyIiwiaWF0IjozNDU2Njd9.eJBP0IBy20JT9iwP6pHiKkFfHcbMPg_gVYKH-e5j0qk
Header
Provides details on the type of Token (JWT) and the algorithm used to sign the token, such as RSA, SHA256. In the above example, it is,
eyJhbGciOiJIUzI1NiIsInR5cCI6IkpXVCJ9
Payload
Contains user details also known as claims, this is the data to be secured. In the above example, it is,
eyJzdWIiOiI1Njc3OCIsIm5hbWUiOiJSYWp1IEt1bWFyIiwiaWF0IjozNDU2Njd9
Signature
Encryption between the header, payload, and a secret key. In the above example, it is,
eJBP0IBy20JT9iwP6pHiKkFfHcbMPg_gVYKH-e5j0qk
See this site JSON Web Tokens - jwt.io to decode this JWT token.
2. Let's start by Installing Required Packages
Create a new ASP.NET Core application using the API template and install the following packages. The target framework is 3.1 and above.
Install-Package Microsoft.AspNetCore.Authentication.JwtBearer
Install-Package Microsoft.AspNetCore.Identity.EntityFrameworkCore
Install-Package Microsoft.EntityFrameworkCore
Install-Package Microsoft.EntityFrameworkCore.Design
Install-Package Microsoft.EntityFrameworkCore.SqlServer
Install-Package Microsoft.EntityFrameworkCore.Tools
Install-Package Microsoft.VisualStudio.Web.CodeGeneration.Design
Install-Package System.IdentityModel.Tokens.Jwt
3(a). Configure JWT in code as shown
Add the following to appsettings.json,
"JWT": {
"key": "C1CF4B7DC4C4175B6618DE4F55CA4",
"Issuer": "MySecureRestApi",
"Audience": "AsecureRestApiUser",
"DurationInMinutes": 20
}
Create a corresponding class for the above settings, namely, Settings/JWT.cs which will be used to read data from our previously created JWT Section of appsettings.json using the IOptions feature of ASP.NET Core.
public class JWTSettings {
public string Key {
get;
set;
}
public string Issuer {
get;
set;
}
public string Audience {
get;
set;
}
public double DurationInMinutes {
get;
set;
}
}
Then, add the following classes to your project:
DbContext - Add connection string in appsettings.json
ApplicationUser which derives from IdentityUser
3(b). Configure JWT in code as shown
To configure the authentication, add code to ConfigureServices method as shown below-
public void ConfigureServices(IServiceCollection services) {
Line 1 //The JWT Configuration from AppSettings
services.Configure < JWTSettings > (_configuration.GetSection("JWT"));
//The User Manager Service
services.AddIdentity < ApplicationUser, IdentityRole > ().AddEntityFrameworkStores < ApplicationDbContext > ();
services.AddScoped < IUserService, UserService > ();
//Adding DB Context with MSSQL
services.AddDbContext < ApplicationDbContext > (options => options.UseSqlServer(_configuration.GetConnectionString("DefaultConnection"), b => b.MigrationsAssembly(typeof(ApplicationDbContext).Assembly.FullName)));
//The JWT Athentication
services.AddAuthentication(options => {
options.DefaultAuthenticateScheme = JwtBearerDefaults.AuthenticationScheme;
options.DefaultChallengeScheme = JwtBearerDefaults.AuthenticationScheme;
}).AddJwtBearer(oa => {
oa.RequireHttpsMetadata = false;
oa.SaveToken = false;
oa.TokenValidationParameters = new TokenValidationParameters {
ValidateIssuerSigningKey = true,
ValidateIssuer = true,
ValidateAudience = true,
ValidateLifetime = true,
ClockSkew = TimeSpan.Zero,
ValidIssuer = _configuration["JWT:Issuer"],
ValidAudience = _configuration["JWT:Audience"],
IssuerSigningKey = new SymmetricSecurityKey(Encoding.UTF8.GetBytes(_configuration["JWT:Key"]))
};
});
services.AddControllers();
}
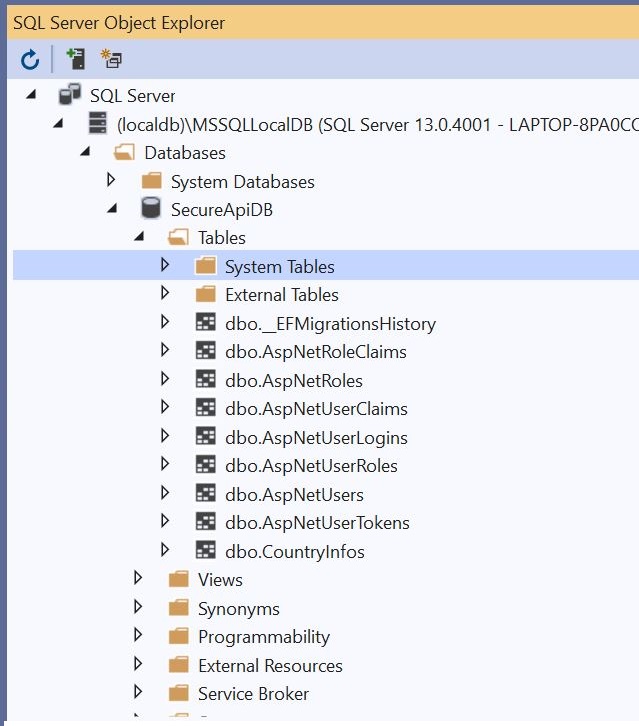
4. For DB Migration
Add a Connection String in APP Settings.json. For creating the database, using Code First Approach of Entity Framework Core.
Before executing the application, please run the following commands on the Package Manager Console to apply migrations.
add-migration "migrationDB"
update-database
Following the set of ASPNET users and roles tables are created post a successful migration, see below
5. Registering a User
Create a Models/RegisterModel.cs with the following properties. The user has to post data with this object to register.
public class RegisterModel {
[Required]
public string FirstName {
get;
set;
}
[Required]
public string LastName {
get;
set;
}
[Required]
public string Username {
get;
set;
}
[Required]
public string Email {
get;
set;
}
[Required]
public string Password {
get;
set;
}
}
In IUserService.cs, add the following 2 function definitions to Register users accepting a Register Model.
Task<string> RegisterAsync(RegisterModel model);
Task<AuthenticationModel> GetTokenAsync(TokenRequestModel model);
Go to Concrete class, UserService to implement the Register Function.
public async Task < string > RegisterAsync(RegisterModel model) {
var user = new ApplicationUser {
UserName = model.Username,
Email = model.Email,
FirstName = model.FirstName,
LastName = model.LastName
};
var userWithSameEmail = await _userManager.FindByEmailAsync(model.Email);
if (userWithSameEmail == null) {
var result = await _userManager.CreateAsync(user, model.Password);
if (result.Succeeded) {
return $ "Success: User Registered with username {user.UserName}";
} else {
string descr = "";
if (result.Errors.Any()) {
foreach(var item in result.Errors) {
descr += item.Description;
}
}
return $ "Error(s), registering user : {descr}";
}
} else {
return $ "Error(s), Email {user.Email } is already registered.";
}
}
In the above code snippet, we accept the RegisterModel object, perform validations and create the user in DB, else return the appropriate error message.
From the controller, the call will go as below,
[HttpPost("CreateUser")]
public async Task < ActionResult > RegisterAsync(RegisterModel model) {
var result = await _userService.RegisterAsync(model);
return Ok(result);
}
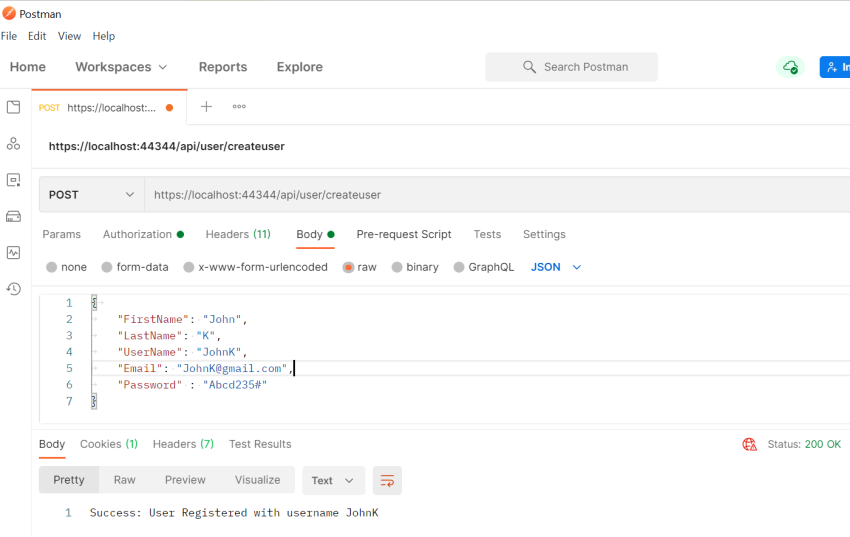
6. Test with Postman
Open up Postman and define a raw JSON object that is to be posted to <localhost>/api/user/CreateUser. Check the following screenshot, on success, we get a confirmed user-created message.
7. Generate JWT Token
Let’s try to fetch the JWT Token. We will build a Token Generation function that accepts a TokenRequestModel (email, password), validates them, and builds a token for us.
Following are model classes for token Models/TokenRequestModel.cs and Models/AuthenticationModel.cs,
public class TokenRequestModel {
[Required]
public string Email {
get;
set;
}
[Required]
public string Password {
get;
set;
}
}
Another class, AuthenticationModel.cs which is basically the response from the API endpoint. This endpoint will return a status message, user details, and finally our token.
public class AuthenticationModel {
public string Message {
get;
set;
}
public bool IsAuthenticated {
get;
set;
}
public string UserName {
get;
set;
}
public string Email {
get;
set;
}
public string Token {
get;
set;
}
}
Check below implementation in the concrete class of UserService for the token generation,
public async Task < AuthenticationModel > GetTokenAsync(TokenRequestModel model) {
var authenticationModel = new AuthenticationModel();
var user = await _userManager.FindByEmailAsync(model.Email);
if (user == null) {
authenticationModel.IsAuthenticated = false;
authenticationModel.Message = $ "No Accounts Registered with {model.Email}.";
return authenticationModel;
}
if (await _userManager.CheckPasswordAsync(user, model.Password)) {
authenticationModel.IsAuthenticated = true;
JwtSecurityToken jwtSecurityToken = await CreateJwtToken(user);
authenticationModel.Token = new JwtSecurityTokenHandler().WriteToken(jwtSecurityToken);
authenticationModel.Email = user.Email;
authenticationModel.UserName = user.UserName;
return authenticationModel;
}
authenticationModel.IsAuthenticated = false;
authenticationModel.Message = $ "Incorrect Credentials for user {user.Email}.";
return authenticationModel;
}
private async Task < JwtSecurityToken > CreateJwtToken(ApplicationUser user) {
var userClaims = await _userManager.GetClaimsAsync(user);
var roles = await _userManager.GetRolesAsync(user);
var roleClaims = new List < Claim > ();
for (int i = 0; i < roles.Count; i++) {
roleClaims.Add(new Claim("roles", roles[i]));
}
var claims = new [] {
new Claim(JwtRegisteredClaimNames.Sub, user.UserName),
new Claim(JwtRegisteredClaimNames.Jti, Guid.NewGuid().ToString()),
new Claim(JwtRegisteredClaimNames.Email, user.Email),
new Claim("uid", user.Id)
}.Union(userClaims).Union(roleClaims);
var symmetricSecurityKey = new SymmetricSecurityKey(Encoding.UTF8.GetBytes(_jwt.Key));
var signingCredentials = new SigningCredentials(symmetricSecurityKey, SecurityAlgorithms.HmacSha256);
var jwtSecurityToken = new JwtSecurityToken(issuer: _jwt.Issuer, audience: _jwt.Audience, claims: claims, expires: DateTime.UtcNow.AddMinutes(_jwt.DurationInMinutes), signingCredentials: signingCredentials);
return jwtSecurityToken;
}
Following are the activities in the above code function,
Line #4 to #11 check the validity of provided email and password and return a message if not.
Line #14 Calls the CreateJWTToken function. This function builds the JWT. It gets all the claims of the user ( user details ) as well as roles if any.
Finally, Line #51 to #57 creates a new JWT Security Token and returns them.
Now, wire this function to Controllers/UserController.cs
[HttpPost("GenerateToken")]
public async Task < IActionResult > GetTokenAsync(TokenRequestModel model) {
var result = await _userService.GetTokenAsync(model);
if (string.IsNullOrEmpty(result.Token)) return NotFound(" " + result.Message);
return Ok(result.Token);
}
Next, post a valid email and password request to ../api/user/GenerateToken. See below Postman screenshot for the successful response of JWT token and AuthenticationModel object containing user details. The validity of this token is 20 minutes (as an expiration time is set to 20 minutes in app.json).
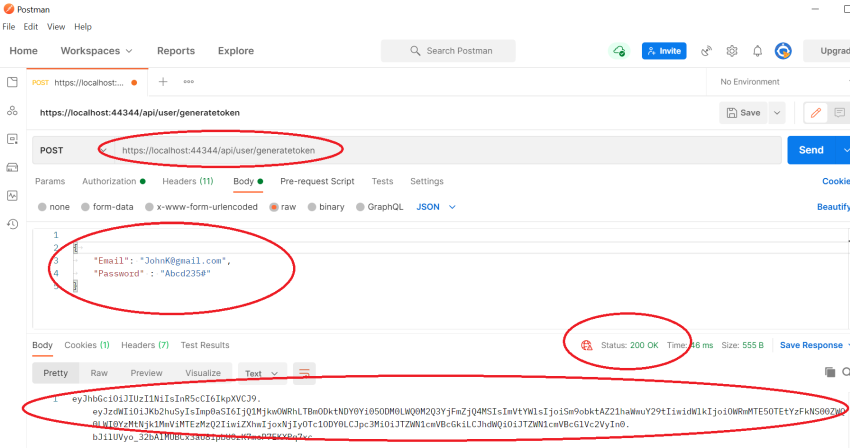
On Posting an invalid password for the same user, PostMan returns the following message: "Incorrect Credentials for user: [email protected]".
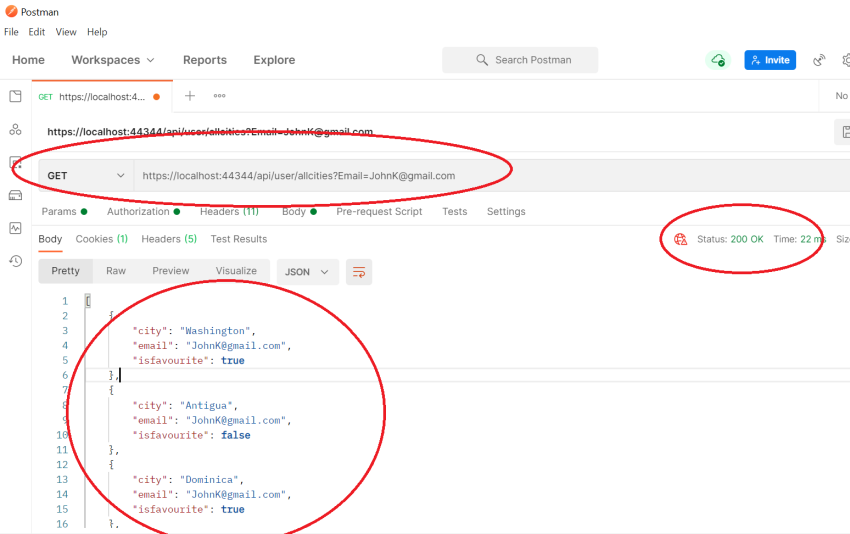
8. Access Database information securely, i.e. using the generated token.
I have earlier created few cities in my Database which I shall access using this bearer token. For this, I need to decorate the Get City endpoint with the [Authorize] keyword in the Controller class. Refer below codebase,
[Authorize]
[HttpGet]
[Route("AllCities")]
public IActionResult GetAllCities(string Email) {
if (appdbcontext.CountryInfos == null || !appdbcontext.CountryInfos.Any()) return Ok("No Country-Cities created as yet.");
var res = appdbcontext.CountryInfos.Where(aa => aa.Email == Email).
Select(xx => new {
City = xx.City,
Email = xx.Email,
Isfavourite = xx.Isfavourite
});
if (res.Count() < 1) {
return NotFound("No records against this UserEmail" + Email);
} else return Ok(res);
}
Now copy the bearer token in the previous snippet and fire this GET Request, ..api/user/allcities?email in POSTMAN to return cities. For a successful response, refer to the screen below,