European ASP.NET 4.5 Hosting BLOG

BLOG about ASP.NET 4, ASP.NET 4.5 Hosting and Its Technology - Dedicated to European Windows Hosting Customer

European ASP.NET Core Hosting - HostForLIFE :: How To Add Colour In Gridview ASP.NET?

clock October 31, 2022 07:50 by author Peter

This article will help you if you wish to color cells of Gridview and learn how to access cell values.

This article is all about how to set or change the background \color of the selected row of ASP.Net GridView programmatically.
Here we go with the cs file code
using System;
using System.Collections.Generic;
using System.ComponentModel;
using System.Data;
using System.Drawing;
namespace gridcolor {
    public partial class WebForm1: System.Web.UI.Page {
        protected void Page_Load(object sender, EventArgs e) {
            DataTable dt = new DataTable();
            dt.Columns.add("Hobbies");
            //here only one column for easy understanding
            dt.Rows.add("I love C# corner")
            mygrid.datasource = dt;
            mygrid.databind();
            //for perticular cell //here it has only 1 cell (0,0)
            myGrid.Rows[i].Cells[j].Style.BackColor = system.drawing.color.Red;
            //incase you want to fill all rows
            for (int i = 0; i < myGrid.Rows.Count; i++) {
                for (int j = 0; j < myGrid.Rows[i].Cells.Count; j++) {
                    myGrid.Rows[i].Cells[j].Style.BackColor = /*color you want*/
                }
            }
        }
    }
}


Now a brief look to my aspx

page code
<html xmlns="http://www.w3.org/1999/xhtml">
<head runat="server">
    <title></title>
    <style type="text/css">
        body
        {
            font-family: Arial;
            font-size: 10pt;
        }
    </style>
</head>
<body>
    <form id="form1" runat="server">
<asp:GridView ID="myGrid" runat="server" AutoGenerateColumns="false" >
    <Columns>
        <asp:BoundField DataField="Hobbies" HeaderText="Hobbies" ItemStyle-Width="150" />


    </Columns>
</asp:GridView>
    </form>
</body>
</html>

Hope you would easily understand the tutorial :-)
Sharing is caring. Share with your coding buddies.

HostForLIFE.eu ASP.NET Core Hosting

European best, cheap and reliable ASP.NET hosting with instant activation. HostForLIFE.eu is #1 Recommended Windows and ASP.NET hosting in European Continent. With 99.99% Uptime Guaranteed of Relibility, Stability and Performace. HostForLIFE.eu security team is constantly monitoring the entire network for unusual behaviour. We deliver hosting solution including Shared hosting, Cloud hosting, Reseller hosting, Dedicated Servers, and IT as Service for companies of all size.


European ASP.NET Core Hosting - HostForLIFE :: Splitting Multilines

clock October 25, 2022 10:29 by author Peter

Splitting multiple lines and storing them into array. I found this code snippet useful in my daily office work in order to do so we need to take the input in my case I use multiple line text box. This tutorial is for beginners. In order to do so I made the languages and terms well-defined so let's start with the ready-to-copy code,
sting[] str = str.Split(new [] { "\r\n" }, StringSplitOptions.RemoveEmptyEntries);

Example of doing so,
my CS page
using System;
using System.Collections.Generic;
using System.ComponentModel;
namespace gridcolor {
    public partial class WebForm1: System.Web.UI.Page {
        protected void Page_Load(object sender, EventArgs e) {
            string str = textbox1.text;
            sting[] str = str.Split(new [] {
                "\r\n"
            }, StringSplitOptions.RemoveEmptyEntries);
        }
    }

Here is my aspx page (code),
<html xmlns="http://www.w3.org/1999/xhtml">
<head runat="server">
    <title></title>
    <style type="text/css">
        body
        {
            font-family: Arial;
            font-size: 10pt;
        }
    </style>
</head>
<body>
    <form id="form1" runat="server">

<asp:TextBox ID="textBox1" runat="server" Height="492px" TextMode="MultiLine"
 Width="994px"></asp:TextBox>
    </form>
</body>
</html>

That's all hope you like it sharing is caring share with your coding buddies.

HostForLIFE.eu ASP.NET Core Hosting

European best, cheap and reliable ASP.NET hosting with instant activation. HostForLIFE.eu is #1 Recommended Windows and ASP.NET hosting in European Continent. With 99.99% Uptime Guaranteed of Relibility, Stability and Performace. HostForLIFE.eu security team is constantly monitoring the entire network for unusual behaviour. We deliver hosting solution including Shared hosting, Cloud hosting, Reseller hosting, Dedicated Servers, and IT as Service for companies of all size.


European ASP.NET Core Hosting - HostForLIFE :: Minimal API Using .NET Core 6 Web API

clock October 24, 2022 09:41 by author Peter

We will discuss minimal APIs in .NET Core 6, their purpose, and step-by-step implementation.

Introduction
    Minimal APIs are used to create HTTP APIs with minimum dependencies and configuration.
    Mostly it is used in microservices that have fewer files and functionality within a single file
    But there are a few things that are not supported in minimal APIs like action filters, and built-in validation, also, a few more that are still in progress and will get in the future by .NET Team.

Minimal APIs Implementation using .NET Core 6
Step 1
Create a new .NET Core Web API

Step 2
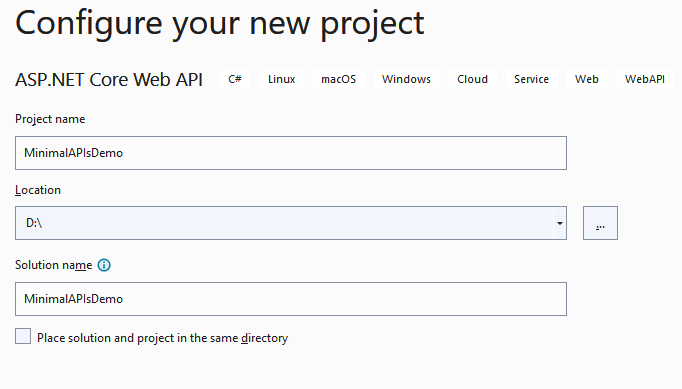
Configure your project

Step 4
Install the following NuGet packages

Project structure

Step 5
Create a Product class inside the entities folder
namespace MinimalAPIsDemo.Entities
{
    public class Product
    {
        public int ProductId { get; set; }
        public string ProductName { get; set; }
        public string ProductDescription { get; set; }
        public int ProductPrice { get; set; }
        public int ProductStock { get; set; }
    }
}

Step 6
Next, create DbContextClass inside the Data folder
using Microsoft.EntityFrameworkCore;
using MinimalAPIsDemo.Entities;

namespace MinimalAPIsDemo.Data
{
    public class DbContextClass : DbContext
    {
        protected readonly IConfiguration Configuration;

        public DbContextClass(IConfiguration configuration)
        {
            Configuration = configuration;
        }
        protected override void OnConfiguring(DbContextOptionsBuilder options)
        {
            options.UseSqlServer(Configuration.GetConnectionString("DefaultConnection"));
        }

        public DbSet<Product> Product { get; set; }
    }
}


Step 7
Register the Db Context service in the DI container inside the Program class which is the entry point of our application
// Add services to the container.
builder.Services.AddDbContext<DbContextClass>();

Step 8
Add database connection string inside the app settings file
{
  "Logging": {
    "LogLevel": {
      "Default": "Information",
      "Microsoft.AspNetCore": "Warning"
    }
  },
  "AllowedHosts": "*",
  "ConnectionStrings": {
    "DefaultConnection": "Data Source=DESKTOP;Initial Catalog=MinimalAPIDemo;User Id=sa;Password=database;"
  }
}


Step 9
Later on, add different API endpoints inside the Program class with the help of Map and specified routing pattern as I showed below
using Microsoft.EntityFrameworkCore;
using MinimalAPIsDemo.Data;
using MinimalAPIsDemo.Entities;

var builder = WebApplication.CreateBuilder(args);
// Add services to the container.
builder.Services.AddDbContext<DbContextClass>();

// Learn more about configuring Swagger/OpenAPI at https://aka.ms/aspnetcore/swashbuckle
builder.Services.AddEndpointsApiExplorer();
builder.Services.AddSwaggerGen();

var app = builder.Build();

// Configure the HTTP request pipeline.
if (app.Environment.IsDevelopment())
{
    app.UseSwagger();
    app.UseSwaggerUI();
}

//get the list of product
app.MapGet("/productlist", async (DbContextClass dbContext) =>
{
    var products = await dbContext.Product.ToListAsync();
    if (products == null)
    {
        return Results.NoContent();
    }
    return Results.Ok(products);
});

//get product by id
app.MapGet("/getproductbyid", async (int id, DbContextClass dbContext) =>
{
    var product = await dbContext.Product.FindAsync(id);
    if (product == null)
    {
        return Results.NotFound();
    }
    return Results.Ok(product);
});

//create a new product
app.MapPost("/createproduct", async (Product product, DbContextClass dbContext) =>
{
    var result = dbContext.Product.Add(product);
    await dbContext.SaveChangesAsync();
    return Results.Ok(result.Entity);
});

//update the product
app.MapPut("/updateproduct", async (Product product, DbContextClass dbContext) =>
{
    var productDetail = await dbContext.Product.FindAsync(product.ProductId);
    if (product == null)
    {
        return Results.NotFound();
    }
    productDetail.ProductName = product.ProductName;
    productDetail.ProductDescription = product.ProductDescription;
    productDetail.ProductPrice = product.ProductPrice;
    productDetail.ProductStock = product.ProductStock;

    await dbContext.SaveChangesAsync();
    return Results.Ok(productDetail);
});

//delete the product by id
app.MapDelete("/deleteproduct/{id}", async (int id, DbContextClass dbContext) =>
{
    var product = await dbContext.Product.FindAsync(id);
    if (product == null)
    {
        return Results.NoContent();
    }
    dbContext.Product.Remove(product);
    await dbContext.SaveChangesAsync();
    return Results.Ok();
});

app.Run();


Step 10
Run the following entity framework command to create migration and update the database
add-migration "initial"
update-database

Step 11
Finally, run your application

HostForLIFE.eu ASP.NET Core Hosting

European best, cheap and reliable ASP.NET hosting with instant activation. HostForLIFE.eu is #1 Recommended Windows and ASP.NET hosting in European Continent. With 99.99% Uptime Guaranteed of Relibility, Stability and Performace. HostForLIFE.eu security team is constantly monitoring the entire network for unusual behaviour. We deliver hosting solution including Shared hosting, Cloud hosting, Reseller hosting, Dedicated Servers, and IT as Service for companies of all size.


European ASP.NET Core Hosting - HostForLIFE :: ASP.NET Core 6.0 Blazor Server APP And Working With MySQL DB

clock October 17, 2022 09:38 by author Peter

In this article, we will see how to create a Stored Procedure in MySQL to search and bind the Customer details in our Blazor application using a Service with search parameter.
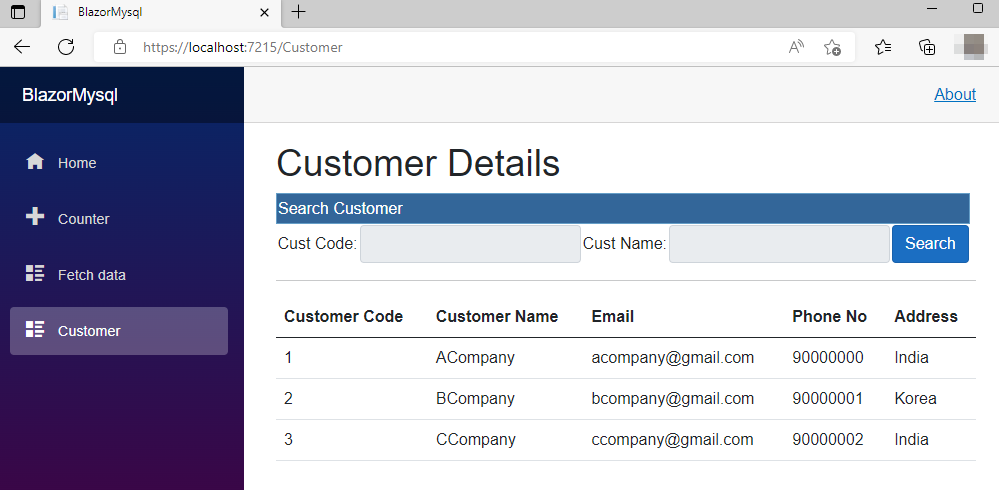
 

Blazor is a framework introduced by Microsoft. I love to work with Blazor as this makes our SPA full stack application development in simpler way and yes, now, we can use only one language, C#. Before Blazor, we were using ASP.NET Core with a combination of Angular or ReactJS. Now, with the help of Blazor support, we can create our own SPA application directly with C# Code.

We can develop two kinds of Blazor Applications which are Blazor Server App and another one is Blazor WebAssembly.

Blazor WebAssembly

WebAssembly or WASM runs on the client side. WebAssembly is the open web standard and works in browsers without support for any other plugins. WASAM uses JavaScript Interoperability to access the full functionality of browsers. Here we can see the structure of ASP.NET Core WASAM Application as the solution has only the client development as same structure of the ASP.NET Core Angular Stand-Alone Templates. For any server-side business logics or for using the Database we need to create an ASP.NET Core WEB API or other server-side project and bind the server-side data to the WASAM applications.
 

Blazor Server
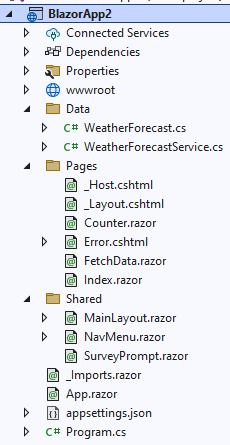
Blazor Server which runs in the ASP.NET Server means its runs on Server side. Blazor Server App uses the SignalR to continuously push updates to the client side. All the JavaScript calls, UI updates and all the app event handling using the SignalR with WebSocket protocol connections. Blazor Server app is much faster than the WASAM as the download size is smaller than the WASAM applications. Here we can see the structure of ASP.NET Core Blazor Server Application as the solution has Data folder where we can write all server-side business logic and can use the service to perform the Database related connections.
Creating the Database and Table
Here using MySQL workbench we create database named as customer and created a table named as custmaster.

Create the Stored Procedure
Let’s create the stored procedure to perform and search and customer details with customer name and customer email.

CREATE DEFINER=`shanu`@`%` PROCEDURE `sp_custGet`(IN CustName varchar(50),
IN Email varchar(50)    )
BEGIN
Select  CustCd,
        CustName,
        Email,
        PhoneNo,
        Address
FROM customer.custmaster
WHERE
CustName LIKE CONCAT('%', CustName , '%')
AND
Email LIKE  CONCAT('%', Email , '%') ;
END

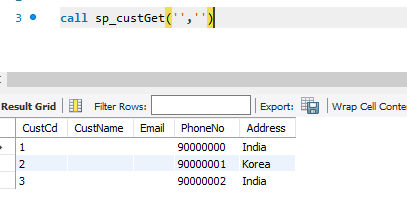
To test the Stored Procedure in MySQL we use the below code as a call with stored procedure name and now let's pass the empty parameter for both custname and email.

Blazor part
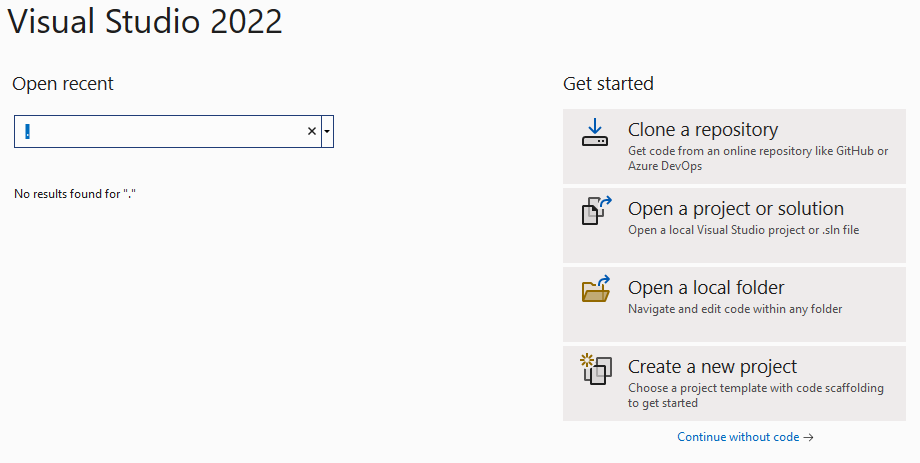
After installing all the prerequisites listed above and click Start >> Programs >> Visual Studio 2022 >> Visual Studio 2022 on your desktop. Click New >> Project.

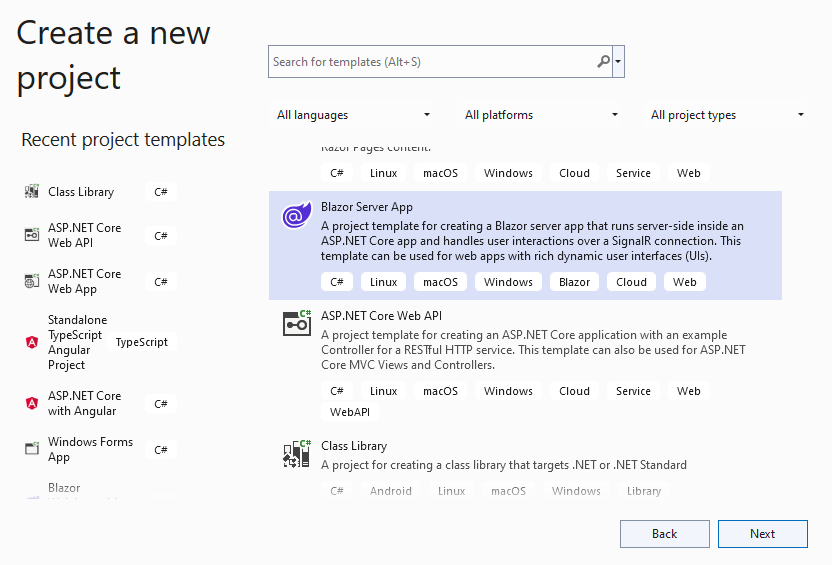
Search for Blazor Server App project and click Next.

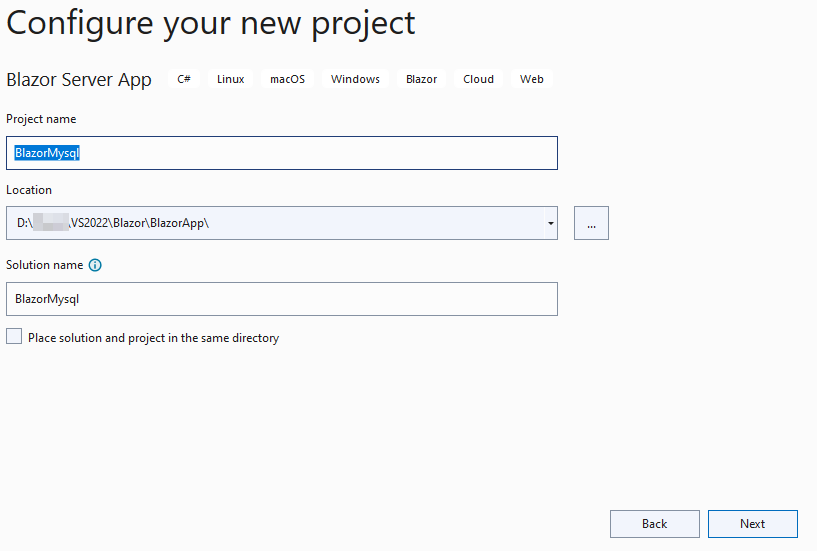
Enter your project name and click Next.
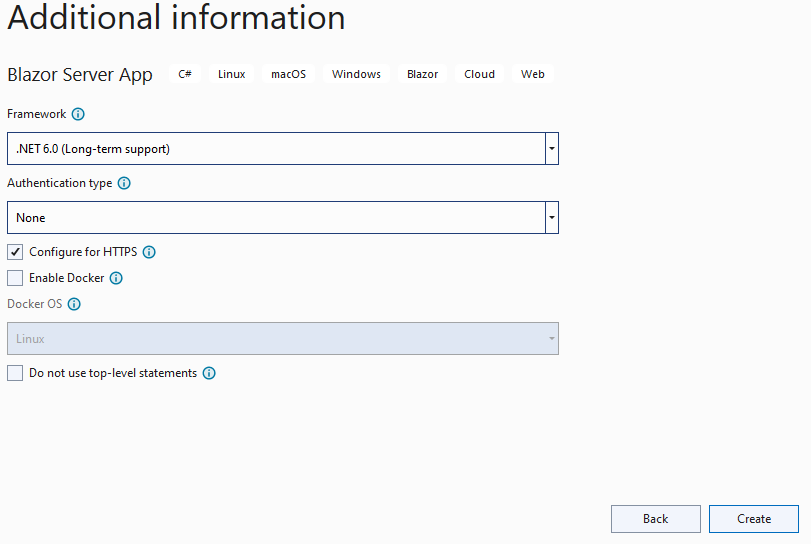
Select .NET 6.0 and click next to create your Blazor Application.
 

Step 2: Connection String
Open the appsettings.json file and add the MySQL connection string. Note add your MySQL server ID details.
"ConnectionStrings": {
    "DefaultConnection": "server=localhost;user id=-------;password=--------;port=3306;database=customer;"
},

Step 3: Install the Packages
In order to work with MySQL Database in our Blazor application here we use the install the below mentioned packages :

MySqlConnector
Microsoft.EntityFrameworkCore
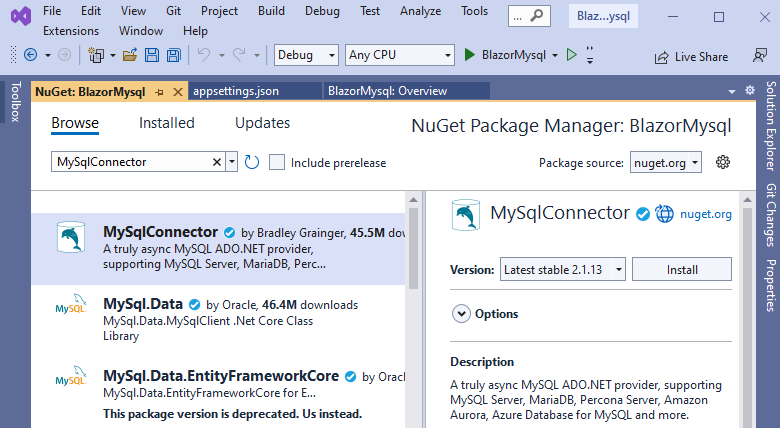
Step 4: Create Model Class
Next, we need to create the Model class for using in our application for binding the Customer Details.
Let’s create a new folder named as Models from our solution and then Right click the created Models folder and create new class file as “CustMaster.cs”.
In the class, we add the property field name which is the same as the below code:
public class custmaster{
    public string CustCd { get; set; }
    public string CustName { get; set; }
    public string Email { get; set; }
    public string PhoneNo { get; set; }
    public string Address { get; set; }
}


Step 5: Create MySQL Connection Class
Now let’s create the MySQL connection class and for this let’s create a class file.
Right click the created Models folder and create new class file as mySQLSqlHelper.cs
using MySqlConnector;
namespace BlazorMysql.Models {
    public class mySQLSqlHelper {
        //this field gets initialized at Startup.cs
        public static string conStr;
        public static MySqlConnection GetConnection() {
            try {
                MySqlConnection connection = new MySqlConnection(conStr);
                return connection;
            } catch (Exception e) {
                Console.WriteLine(e);
                throw;
            }
        }
    }
}


Now open the Program.cs file and lets assign the connection string from our appsetting.json to the mysqlHelper constring variable for connecting to the MySQL.
using BlazorMysql.Data;
using BlazorMysql.Models;
using Microsoft.AspNetCore.Components;
using Microsoft.AspNetCore.Components.Web;
var builder = WebApplication.CreateBuilder(args);

mySQLSqlHelper.conStr = builder.Configuration["ConnectionStrings:DefaultConnection"];


Step 6: Creating Customer MySql Connection class
Right Click the Data folder from the solution and add the new class named as custConnectoins .cs

In this class we create the GetCustDetails for connecting to Database and get the customer details by calling the Stored procedure with the required parameter passing and return to the list to our Service.
using BlazorMysql.Models;
using MySqlConnector;
using System.Data;
namespace BlazorMysql.Data {
    public class custConnectoins {
        public async Task < custmaster[] > GetCustDetails(string CustName, String Email) {
            List < custmaster > list = new List < custmaster > ();
            using(MySqlConnection conn = mySQLSqlHelper.GetConnection()) {
                conn.Open();
                using(MySqlCommand cmd = new MySqlCommand("sp_custGet", conn)) {
                    cmd.CommandType = CommandType.StoredProcedure;
                    cmd.Parameters.Add(new MySqlParameter {
                        ParameterName = "@CustNames",
                            DbType = DbType.String,
                            Value = CustName,
                            Direction = ParameterDirection.Input,
                    });
                    cmd.Parameters.Add(new MySqlParameter {
                        ParameterName = "@Emails",
                            DbType = DbType.String,
                            Value = Email,
                            Direction = ParameterDirection.Input,
                    });
                    using(MySqlDataReader reader = cmd.ExecuteReader()) {
                        while (reader.Read()) {
                            list.Add(new custmaster() {
                                CustCd = reader.GetInt32("CustCd"),
                                    CustName = reader.GetString("CustName"),
                                    Email = reader.GetString("Email"),
                                    PhoneNo = reader.GetString("PhoneNo"),
                                    Address = reader.GetString("Address"),
                            });
                        }
                    }
                }
            }
            return list.ToArray();
        }
    }
}


Step 7: Working with Service Class
Next, we create the custMasterDetailSerivce.cs class and added the function named as GetCustDetails in order to bind the result to our Blazor apps.
using BlazorMysql.Models;
namespace BlazorMysql.Data {
    public class custMasterDetailSerivce {
        custConnectoins objUsers = new custConnectoins();
        public async Task < custmaster[] > GetCustDetails(string CustName, String Email) {
            custmaster[] custsObjs;
            custsObjs = objUsers.GetCustDetails(CustName, Email).Result.ToArray();
            return custsObjs;
        }
    }
}


Step 8: Add the Service
We need to add the services created by us to the Program.cs class.

builder.Services.AddSingleton<custMasterDetailSerivce>();

Step 9: Working with Client Project

First, we need to add the Razor Component page.

Add Razor Component
To add the Razor Component page, right click the Pages folder from the solution. Click on Add >> New Item >> Select Razor Component >> Enter your component name, here we have given the name as Customer.razor.

Note all the component files need to have the extension as .razor.
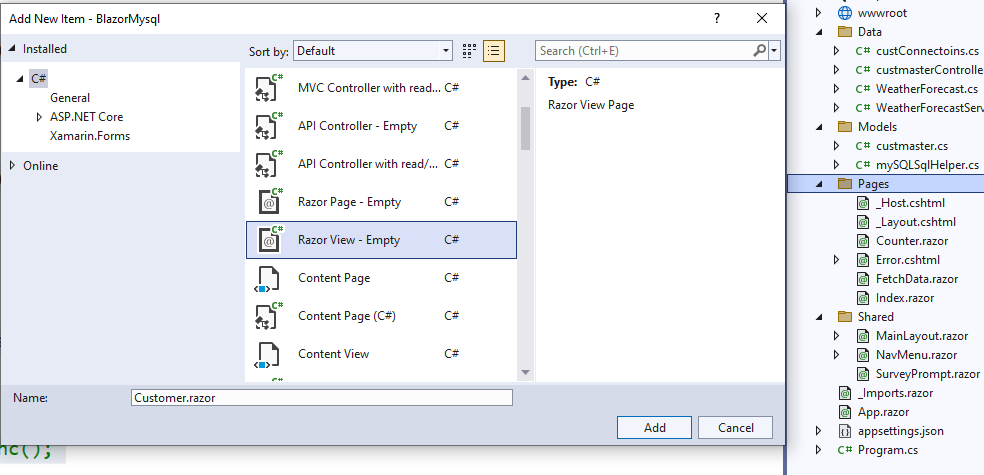
In Razor Component Page, we have three parts of code as first is the Import part where we import all the references and models for using in the component, HTML design and data bind part and finally we have the function part to Inject and call the service to bind in our HTML page and also to perform client-side business logic to be displayed in Component page.

Import Part
First, we import all the needed support files and references in our Razor View page. Here, we have first imported our Model and service class to be used in our view.
@page "/Customer"
@using BlazorMysql.Models
@using BlazorMysql.Data
@inject custMasterDetailSerivce CustomerService


HTML Design and Data Bind Part
In design part, we bind the result in table and also, we design a search part with button.
<h1>Customer Details</h1>
<table >
    <tr style="height: 30px; background-color:#336699 ; color:#FFFFFF ;border: solid 1px #659EC7;">
        <td colspan="5" align="left">
            Search Customer
        </td>
    </tr>
    <tr>
        <td>Cust Code:</td>
        <td>
            <input class="input-group-text" type="text" @bind-value="@CustName" />
        </td>
        <td>Cust Name:</td>
        <td>
            <input class="input-group-text" type="text" @bind-value="@Email" />
        </td>
        <td>
            <input type="button" class="btn btn-primary" value="Search" @onclick="@searchDetails" />
        </td>
    </tr>
</table>
<hr />
@if (custDetails == null)
{
    <p><em>Loading...</em></p>
}
else
{
    <table class="table">
        <thead>
            <tr>
                <th>Customer Code</th>
                <th>Customer Name</th>
                <th>Email</th>
                <th>Phone No</th>
                <th>Address</th>
            </tr>
        </thead>
        <tbody>
            @foreach (var cuDetails in custDetails)
            {
                <tr>
                    <td>@cuDetails.CustCd</td>
                    <td>@cuDetails.CustName</td>
                    <td>@cuDetails.Email</td>
                    <td>@cuDetails.PhoneNo</td>
                    <td>@cuDetails.Address</td>
                </tr>
            }
        </tbody>
    </table>
}

Function Part
Function part to get the Service result and bind the result in array and we have created function to search and bind the result when button clicked. Here, first we declare the customer Array to get bind the result and declared variables for search.

In OnInitializedAsync, we get the CustomerService result and bind the result in the ItemsArrays.
@code {
    String CustName = "";
    String Email = "";
    private custmaster[] ? custDetails;
    protected override async Task OnInitializedAsync() {
        custDetails = await CustomerService.GetCustDetails(CustName, Email);
    }
    //SearchCustomer
    async Task searchDetails() {
        custDetails = await CustomerService.GetCustDetails(CustName, Email);
    }
}


Navigation Menu
Now, we need to add this newly added customer Razor page to our left Navigation. For adding this, open the Shared Folder and open the NavMenu.cshtml page and add the menu.
<div class="nav-item px-3">
    <NavLink class="nav-link" href="Customer">
         <span class="oi oi-list-rich" aria-hidden="true"></span> Customer
    </NavLink>
</div>


Build and Run the Application
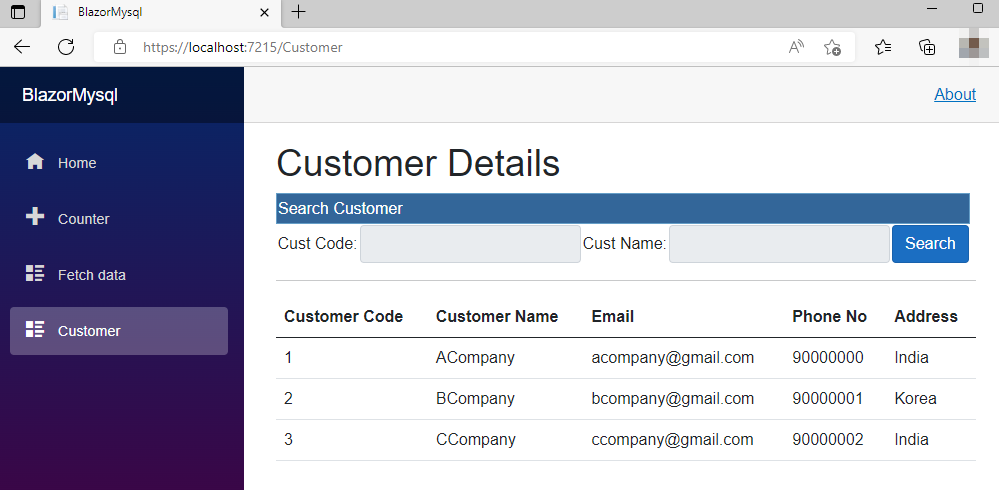
Conclusion
Hope this article helps you to understand getting started with ASP.NET Core 6.0 and Blazor Application to work with MySQL Database with search functionality.

HostForLIFE.eu ASP.NET Core Hosting

European best, cheap and reliable ASP.NET hosting with instant activation. HostForLIFE.eu is #1 Recommended Windows and ASP.NET hosting in European Continent. With 99.99% Uptime Guaranteed of Relibility, Stability and Performace. HostForLIFE.eu security team is constantly monitoring the entire network for unusual behaviour. We deliver hosting solution including Shared hosting, Cloud hosting, Reseller hosting, Dedicated Servers, and IT as Service for companies of all size.


European ASP.NET Core Hosting - HostForLIFE :: Hosting .NET Core Web API images With Docker Compose over HTTPS

clock October 10, 2022 08:17 by author Peter

We are going to discuss here SSL Certificate configuration for secure communication over the HTTPS using .NET Core Web API and Docker after running our application inside the docker container using docker-compose.

Introduction
    HTTPS is a standard internet protocol that makes the data to be encrypted and a more advanced and secure version of the HTTP protocol.
    SSL stands for Secure Sockets Layer and standard technology which keeps secure our application over the internet.
    SSL is the part of HTTPS protocol and it takes care of the encryption of data.
    It enables a secure connection and prevents hacker attacks because of its encryption algorithm and many security layers.

Implementation of .NET Core Web API Application

Step 1

Create a new .NET Core Web API application

Step 2
Configure your application

Step 3
Provide additional information

Step 4
Next, we create a certificate for the local machine using the following command
    dotnet dev-certs https -ep %USERPROFILE%\.aspnet\https\dockerdemo.pfx -p Pass@*****
    dotnet dev-certs https --trust


Here as you can see, we pass the certificate name and password in the above command and it will create the certificate at %USERPROFILE%\.aspnet\https this location


Step 5
Create a Docker file for our Weather Forecast application
FROM mcr.microsoft.com/dotnet/sdk:6.0 AS build
WORKDIR /app

EXPOSE 443
EXPOSE 80

# copy project csproj file and restore it in docker directory
COPY ./*.csproj ./
RUN dotnet restore

# Copy everything into the docker directory and build
COPY . .
RUN dotnet publish -c Release -o out

# Build runtime final image
FROM mcr.microsoft.com/dotnet/aspnet:6.0
WORKDIR /app
COPY --from=build /app/out .
ENTRYPOINT ["dotnet", "HTTPSCertDemo.dll"]

Step 6
Here using this command, you can create a docker image inside the docker desktop (Note: Make sure docker desktop is working fine on your machine)
docker build . -t ssldemo:v1

Next, we run our application after setting port and certificate details using docker volume.

docker run -p 8081:80 -p 8082:443 -e ASPNETCORE_URLS="https://+;http://+" -e ASPNETCORE_HTTPS_PORT=7001 -e ASPNETCORE_Kestrel__Certificates__Default__Password="Pass@*****" -e ASPNETCORE_Kestrel__Certificates__Default__Path=/https/dockerdemo.pfx -v %USERPROFILE%\.aspnet\https:/https/ ssldemo:v1

Here you can see we provide two ports one is for HTTPS and another one is for HTTPS, also some environmental variables like port, certificate path, and credentials along with docker volume (Note: docker volume is basically the shared directory which persists the data with docker container which is created by the user like in this case we create a certificate and it located at our local system)

Step 7

Also, if we want to manage multiple docker images and their configuration efficiently, in that case, we can use the docker-compose file for managing all our application dynamic settings which we required when the application image is running inside the docker container for that we are going to create a docker-compose YAML file for the application
    version: '3.5'
    services:
      Weatherforecase.Service:
       image: ${DOCKER_REGISTRY-}ssldemo:v1
       build:
        context: ./HTTPSCertDemo
        dockerfile: Dockerfile
       environment:
        - ASPNETCORE_ENVIRONMENT=Development
        - ASPNETCORE_URLS=https://+:443;http://+:80
        - ASPNETCORE_Kestrel__Certificates__Default__Password=Pass@*****
        - ASPNETCORE_Kestrel__Certificates__Default__Path=/https/dockerdemo.pfx
       ports:
        - "8081:80"
        - "8082:443"
       volumes:
        - ~/.aspnet/https:/https:ro


Here, you can see we provide different parameters with the help of environmental variables like docker image name, container name, certificate details, docker volume, and application port numbers

To run your application using the docker-compose YAML file for that use the following commands
docker-compose build
docker-compose up


Here one command is going to build and create a docker image inside the docker desktop and another one runs your application image inside the docker container and configure all dynamic settings which you passed inside the YAML file.

Step 8

Next, in the docker desktop, you can see the application is running inside the docker container


Also, inside the visual studio, we can see the details of containers as shown in the below images


Step 9
Finally, open both application URLs and use the application
http://localhost:8081/swagger/index.html


https://localhost:8082/swagger/index.html


HostForLIFE.eu ASP.NET Core Hosting

European best, cheap and reliable ASP.NET hosting with instant activation. HostForLIFE.eu is #1 Recommended Windows and ASP.NET hosting in European Continent. With 99.99% Uptime Guaranteed of Relibility, Stability and Performace. HostForLIFE.eu security team is constantly monitoring the entire network for unusual behaviour. We deliver hosting solution including Shared hosting, Cloud hosting, Reseller hosting, Dedicated Servers, and IT as Service for companies of all size.


European ASP.NET Core Hosting - HostForLIFE :: Sitecore Tokens For Standard Values

clock October 3, 2022 10:05 by author Peter

As Sitecore developers, when we're creating templates, a good practice is to add Standard Values so that fields can have default values or sample values.For this purpose, we can use Sitecore Tokens, this will allow us to dynamically add values to fields, according to the item that is being created by the Content Author.

Tokens

These are the tokens that we can use:

Token Utility
$name The name of the item.
$id The ID of the item.
$parentid The ID of the parent of the item.
$parentname The name of the parent of the item.
$date The system date (yyyyMMdd).
$time The system time (HHmmss).
$now The system date and time (yyyyMMddTHHmmss).

Example

Below we can see an example with the $name token. In this example, we have a field with the name Heading, and at the time of creating a new item, this field will take the name of the item.

Thanks for reading!
Now you know how to add automatic generation of field values and the different tokens you can use in a general way.
If you have any questions or ideas in mind, it will be a pleasure to be able to be in communication with you, and together exchange knowledge with each other.

HostForLIFE.eu ASP.NET Core Hosting

European best, cheap and reliable ASP.NET hosting with instant activation. HostForLIFE.eu is #1 Recommended Windows and ASP.NET hosting in European Continent. With 99.99% Uptime Guaranteed of Relibility, Stability and Performace. HostForLIFE.eu security team is constantly monitoring the entire network for unusual behaviour. We deliver hosting solution including Shared hosting, Cloud hosting, Reseller hosting, Dedicated Servers, and IT as Service for companies of all size.


European ASP.NET SignalR Hosting - HostForLIFE :: Using ASP.NET SignalR for Chat Application

clock September 27, 2022 10:42 by author Peter

Nowadays, chat applications have become pretty common. But still, the idea of how a client gets the message from the server without asking for it or in other words, without any event being fired, is remarkable. Such applications are known as real-time applications because they are responsible for live data exchange as used in multiplayer games, social media, or news forecasts. In real-time applications, the server pushes the message to connected clients instantly it becomes available to all connected clients. So, in this article, we will build a real-time chatting/twaddling application using SignalR. SignalR uses simple Web APIs to connect a server Hub to all of its clients basically, by creating server-to-client RPC (Remote Procedure Calls) that calls JavaScript methods in client browsers from the server and vice-versa.
 
Let's start building a twaddling application which would allow the user to share messages to all users as well as to individual users privately. Firstly, we start by creating a new web application project with MVC template in your visual studio. Then, you need to add the Microsoft.AspNet.SignalR NuGet package reference to the newly created project. After adding the reference, we have to register the SignalR Hub APIs by just calling the predefined method MapHubs() of RouteTableCollection at global.asax. But what does registering of hubs mean? It implies creating a route of the hub URLs and maps each to all the hubs in our project. Here is a demo of how API URLs are registered in the global.asax file,
    public class MvcApplication : System.Web.HttpApplication  
    {  
        protected void Application_Start()  
        {  
            BundleConfig.RegisterBundles(BundleTable.Bundles);  
            AreaRegistration.RegisterAllAreas();  
            RouteTable.Routes.MapHubs();  
            RouteConfig.RegisterRoutes(RouteTable.Routes);  
        }  
    }  


Now, we will create our own hub which will communicate with our client-side's javascript by just inheriting Microsoft.AspNet.SignalR.Hub class. This base class provides us with three properties and three virtuals methods, which would help us build our hub, namely,
    Clients: A collection of all the clients connected to the hub.
    Groups: A collection of groups of clients, mainly used for managing groups of clients.
    Context: Stores the details of that client which has called the server method.
    connected(): Triggered when a client joins the hub for the first time.
    OnDisconnected() : Triggered when a client leaves a hub.
    OnReconnected(): Triggered when a client joins the hub for the next time.

By using this properties and method, we create a hub named MasterHub where we will mainly have our broadcasting logics. So, now its time to define the client methods used in MasterHub but before that, we need to create a hub proxy by adding a script reference of ~/signalr/hubs and start that proxy by calling the predefined method $.connection.hub.start(). Here is an example how to create a hub proxy and declare all the client methods,
    <script src="~/signalr/hubs"></script>  
    <script type="text/javascript">  
    $(window).load(function () {  
        let hub = $.connection.masterHub;  
        //define all your client-side methods  
        hub.client.LogIn = function (parameters) {  
        //define the client side logics  
        }  
        //finally start the hub proxy  
        $.connection.hub.start().done(function () {  
            $.fn.TwaddlerLogIn(hub);  
        });  
    });  
    </script>  


Your application is ready for a run. The first step for the client is to get connected to the hub by entering his name.

    public class MasterHub : Hub  
    {  
        private static List<Twaddler> Twaddlers = new List<Twaddler>();  
      
        private static List<TwaddleDetails> Twaddles = new List<TwaddleDetails>();  
      
        public void OnConnected(string TwaddlerName)  
        {  
            if (!Twaddlers.Any(x => Equals(x.ConnectionId, Context.ConnectionId)))  
            {  
                var twaddler = new Twaddler()  
                {  
                    Name = TwaddlerName,  
                    ConnectionId = Context.ConnectionId  
                };  
      
                Twaddlers.Add(twaddler);  
                Clients.Caller.LogIn(twaddler, Twaddlers, Twaddles);  
      
                //broadcast the new twaddler to all twaddlers  
                Clients.AllExcept(Context.ConnectionId).TwaddlerLogIn(twaddler);  
            }  
        }  


Then, the client could send a message to all the clients in the hub, globally.
 

    public void BroadcastTwaddle(TwaddleDetails twaddle)  
    {  
        Twaddles.Add(twaddle);  
        //broadcast the new twaddle to all twaddlers  
        Clients.All.BroadcastTwaddle(twaddle);  
    }  

The client could also send a private message to any specific hub, privately.

    public void PrivateTwaddle(string reciverId, string message)  
    {  
        var reciver = Twaddlers.Find(x => Equals(x.ConnectionId, reciverId));  
        if (reciver == null)  
            return;  
      
        var sender = Twaddlers.Find(x => Equals(x.ConnectionId, Context.ConnectionId));  
        if (sender == null)  
            return;  
      
        var privateTwaddle = new TwaddleDetails()  
        {  
            Twaddler = sender.Name,  
            TwaddleContent = message  
        };  
      
        Clients.Client(reciverId).PrivateTwaddle(sender.ConnectionId, privateTwaddle);  
        Clients.Caller.PrivateTwaddle(reciver.ConnectionId, privateTwaddle);  
    }  


And lastly, inform other clients when this client gets disconnected.


    public override Task OnDisconnected()  
    {  
        var twaddler = Twaddlers.Find(x => Equals(x.ConnectionId, Context.ConnectionId));  
        if (twaddler != null)  
        {  
            Twaddlers.Remove(twaddler);  
      
            //broadcast the twaddler has loggedout to all twaddlers  
            Clients.All.BoradcastTwaddlerLogOut(twaddler);  
        }  
        return base.OnDisconnected();  
    }  


Finally, you have successfully used SignalR to build your own real-time application which allows users to create private as well as global chat rooms by just writing a few server and client methods. Click here to get to the Twaddler project repository.

HostForLIFE.eu ASP.NET Core Hosting

European best, cheap and reliable ASP.NET hosting with instant activation. HostForLIFE.eu is #1 Recommended Windows and ASP.NET hosting in European Continent. With 99.99% Uptime Guaranteed of Relibility, Stability and Performace. HostForLIFE.eu security team is constantly monitoring the entire network for unusual behaviour. We deliver hosting solution including Shared hosting, Cloud hosting, Reseller hosting, Dedicated Servers, and IT as Service for companies of all size.


European ASP.NET SignalR Hosting - HostForLIFE :: SignalR Best Practices

clock September 2, 2022 07:34 by author Peter

To achieve real-time messaging, earlier we used long-polling and server-sent events. We can achieve real-time messaging in .Net Core using SignalR. It uses WebSocket protocols for real-time messaging to make communication bidirectional from client to server. It delivers information in real time, without the need to refresh the app screen.

Protocol
SignalR supports both WebSocket (WS) and WebSocket Secure (WSS) protocols. The application will be connected to the SignalR hub using these protocols. Based on the needs we can use the corresponding protocols. We can create a secure socket connection using WSS protocol like HTTPS. If the application connects from the external world, then we can use WSS protocols the connection will become secure, otherwise, we can use the WS protocol. WS protocol uses port 80 for connectivity. WSS protocol uses port 443 for connectivity. We need to use port 5000 while implementing the SignalR service in the OpenShift environment.

Authentication using headers
We need to enable the authentication for SignalR connection from the client application based on the business needs. If the application needs authentication, then the application should use the WSS protocol. We can enable authentication in multiple ways. Passing the bearer token information in Cookie. But it's not recommended way. We can pass the Bearer token in the authorization header from some of the .Net Client applications. Android and Html5 apps do not support passing the Bearer token in the authorized header. We need to pass the token information in the query parameters using the access_token keyword.

Hub Connectivity

The application will connect to the SignalR hub for any real-time message communication. There are two types of connectivity. The application can connect to the SignalR hub directly or it can connect to the hub via reverse proxy from some other services. If you want to manage all your services like web services, and SignalR services via a single endpoint then we can expose the hub via reverse proxy or we can expose a hub directly to the client application to connect.

Client vs Groups
SignalR hub will send messages to the specific clients by Connection id, or the list of clients connected via group using Group Id. It will be better to send the message to the group instead of a list of client IDs. It will avoid the multiple requests to send the message to each client from the hub.

On-Prem SignalR vs Azure SignalR service
When the client size increase, we need to manage all the connections in the Hub. We need to scale out the machines when we manage the SignalR Hub in our On-Prem Servers. Azure provides SignalR Hub Service, it will manage the client connection based on the plan. Clients will connect to Azure SignalR hub Service and backend we need to send the message using group Id or client Id to SignalR hub. It will deliver the message to the client connected to the hub.

Reconnections
ASP.NET SignalR automatically handles restarting the connection when a disconnection occurs. Reconnection behavior is often specific to each application. For this reason, ASP.NET Core SignalR doesn't provide a default automatic reconnection mechanism. For most common scenarios, a client only needs to reconnect to the hub when a connection is lost, or a connection attempt fails. To do this, the application can listen to these events and call the start method on the hub connection.

HostForLIFE.eu ASP.NET Core Hosting

European best, cheap and reliable ASP.NET hosting with instant activation. HostForLIFE.eu is #1 Recommended Windows and ASP.NET hosting in European Continent. With 99.99% Uptime Guaranteed of Relibility, Stability and Performace. HostForLIFE.eu security team is constantly monitoring the entire network for unusual behaviour. We deliver hosting solution including Shared hosting, Cloud hosting, Reseller hosting, Dedicated Servers, and IT as Service for companies of all size.


European ASP.NET SignalR Hosting - HostForLIFE :: SignalR Error: Failed To Complete Negotiation With The Server

clock June 30, 2022 09:13 by author Peter

I was working on ASP.NET Core SignalR client application to receive the message from the SignalR hub. This is the scenario where my SignalR server and client were two separate .NET Core applications. In the client application, I got the below error message while trying to receive the message from SignalR Hub(server). This error may arise and the solution is almost similar for both cases using SignalR Javascript client and .NET Client.

Exact Error Message: “Error: Failed to complete negotiation with the server: Error: Not Found: Status code ‘404’ Either this is not a SignalR endpoint or there is a proxy blocking the connection.”

Below is my earlier code:
var connection = new signalR.HubConnectionBuilder().withUrl("http://localhost:39823/event-hub)

Then to resolve the above error I found that we need to add the below code in HubConnectionBuilder.

skipNegotiation: true,
transport: signalR.HttpTransportType.WebSockets

Note that: The negotiation should be skipped only when the transport property is set to ‘signalR.HttpTransportType.WebSockets‘.

Solution
Below is the previous code with which I got an error.
var connection = new signalR.HubConnectionBuilder().withUrl("http://localhost:4023/yourevent)

Complete code to resolve the issue.

var connection = new signalR.HubConnectionBuilder().withUrl("http://localhost:4023/yourevent", {
    skipNegotiation: true,
    transport: signalR.HttpTransportType.WebSockets
})

Note: This solution is applicable for both cases either using the SignalR .NET client or SignalR JavaScript client.

I hope you have got an idea of how to resolve this error.


European ASP.NET SignalR Hosting - HostForLIFE :: How To Get List Of Connected Clients In SignalR?

clock March 18, 2022 07:33 by author Peter

I have not found any direct way to call. So, we need to write our own logic inside a method provided by SignalR Library.

There is a Hub class provided by the SignalR library.
 
In this class, we have 2 methods.

  • OnConnectedAsync()
  • OnDisconnectedAsync(Exception exception)

So, the OnConnectedAsync() method will add user and OnDisconnectedAsyn will disconnect a user because when any client gets connected, this OnConnectedAsync method gets called.

In the same way, when any client gets disconnected, then the OnDisconnectedAsync method is called.
 
So, let us see it by example.
 
Step 1
Here, I am going to define a class SignalRHub and inherit the Hub class that provides virtual method and add the Context.ConnectionId: It is a unique id generated by the SignalR HubCallerContext class.
    public class SignalRHub : Hub  
    {  
    public override Task OnConnected()  
    {  
    ConnectedUser.Ids.Add(Context.ConnectionId);  
    return base.OnConnected();  
    }  
    public override Task OnDisconnected()  
    {  
    ConnectedUser.Ids.Remove(Context.ConnectionId);  
    return base.OnDisconnected();  
    }  
    }  


Step 2
In this step, we need to define our class ConnectedUser with property Id that is used to Add/Remove when any client gets connected or disconnected.
 
Let us see this with an example.
    public static class ConnectedUser  
    {  
    public static List<string> Ids = new List<string>();  
    }  

Now, you will get the result of currently connected client using ConnectedUser.Ids.Count.
 
Note
As you see, here I am using a static class that will work fine when you have only one server, but when you will work on multiple servers, then it will not work as expected. In this case, you could use a cache server like Redis cache, SQL cache.


About HostForLIFE

HostForLIFE is European Windows Hosting Provider which focuses on Windows Platform only. We deliver on-demand hosting solutions including Shared hosting, Reseller Hosting, Cloud Hosting, Dedicated Servers, and IT as a Service for companies of all sizes.

We have offered the latest Windows 2019 Hosting, ASP.NET 5 Hosting, ASP.NET MVC 6 Hosting and SQL 2019 Hosting.


Month List

Tag cloud

Sign in