European ASP.NET 4.5 Hosting BLOG

BLOG about ASP.NET 4, ASP.NET 4.5 Hosting and Its Technology - Dedicated to European Windows Hosting Customer

European ASP.NET Core Hosting - HostForLIFE :: How To Write Resilient Code Using Polly In .NET 6?

clock March 20, 2023 08:46 by author Peter

In today's fast-paced world of software development, it's essential to have reliable and resilient applications. With the rise of cloud computing and microservices, network failures and system errors are inevitable. In such scenarios, retrying the failed operations is a common solution to keep the application up and running. Polly is a powerful .NET library that provides a flexible and easy-to-use solution to handle such scenarios.

This article will discuss how to use Polly in .NET 6 to handle network failures, retries, and circuit breakers.

What is Polly?
Polly is an open-source library for .NET that provides a simple and elegant way to handle transient errors, retries, and circuit breakers. It allows developers to define policies to handle different types of exceptions and failures. Polly is flexible, extensible, and easy to use, making it an excellent choice for building resilient applications.

Getting started with Polly
To use Polly in your .NET 6 application, you must add the Polly NuGet package to your project. You can do this by using the NuGet Package Manager or adding the package reference to the .csproj file.

Once you have added the Polly package to your project, you can use it in your code. Here's a simple example of how to use Polly to handle a network failure and retry the operation.
using Polly;
using System;
using System.Net.Http;
public static async Task < string > GetResponseData(string url) {
    var policy = Policy.Handle < HttpRequestException > ().WaitAndRetryAsync(3, retryAttempt => TimeSpan.FromSeconds(Math.Pow(2, retryAttempt)));
    var client = new HttpClient();
    var response = await policy.ExecuteAsync(async () => await client.GetAsync(url));
    return await response.Content.ReadAsStringAsync();
}


In the above code, we define a policy that handles HttpRequestException and retries the operation up to three times with an exponential backoff strategy. The WaitAndRetryAsync method takes two parameters: the number of retries and a function that calculates the delay between retries.

We then create an instance of the HttpClient and use the ExecuteAsync method of the policy to execute the GET request. Polly will automatically retry the operation according to the defined policy if the request fails due to a network failure.
Handling Circuit Breakers

Circuit breakers are another important aspect of building resilient applications. They prevent an application from repeatedly making requests to a failing service, which can overload the system and cause it to crash.

Polly provides an easy-to-use circuit breaker implementation that allows you to define a threshold for failed operations. Once the threshold is reached, the circuit breaker will trip and stop executing requests for a specified amount of time.

Here's an example of how to use Polly's circuit breaker,
var policy = Policy
    .Handle<HttpRequestException>()
    .CircuitBreakerAsync(
        handledEventsAllowedBeforeBreaking: 2,
        durationOfBreak: TimeSpan.FromSeconds(30)
    );

try
{
    await policy.ExecuteAsync(async () => await client.GetAsync(url));
}
catch (Exception ex)
{
    // Handle the exception
}


In the above code, we define a policy that handles HttpRequestException and trips the circuit breaker after two consecutive failures. The circuit breaker remains open for 30 seconds, after which it resets and allows requests to be executed again.

In conclusion, Polly is a powerful library that provides a flexible and easy-to-use solution for handling network failures, retries, and circuit breakers. Polly's simple and elegant API makes it easy to build resilient applications that can handle transient errors and keep running under adverse conditions. By using Polly in your .NET 6 application, you can make your application more reliable, and scalable.

HostForLIFE ASP.NET Core Hosting

European best, cheap and reliable ASP.NET hosting with instant activation. HostForLIFE.eu is #1 Recommended Windows and ASP.NET hosting in European Continent. With 99.99% Uptime Guaranteed of Relibility, Stability and Performace. HostForLIFE.eu security team is constantly monitoring the entire network for unusual behaviour. We deliver hosting solution including Shared hosting, Cloud hosting, Reseller hosting, Dedicated Servers, and IT as Service for companies of all size.


European ASP.NET Core Hosting - HostForLIFE :: Implementation Of NLog With .NET 6 Web API

clock March 13, 2023 08:22 by author Peter

As a Modern web application, we do a lot of operations in it. To handle more requests, we need a robust logging mechanism for monitoring.

Henceforth I've shared One of the best logging mechanisms implemented for the .NET 6 web application.

By default, Microsoft has a logging mechanism, but for our convenience, we go with third-party log providers, which is helpful to make how we need our logs to be said, for example, file, console, etc...

I'm using NLog as a third-party log provider (you can learn more about NLog here NLog under config options).

Hereby I've given some short notes about logs done in NLog. For NLog configuration, you need the "NLog.config" file. Inside that, you have an XML file describing the logging configuration.

NLog.config
<?xml version="1.0" encoding="utf-8" ?>
<nlog xmlns="http://www.nlog-project.org/schemas/NLog.xsd"
      xmlns:xsi="http://www.w3.org/2001/XMLSchema-instance">
  <!--
  See https://github.com/nlog/nlog/wiki/Configuration-file
  for information on customizing logging rules and outputs.
   -->
  <targets async="true">
     <target name="console" xsi:type="Console" layout="${longdate} ${level:upperCase=true} ${logger}:${callsite-linenumber} - ${scopeproperty:item=requestId} - ${message}" />
  </targets>
  <rules>
    <!-- Log all events to the json-file target -->
    <logger name="*" writeTo="console" minlevel="Info" />
  </rules>
</nlog>


Here an XML syntax with encoding UTF-8 will be created and followed by NLog tag, which was a basic syntax. Then targets tag is used to specify how we need the logs, whether in a file format, mail or console, or other formats. Inside <target> tag, you need to specify xsi:type="Console" (hereby, I need console logs). Then what layout do you need to specify under the layout property, which describes the details you need inside the logs?

Then follows the rules section. Under this, you need to specify the logger, which has the restriction part, which gives the log level you need, the logger's name, and where to write it.

For this implementation, you must add the relevant dependency package from nuget.org to your ".csproj" file.
<PackageReference Include="NLog.Web.AspNetCore" Version="5.2.1" />

Inside the layout, we have some config renderers,
${longdate} - used for date time printing when the logs get printed in the sortable format `yyyy-MM-dd HH:mm:ss.ffff`.
${level:upperCase=true} - used to print by which log level we're logging. I've mentioned the default log levels with their precedence (if set minimum level, then you mention inside the rules under logger tag set property min level = "info" then greater than info-2 (Warning-3, Error-4, Critical-5 )and info-2 logs are getting caught, Debug and Trace won't) below
    public enum LogLevel {
        Trace = 0,
            Debug = 1,
            Information = 2,
            Warning = 3,
            Error = 4,
            Critical = 5,
            None = 6
    }

    ${logger} - Name of the logger, the class name in most common cases.

    ${callsite-linenumber} - which gives the line number where the log gets jumped out (Error case like a try-catch exception) and prints the log statement where it is held up.

    ${scopeproperty:item=requestId} - which is of dynamic value assignment for user convenience like context headers or request-based information. Then you can assign the values inside the code (Earlier MDC, MDLC, NDC, and NDLCs were used but not in the current version. They were put up in a single one).
    ${message} - For log messages.

I'm declaring the logger like this in my class for the basic declaration of the logger.
private static Logger logger = LogManager.GetLogger("WeatherForecastController");

By using this logger, you can access the different methods. Here I'm mentioning the info log.
logger.Info("Inside GetWeatherForecast Controller");

Earlier, I said that scope property is a dynamic one. You can set it on your own, which can be set as,
ScopeContext.PushProperty("requestId",1001);

HostForLIFE ASP.NET Core Hosting

European best, cheap and reliable ASP.NET hosting with instant activation. HostForLIFE.eu is #1 Recommended Windows and ASP.NET hosting in European Continent. With 99.99% Uptime Guaranteed of Relibility, Stability and Performace. HostForLIFE.eu security team is constantly monitoring the entire network for unusual behaviour. We deliver hosting solution including Shared hosting, Cloud hosting, Reseller hosting, Dedicated Servers, and IT as Service for companies of all size.


European ASP.NET Core Hosting - HostForLIFE :: REST In Depth Or What Exactly REST Is?

clock November 4, 2022 07:30 by author Peter

In this article, we’ll go through the details and meaning of REST. It will help you to better understand REST and use it with its best practices.

What is an API?
When developing software, we write API (Application Programming Interface) in order not to perform some tasks over and over again. The API insulates us from the difficulties of the environment and domain area where we work and ensures the encapsulation of complex processes and our abstraction from the domain area. Due to this, we stay away from low-level design architectural solutions and communicate with the environment only through the provided interface. For example, when using the framework, we can see all the DLLs (packages) whose functionality we benefit from as APIs.

What exactly is a web-based API?

Web Based API is just a variation of API. Web Based API is a form of API used to enable data exchange between applications using web standards and protocols. Typically, these types of APIs manifest themselves as REST APIs and SOAP services. Due to this, by creating a channel between different web resources (site, service, etc.), it is possible to build a large infrastructure (microservice, etc.) or simply an exchange mechanism.

The main topic of today's article will be RESTful Services, one of the forms of Web Based API.

What exactly REST is?

REST (Representational State Transfer) is an architectural style used to develop loosely-coupled applications over the HTTP protocol. REST is just an architectural style. The architectural style is: although the high-level architectural design of any work is given, the low-level design is kept free for the implementing party (vendor, provider).

REST is not a standard. Although REST is not a standard, it is implemented through web standards in modern days.

REST is not a protocol. Although REST is not a protocol, it has been implemented through web protocols (HTTP) nowadays. But REST is protocol-independent. The fact that it is implemented with the HTTP protocol doesn’t mean that it can only work with this protocol.

You can think of REST as a kind of ISO/OSI model. Although it is an ideal model, in real practice the TCP/IP model is used, and ISO/OSI remains a kind of theory. Although REST does not remain in theory, it is not excluded that it may be implemented in another format in the future.

If we express the work of REST in a short, we can say that "The client sends a request to the server, and the server changes the state of the client according to the response".

As for the core of the word REST. REST is based on the concepts of Resource, Representation, State, and Transfer. First, the client requests a resource from the server. The server keeps the original resource in itself and sends the Representation, which is just a copy of it, to the client. If the resource changes tomorrow, the client must request again and get the latest state of the resource again. The transfer of the resource from the server to the client is just a Transfer.

Why do we need REST
    It isolates the Client and Server from each other and eliminates the dependency between them.
    It does not depend on any platform
    It does not depend on any programming language. Whether you use PHP, C#, Node.js, etc. you can write REST services with all of them.
    It is not tied to a specific format. You can receive data in either XML or JSON (maybe in other formats).
    Allows building distributed systems
    It has the Discoverable feature. Resources can be easily identified
    Very easy to use
    Can use HTTP cache

What are REST constraints?
The main mechanism that indicates whether a service is a REST is its constraints.

REST has 6 (5 mandatories, 1 optional) constraints.
1) Uniform-Interface Constraint
This constraint is perhaps the most important constraint among REST constraints. If it is necessary to briefly list the main ideas on which it is based, we can say:
    Different devices, equipment, and programs must use resources over the same URL
    A URL can provide different representations. This is usually given as Content Negation in services. That is, by referring to the same URL, depending on the configuration, you can receive information in both XML and JSON format.
    We can make both GET and POST requests to the same URL

The above brief overview is not complete. Because the Uniform-interface constraint itself consists of 4 sub-parts. If we don't know them, it's hard to fully understand what this limitation does:

1.1 Identification of Resources
Identification of resources should be done over URL. That is, it should be easy to know what type of resource is used when looking at the URL. Example: If the URL https://website.com/api/students is given, here students are our called and used as a resource. The name of the resource must be represented in the URL.

1.2 Manipulating Resources through representation
If the requesting client has permission to manipulate (edit, delete) the resource, there should be metadata about how to manipulate the resource together with the returned representation. Through these metadata links, the called resource can be changed or deleted.

1.3 Self-descriptive messages
Each sent request should be complete in itself, no additional commands should be needed to do any atomic work. Typically, metadata (additional credentials, HTTP method information, meta info) is sent via HTTP headers.

1.4 HATEOAS – (Hypermedia As The Engine of Application State)

During each request, it should be possible to receive documentation information, like a WSDL in WCF services. The point is that the client side should easily know where other resources are located (discoverable).

2) Client-Server constraint (Client Server constraint)
This constraint allows us to isolate the client and the server from each other.
    There must be a client and a server for data exchange
    They should be accompanied and expanded independently
    They should not depend on each other
    The client should not need to know anything about the architecture of the server
    The server should not need to know anything about the client's UI

3) Stateless constraint
Due to this limitation, the server and client should communicate without having information about each other.
    The server should not store any session (data) about the client
    The relationship between the client and the server is performed stateless, and all requests must be completely independent requests, not dependent on the results of other requests

4) Cachable constraint
The goal is to save the network and increase the exchange speed

    If possible, the request from the server should be cached
    During each response, it should be possible to manage the cache through the header

5) Layered system
The goal is to reduce complexity.

    Server architecture is divided into the hierarchical layer (cover-abstraction level).
    Each layer only knows about the middle layer

6) Code on demand constraint
This constraint is optional.
    In addition to simple data, the server can provide the client with the opportunity to execute some executable code examples. For example, to execute JS code. Just because this type of restriction is relatively dangerous, there is no obligation to implement it.

HostForLIFE.eu ASP.NET Core Hosting

European best, cheap and reliable ASP.NET hosting with instant activation. HostForLIFE.eu is #1 Recommended Windows and ASP.NET hosting in European Continent. With 99.99% Uptime Guaranteed of Relibility, Stability and Performace. HostForLIFE.eu security team is constantly monitoring the entire network for unusual behaviour. We deliver hosting solution including Shared hosting, Cloud hosting, Reseller hosting, Dedicated Servers, and IT as Service for companies of all size.


European ASP.NET Core Hosting - HostForLIFE :: Minimal API Using .NET Core 6 Web API

clock October 24, 2022 09:41 by author Peter

We will discuss minimal APIs in .NET Core 6, their purpose, and step-by-step implementation.

Introduction
    Minimal APIs are used to create HTTP APIs with minimum dependencies and configuration.
    Mostly it is used in microservices that have fewer files and functionality within a single file
    But there are a few things that are not supported in minimal APIs like action filters, and built-in validation, also, a few more that are still in progress and will get in the future by .NET Team.

Minimal APIs Implementation using .NET Core 6
Step 1
Create a new .NET Core Web API

Step 2
Configure your project

Step 4
Install the following NuGet packages

Project structure

Step 5
Create a Product class inside the entities folder
namespace MinimalAPIsDemo.Entities
{
    public class Product
    {
        public int ProductId { get; set; }
        public string ProductName { get; set; }
        public string ProductDescription { get; set; }
        public int ProductPrice { get; set; }
        public int ProductStock { get; set; }
    }
}

Step 6
Next, create DbContextClass inside the Data folder
using Microsoft.EntityFrameworkCore;
using MinimalAPIsDemo.Entities;

namespace MinimalAPIsDemo.Data
{
    public class DbContextClass : DbContext
    {
        protected readonly IConfiguration Configuration;

        public DbContextClass(IConfiguration configuration)
        {
            Configuration = configuration;
        }
        protected override void OnConfiguring(DbContextOptionsBuilder options)
        {
            options.UseSqlServer(Configuration.GetConnectionString("DefaultConnection"));
        }

        public DbSet<Product> Product { get; set; }
    }
}


Step 7
Register the Db Context service in the DI container inside the Program class which is the entry point of our application
// Add services to the container.
builder.Services.AddDbContext<DbContextClass>();

Step 8
Add database connection string inside the app settings file
{
  "Logging": {
    "LogLevel": {
      "Default": "Information",
      "Microsoft.AspNetCore": "Warning"
    }
  },
  "AllowedHosts": "*",
  "ConnectionStrings": {
    "DefaultConnection": "Data Source=DESKTOP;Initial Catalog=MinimalAPIDemo;User Id=sa;Password=database;"
  }
}


Step 9
Later on, add different API endpoints inside the Program class with the help of Map and specified routing pattern as I showed below
using Microsoft.EntityFrameworkCore;
using MinimalAPIsDemo.Data;
using MinimalAPIsDemo.Entities;

var builder = WebApplication.CreateBuilder(args);
// Add services to the container.
builder.Services.AddDbContext<DbContextClass>();

// Learn more about configuring Swagger/OpenAPI at https://aka.ms/aspnetcore/swashbuckle
builder.Services.AddEndpointsApiExplorer();
builder.Services.AddSwaggerGen();

var app = builder.Build();

// Configure the HTTP request pipeline.
if (app.Environment.IsDevelopment())
{
    app.UseSwagger();
    app.UseSwaggerUI();
}

//get the list of product
app.MapGet("/productlist", async (DbContextClass dbContext) =>
{
    var products = await dbContext.Product.ToListAsync();
    if (products == null)
    {
        return Results.NoContent();
    }
    return Results.Ok(products);
});

//get product by id
app.MapGet("/getproductbyid", async (int id, DbContextClass dbContext) =>
{
    var product = await dbContext.Product.FindAsync(id);
    if (product == null)
    {
        return Results.NotFound();
    }
    return Results.Ok(product);
});

//create a new product
app.MapPost("/createproduct", async (Product product, DbContextClass dbContext) =>
{
    var result = dbContext.Product.Add(product);
    await dbContext.SaveChangesAsync();
    return Results.Ok(result.Entity);
});

//update the product
app.MapPut("/updateproduct", async (Product product, DbContextClass dbContext) =>
{
    var productDetail = await dbContext.Product.FindAsync(product.ProductId);
    if (product == null)
    {
        return Results.NotFound();
    }
    productDetail.ProductName = product.ProductName;
    productDetail.ProductDescription = product.ProductDescription;
    productDetail.ProductPrice = product.ProductPrice;
    productDetail.ProductStock = product.ProductStock;

    await dbContext.SaveChangesAsync();
    return Results.Ok(productDetail);
});

//delete the product by id
app.MapDelete("/deleteproduct/{id}", async (int id, DbContextClass dbContext) =>
{
    var product = await dbContext.Product.FindAsync(id);
    if (product == null)
    {
        return Results.NoContent();
    }
    dbContext.Product.Remove(product);
    await dbContext.SaveChangesAsync();
    return Results.Ok();
});

app.Run();


Step 10
Run the following entity framework command to create migration and update the database
add-migration "initial"
update-database

Step 11
Finally, run your application

HostForLIFE.eu ASP.NET Core Hosting

European best, cheap and reliable ASP.NET hosting with instant activation. HostForLIFE.eu is #1 Recommended Windows and ASP.NET hosting in European Continent. With 99.99% Uptime Guaranteed of Relibility, Stability and Performace. HostForLIFE.eu security team is constantly monitoring the entire network for unusual behaviour. We deliver hosting solution including Shared hosting, Cloud hosting, Reseller hosting, Dedicated Servers, and IT as Service for companies of all size.


European ASP.NET Core Hosting - HostForLIFE :: Options Pattern In .NET 6.0

clock October 6, 2022 08:09 by author Peter

In this tutorial, we are going to cover an approach through which we can read the configuration data in .NET Core - the options pattern.

Why the Options Pattern?

   Options pattern gives the below features
    It can be used to bind configuration data to strongly typed objects.
    It adheres to two important software engineering principles - Encapsulation and Separation of Concerns.
    It provides a mechanism to validate configuration data.

Please refer to the Microsoft documentation for more details.

Tools which I have used for this tutorial:
    Visual Studio 2022 Community Edition – Preview version 17.4 (Preview 2)
    .NET 6.0
    Web API
    Swagger

To begin with, let us create a sample project. The source code can be downloaded from GitHub.

Let us assume that we have the below configuration in appsettings.json
"OptionsTutorial": {
    "InterfaceName" : "IOptions"
}

Create the following class:
public class OptionsTutorial
{
    public const string Position = "OptionsTutorial";
    public string InterfaceName { get; set; }
}

Rules which need to be followed to create this class:
    Must be non-abstract with a public parameterless constructor.
    All public read-write properties of the type are bound.
    Fields are not bound. In the preceding code, “Position” is not bound.
    The “Position” field is used so the string " OptionsTutorial " doesn't need to be hard coded in the app when binding the class to a configuration provider.

Bind the configuration data to strongly typed objects.

In Program.cs class, we need to add the below line to bind the configuration data.
builder.Services
    .Configure< OptionsTutorial>(builder.Configuration.GetSection(OptionsTutorial.Position));

Use IOptions<T> Interface
This interface is registered as a Singleton and can be injected into any service lifetime.

This does not support:
    Read configuration data after the application has started.
    Named Options -  Refer to the Microsoft documentation for more details.

Let us make a few code changes in WeatherForecastController.cs

Add the below variable at the beginning of the class.
private OptionsTutorial _optionsTutorial;

make the below code changes in Constructor.
public WeatherForecastController(ILogger<WeatherForecastController> logger, IOptions<OptionsTutorial> options)
{
    _logger = logger;
    this._optionsTutorial = options.Value;
}


Introduce a new action method as below
[HttpGet]
[Route("optionspattern")]
public IActionResult OptionsPattern()
{
    var interfaceName = this._optionsTutorial.InterfaceName;
    var message = $"interface name from OptionsTutorial - {interfaceName}";
    return Ok(message);
}


Let us debug the action method and the result.

We can see that; the configuration data has been bound to the strongly typed object.

Use IOptionsSnapshot<T> Interface
    This interface is useful in scenarios where options need to be recomputed on every request. Please refer to the Microsoft documentation for more details on this.
    This interface has been registered as Scoped; hence it cannot be injected into Singleton Services.
    It supports Names Options.

Add the below settings in Appsettings.json
"SnapShot": {
    "InterfaceName": "IOptionsSnapshot"
}


Add the below interface and classes
public class SnapShot
{
    public const string Position = "Snapshot";
    public string InterfaceName { get; set; }
}

I have created two interfaces - ISnapShotCheckWithScope.cs and ISnapShotCheckWithSingleton.cs for validating the Singleton as well as Scoped service lifetime

Make the necessary changes in Program.cs
builder.Services.AddScoped<ISnapShotCheckWithScope, SnapShotCheckWithScope>();
/// UnComment this line and see whether the code executed or not.
/// you will get a runtime error
//builder.Services.AddSingleton<ISnapShotCheckWithSingleton, SnapShotCheckWithSingleton>();


As IOptionsSnapshot interface has been registered as Scoped, it cannot be injected into Singleton Services. Please look at the source code available in GitHub to understand more on this.

Let us go ahead and execute the Scoped controller.

Now change from Scoped to Singleton in Program.cs and see how this behaves.
//builder.Services.AddScoped<IOptionsMonitorCheck, OptionMonitorCheck>();
//Uncomment each of the below one at a time and see how this behaves
builder.Services.AddSingleton<IOptionsMonitorCheck, OptionMonitorCheck>();
//builder.Services.AddTransient<IOptionsMonitorCheck, OptionMonitorCheck>();

Successfully execute.

Now let us change to Transient in Program.cs and see.
//builder.Services.AddScoped<IOptionsMonitorCheck, OptionMonitorCheck>();
//Uncomment each of the below one at a time and see how this behaves
//builder.Services.AddSingleton<IOptionsMonitorCheck, OptionMonitorCheck>();
builder.Services.AddTransient<IOptionsMonitorCheck, OptionMonitorCheck>();

Execute successfully.

We have seen how to read configuration data using Options pattern in .NET 6.0. This approach will ensure two engineering principles – encapsulation and separation of concerns.  Hope this article helps you to understand the Options pattern at high level. Thank you for reading my article and please leave your comments in the comment box below.


European ASP.NET Core Hosting :: JWT Token Creation, Authentication And Authorization In ASP.NET Core 6.0 With Postman

clock September 6, 2022 07:38 by author Peter

In this article, I will explain how to create the JWT token and how to Authenticate and Authorize it in very simple steps. We will follow the below steps to JWT token creation, authentication and authorization.

  • ASP.Net Core API Application
  • Add required packages.
  • Add Key, Issuer and Audience in appsettings.cs
  • Register JWT Token for Authentication in Startup.cs file.
  • Create Models (UserLogin, UserModel and UserConstant)
  • Create Login API Controller (Authenticate user and generate token)
  • Create User API Controller to authorize user role.
  • Test the API endpoint in Postman with Token.

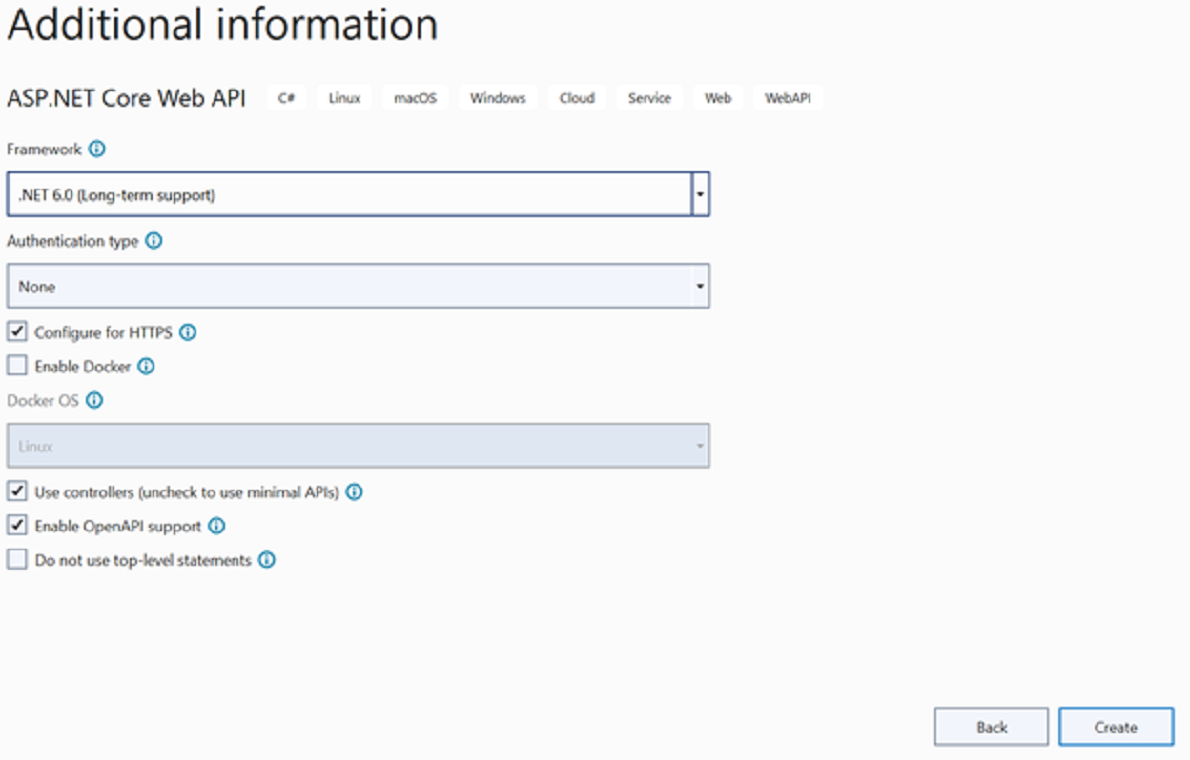
1. Add ASP.Net Core API Application
Open visual studio 2022 click on create new project --> Select ASP.Net Core Web API --> Next

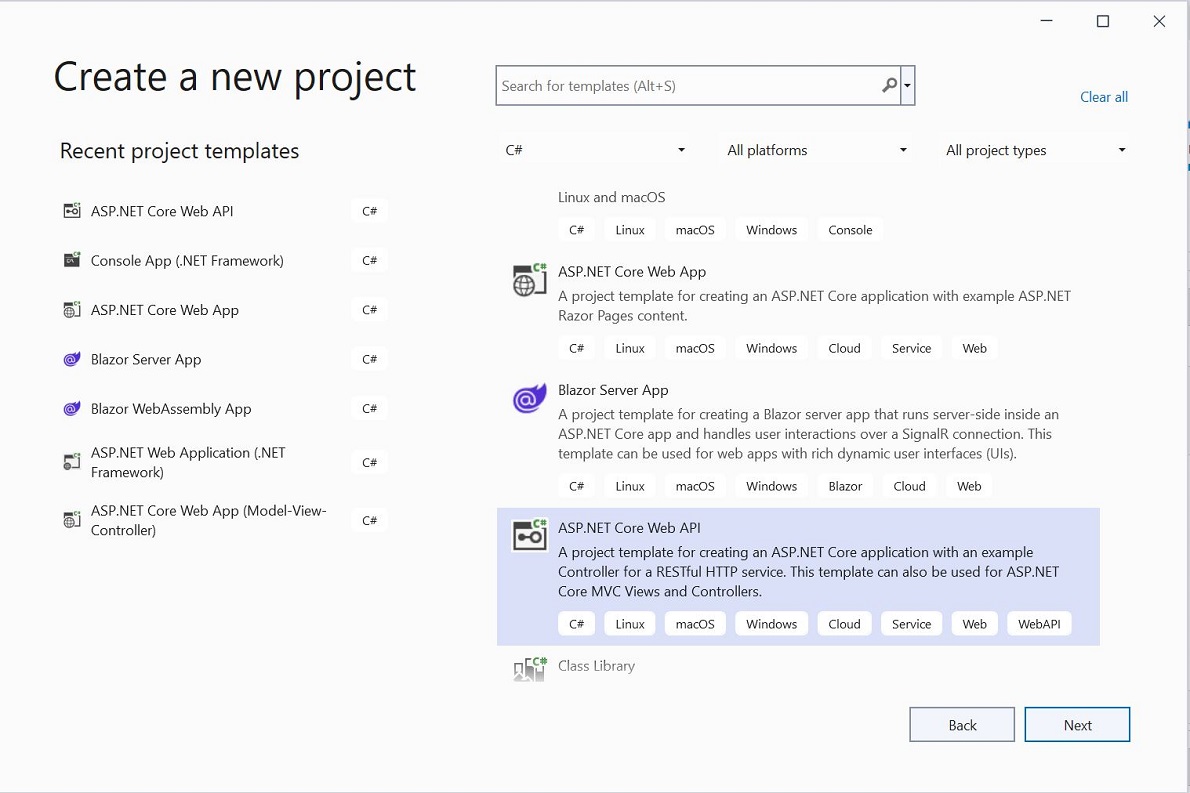
Give desired project and solution name --> Next --> select framework .Net 6.0 --> Create

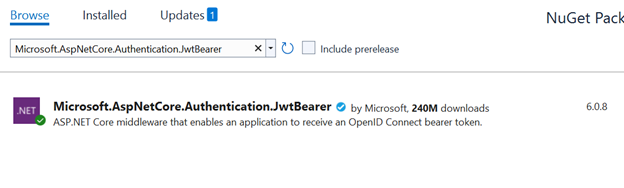
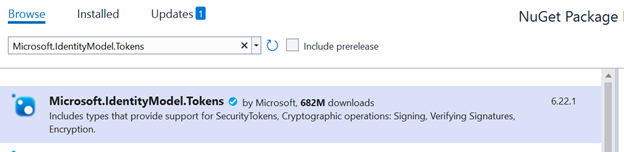
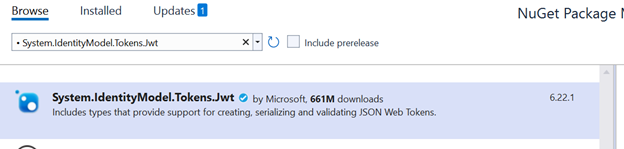
2. Add Nuget Packages
Add the following packages from nuget package manager.
    Microsoft.AspNetCore.Authentication.JwtBearer
    Microsoft.IdentityModel.Tokens
    System.IdentityModel.Tokens.Jwt


3. Add setting in appsetting.json
Open appsetting.json and add following Key, Issuer and Audience

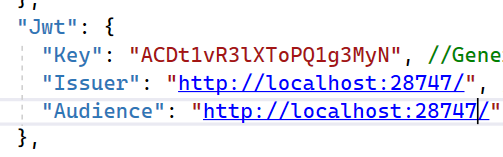
* To generate the random key use
https://www.random.org/strings

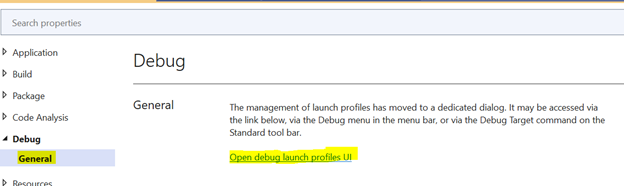
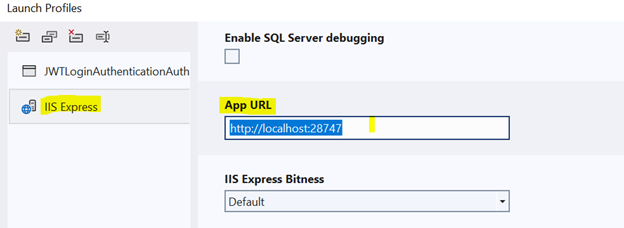
* For issuer and audience local URL follow the below steps
Project properties --> Debug --> General --> Open Debug Launch Profile UI


Select IIS Express and pick the App URL

"Jwt": {
    "Key": "ACDt1vR3lXToPQ1g3MyN", //Generate random String from https://www.random.org/strings
    "Issuer": "http://localhost:28747/", //Project Property-> Debug-> IIS-->App URL (you can local host url as well)
    "Audience": "http://localhost:28747/"
  },

4. Register JWT token for Authentication in Program.cs file

using Microsoft.AspNetCore.Authentication.JwtBearer;
using Microsoft.IdentityModel.Tokens;
using System.Text;
var builder = WebApplication.CreateBuilder(args);
// Add services to the container.
builder.Services.AddControllers();
// Learn more about configuring Swagger/OpenAPI at https://aka.ms/aspnetcore/swashbuckle
builder.Services.AddEndpointsApiExplorer();
builder.Services.AddSwaggerGen();
//JWT Authentication
builder.Services.AddAuthentication(JwtBearerDefaults.AuthenticationScheme).AddJwtBearer(options => {
    options.TokenValidationParameters = new TokenValidationParameters {
        ValidateIssuer = true,
            ValidateAudience = true,
            ValidateLifetime = true,
            ValidateIssuerSigningKey = true,
            ValidIssuer = builder.Configuration["Jwt:Issuer"],
            ValidAudience = builder.Configuration["Jwt:Audience"],
            IssuerSigningKey = new SymmetricSecurityKey(Encoding.UTF8.GetBytes(builder.Configuration["Jwt:Key"]))
    };
});
var app = builder.Build();
// Configure the HTTP request pipeline.
if (app.Environment.IsDevelopment()) {
    app.UseSwagger();
    app.UseSwaggerUI();
}
app.UseHttpsRedirection();
app.UseAuthentication();
app.UseAuthorization();
app.MapControllers();
app.Run();

5. Create Models (UserLogin, UserModel and UserConstant)
Add a new folder with Models name and create UserLogin, UserModel and UserConstant classes.

namespace JWTLoginAuthenticationAuthorization.Models
{
    public class UserModel
    {
        public string Username { get; set; }
        public string Password { get; set; }
        public string Role { get; set; }
    }
}

namespace JWTLoginAuthenticationAuthorization.Models
{
    public class UserLogin
    {
        public string Username { get; set; }
        public string Password { get; set; }
    }
}

namespace JWTLoginAuthenticationAuthorization.Models
{
    // We are not taking data from data base so we get data from constant
    public class UserConstants
    {
        public static List<UserModel> Users = new()
            {
                    new UserModel(){ Username="naeem",Password="naeem_admin",Role="Admin"}
            };
    }
}

6. Create LoginAPI Controller (Authenticate user and generate token)
Add a new Empty API controller name “LoginController” in controller folder.


Here creates one Post Action method for Login and two methods for Authenticating the user credentials and Generate the token (if user is authenticated).

using JWTLoginAuthenticationAuthorization.Models;
using Microsoft.AspNetCore.Authorization;
using Microsoft.AspNetCore.Mvc;
using Microsoft.IdentityModel.Tokens;
using System.IdentityModel.Tokens.Jwt;
using System.Security.Claims;
using System.Text;

namespace JWTLoginAuthenticationAuthorization.Controllers
{
    [Route("api/[controller]")]
    [ApiController]
    public class LoginController : ControllerBase
    {
        private readonly IConfiguration _config;
        public LoginController(IConfiguration config)
        {
            _config = config;
        }

        [AllowAnonymous]
        [HttpPost]
        public ActionResult Login([FromBody] UserLogin userLogin)
        {
            var user = Authenticate(userLogin);
            if (user != null)
            {
                var token = GenerateToken(user);
                return Ok(token);
            }

            return NotFound("user not found");
        }

        // To generate token
        private string GenerateToken(UserModel user)
        {
            var securityKey = new SymmetricSecurityKey(Encoding.UTF8.GetBytes(_config["Jwt:Key"]));
            var credentials = new SigningCredentials(securityKey, SecurityAlgorithms.HmacSha256);
            var claims = new[]
            {
                new Claim(ClaimTypes.NameIdentifier,user.Username),
                new Claim(ClaimTypes.Role,user.Role)
            };
            var token = new JwtSecurityToken(_config["Jwt:Issuer"],
                _config["Jwt:Audience"],
                claims,
                expires: DateTime.Now.AddMinutes(15),
                signingCredentials: credentials);


            return new JwtSecurityTokenHandler().WriteToken(token);

        }

        //To authenticate user
        private UserModel Authenticate(UserLogin userLogin)
        {
            var currentUser = UserConstants.Users.FirstOrDefault(x => x.Username.ToLower() ==
                userLogin.Username.ToLower() && x.Password == userLogin.Password);
            if (currentUser != null)
            {
                return currentUser;
            }
            return null;
        }
    }
}

7. Create User API Controller to authorize user role
Add new empty API controller named “UserController.cs” in controller folder.
Here we will authorize the endpoint on the behalf of role.

namespace JWTLoginAuthenticationAuthorization.Controllers
{
    [Route("api/[controller]")]
    [ApiController]
    public class UserController : ControllerBase
    {
        //For admin Only
        [HttpGet]
        [Route("Admins")]
        [Authorize(Roles = "Admin")]
        public IActionResult AdminEndPoint()
        {
            var currentUser = GetCurrentUser();
            return Ok($"Hi you are an {currentUser.Role}");
        }
        private UserModel GetCurrentUser()
        {
            var identity = HttpContext.User.Identity as ClaimsIdentity;
            if (identity != null)
            {
                var userClaims = identity.Claims;
                return new UserModel
                {
                    Username = userClaims.FirstOrDefault(x => x.Type == ClaimTypes.NameIdentifier)?.Value,
                    Role = userClaims.FirstOrDefault(x => x.Type == ClaimTypes.Role)?.Value
                };
            }
            return null;
        }
    }
}

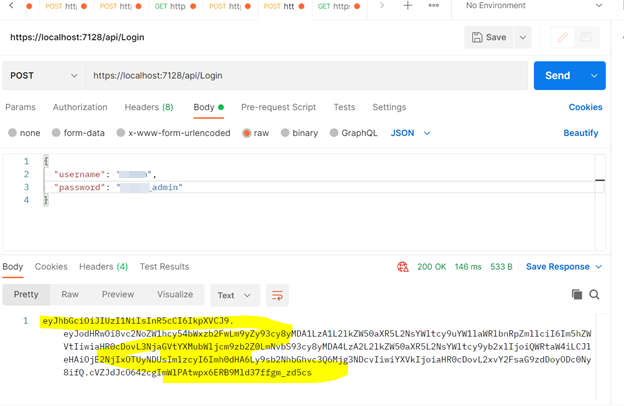
8. Test the API endpoint in Postman with Token
Run the application and copy the URL domain from the browser.
Now open the Postman, give the URL with correct API route and select post request --> Body --> Json --> give the value of Username and Password
.

After clicking on send button we will get the JWT token in response.

Now copy this token and add a new Get request in postman and add the JWT token Authorization Tab --> Select Bearer --> Insert token and click on send button to test the authorization with given token. If the token is not valid token then we will get 401 Error otherwise will get the bolow result.

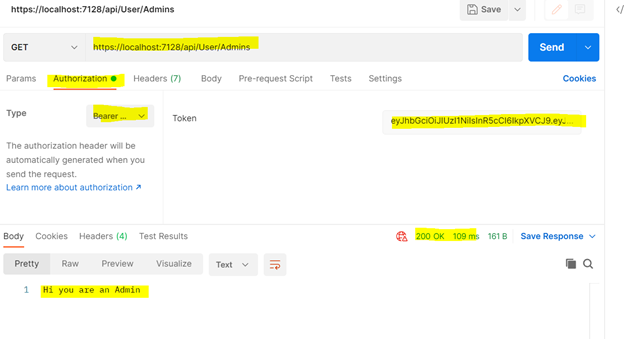
So we created the token and did the authentication on the behalf of username and password then check the user authorization.

HostForLIFE.eu ASP.NET Core Hosting

European best, cheap and reliable ASP.NET hosting with instant activation. HostForLIFE.eu is #1 Recommended Windows and ASP.NET hosting in European Continent. With 99.99% Uptime Guaranteed of Relibility, Stability and Performace. HostForLIFE.eu security team is constantly monitoring the entire network for unusual behaviour. We deliver hosting solution including Shared hosting, Cloud hosting, Reseller hosting, Dedicated Servers, and IT as Service for companies of all size.


European ASP.NET Core Hosting :: Telemtery Converter Was Not Found Error

clock August 29, 2022 09:11 by author Peter

If you are using serilog 4.0, the latest GitHub documentation mentioned the depreciation of telemetry configuration active and future removal support of instrumentation Key.

They adjusted their namespaces, which cause the serilog configuration binding not able to find the type.

    GitHub

you have to replace instrumentation Key with 'connection string' and add correct namespace for telemetry converter in your appsetting.json.

"Serilog": {
    "MinimumLevel": {
        "Default": "Information",
        "Override": {
            "Microsoft": "Warning",
            "System": "Warning"
        }
    },
    "WriteTo": {
        "0": {
            "Name": "ApplicationInsights",
            "Args": {
                "connectionString": "",
                "telemetryConverter": "Serilog.Sinks.ApplicationInsights.TelemetryConverters.TraceTelemetryConverter, Serilog.Sinks.ApplicationInsights"
            }
        },
        "1": {
            "Name": "Console"
        }
    },
    "Enrich": ["FromLogContext", "WithMachineName", "WithProcessId", "WithThreadId"],
    "Properties": {
        "ApplicationName": "<application_name>"
    },
    "AllowedHosts": "*"
},

You just need to paste connection string in Args section which you can find on application insights of azure monitor.

Program.cs

public static void Main(string[] args) {
    Activity.DefaultIdFormat = ActivityIdFormat.W3C;
    var env = Environment.GetEnvironmentVariable(Env);
    var config = new ConfigurationBuilder().AddJsonFile("appsettings.json", true).AddJsonFile($ "appsettings.{env}.json", true).Build();
    //Initialize Logger
    Log.Logger = new LoggerConfiguration().ReadFrom.Configuration(config).CreateLogger();
    try {
        Log.Information("application starting up...");
        CreateHostBuilder(args).Build().Run();
        Log.Information("application has started... running host");
    } catch (Exception ex) {
        Log.Fatal(ex, " application failed to start...");
    } finally {
        Log.CloseAndFlush();
    }
}
public static IHostBuilder CreateHostBuilder(string[] args) => Host.CreateDefaultBuilder(args).UseSerilog().ConfigureWebHostDefaults(webBuilder => {
    webBuilder.UseStartup < Startup > ();
});

Initialize Logger before calling CreateHostBuilder.

HostForLIFE.eu ASP.NET Core Hosting

European best, cheap and reliable ASP.NET hosting with instant activation. HostForLIFE.eu is #1 Recommended Windows and ASP.NET hosting in European Continent. With 99.99% Uptime Guaranteed of Relibility, Stability and Performace. HostForLIFE.eu security team is constantly monitoring the entire network for unusual behaviour. We deliver hosting solution including Shared hosting, Cloud hosting, Reseller hosting, Dedicated Servers, and IT as Service for companies of all size.


European ASP.NET Core Hosting :: Upload/Download Bot Framework Composer Conversation/Chat

clock August 26, 2022 07:27 by author Peter

If you are working on Bot Framework Composer then challenging works you will find is about storing and retrieving conversation history.

Using Bot framework SDK, it is easy but complexity is there using composer.

While I was implementing, trust me I found very few articles and content to store/retrieve conversation.

Here I will mention all the points that can help you to preserve and download conversation history.

Pre-requisite

    Azure Portal access or Azurite

Step 1
Create a storage account in portal and create container

Step 2
Now, Follow some changes that are mentioned below,
<PackageReference Include="Microsoft.Bot.Builder.Azure.Blobs" Version="4.16.1" />

Add package to your project file,
public class Startup {
    private readonly BlobsTranscriptStore _blobTranscripts;
    public Startup(IConfiguration configuration) {
        Configuration = configuration;
        _blobTranscripts = new BlobsTranscriptStore(Configuration.GetValue < string > ("StorageConnectionString"), Configuration.GetValue < string > ("ContainerName"));
    }
    public void ConfigureServices(IServiceCollection services) {
        services.AddSingleton < ITranscriptStore > (_blobTranscripts);
        // Create the TranscriptLoggerMiddleware to log all activities to the TranscriptStore
        services.AddSingleton < IMiddleware, TranscriptLoggerMiddleware > (serviceProvider => {
            return new TranscriptLoggerMiddleware(_blobTranscripts);
        });
    }


Please note that add namespaces for above classes, I will leave up to you.

Now using above code, all your bot conversation starts storing on blob container.

Step 3
Now comes, the download of conversation part. Remember bot store JSON file for each of your message. so there will be lots of JSON get stored. To retrieve all transcript files of your conversation, you need channeled and conversationid.
var blobsTranscriptStore = new BlobsTranscriptStore("StorageConnectionString", "ContainerName");
string continutionToken = null;
List <IActivity> activitiesList = new List <IActivity> ();
do {
    var activities = await blobsTranscriptStore.GetTranscriptActivitiesAsync(ChannelId, ConversationId, continutionToken).ConfigureAwait(false);
    continutionToken = activities.ContinuationToken;
    activitiesList.AddRange(activities.Items);
} while (continutionToken != null);


Now you will find all conversation in activitiesList.

Step 4
Now you will find actual message in specific files by filtering using activity type.
foreach(Activity item in activities.Where(x => x.Type == ActivityTypes.Message).Cast<Activity> ()) {
    if (!string.IsNullOrEmpty(item.Text)) {
        Console.WriteLine($ "{item.Timestamp}   {item.From.Id} : {item.Text}");
    }
}


Now I will leave up to you whether you prepare text file or .csv file to store your conversation.

Definitely, you need to implement some of your logic here to get all messages. But I don't think it is too difficult.

Step 5

Now you can store this conversation file to blob storage again and allow it to download or you can directly allow user to download from here, the choice is your as per your requirement.

Hope the above article is helpful to you and you can customize this logic as my intention here is to provide you with core logic for this.

Keep learning, Keep Implementing.

HostForLIFE.eu ASP.NET Core Hosting

European best, cheap and reliable ASP.NET hosting with instant activation. HostForLIFE.eu is #1 Recommended Windows and ASP.NET hosting in European Continent. With 99.99% Uptime Guaranteed of Relibility, Stability and Performace. HostForLIFE.eu security team is constantly monitoring the entire network for unusual behaviour. We deliver hosting solution including Shared hosting, Cloud hosting, Reseller hosting, Dedicated Servers, and IT as Service for companies of all size.


European ASP.NET Core Hosting :: Filtering In Datagridview In Vb.Net And Also In C#

clock August 3, 2022 10:04 by author Peter

In this article we will learn about how to filter data in datagridview. We can better understand this with an example.

Step 1
Create Windows Form with Textbox and DataGridView.

Step 2
In coding view, code as per the following code. Here, I give both code c# and vb.Net. You can choose as per your requirement(s).

Code as per Vb.Net
Imports System.Data.SqlClient

Public Class Form14
    Dim libconn As SqlConnection
    Dim daMain As SqlDataAdapter
    Dim dtMain As New DataSet
    Dim strQuery As String = ""
    Dim strConnectionString As String
    Dim otable As DataTable = New DataTable()

    Private Sub Form14_Load(sender As System.Object, e As System.EventArgs) Handles MyBase.Load
        load_data()
        DataGridView1.AllowUserToAddRows = False
        DataGridView1.AllowUserToDeleteRows = False
    End Sub

    Private Sub load_data()
        Connetion()
        daMain = New SqlDataAdapter("Select * From Employee", libconn)
        dtMain.Clear()
        daMain.Fill(dtMain)
        DataGridView1.DataSource = dtMain.Tables(0)
        libconn.Close()
        DataGridView1.ClearSelection()
        TextBox1.Text = ""
        otable = GetOriginalDataTable()
    End Sub

    Public Function Connetion()
        strConnectionString = "Data Source=UDAY-LAPTOP;Initial Catalog=sqldemo;Integrated Security=true"
        libconn = New SqlConnection
        libconn.ConnectionString = strConnectionString
        If libconn.State <> ConnectionState.Open Then
            Try
                libconn.Open()
            Catch conn_error As SqlException
                MsgBox(conn_error.Message)
                Connetion = False
            End Try
        End If
        Connetion = True
    End Function

    Private Function GetOriginalDataTable() As DataTable
        Dim dtable As DataTable = New DataTable()
        For Each col As DataGridViewColumn In DataGridView1.Columns
            dtable.Columns.Add(col.Name)
        Next
        For Each row As DataGridViewRow In DataGridView1.Rows

            Dim dRow As DataRow = dtable.NewRow()
            Dim flag As Integer = -1
            For Each cell As DataGridViewCell In row.Cells
                dRow(cell.ColumnIndex) = cell.Value
            Next
            dtable.Rows.Add(dRow)
        Next
        Return dtable
    End Function

    Private Function SearchGrid()
        Dim dtable As DataTable = New DataTable()
        If TextBox1.Text.Length > 0 And DataGridView1.RowCount = 0 Then
            DataGridView1.DataSource = otable
        End If
        If TextBox1.Text.Length = 0 Then
            DataGridView1.DataSource = Nothing
            DataGridView1.DataSource = otable
        Else
            For Each col As DataGridViewColumn In DataGridView1.Columns
                dtable.Columns.Add(col.Name)
            Next
            For Each row As DataGridViewRow In DataGridView1.Rows
                Dim dRow As DataRow = dtable.NewRow()
                Dim flag As Integer = -1
                For Each cell As DataGridViewCell In row.Cells
                    dRow(cell.ColumnIndex) = cell.Value
                    Dim str As String = cell.Value.ToString().ToLower()
                    Dim str1 As String = TextBox1.Text.ToLower()
                    If str.Contains(str1.ToString()) = True Then
                        flag = 1
                    End If
                Next
                If flag = 1 Then
                    dtable.Rows.Add(dRow)
                End If
            Next
            DataGridView1.DataSource = Nothing
            DataGridView1.DataSource = dtable
        End If
        SearchGrid = True
    End Function

    Private Function HighlightGrid()
        If TextBox1.Text.Length = 0 Then
            For n As Integer = 0 To (DataGridView1.Rows.Count) - 1
                For m As Integer = 0 To (DataGridView1.Rows(n).Cells.Count) - 1
                    DataGridView1.Rows(n).Cells(m).Style.BackColor = SystemColors.Control
                Next
            Next
        Else
            For n As Integer = 0 To (DataGridView1.Rows.Count) - 1
                For m As Integer = 0 To (DataGridView1.Rows(n).Cells.Count) - 1
                    Dim str As String = DataGridView1.Rows(n).Cells(m).Value.ToString().ToLower()
                    Dim str1 As String = TextBox1.Text.ToLower()
                    If str.Contains(str1.ToString()) = True Then
                        DataGridView1.Rows(n).Cells(m).Style.BackColor = Color.Yellow
                    Else
                        DataGridView1.Rows(n).Cells(m).Style.BackColor = SystemColors.Control
                    End If
                Next
            Next
        End If
        HighlightGrid = True
    End Function

    Private Sub TextBox1_KeyUp(sender As Object, e As System.Windows.Forms.KeyEventArgs) Handles TextBox1.KeyUp
        If e.KeyCode = Keys.Back Then
            DataGridView1.DataSource = otable
            SearchGrid()
            HighlightGrid()
            DataGridView1.ClearSelection()
        End If
    End Sub

    Private Sub TextBox1_TextChanged(sender As System.Object, e As System.EventArgs) Handles TextBox1.TextChanged
        SearchGrid()
        HighlightGrid()
        DataGridView1.ClearSelection()
    End Sub

End Class


ASP.NET (C#)
Code as per C#
using System.Data.SqlClient;

public class Form14
{
    private SqlConnection libconn;
    private SqlDataAdapter daMain;
    private DataSet dtMain = new DataSet();
    private string strQuery = "";
    private string strConnectionString;
    private DataTable otable = new DataTable();

    private void Form14_Load(System.Object sender, System.EventArgs e)
    {
        load_data();
        DataGridView1.AllowUserToAddRows = false;
        DataGridView1.AllowUserToDeleteRows = false;
    }

    private void load_data()
    {
        Connetion();
        daMain = new SqlDataAdapter("Select * From Employee", libconn);
        dtMain.Clear();
        daMain.Fill(dtMain);
        DataGridView1.DataSource = dtMain.Tables(0);
        libconn.Close();
        DataGridView1.ClearSelection();
        TextBox1.Text = "";
        otable = GetOriginalDataTable();
    }

    public void Connetion()
    {
        strConnectionString = "Data Source=UDAY-LAPTOP;Initial Catalog=sqldemo;Integrated Security=true";
        libconn = new SqlConnection();
        libconn.ConnectionString = strConnectionString;
        if (libconn.State != ConnectionState.Open)
        {
            try
            {
                libconn.Open();
            }
            catch (SqlException conn_error)
            {
                Interaction.MsgBox(conn_error.Message);
                Connetion = false;
            }
        }
        Connetion = true;
    }

    private DataTable GetOriginalDataTable()
    {
        DataTable dtable = new DataTable();
        foreach (DataGridViewColumn col in DataGridView1.Columns)
            dtable.Columns.Add(col.Name);
        foreach (DataGridViewRow row in DataGridView1.Rows)
        {
            DataRow dRow = dtable.NewRow();
            int flag = -1;
            foreach (DataGridViewCell cell in row.Cells)
                dRow(cell.ColumnIndex) = cell.Value;
            dtable.Rows.Add(dRow);
        }
        return dtable;
    }

    private void SearchGrid()
    {
        DataTable dtable = new DataTable();
        if (TextBox1.Text.Length > 0 & DataGridView1.RowCount == 0)
            DataGridView1.DataSource = otable;
        if (TextBox1.Text.Length == 0)
        {
            DataGridView1.DataSource = null;
            DataGridView1.DataSource = otable;
        }
        else
        {
            foreach (DataGridViewColumn col in DataGridView1.Columns)
                dtable.Columns.Add(col.Name);
            foreach (DataGridViewRow row in DataGridView1.Rows)
            {
                DataRow dRow = dtable.NewRow();
                int flag = -1;
                foreach (DataGridViewCell cell in row.Cells)
                {
                    dRow(cell.ColumnIndex) = cell.Value;
                    string str = cell.Value.ToString().ToLower();
                    string str1 = TextBox1.Text.ToLower();
                    if (str.Contains(str1.ToString()) == true)
                        flag = 1;
                }
                if (flag == 1)
                    dtable.Rows.Add(dRow);
            }
            DataGridView1.DataSource = null;
            DataGridView1.DataSource = dtable;
        }
        SearchGrid = true;
    }

    private void HighlightGrid()
    {
        if (TextBox1.Text.Length == 0)
        {
            for (int n = 0; n <= (DataGridView1.Rows.Count) - 1; n++)
            {
                for (int m = 0; m <= (DataGridView1.Rows(n).Cells.Count) - 1; m++)
                    DataGridView1.Rows(n).Cells(m).Style.BackColor = SystemColors.Control;
            }
        }
        else
            for (int n = 0; n <= (DataGridView1.Rows.Count) - 1; n++)
            {
                for (int m = 0; m <= (DataGridView1.Rows(n).Cells.Count) - 1; m++)
                {
                    string str = DataGridView1.Rows(n).Cells(m).Value.ToString().ToLower();
                    string str1 = TextBox1.Text.ToLower();
                    if (str.Contains(str1.ToString()) == true)
                        DataGridView1.Rows(n).Cells(m).Style.BackColor = Color.Yellow;
                    else
                        DataGridView1.Rows(n).Cells(m).Style.BackColor = SystemColors.Control;
                }
            }
        HighlightGrid = true;
    }

    private void TextBox1_KeyUp(object sender, System.Windows.Forms.KeyEventArgs e)
    {
        if (e.KeyCode == Keys.Back)
        {
            DataGridView1.DataSource = otable;
            SearchGrid();
            HighlightGrid();
            DataGridView1.ClearSelection();
        }
    }

    private void TextBox1_TextChanged(System.Object sender, System.EventArgs e)
    {
        SearchGrid();
        HighlightGrid();
        DataGridView1.ClearSelection();
    }
}


Output 1
When you run the application, by default all data will be loaded in datagridview as per the following:


Final Output
In Textbox, when I type IT, the following records will be filtered:

Final Output
In Textbox, when I type IT, the following records will be filtered:

HostForLIFE.eu ASP.NET Core Hosting

European best, cheap and reliable ASP.NET hosting with instant activation. HostForLIFE.eu is #1 Recommended Windows and ASP.NET hosting in European Continent. With 99.99% Uptime Guaranteed of Relibility, Stability and Performace. HostForLIFE.eu security team is constantly monitoring the entire network for unusual behaviour. We deliver hosting solution including Shared hosting, Cloud hosting, Reseller hosting, Dedicated Servers, and IT as Service for companies of all size.


European ASP.NET Core Hosting :: Creating Dynamic Checkbox Using C# In ASP.NET Web Forms

clock July 29, 2022 10:25 by author Peter

Creating dynamic elements means that user can generate checkbox on demand based on their input. In this short tutorial, we will learn how to create various functions to generate the checkbox.

We will mainly use 3 types of object: Checkbox list, text box, label, and button. All the related objects will be run at server.
First Scenario: User inputs number of checkbox that needs to be generated

In the ASP.NET web forms structure, we have two main parts: the front end part which house our HTML, CSS, and JS, and also the back end part which run our code in server. There are several web structures such as Single Page Application, MVP, etc. However, we first will use the traditional web forms (1 interface, 1 code behind) to keep our learning simple.

1. Accepting Input
To accept user input, we need a textbox object. Because the textbox will be load together with the page load, then we can directly write our object in the interface (.aspx) or using the drag and drop toolbox (to activate it you can use Ctrl+Alt+X)

Inside the asp:Content insert the textbox object. An object needs ID. We also tell our aspx that this textbox will be runat=”server”. Thus, we can gain control over it from our C# code. We also tell the aspx that our textbox has the AutoPostBack behavior which means that whenever the content is changed, the page will undergo a PostBack or “Reload”.

<p>Enter Number of Checkbox:<asp:TextBox ID="TextBox1" runat="server" AutoPostBack="true"></asp:TextBox><asp:Panel ID="PnlControl" runat="server">

ASP.NET (C#)

or

Searching the textbox object using toolbox (Ctrl+Alt+X)

The interface design after drag and drops

We also need to put a Panel Control as a place to render our generated CheckBoxList.

2. Processing Input: (1) Page_Load and PostBack
After we set up the textbox, now user can input the number. As long as there are any changes to the textbox, our code will request a postback. And nothing happens!

In order to do something after the user input the number, we need to create a function that generates our checkboxlist every time the page is loaded.
As a rule of thumbs, Dynamically generated object needs to be regenerated every postback.
protected void Page_Load(object sender, EventArgs e) {
    if (Page.IsPostBack) {
        RecreateControls(TextBox1.Text);
    }
}

A void can be translated as “a function”, hence the code above is a function that runs every time the page is load due to user action such as postback request.

Inside this pageload function, we are going to check whether the page is postback or not by using the isPostBack method. Page is our object here. The isPostBack method is a boolean method that will return true or false value. If it is true, then we create the execute the function that will recreate our dynamic object, in this case our checkboxlist.

The reason why we need to check whether the page is postback or not is because we only want to generate the dynamic object (checkboxlist) only after the user changes any value in the input textbox. Therefore, when the user loads the page for the first time, our user only can see the default object that we have in the aspx interface (our HTML).

3. Processing Input: (2) Recreate dynamic objects

In order to create or recreate our dynamically generate checkbox, we will utilize checkboxlist as our object. Because we want to generate it dynamically, we cannot do the drag and drop method. Therefore inside the function that we already call in the page load, we need to manually instruct how to generate the checkbox inside our checkboxlist.
RecreateControls(TextBox1.Text);

This function will be able to accept a string input from our textbox by calling the .Text method.

Overview: Recreate checkbox list Object
The first step we need to do is to create and define a new object using CheckBoxList class. We give our new CheckBoxList variable name as genCBL and an ID of genCBL. Both things do not need necessarily to be the same. The variable names are used internally in the backend code, while the ID is the global identifier of our chechboxlist in the ASPX.
CheckBoxList genCBL = new CheckBoxList {ID = "genCBL"};

Same as textbox, every object needs to have its own properties and related behavior. In this case, we set the AutoPostBack behavior to be true.
genCBL.AutoPostBack = true;

Because Checkbox List is a collection of individual checkboxes, thus to produce the checkbox dynamically, we need to DataSource property. DataSource can accept list-type data. So we need to create a function that can supply a sorted list of keys and values.

Flowchart of Generating the Data Source (list) for CheckBoxList

    Convert Numerical String to Int: Convert.ToInt32(int)
    Convert Int to String: .ToString()


We named the function above as addCB and return the value as SortedList<TKey: int, TValue: string>. Now, we instruct our CheckBoxList generator to take this value. The databind method forces our control to read the datasource (More about databinding).
genCBL.DataValueField = "Key";
genCBL.DataTextField = "Value";
genCBL.DataSource = addCB(inputNumCB);
//keep selected item
genCBL.DataBind();

After we attributed all the neccessary properties and behaviour, then we instruct the PanelControl to render it inside.
PnlControl.Controls.Add(genCBL);

4. Result: After the first PostBack

HTML output after running the code

HTML source from the rendered ASPX

Code Overview
protected void Page_Load(object sender, EventArgs e) {
    if (Page.IsPostBack) {
        RecreateControls(TextBox1.Text);
    }
}
private SortedList < int, string > addCB(string inputNumCB) {
    SortedList < int, string > addCB_data = new SortedList < int, string > ();
    for (int index = 0; index < Convert.ToInt32(inputNumCB); index++) addCB_data.Add(index, "CheckBox -" + index.ToString());
    return addCB_data;
}
private void RecreateControls(string inputNumCB) {
    CheckBoxList genCBL = new CheckBoxList {
        ID = "genCBL"
    };
    genCBL.AutoPostBack = true;
    genCBL.DataTextField = "Value";
    genCBL.DataValueField = "Key";
    genCBL.DataSource = addCB(inputNumCB);
    genCBL.DataBind();
    PnlControl.Controls.Add(genCBL);
}


Second Scenario: Shows selected checkbox after user click

In this scenario, we want to know which checkbox is already clicked or selected by the user. Thus, we need a way to check whether each checkbox is selected, then we show the results. We will utilize label object to show the results. We also set the label to runat server, so we can manipulate it from code behind.
<p>Enter Number of Checkbox:
<asp:TextBox ID="TextBox1" runat="server" AutoPostBack="true"></asp:TextBox>
<asp:Label ID="Label1" runat="server" Text="Active: "></asp:Label>

We want that each time user does something with our previous CheckBoxList the results will auto-update. We can create new handler to implement this scheme by calling the .SelectedIndexChange method. Inside the Recreate CheckBoxList function instruct our object to recognize new handler, in this case, I name it genCBL_SelectedIndexChange.
genCBL.SelectedIndexChanged += new EventHandler(genCBL_SelectedIndexChanged);

After adding the new handler, we need to declare our handling function or what it needs to do when the CBL change.


Create function to update the Label based on CBL changed (user click)

Flowchart of the SelectedIndexChanged handler


Already selected checkbox will be showed on the label’s text
Third Scenario: Adding default selected/checked checkbox

The last scenario will be involved cases like default preferences from previous data or when you want to make it stays selected despite its changes. Therefore, we need input or a previous state that can tell our function to auto-select the checkbox. To facilitate this, we can extract value from the database or provide another textbox as an input method.
<asp:TextBox ID="TextBox2" runat="server" AutoPostBack="true" Font-Italic="True"></asp:TextBox>

Adding new input for taking default selected textbox
After that, we can insert new instructions in our previous updateCBL function. We want to check whether each checkbox is a member of the supplied default value. If true, then we make the checkbox status to be selected and add the textfield to our label.


If the index is the same as any default value, then make it selected. The problem now is how to check whether the current index checkbox is contained within any default value. Thus, we need a function that returns a boolean value.


A function that takes our index as a parameter and checks whether it “exists” within the default value
This function mainly utilizes two major tools: Parser and Array. First, we extract the string text from our textbox. Then, we split the string by the comma separator. Therefore, we need to make sure that the user also understands what kind of format they should input. After splitting, we try to parse the string number into an int and if it succeeds, we put it in the list. We change the list into an array type so that we can easily use the .Exist method to compare the int from parameter and the int on the default array. We then return it as true or false.

Flowchart for the default checkbox function
After that don’t forget to make this function runs when the textbox change. We can create a new handler to find our CheckBoxList by its ID then do update on it.
<asp:TextBox ID="TextBox2" runat="server" AutoPostBack="true" Font-Italic="True" OnTextChanged="TextBox2_TextChanged"></asp:TextBox>

Updating whenever the checkbox is clicked, or the text box value changes


Final Rendered Result on browser


In this tutorial, we successfully create a dynamic checkbox using three different scenarios. We utilize several C# tools such as array, parser, covert, etc. We also learn how to generate objects and what kind of properties or behavior we can attribute to them. In the future, this simple tutorial can become a starting point for coding web app using C# and also a nice and simple gateway to understanding relating structure and functionality around the C# web forms. Thank you and enjoy learning!

HostForLIFE.eu ASP.NET Core Hosting

European best, cheap and reliable ASP.NET hosting with instant activation. HostForLIFE.eu is #1 Recommended Windows and ASP.NET hosting in European Continent. With 99.99% Uptime Guaranteed of Relibility, Stability and Performace. HostForLIFE.eu security team is constantly monitoring the entire network for unusual behaviour. We deliver hosting solution including Shared hosting, Cloud hosting, Reseller hosting, Dedicated Servers, and IT as Service for companies of all size.


About HostForLIFE

HostForLIFE is European Windows Hosting Provider which focuses on Windows Platform only. We deliver on-demand hosting solutions including Shared hosting, Reseller Hosting, Cloud Hosting, Dedicated Servers, and IT as a Service for companies of all sizes.

We have offered the latest Windows 2019 Hosting, ASP.NET 5 Hosting, ASP.NET MVC 6 Hosting and SQL 2019 Hosting.


Month List

Tag cloud

Sign in