European ASP.NET 4.5 Hosting BLOG

BLOG about ASP.NET 4, ASP.NET 4.5 Hosting and Its Technology - Dedicated to European Windows Hosting Customer

European ASP.NET Core Hosting :: IActionResult Vs ActionResult

clock October 25, 2021 10:04 by author Peter

IActionResult is an interface and ActionResult is an implementation of that interface.

ActionResults is an abstract class and action results like ViewResult, PartialViewResult, JsonResult, etc., derive from ActionResult.

Let's say you want to create an action result not catered to by MVC, say an XML result.

IActionResult is an interface, we can create a custom response as a return, when you use ActionResult you can return only predefined ones for returning a View or a resource. With IActionResult we can return a response, or error as well. On the other hand, ActionResult is an abstract class, and you would need to make a custom class that inherits.

For example see below,
    publicNoContentResultNoContentActionResult() {  
        returnNoContent();  
    }  
    publicIActionResult NoContentActionResult() {  
        returnNoContent();  
    }  
    OR  
    publicIActionResult JsonActionResult() {  
        returnNotFound();  
    }  
    publicJsonResult JsonActionResult() {  
        returnNotFound(); // This line will give Error  
    }  


From the above examples we can return NoContent() OR NotFound() from IActionResult. But if you want to use such type of return values with ActionResults, you need to use particular ActionResults, NoContentResult And JsonResult.

HostForLIFE.eu ASP.NET Core Hosting

European best, cheap and reliable ASP.NET hosting with instant activation. HostForLIFE.eu is #1 Recommended Windows and ASP.NET hosting in European Continent. With 99.99% Uptime Guaranteed of Relibility, Stability and Performace. HostForLIFE.eu security team is constantly monitoring the entire network for unusual behaviour. We deliver hosting solution including Shared hosting, Cloud hosting, Reseller hosting, Dedicated Servers, and IT as Service for companies of all size.


European ASP.NET Core Hosting :: Error Message 401.2. - Unauthorized - Logon Failed Due To Server Config

clock October 21, 2021 08:14 by author Peter

Sometimes, we get this error message after publishing the solution in IIS. This error is quite common.

Exact Error
Error message 401.2.: Unauthorized: Logon failed due to server configuration. Verify that you have permission to view this directory or page based on the credentials you supplied and the authentication methods enabled on the Web server. Contact the Web server’s administrator for additional assistance

This particular error happens mostly because of the authentication setting in IIS.

Solution
Open the IIS.

Select the site you are facing the issue.

Select Authentication Setting as shown,

Error Message 401.2.: Unauthorized: Logon failed due to server config


Based on your application requirement, you can update authentication options.

In my case, the application needs to set windows authentication, therefore, I set it to enabled and Anonymous Authentication Disabled.

HostForLIFE.eu ASP.NET Core Hosting

European best, cheap and reliable ASP.NET hosting with instant activation. HostForLIFE.eu is #1 Recommended Windows and ASP.NET hosting in European Continent. With 99.99% Uptime Guaranteed of Relibility, Stability and Performace. HostForLIFE.eu security team is constantly monitoring the entire network for unusual behaviour. We deliver hosting solution including Shared hosting, Cloud hosting, Reseller hosting, Dedicated Servers, and IT as Service for companies of all size.


European ASP.NET Core Hosting :: Disposable Types - Properly Disposing Objects

clock October 18, 2021 07:12 by author Peter

Microsoft .NET has been around for 20 years and one thing that is very critical for every to know is exactly how memory management works in the runtime. If you don’t, you will cause performance issues but more serious is causing virtual memory leaks. The way that .NET was designed back in the late ’90s is that it does not have memory leaks in the true sense, but it can create virtual memory leaks.

In a nutshell, if your app has a virtual memory leak, the memory is not destroyed correctly properly, and the leak just keeps building up until the app or service crashes. I have even seen it bring down servers on the backend (I have written about this many times before, so I won’t re-tell them here) and in client apps.
This article covers the way to dispose of objects properly for most cases. There are edge cases where Dispose should not be called due to the lifetime of the object. That will be covered in a separate article.

The reason I decided to write a comprehensive set of articles about reference types that implement IDisposable and where you might need to in your types is because of a recent solution I worked on. Unfortunately, this solution has the most issues of any of the millions of lines of code I have analyzed in the past 20 years. I had hoped that after all this time, developers would know how to do this correctly, but sadly it is obvious to me far too many do not, so I hope these articles will help this critical issue.

This solution has a little over a million lines of code. First, I found over 600 places in the code where Dispose() is not being called on Disposable types. Also, I found over 90 types that either did not implement IDisposable correctly or did not implement it when it needed to. For the classes that did implement IDisposable, not even one did it correctly. These changes will cause over 2,000 touchpoints in the code that will need to be changed, code reviewed, tested, and deployed.

The reason I’m sharing these real-world numbers is that if developers do not deal with these types when the code is first written, it will be very, very expensive and time-consuming to fix later down the road (if they even get fixed). Far too many teams do not understand why they must restart servers or services on a regular basis… this is the reason! Please use these articles as a warning for your team and management!

New Code Rules
I feel so strongly about this I made it the topic of a recent New Code Rules segment on my show Rockin’ the Code World with dotNetDave on C# Corner Live. I rant in this video but also give ideas for Microsoft to once and for all solve this issue so developers do not need to worry about it and so apps and services stop failing.

Two Types of Memory Management in .NET
Microsoft .NET handles memory in two very different ways that every developer needs to fully understand. The first is the memory stack where all value types are created. The second is the memory heap where all reference types are created and managed by the garbage collector, and this will be the focus of this article. How do you know if a type is a value or reference type? It’s fairly easy… all types such as DateTime, integer, Boolean, or any of the framework types that are number-based, plus user-defined types (structures), are value types and live on the memory stack. Everything else, including the classes you create, are reference types and live on the memory heap. Essentially if you create a type by using ‘new’, it’s a reference type, including the string type. Reference types are what needs attention, especially if they implement IDisposable or contain any disposable fields.
The Memory Heap

People have been writing about how the memory heap works in .NET since it was released, so I won’t rehash that here since that would be an article (or an eBook) in itself. If you are new to .NET or don’t fully understand how the memory heap and the Garbage Collector works, go here for more detailed information from Microsoft.

I will quickly mention that the reason .NET is very performant is that when objects are created on the heap, they are always created at the top of the heap. When an object is no longer is used, it is marked to be removed from memory by the Garbage Collector (GC). They do not go away at the end of the code block! Then the heap is compacted by the GC. When are they are removed from memory?

Whenever the Garbage Collector wants to!

Well, it’s a lot more complicated than that, but just remember, developers have no real direct control over the GC. All we can do is allocate cautiously, release objects as soon as possible, and most importantly call Dispose on any disposable objects or implement IDisposable for the types we create that contain a field that is a disposable type. In the early days of .NET, I spent a lot of time watching and learning how the GC works, so I understand it well. Also, twice I had one of the engineers who created the GC speak at the user group I ran for 20 years. Listening to him and speaking with him taught me even more about how memory works in .NET and the pitfalls of the GC.
Disposing Disposable Types

First, let us get into what I teach my beginner students when I taught at a university.

It is critically important to call Dispose() on any type that implements IDisposable!

If a type implements IDisposable it means that it has something it needs to clean up like file handles, memory pointers, other disposable types, and more. So, developers MUST call Dispose as soon as the object is done being used. How do you know if a type implements IDisposable? There are two simple ways.

The first is, just type “.Dispose” at the end of the variable for the type, if it comes up in Intellisense, then you need to call it. The other method is to right mouse click on the type and selects ‘Go to Definition’ and see if IDisposable is in the definition of the class. This is exactly what I tell my beginner students. After you deal with disposable types for a while, you will start to remember which ones are. Here are some helpful tips that I use when I first analyze a codebase.

    If the type name ends in “Stream”, it’s disposable.
    If the type name ends in “Writer” or “Reader”, it’s most likely disposable.
    Any types that deal with graphics are most likely disposable such as the Bitmap type.
    If the type deals with connections, such as databases, sockets, HTTP, it’s disposable. This also includes related types such as DataTable and MailMessage and more.

How we dispose of disposable objects has changed since .NET was created. The safest, recommended way is by using the using pattern and statement.

Here is how to properly use the using statement pattern (the code below is from my OSS called Spargine).
public static TResult Deserialize<TResult>(string xml) where TResult: class
{
    using(var sr = new StringReader(xml))
    {
        var xs = new XmlSerializer(typeof(TResult));
        return (TResult) xs.Deserialize(sr);
    }
}


First, the Disposable object is created in the using statement. When the end of that code block is reached, then Dispose of will be called by the runtime. What happens is that the compiler creates a try/finally block and calls Dispose of in the final as shown in the IL code below.

You can also use the simple using statement as shown below,

using var sr = new StringReader(xml);
var xs = new XmlSerializer(typeof(TResult));
return (TResult) xs.Deserialize(sr);

Both using statements do the same thing, but I tend to prefer the original using statement since for me as a code reviewer, it’s easier for me to spot where it’s being used or isn’t being used.
Hidden Disposable Issues

Other “hidden” disposable issues also need to be considered. Some developers who like to put as much code on one line could run into issues. Here is an example.

public static TResult Deserialize<TResult>(string xml) where TResult: class
{
    var xs = new XmlSerializer(typeof(TResult));
    return (TResult) xs.Deserialize(new StringReader(xml));
}

The issue with this is the final line where a new StringReader is created. StringReader is a disposable type and as you can see, there isn’t a call to Dispose in the code or any use of a using statement. Therefore, code like this will cause memory leaks! I can prove that Dispose is not being called by looking at the IL for this method.


As you can see, there isn’t a call to Dispose in the IL. So, it’s very important to not code Disposable types like this but instead using one of the using statements. I wished that Visual Studio and the compilers would not allow disposable types to be created in this manner.

The takeaway from this article is that it is critically important to make sure all your code is properly disposing of disposable types. Not only could this improve the performance of your apps, but more importantly your apps will be free of virtual memory leaks.

I challenge everyone reading this article to do a critical scan of your codebase NOW to ensure that all your disposable types are being disposed of. I would love to hear how many of these issues you found. Just comment below.

Part 2 of this article will tackle how to properly implement the IDisposable interface for types that you create that have field variables that hold disposable types. Part 3 of this article will discuss how to use tools to help you find these issues in your code.


European ASP.NET Core Hosting :: News Feed System Design

clock October 13, 2021 08:43 by author Peter

News Feed is the constantly updating list of stories in the middle of your home page. It includes status updates, photos, videos, links, app activity, and likes from people, pages, and groups that you follow.

There are two main components in the news feed,

  • Publishing the posts
  • Retrieving the posts

Let’s first concentrate on publishing the post.

Publishing a Post

It is pretty straightforward. You log in to the website/app. Under the post, you write the text that you want to post and hit the submit button. As soon as you click on the submit button, the request sends to the server where it first gets authenticated. The server checks whether the user who has to send the request is a valid user or not. The load balancer is used to distribute the traffic to web servers. The web server sends the request data to the post publisher where it gets saved into the database as well as in the post cache for fast retrieval.

Once the post has been saved into the database successfully. Now it’s time to fan out the post.
Fanout

The process of pushing a post to all the followers is called fanout.

There are two ways we can Fanout a post,
    Fanout Read
    Fanout Write

Fanout Read
When you request for news feed, you create a read request to the system. With fanout read, the read request is fanned out to all your followers to read their posts. The feed is created during the read time. Usually, it pulls recent posts of a user.

Pros
    No need to pre-compute the posts for in-active users.
    The cost of the write operations is low.

Cons
    The time taken to load the feed is more as compare to the Fanout Write.
    It can take a lot of time if a user has many followers.
    You cannot update the user feed on a real-time basis. The user has to request the feeds in case he/she wants to see the latest posts.

Fanout Write
In this case, as soon as the post is published, it gets fanned out to all the friends immediately. Most of the work is done at the time of writing to figure out who will get this post. This significantly reduces the read operations on the system. This approach is not recommended if a user has a large number of followers.

Pros
    The cost of the read operation is low.
    Feed is generated in real-time and pushed to all the friends.
    Displaying the feed is faster as compare to the fanout read because it’s pre-computed.

Cons
    It can take significant time if a user has too many friends.

Hybrid
In this approach, we will take the benefits from both the above approaches (Fanout Read and Write). Allowing the users with a less number of followers to use the Fanout Write model whereas the users with a higher number of followers, a Fanout Read model will be used.
Retrieval

When a user sends a request to retrieve a news feed, it lands on the load balancer which distributes the request to different web servers. The news feed service gets the request from the web servers to fetch the news feed from the cache. The news feed cache returned the post ids for the specific user. User cache returns the user-related info and post cache returns the post-related info. Once everything is computed, we send back the response to the web servers that further deliver the content to the user.


Improvement
Scale the System
As the number of users and posts increases, the current system might now be able to handle the load. So we need to scale the system horizontally. There are different ways we can scale the system. We can use Master-Slave System to separate the read and write operations on the system. We can also use Sharding on the data. We can shard the system based on the feed data and posts. The other improvement we can do is to limit the number of requests that we are getting by implementing the Rate Limiting Module at the webserver level.

HostForLIFE.eu ASP.NET Core Hosting

European best, cheap and reliable ASP.NET hosting with instant activation. HostForLIFE.eu is #1 Recommended Windows and ASP.NET hosting in European Continent. With 99.99% Uptime Guaranteed of Relibility, Stability and Performace. HostForLIFE.eu security team is constantly monitoring the entire network for unusual behaviour. We deliver hosting solution including Shared hosting, Cloud hosting, Reseller hosting, Dedicated Servers, and IT as Service for companies of all size.


European ASP.NET Core Hosting :: HandleError Action Filter In ASP.NET MVC

clock October 6, 2021 07:33 by author Peter

In this article, you will learn how to handleIn all the software Applications, Exception Handling plays a critical role. An exception can also be thrown during runtime, because of some mathematical calculations, some invalid data, or maybe because of network failure etc. ASP.NET MVC has HandleError Attribute (Action Filter), which provides one of the simplest ways to handle errors. HandleError Attribute has a couple of properties which are useful in handling an exception and help in modifying the default behavior of HandleError Attribute.

ExceptionType: Exception Type specifies the type of an exception. If not specified, then HandleError filter handles all the Exception.

View: Specifies the name of view to display when an exception occurs.

Master: Master specifies the name of the master view.

Order: If more than one HandleError attribute is used, then the order specifies the order of the filters applied. We can set an integer from -1 (Highest Priority) to any positive integer. If no order is specified, then the Order value is -1.

In order to use HandleError Attribute, first, we have to enable Custom Error in web.config file.

Let’s Start,
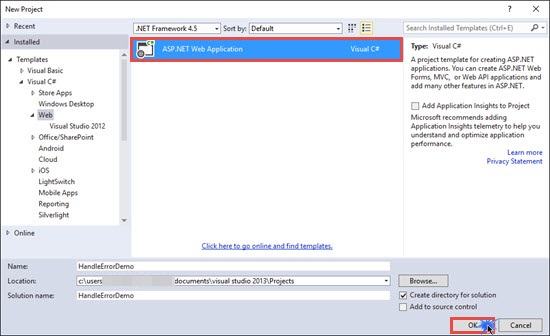
Create a new ASP.NET MVC Project. errors using HandleError Action Filter in ASP.Net MVC.

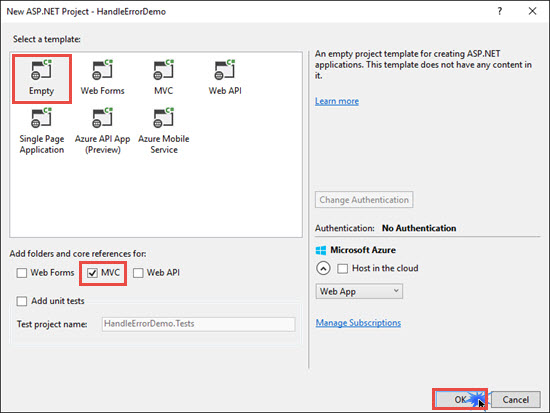
Select Empty MVC Template and click OK.

    public class HomeController : Controller  
    {  
            // GET: Home  
            public ActionResult Index()  
            {  
                return View();  
            }  
    }  


Right click on View and click on Add View.
    @{  
        ViewBag.Title = "Index";  
    }  
      
    <h2>Home</h2>  
    @Html.ActionLink("About Us","About","Home")  
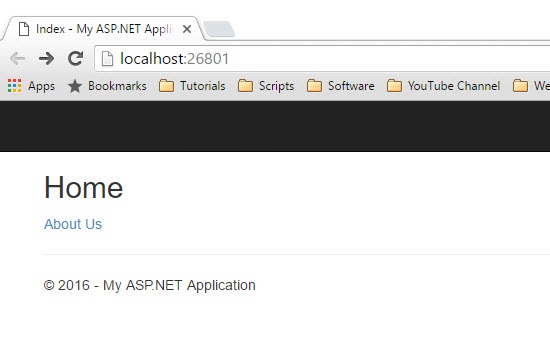
I have also added About Action method in HomeController. For demonstration purposes, I will throw an exception on calling About Action Method.
    public ActionResult About()  
    {  
                //Throws an exception for demonstration  
                throw new Exception("Some unknown error encountered!");  
                return View();  
     }  


On clicking About us link, you will see the exception is thrown and Yellow Screen of death appears.
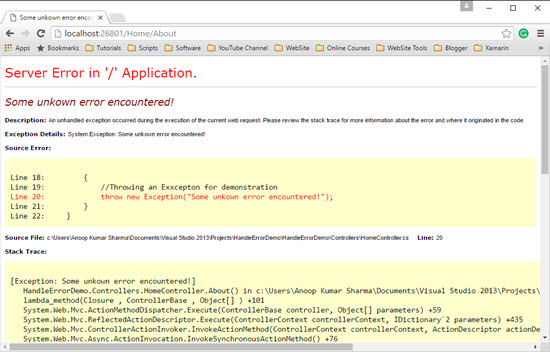

Hackers can easily take advantage of the yellow screen of death, because it shows some valuable/secret code. In order to prevent the Yellow screen of death, we have to add Custom Error in web.config file.
    <system.web>  
        <customErrors mode="On"></customErrors>  
    </system.web>  


Add HandleError Attribute on About Action method of HomeController.
    [HandleError]  
    public ActionResult About()  
    {  
                //Throws an exception for demonstration  
                throw new Exception("Some unknown error encountered!");  
                return View();  
    }  


Add shared folder in Views and then add an Error View (error.cshtml), which will be shown when an exception is thrown.

    @{  
        Layout = "~/Views/Shared/_Layout.cshtml";  
    }  
      
    <h3>An error occurred while processing your request. Please contact the administrator.</h3>  

Preview


We can also declare HandleError attribute on the Controller level as well as on Action method. Declare HandleError attribute on an Action method.
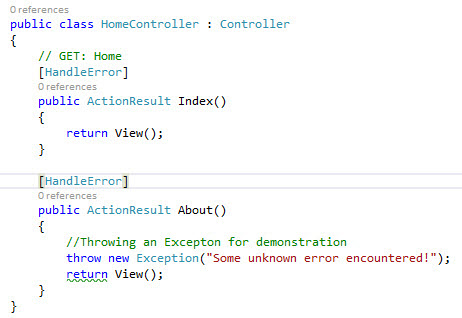

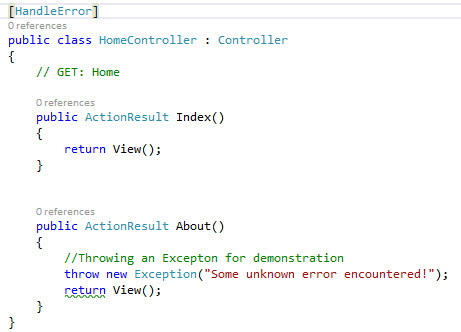
Declare HandleError attribute on the Controller level.

Using View property of HandleError attribute, we can show the specified view on getting unhandled exceptions.
    [HandleError(View = "Error")]  

Adding more than One HandleError attribute

We can control the view to be displayed based upon ExceptionType.
    //If Format Exception thrown then SpecificError View is displayed  
    //If Divide by Zero Exception thrown then Error View is displayed  
    [HandleError(View = "SpecificError", ExceptionType = typeof(FormatException))]  
    [HandleError(Order = 2, View = "Error", ExceptionType = typeof(DivideByZeroException))]  
    public ActionResult About()  
    {  
           //Throws an Exception for demonstration  
           throw new FormatException();  
           return View();  
    }  


In the example shown above, if FormatException Occurs, then it will Show SpecificError.cshtml error view or if DivideByZeroException Exception occurs, then it will show Error.cshtml View.
 
Show Error Details
We can also show error detail on getting an exception. HandleErrorInfo class provides information for handling an error that is thrown by the Action method. HandleErrorInfo has several properties like ActionName, ControllerName, and Exception, which help in getting additional information about the exception.
    [HandleError(View = "DetailedError")]  
    public ActionResult About()  
    {  
           //Throwing an Exception for demonstration  
           throw new DivideByZeroException();  
           return View();  
    }  


In the code, shown above, we set DetailedError View for showing the exception.
    @model System.Web.Mvc.HandleErrorInfo  
      
    @{  
        Layout = "~/Views/Shared/_Layout.cshtml";  
    }  
      

    <h4>Error Details:</h4>  
    <p>Controller Name: @Model.ControllerName</p>  
    <p>Action Name: @Model.ActionName</p>  
    <p>Exception: @Model.Exception</p>  


Preview
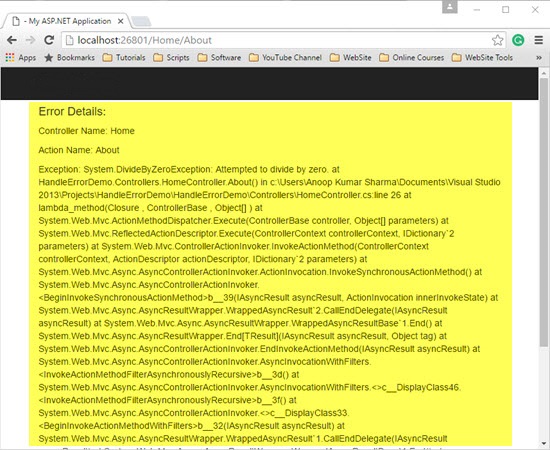

Setting HandleError Attribute as a Global Filter
We can register HandleError attribute as a global error handling filter. Open Global.asax file and add the code, given below:
    protected void Application_Start()  
    {  
           AreaRegistration.RegisterAllAreas();  
           GlobalFilters.Filters.Add(new HandleErrorAttribute());  
           RouteConfig.RegisterRoutes(RouteTable.Routes);  
    }  

Now, remove all the HandleError attributes from HomeController, build and run the Application.
 
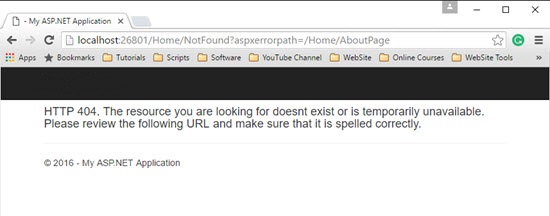
Handle Errors related to Http Status Code
If we visit the path that doesn’t exist it will throw an HTTP 404 exception.
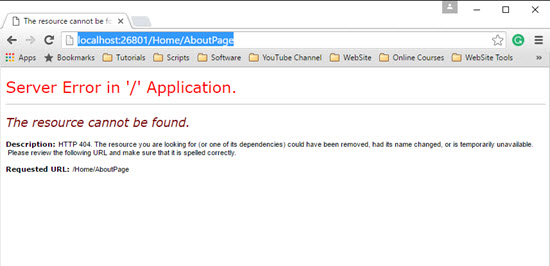
In order to handle it, first, we have to add an Action Method (NotFound in my case), which will return the NotFound.cshtml view.
    public ActionResult NotFound()  
    {  
           return View();  
    }  

NotFound.cshtml Code
    @{  
        Layout = "~/Views/Shared/_Layout.cshtml";  
    }  
      
    <h4>HTTP 404. The resource you are looking for doesn’t exist or is temporarily unavailable. Please review the following URL and make sure that it is spelled correctly.</h4>  

Now, open web.config file and add the following line of code:
    <customErrors mode="On">  
          <error statusCode="404" redirect="~/Home/NotFound"/>  
    </customErrors>  


Preview

HostForLIFE.eu ASP.NET Core Hosting

European best, cheap and reliable ASP.NET hosting with instant activation. HostForLIFE.eu is #1 Recommended Windows and ASP.NET hosting in European Continent. With 99.99% Uptime Guaranteed of Relibility, Stability and Performace. HostForLIFE.eu security team is constantly monitoring the entire network for unusual behaviour. We deliver hosting solution including Shared hosting, Cloud hosting, Reseller hosting, Dedicated Servers, and IT as Service for companies of all size.


European ASP.NET Core Hosting :: Save Request And Response Headers In ASP.NET 5 Core

clock October 4, 2021 07:36 by author Peter

In a typical request-response cycle, the request and response headers contain a lot of additional information. This article talks about how to retrieve them and store them in a database. In this article, we’ll use PostgreSQL as the database and connect to it using dotConnect for PostgreSQL.

To be able to work with the code examples demonstrated in this article, you should have the following installed in your system:
    Visual Studio 2019 Community Edition
    PostgreSQL
    dotConnect for PostgreSQL

Create a new ASP.NET Core 5.0 Project in Visual Studio 2019

Assuming that the necessary software has been installed on your computer, follow the steps outlined below to create a new ASP.NET Core Web API project.

  • First off, open the Visual Studio 2019 IDE
  • Next, click "Create a new project" once the IDE has loaded
  • In the "Create a new project" screen, select “ASP.NET Core Web API” as the project template.
  • Click the "Next" button
  • Specify the project name and location - where it should be stored in your system
  • Optionally, click the "Place solution and project in the same directory" checkbox.
  • Next, click the "Create" button
  • In the "Create a new ASP.NET Core Web Application" dialog window that is shown next, select "API" as the project template.
  • In the “Additional Information” screen, .NET 5.0 is the framework version.
  • You should disable the "Configure for HTTPS" and "Enable Docker Support" options by disabling the respective checkboxes.
  • Since we'll not be using authentication in this example, specify authentication as "No Authentication".
  • Finally, click on the "Create" button to finish the process.

This will create a new ASP.NET Core Web API project in Visual Studio.

Install NuGet Package(s)
To work with dotConnect for PostgreSQL in ASP.NET Core 5, you should install the following package into your project:
Devart.Data.PostgreSQL

You have two options for installing this package: either via the NuGet Package Manager or through the Package Manager Console Window by running the following command.
PM> Install-Package Devart.Data.PostgreSQL

Request and Response Headers in ASP.NET Core
Request headers provide more information about the requested resource or the client who is requesting it. You can take advantage of request headers to add extra information to the HTTP Request.

The response headers contain additional information about the response, such as its location and the server. It is an HTTP header that can only be used in an HTTP response and doesn't have to do anything with the content of the message. To provide more context to the response, you can use response headers like Age, Server, and Location.

Both Request headers and Response headers are represented as a collection of key-value pairs that can be passed back and forward between the client and the server.

Reading Request and Response Headers in ASP.NET Core
You can read request and response headers using the Request and Response properties of the HttpContext class. These properties are of HttpRequest and HttpResponse types respectively.

You can use the following code to retrieve the request headers in ASP.NET:
List < string > AllRequestHeaders = new List < string > ();
var requestHeaders = httpContext.Request.Headers.Where(x => AllRequestHeaders.All(h => h != x.Key)).Select(x => x.Key);


The following code snippet can be used to retrieve all response headers:
List < string > AllResponseHeaders = new List < string > ();
var uniqueResponseHeaders = httpContext.Response.Headers.Where(x => AllResponseHeaders.All(h => h != x.Key)).Select(x => x.Key);


Building a Middleware to Read Request and Response Headers

A middleware is a software component that processes requests and responds. ASP.Net Core typically has a series of middleware components - these middleware components either process requests or pass them to the next component in the request processing pipeline.

Create a new class in your project's root and name it as RequestResponseHeaderMiddleware. Next, replace the default code with the following:
public class RequestResponseHeadersMiddleware {
    private readonly RequestDelegate _next;
    public RequestResponseHeadersMiddleware(RequestDelegate next) {
        _next = next;
    }
    public async Task Invoke(HttpContext httpContext) {
        await _next.Invoke(httpContext);
    }
}

This is a minimalistic implementation of middleware in ASP.NET Core. However, it doesn’t do anything other than passing the control to the next component in the pipeline.

We need to add the logic of reading requests and response headers. We’ve already written the code in the previous section. Here’s the updated version of our middleware:
public class RequestResponseHeadersMiddleware {
    private readonly RequestDelegate _next;
    public readonly List < string > AllRequestHeaders = new List < string > ();
    public readonly List < string > AllResponseHeaders = new List < string > ();
    public RequestResponseHeadersMiddleware(RequestDelegate next) {
        _next = next;
    }
    public async Task Invoke(HttpContext httpContext) {
        var requestHeaders = httpContext.Request.Headers.Where(x => AllRequestHeaders.All(h => h != x.Key)).Select(x => x.Key);
        AllRequestHeaders.AddRange(requestHeaders);
        await this._next.Invoke(httpContext);
        var uniqueResponseHeaders = httpContext.Response.Headers.Where(x => AllResponseHeaders.All(h => h != x.Key)).Select(x => x.Key);
        AllResponseHeaders.AddRange(uniqueResponseHeaders);
        await _next.Invoke(httpContext);
    }
}


Create an Extension Method for the Middleware
We’ll now create an extension method for our middleware to be able to conveniently configure the middleware in the Configure method of the Startup class.

To do this, create a new class named RequestResponseHeadersMiddlewareExtensions in a file called RequestResponseHeadersMiddlewareExtensions.cs with the following code in there:
public static class RequestResponseHeadersMiddlewareExtensions {
    public static IApplicationBuilder UseRequestResponseHeadersMiddleware(this IApplicationBuilder builder) {
        return builder.UseMiddleware < RequestResponseHeadersMiddleware > ();
    }
}


Configure the Middleware in the Startup Class
You can write the following code in the Configure method of the Startup class to enable the custom middleware we have built thus far.
app.UseRequestResponseHeadersMiddleware();

Create the Model
Now create the following class in a file of the same name having an extension .cs. We'll use it to store request and response header values.
public class RequestResponseHeader {
    public string RequestHeader {
        get;
        set;
    }
    public string ResponseHeader {
        get;
        set;
    }
}


Create the DbManager Class
The DbManager class wraps all calls made to the database using dotConnect for Postgresql. It has just one method named Save to persist the request and response header values in the Postgresql database.
public class DbManager {
    private readonly string connectionString = "Some connection string...";
    public int Save(RequestResponseHeader requestResponseHeader) {
        try {
            using(PgSqlConnection pgSqlConnection = new PgSqlConnection(connectionString)) {
                using(PgSqlCommand cmd = new PgSqlCommand()) {
                    cmd.CommandText = "INSERT INTO
                    public.requestresponseheaders " +
                    "(requestheader, responseheader) " + "VALUES (@requestheader, @responseheader)";
                    cmd.Connection = pgSqlConnection;
                    cmd.Parameters.AddWithValue("requestkey", requestResponseHeader.RequestHeader);
                    cmd.Parameters.AddWithValue("responsevalue", requestResponseHeader.ResponseHeader);
                    if (pgSqlConnection.State != System.Data.ConnectionState.Open) pgSqlConnection.Open();
                    return cmd.ExecuteNonQuery();
                }
            }
        } catch {
            throw;
        }
    }
}


Call the Save Method from the Middleware
We’ll now modify the middleware we’ve implemented to store the request and response headers in a PostgreSQL database using dotConnect for PostgreSQL.

You can use the following code snippet to call the Save method of the DbManager class from the middleware we implemented earlier.
for (int index = 0; index < AllRequestHeaders.Count; index++) {
    RequestResponseHeader requestResponseHeader = new
    RequestResponseHeader();
    requestResponseHeader.RequestHeader = AllRequestHeaders[index];
    requestResponseHeader.ResponseHeader = AllResponseHeaders[index];
    dbManager.Save(requestResponseHeader);
}

As you can see here, there are two string collections namely AllRequestHeaders and AllResponseHeaders that hold the request and response header values respectively. We saw how it is done earlier in the article.

In this code snippet, an instance of RequestResponseHeader is created, its properties initialized and then this instance is passed as a parameter to the Save method.

Here is the complete code of the middleware for your reference:
public class RequestResponseHeadersMiddleware {
    private readonly RequestDelegate _next;
    public readonly List < string > AllRequestHeaders = new List < string > ();
    public readonly List < string > AllResponseHeaders = new List < string > ();
    private readonly DbManager dbManager = new DbManager();
    public RequestResponseHeadersMiddleware(RequestDelegate next) {
        _next = next;
    }
    public async Task Invoke(HttpContext httpContext) {
        var requestHeaders = httpContext.Request.Headers.Where(x => AllRequestHeaders.All(h => h != x.Key)).Select(x => x.Key);
        AllRequestHeaders.AddRange(requestHeaders);
        await this._next.Invoke(httpContext);
        var uniqueResponseHeaders = httpContext.Response.Headers.Where(x => AllResponseHeaders.All(h => h != x.Key)).Select(x => x.Key);
        AllResponseHeaders.AddRange(uniqueResponseHeaders);
        await _next.Invoke(httpContext);
        for (int index = 0; index < AllRequestHeaders.Count; index++) {
            RequestResponseHeader requestResponseHeader = new
            RequestResponseHeader();
            requestResponseHeader.RequestHeader = AllRequestHeaders[index];
            requestResponseHeader.ResponseHeader = AllResponseHeaders[index];
            dbManager.Save(requestResponseHeader);
        }
    }
}


In ASP.NET Core, you can read request and response headers in your application easily. Request headers allow you to work with optional data that is stored as key-value pairs. Response headers include extra information about the response that allows for a more comprehensive context of the response to be sent to the client.

HostForLIFE.eu ASP.NET Core Hosting

European best, cheap and reliable ASP.NET hosting with instant activation. HostForLIFE.eu is #1 Recommended Windows and ASP.NET hosting in European Continent. With 99.99% Uptime Guaranteed of Relibility, Stability and Performace. HostForLIFE.eu security team is constantly monitoring the entire network for unusual behaviour. We deliver hosting solution including Shared hosting, Cloud hosting, Reseller hosting, Dedicated Servers, and IT as Service for companies of all size.


About HostForLIFE

HostForLIFE is European Windows Hosting Provider which focuses on Windows Platform only. We deliver on-demand hosting solutions including Shared hosting, Reseller Hosting, Cloud Hosting, Dedicated Servers, and IT as a Service for companies of all sizes.

We have offered the latest Windows 2019 Hosting, ASP.NET 5 Hosting, ASP.NET MVC 6 Hosting and SQL 2019 Hosting.


Month List

Tag cloud

Sign in