European ASP.NET 4.5 Hosting BLOG

BLOG about ASP.NET 4, ASP.NET 4.5 Hosting and Its Technology - Dedicated to European Windows Hosting Customer

European ASP.NET Core Hosting :: Introduction To Postman

clock April 26, 2022 09:43 by author Peter

In this step-by-step article series, we are going to learn about the Postman. This article covers the following topics:
    What is Postman?
    Features
    How to make a first GET API request?

What is Postman?
It is an API platform to build and use APIs. You can create better or faster APIs with the help of an API repository, tools, intelligence, workspace, and integrations. It is built on open-source technologies.
    API repository – Using the central platform you can easily store, catalog, and collaborate all your API-related stuff like test cases, specifications, documentation, etc.
    Tools – It provides various sets of API tools to accelerate the API lifecycle like design, testing, mocking, documentation, etc.
    Intelligence – It provides an advanced level of intelligence and insights about the API operations alerts, search, security warnings, reporting, etc.
    Workspace – It helps you to organize your API work and collaborate across the world. There are three different workspaces – personal, team and public.
    Integrations – It is a most important tool in the software development pipeline to go with API-first practices. You can integrate postman into the code repositories, CI/CD pipeline, you can build your integrations using the postman API, etc.

So, what are you waiting for go and download the Postman, start designing, testing, and documenting API - https://www.postman.com/downloads/
It comes in two types of versions desktop app and a web version.

Features
It provides a bunch of cool features some are as below:

Request
    Create, send and save REST, SOAP, or GraphQL requests.
    Save request to collections.
    Send a request through a proxy server, etc.

Response

    View status code, response time, headers, and size.
    View response body in raw and pretty view.
    Save response as an example, etc.

Variables
    Built-in support for variables.
    Create and set variables for collections, environments, and global.
    Dynamic variables for dummy data, etc.

Scripts and Postman sandbox

    Write scripts at the collection, folder, or request level.
    Write pre or post-request scripts for after or before the request.
    Use scripts to send the request, etc.

Collaboration
    Create unlimited personal or team workspaces.
    Create a private workspace(Enterprise only).
    You can set roles, and invite members, etc.

Collections
    They are executable API descriptions.
    You can organize and keep track of related requests.
    You can share collections to workspaces, etc.

How to make a first GET API request?
I hope you have installed any one of the postman versions on your system desktop, or web version, follow the below steps to make your first request in postman:

Step 1

Open the Postman app.(Using the desktop version)

Once you open the Postman, you will see the output as above screenshot. This is what the postman UI looks like and you can see the various options such as Sign-in, Create Account, Home, Workspace, Reports, Explore, Collections, API, Environments, etc. these options we are going learn in upcoming articles.

Step 2

Click on the plus icon button as shown below screenshot:

It will open the request pop-up in the same window like the below screenshot:


Step 3
Next, enter the URL for our first GET request as ‘https://api.github.com/users/jsgund’ and click on send button as below screenshot:

Step 4
Once you click on send button you will get the response as below screenshot:

In this example, we are accessing the GitHub to get users to request by id and at the end, you can see my GitHub login id as “jsgund”. In the response, you will get the details of the GitHub login id “jsgund”, properties such as name, id, imageUrl, followers URL, etc.

HostForLIFE.eu ASP.NET Core Hosting

European best, cheap and reliable ASP.NET hosting with instant activation. HostForLIFE.eu is #1 Recommended Windows and ASP.NET hosting in European Continent. With 99.99% Uptime Guaranteed of Relibility, Stability and Performace. HostForLIFE.eu security team is constantly monitoring the entire network for unusual behaviour. We deliver hosting solution including Shared hosting, Cloud hosting, Reseller hosting, Dedicated Servers, and IT as Service for companies of all size.


European ASP.NET Core Hosting :: How To Handle Nullable Reference In .NET 6?

clock April 20, 2022 09:08 by author Peter

As we know there are so many changes in .Net 6 and C# 10. In this article, we will explore one of the changes in C#10 on the writing properties and objects of a class. More details on new features or changes in .NET 6 can be found in the previous article Features of .NET 6.

In .NET 5 and lower versions, we can write properties and objects of class like below.
public class Person {
    public string Name;
    public string Sex;
    public string Address;
    public string Email;
}


However, it has been changed in C# 10. If we write like earlier, the compiler shows a warning like below.

So, to handle this there are different ways. In this article, we will learn those methods to handle the warnings.

Let’s create a console application in .NET6
Create Console Application in .NET 6

Step 1
Open Visual Studio 2022 and click Create a new project.

Step 2
Select Console App and click Next.

Step 3
Give the project name and location of the project.

Step 4
Select framework: .NET 6.0 (Long-term support).

This creates the console app which looks like below.

Default Program.cs file is listed below.

// See https://aka.ms/new-console-template for more information
Console.WriteLine("Hello, World!");


Now, let’s compile and run the program. when you run it, it will display the “Hello, World!” message. Now, we will move to the main point of this write-up.
Add a New Class

Right-click on project -> add class and give the name of the class as Person.

Person class contains the following properties. Write the below code.

public class Person {
    public string Name;
    public string Sex;
    public string Address;
    public string Email;
    public string Description {
        get;
        set;
    }
}

Then, you will get the warning as depicted below.

Let’s jump to different ways to handle the compiler warning.

Method 1
Changing the project file(project.csproj). You disable or remove the nullable in csproj file so that it will not show the warning message. Right-click on the project and Edit the project as shown below.

Then project file will be opened, and you can simply disable Nullable as illustrated below.

Inside the PropertyGroup change Nullable to disable as shown below or remove that line.
<Nullable>disable</Nullable>

Method 2: Giving default value

You can assign it in different ways:
    a default value
    reasonable default value as a string.Empty or
    “”

as illustrated in the below code.

public class Person {
    public string Name = "Default Value";
    public string Sex = "";
    public string Address = "";
    public string Email = string.Empty;
    public string Description {
        get;
        set;
    } = string.Empty;
}


Method 3
Another way to handle it is to make properties nullable reference type by simply using "?" as demonstrated below.
public class Person {
    public string ? Name;
    public string ? Sex;
    public string ? Address;
    public string ? Email;
    public string ? Description {
        get;
        set;
    }
}


Overall, in .NET 6 we should define the variable, properties, or field explicitly as either nullable or non-nullable with a reference type.

Summary

In this article, I have created a console application in .NET 6 and demonstrated issues with fields or properties if we code as in .NET 5 or lower. Additionally, the article has provided the different methods to handle such situations in .NET 6. Hence, these are the three ways to handle the nullable, non-nullable field and properties in .NET 6. I hope you have got an idea about it.

HostForLIFE.eu ASP.NET Core Hosting

European best, cheap and reliable ASP.NET hosting with instant activation. HostForLIFE.eu is #1 Recommended Windows and ASP.NET hosting in European Continent. With 99.99% Uptime Guaranteed of Relibility, Stability and Performace. HostForLIFE.eu security team is constantly monitoring the entire network for unusual behaviour. We deliver hosting solution including Shared hosting, Cloud hosting, Reseller hosting, Dedicated Servers, and IT as Service for companies of all size.


European ASP.NET Core Hosting ::How To Add KendoUI Grid In Angular With .NET Core API With Multilayer Architecture

clock April 19, 2022 08:42 by author Peter

In this part of the article, we learn how to create .Net Core API for the KendoUI Curd Operations. Also here we learn the multilayer architecture of .Net Core API.

Preconditions
    Basic knowledge of Angular CLI
    Basic knowledge of Dot Net core
    Basic knowledge of SQL server
    Bootstrap
    Node.js
    V.S. Code,Visual Studio

We cover the below things

    Create Dot Net Core API
    Create Angular application
    Angular Routing
    Kendo UI setup
    Bind KendoUI grid

Add this script to the database to create table.

Create Database KendoUIDb
CREATE TABLE [dbo].[Users](
    [UserId] [int] primary key IDENTITY(1,1) NOT NULL,
    [UserName] [nvarchar](56) NOT NULL,
    [FullName] [nvarchar](200) NULL,
    [EmailId] [nvarchar](200) NULL,
    [Contactno] [nvarchar](10) NULL,
    [Password] [nvarchar](200) NULL,
    [Createdby] [int] NULL,
    [CreatedDate] [datetime] NULL,
    [Status] [bit] NULL,
    [imagename] [varchar](100) NULL
)


Now let's create a .Net API Project in visual studio using the following steps.
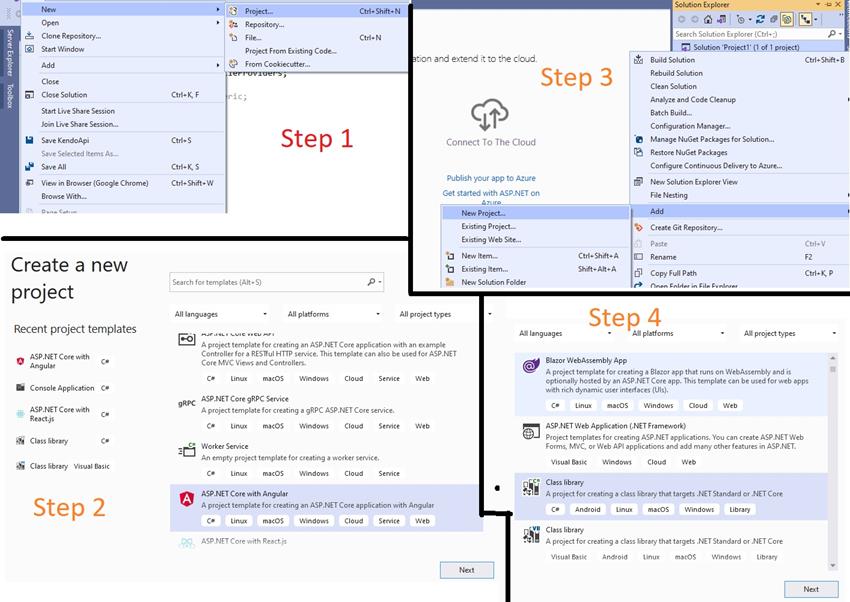
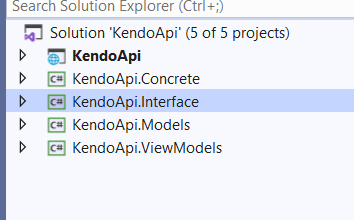
We have to create four libraries mentioned in the below image.
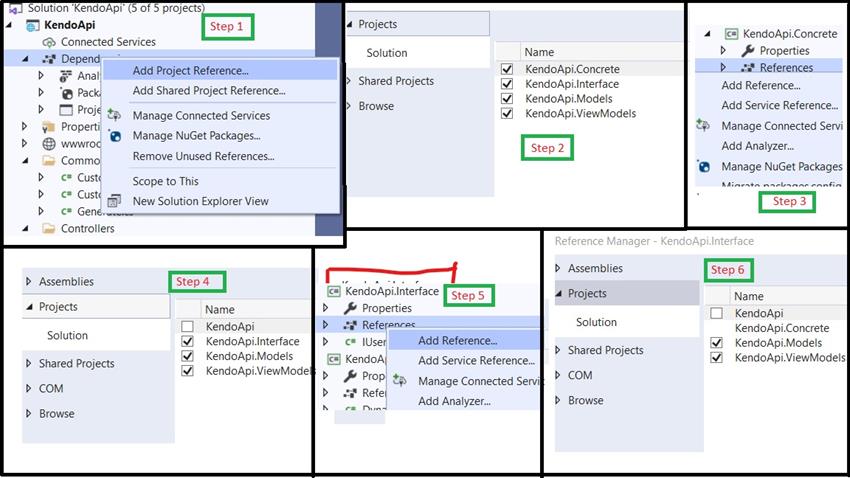
Now we add the references of project for interconnect.

Now we will create the following files according to the below images.
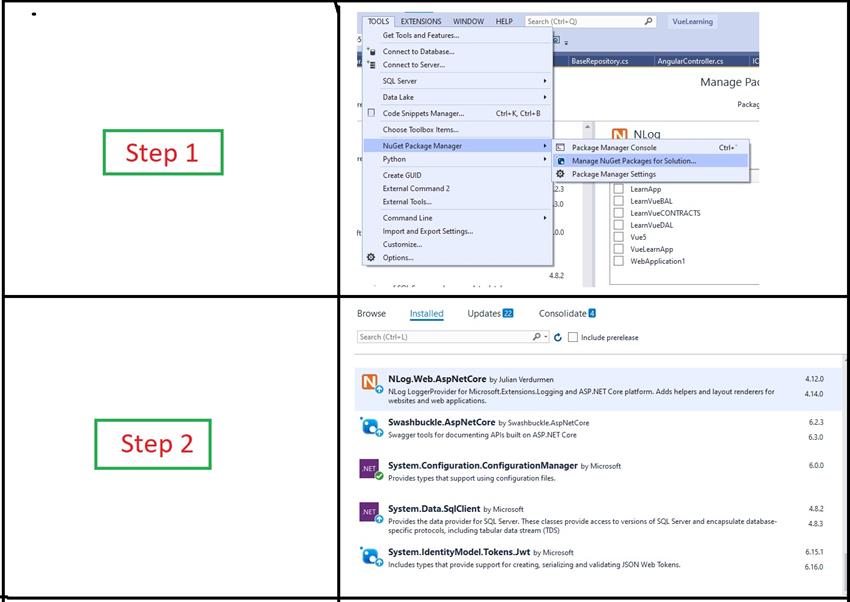

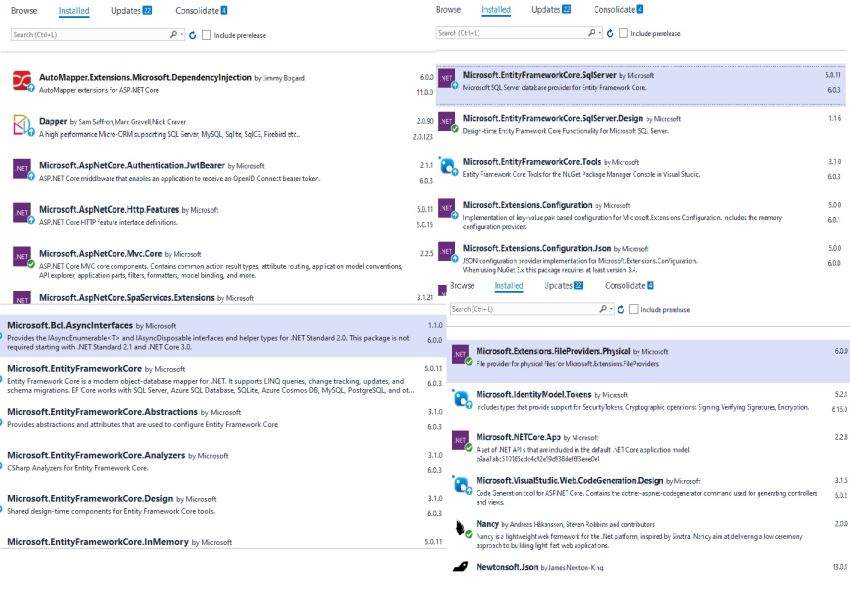
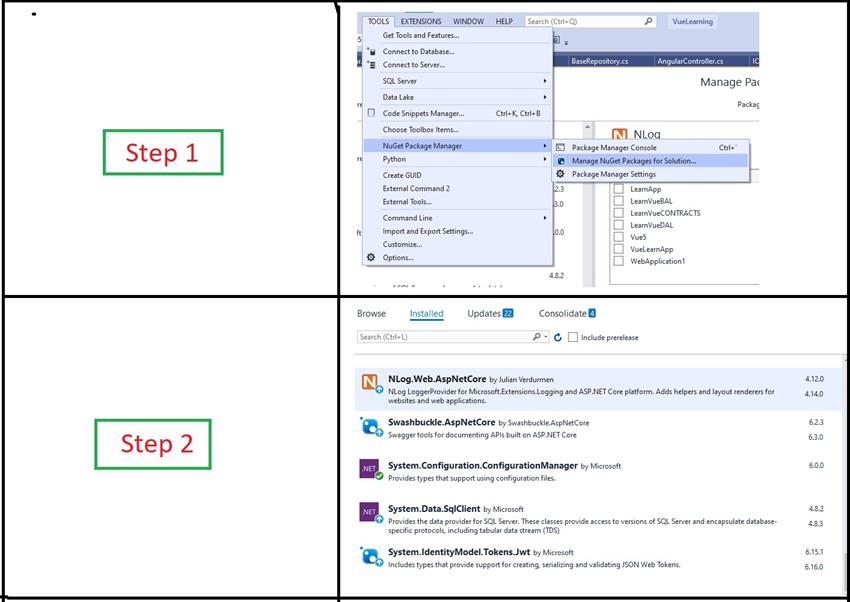
Now add the following packages from nuget package manager.
Now add the below code in the Custom.cs file.

using Microsoft.AspNetCore.Hosting;
using Microsoft.Extensions.FileProviders;
using System;
using System.Collections.Generic;
using System.IO;
using System.Linq;
using System.Threading.Tasks;
using KendoApi.ViewModels;
namespace KendoApi.Common {
    public class Custom {
        public static string UploadImage(UsersViewModel users, IHostingEnvironment _environment, string routePath = "") {
            string filesName = "";
            if (users.file != null) {
                //Getting FileName
                var fileName = Path.GetFileName(users.file.FileName);
                //Assigning Unique Filename (Guid)
                var myUniqueFileName = Convert.ToString(Guid.NewGuid());
                //Getting file Extension
                var fileExtension = Path.GetExtension(fileName);
                // concatenating  FileName + FileExtension
                var newFileName = String.Concat(myUniqueFileName, fileExtension);
                filesName = newFileName;
                // Combines two strings into a path.
                var filepath = new PhysicalFileProvider(Path.Combine(Directory.GetCurrentDirectory(), "wwwroot", "Images")).Root + $ @ "\{newFileName}";
                using(FileStream fs = System.IO.File.Create(filepath)) {
                    users.file.CopyTo(fs);
                    fs.Flush();
                }
            } else {
                if (users.imagename == null) {
                    filesName = "";
                } else {
                    filesName = users.imagename != "" ? users.imagename.Replace("http://" + routePath + "/images/", "") : null;
                }
            }
            return filesName;
        }
    }
}

Now add the below code in the CustomExceptionFilterAttribute.cs file.

using System;
using System.Collections.Generic;
using System.Globalization;
using System.IO;
using System.Linq;
using System.Threading.Tasks;
using Microsoft.AspNetCore.Hosting;
using Microsoft.AspNetCore.Mvc;
using Microsoft.AspNetCore.Mvc.Filters;
using Microsoft.AspNetCore.Routing;
namespace KendoApi.Common {
    public class CustomExceptionFilterAttribute: ExceptionFilterAttribute {
        private readonly IHostingEnvironment _hostingEnvironment;
        public CustomExceptionFilterAttribute(IHostingEnvironment hostingEnvironment) {
            _hostingEnvironment = hostingEnvironment;
        }
        public override void OnException(ExceptionContext context) {
            string strLogText = "";
            Exception ex = context.Exception;
            context.ExceptionHandled = true;
            var objClass = context;
            strLogText += "Message ---\n{0}" + ex.Message;
            if (context.HttpContext.Request.Headers["x-requested-with"] == "XMLHttpRequest") {
                strLogText += Environment.NewLine + ".Net Error ---\n{0}" + "Check MVC Ajax Code For Error";
            }
            strLogText += Environment.NewLine + "Source ---\n{0}" + ex.Source;
            strLogText += Environment.NewLine + "StackTrace ---\n{0}" + ex.StackTrace;
            strLogText += Environment.NewLine + "TargetSite ---\n{0}" + ex.TargetSite;
            if (ex.InnerException != null) {
                strLogText += Environment.NewLine + "Inner Exception is {0}" + ex.InnerException;
                //error prone
            }
            if (ex.HelpLink != null) {
                strLogText += Environment.NewLine + "HelpLink ---\n{0}" + ex.HelpLink; //error prone
            }
            StreamWriter log;
            string timestamp = DateTime.Now.ToString("d-MMMM-yyyy", new CultureInfo("en-GB"));
            string errorFolder = Path.Combine(_hostingEnvironment.WebRootPath, "ErrorLog");
            if (!System.IO.Directory.Exists(errorFolder)) {
                System.IO.Directory.CreateDirectory(errorFolder);
            }
            // ReSharper disable once ConvertIfStatementToConditionalTernaryExpression
            if (!File.Exists($ @ "{errorFolder}\Log_{timestamp}.txt")) {
                log = new StreamWriter($ @ "{errorFolder}\Log_{timestamp}.txt");
            } else {
                log = File.AppendText($ @ "{errorFolder}\Log_{timestamp}.txt");
            }
            var controllerName = (string) context.RouteData.Values["controller"];
            var actionName = (string) context.RouteData.Values["action"];
            // Write to the file:
            log.WriteLine(Environment.NewLine + DateTime.Now);
            log.WriteLine("------------------------------------------------------------------------------------------------");
            log.WriteLine("Controller Name :- " + controllerName);
            log.WriteLine("Action Method Name :- " + actionName);
            log.WriteLine("------------------------------------------------------------------------------------------------");
            log.WriteLine(objClass);
            log.WriteLine(strLogText);
            log.WriteLine();
            // Close the stream:
            log.Close();
            if (!_hostingEnvironment.IsDevelopment()) {
                // do nothing
                return;
            }
            var result = new RedirectToRouteResult(new RouteValueDictionary {
                {
                    "controller",
                    "Errorview"
                }, {
                    "action",
                    "Error"
                }
            });
            // TODO: Pass additional detailed data via ViewData
            context.Result = result;
        }
    }
}

Now add the below code in the UserController.cs file.
using System;
using System.Collections.Generic;
using System.Linq;
using System.Net;
using System.Net.Http;
using System.Security.Claims;
using System.Threading.Tasks;
using Microsoft.AspNetCore.Authorization;
using Microsoft.AspNetCore.Http;
using Microsoft.AspNetCore.Mvc;
using Newtonsoft.Json;
using KendoApi.Common;
using KendoApi.Interface;
using KendoApi.Models;
using KendoApi.ViewModels;
using System.Web;
using Microsoft.AspNetCore.Hosting;
using System.IO;
using Newtonsoft.Json;
using Newtonsoft.Json.Linq;
using AutoMapper;
namespace KendoApi.Controllers {
    //[Authorize]
    [Route("api/[controller]")]
    [ApiController]
    public class UserController: ControllerBase {
        private readonly IUsers _users;
        private readonly IHostingEnvironment _environment;
        private readonly IHttpContextAccessor _httpContextAccessor;
        public UserController(IUsers users, IHostingEnvironment environment, IHttpContextAccessor httpContextAccessor) {
            _users = users;
            _environment = environment;
            _httpContextAccessor = httpContextAccessor;
        }
        // GET: api/User
        [HttpGet]
        public IEnumerable < Users > Get() {
            var path = _httpContextAccessor.HttpContext.Request.Host.ToString();
            var UserData = _users.GetAllUsers(path);
            return UserData;
        }
        // GET: api/User/5
        [HttpGet]
        [Route("GetByUserName")]
        public Users GetByUserName(string username = "") {
            var path = _httpContextAccessor.HttpContext.Request.Host.ToString();
            var UserData = _users.GetByUserName(username, path);
            return UserData;
        }
        // GET: api/User/5
        [HttpGet("{id}", Name = "GetUsers")]
        public Users Get(int id) {
                var UserData = _users.GetUsersbyId(id);
                var password = EncryptionLibrary.DecryptText(UserData.Password);
                return UserData;
            }
            [HttpPost]
        public IActionResult Post([FromForm] UsersViewModel users) {
            var path = _httpContextAccessor.HttpContext.Request.Host.ToString();
            var Result = Custom.UploadImage(users, _environment, path);
            string imagepath = "http://" + path + "/images/";
            var _rootPath = _environment.WebRootPath;
            if (ModelState.IsValid) {
                if (_users.CheckUsersExits(users.UserName)) {
                    var response = new HttpResponseModel() {
                        StatusCode = (int) HttpStatusCode.Conflict,
                            data = ""
                    };
                    return Ok(response);
                } else {
                    var userId = this.User.FindFirstValue(ClaimTypes.Name);
                    var tempUsers = AutoMapper.Mapper.Map < Users > (users);
                    tempUsers.UserName = users.UserName;
                    tempUsers.imagename = users.file != null ? users.file.FileName : "";
                    tempUsers.CreatedDate = DateTime.Now;
                    tempUsers.imagename = Result;
                    tempUsers.Createdby = Convert.ToInt32(userId);
                    tempUsers.Password = EncryptionLibrary.EncryptText(users.Password);
                    _users.InsertUsers(tempUsers);
                    var response = new HttpResponseModel() {
                        StatusCode = (int) HttpStatusCode.OK,
                            data = imagepath + tempUsers.imagename
                    };
                    return Ok(response);
                }
            } else {
                var Results = ModelState.Values.ToList()[0].Errors.Count().ToString();
                var response = new HttpResponseModel() {
                    StatusCode = (int) HttpStatusCode.BadRequest,
                        data = ""
                };
                return Ok(Results);
            }
        }
        // PUT: api/User/5
        [HttpPut("{id}")]
        public IActionResult Put(int id, [FromForm] UsersViewModel users) {
            if (ModelState.IsValid) {
                var path = _httpContextAccessor.HttpContext.Request.Host.ToString();
                string imagepath = "http://" + path + "/images/";
                var Result = Custom.UploadImage(users, _environment, path);
                users.Password = EncryptionLibrary.EncryptText(users.Password);
                var tempUsers = AutoMapper.Mapper.Map < Users > (users);
                tempUsers.UserId = id;
                tempUsers.CreatedDate = DateTime.Now;
                tempUsers.imagename = Result;
                _users.UpdateUsers(tempUsers);
                var response = new HttpResponseModel() {
                    StatusCode = (int)(HttpStatusCode.OK),
                        data = imagepath + tempUsers.imagename
                };
                return Ok(response);
            } else {
                var response = new HttpResponseModel() {
                    StatusCode = (int) HttpStatusCode.BadRequest,
                        data = ""
                };
                return Ok(response);
            }
        }
        // DELETE: api/ApiWithActions/5
        [HttpDelete("{id}")]
        public HttpResponseMessage Delete(int id) {
            var result = _users.DeleteUsers(id);
            if (result) {
                var response = new HttpResponseMessage() {
                    StatusCode = HttpStatusCode.OK
                };
                return response;
            } else {
                var response = new HttpResponseMessage() {
                    StatusCode = HttpStatusCode.BadRequest
                };
                return response;
            }
        }
    }
}

Now add the below code in the MappingProfile.cs file.

using System;
using System.Collections.Generic;
using System.Linq;
using System.Threading.Tasks;
using AutoMapper;
using KendoApi.Models;
using KendoApi.ViewModels;

namespace KendoApi.Mappings
{
    public class MappingProfile : Profile
    {
        public MappingProfile()
        {

            CreateMap<UsersViewModel, Users>()
                .ForMember(dest => dest.UserName, opt => opt.MapFrom(src => src.UserName))
                .ForMember(dest => dest.Contactno, opt => opt.MapFrom(src => src.Contactno))
                .ForMember(dest => dest.EmailId, opt => opt.MapFrom(src => src.EmailId))
                .ForMember(dest => dest.FullName, opt => opt.MapFrom(src => src.FullName))
                .ForMember(dest => dest.Password, opt => opt.MapFrom(src => src.Password))
                .ForMember(dest => dest.UserId, opt => opt.MapFrom(src => src.Id))
                .ForMember(dest => dest.Status, opt => opt.MapFrom(src => src.Status));
        }
    }
}

Now add the below code in the AppSettings.cs file.

using System;
using System.Collections.Generic;
using System.Linq;
using System.Threading.Tasks;
namespace KendoApi.Models {
    public class AppSettings {
        public string Secret {
            get;
            set;
        }
    }
}

Now add the below code in the AppSettings.cs file.

{
    "AppSettings": {
        "Secret": "6XJCIEJO41PQZNWJC4RR"
    },
    "Logging": {
        "LogLevel": {
            "Default": "Warning"
        }
    },
    "AllowedHosts": "*",
    "ConnectionStrings": {
        "DatabaseConnection": "Data Source=DESKTOP-13P092J\\SA; UID=sa; Password=sa123;Database=KendoUIDb;"
    }
}

Now add the below code in the Startup.cs file.

using System;
using System.Collections.Generic;
using System.Linq;
using System.Text;
using System.Threading.Tasks;
using AutoMapper;
using Microsoft.AspNetCore.Authentication.JwtBearer;
using Microsoft.AspNetCore.Builder;
using Microsoft.AspNetCore.Hosting;
using Microsoft.AspNetCore.Http;
using Microsoft.AspNetCore.Http.Features;
using Microsoft.AspNetCore.Mvc;
using Microsoft.AspNetCore.Mvc.Infrastructure;
using Microsoft.AspNetCore.Mvc.Routing;
using Microsoft.EntityFrameworkCore;
using Microsoft.Extensions.Configuration;
using Microsoft.Extensions.DependencyInjection;
using Microsoft.IdentityModel.Tokens;
using KendoApi.Common;
using KendoApi.Concrete;
using KendoApi.Interface;
using KendoApi.Mappings;
using KendoApi.Models;
namespace KendoApi {
    public class Startup {
        public Startup(IConfiguration configuration) {
            Configuration = configuration;
        }
        public IConfiguration Configuration {
            get;
        }
        // This method gets called by the runtime. Use this method to add services to the container.
        public void ConfigureServices(IServiceCollection services) {
            services.Configure < CookiePolicyOptions > (options => {
                // This lambda determines whether user consent for non-essential cookies is needed for a given request.
                options.CheckConsentNeeded = context => true;
                options.MinimumSameSitePolicy = SameSiteMode.None;
            });
            #region MyRegion
            var connection = Configuration.GetConnectionString("DatabaseConnection");
            services.AddDbContext < DatabaseContext > (options => options.UseSqlServer(connection, b => b.UseRowNumberForPaging()));
            var appSettingsSection = Configuration.GetSection("AppSettings");
            services.Configure < AppSettings > (appSettingsSection);
            // configure jwt authentication
            var appSettings = appSettingsSection.Get < AppSettings > ();
            var key = Encoding.ASCII.GetBytes(appSettings.Secret);
            services.AddAuthentication(x => {
                x.DefaultAuthenticateScheme = JwtBearerDefaults.AuthenticationScheme;
                x.DefaultChallengeScheme = JwtBearerDefaults.AuthenticationScheme;
            }).AddJwtBearer(x => {
                x.RequireHttpsMetadata = false;
                x.SaveToken = true;
                x.TokenValidationParameters = new TokenValidationParameters {
                    ValidateIssuerSigningKey = true,
                        IssuerSigningKey = new SymmetricSecurityKey(key),
                        ValidateIssuer = false,
                        ValidateAudience = false
                };
            });
            services.AddSingleton < IConfiguration > (Configuration);
            services.AddTransient < IUsers, UsersConcrete > ();
            services.AddSingleton < IActionContextAccessor, ActionContextAccessor > ();
            services.AddScoped < IUrlHelper > (implementationFactory => {
                var actionContext = implementationFactory.GetService < IActionContextAccessor > ().ActionContext;
                return new UrlHelper(actionContext);
            });
            #endregion
            services.AddSingleton < IHttpContextAccessor, HttpContextAccessor > ();
            services.AddHttpContextAccessor();
            // Start Registering and Initializing AutoMapper
            Mapper.Initialize(cfg => cfg.AddProfile < MappingProfile > ());
            services.AddAutoMapper();
            // End Registering and Initializing AutoMapper
            services.Configure < FormOptions > (options => {
                options.ValueCountLimit = 200; //default 1024
                options.ValueLengthLimit = 1024 * 1024 * 100; //not recommended value
                options.MultipartBodyLengthLimit = long.MaxValue; //not recommended value
            });
            services.AddMvc(options => {
                options.Filters.Add(typeof(CustomExceptionFilterAttribute));
            }).SetCompatibilityVersion(CompatibilityVersion.Version_2_1).AddJsonOptions(options => {
                options.SerializerSettings.ContractResolver = new Newtonsoft.Json.Serialization.DefaultContractResolver();
            });
            services.AddCors(options => {
                options.AddPolicy("CorsPolicy", builder => builder.AllowAnyOrigin().AllowAnyMethod().AllowAnyHeader().AllowCredentials().WithExposedHeaders("X-Pagination"));
            });
        }
        // This method gets called by the runtime. Use this method to configure the HTTP request pipeline.
        public void Configure(IApplicationBuilder app, IHostingEnvironment env) {
            if (env.IsDevelopment()) {
                app.UseDeveloperExceptionPage();
            } else {
                app.UseExceptionHandler("/Home/Error");
            }
            app.UseStaticFiles();
            app.UseCookiePolicy();
            app.UseAuthentication();
            app.UseCors("CorsPolicy");
            app.UseMvc(routes => {
                routes.MapRoute(name: "default", template: "{controller=Home}/{action=Index}/{id?}");
            });
        }
    }
}

Now add the below code in the DatabaseContext.cs file.

using System;
using System.Collections.Generic;
using System.Linq;
using System.Text;
using System.Threading.Tasks;
using Microsoft.EntityFrameworkCore;
using KendoApi.Models;
namespace KendoApi.Concrete {
    public class DatabaseContext: DbContext {
        public DatabaseContext(DbContextOptions < DatabaseContext > options): base(options) {}
        public DbSet < Users > Users {
            get;
            set;
        }
    }
}

Now add the below code in the UsersConcrete.cs file.

using System;
using System.Collections.Generic;
using KendoApi.Models;
using KendoApi.ViewModels;
namespace KendoApi.Interface {
    public interface IUsers {
        bool InsertUsers(Users user);
        bool CheckUsersExits(string username);
        Users GetUsersbyId(int userid);
        bool DeleteUsers(int userid);
        bool UpdateUsers(Users role);
        List < Users > GetAllUsers(string rootpath = "");
        bool AuthenticateUsers(string username, string password);
        Users GetByUserName(string username, string rootpath);
    }
}

Now add the below code in the Users.cs file.

using System;
using System.Collections.Generic;
using System.ComponentModel.DataAnnotations;
using System.ComponentModel.DataAnnotations.Schema;
using System.Linq;
using System.Text;
using System.Threading.Tasks;
namespace KendoApi.Models {
    [Table("Users")]
    public class Users {
        [Key]
        public int UserId {
            get;
            set;
        }
        public string UserName {
            get;
            set;
        }
        public string FullName {
            get;
            set;
        }
        public string EmailId {
            get;
            set;
        }
        public string Contactno {
            get;
            set;
        }
        public string Password {
            get;
            set;
        }
        public int ? Createdby {
            get;
            set;
        }
        public string imagename {
            get;
            set;
        }
        public DateTime ? CreatedDate {
            get;
            set;
        }
        public bool Status {
            get;
            set;
        }
    }
}

Now add the below code in the HttpResponseModel.cs file.

using Microsoft.AspNetCore.Http;
using System;
using System.Collections.Generic;
using System.ComponentModel.DataAnnotations;
using System.ComponentModel.DataAnnotations.Schema;
using System.Linq;
using System.Text;
using System.Threading.Tasks;
namespace KendoApi.ViewModels {
    public class HttpResponseModel {
        public string data {
            get;
            set;
        }
        public int StatusCode {
            get;
            set;
        }
    }
}

Now add the below code in the UsersViewModel.cs file.

using Microsoft.AspNetCore.Http;
using System;
using System.Collections.Generic;
using System.ComponentModel.DataAnnotations;
using System.ComponentModel.DataAnnotations.Schema;
using System.Linq;
using System.Text;
using System.Threading.Tasks;
namespace KendoApi.ViewModels {
    public class UsersViewModel {
        public int Id {
            get;
            set;
        }
        public int UserId {
            get;
            set;
        }
        //[Required]
        public string UserName {
            get;
            set;
        }
        // [Required]
        public string FullName {
            get;
            set;
        }
        // [Required]
        public string EmailId {
            get;
            set;
        }
        // [Required]
        public string Contactno {
            get;
            set;
        }
        //   [Required]
        public string Password {
            get;
            set;
        }
        public bool Status {
            get;
            set;
        }
        [NotMapped]
        public IFormFile file {
            get;
            set;
        }
        public string imagename {
            get;
            set;
        }
        //     public List<IFormFile> files { get; set; }
    }
}

We have completed the API part, now in the next part we will work on binding the KendoUI Grid with API.

Summary
In this article, we learned how to create .Net core multilayer architecture for API with curd operations.


European ASP.NET Core Hosting :: Implement And Register Dependency Injection In ASP.NET Core/.NET 6

clock April 12, 2022 07:49 by author Peter

.NET core support build-in dependency injection(DI) which we can achieve by the below approaches:
    Constructor injection
    Property injection
    Method injection

In this article, we will learn

    Inject the dependency injection using first method(Constructor Injection)
    Register the interfaces and classes in the container class.

To start, few things are required:

    Visual studio 22
    .NET 6 (.NET Core)
    Swagger for testing the API

Before start, I would like to explain few points about the .NET 6 (.NET core new Version 6)

    On the creation of the Web API .NET Core project, Startup class is not present.
    Startup class gets merged with Program class.
    All configurations and services will be configured in the Program class.
    Build-in support of Swagger. (Tick the checkbox of "Enable OpenAPI support" while creating the project)

Let's go and start to implement the multiple interface in the .NET 6/.NET Core.

    Search and select an ASP .NET Core Web API project from the create a new project tab.
    Click next and add the project name
    Select .NET 6.0 as framework and click on the check box of "Enable OpenAPI support" as its build-in feature of swagger for testing the API.

Once the project gets created, then move it to the next step.

STEP 1 - Created interfaces – IEmployeeDetails and IDepartmentDetails

namespace Business;

public interface IEmployeeDetails
{
    public List<Employee> GetEmployee();
}
public interface IDepartmentDetails
{
    List<Department> getDepartmentDetails();
}

STEP 2 - Create service and implement the interface in the classes as below:

namespace Business;
public class EmployeeService : IEmployeeDetails, IDepartmentDetails
{
    public List<Employee> GetEmployee()
    {
        var employees = new List<Employee>()
        {
            new Employee()
            {
                Id = 1,
                Title = "Mr",
                Name = "Simon",
                Age = 32,
                EmailId = "[email protected]",
                MobileNumber= "12346",
                Address = "Pune",
                Pincode =   411057

            },
            new Employee()
            {
                Id = 2,
                Name = "David",
                Age = 35,
                EmailId = "[email protected]",
                MobileNumber= "654323456",
                Address = "Mumbai",
                Pincode =   221011
            },
            new Employee()
            {
                Id = 3,
                Title = "Mr",
                Name = "Peter",
                Age = 29,
                EmailId = "[email protected]",
                MobileNumber= "54323456",
                Address = "Lucknow",
                Pincode =   221100

            }
        };
        return employees;
    }

    public List<Department> getDepartmentDetails()
    {
        var departmentList = new List<Department>()
        {
            new Department()
            {
                DepartmentId = "D001",
                DepartmentHead = "Mr. Davis",
                DepartmentName = "IT"
            }

        };
        return departmentList;
    }

    public IEnumerable<Employee> SaveEmpAsList(Employee request)
    {
        List<Employee> emp = new List<Employee>();
        emp.Add(request);
        return emp;
    }

    public Employee GetOneEmployee()
    {
        Employee employee = new Employee()
        {
            Id = 3,
            Title = "Mr",
            Name = "Peter",
            Age = 29,
            EmailId = "[email protected]",
            MobileNumber = "54323456",
            Address = "Lucknow",
            Pincode = 221100

        };
        return employee;
    }
}

STEP 3 - Need to call the business logic in the controller. For this we need to inject the dependency in the controller layer using Constructor injection 

[Route("api/[controller]")]
[ApiController]
public class EmployeeController : ControllerBase
{
    private readonly IEmployeeDetails _employeeService;
    private readonly IDepartmentDetails _departmentService;
       public EmployeeController(IEmployeeDetails employeeService,
        IDepartmentDetails departmentService)
    {
        _employeeService = employeeService;
        _departmentService = departmentService;
    }
}

STEP 4 - Calling the service using the injector
[Route("GetEmp")]
[HttpGet]
public IEnumerable<Employee> GetEmployeeList1()
{
    var res = _employeeService.GetEmployee();
    return res;
}

[Route("GetDepartment")]
[HttpGet]
//[Authorize]
public IEnumerable<Department> GetDepartment()
{
    var res = _departmentService.getDepartmentDetails();
    return res;
}

NOTE: Try to run the code, you will get the run time exception.

    "System.InvalidOperationException: Unable to resolve service for type 'Business.IDepartmentDetails' while attempting to activate 'POCAutomapperWithSql.Controllers.EmployeeController'. "

As we haven't registered the interface in the container class (Program.cs). For registering the interface and classes, you need to go in the Program class (As Startup class is no more with .NET 6) and use these methods i.e "AddScoped" || "AddTransient" || "AddSingleton"  as it defines the lifetime of the services.

STEP 5 - Go to Program class and register it.

// Register interface and class which we injected

// Register interface and classes
builder.Services.AddScoped<IEmployeeDetails, EmployeeService>();
builder.Services.AddScoped<IDepartmentDetails, EmployeeService>();

HostForLIFE.eu ASP.NET Core Hosting

European best, cheap and reliable ASP.NET hosting with instant activation. HostForLIFE.eu is #1 Recommended Windows and ASP.NET hosting in European Continent. With 99.99% Uptime Guaranteed of Relibility, Stability and Performace. HostForLIFE.eu security team is constantly monitoring the entire network for unusual behaviour. We deliver hosting solution including Shared hosting, Cloud hosting, Reseller hosting, Dedicated Servers, and IT as Service for companies of all size.


European ASP.NET Core Hosting :: Generate CSV Using CsvHelper

clock April 11, 2022 08:48 by author Peter

There are many approaches to generate CSV files from the database data. One simple way is to use string builder and just append the comma separated values from database with header in the first row. But this approach has some drawbacks as the plain strings don't handle commas in the data strings and also some speacial characters. This is where the CSV helper (https://www.nuget.org/packages/CsvHelper/) nugget package comes in handy.

But nonetheless if your data has no commas/ string data and you don't want external nugget packages to generate CSV then using string builder is preferred.

Generate CSV using String builder
private static void DownloadValidations(IList<Validation> validations )
{
    var stringBuilder = new StringBuilder();    stringBuilder.AppendLine("ValidationId,ValidationTimeStamp,UserId,ImageId,ImageDate,ImageSource,Crop,CropTypeId,ImageLocation(x:y),Country,CountryIsoCode, ImageUrl");
    foreach (var validation in validations)
    {
        var image = validation.Image;
        var row =
            $"{validation.Id},{validation.CreationTime:dd/MM/yyyy},{validation.User.Id},{image.Id},{image.Date:dd/MM/yyyy},{image.ImageSource},{validation.Classification.Name},{validation.Classification.Id},{$"{image.Location.X}:{image.Location.Y},{image.Country.Name},{image.Country.Code},{image.Url}"}";
        stringBuilder.AppendLine(row);
    }
    File.WriteAllText(".\\validations.csv", stringBuilder.ToString());
}

public class Validation
{
    public virtual User User { get; set; }
    public virtual Image Image { get; set; }
    public virtual Classification Classification { get; set; }
    public string Platform { get; set; } // browser or mobile etc
    public double TimeNeeded { get; set; }  // comes from importer tool?
    public bool IsCorrect { get; set; }  // is classification correct?
    public string Version { get; set; } //app versions
    public string IpAddress { get; set; } // device Ip
}


Generate CSV using CSVHelper
public void GenerateCsv(IList<survey> surveys )
{
    var memoryStream = new MemoryStream();
    using (var streamWriter = new StreamWriter(memoryStream, Encoding.UTF8))
    {
        var csvWriter = new CsvSerializer(streamWriter, CultureInfo.InvariantCulture);
        await csvWriter.WriteAsync(new[]
        {
            "Id", "CreationTime", "CreatorId", "StorageType", "x_lat", "y_long",  "capacity",
            "lifetime", "location",
            "locationOther",
            "food", "foodOther", "Protected", "ProtectedRemarks", "PercentConsumed", "PercentSold",
            "Storageduration", "Storagedurationremarks", "owner",
            "ownerOther", "differences", "improvements", "remarks"
        });
        await csvWriter.WriteLineAsync();
        foreach (var survey in surveys)
        {

            await csvWriter.WriteAsync(new[]
            {
                $"{survey.Id}", $"{survey.CreationTime:s}", $"{survey.CreatorId}", $"{survey.StorageType}",
                $"{survey.Location.Coordinate.X}", $"{survey.Location.Coordinate.Y}",
                $"{extraData.Capacity}", $"{extraData.Lifetime}", $"{extraData.Location:G}",
                $"\"{extraData.LocationOther}\"", $"{extraData.Food:G}", $"\"{extraData.FoodOther}\"",
                $"{extraData.Protected:G}", $"\"{extraData.ProtectedRemarks}\"",
                $"{extraData.PercentConsumed}", $"\"{extraData.PercentSold}\"",
                $"{extraData.Storageduration}", $"\"{extraData.Storagedurationremarks}\"",
                $"{extraData.Owner:G}", $"\"{extraData.OwnerOther}\"", $"\"{extraData.Differences}\"",
                $"\"{extraData.Improvements}\"", $"\"{extraData.Remarks}\""
            });
            await csvWriter.WriteLineAsync();
        }
        await streamWriter.FlushAsync();
    }
    File.WriteAllText(".\\surveys.csv", stringBuilder.ToString());
}

public class survey
{
    public long SurveyId { get; set; }
    public DateTime CreatedOn { get; set; }
    public Geometry Location { get; set; }
    public double UserLat { get; set; }
    public double UserLng { get; set; }
    public string Crop { get; set; }
    public string CropOther { get; set; }
    public string Phenology { get; set; }
    public string PhenologyOther { get; set; }
    public string Damage { get; set; }
    public string DamageOther { get; set; }
    public string Manage { get; set; }
    public string ManageOther { get; set; }
    public string Remarks { get; set; }
    public string[] Images { get; set; }
    public int PlantHeight { get; set; }
    public string DateObservation { get; set; }
    public string DateSurveyCreation { get; set; }
    public string PolygonWkt { get; set; }
}


The CSVHelper can handle strings with commas and all special characters. So based on your need if there is a requirement choose this nugget package.
Conclusion

If you need a very simple CSV generator then go for stringbuilder and append your data to generate CSV string and save it to a file

If you need a more advanced CSV generator which can handle any sort of strings, and don't mind external nugget packages then go for csvhelper, which has matured over the years and is open source.

HostForLIFE.eu ASP.NET Core Hosting

European best, cheap and reliable ASP.NET hosting with instant activation. HostForLIFE.eu is #1 Recommended Windows and ASP.NET hosting in European Continent. With 99.99% Uptime Guaranteed of Relibility, Stability and Performace. HostForLIFE.eu security team is constantly monitoring the entire network for unusual behaviour. We deliver hosting solution including Shared hosting, Cloud hosting, Reseller hosting, Dedicated Servers, and IT as Service for companies of all size.


European ASP.NET Core Hosting :: Customize Swagger UI In ASP.NET Web API Restful Service

clock April 1, 2022 08:56 by author Peter

Swagger UI is a very powerful documentation tool for Restful services. It is a framework for describing and consuming RESTful APIs. It keeps the documentation system of methods, parameters, and models tightly integrated into the server code. We can add Swashbuckle to any Web API project, and then we can easily customize the generated specification along with the UI (swagger-ui). Swagger UI uses Swashbuckle to displays the documentation. The Swashbuckle has few extension points that we can use to customize the look and feel.
Description

In this article, I will show the steps for customizing the Swagger UI.

  • Add XML Comments/Description for GET() methods
  • Customize the Swagger UI Using Style Sheet
  • Customize the Swagger UI Using Javascript
Things you can customize in Swashbuckle are shown below,
    Style Sheet
    Javascript
    HTML
    Submit methods, Boolean values, etc

Steps to be followed,
If you open SwaggerConfig.cs file under App_Start folder you can see that all the configuration that is related to the swagger is present. Swagger Ui has some feature and facility to read XML comment from the methods like GET() and GET(ID).

Step 1
Go to EmployeeController.cs and the XML comments for GET() methods as shown below. For that just type 3 forward slash (or simply slash) /// and it will auto create the XML section to write your own comments in Summary and Param section.

For GET() Method

For GET(ID) Method

Step 2
We need one more setting and for that right click on project and go to properties. Next step is select Build and choose the XML documentation file, Then save those changes.

Step 3
Go to SwaggerConfig.cs file under App_Start folder and add the following code.

Here WebAPIProj.XML is name of the Web API project. So, put your own project name.

Step 4
Uncomment the below line of code in SwaggerConfig.cs file.


c.IncludeXmlComments(GetXmlCommentsPath());

Build your solution after these changes are made in SwaggerConfig.cs file and Run it.

OUTPUT
Here we can see the XML comments in GET() methods are shown below.


Also, we can see the Employee ID as description is added in param section of GET(ID) method in EmployeeController.


Customize the Swagger UI Using Style Sheet

Step 5
Here we can customize the Swagger UI as well using Stylesheet. I have added one style sheet file named SwaggerStyle.css under Content folder.
Right click on SwaggerStyle.css file and select Embedded Resource option for Build Action as shown below.


Here I added CSS class in SwaggerStyle.css file as shown below.

.swagger-section #header {
    background-color: #ffd800;
    padding: 14px;
}

This class has two properties for background color and padding to header.

Step 6
Then I will add this SwaggerStyle.css file reference in SwaggerConfig.cs file. Uncomment the below line of code.


Modify this line of code as shown below.
c.InjectStylesheet(thisAssembly, "WebAPIProj.Content.SwaggerStyle.css");

Here I have mentioned the full name of CSS file that is under WebAPIProj / Content / SwaggerStyle.css.

OUTPUT
Here, we can see the background color of header is changed and the padding properties as well.


Like this we can customize the whole Swagger UI as per requirement.

Customize the Swagger UI Using Javascript
Here I added a JavaScript file named SwaggerScript.js under Content folder.


Right click on SwaggerScript.js file and select Embedded Resource option for Build Action as shown below.


Here I added javascript code in SwaggerScript.js file as shown below.
$(document).ready(function () {
    alert("Swagger Script Alert Added.");
});

Step 7
Then I will add this SwaggerScript.js file reference in SwaggerConfig.cs file. Uncomment the below line of code.

Modify this line of code as shown below.
c.InjectJavaScript(thisAssembly, "WebAPIProj.Content.SwaggerScript.js");

Here I have mentioned the full name to JS file that is under WebAPIProj/Content/SwaggerScript.js.

OUTPUT

Here, we can see that javascript alert message when the Swagger UI loads as shown below.

HostForLIFE.eu ASP.NET Core Hosting

European best, cheap and reliable ASP.NET hosting with instant activation. HostForLIFE.eu is #1 Recommended Windows and ASP.NET hosting in European Continent. With 99.99% Uptime Guaranteed of Relibility, Stability and Performace. HostForLIFE.eu security team is constantly monitoring the entire network for unusual behaviour. We deliver hosting solution including Shared hosting, Cloud hosting, Reseller hosting, Dedicated Servers, and IT as Service for companies of all size.


About HostForLIFE

HostForLIFE is European Windows Hosting Provider which focuses on Windows Platform only. We deliver on-demand hosting solutions including Shared hosting, Reseller Hosting, Cloud Hosting, Dedicated Servers, and IT as a Service for companies of all sizes.

We have offered the latest Windows 2019 Hosting, ASP.NET 5 Hosting, ASP.NET MVC 6 Hosting and SQL 2019 Hosting.


Month List

Tag cloud

Sign in