European ASP.NET 4.5 Hosting BLOG

BLOG about ASP.NET 4, ASP.NET 4.5 Hosting and Its Technology - Dedicated to European Windows Hosting Customer

European ASP.NET Core 8.0.1 Hosting - HostForLIFE :: FluentValidation's Dynamic Registration in the.NET Minimal API

clock April 30, 2024 09:49 by author Peter

Validation plays a crucial role in the.NET development environment in guaranteeing data integrity and robustness of applications. A popular package called FluentValidation offers a clear and expressive method for defining validation rules in.NET applications. We will look at how to make the process of dynamically registering FluentValidation classes in.NET Minimal APIs more efficient in this blog post. This method improves the maintainability of your apps' validation mechanism while lowering manual overhead.

Understanding Dynamic Registration
Dynamic registration refers to the process of automatically discovering and registering components at runtime, based on predefined conventions or criteria. In the context of FluentValidation and .NET Minimal APIs, dynamic registration allows us to scan assemblies, identify validator classes, and register them with the dependency injection container without explicit manual intervention.

Benefits of Dynamic Registration with FluentValidation

  • Reduced Boilerplate Code: With dynamic registration, developers no longer need to manually register each validator class. This reduces boilerplate code and makes the registration process more concise and maintainable.
  • Improved Scalability: As your application grows and evolves, dynamic registration accommodates new validator classes seamlessly. Adding or modifying validation logic becomes simpler and requires minimal changes to the registration code.
  • Enhanced Flexibility: Dynamic registration enables developers to adhere to conventions or patterns for validator class naming and structure. This promotes consistency and simplifies maintenance across the codebase.

Implementing Dynamic Registration
To implement dynamic registration of FluentValidation classes in .NET Minimal APIs, follow these steps.

  • The tools that we are leveraging here are.
  • FluentValidation
  • Microsoft.Extensions.DependencyInjection.Abstractions
  • .NET 8.0
  • Visual Studio 2022 Community Edition
  • Web API

Scanning Assemblies: Utilize reflection to scan assemblies at runtime and identify classes that implement the IValidator<T> interface. This involves iterating through types, filtering out validator classes, and extracting generic type arguments.Registering Validators: Once validator classes are identified, register them with the dependency injection container using the appropriate service lifetime scope (e.g., scoped, transient). Map each validator interface (IValidator<T>) to its corresponding concrete implementation.Integration with Startup Logic: Integrate the dynamic registration logic into the startup/configuration code of your .NET 6 Minimal API project. This typically involves invoking the scanning mechanism during application startup and configuring the dependency injection container accordingly.Code Snippet//Person Domain Model

public class Person
 {
     public string Name { get; set; }
     public int Age { get; set; }
     public string Email { get; set; }

 }

//PersonValidation.cs
public class PersonValidation:AbstractValidator<Person>
{
    public PersonValidation()
    {
        RuleFor(x => x.Name).NotEmpty().WithMessage("Name is required");
        RuleFor(x => x.Age).GreaterThan(0).WithMessage("Age must be greater than 18");
        RuleFor(x => x.Email).EmailAddress().WithMessage("Email is not valid");
    }
}

//Create Person Action
app.MapPost("Person",([FromBody] Person person, IValidator<Person> validator) =>
{
    var personValidation = validator.Validate(person);
    if (!personValidation.IsValid)
    {
        return Results.BadRequest(personValidation.ToDictionary());
    }
    return Results.Ok("Person created successfully");
})
    .WithName("CreatePerson")
    .WithOpenApi();

//TypeExtension.cs

/*
This extension method is designed to check whether a given type or any of its base types implement a generic type or generic interface specified by genericType. It handles both interface and inheritance hierarchies, recursively checking base types until a match is found or until there are no more base types to check.

*/

public static class TypeExtensions
{
    public static bool IsAssignableToGenericType(this Type givenType, Type genericType)
    {
        var interfaceTypes = givenType.GetInterfaces();

        foreach (var it in interfaceTypes)
        {
            if (it.IsGenericType && it.GetGenericTypeDefinition() == genericType)
                return true;
        }

        if (givenType.IsGenericType && givenType.GetGenericTypeDefinition() == genericType)
            return true;

        var baseType = givenType.BaseType;
        if (baseType == null) return false;

        return IsAssignableToGenericType(baseType, genericType);
    }
}

//FluentValidationServiceCollections.cs
public static class FluentValidationServiceCollections
{
    public static void AddFluentValidationValidators(this IServiceCollection services)
    {
        var validatorTypes = Assembly.GetExecutingAssembly()
            .GetTypes()
            .Where(t => !t.IsAbstract && t.IsAssignableToGenericType(typeof(AbstractValidator<>)))
            .ToList();

        foreach (var validatorType in validatorTypes)
        {
            var genericArg = validatorType.BaseType!.GetGenericArguments().FirstOrDefault();
            if (genericArg != null)
            {
                var serviceType = typeof(IValidator<>).MakeGenericType(genericArg);
                services.AddScoped(serviceType, validatorType);
            }
        }
    }
}

//register the fluent validation validators in Program.cs
builder.Services.AddFluentValidationValidators();

HostForLIFE ASP.NET Core 8.0.1 Hosting

European best, cheap and reliable ASP.NET hosting with instant activation. HostForLIFE.eu is #1 Recommended Windows and ASP.NET hosting in European Continent. With 99.99% Uptime Guaranteed of Relibility, Stability and Performace. HostForLIFE.eu security team is constantly monitoring the entire network for unusual behaviour. We deliver hosting solution including Shared hosting, Cloud hosting, Reseller hosting, Dedicated Servers, and IT as Service for companies of all size.


European ASP.NET Core 8.0.1 Hosting - HostForLIFE :: How to Implementing Long Polling in .NET for Real-Time Communication?

clock April 23, 2024 07:45 by author Peter

In-depth polling in.NET
A method for achieving real-time communication between a client and a server is called long polling. Long polling lowers latency and boosts efficiency by keeping the connection open until the server has new data to share, in contrast to regular polling, which involves the client requesting updates from the server often. We'll look at how to add lengthy polling for real-time updates to a.NET application in this blog post.

Benefits of Long Polling

  • Real-Time Updates: Long polling allows for near-real-time communication between clients and servers, enabling instant updates and notifications.
  • Reduced Latency: By keeping connections open until new data is available, long polling reduces latency compared to traditional polling techniques.
  • Efficiency: Long polling minimizes unnecessary requests and server load by only retrieving data when updates are available.
  • Simplicity: Implementing long polling in .NET is straightforward and requires minimal configuration, making it accessible for developers.

Use Cases

  • Chat Applications: Long polling is commonly used in chat applications to deliver messages and notifications to users in real time.
  • Live Updates: Websites or applications that require live updates, such as stock tickers, news feeds, or sports scores, can benefit from long polling.
  • Collaborative Tools: Long polling enables collaborative editing tools, where multiple users can see changes made by others in real time.

Drawbacks of Long polling

  • Connection Overhead: Long polling requires maintaining open connections, which can lead to increased server resource consumption and potential scalability challenges.
  • Resource Consumption: Long-lived connections may tie up server resources, impacting the overall performance and scalability of the application.
  • Timeouts: If a long-polling request times out before new data is available, the client must initiate a new request, potentially introducing delays.

Avoiding Drawbacks

  • Connection Pooling: Use connection pooling to efficiently manage long-lived connections and prevent resource exhaustion on the server.
  • Timeout Management: Implement appropriate timeout settings to ensure that long-polling requests do not remain open indefinitely, balancing responsiveness with resource usage.
  • Scalability Planning: Monitor server performance and scalability to identify potential bottlenecks and optimize resource allocation as needed.

Alternatives

  • WebSockets: WebSockets provide full-duplex communication channels over a single, long-lived connection, offering real-time, bi-directional communication between clients and servers.
  • Server-Sent Events (SSE): SSE is a standard allowing servers to push updates to clients over HTTP connections, providing a simpler alternative to WebSockets for one-way communication.

1. Setting Up a .NET Web Application
Initiate a new.NET web application project using your IDE of choice. ASP.NET Core can be used to create a contemporary, cross-platform online application.
dotnet new web -n LongPollingDemo
cd LongPollingDemo


2. Implementing Long Polling Controller
In order to manage lengthy polling requests from clients, create a controller in your.NET application.
using Microsoft.AspNetCore.Mvc;
using System;
using System.Threading;
using System.Threading.Tasks;

[Route("api/[controller]")]
[ApiController]
public class UpdatesController : ControllerBase
{
    [HttpGet]
    public async Task<IActionResult> LongPoll()
    {
        // Simulate long-running operation
        await Task.Delay(5000);

        // Generate random data or fetch updates from database
        var randomUpdate = new { Message = $"Update received at {DateTime.UtcNow}" };

        return Ok(randomUpdate);
    }
}

3. Client-Side Implementation
Implement a lengthy polling mechanism on the client side (using JavaScript, for example) to make many requests for updates from the server.
function longPoll() {
    fetch('/api/updates')
        .then(response => response.json())
        .then(data => {
            // Process received update
            console.log(data);
            // Initiate next long poll request
            longPoll();
        })
        .catch(error => {
            console.error('Long poll request failed', error);
            // Retry long poll after a delay
            setTimeout(longPoll, 3000);
        });
}

// Start long polling
longPoll();

4. Configuring Server-Side Settings

Make sure the server-side program is set up to deal with timeouts and persistent connections in the right way. Modify the server configuration to support extended polling requests without disconnecting connections too soon.

5. Testing and Deployment

Test your long polling implementation locally to verify real-time updates between the client and server. Once tested, deploy your .NET web application to a production environment to provide real-time communication capabilities to users.

Conclusion

By implementing long polling in a .NET web application, you can achieve real-time communication between clients and servers, enabling instant updates and notifications without the overhead of constant polling. Long polling is particularly useful for applications requiring timely updates, such as chat applications, real-time monitoring dashboards, and collaborative editing tools. With the flexibility and scalability of .NET, you can build robust and responsive web applications that meet the demands of modern users.

HostForLIFE ASP.NET Core 8.0.1 Hosting

European best, cheap and reliable ASP.NET hosting with instant activation. HostForLIFE.eu is #1 Recommended Windows and ASP.NET hosting in European Continent. With 99.99% Uptime Guaranteed of Relibility, Stability and Performace. HostForLIFE.eu security team is constantly monitoring the entire network for unusual behaviour. We deliver hosting solution including Shared hosting, Cloud hosting, Reseller hosting, Dedicated Servers, and IT as Service for companies of all size.


European ASP.NET Core 8.0.1 Hosting - HostForLIFE :: Using xUnit for Unit Testing in.NET 8

clock April 17, 2024 07:07 by author Peter

A common option in.NET 8 for creating and running unit tests in C# is the xUnit testing framework, which is essential to the software development process. In this thorough tutorial, we will go over key ideas and offer code samples as we examine the foundations of unit testing using xUnit.

Establishing a Model Project
The first step is to use xUnit to construct a small console application in C# and a unit test project for it.

# Create a new console application
dotnet new console -n PeterConsoleApp

# Create a new xUnit test project
dotnet new xunit -n PeterConsoleApp.Tests

Write Our Console Application
We just printed this article's title and my name, Peter, in the Program.cs file. as demonstrated by the code example below.

Console.WriteLine("Hi and Welcome to Peter Article on Unit Testing with xUnit in .NET 8: A Comprehensive Guide");

Create Our Calculator Class

We just create a simple Calculator class with simple functions such as Add, Subtract, Multiply, Divide, and the key one Dispose of as the code example below.
namespace PeterConsoleApp
{
    public class Calculator : IDisposable
    {
        // Add method
        public int Add(int a, int b)
        {
            return a + b;
        }

        // Subtract method
        public int Subtract(int a, int b)
        {
            return a - b;
        }

        // Multiply method
        public int Multiply(int a, int b)
        {
            return a * b;
        }

        // Divide method
        public double Divide(int a, int b)
        {
            if (b == 0)
            {
                throw new ArgumentException("Cannot divide by zero.");
            }

            return (double)a / b;
        }

        private bool disposed = false;

        protected virtual void Dispose(bool disposing)
        {
            if (!disposed)
            {
                if (disposing)
                {
                    // Dispose of managed resources here go here
                }

                // Dispose of unmanaged resources goes here , if any
                disposed = true;
            }
        }

        public void Dispose()
        {
            Dispose(true);
            GC.SuppressFinalize(this);
        }

        ~Calculator()
        {
            Dispose(false);
        }
    }
}


Data Source
We will create two files for our Data Source one is an interface and the other is a class as code example below.
namespace PeterConsoleApp
{
    public interface IDataSource
    {
        string GetData();
    }
}


namespace PeterConsoleApp
{
    public class DataService
    {
        private readonly IDataSource _dataSource;

        public DataService(IDataSource dataSource)
        {
            _dataSource = dataSource;
        }

        public string ProcessData()
        {
            return _dataSource.GetData().ToUpper();
        }
    }
}


Now we are all set to create our Unit Tests 😊

Writing Our First Test

Our preferred code editor should open the PeterConsoleApp.Tests project. XUnit automatically creates a test file named UnitTest1.cs. To replace UnitTest1.cs with the following code example, please refer to the below code example. As an example, we will create a simple test method named TestAddition. The [Fact] attribute indicates that this method is a test.
namespace PeterConsoleApp.Tests
{
    public class PeterConsoleAppTests
    {
        [Fact]
        public void TestAddition()
        {
           // Arrange
           int a = 2;
           int b = 3;

           // Act
           int result = a + b;

           // Assert
           Assert.Equal(5, result);
        }
    }
}


Arrange

Putting the required things and circumstances in place.

Act

Executing the operation or calling the tested procedure.

Assert
Confirming that the outcome meets expectations.

Running the Tests

Now, let's run our unit tests.
# Navigate to the test project directory
cd PeterConsoleApp.Tests

# Run the tests
dotnet test
# Navigate to the test project directory
cd PeterConsoleApp.Tests

# Run the tests
dotnet test


There should be an output indicating that one test has been run and passed.

Writing More Tests
Let's add a few more tests to cover different scenarios. Let's replace UnitTest1.cs with the following code example. We will add a subtraction test and a parameterized multiplication test using the [Theory] and [InlineData] attributes.
namespace PeterConsoleApp.Tests
{
    public class PeterConsoleAppTests
    {
        [Fact]
        public void TestSubtraction()
        {
            // Arrange
            int a = 5;
            int b = 3;

            // Act
            int result = a - b;

            // Assert
            Assert.Equal(2, result);
        }

        [Theory]
        [InlineData(2, 3, 6)]
        [InlineData(5, 4, 20)]
        [InlineData(0, 7, 0)]
        public void TestMultiplication(int a, int b, int expected)
        {
            // Act
            int result = a * b;

            // Assert
            Assert.Equal(expected, result);
        }
    }
}


Advanced Concepts

Test Fixture

Generally, a test fixture contains one or more test methods. It can be used to share setup and cleanup code between tests.
namespace PeterConsoleApp
{
    public class CalculatorFixture : IDisposable
    {
        public Calculator Calculator { get; private set; }

        public CalculatorFixture()
        {
            // Initialize resources, create instances, etc.
            Calculator = new Calculator();
        }

        public void Dispose()
        {
            // Clean up resources, dispose of instances, etc.
            Calculator.Dispose();
        }
    }
}


namespace PeterConsoleApp.Tests
{
    public class CalculatorTests : IClassFixture<CalculatorFixture>
    {
        private readonly CalculatorFixture _fixture;

        public CalculatorTests(CalculatorFixture fixture)
        {
            _fixture = fixture;
        }

        [Fact]
        public void TestAddition()
        {
            // Arrange
            Calculator calculator = _fixture.Calculator;
            int a = 5;
            int b = 10;

            // Act
            int result = calculator.Add(a, b);

            // Assert
            Assert.Equal(15, result);
        }
    }
}

Mocking
The use of mocking libraries, such as Moq, can help isolate code units for testing.
using Moq;

namespace PeterConsoleApp.Tests;
public class DataServiceTests
{
    [Fact]
    public void TestDataProcessing()
    {
        // Arrange
        var mockDataSource = new Mock<IDataSource>();
        mockDataSource.Setup(d => d.GetData()).Returns("HELLO, I AM Peter");

        var dataService = new DataService(mockDataSource.Object);

        // Act
        string result = dataService.ProcessData();

        // Assert
        Assert.Equal("HELLO, I AM Peter", result);
    }
}

HostForLIFE ASP.NET Core 8.0.1 Hosting

European best, cheap and reliable ASP.NET hosting with instant activation. HostForLIFE.eu is #1 Recommended Windows and ASP.NET hosting in European Continent. With 99.99% Uptime Guaranteed of Relibility, Stability and Performace. HostForLIFE.eu security team is constantly monitoring the entire network for unusual behaviour. We deliver hosting solution including Shared hosting, Cloud hosting, Reseller hosting, Dedicated Servers, and IT as Service for companies of all size.


European ASP.NET Core 8.0.1 Hosting - HostForLIFE :: Explain StackLayout in.NET MAUI

clock April 1, 2024 06:57 by author Peter

In this tutorial, we'll look at the StackLayout in.NET MAUI. If you are new to.NET MAUI, I recommend that you read the following topics in this series. StackLayout is a layout that allows us to organize the child views in a one-dimensional stack horizontally or vertically. The StackLayout's default orientation is vertical, however it can be modified to horizontal.

Let's look at few instances to better grasp StackLayout.

Stack layout with vertical orientation

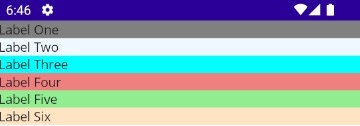
In the first example, I added many Labels to the StackLayout and organized them vertically because the StackLayout's default orientation is 'Vertical'.
<StackLayout>
        <Label x:Name="lblOne" Text="Label One" BackgroundColor="Gray"></Label>
        <Label x:Name="lblTwo" Text="Label Two" BackgroundColor="AliceBlue"></Label>
        <Label x:Name="lblThree" Text="Label Three" BackgroundColor="Aqua"></Label>
        <Label x:Name="lblFour" Text="Label Four" BackgroundColor="LightCoral"></Label>
        <Label x:Name="lblFive" Text="Label Five" BackgroundColor="LightGreen"></Label>
        <Label x:Name="lblSix" Text="Label Six" BackgroundColor="Bisque"></Label>
</StackLayout>


Preview
StackLayout with Horizontal orientation
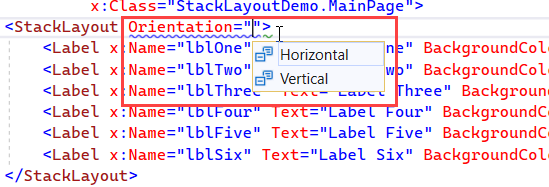
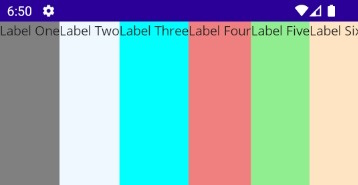
Let’s change the orientation property of the StackLayout to ‘Horizontal’.
<StackLayout Orientation="Horizontal">
        <Label x:Name="lblOne" Text="Label One" BackgroundColor="Gray"></Label>
        <Label x:Name="lblTwo" Text="Label Two" BackgroundColor="AliceBlue"></Label>
        <Label x:Name="lblThree" Text="Label Three" BackgroundColor="Aqua"></Label>
        <Label x:Name="lblFour" Text="Label Four" BackgroundColor="LightCoral"></Label>
        <Label x:Name="lblFive" Text="Label Five" BackgroundColor="LightGreen"></Label>
        <Label x:Name="lblSix" Text="Label Six" BackgroundColor="Bisque"></Label>
</StackLayout>

After changing the orientation, all the child elements under the StackLayout are arranged horizontally.
Spacing property in StackLayout
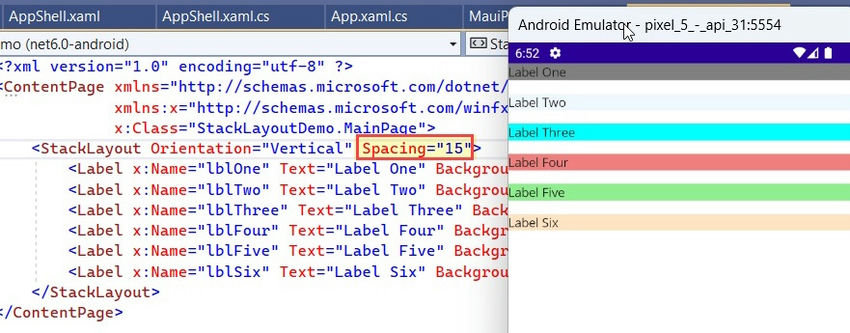
Another property of StackLayout is ‘Spacing’ which is of type double, and specifies the amount of space between the child views. Its default value is 0. For demonstration purposes, I am changing this value to 15.
HorizontalOptions and VerticalOptions in StackLayout
The HorizontalOptions and VerticalOptions properties of the StackLayout are of type LayoutOptions and are used to specify how a view should be aligned or positioned within its parent layout when there is unused space available. In the below example, I am changing the VerticalOptions of the StackLayout to Center.
<StackLayout Orientation="Vertical" Spacing="15" VerticalOptions="Center">
        <Label x:Name="lblOne" Text="Label One" BackgroundColor="Gray"></Label>
        <Label x:Name="lblTwo" Text="Label Two" BackgroundColor="AliceBlue"></Label>
        <Label x:Name="lblThree" Text="Label Three" BackgroundColor="Aqua"></Label>
        <Label x:Name="lblFour" Text="Label Four" BackgroundColor="LightCoral"></Label>
        <Label x:Name="lblFive" Text="Label Five" BackgroundColor="LightGreen"></Label>
        <Label x:Name="lblSix" Text="Label Six" BackgroundColor="Bisque"></Label>
</StackLayout>


Preview
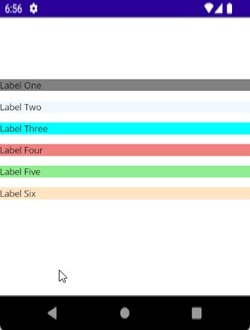
There are 8 Layout options (Center, CenterAndExpand, End, EndAndExpand, Fill, FillAndExpand, Start, StartAndExpand) that you can use in HorizontalOptions and VerticalOptions based on the layout you are planning to design. It is important to understand that the behavior of the horizontal options and vertical options can vary depending on the parent layout.

In the below example, I have changed the HorizontalOptions & VerticalOptions properties to demonstrate the position of the Label object position within the StackLayout.
<StackLayout Orientation="Vertical" Spacing="15">
        <Label x:Name="lblOne" Text="Label One"
               BackgroundColor="Gray"
               HorizontalOptions="Start"></Label>
        <Label x:Name="lblTwo" Text="Label Two"
               BackgroundColor="AliceBlue"
               HorizontalOptions="End"></Label>
        <Label x:Name="lblThree" Text="Label Three"
               BackgroundColor="Aqua"
               HorizontalOptions="Center"></Label>
        <Label x:Name="lblFour" Text="Label Four"
               BackgroundColor="LightCoral"
               HorizontalOptions="Start"
               VerticalOptions="FillAndExpand"></Label>
        <Label x:Name="lblFive" Text="Label Five"
               BackgroundColor="LightGreen"
               HorizontalOptions="End"
               VerticalOptions="FillAndExpand"></Label>
        <Label x:Name="lblSix" Text="Label Six"
               BackgroundColor="Bisque"
               VerticalOptions="FillAndExpand"></Label>
</StackLayout>


Preview
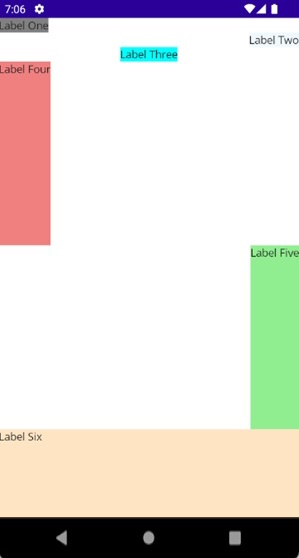
Nested StackLayout Objects
We can create complex UI Structures by using nested StackLayout objects. In the below example, I have used the combination of Vertical and Horizontal orientation, as well as the nested StackLayout.
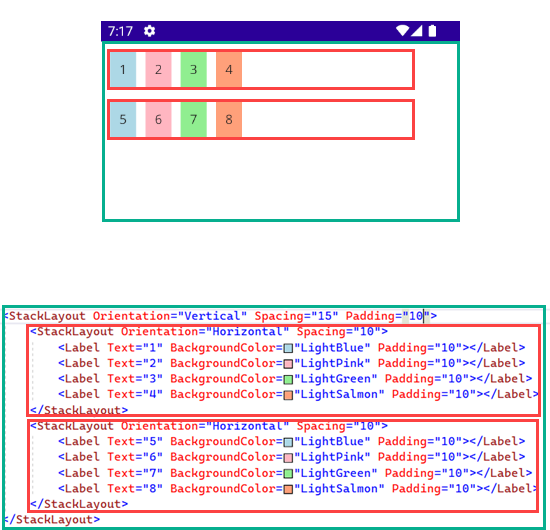
<StackLayout Orientation="Vertical" Spacing="15" Padding="10">
        <StackLayout Orientation="Horizontal" Spacing="10">
            <Label Text="1" BackgroundColor="LightBlue" Padding="10"></Label>
            <Label Text="2" BackgroundColor="LightPink" Padding="10"></Label>
            <Label Text="3" BackgroundColor="LightGreen" Padding="10"></Label>
            <Label Text="4" BackgroundColor="LightSalmon" Padding="10"></Label>
        </StackLayout>
        <StackLayout Orientation="Horizontal" Spacing="10">
            <Label Text="5" BackgroundColor="LightBlue" Padding="10"></Label>
            <Label Text="6" BackgroundColor="LightPink" Padding="10"></Label>
            <Label Text="7" BackgroundColor="LightGreen" Padding="10"></Label>
            <Label Text="8" BackgroundColor="LightSalmon" Padding="10"></Label>
        </StackLayout>
</StackLayout>


Implementing StackLayout using C#

In all the above examples, I have designed the layout using the XAML. Now let’s see How we can achieve the same using the c#. For demonstration purposes, I am creating a Simple StackLayout containing multiple Labels.
public partial class MainPage : ContentPage
{
    public MainPage()
    {
        InitializeComponent();

        StackLayout stackLayout = new StackLayout()
        {
            Orientation = StackOrientation.Vertical,
            VerticalOptions = LayoutOptions.Center,
            Spacing = 10
        };

        stackLayout.Add(new Label() { Text = "Label One", BackgroundColor = Color.FromRgb(255, 225, 225) });
        stackLayout.Add(new Label() { Text = "Label Two", BackgroundColor = Color.FromRgb(0, 204, 0) });
        stackLayout.Add(new Label() { Text = "Label Three", BackgroundColor = Color.FromRgb(255, 255, 204) });
        stackLayout.Add(new Label() { Text = "Label Four", BackgroundColor = Color.FromRgb(224, 224, 224) });

        Content= stackLayout;

    }
}


Preview
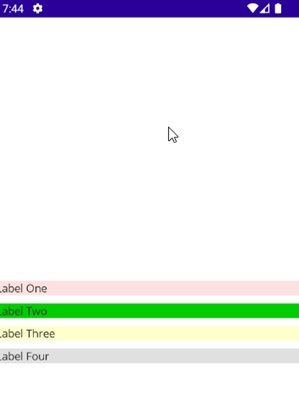
There are two other Layouts, i.e., HorizontalStackLayout and VerticalStackLayout, which are more performant alternatives to the StackLayout. However, implementation-wise, they are quite similar to StackLayout. To learn more about them, you may refer to the official Microsoft documentation.

HostForLIFE ASP.NET Core 8.0.1 Hosting

European best, cheap and reliable ASP.NET hosting with instant activation. HostForLIFE.eu is #1 Recommended Windows and ASP.NET hosting in European Continent. With 99.99% Uptime Guaranteed of Relibility, Stability and Performace. HostForLIFE.eu security team is constantly monitoring the entire network for unusual behaviour. We deliver hosting solution including Shared hosting, Cloud hosting, Reseller hosting, Dedicated Servers, and IT as Service for companies of all size.


About HostForLIFE

HostForLIFE is European Windows Hosting Provider which focuses on Windows Platform only. We deliver on-demand hosting solutions including Shared hosting, Reseller Hosting, Cloud Hosting, Dedicated Servers, and IT as a Service for companies of all sizes.

We have offered the latest Windows 2019 Hosting, ASP.NET 5 Hosting, ASP.NET MVC 6 Hosting and SQL 2019 Hosting.


Month List

Tag cloud

Sign in