In this article, we are going to discuss the working of CQRS and MediatR patterns and step-by-step implementation using .NET Core 6 Web API.
Introduction of CQRS Pattern
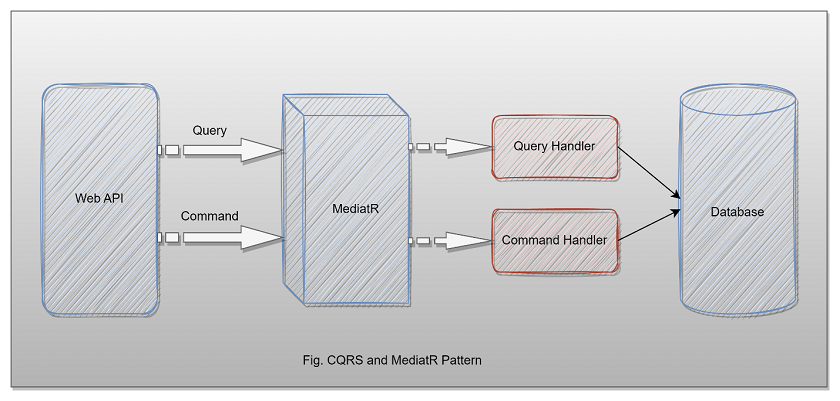
CQRS stands for Command and Query Responsibility Segregation and uses to separate read(queries) and write(commands).
In that, queries perform read operation, and command perform writes operation like create, update, delete, and return data.
As we know, in our application we mostly use a single data model to read and write data, which will work fine and perform CRUD operations easily. But, when the application becomes a vast in that case, our queries return different types of data as an object so that become hard to manage with different DTO objects. Also, the same model is used to perform a write operation. As a result, the model becomes complex.
Also, when we use the same model for both reads and write operations the security is also hard to manage when the application is large and the entity might expose data in the wrong context due to the workload on the same model.
CQRS helps to decouple operations and make the application more scalable and flexible on large scale.
When to use CQRS
We can use Command Query Responsibility Segregation when the application is huge and access the same data in parallel. CQRS helps reduce merge conflicts while performing multiple operations with data.
In DDD terminology, if the domain data model is complex and needs to perform many operations on priority like validations and executing some business logic so in that case, we need the consistency that we will by using CQRS.
MediatR
MediatR pattern helps to reduce direct dependency between multiple objects and make them collaborative through MediatR.
In .NET Core MediatR provides classes that help to communicate with multiple objects efficiently in a loosely coupled manner.
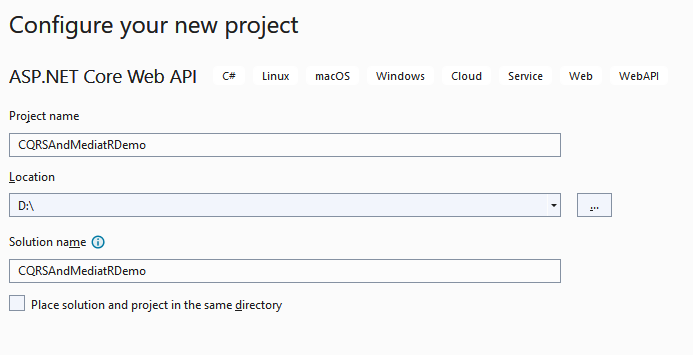
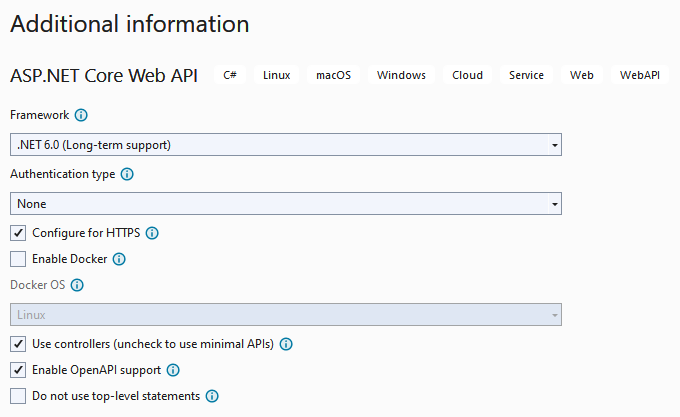
Step-by-step Implementation
Step 2
Configure your application
Step 3
Provide additional information
Step 4
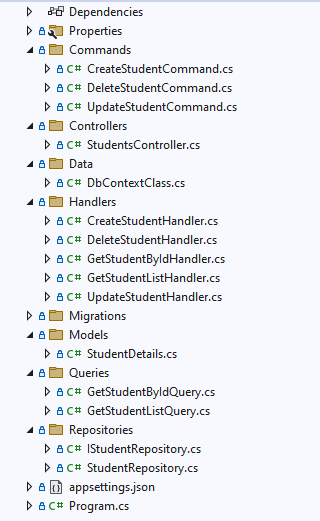
Project Structure
Step 5
Install the following NuGet Packages
<Project Sdk="Microsoft.NET.Sdk.Web">
<PropertyGroup>
<TargetFramework>net6.0</TargetFramework>
<Nullable>disable</Nullable>
<ImplicitUsings>enable</ImplicitUsings>
</PropertyGroup>
<ItemGroup>
<PackageReference Include="MediatR.Extensions.Microsoft.DependencyInjection" Version="8.0.0" />
<PackageReference Include="Microsoft.EntityFrameworkCore" Version="6.0.8" />
<PackageReference Include="Microsoft.EntityFrameworkCore.Design" Version="6.0.8">
<PrivateAssets>all</PrivateAssets>
<IncludeAssets>runtime; build; native; contentfiles; analyzers; buildtransitive</IncludeAssets>
</PackageReference>
<PackageReference Include="Microsoft.EntityFrameworkCore.SqlServer" Version="6.0.8" />
<PackageReference Include="Microsoft.EntityFrameworkCore.Tools" Version="6.0.8">
<PrivateAssets>all</PrivateAssets>
<IncludeAssets>runtime; build; native; contentfiles; analyzers; buildtransitive</IncludeAssets>
</PackageReference>
<PackageReference Include="Swashbuckle.AspNetCore" Version="6.2.3" />
</ItemGroup>
</Project>
Step 6
Create a Student Details class inside the model folder
namespace CQRSAndMediatRDemo.Models
{
public class StudentDetails
{
public int Id { get; set; }
public string StudentName { get; set; }
public string StudentEmail { get; set; }
public string StudentAddress { get; set; }
public int StudentAge { get; set; }
}
}
Step 7
Next, add DbContextClass inside the Data folder
using CQRSAndMediatRDemo.Models;
using Microsoft.EntityFrameworkCore;
namespace CQRSAndMediatRDemo.Data
{
public class DbContextClass : DbContext
{
protected readonly IConfiguration Configuration;
public DbContextClass(IConfiguration configuration)
{
Configuration = configuration;
}
protected override void OnConfiguring(DbContextOptionsBuilder options)
{
options.UseSqlServer(Configuration.GetConnectionString("DefaultConnection"));
}
public DbSet<StudentDetails> Students { get; set; }
}
}
Step 8
Create one student repository and a class related to that.
IStudentRepository
using CQRSAndMediatRDemo.Models;
namespace CQRSAndMediatRDemo.Repositories
{
public interface IStudentRepository
{
public Task<List<StudentDetails>> GetStudentListAsync();
public Task<StudentDetails> GetStudentByIdAsync(int Id);
public Task<StudentDetails> AddStudentAsync(StudentDetails studentDetails);
public Task<int> UpdateStudentAsync(StudentDetails studentDetails);
public Task<int> DeleteStudentAsync(int Id);
}
}
StudentRepository
using CQRSAndMediatRDemo.Data;
using CQRSAndMediatRDemo.Models;
using Microsoft.EntityFrameworkCore;
using System;
using System.Numerics;
namespace CQRSAndMediatRDemo.Repositories
{
public class StudentRepository : IStudentRepository
{
private readonly DbContextClass _dbContext;
public StudentRepository(DbContextClass dbContext)
{
_dbContext = dbContext;
}
public async Task<StudentDetails> AddStudentAsync(StudentDetails studentDetails)
{
var result = _dbContext.Students.Add(studentDetails);
await _dbContext.SaveChangesAsync();
return result.Entity;
}
public async Task<int> DeleteStudentAsync(int Id)
{
var filteredData = _dbContext.Students.Where(x => x.Id == Id).FirstOrDefault();
_dbContext.Students.Remove(filteredData);
return await _dbContext.SaveChangesAsync();
}
public async Task<StudentDetails> GetStudentByIdAsync(int Id)
{
return await _dbContext.Students.Where(x => x.Id == Id).FirstOrDefaultAsync();
}
public async Task<List<StudentDetails>> GetStudentListAsync()
{
return await _dbContext.Students.ToListAsync();
}
public async Task<int> UpdateStudentAsync(StudentDetails studentDetails)
{
_dbContext.Students.Update(studentDetails);
return await _dbContext.SaveChangesAsync();
}
}
}
Step 9
After that, add read queries
GetStudentListQuery
using CQRSAndMediatRDemo.Models;
using MediatR;
namespace CQRSAndMediatRDemo.Queries
{
public class GetStudentListQuery : IRequest<List<StudentDetails>>
{
}
}
GetStudentByIdQuery
using CQRSAndMediatRDemo.Models;
using MediatR;
namespace CQRSAndMediatRDemo.Queries
{
public class GetStudentByIdQuery : IRequest<StudentDetails>
{
public int Id { get; set; }
}
}
Step 10
Next, create different commands
CreateStudentCommand
using CQRSAndMediatRDemo.Models;
using MediatR;
namespace CQRSAndMediatRDemo.Commands
{
public class CreateStudentCommand : IRequest<StudentDetails>
{
public string StudentName { get; set; }
public string StudentEmail { get; set; }
public string StudentAddress { get; set; }
public int StudentAge { get; set; }
public CreateStudentCommand(string studentName, string studentEmail, string studentAddress, int studentAge)
{
StudentName = studentName;
StudentEmail = studentEmail;
StudentAddress = studentAddress;
StudentAge = studentAge;
}
}
}
UpdateStudentCommand
using MediatR;
namespace CQRSAndMediatRDemo.Commands
{
public class UpdateStudentCommand : IRequest<int>
{
public int Id { get; set; }
public string StudentName { get; set; }
public string StudentEmail { get; set; }
public string StudentAddress { get; set; }
public int StudentAge { get; set; }
public UpdateStudentCommand(int id, string studentName, string studentEmail, string studentAddress, int studentAge)
{
Id = id;
StudentName = studentName;
StudentEmail = studentEmail;
StudentAddress = studentAddress;
StudentAge = studentAge;
}
}
}
DeleteStudentCommand
using MediatR;
namespace CQRSAndMediatRDemo.Commands
{
public class DeleteStudentCommand : IRequest<int>
{
public int Id { get; set; }
}
}
Step 11
Now, add Query and Command Handlers
GetStudentListHandler
using CQRSAndMediatRDemo.Models;
using CQRSAndMediatRDemo.Queries;
using CQRSAndMediatRDemo.Repositories;
using MediatR;
using System.Numerics;
namespace CQRSAndMediatRDemo.Handlers
{
public class GetStudentListHandler : IRequestHandler<GetStudentListQuery, List<StudentDetails>>
{
private readonly IStudentRepository _studentRepository;
public GetStudentListHandler(IStudentRepository studentRepository)
{
_studentRepository = studentRepository;
}
public async Task<List<StudentDetails>> Handle(GetStudentListQuery query, CancellationToken cancellationToken)
{
return await _studentRepository.GetStudentListAsync();
}
}
}
GetStudentByIdHandler
using CQRSAndMediatRDemo.Models;
using CQRSAndMediatRDemo.Queries;
using CQRSAndMediatRDemo.Repositories;
using MediatR;
using System.Numerics;
namespace CQRSAndMediatRDemo.Handlers
{
public class GetStudentByIdHandler : IRequestHandler<GetStudentByIdQuery, StudentDetails>
{
private readonly IStudentRepository _studentRepository;
public GetStudentByIdHandler(IStudentRepository studentRepository)
{
_studentRepository = studentRepository;
}
public async Task<StudentDetails> Handle(GetStudentByIdQuery query, CancellationToken cancellationToken)
{
return await _studentRepository.GetStudentByIdAsync(query.Id);
}
}
}
C#
CreateStudentHandler
using CQRSAndMediatRDemo.Commands;
using CQRSAndMediatRDemo.Models;
using CQRSAndMediatRDemo.Repositories;
using MediatR;
namespace CQRSAndMediatRDemo.Handlers
{
public class CreateStudentHandler: IRequestHandler<CreateStudentCommand, StudentDetails>
{
private readonly IStudentRepository _studentRepository;
public CreateStudentHandler(IStudentRepository studentRepository)
{
_studentRepository = studentRepository;
}
public async Task<StudentDetails> Handle(CreateStudentCommand command, CancellationToken cancellationToken)
{
var studentDetails = new StudentDetails()
{
StudentName = command.StudentName,
StudentEmail = command.StudentEmail,
StudentAddress = command.StudentAddress,
StudentAge = command.StudentAge
};
return await _studentRepository.AddStudentAsync(studentDetails);
}
}
}
UpdateStudentHandler
using CQRSAndMediatRDemo.Commands;
using CQRSAndMediatRDemo.Repositories;
using MediatR;
namespace CQRSAndMediatRDemo.Handlers
{
public class UpdateStudentHandler : IRequestHandler<UpdateStudentCommand, int>
{
private readonly IStudentRepository _studentRepository;
public UpdateStudentHandler(IStudentRepository studentRepository)
{
_studentRepository = studentRepository;
}
public async Task<int> Handle(UpdateStudentCommand command, CancellationToken cancellationToken)
{
var studentDetails = await _studentRepository.GetStudentByIdAsync(command.Id);
if (studentDetails == null)
return default;
studentDetails.StudentName = command.StudentName;
studentDetails.StudentEmail = command.StudentEmail;
studentDetails.StudentAddress = command.StudentAddress;
studentDetails.StudentAge = command.StudentAge;
return await _studentRepository.UpdateStudentAsync(studentDetails);
}
}
}
DeleteStudentHandler
using CQRSAndMediatRDemo.Commands;
using CQRSAndMediatRDemo.Repositories;
using MediatR;
namespace CQRSAndMediatRDemo.Handlers
{
public class DeleteStudentHandler : IRequestHandler<DeleteStudentCommand, int>
{
private readonly IStudentRepository _studentRepository;
public DeleteStudentHandler(IStudentRepository studentRepository)
{
_studentRepository = studentRepository;
}
public async Task<int> Handle(DeleteStudentCommand command, CancellationToken cancellationToken)
{
var studentDetails = await _studentRepository.GetStudentByIdAsync(command.Id);
if (studentDetails == null)
return default;
return await _studentRepository.DeleteStudentAsync(studentDetails.Id);
}
}
}
Step 12
Configure the database connection string inside the appsettings.json file
{
"Logging": {
"LogLevel": {
"Default": "Information",
"Microsoft.AspNetCore": "Warning"
}
},
"AllowedHosts": "*",
"ConnectionStrings": {
"DefaultConnection": "Data Source=DESKTOP-8RL8JOG;Initial Catalog=CQRSAndMediatRDemoDB;User Id=sa;Password=database@1;"
}
}
Step 13
Register a few services inside the program class
using CQRSAndMediatRDemo.Data;
using CQRSAndMediatRDemo.Repositories;
using MediatR;
using Microsoft.AspNetCore.Hosting;
using System.Reflection;
var builder = WebApplication.CreateBuilder(args);
// Add services to the container.
builder.Services.AddMediatR(Assembly.GetExecutingAssembly());
builder.Services.AddDbContext<DbContextClass>();
builder.Services.AddScoped<IStudentRepository, StudentRepository>();
builder.Services.AddControllers();
// Learn more about configuring Swagger/OpenAPI at https://aka.ms/aspnetcore/swashbuckle
builder.Services.AddEndpointsApiExplorer();
builder.Services.AddSwaggerGen();
var app = builder.Build();
// Configure the HTTP request pipeline.
if (app.Environment.IsDevelopment())
{
app.UseSwagger();
app.UseSwaggerUI();
}
app.UseHttpsRedirection();
app.UseAuthorization();
app.MapControllers();
app.Run();
Step 14
Next, perform database migration and update commands
add-migration “initial”
update-database
Step 15
After that, create Students Controller and inject MediatR service inside that to send query and command
using CQRSAndMediatRDemo.Commands;
using CQRSAndMediatRDemo.Models;
using CQRSAndMediatRDemo.Queries;
using CQRSAndMediatRDemo.Repositories;
using MediatR;
using Microsoft.AspNetCore.Http;
using Microsoft.AspNetCore.Mvc;
using System;
namespace CQRSAndMediatRDemo.Controllers
{
[Route("api/[controller]")]
[ApiController]
public class StudentsController : ControllerBase
{
private readonly IMediator mediator;
public StudentsController(IMediator mediator)
{
this.mediator = mediator;
}
[HttpGet]
public async Task<List<StudentDetails>> GetStudentListAsync()
{
var studentDetails = await mediator.Send(new GetStudentListQuery());
return studentDetails;
}
[HttpGet("studentId")]
public async Task<StudentDetails> GetStudentByIdAsync(int studentId)
{
var studentDetails = await mediator.Send(new GetStudentByIdQuery() { Id = studentId });
return studentDetails;
}
[HttpPost]
public async Task<StudentDetails> AddStudentAsync(StudentDetails studentDetails)
{
var studentDetail = await mediator.Send(new CreateStudentCommand(
studentDetails.StudentName,
studentDetails.StudentEmail,
studentDetails.StudentAddress,
studentDetails.StudentAge));
return studentDetail;
}
[HttpPut]
public async Task<int> UpdateStudentAsync(StudentDetails studentDetails)
{
var isStudentDetailUpdated = await mediator.Send(new UpdateStudentCommand(
studentDetails.Id,
studentDetails.StudentName,
studentDetails.StudentEmail,
studentDetails.StudentAddress,
studentDetails.StudentAge));
return isStudentDetailUpdated;
}
[HttpDelete]
public async Task<int> DeleteStudentAsync(int Id)
{
return await mediator.Send(new DeleteStudentCommand() { Id = Id });
}
}
}
Step 16
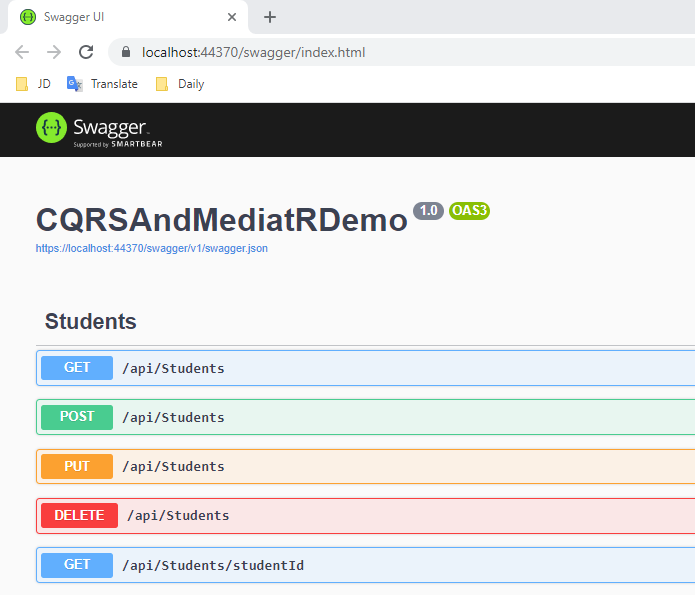
Finally, run your application and access different endpoints using swagger UI.
European best, cheap and reliable ASP.NET hosting with instant activation. HostForLIFE.eu is #1 Recommended Windows and ASP.NET hosting in European Continent. With 99.99% Uptime Guaranteed of Relibility, Stability and Performace. HostForLIFE.eu security team is constantly monitoring the entire network for unusual behaviour. We deliver hosting solution including Shared hosting, Cloud hosting, Reseller hosting, Dedicated Servers, and IT as Service for companies of all size.
