European ASP.NET 4.5 Hosting BLOG

BLOG about ASP.NET 4, ASP.NET 4.5 Hosting and Its Technology - Dedicated to European Windows Hosting Customer

European ASP.NET Core Hosting - HostForLIFE :: Using the Splash Screen in.NET MAUI

clock November 27, 2023 06:53 by author Peter

We will learn how to construct and configure the splash screen in.NET MAUI in this tutorial. If you are new to.NET MAUI, I recommend that you read the articles in this series listed below. When you launch the program, a splash screen appears till the application initialization procedure is complete. The Splash screen is removed once the application is ready for usage.

Let's start by making a new.NET MAUI project to learn how to design or edit the Splash Screen. I've started a new project called SplashScreenExample.

When you run the program on an Android device, you will see the default Splash Screen, as shown in the image below.

A splash screen in.NET MAUI can be provided in a single location within the application. In the "ResourcesSplash folder," you will find a scalable vector graphic, splash.svg, with a build action of MauiSplashScreen in the settings box.

Scalable vector graphics have the advantage of being able to be adjusted to the suitable resolution for the target application. Let's swap out the splash screen icon for something new. I already have a medical icon that I will display on the Splash Screen. I removed the splash.svg icon and replaced it with the medical.svg image, with the build action MauiSplashScreen. Make sure the name of the icon you're adding to the Splash screen is lowercase, begins and finishes with a letter character, and only contains alphanumeric characters or underscore.

Now edit the .csproj file of the project as shown in the below image.


Add the BaseSize of a splash screen, which represents the image's baseline density. If no base size is supplied for the vector picture, the dimensions specified in the image are utilized as the base size. BaseSize is supplied using the BaseSize="W,H" syntax, where W is the image's width and H is its height. The BaseSize value supplied must be divisible by 8. In my case, BaseSize="128,128" is divisible by 8.

Use the TintColor property to modify the color of the SVG icon, and the Color property to adjust the backdrop color.

<!-- Images -->
<MauiSplashScreen Include="Resources\Splash\medical.svg" BaseSize="128,128" Color="#F5F7F8" TintColor="#BE3144"/>

Let's create and execute the app in the Android emulator now. You will notice that the Splash Screen with the medical.svg icon is displayed as per the MauiSplashScreen setup.

HostForLIFE ASP.NET Core Hosting

European best, cheap and reliable ASP.NET hosting with instant activation. HostForLIFE.eu is #1 Recommended Windows and ASP.NET hosting in European Continent. With 99.99% Uptime Guaranteed of Relibility, Stability and Performace. HostForLIFE.eu security team is constantly monitoring the entire network for unusual behaviour. We deliver hosting solution including Shared hosting, Cloud hosting, Reseller hosting, Dedicated Servers, and IT as Service for companies of all size.


European ASP.NET Core Hosting - HostForLIFE :: How to Create Your Own Middleware in ASP.NET Core?

clock November 22, 2023 07:34 by author Peter

ASP.NET Core is a strong platform for building robust and scalable web applications. Middleware, which is essential in managing HTTP requests and responses, is one of its important characteristics. Middleware is a software component that lies between the client and the server, allowing developers to add additional logic to the request processing pipeline.

What exactly is middleware?
In the context of ASP.NET Core, middleware refers to a collection of components that are triggered in the request pipeline to handle requests and responses. Each middleware component receives an HTTP request, performs particular duties, and then either forwards the request or provides a response.

The Request Pipeline's Middleware
In ASP.NET Core, the request pipeline is made up of a series of middleware components. When the server receives a request, it passes it through this pipeline, and each middleware component can.

  • Respond to the Request: Execute tasks such as logging, authentication, and authorization, among others.
  • Process the Response: Make changes to the response before returning it to the client.

Developing Custom Middleware
ASP.NET Core custom middleware allows developers to add their own logic to the request processing pipeline. Here's a step-by-step tutorial on developing bespoke middleware.
using Microsoft.AspNetCore.Http;
using System.Threading.Tasks;

public class CustomMiddleware
{
    private readonly RequestDelegate _next;

    public CustomMiddleware(RequestDelegate next)
    {
        _next = next;
    }

    public async Task InvokeAsync(HttpContext context)
    {
        // Logic before the next middleware
        await _next(context);
        // Logic after the next middleware
    }
}

Step 2: In Startup.cs, configure the Middleware
Add your custom middleware to Startup.cs's Configure function using the UseMiddleware extension method

public void Configure(IApplicationBuilder app)
{
    app.UseMiddleware<CustomMiddleware>();
    // Other middleware configurations
}

Step 3: Put Middleware Logic in Place
You can implement your required logic before and after invoking the next middleware in your custom middleware's InvokeAsync method. This can include authentication, logging, and altering requests/responses, among other things.

Custom Middleware Use Cases
Custom middleware can be used for a variety of applications, including.

  • Authentication: Before forwarding the request to the application, implement custom authentication logic.
  • Logging: For debugging purposes, log request details or errors.
  • Caching: To boost application performance, use caching methods.
  • Response Modification: Make changes to the response before returning it to the client.

Conclusion
In ASP.NET Core, middleware is a sophisticated framework that allows developers to alter the request pipeline. Creating custom middleware gives flexibility in processing requests and answers, allowing developers to smoothly integrate their own logic into the application flow. Developers may improve the functionality, performance, and security of their ASP.NET Core apps by understanding and exploiting middleware.

HostForLIFE ASP.NET Core Hosting

European best, cheap and reliable ASP.NET hosting with instant activation. HostForLIFE.eu is #1 Recommended Windows and ASP.NET hosting in European Continent. With 99.99% Uptime Guaranteed of Relibility, Stability and Performace. HostForLIFE.eu security team is constantly monitoring the entire network for unusual behaviour. We deliver hosting solution including Shared hosting, Cloud hosting, Reseller hosting, Dedicated Servers, and IT as Service for companies of all size.


European ASP.NET Core Hosting - HostForLIFE :: .Net Core gRPC Implementation

clock November 16, 2023 07:29 by author Peter

As the world of microservices evolved, so did the strategy and technologies that surrounded it. Communication across multiple services is one of the most critical components of microservices. Remote procedure calls are one method of communication that is employed, and gRPC provides a complex framework for it.

As the acronym suggests, gRPC stands for Google remote procedure call. It was the framework that Google utilized before opening it out to the open-source community. It employs the HTTP2 protocol.

It has a few advantages, such as.

  • Messages that are brief
  • It is quick
  • It supports full-duplex communication

gRPC is generally used for internal service communication, however it does support web gRPC, which may be accessed via browsers.

Unlike RESTful services, the service signature and message property must be known by both the client and the server.

It offers versatility. Both the client and the server can be constructed in various technology stacks and still communicate effectively.

Now, begin building gRPC in.Net Core, but note that the.Net API project can have both Rest API and gRPC services, and in this tutorial, we will add gRPC to the already existing

RestFull API Project
For Rest API, I use Mediator and CQRS architecture, but you can use any technique.

Step 1: Make a Prototype file.

Now, define the RPC Service structure.

service EventCatalogService {
      rpc GetAllCategories(GetCategoriesRequest) returns (CategoriesResponse);
}


As we can see, the Name is GetAllCategories, the request it is taking is GetCategoriesRequest, and the Response is sending CategoriesResponse.

Now, Create the request and response messages for services.

message GetCategoriesRequest
{
}

message CategoriesResponse {
    repeated CategoryItem Categories = 1;
}

message CategoryItem {
    string CategoryId = 1;
    string Name = 2;
}

The repeated is defining the collection here.

You can see the number against each attribute defining the position of the attribute in the message. We can also reserve some position for future use.
syntax = "proto3";
option csharp_namespace = "EventCatalog.gRPC";

import "google/protobuf/timestamp.proto";

service EventCatalogService {
    rpc GetAllCategories(GetCategoriesRequest) returns (CategoriesResponse);
}

message GetCategoriesRequest {}

message EventByCategoryIdRequest {
    string CategoryId = 1;
}

message EventByEventIdRequest {
    string EventId = 1;
}

message EventByCategoryIdResponse {
    string EventId = 1;
    string Name = 2;
    int32 Price = 3;
    string Artist = 4;
    google.protobuf.Timestamp Date = 5;
    string Description = 6;
    string ImageUrl = 7;
    string CategoryId = 8;
    string CategoryName = 9;
}

message EventByEventIdResponse {
    string EventId = 1;
    string Name = 2;
    int32 Price = 3;
    string Artist = 4;
    google.protobuf.Timestamp Date = 5;
    string Description = 6;
    string ImageUrl = 7;
    string CategoryId = 8;
    string CategoryName = 9;
}

message CategoriesResponse {
    repeated CategoryItem Categories = 1;
}

message CategoryItem {
    string CategoryId = 1;
    string Name = 2;
}

The proto file is ready.

Step 2. Add gRPC to your .Net project
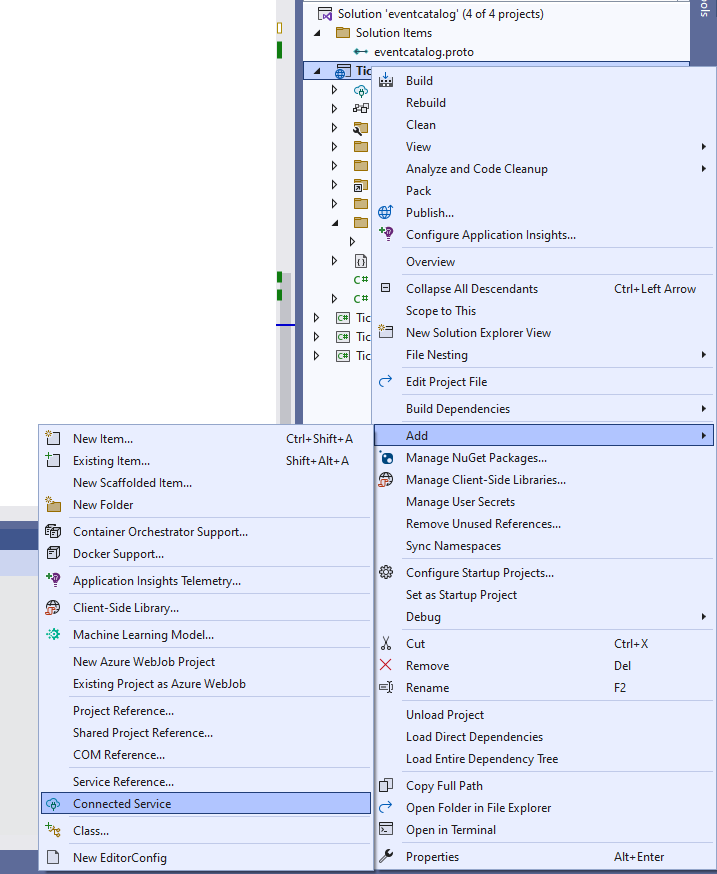
Add the proto file as a connected service.

Click on project connected service.

Now, create the grpc server by giving the proto file path.

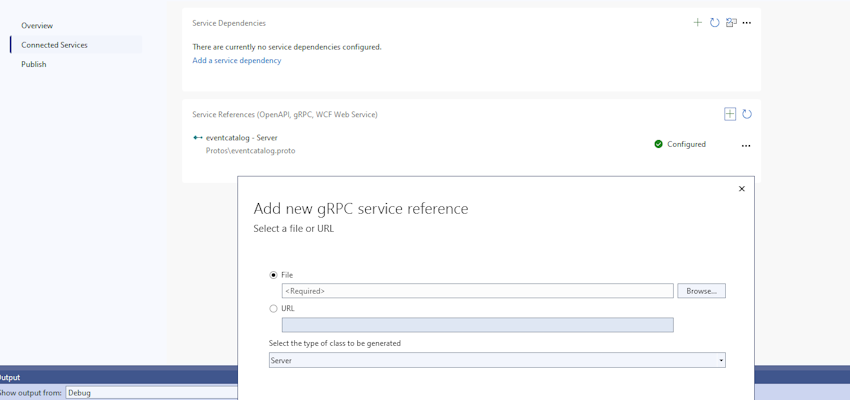
It will include the proto file as well as other necessary Nuget packages in the project.

Step 3: Add the gRPC to your service layer

First, establish the gRPC service that will inherit the basic class of gRPC service, and then integrate your business layer into it. Because I'm using mediatr, I'll get the message from the gRPC service, pass it to my application layer, and then provide a response.

using EventCatalog.gRPC;

using FOA.Application.Mapper;

using Grpc.Core;

using MediatR;

using TicketManagement.Services.EventCatalog.Application.Feature.Category.Queries;

using static EventCatalog.gRPC.EventCatalogService;

namespace TicketManagement.Services.EventCatalog.RPCServices;

public class EventCatalogRPCService : EventCatalogServiceBase

{
    private readonly IMediator _mediator;
    public EventCatalogRPCService(IMediator mediator)
    {
        _mediator = mediator;
    }
    public override async Task<CategoriesResponse> GetAllCategories(GetCategoriesRequest request,ServerCallContext context)

    {
        var serviceResult = await _mediator.Send(new GetAllCategoriesRequest());
        var result =  gRPCMappers.Mapper.Map<List<CategoryItem>>(serviceResult);
        var response = new CategoriesResponse();
        response.Categories.AddRange(result);
        return response;

    }

}


Step 5. Add gRPC to your program.cs
// adding grpc

builder.Services.AddGrpc(cfg => cfg.EnableDetailedErrors = true);


After build, add the following line.
app.MapGrpcService<EventCatalogRPCService>();

Now the server is ready, we need a client to test it.

Step 6. Create gRPC Client

Create a new .Net API project and the Client gRPC through the connected service, but this time, instead of the server, select client.
As the client is only going to send and receive messages from the server, there will be not much code other than basic communication.
var channel = GrpcChannel.ForAddress(_serviceURL);
var client = new EventCatalogServiceClient(channel);
var request = new GetCategoriesRequest();
var response = client.GetAllCategories(request);


It is creating a channel through the service URL, which is the URL of our gRPC Server, and then creating a client through that channel and calling the service through that client.

Step 7. Add authorization to your service
So, adding security to your gRPC service is very easy. As the gRPC is added as a middleware to your application, the already implemented authentication or Authorization is already available to you.

You just need to add an Authorization tag to your service.
[Authorize]
public override async Task<CategoriesResponse> GetAllCategories(GetCategoriesRequest request,ServerCallContext context)
{
        var serviceResult = await _mediator.Send(new GetAllCategoriesRequest());
        var result =  gRPCMappers.Mapper.Map<List<CategoryItem>>(serviceResult);
        var response = new CategoriesResponse();
        response.Categories.AddRange(result);
        return response;

}

HostForLIFE ASP.NET Core Hosting

European best, cheap and reliable ASP.NET hosting with instant activation. HostForLIFE.eu is #1 Recommended Windows and ASP.NET hosting in European Continent. With 99.99% Uptime Guaranteed of Relibility, Stability and Performace. HostForLIFE.eu security team is constantly monitoring the entire network for unusual behaviour. We deliver hosting solution including Shared hosting, Cloud hosting, Reseller hosting, Dedicated Servers, and IT as Service for companies of all size.


European ASP.NET Core Hosting - HostForLIFE :: .NET MAUI - Zxing Barcode Scanner

clock November 7, 2023 06:40 by author Peter

.NET MAUI is a powerful platform for building cross-platform mobile applications, and with the right tools and resources, it's easy to add barcode scanning functionality to your app. In this tutorial, we'll walk you through the steps of implementing a barcode scanner in .NET MAUI using the ZXing.Net.MAUI plugin.

Project Setup
Launch Visual Studio 2022, and in the start, window click Create a new project to create a new project.

In the Create a new project window, select MAUI in the All project types drop-down, select the .NET MAUI App template, and click the Next button.

In the configure your new project window, name your project, choose a suitable location for it, and click the Next button.  .Net MAUI - Zxing Barcode Scanner


In the Additional information window, click the Create button.

Once the project is created, we can able to see the Android, iOS, Windows, and other running options in the toolbar. Press the emulator or run button to build and run the app.

Implementation
The successor to ZXing.Net.Mobile: barcode scanning and generation for .NET MAUI applications. First, we need to add the ZXing.Net.MAUI library to our project as a dependency. To do this, open the NuGet Package Manager and search for "ZXing.Net.MAUI". Install the package in your .NET MAUI project.

Install ZXing.Net.MAUI
Install the ZXing.Net.MAUI NuGet package on your .NET MAUI application. Make sure to initialize the plugin first in your MauiProgram.cs, see below
// Add the using to the top
using ZXing.Net.Maui;
// ... other code
public static MauiApp Create() {
    var builder = MauiApp.CreateBuilder();
    builder.UseMauiApp & lt;
    App & gt;
    ().UseBarcodeReader(); // Make sure to add this line
    return builder.Build();
}

Now we just need to add the right permissions to our app metadata. Find below how to do that for each platform.

For Android go to your "AndroidManifest.xml" file (under the Platforms\Android folder) and add the following permissions inside of the "manifest" node.
<uses-permission android:name="android.permission.CAMERA" />

For iOS go to your "info.plist" file (under the Platforms\iOS folder) and add the following permissions inside of the "dict" node:
<key>NSCameraUsageDescription</key>
<string>This app uses barcode scanning to...</string>


Make sure that you enter a clear and valid reason for your app to access the camera. This description will be shown to the user.

Using ZXing.Net.Maui
If you're using the controls from XAML, make sure to add the right XML namespace in the root of your file, e.g:
xmlns:zxing="clr-namespace:ZXing.Net.Maui.Controls;assembly=ZXing.Net.MAUI"

<zxing:CameraBarcodeReaderView
  x:Name="cameraBarcodeReaderView"
  BarcodesDetected="BarcodesDetected" />


Full Code of MainPage.xaml
<?xml version="1.0" encoding="utf-8" ?>
<ContentPage xmlns="http://schemas.microsoft.com/dotnet/2021/maui"
             xmlns:x="http://schemas.microsoft.com/winfx/2009/xaml"
             xmlns:zxing="clr-namespace:ZXing.Net.Maui.Controls;assembly=ZXing.Net.MAUI"
             x:Class="MauiTutorial9.MainPage">
    <Grid>
        <zxing:CameraBarcodeReaderView
            Grid.Row="0"
            Grid.RowSpan="3"
            x:Name="barcodeView"
            BarcodesDetected="BarcodesDetected" />
        <Label Grid.Row="0"
               Text="Scan Barcode..."
               TextColor="White"
               FontSize="Subtitle"
               HorizontalOptions="Center"
               VerticalOptions="Center"/>
        <Label Grid.Row="2"
               Text=""
               x:Name="lbl"
               TextColor="White"
               FontSize="Subtitle"
               HorizontalOptions="Center"
               VerticalOptions="Center"/>
    </Grid>
</ContentPage>


Configure Reader options
cameraBarcodeReaderView.Options = new BarcodeReaderOptions {
    Formats = BarcodeFormats.OneDimensional,
        AutoRotate = true,
        Multiple = true
};

Toggle Torch
cameraBarcodeReaderView.IsTorchOn = !cameraBarcodeReaderView.IsTorchOn;

Flip between the Rear/Front cameras
cameraBarcodeReaderView.CameraLocation
  = cameraBarcodeReaderView.CameraLocation == CameraLocation.Rear ? CameraLocation.Front : CameraLocation.Rear;


Handle detected barcode(s)

protected void BarcodesDetected(object sender, BarcodeDetectionEventArgs e) {
    foreach(var barcode in e.Results)
    Console.WriteLine($ "Barcodes: {barcode.Format} -> {barcode.Value}");
}


Full code of MainPage.xaml.cs
using ZXing.Net.Maui;
namespace MauiTutorial9;
public partial class MainPage: ContentPage {
    public MainPage() {
        InitializeComponent();
    }
    protected void BarcodesDetected(object sender, BarcodeDetectionEventArgs e) {
        MainThread.BeginInvokeOnMainThread(() => {
            lbl.Text = $ "{e.Results[0].Format}->{e.Results[0].Format}";
            barcodeView.IsDetecting = false;
        });
    }
}

Demo

Full Code
<?xml version="1.0" encoding="utf-8" ?>
<ContentPage xmlns="http://schemas.microsoft.com/dotnet/2021/maui"
             xmlns:x="http://schemas.microsoft.com/winfx/2009/xaml"
             xmlns:zxing="clr-namespace:ZXing.Net.Maui.Controls;assembly=ZXing.Net.MAUI"
             x:Class="MauiTutorial9.MainPage">
    <Grid>
        <zxing:CameraBarcodeReaderView
            Grid.Row="0"
            Grid.RowSpan="3"
            x:Name="barcodeView"
            BarcodesDetected="BarcodesDetected" />
        <Label Grid.Row="0"
               Text="Scan Barcode..."
               TextColor="White"
               FontSize="Subtitle"
               HorizontalOptions="Center"
               VerticalOptions="Center"/>
        <Label Grid.Row="2"
               Text=""
               x:Name="lbl"
               TextColor="White"
               FontSize="Subtitle"
               HorizontalOptions="Center"
               VerticalOptions="Center"/>
    </Grid>
</ContentPage>


using ZXing.Net.Maui;
namespace MauiTutorial9;
public partial class MainPage: ContentPage {
    public MainPage() {
        InitializeComponent();
    }
    protected void BarcodesDetected(object sender, BarcodeDetectionEventArgs e) {
        MainThread.BeginInvokeOnMainThread(() => {
            lbl.Text = $ "{e.Results[0].Format}->{e.Results[0].Format}";
            barcodeView.IsDetecting = false;
        });
    }
}

Download Code
You can download the code from GitHub. If you have any doubts, feel free to post a comment. If you liked this article, and it is useful to you, do like, share the article & star the repository on GitHub.

HostForLIFE ASP.NET Core Hosting

European best, cheap and reliable ASP.NET hosting with instant activation. HostForLIFE.eu is #1 Recommended Windows and ASP.NET hosting in European Continent. With 99.99% Uptime Guaranteed of Relibility, Stability and Performace. HostForLIFE.eu security team is constantly monitoring the entire network for unusual behaviour. We deliver hosting solution including Shared hosting, Cloud hosting, Reseller hosting, Dedicated Servers, and IT as Service for companies of all size.


About HostForLIFE

HostForLIFE is European Windows Hosting Provider which focuses on Windows Platform only. We deliver on-demand hosting solutions including Shared hosting, Reseller Hosting, Cloud Hosting, Dedicated Servers, and IT as a Service for companies of all sizes.

We have offered the latest Windows 2019 Hosting, ASP.NET 5 Hosting, ASP.NET MVC 6 Hosting and SQL 2019 Hosting.


Month List

Tag cloud

Sign in