European ASP.NET 4.5 Hosting BLOG

BLOG about ASP.NET 4, ASP.NET 4.5 Hosting and Its Technology - Dedicated to European Windows Hosting Customer

European ASP.NET Core Hosting - HostForLIFE :: New File Scope Feature In .NET 7

clock November 28, 2022 07:55 by author Peter

Microsoft has just released .NET 7 on 14th November 2022. In the previous article, we looked at improvements in string literals. Today, we will look at another feature introduced with .NET 7 and that is the file access modifier. Let us begin.

The file access modifier keyword
Let us create a console application using Visual Studio 2022 Community edition.


Now, add a new class as below,

Next, add the below code to the new class,
namespace DotNet7File {
    public class FileTest {
        public void PrintDateCall() {
            Console.WriteLine("Printed from the FileTest.cs file");
        }
    }
}


Then, add another class as below,


And add the below code to it,
namespace DotNet7File {
    public class FileTest {
        public void PrintDateCall() {
            Console.WriteLine("Printed from the AnotherFileTest.cs file");
        }
    }
}

You will see the below errors,


The reason is that the same class has already been defined in this namespace. Now change the code in the second file to the below,
namespace DotNet7File {
    file class FileTest {
        public void PrintDateCall() {
            Console.WriteLine("Printed from the AnotherFileTest.cs file");
        }
    }
}


All will compile fine. This is because the scope of the class in the second file has been changed to file and hence it is accessible at the file level only.

Add the below code to the “Program.cs” file,
using DotNet7File;
FileTest fileTest = new ();
fileTest.PrintDateCall();

Run the application and you will see the below output,


As expected, the class with the public modifier was created and called. So, how do we call the file level class. It can be called from within the file. Change your code in the second file as below,
namespace DotNet7File {
    file class FileTest {
        public void PrintDateCall() {
            Console.WriteLine("Printed from the AnotherFileTest.cs file");
        }
    }
    public class ToCallExternally {
        public void CallTheFileLevelClass() {
            FileTest fileTest = new();
            fileTest.PrintDateCall();
        }
    }
}

And update the code in the Program.cs file as below,
using DotNet7File;
ToCallExternally toCallExternally = new ();
toCallExternally.CallTheFileLevelClass();


Now, run the application and you will see the below,


Here, we see the class at the file level is used.

In this article, we looked at a new feature that has been introduced with .NET 7. The usage of the file modifier would probably be helpful in the design of compiler-related features in order to avoid conflict with user-defined classes. In the next article, we will look into another feature of .NET 7.

HostForLIFE.eu ASP.NET Core Hosting

European best, cheap and reliable ASP.NET hosting with instant activation. HostForLIFE.eu is #1 Recommended Windows and ASP.NET hosting in European Continent. With 99.99% Uptime Guaranteed of Relibility, Stability and Performace. HostForLIFE.eu security team is constantly monitoring the entire network for unusual behaviour. We deliver hosting solution including Shared hosting, Cloud hosting, Reseller hosting, Dedicated Servers, and IT as Service for companies of all size.


European ASP.NET Core Hosting - HostForLIFE :: Minimal API Using .NET Core 6 Web API

clock November 21, 2022 08:05 by author Peter

We will discuss minimal APIs in .NET Core 6, their purpose, and step-by-step implementation.

Minimal APIs Implementation using .NET Core 6

Step 1
Create a new .NET Core Web API

Step 2
Configure your project

Step 3
Provide additional information as I showed below


Step 4
Install the following NuGet packages

Project structure

Step 5
Create a Product class inside the entities folder
namespace MinimalAPIsDemo.Entities
{
    public class Product
    {
        public int ProductId { get; set; }
        public string ProductName { get; set; }
        public string ProductDescription { get; set; }
        public int ProductPrice { get; set; }
        public int ProductStock { get; set; }
    }
}

Step 6

Next, create DbContextClass inside the Data folder
using Microsoft.EntityFrameworkCore;
using MinimalAPIsDemo.Entities;

namespace MinimalAPIsDemo.Data
{
    public class DbContextClass : DbContext
    {
        protected readonly IConfiguration Configuration;

        public DbContextClass(IConfiguration configuration)
        {
            Configuration = configuration;
        }
        protected override void OnConfiguring(DbContextOptionsBuilder options)
        {
            options.UseSqlServer(Configuration.GetConnectionString("DefaultConnection"));
        }

        public DbSet<Product> Product { get; set; }
    }
}


Step 7

Register the Db Context service in the DI container inside the Program class which is the entry point of our application
// Add services to the container.
builder.Services.AddDbContext<DbContextClass>();


Step 8
Add database connection string inside the app settings file
{
  "Logging": {
    "LogLevel": {
      "Default": "Information",
      "Microsoft.AspNetCore": "Warning"
    }
  },
  "AllowedHosts": "*",
  "ConnectionStrings": {
    "DefaultConnection": "Data Source=DESKTOP;Initial Catalog=MinimalAPIDemo;User Id=sa;Password=database;"
  }
}


Step 9
Later on, add different API endpoints inside the Program class with the help of Map and specified routing pattern as I showed below
using Microsoft.EntityFrameworkCore;
using MinimalAPIsDemo.Data;
using MinimalAPIsDemo.Entities;

var builder = WebApplication.CreateBuilder(args);

// Add services to the container.
builder.Services.AddDbContext<DbContextClass>();

// Learn more about configuring Swagger/OpenAPI at https://aka.ms/aspnetcore/swashbuckle
builder.Services.AddEndpointsApiExplorer();
builder.Services.AddSwaggerGen();

var app = builder.Build();

// Configure the HTTP request pipeline.
if (app.Environment.IsDevelopment())
{
    app.UseSwagger();
    app.UseSwaggerUI();
}

//get the list of product
app.MapGet("/productlist", async (DbContextClass dbContext) =>
{
    var products = await dbContext.Product.ToListAsync();
    if (products == null)
    {
        return Results.NoContent();
    }
    return Results.Ok(products);
});

//get product by id
app.MapGet("/getproductbyid", async (int id, DbContextClass dbContext) =>
{
    var product = await dbContext.Product.FindAsync(id);
    if (product == null)
    {
        return Results.NotFound();
    }
    return Results.Ok(product);
});

//create a new product
app.MapPost("/createproduct", async (Product product, DbContextClass dbContext) =>
{
    var result = dbContext.Product.Add(product);
    await dbContext.SaveChangesAsync();
    return Results.Ok(result.Entity);
});

//update the product
app.MapPut("/updateproduct", async (Product product, DbContextClass dbContext) =>
{
    var productDetail = await dbContext.Product.FindAsync(product.ProductId);
    if (product == null)
    {
        return Results.NotFound();
    }
    productDetail.ProductName = product.ProductName;
    productDetail.ProductDescription = product.ProductDescription;
    productDetail.ProductPrice = product.ProductPrice;
    productDetail.ProductStock = product.ProductStock;

    await dbContext.SaveChangesAsync();
    return Results.Ok(productDetail);
});

//delete the product by id
app.MapDelete("/deleteproduct/{id}", async (int id, DbContextClass dbContext) =>
{
    var product = await dbContext.Product.FindAsync(id);
    if (product == null)
    {
        return Results.NoContent();
    }
    dbContext.Product.Remove(product);
    await dbContext.SaveChangesAsync();
    return Results.Ok();
});

app.Run();


Step 10
Run the following entity framework command to create migration and update the database
add-migration "initial"
update-database


Step 11
Finally, run your application


European ASP.NET Core 7.0 Hosting - HostForLIFE :: Using NCache As IdentityServer4 Cache And Store

clock November 16, 2022 08:48 by author Peter

Identity Server4 is an open-source authentication provider with OpenID connect and OAuth2.0 framework for ASP.NET Core. It acts as a centralized authentication provider or security token server (STS). It will be ideal to go through layers when you have multiple API/microservices applications and you should have single security token server to handle the authentication so that you really don’t have to define the Authentication in each and every application.   

Identity server4 is a simple and straightforward STS. The user uses the clients (ASP.NET MVC or angular or react application and so on) to access the data, these users are authenticated by Identity Server to use the client. After successful authentication, the Identity server will send a token to client. Then client should use this token to access the data from the APIs.

Identity server4 provides the flexibility to use external storage like relational database, NoSQL, or in-memory data storage. NCache, being a distributed and scalable in-memory key-value data store is a great fit for IdentityServer4. In this article, you will learn how to use NCache as external in-memory storage for identityServer4. The main advantage of using external in-memory storage is to improve the application performance
Advantages of using Identity Server4  

    Secure your resources
    Authenticate users either using a local account store or an external provider
    Validate tokens  

What is NCache?
NCache is an Open Source in-memory distributed cache for .NET, Java, and Node.js. NCache is extremely fast and linearly scalable and caches application data to reduce expensive database trips. Use NCache to remove performance bottlenecks related to your data storage and databases and scale your .NET, Java, and Node.js applications to extreme transaction processing (XTP).
Using NCache as IdentityServer4

 NCache can be used with IdentityServer in the following ways.

     NCache as IdentityServer4 Store
     NCache as IdentityServer4 Cache

1. NCache as an In-Memory IdentityServer4 Store
NCache acts as a caching layer on top of the IdentityServer 4 persistence configuration and operational stores to speed up the operation through in-memory caching and also reduce the frequent database hits.

NCache as an IdentityServer4 Store, stores information about the clients, Identity resources and APIs etc. You have an option to choose NCache as one store or both of them.

The below figure will give you a complete understanding of NCache as an In-Memory IdentityServer4 Store.
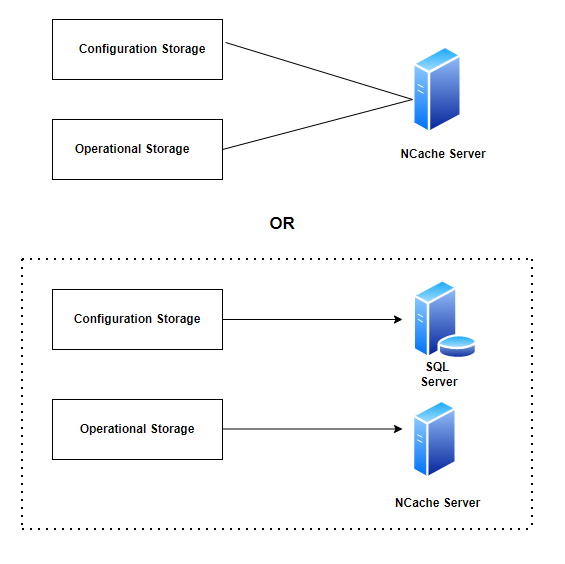
Option 1
NCache store acts as both a configuration and operational store

Option 2
Configuration Storage as a SQL Server or some other storage and the Operational storage as an NCache Server.

Note: Both cache and store roles of NCache with IdentityServer4 can also be a mix and match using the implementation from IIdentityServerBuilder NCache extension for ASP.NET Core.  

What is configuration store?

A store where the static data is stored which doesn’t change frequently.

What is an operational store?
A store where the operational data is kept on which operations are performed and the changes are applied more frequently.

Configure NCache as IdentityServer4 Store    
For a demo, I have used my existing ASP.NET Core IdentityServer4 application, you can download it from GiHub.
    Download and install “Alachisoft.NCache.IdentityServer4” package from NuGet Package Manager
    Create a new Startup file “StartupNCache.cs” and add the following code.

public void ConfigureServices(IServiceCollection services) {
    services.AddControllersWithViews();
    var builder = services.AddIdentityServer().AddTestUsers(TestUsers.Users)
        /// Add NCache as a configuration store
        .AddNCacheConfigurationStore(options => {
            options.CacheId = _configuration["NCacheConfiguration:CacheId"];
            var serverList = _configuration["Servers"].Split(',').Select(x => x.Trim()).ToList().Select(y => new NCacheServerInfo(y, 9800)).ToList();
            options.ConnectionOptions = new NCacheConnectionOptions {
                ServerList = serverList,
                    EnableClientLogs = true,
                    LogLevel = NCacheLogLevel.Debug
            };
        })
        /// Add NCache as an operational store
        .AddNCachePersistedGrantStore(options => {
            options.CacheId = _configuration["NCacheConfiguration:CacheId"];
            var serverList = _configuration["NCacheConfiguration:Servers"].Split(',').Select(x => x.Trim()).ToList().Select(y => new NCacheServerInfo(y, 9800)).ToList();
            options.ConnectionOptions = new NCacheConnectionOptions {
                ServerList = serverList,
                    EnableClientLogs = true,
                    LogLevel = NCacheLogLevel.Debug
            };
        }).AddNCacheDeviceCodeStore(options => {
            options.CacheId = _configuration["NCacheConfiguration:CacheId"];
            var serverList = _configuration["NCacheConfiguration:Servers"].Split(',').Select(x => x.Trim()).ToList().Select(y => new NCacheServerInfo(y, 9800)).ToList();
            options.ConnectionOptions = new NCacheConnectionOptions {
                ServerList = serverList,
                    EnableClientLogs = true,
                    LogLevel = NCacheLogLevel.Debug
            };
        })
}


In appsettings.json file, modify the value of the CacheId key to the name of the cluster cache you are using. For multiple Servers keys, use a comma separated list of one or more IP addresses belonging to the NCache servers.
"NCacheConfiguration": {
  "CacheId": "demoCache",
  "Servers": "[your server adddress]"
},


Replace [your server address] with your server address used for Clustred Caches in my case it is 192.168.1.2

Define the new startup file in program.cs file
webBuilder.UseStartup<StartupNCache>();

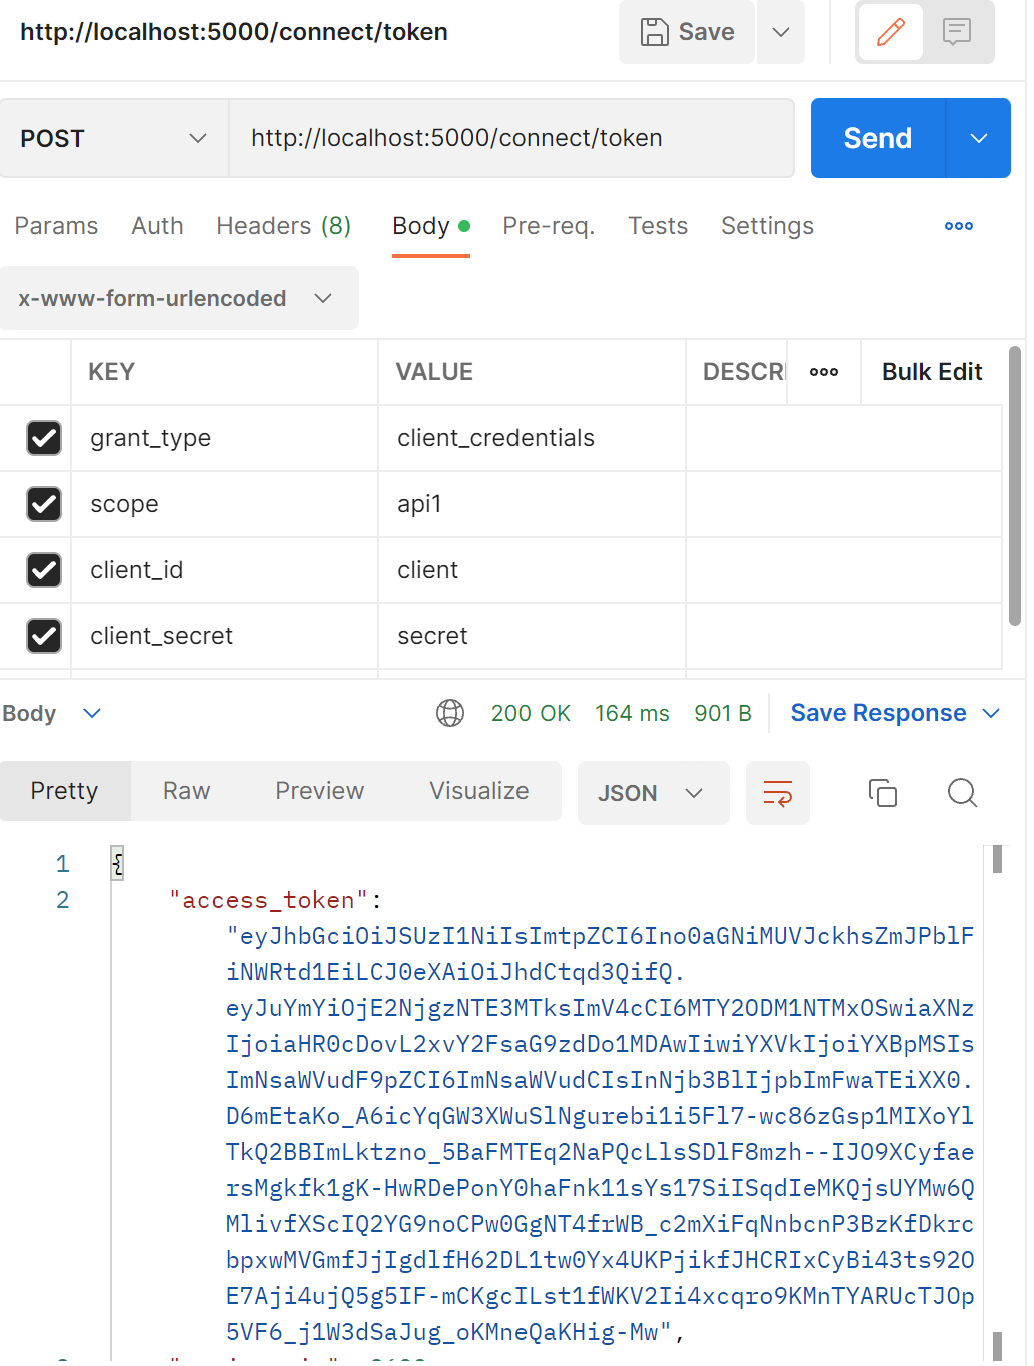
Run the application, let's test the token generation from postman.
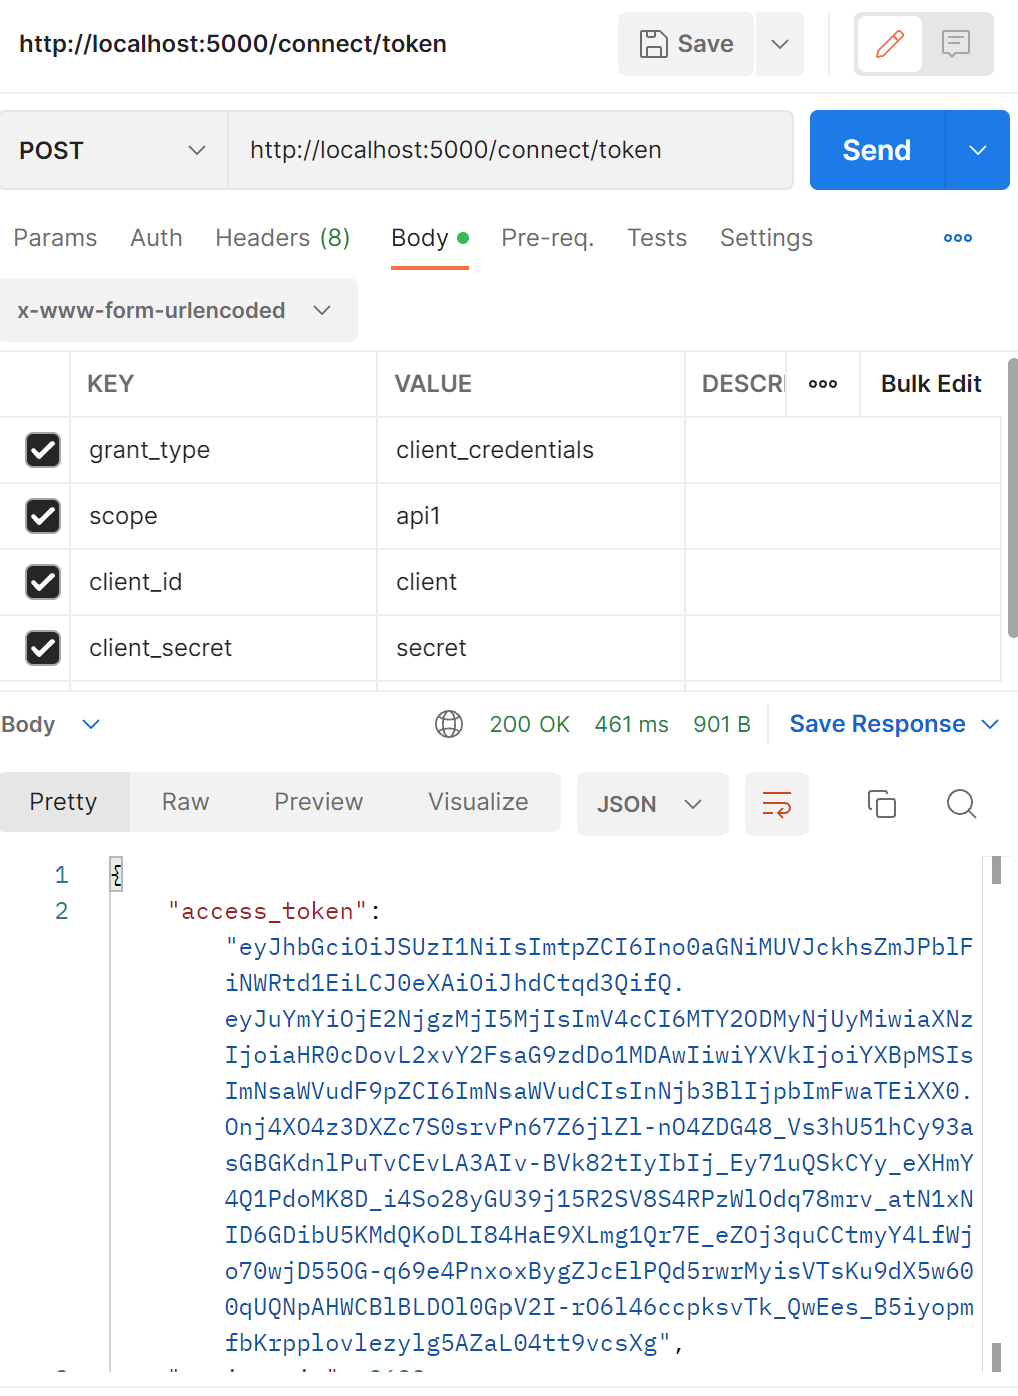
From the above figure you can observe, the ASP.NET Core application with NCache as IdentityServer4 running under port 5000 and the token has been successfully generated from Postman tool. Now open NCache web manager to check the statistics.
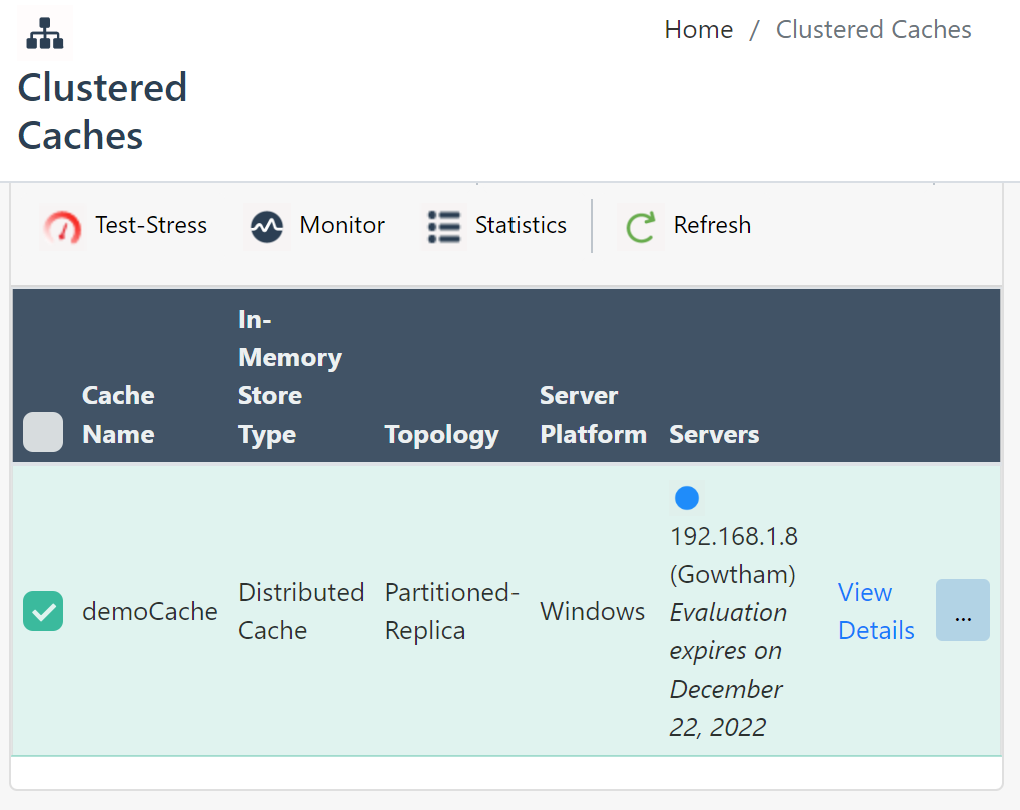
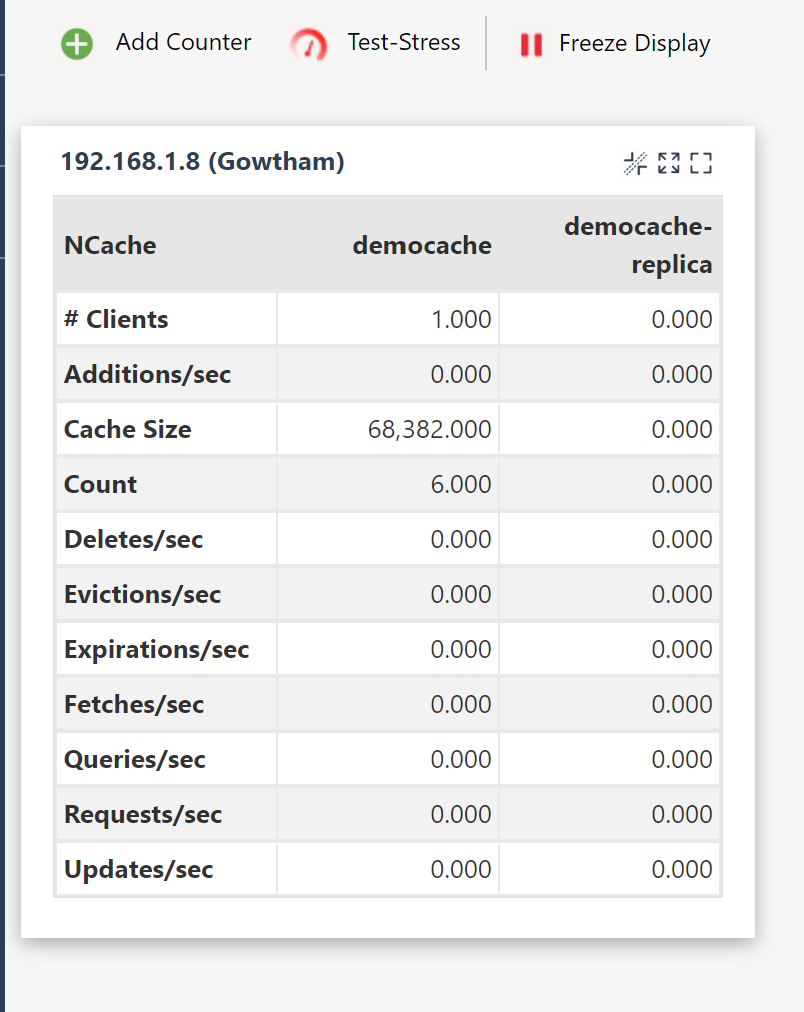
 

From the above statistics, the clients parameter gives you the no of connection established count, In my case, I have connected only one application to the NCache clustered cache, so the count is 1.

The count parameter gives you the number of key value pair cached.

2. NCache as an In-Memory IdentityServer4 Cache Implementation
NCache can be used as a configuration and persistent grant store, which increases performance by removing the bottleneck to get data from a disk. The in-memory content of the cache can then be periodically persisted to disk, this will reduce the average time taken to get the data.

NCache’s core functionality is to cache data persisting in your data source for faster access and better performance. While you can use NCache as your data store, you can also use it between your data store and the application by caching the configuration and/or the operational data in NCache.

The below figure will give you a complete understanding of NCache as an In-Memory IdentityServer4 Cache.
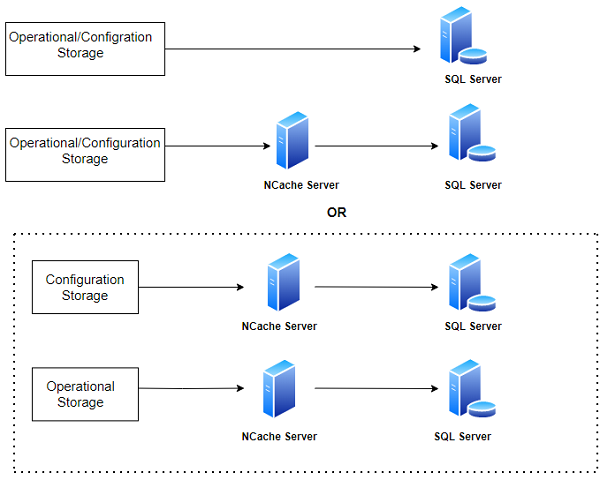

Install the following NuGet package to your application:
"Alachisoft.NCache.IdentityServer4""

Create a new file StartupEFCore and add the following code,

Download and install “IdentityServer4.NCache.Options” package from NuGet package manager.
public void ConfigureServices(IServiceCollection services) {
    ...
    var builder = services.AddIdentityServer().AddTestUsers(TestUsers.Users)
        /// Add NCache as a configuration store
        .AddNCacheCaching(options => {
            options.CacheId = _configuration["NCacheConfiguration:CacheId"];
            var serverList = _configuration["Servers"].Split(',').Select(x => x.Trim()).ToList().Select(y => new NCacheServerInfo(y, 9800)).ToList();
            options.ConnectionOptions = new NCacheConnectionOptions {
                ServerList = serverList
            };
            options.DurationOfBreakInSeconds = 120;
        })
        /// Add NCache as a persisted operational grant store
        .AddClientStoreCache < ClientStore > ().AddResourceStoreCache < ResourceStore > ().AddNCacheCorsPolicyCache < CorsPolicyService > ().AddNCachePersistedGrantStoreCache < PersistedGrantStore > (options => {
            options.CacheId = _configuration["NCacheConfiguration:CacheId"];
            var serverList = _configuration["Servers"].Split(',').Select(x => x.Trim()).ToList().Select(y => new NCacheServerInfo(y, 9800)).ToList();
            options.ConnectionOptions = new NCacheConnectionOptions {
                ServerList = serverList
            };
            options.DurationOfBreakInSeconds = 120;
        })
        /// NCache as an IProfileService default implementation
        .AddNCacheProfileServiceCache < TestUserProfileService > (options => {
            options.Expiration = TimeSpan.FromMinutes(10);
            options.KeyPrefix = "NCache-";
            options.KeySelector = (context) => context.Subject.Claims.First(_ => _.Type == "sub").Value;
            options.ShouldCache = (context) => true;
        });
}


In appsettings.json file, modify the value of the CacheId key to the name of the cluster cache you are using. For multiple Servers keys, use a comma separated list of one or more IP addresses belonging to the NCache servers.
{
    "NCacheConfiguration": {
        "CacheId": "demoCache",
        "Servers": "192.168.1.8"
    },
    "ConnectionStrings": {
        "db": "server=;database=IdentityServerNCacheLocal;UserId=userid;Password=password;"
    }
}


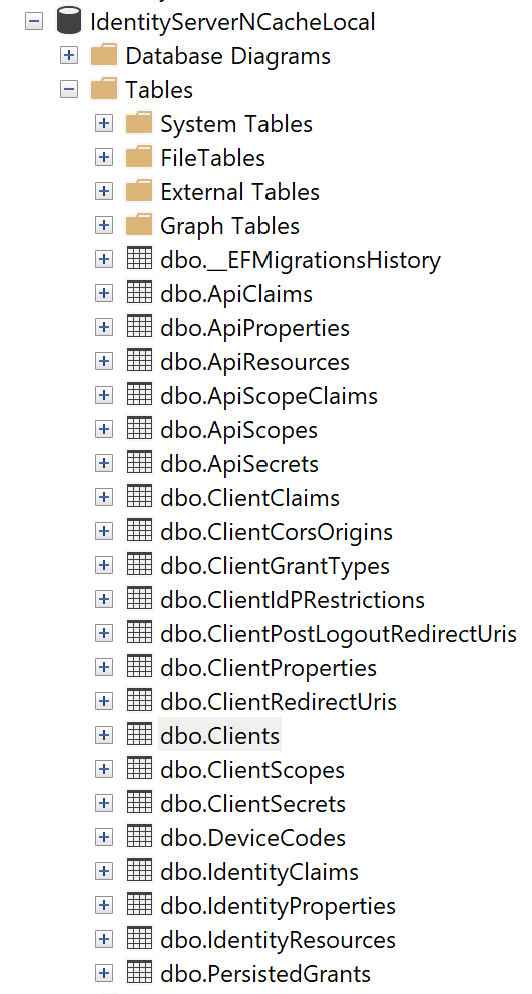
Run the application, the client information are stored in the database. Since we have NCahce with configurational and operational storage the data will be cached by NCache Clustered cache, so that we can skip the database transaction to improve our application performance.

Database tables

Get the token using Postman

Trace of the database transaction given below, while getting a token using Postman.
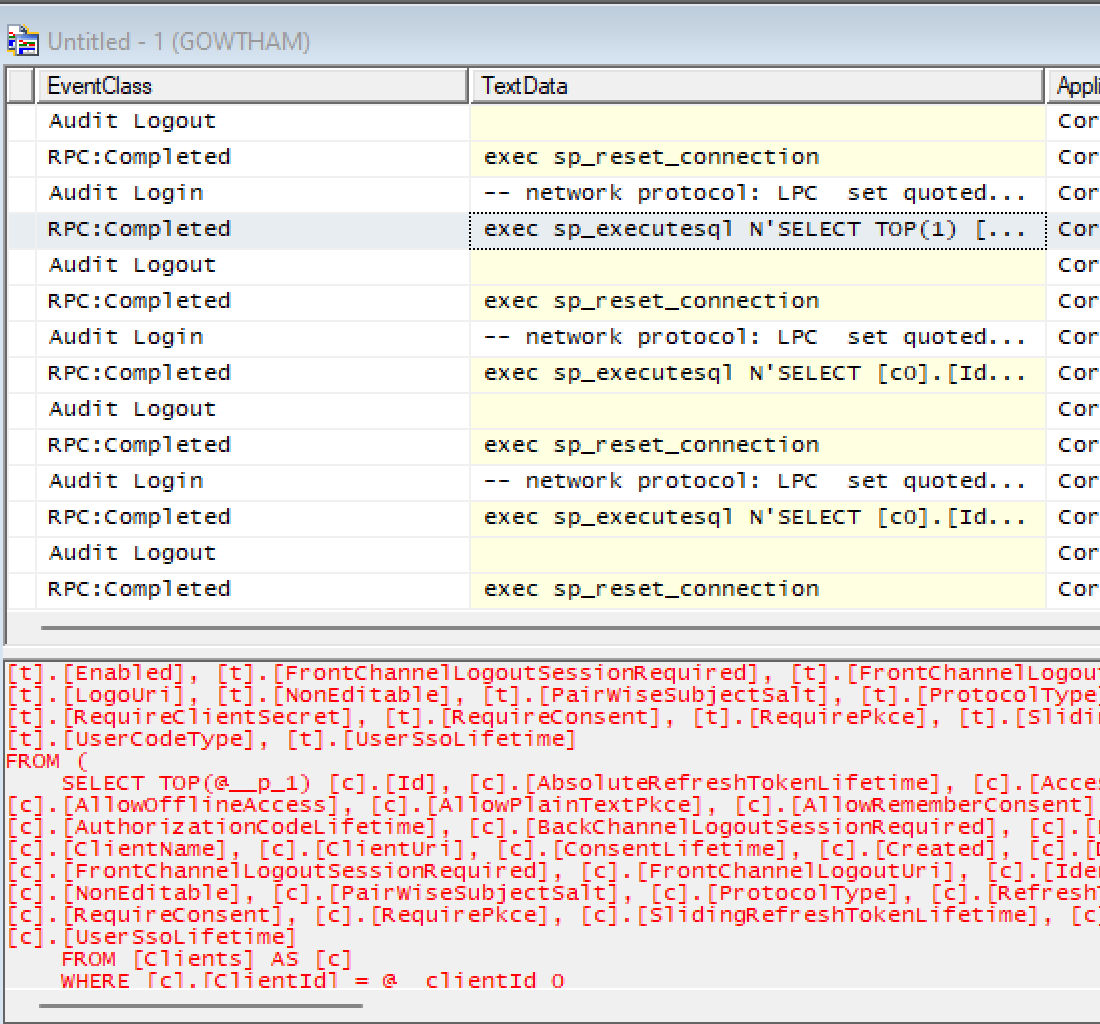

First time it will hit a database to generate a new token.
Check the Cache count in NCache web Manager
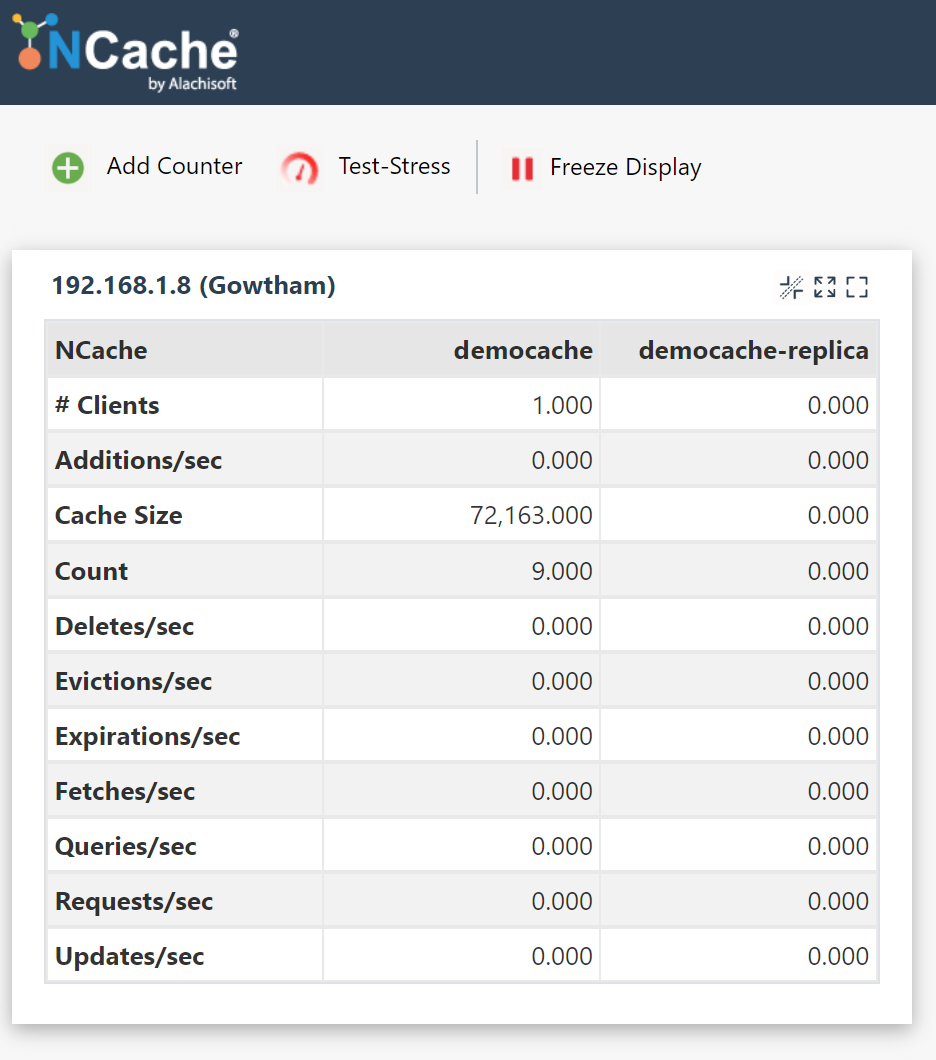
Previously the count is 6, and now the count is 9 and the cache size also increased, which means the token has been cached to NCache Clustered cache. Next time when you try to get a token, there won't be any database transaction

Once again get the token from Postman, now the token and other details are from NCacher server. 
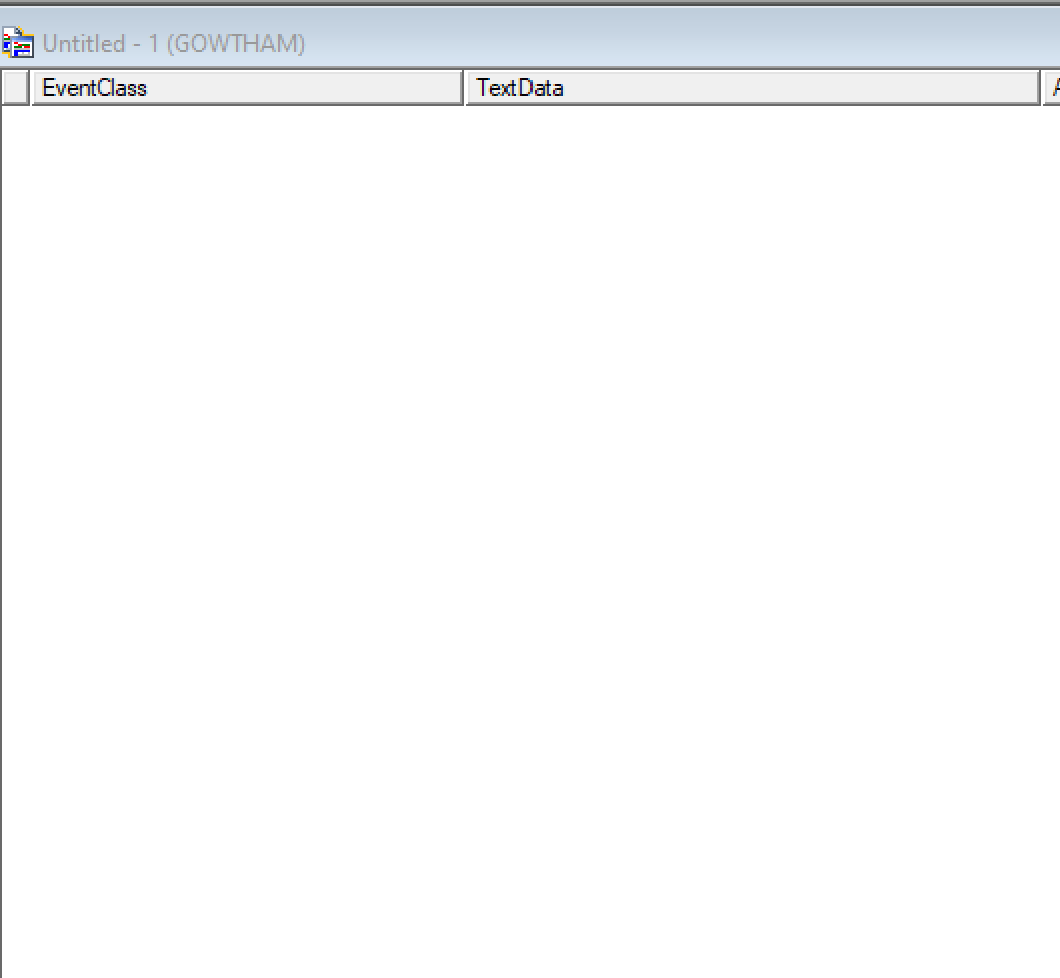

In the profiler no transaction has been recorded, which means no database transaction had happened when you try to get the token for second time. This approach will help us to improve the application performance by reducing the database trips.

Implementing the OpenId Connect using IdentitServer4 will secure our application by authenticating the user, on top of it by integrating the NCache as an external storage will improve your application performance and also, it’s provided you a lot of features by acting as IdentityServer Cache and store.

HostForLIFE.eu ASP.NET Core Hosting

European best, cheap and reliable ASP.NET hosting with instant activation. HostForLIFE.eu is #1 Recommended Windows and ASP.NET hosting in European Continent. With 99.99% Uptime Guaranteed of Relibility, Stability and Performace. HostForLIFE.eu security team is constantly monitoring the entire network for unusual behaviour. We deliver hosting solution including Shared hosting, Cloud hosting, Reseller hosting, Dedicated Servers, and IT as Service for companies of all size.


European ASP.NET Core Hosting - HostForLIFE :: Getting Started With .NET 7.0

clock November 11, 2022 07:46 by author Peter

Microsoft has released .NET 7 preview 1 last week Feb 17th, 2022. In this write-up, we will learn what’s new in .NET 7 preview and create a sample project in .NET 7. As per Microsoft, it is built on the foundation of .NET 6 that includes a unified set of base libraries, runtime, and SDK, an effortless development experience, and high-pitched developer productivity. Mainly, .NET 7 has brought enhanced support for cloud-native scenarios, tools to make it easier to upgrade legacy projects, and simplifying the developer experience by making it easier to work with containers. To know more about .NET 7 Preview 1 and its features, you can check the official announcement.

Prerequisites
    .NET 7 Preview
    Visual Studio 2022 17.2 Preview1

You can download and install .NET 7 preview from here. Additionally, you need to download and install Visual Studio 2022 17.2 Preview1 (VS2022 17.2 Preview 1) from Official Microsoft here.

If you have already installed the visual studio 2022 17.1.0 version then, installing the above two prerequisites will be enough for you. You can directly configure from Visual Studio 2022 17.1.0 to Visual Studio 2022 17.2 Preview1 by changing the update setting. For this, you can follow the article Enable Preview version in Visual Studio 2022.

Now, Let’s create a console application in .NET 7.

Step 1
Open Visual Studio 2022 and click Create a new project.

Step 2
Select Console App as shown below and click Next.

Step 3
Give the project name, location of the project, and click on Next.

Step 4
Then, select Framework: .NET 7.0(Preview) as illustrated below and click Create.

Then it will create a project which looks like it as depicted below. You can see, there are no differences in Program.cs file of .NET 6.0 and .NET 7.0 preview. You can refer to the previous article on Getting Started with .NET6 to learn .NET 6.0.


Project.csproj file looks like below.

If you go to the bin folder-->debug, then you will see .net7.0 folder. Inside this folder files including dll, exe, and all relevant files to your project will be available there.


You can run the .exe and launch your application. When you launch the app, it will display the “Hello, World!” message.

Hence, we have created a console application in .NET 7.0.

Summary
In this article, we learned what is needed to get started with .NET 7.0 preview and its features. Additionally, we created the console application in .NET 7. Microsoft has released .NET 7 preview 1 recently which is based on the foundation set up by .NET 6. It is available in Visual Studio 2022 version 17.2 Preview 1 with improvement in Web Tools, Git Tooling, Productivity, Razor (ASP.NET Core) Editor, debugging and Diagnostics, and so on.

HostForLIFE.eu ASP.NET Core Hosting

European best, cheap and reliable ASP.NET hosting with instant activation. HostForLIFE.eu is #1 Recommended Windows and ASP.NET hosting in European Continent. With 99.99% Uptime Guaranteed of Relibility, Stability and Performace. HostForLIFE.eu security team is constantly monitoring the entire network for unusual behaviour. We deliver hosting solution including Shared hosting, Cloud hosting, Reseller hosting, Dedicated Servers, and IT as Service for companies of all size.


European ASP.NET Core Hosting - HostForLIFE :: HTTP Best Practices Using ASP.NET Core?

clock November 7, 2022 08:43 by author Peter

Past few years, we are using Httpclient but are we using it properly? Recently, I came across the code of a senior developer from the other team. The developer was trying to communicate with the microservices by using HttpClient and has implemented his own logic of retry.

Implementing the own logic for retry is not wrong but understanding what overhead it could bring is more important.

The logic that he has written has some major drawbacks

    Usage of HttpClient  
    Usage of retry using loops

In this article, we’ll be covering only about drawbacks of HttpClient and how to fix the issues related to it.

Please find the source code here.
Usage of HttpClient

HttpClient is used to send the HTTP request or receive the HTTP response from the desired endpoint specified.

Internally, HttpClient uses HttpMessageInvoker class.  HttpMessageInvoker class allows the applications to call the SendAsync method(send the HTTP request as an async operation). However, HttpMessageInvoker uses an IDisposable interface to release unmanaged resources.
//
  // Summary:
  //     Provides a class for sending HTTP requests and receiving HTTP responses from
  //     a resource identified by a URI.
  public class HttpClient : HttpMessageInvoker
  {
      //
      // Summary:
      //     Gets or sets the base address of Uniform Resource Identifier (URI) of the Internet
      //     resource used when sending requests.
      //
      // Returns:
      //     The base address of Uniform Resource Identifier (URI) of the Internet resource
      //     used when sending requests.
      public Uri? BaseAddress
      {
          [System.Runtime.CompilerServices.NullableContext(2)]
          get
          {
              throw null;
          }
          [System.Runtime.CompilerServices.NullableContext(2)]
          set
          {
          }
      }

      //
      // Summary:
      //     Gets or sets the global Http proxy.
      //
      // Returns:
      //     A proxy used by every call that instantiates a System.Net.HttpWebRequest.
      //
      // Exceptions:
      //   T:System.ArgumentNullException:
      //     The value passed cannot be null.
      public static IWebProxy DefaultProxy
      {
          get
          {
              throw null;
          }
          set
          {
          }
      }

//
// Summary:
//     A specialty class that allows applications to call the System.Net.Http.HttpMessageInvoker.SendAsync(System.Net.Http.HttpRequestMessage,System.Threading.CancellationToken)
//     method on an HTTP handler chain.
public class HttpMessageInvoker : IDisposable
{
    //
    // Summary:
    //     Initializes an instance of a System.Net.Http.HttpMessageInvoker class with a
    //     specific System.Net.Http.HttpMessageHandler.
    //
    // Parameters:
    //   handler:
    //     The System.Net.Http.HttpMessageHandler responsible for processing the HTTP response
    //     messages.
    public HttpMessageInvoker(HttpMessageHandler handler)
    {
    }

    //
    // Summary:
    //     Initializes an instance of a System.Net.Http.HttpMessageInvoker class with a
    //     specific System.Net.Http.HttpMessageHandler.
    //
    // Parameters:
    //   handler:
    //     The System.Net.Http.HttpMessageHandler responsible for processing the HTTP response
    //     messages.
    //
    //   disposeHandler:
    //     true if the inner handler should be disposed of by Dispose(), false if you intend
    //     to reuse the inner handler.
    public HttpMessageInvoker(HttpMessageHandler handler, bool disposeHandler)
    {
    }

    //
    // Summary:
    //     Releases the unmanaged resources and disposes of the managed resources used by
    //     the System.Net.Http.HttpMessageInvoker.
    public void Dispose()
    {
    }

    //
    // Summary:
    //     Releases the unmanaged resources used by the System.Net.Http.HttpMessageInvoker
    //     and optionally disposes of the managed resources.
    //
    // Parameters:
    //   disposing:
    //     true to release both managed and unmanaged resources; false to releases only
    //     unmanaged resources.
    protected virtual void Dispose(bool disposing)
    {
    }

    //
    // Summary:
    //     Sends an HTTP request with the specified request and cancellation token.
    //
    // Parameters:
    //   request:
    //     The HTTP request message to send.
    //
    //   cancellationToken:
    //     The cancellation token to cancel operation.
    //
    // Returns:
    //     The HTTP response message.
    //
    // Exceptions:
    //   T:System.ArgumentNullException:
    //     The request was null.
    //
    //   T:System.NotSupportedException:
    //     For HTTP/2 and higher or when requesting version upgrade is enabled by System.Net.Http.HttpVersionPolicy.RequestVersionOrHigher.
    //     -or- If using custom class derived from System.Net.Http.HttpContent not overriding
    //     System.Net.Http.HttpContent.SerializeToStream(System.IO.Stream,System.Net.TransportContext,System.Threading.CancellationToken)
    //     method. -or- If using custom System.Net.Http.HttpMessageHandler not overriding
    //     System.Net.Http.HttpMessageHandler.Send(System.Net.Http.HttpRequestMessage,System.Threading.CancellationToken)
    //     method.
    [UnsupportedOSPlatform("browser")]
    public virtual HttpResponseMessage Send(HttpRequestMessage request, CancellationToken cancellationToken)
    {
        throw null;
    }

    //
    // Summary:
    //     Send an HTTP request as an asynchronous operation.
    //
    // Parameters:
    //   request:
    //     The HTTP request message to send.
    //
    //   cancellationToken:
    //     The cancellation token to cancel operation.
    //
    // Returns:
    //     The task object representing the asynchronous operation.
    //
    // Exceptions:
    //   T:System.ArgumentNullException:
    //     The request was null.
    public virtual Task<HttpResponseMessage> SendAsync(HttpRequestMessage request, CancellationToken cancellationToken)
    {
        throw null;
    }
}

Current Implementation
I’m using the default Web API template for both frontend and backend applications.

Backend
[ApiController]
[Route("[controller]")]
public class WeatherForecastController : ControllerBase
{
    private static readonly string[] Summaries = new[]
    {
        "Freezing", "Bracing", "Chilly", "Cool", "Mild", "Warm", "Balmy", "Hot", "Sweltering", "Scorching"
    };

    private readonly ILogger<WeatherForecastController> _logger;

    public WeatherForecastController(ILogger<WeatherForecastController> logger)
    {
        _logger = logger;
    }

    [HttpGet(Name = "GetWeatherForecast")]
    public IEnumerable<WeatherForecast> Get()
    {
        return Enumerable.Range(1, 5).Select(index => new WeatherForecast
        {
            Date = DateTime.Now.AddDays(index),
            TemperatureC = Random.Shared.Next(-20, 55),
            Summary = Summaries[Random.Shared.Next(Summaries.Length)]
        })
        .ToArray();
    }
}

You might have noticed, it’s a default weather controller that comes with a Web API template.
[ApiController]
[Route("[controller]")]
public class WeatherForecastController : ControllerBase
{
    private readonly ILogger<WeatherForecastController> _logger;
    [HttpGet(Name = "GetWeatherForecast")]
    public async Task Get()
    {
        for (int i = 0; i < 100; i++)
        {
            var httpClient = new HttpClient();
            var response = await httpClient.GetAsync("https://localhost:7054/WeatherForecast").Result.Content.ReadAsStringAsync();
        }
    }
}


I’m iterating the HTTPClient 100 times and sending the request to the backend application. All works and everything is right.

But wait, there’s more!

Let’s use the netstat tool to understand the state of the socket on the machine running.

Huh, that’s weird. The application has exited but still, there are a bunch of connections open. They are in the time_wait state which means the connection has been closed on one side(ours) but still waiting for the additional packets coming in on it because of the network delay.

As discussed before, HttpClient internally uses an IDisposable interface. Try the Using keyword to release the socket after completing our operation.
public async Task Get() {
    for (int i = 0; i < 100; i++) {
        using
        var httpClient = new HttpClient();
        var response = await httpClient.GetAsync("https://localhost:7054/WeatherForecast").Result.Content.ReadAsStringAsync();
    }
}


Now, let us perform netstat again,

Even after applying Using keyword, the results are the same then what is the use of Disposable interface – not able to release the sockets even after completion.  When dispose of is called, the connection will stay open for 4 mins to handle the network traffic.
 
Unlike Monolithic architecture, usage of HttpClient has increased in the new era of microservice architecture. Microservice or container-based applications ideally have limited resources. Ex: 400 MB of Memory and  400 MI of CPU

Now imagine, the socket remaining open for 4 mins with the container of limited resources. The sockets will exhaust soon and the application starts throwing a socket exhaustion error.

Enough about drawbacks, solution time
HttpClientFactory has been introduced in .Net Core 2.1 and it’s been around for quite a while.
HttpClientFactory manages the life cycle of the HTTP instance. All the life cycle management is taken care of by the factory class and provides a nice way of configuring the HTTP client in the startup. You have the option to implement factory class either by using Named clients or typed clients.

Named Client
Named clients are useful when,
App uses HttpClient for different components/services
Many HttpClient instances have different configurations. Ex: One HttpClient instance for Order service and another instance for Product service.
public class WeatherForecastController : ControllerBase
{
    private readonly ILogger<WeatherForecastController> _logger;
    private readonly IHttpClientFactory _httpClientFactory;

    public WeatherForecastController(ILogger<WeatherForecastController> logger,IHttpClientFactory httpClientFactory)
    {
        _logger = logger;
        _httpClientFactory = httpClientFactory;
       }
    #endregion

    [HttpGet(Name = "GetWeatherForecast")]
    public async Task Get()
    {
        for (int i = 0; i < 100; i++)
        {
            using var httpClient = _httpClientFactory.CreateClient("weatherForecast");
            string url = $"{httpClient.BaseAddress}WeatherForecast";
            var response = await httpClient.GetAsync(url).Result.Content.ReadAsStringAsync();
            _logger.LogInformation(response);
        }
    }
}

Changes in Program.cs,
builder.Services.AddHttpClient("weatherForecast", client =>
{
   client.BaseAddress = new Uri("https://localhost:7054");
    client.DefaultRequestHeaders.Add("Accept", "application/json");
});


AddHttpClient method is used to register the HTTP instance for HttpClientFactory. The parameter/name to invoke the HTTP instance of the weather forecast class is “weatherForecast”.

Let us perform a similar test using netstat again,

Unlike HttpClient, a single socket is created with the status “Established” and the lifetime of the socket will be completed and managed by HttpClientFactory.

Typed Client
Typed clients are better than Named clients

  • Typed clients are strongly typed and no need to inject IHttpClientFactory
  • Typed clients can be injected directly into your classes.

Create a service layer to properly utilize the typed client
public interface IWeatherService

{
    Task<string> GetWeatherAsync();
}
public class WeatherService : IWeatherService
{
    private readonly ILogger<WeatherService> logger;
    private readonly HttpClient httpClient;

    public WeatherService(ILogger<WeatherService> logger,HttpClient httpClient)
    {
        this.logger = logger;
        this.httpClient = httpClient;
    }

    public async Task<string> GetWeatherAsync()
    {
        string url = $"{httpClient.BaseAddress}WeatherForecast";
        var response = await httpClient.GetAsync(url).Result.Content.ReadAsStringAsync();
        logger.LogInformation(response);
        return response;
    }
}


Changes in the program.cs

builder.Services.AddHttpClient<IWeatherService,WeatherService>(client =>
{
    client.BaseAddress = new Uri("https://localhost:7054");
    client.DefaultRequestHeaders.Add("Accept", "application/json");
});

Changes in the WeatherForecast Controller

[ApiController]
[Route("[controller]")]
public class WeatherForecastController: ControllerBase {
    private readonly ILogger < WeatherForecastController > _logger;
    private readonly IWeatherService weatherService;
    public WeatherForecastController(ILogger < WeatherForecastController > logger, IWeatherService weatherService) {
            _logger = logger;
            this.weatherService = weatherService;
        }
        [HttpGet(Name = "GetWeatherForecast")]
    public async Task Get() {
        for (int i = 0; i < 100; i++) {
            var response = await weatherService.GetWeatherAsync();
            _logger.LogInformation(response);
        }
    }
}

Let us perform a similar test using netstat again

The result remains the same for Named and Typed Clients.
Like the Named client, a single socket is created with the status “Established” and the lifetime of the socket will be completed and managed by HttpClientFactory.

What’s next
In the next article, we’ll discuss resiliency for HTTP calls such as Retry and Circuit breakers using Polly.

HostForLIFE.eu ASP.NET Core Hosting

European best, cheap and reliable ASP.NET hosting with instant activation. HostForLIFE.eu is #1 Recommended Windows and ASP.NET hosting in European Continent. With 99.99% Uptime Guaranteed of Relibility, Stability and Performace. HostForLIFE.eu security team is constantly monitoring the entire network for unusual behaviour. We deliver hosting solution including Shared hosting, Cloud hosting, Reseller hosting, Dedicated Servers, and IT as Service for companies of all size.


European ASP.NET Core Hosting - HostForLIFE :: REST In Depth Or What Exactly REST Is?

clock November 4, 2022 07:30 by author Peter

In this article, we’ll go through the details and meaning of REST. It will help you to better understand REST and use it with its best practices.

What is an API?
When developing software, we write API (Application Programming Interface) in order not to perform some tasks over and over again. The API insulates us from the difficulties of the environment and domain area where we work and ensures the encapsulation of complex processes and our abstraction from the domain area. Due to this, we stay away from low-level design architectural solutions and communicate with the environment only through the provided interface. For example, when using the framework, we can see all the DLLs (packages) whose functionality we benefit from as APIs.

What exactly is a web-based API?

Web Based API is just a variation of API. Web Based API is a form of API used to enable data exchange between applications using web standards and protocols. Typically, these types of APIs manifest themselves as REST APIs and SOAP services. Due to this, by creating a channel between different web resources (site, service, etc.), it is possible to build a large infrastructure (microservice, etc.) or simply an exchange mechanism.

The main topic of today's article will be RESTful Services, one of the forms of Web Based API.

What exactly REST is?

REST (Representational State Transfer) is an architectural style used to develop loosely-coupled applications over the HTTP protocol. REST is just an architectural style. The architectural style is: although the high-level architectural design of any work is given, the low-level design is kept free for the implementing party (vendor, provider).

REST is not a standard. Although REST is not a standard, it is implemented through web standards in modern days.

REST is not a protocol. Although REST is not a protocol, it has been implemented through web protocols (HTTP) nowadays. But REST is protocol-independent. The fact that it is implemented with the HTTP protocol doesn’t mean that it can only work with this protocol.

You can think of REST as a kind of ISO/OSI model. Although it is an ideal model, in real practice the TCP/IP model is used, and ISO/OSI remains a kind of theory. Although REST does not remain in theory, it is not excluded that it may be implemented in another format in the future.

If we express the work of REST in a short, we can say that "The client sends a request to the server, and the server changes the state of the client according to the response".

As for the core of the word REST. REST is based on the concepts of Resource, Representation, State, and Transfer. First, the client requests a resource from the server. The server keeps the original resource in itself and sends the Representation, which is just a copy of it, to the client. If the resource changes tomorrow, the client must request again and get the latest state of the resource again. The transfer of the resource from the server to the client is just a Transfer.

Why do we need REST
    It isolates the Client and Server from each other and eliminates the dependency between them.
    It does not depend on any platform
    It does not depend on any programming language. Whether you use PHP, C#, Node.js, etc. you can write REST services with all of them.
    It is not tied to a specific format. You can receive data in either XML or JSON (maybe in other formats).
    Allows building distributed systems
    It has the Discoverable feature. Resources can be easily identified
    Very easy to use
    Can use HTTP cache

What are REST constraints?
The main mechanism that indicates whether a service is a REST is its constraints.

REST has 6 (5 mandatories, 1 optional) constraints.
1) Uniform-Interface Constraint
This constraint is perhaps the most important constraint among REST constraints. If it is necessary to briefly list the main ideas on which it is based, we can say:
    Different devices, equipment, and programs must use resources over the same URL
    A URL can provide different representations. This is usually given as Content Negation in services. That is, by referring to the same URL, depending on the configuration, you can receive information in both XML and JSON format.
    We can make both GET and POST requests to the same URL

The above brief overview is not complete. Because the Uniform-interface constraint itself consists of 4 sub-parts. If we don't know them, it's hard to fully understand what this limitation does:

1.1 Identification of Resources
Identification of resources should be done over URL. That is, it should be easy to know what type of resource is used when looking at the URL. Example: If the URL https://website.com/api/students is given, here students are our called and used as a resource. The name of the resource must be represented in the URL.

1.2 Manipulating Resources through representation
If the requesting client has permission to manipulate (edit, delete) the resource, there should be metadata about how to manipulate the resource together with the returned representation. Through these metadata links, the called resource can be changed or deleted.

1.3 Self-descriptive messages
Each sent request should be complete in itself, no additional commands should be needed to do any atomic work. Typically, metadata (additional credentials, HTTP method information, meta info) is sent via HTTP headers.

1.4 HATEOAS – (Hypermedia As The Engine of Application State)

During each request, it should be possible to receive documentation information, like a WSDL in WCF services. The point is that the client side should easily know where other resources are located (discoverable).

2) Client-Server constraint (Client Server constraint)
This constraint allows us to isolate the client and the server from each other.
    There must be a client and a server for data exchange
    They should be accompanied and expanded independently
    They should not depend on each other
    The client should not need to know anything about the architecture of the server
    The server should not need to know anything about the client's UI

3) Stateless constraint
Due to this limitation, the server and client should communicate without having information about each other.
    The server should not store any session (data) about the client
    The relationship between the client and the server is performed stateless, and all requests must be completely independent requests, not dependent on the results of other requests

4) Cachable constraint
The goal is to save the network and increase the exchange speed

    If possible, the request from the server should be cached
    During each response, it should be possible to manage the cache through the header

5) Layered system
The goal is to reduce complexity.

    Server architecture is divided into the hierarchical layer (cover-abstraction level).
    Each layer only knows about the middle layer

6) Code on demand constraint
This constraint is optional.
    In addition to simple data, the server can provide the client with the opportunity to execute some executable code examples. For example, to execute JS code. Just because this type of restriction is relatively dangerous, there is no obligation to implement it.

HostForLIFE.eu ASP.NET Core Hosting

European best, cheap and reliable ASP.NET hosting with instant activation. HostForLIFE.eu is #1 Recommended Windows and ASP.NET hosting in European Continent. With 99.99% Uptime Guaranteed of Relibility, Stability and Performace. HostForLIFE.eu security team is constantly monitoring the entire network for unusual behaviour. We deliver hosting solution including Shared hosting, Cloud hosting, Reseller hosting, Dedicated Servers, and IT as Service for companies of all size.


About HostForLIFE

HostForLIFE is European Windows Hosting Provider which focuses on Windows Platform only. We deliver on-demand hosting solutions including Shared hosting, Reseller Hosting, Cloud Hosting, Dedicated Servers, and IT as a Service for companies of all sizes.

We have offered the latest Windows 2019 Hosting, ASP.NET 5 Hosting, ASP.NET MVC 6 Hosting and SQL 2019 Hosting.


Month List

Tag cloud

Sign in