European ASP.NET 4.5 Hosting BLOG

BLOG about ASP.NET 4, ASP.NET 4.5 Hosting and Its Technology - Dedicated to European Windows Hosting Customer

European ASP.NET Core Hosting :: How To Use Dependency Injection In .NET Core?

clock January 28, 2022 05:41 by author Peter

Have you ever had to alter a lot of code due to a new straightforward requirement? Have you ever had a difficult time attempting to refactor an application? If you replied yes to any of the above questions, perhaps your codebase mourns from dependency. It's a specific challenge of the code of an application when its components are too coupled. In other words, when a component depends on another one in a too-tight way. The major effect of component dependency is the maintenance hardship of the code, which, of course, signifies a more heightened cost.

What is Dependency Injection?
In software engineering, there is a term design pattern that could facilitate solving the problem by reusing the solution that is already found, In which Dependency Injection(DI) is one of the good design patterns in which a technique, “an object achieves other objects that it depends on, called dependencies”. The “injection” does mean the passing of a dependency “a service” into the client that uses it. The service is made part of the client's state. It actually helps us to create a loosely coupled application.

DI is one of the most common practices that assist you to create better maintainable code. The main advantage is the application which is going to be created is loosely coupled and has provided superb maintainability, reusability, and testability as well. It is loosely coupled due to dependency required by the class being injected from the external world rather than made themselves directly win in code.

.Net Core also provides you facility with ample support to DI, but it may not always be obvious how to use it. In this article, I want to explain various DI concepts and introduce you to support provided by .Net Core.

Use DI in .Net Core
.NET Core provided a built-in IoC Container that facilitates DI management. The IoC Container is responsible for helping automatic DI. It includes:

  • Registration: The IoC Container ought to know which type of object to make for a specific dependency so, it delivers a way to map a type to a class so that it can make the correct dependency instance.
  • Resolution: The IoC Container helps to resolve a dependency by making an object and injecting it into the requesting class. We do not have to instantiate objects manually to handle dependencies.
  • Disposition: The IoC Container manages the lifetime of the dependencies.

The IoC Container implements the 'IServiceProvider' interface. If you want to create your own IoC Container, you must implement this interface. In .NET Core, the dependencies managed by the container are called services. We have 2 types of services:

  • Framework services: are part of the .NET Core framework
  • e.g IApplicationBuilder, IConfiguration, ILoggerFactory, etc.
  • Application services: we create in our application while IoC doesn't know them, we need to register them explicitly.


Framework Services (Example)

The Startup class in an ASP.NET application uses Dependency Injection much:


The above example shows that the Startup() constructor needs a configuration parameter implementing the IConfiguration type. While IConfiguration is one of the framework service types, IoC Container knows how to make an instance of it and inject it into the Startup class using the Constructor Injection technique. The same is used in the Configure() method. Here the thing which we have to Keep in mind is that only the below mention framework service types can be injected in the Startup() constructor and the Configure() method of a standard ASP.NET application:

    IWebHostEnvironment
    IHostEnvironment
    IConfiguration

 These are certain cases for framework services because we don't need to register them.
Register Framework Services

ConfigureServices() method of the Startup class is used for registering of services, It has an IServiceCollection parameter illustrating the list of services our application depends on. The collection portrayed by this parameter allows us to register a service in the IoC Container. Following example illustrate it:

In the above illustration, we are registering a dependency for handling authentication for our application. In this particular case, are using the extension method AddAuthentication(). The framework provides extension methods to register and configure dependencies for the common services.

Application Services (Example)
For explaining this we have to create some practical scenario, we want to fetch all the students from the database and display them in the UI layer. So for this, we have to create a service (API) that will be called by the UI layer. Then, in API, we require to create one 'GET' method that will call the repository, and the repository will get a list from the database. For the purpose to call this repository, we have to create an instance of the repo in API's GET method, which means, it is mandatory to create an instance of repository for API.

So the dependency of API is the instance of the repository. So, let’s get practical and see code how we can inject this dependency into our API.

The Student Model class has 2 properties.

public class Student
{
    public int StudentId { get; set; }
    public string Name { get; set; }
}

The Student Repository Interface.

public interface IStudentRepository
{
    List<Student> GetStudents();
}

The implementation class of above interface having dummy data.

public class StudentRepository : IStudentRepository
{
    public List<Student> GetStudents()
    {
        List<Student> students = new List<Student>();

        Student student = new Student() { StudentId = 1, Name = "Student1" };
        students.Add(student);

        student = new Student() { StudentId = 2, Name = "Student2" };
        students.Add(student);

        return students;
    }
}

Then we have to create a Controller(API) for calling this repo, and inject this interface into this.

public class StudentController : Microsoft.AspNetCore.Mvc.Controller
{
    private IStudentRepository studentRepository { get; set; }
    public StudentController(IStudentRepository _studentRepository)
    {
        studentRepository = _studentRepository;
    }

    [HttpGet]
    public async Task<IActionResult> Get()
    {
        List<Student> categories = studentRepository.GetStudents();
        return Ok(categories);
    }
}

In the last, we have to register it in Startup class. Also mention which type of instance want to inject - (the lifetime) of our instance.
public void ConfigureServices(IServiceCollection services)
{
    // its lifetime so get only one
    services.AddSingleton<IStudentRepository, StudentRepository>();
    //services.AddTransient<IStudentRepository, StudentRepository>();
    //services.AddScoped<IStudentRepository, StudentRepository>();
    //services.AddControllersWithViews();
}


What is the lifetime?

Transient
    Makes an instance each time.
    Never shared.
    Used for lightweight stateless services.

Singleton
    Creates only single instance.
    Shared among all components that demand it.

Scoped

    Creates an instance once per scope.
    Created on every request to the application.


Finally, we got the above result from our API. Hopefully, it has been helpful to you to understand the concept of DI.

HostForLIFE.eu ASP.NET Core Hosting

European best, cheap and reliable ASP.NET hosting with instant activation. HostForLIFE.eu is #1 Recommended Windows and ASP.NET hosting in European Continent. With 99.99% Uptime Guaranteed of Relibility, Stability and Performace. HostForLIFE.eu security team is constantly monitoring the entire network for unusual behaviour. We deliver hosting solution including Shared hosting, Cloud hosting, Reseller hosting, Dedicated Servers, and IT as Service for companies of all size.


European ASP.NET Core Hosting :: How To Resolve Issue Of Test Project Not Running The Unit Tests After Upgrade To .NET 6?

clock January 25, 2022 07:36 by author Peter

I was upgrading the .NET Core 3.1 project to .NET 6 and faced issues running test cases in my test projects. I had several projects and test projects for each project; all were working fine after the upgrade. However, I got an issue with only two test projects after the upgrade. So here in this article, I am going to share the issue and the solution to how I fixed it.

Even though there was no single error after the upgrade, the solution was cleaned and built successfully I was not able to run unit tests of two projects.

Once, the upgrade is completed I was testing the solution where I got an error: “unexpected error detected. Check the Tests output Pane for details.”

Two of my test projects didn’t run the test cases, it was about to start and took some time to run the test but got stopped after a few minutes. This is the scenario of the Test project using xunit framework for unit tests.

The below image shows the error that I got while testing.

When I checked the Output pane the exact error was

“Starting test discovery for requested test run

========== Starting test discovery ==========

Microsoft.VisualStudio.TestPlatform.ObjectModel.TestPlatformException: Failed to negotiate protocol, waiting for response timed out after 90 seconds. This may occur due to machine slowness, please set environment variable VSTEST_CONNECTION_TIMEOUT to increase timeout.

at Microsoft.VisualStudio.TestPlatform.CommunicationUtilities.TestRequestSender.CheckVersionWithTestHost()

at Microsoft.VisualStudio.TestPlatform.CrossPlatEngine.Client.ProxyOperationManager.SetupChannel(IEnumerable`1 sources, String runSettings)

at Microsoft.VisualStudio.TestPlatform.CrossPlatEngine.Client.ProxyDiscoveryManager.DiscoverTests(DiscoveryCriteria discoveryCriteria, ITestDiscoveryEventsHandler2 eventHandler)

========== Test discovery aborted: 0 Tests found in 1.5 min ==========

========== Starting test run ==========

Failed to negotiate protocol, waiting for response timed out after 90 seconds. This may occur due to machine slowness, please set environment variable VSTEST_CONNECTION_TIMEOUT to increase timeout.

Failed to negotiate protocol, waiting for response timed out after 90 seconds. This may occur due to machine slowness, please set environment variable VSTEST_CONNECTION_TIMEOUT to increase timeout.

========== Test run aborted: 0 Tests (0 Passed, 0 Failed, 0 Skipped) run in < 1 ms ==========”
Solution

Then I researched, spent several hours surfing various sites, forums and couldn’t get the solution for this. Later on, I checked and compared the project file of working test project after upgrade to .NET 6 and the project having issue after upgrade where I found some differences in the .csproj file.

Differences are listed below:

    Additionally, there was no Microsoft.NET.Test.Sdk in the .csproj file.
    Project which is having issue has different version of xunit and xunit.runner.visualstudio than the working project.

I updated the project file (csproj) manually and made it same as a working project, then cleaned and built the project. After that the test project worked perfectly.

Updated part of the project.csproj file is highlighted below.

Alternatively, you can add “Microsoft.NET.Test.Sdk” from the NuGet package manager or Package Manager console as well. I made changes to xunit and xunit.runner.visualstudio to make uniformity of version with all test projects.

Note that: some cases only adding the below line in ItemGroup may resolve the issue. In my case only adding the below package reference resolved the problem. However, to maintain the same version of xunit and xunit.runner.visualstudio, I kept the same version of those across all test projects.

<PackageReference Include="Microsoft.NET.Test.Sdk" Version="16.9.1" />

Test Project’s project file(.csproj file) in details

    TargetFramework specifies the target framework of your project.
    IsPackable has nothing to do. Unit test projects cannot be packed so it is redundant. If you wish you can remove it. However, when you create the test projects in .Net 6, it comes by default.
    Packages xunit.runner.visualstudio and Microsoft.NET.Test.Sdk are mandatory to run the test project using visual studio as well as with command dotnet test.

In my case, Microsoft.NET.Test.Sdk was missing which plays a vital role to run the unit test that’s why I was not able to run tests.

I hope, this helps you to upgrade your test project to .NET 6 and resolve the issue if you encounter it after the upgrade.

HostForLIFE.eu ASP.NET Core Hosting

European best, cheap and reliable ASP.NET hosting with instant activation. HostForLIFE.eu is #1 Recommended Windows and ASP.NET hosting in European Continent. With 99.99% Uptime Guaranteed of Relibility, Stability and Performace. HostForLIFE.eu security team is constantly monitoring the entire network for unusual behaviour. We deliver hosting solution including Shared hosting, Cloud hosting, Reseller hosting, Dedicated Servers, and IT as Service for companies of all size.


European ASP.NET Core Hosting :: Working With Async/Await/Task Keywords In Depth

clock January 13, 2022 06:43 by author Peter

Modern systems are becoming more powerful with multiple processors. Similarly,  modern server application development  has also improved to leverage the host CPU power for processing multiple requests in parallel to achieve more scalability.

Earlier we had many limitations on asynchronous calls and not utilizing the complete CPU cores. The Task Parallel Library (TPL) that was introduced in the .NET Framework 4 made rapid changes to our asynchronous development and utilization of infrastructure.

Still, most of the developers are not very familiar with understanding these keywords and make regular mistakes during usage. Here, we will concentrate more on understanding how these keywords work with asynchronous calls. At the end we will see some of the recommendations needed for regular usage.

Every .NET/.NET Core application is associated with a thread pool and is a collection of threads that effectively executes asynchronous calls of an application. These threads on the thread pool are known as Worker threads.

Threadpool will work as a software-level thread management system for the .NET runtime. It is a queuing mechanism for all application requests.

When the application is initiated, the .NET runtime will spawn the worker threads and keep them in the thread pool queue as available threads. Once any request comes, the runtime will pick one worker thread from this queue and assign this incoming request to it and it will be retained to the queue once this request process is completed. The number of threads the runtime will spawn depends on how many logical processors are available on the host system by default. If needed we can increase the minimum worker threads to spawn by using the below statement at the startup of the application.

ThreadPool.SetMinThreads(100, 100);

The first parameter is the number of worker threads that need to be created and the second parameter defines the completion port thread count. Please find my other article on completion ports in detail here.

Let us understand Async, Await and Task keywords in detail here with the following example code block.
public async Task<decimal> TotalGiftBudget()
{
  decimal totalBudgetAmount = 0;
  decimal percentageAmount = GetGiftPercentage();
  List<Employee> lstEmployees = new List<Employee>();
  //Fetch all active employees from Hyderabad Branch
  List<Employee> lstHyd = await GetHyderabadEmployeesListAsync();
  lstEmployees.AddRange(lstHyd);
  //Fetch all active employees from Banglore Branch
  List<Employee> lstBglre = await GetBangloreEmployeesListAsync();
  lstEmployees.AddRange(lstBglre);
  foreach(var emp in lstEmployees)
  {
    totalBudgetAmount += (emp.Salary * percentageAmount) / 100.0m;
  }
  return totalBudgetAmount;
}

Let say a company decided to pay a Christmas gift to all their employees with a certain percentage of their monthly salary. Before announcing to the employees they want to check the budget for this bonus amount. This asynchronous method will give this information by fetching all the employees from their Hyderabad and Bangalore branches asynchronously and calculating the expected gift amount based on each employee's salary.

When this method is called, the following actions will happen at the runtime.

When runtime finds the async keyword, it will allocate some memory on the RAM to store the state information of the method.

Next, Runtime will divide this method into three parts as follows

Once it executes or processes part-1 and founds asynchronous statement to get employees from the Hyderabad branch, then immediately creates an I/O thread and returns the Task object which points to its IOCP and the current worker thread will be retained to the available worker threads queue i.e., thread pool so that runtime will utilize this worker thread to serve other requests.

Once the Hyderabad list is ready (for example, it might get from an external API) our completion port will keep this in its queue. The await keyword is used so that the runtime will keep getting the status of the I/O process using the GetQueuedCompletionStatus function and once it is ready, a new available worker thread will be allocated to continue the rest of the actions. This new worker thread will fetch the state machine information from the RAM and continue the remaining process of the method.

In our case, once the list of Hyderabad is available and added to the listEmployee list and again runtime found another asynchronous statement and repeat the same as above. Once we get the Bangalore list too, there is no other asynchronous statement and this time runtime will complete the next actions to calculate the total gift amount and returns successfully.

Here the point of interest is until we get the list of employees from Hyderabad and Bangalore the worker thread is retained and utilized to serve other requests. In the case of a synchronous call, the worker thread will be blocked until it returns the budget amount. Here is the advantage of these asynchronous calls using async/await keywords to improve the performance of the application and to make it more scalable.

Recommendations

If possible avoid the Async keyword and use only Task. When we use Async, some memory will be allocated to the Ram and it will impact the performance. For example, the below code doesn’t need any async and await.
publc Task<int> GetSum(int a, int b)
{
    int c = a + b;
   return c;
}


In case, if we have a method non-async and we need to call an async method. The following statements are very BAD and they will block the thread and it will lead to perf issues.
Task.Result; //bad
Task.Wait(); //bad
Task.GetAwaiter().GetResult(); //bad

Instead, we can write like below

Public string Getsomething()
{
   var task1 = Do1Async();
   var task2 = Do2Async();

   Task.WaitAll(new[] {task1, task2});
  //or
   Task.WhenAll(new[] {task1, task2});
}
Public async Task<string> do1Async()
{}
Public async Task<string> do2Async()
{}


Hope this article is helpful to you in understanding the best usage of Async, Await and Task keywords in an asynchronous world.

HostForLIFE.eu ASP.NET Core Hosting

European best, cheap and reliable ASP.NET hosting with instant activation. HostForLIFE.eu is #1 Recommended Windows and ASP.NET hosting in European Continent. With 99.99% Uptime Guaranteed of Relibility, Stability and Performace. HostForLIFE.eu security team is constantly monitoring the entire network for unusual behaviour. We deliver hosting solution including Shared hosting, Cloud hosting, Reseller hosting, Dedicated Servers, and IT as Service for companies of all size.


European ASP.NET Core Hosting :: JWT Authentication In Microservices

clock January 3, 2022 06:16 by author Peter

As with any Web Service, the microservices need to be protected from unauthorized access. So how do you protect each of your services? How does one share the token that is received from the Auth service? Exposing your microservices directly to the client and allowing them to directly communicate with all your services would have its own problems, so in this example, we will also add a layer of API Gateway which would be the single point of contact for all your clients.

The Gateways, in addition to providing a single point of access, also adds a security layer over your microservices. It could also support load balancing and reducing round trips when the client requires calls to multiple microservices. With regard to authentication, the gateway could pass the authentication token to the downstream paths. In this example, we would be using Ocelot for building our gateway.

The Working
The typical authentication process could be outlined as shown in the diagram below.
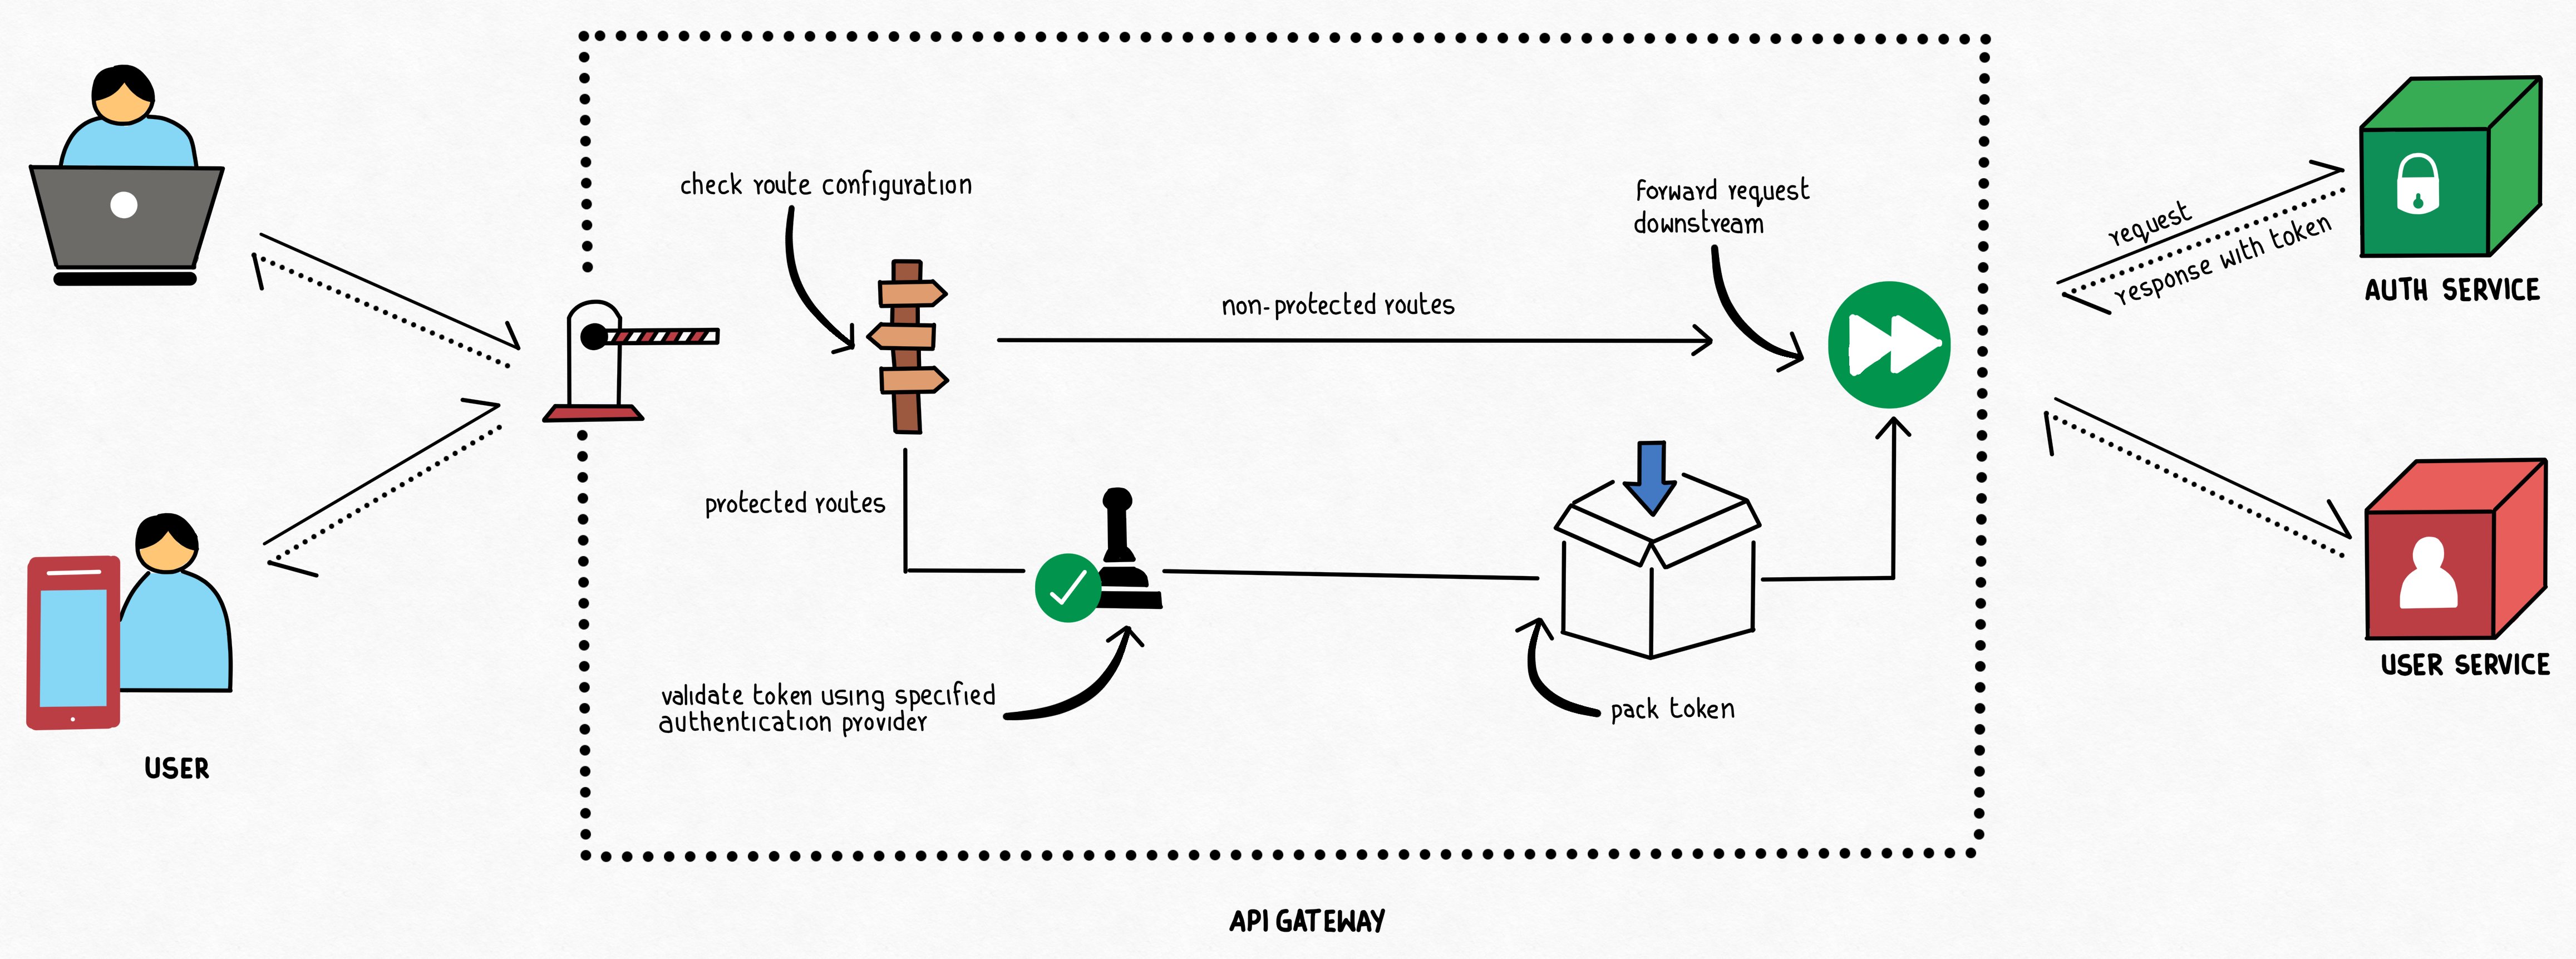
The authentication request from the client is redirected to the dedicated Auth service. This service would be responsible for validating the user and granting the authentication token. The authentication token is then returned back to the client via the gateway. In each of the subsequent requests, the client would pass the Authentication token along with the request. The API Gateway would be processed the incoming request, and if the downstream service requires an authenticated path, would pass the received token along.

We could also add BFF and other layers in the architecture, but for this article, we will keep it to a bare minimum. Let us now get our hands dirty and start building our sample application which would comprise of an API Gateway, two microservices - an auth service, and a User Service. For the sake of example, we will use Postman as our client and use Minimal API for building our services.

Auth Service

As mentioned earlier, the Auth Service would be responsible for authenticating the User and generating the Auth token. We will begin by defining our Token Service and registering it.
internal interface ITokenService
{
    string BuildToken(string key, string issuer, IEnumerable<string> audience, string userName);
}
internal class TokenService : ITokenService
{
    private TimeSpan ExpiryDuration = new TimeSpan(0, 30, 0);
    public string BuildToken(string key, string issuer, IEnumerable<string> audience, string userName)
    {
        var claims = new List<Claim>
        {
            new Claim(JwtRegisteredClaimNames.UniqueName, userName),
        };

        claims.AddRange(audience.Select(aud => new Claim(JwtRegisteredClaimNames.Aud, aud)));

        var securityKey = new SymmetricSecurityKey(Encoding.UTF8.GetBytes(key));
        var credentials = new SigningCredentials(securityKey, SecurityAlgorithms.HmacSha256Signature);
        var tokenDescriptor = new JwtSecurityToken(issuer, issuer, claims,
            expires: DateTime.Now.Add(ExpiryDuration), signingCredentials: credentials);
        return new JwtSecurityTokenHandler().WriteToken(tokenDescriptor);
    }
}

We will go ahead and register it so that we could use it with DI.
builder.Services.AddSingleton<ITokenService>(new TokenService());

We will keep the Validate endpoint simple for sake of the example and hardcode our user credentials, but this could be easily replaced with your repositories later.
app.MapPost("/validate", [AllowAnonymous] (UserValidationRequestModel request, HttpContext http, ITokenService tokenService) =>
{
    if (request is UserValidationRequestModel { UserName: "john.doe", Password: "123456" })
    {
        var token = tokenService.BuildToken(builder.Configuration["Jwt:Key"],
                                            builder.Configuration["Jwt:Issuer"],
                                            new[]
                                            {
                                                        builder.Configuration["Jwt:Aud1"],
                                                        builder.Configuration["Jwt:Aud2"]
                                                    },
                                            request.UserName);
        return new
        {
            Token = token,
            IsAuthenticated = true,
        };
    }
    return new
    {
        Token = string.Empty,
        IsAuthenticated = false
    };
})
.WithName("Validate");


Where UserValidationRequestModel is defined as
internal record UserValidationRequestModel([Required]string UserName, [Required] string Password);

The AuthService, as you could understand from the code above, exposes a single endpoint - validate which would generate an auth token if the username/password supplied are "john.doe" and "123456". The generated and subsequently returned auth token would be then used by the succeeding requests by the client for accessing authorized routes.

API Gateway
As mentioned earlier, we would be using Ocelot for building our API Gateway. The role of Gateway as far as Authentication is concerned would be to detect if the requested downstream path requires authentication and if so, pass the authorization token which was passed in the upstream request. Let us configure the routing configuration for our sample Gateway.
{
  "Routes": [
    {
      "DownstreamPathTemplate": "/GetUsers",
      "DownstreamSchema": "https",
      "DownstreamHttpMethod": "GET",
      "RouteIsCaseSensitive": false,
      "DownstreamHostAndPorts": [
        {
          "Host": "localhost",
          "Port": "7163"
        }
      ],
      "UpstreamPathTemplate": "/user/getusers",
      "UpstreamHttpMethod": [ "Get" ],
      "AuthenticationOptions": {
        "AuthenticationProviderKey": "GatewayAuthenticationKey",
        "AllowedScopes": []
      }
    },
    {
      "DownstreamPathTemplate": "/validate",
      "DownstreamSchema": "https",
      "DownstreamHttpMethod": "POST",
      "RouteIsCaseSensitive": false,
      "DownstreamHostAndPorts": [
        {
          "Host": "localhost",
          "Port": "7075"
        }
      ],
      "UpstreamPathTemplate": "/user/validate",
      "UpstreamHttpMethod": [ "Post" ]
    }
  ],
  "GlobalConfiguration": {
    "BaseUrl": "https://localhost:7254"
  }
}


As you can observe in the configuration, there are two routes that are exposed in the API Gateway. The /validate route doesn't require any authentication, while the /GetUsers route requires authentication. When ocelot runs, it would check the routes AuthenticationOptions and if it exists, reads the AuthenticationProviderKey. This denotes the authentication key (scheme), which needs to be registered with the authentication services at the startup.

builder.Services.AddAuthentication(JwtBearerDefaults.AuthenticationScheme)
    .AddJwtBearer("GatewayAuthenticationKey", option =>
    {
        option.TokenValidationParameters = new TokenValidationParameters
        {
            ValidateIssuer = true,
            ValidateAudience = true,
            ValidateLifetime = true,
            ValidateIssuerSigningKey = true,
            ValidIssuer = builder.Configuration["Jwt:Issuer"],
            ValidAudience = builder.Configuration["Jwt:Aud"],
            IssuerSigningKey = new SymmetricSecurityKey(Encoding.UTF8.GetBytes(builder.Configuration["Jwt:Key"]))
        };
    });
builder.Configuration.AddJsonFile("ocelot.json");
builder.Services.AddOcelot(builder.Configuration);


Ocelot requires you to register the Authentication Service be registered with a name/key. Ocelot would use this key to recognize the service to use when encountered  AuthenticationProviderKey in the route declaration. If the route requires authentication, Ocelot would execute the authentication middleware registered for the provider.

UserService
The last step in this demo code would be to set up a mock User Service, a microservice that would be responsible for handling user details. We will expose a single endpoint the UserService, which would return a set of Usernames.

app.MapGet("/GetUsers", [Authorize]() =>
{
    return new[]
    {
        "John.Doe",
        "Jane.Doe",
        "Jewel.Doe",
        "Jayden.Doe",
    };
}).WithName("GetUsers");


Do not forget to register the authentication services as usual.
builder.Services.AddAuthentication(JwtBearerDefaults.AuthenticationScheme)
    .AddJwtBearer(option =>
    {
        option.TokenValidationParameters = new TokenValidationParameters
        {
            ValidateIssuer = true,
            ValidateAudience = true,
            ValidateLifetime = true,
            ValidateIssuerSigningKey = true,
            ValidIssuer = builder.Configuration["Jwt:Issuer"],
            ValidAudience = builder.Configuration["Jwt:Aud"],
            IssuerSigningKey = new SymmetricSecurityKey(Encoding.UTF8.GetBytes(builder.Configuration["Jwt:Key"]))
        };
    });


That would be what we all require in the microservice end of our demo code to test our Authentication sample.

Client
As mentioned earlier, we will be using Postman to test our sample set of services. So fire up your Postman, and first send the request to validate the user and get the auth token. Remember to use the Gateway instead of using the microservice directly.
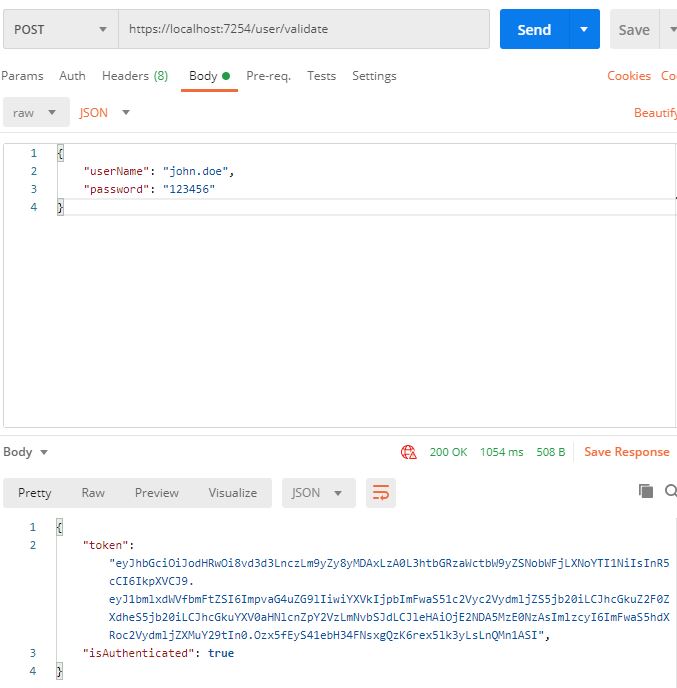
As you can observe, we have retrieved the Auth Token from the Auth Service (via the gateway of course). We will now use the auth token to authenticate our request to access the protected route in the User Service.
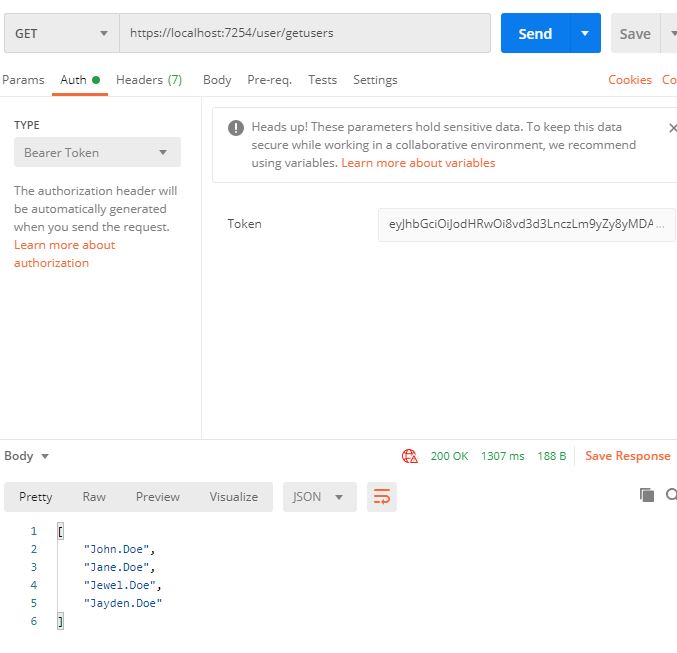

It could be observed that the request was a success and then User Service has returned the required results.

In this article, we addressed how to authenticate the different individual services in the microservice architecture. We also used the wonderful Ocelot library for building API Gateways. The services and the gateways are loosely coupled with each other, while the client is having a single point of contact in the gateway.

HostForLIFE.eu ASP.NET Core Hosting

European best, cheap and reliable ASP.NET hosting with instant activation. HostForLIFE.eu is #1 Recommended Windows and ASP.NET hosting in European Continent. With 99.99% Uptime Guaranteed of Relibility, Stability and Performace. HostForLIFE.eu security team is constantly monitoring the entire network for unusual behaviour. We deliver hosting solution including Shared hosting, Cloud hosting, Reseller hosting, Dedicated Servers, and IT as Service for companies of all size.


About HostForLIFE

HostForLIFE is European Windows Hosting Provider which focuses on Windows Platform only. We deliver on-demand hosting solutions including Shared hosting, Reseller Hosting, Cloud Hosting, Dedicated Servers, and IT as a Service for companies of all sizes.

We have offered the latest Windows 2019 Hosting, ASP.NET 5 Hosting, ASP.NET MVC 6 Hosting and SQL 2019 Hosting.


Month List

Tag cloud

Sign in