European ASP.NET 4.5 Hosting BLOG

BLOG about ASP.NET 4, ASP.NET 4.5 Hosting and Its Technology - Dedicated to European Windows Hosting Customer

European ASP.NET Core Hosting - HostForLIFE :: Introduction to ASP.NET Core's Minimal API

clock December 13, 2024 06:18 by author Peter

What is Minimal API?
ASP.NET Core Minimal APIs provide a streamlined approach to developing web APIs with minimal code. They prioritize conciseness, focusing on the core functionality of handling HTTP requests and responses.

Here are some key aspects of Minimal APIs:

  • Concise Syntax: They leverage top-level statements and lambda expressions to define endpoints in a very compact manner.
  • Reduced Boilerplate: Minimal APIs significantly reduce the amount of boilerplate code compared to traditional ASP.NET Core controllers.
  • Focus on Functionality: They encourage developers to prioritize the essential logic of handling requests and generating responses.
  • Flexibility: While concise, they still provide flexibility for more complex scenarios by allowing the use of middleware, dependency injection, and other features of the ASP.NET Core framework.

Let me explain with a CRUD example. (I have used .NET 9 as the target framework)
Create an ASP.NET Core Web API project with the following endpoints. In the program.cs file, add the following code.

var builder = WebApplication.CreateBuilder(args);

var app = builder.Build();

app.MapGet("/api/apple/products",()=>Results.Ok("Get all Apple products"));
app.MapGet("/api/apple/products/{id}",(int id)=>Results.Ok($"Get Apple Product by id {id}"));
app.MapPost("/api/apple/products",()=>Results.Ok("Create an Apple product"));
app.MapPut("/api/apple/products/{id}",(int id)=>Results.Ok($"Update Apple product by id {id}"));
app.MapDelete("/api/apple/products/{id}",(int id)=>Results.Ok($"Delete Apple product by id {id}"));

app.Run();


Code Explanation

1. app.MapGet("/api/apple/products", () => Results.Ok("Get all Apple products"));

  • Endpoint: /api/apple/products
  • HTTP Method: GET
  • Action: This endpoint handles HTTP GET requests to the specified URL.
  • Response: It returns a 200 OK response with the message "Get all Apple products".

2. app.MapGet("/api/apple/products/{id}", (int id) => Results.Ok($"Get Apple Product by id {id}"));

  • Endpoint: /api/apple/products/{id}
  •     {id} is a route parameter that captures the ID of the product in the URL.
  • HTTP Method: GET
  • Action: This endpoint handles GET requests to the URL with a specific product ID.
  • Response: It returns a 200 OK response with a message indicating the ID of the retrieved product, e.g., "Get Apple Product by id 123".

3. app.MapPost("/api/apple/products", () => Results.Ok("Create an Apple product"));

  • Endpoint: /api/apple/products
  • HTTP Method: POST
  • Action: This endpoint handles POST requests to the URL.
  • Response: It returns a 200 OK response with the message "Create an Apple product".

4. app.MapPut("/api/apple/products/{id}", (int id) => Results.Ok($"Update Apple product by id {id}"));

  • Endpoint: /api/apple/products/{id}
  • HTTP Method: PUT
  • Action: This endpoint handles PUT requests to the URL with a specific product ID.
  • Response: It returns a 200 OK response with a message indicating the ID of the updated product, e.g., "Update Apple product by id 123".

5. app.MapDelete("/api/apple/products/{id}", (int id) => Results.Ok($"Delete Apple product by id {id}"));

  • Endpoint: /api/apple/products/{id}
  • HTTP Method: DELETE
  • Action: This endpoint handles DELETE requests to the URL with a specific product ID.
  • Response: It returns a 200 OK response with a message indicating the ID of the deleted product, e.g., "Delete Apple product by id 123".

Key Points

  • Minimal API Syntax: The code utilizes the concise syntax of Minimal APIs in ASP.NET Core.
  • Route Parameters: The {id} placeholder in the URL allows for dynamic routing based on the product ID.
  • Lambda Expressions: The endpoints are defined using lambda expressions, making the code more concise.
  • Results.Ok(): This helper method returns a 200 OK HTTP response with the specified message.

This is a basic example. In a real-world scenario, you would typically implement more complex logic within these endpoints, such as:

  • Data Access
  • Data Validation
  • Error Handling
  • Business Logic

Organizing Minimal APIs with MapGroup
MapGroup is a powerful feature in Minimal APIs that allows you to group related endpoints under a common path. This improves organization and readability, especially as your API grows in complexity.

Let me organize the above endpoints with MapGroup.
var builder = WebApplication.CreateBuilder(args);
var app = builder.Build();
var appleProductsGroup = app.MapGroup("/api/apple/products");

appleProductsGroup.MapGet("",()=>Results.Ok("Get all Apple products"));
appleProductsGroup.MapGet("{id}",(int id)=>Results.Ok($"Get Apple Product by id {id}"));
appleProductsGroup.MapPost("",()=>Results.Ok("Create an Apple product"));
appleProductsGroup.MapPut("{id}",(int id)=>Results.Ok($"Update Apple product by id {id}"));
appleProductsGroup.MapDelete("{id}",(int id)=>Results.Ok($"Delete Apple product by id {id}"));

app.Run();


var appleProductsGroup = app.MapGroup("/api/apple/products");

This line creates a new route group named "appleProductsGroup" that will handle requests under the path "/api/apple/products".

Key Benefits

  • Improved Code Readability: Makes the API definition more organized and easier to understand.
  • Reduced Code Duplication: Avoids repeating middleware configurations for individual routes.
  • Enhanced Maintainability: It is easier to modify or add new routes within a specific group.

Minimal APIs in ASP.NET Core provide a refreshing approach to building web APIs, emphasizing simplicity, efficiency, and a focus on core HTTP concepts.By employing MapGroup, you can establish a well-defined hierarchy within your Minimal API routes, facilitating better code organization and easier maintenance.

Happy Coding!

HostForLIFE ASP.NET Core Hosting

European Best, cheap and reliable ASP.NET hosting with instant activation. HostForLIFE.eu is #1 Recommended Windows and ASP.NET hosting in European Continent. With 99.99% Uptime Guaranteed of Relibility, Stability and Performace. HostForLIFE.eu security team is constantly monitoring the entire network for unusual behaviour. We deliver hosting solution including Shared hosting, Cloud hosting, Reseller hosting, Dedicated Servers, and IT as Service for companies of all size.


European ASP.NET Core Hosting - HostForLIFE :: Build a Worker Service and Launch it as a Windows Service .NET Core Application

clock December 5, 2024 07:36 by author Peter

In Visual Studio 2022 or 2019, create a .Net Worker service project and give it whatever name you like. The worker service was first implemented in Visual Studio 2019 and is compatible with the most recent versions. A worker service is a background service that performs ongoing background tasks while operating as a service.

Worker.cs
namespace MyWorkerService
{
    public class Worker : BackgroundService
    {
        private readonly ILogger<Worker> _logger;

        public Worker(ILogger<Worker> logger)
        {
            _logger = logger;
        }

        protected override async Task ExecuteAsync(CancellationToken stoppingToken)
        {
            while (!stoppingToken.IsCancellationRequested)
            {
                if (_logger.IsEnabled(LogLevel.Information))
                {
                    _logger.LogInformation("Worker running at: {time}", DateTimeOffset.Now);
                }

                await Task.Delay(1000, stoppingToken);
            }
        }
    }
}

To install the Worker service in Windows, the background service installs the below-mentioned Hosting package from the Nuget package.
Microsoft.Extensions.Hosting.WindowsServices

Add the code below to the program.cs
public static IHostBuilder CreateHostBuilder(string[] args) =>
    Host.CreateDefaultBuilder(args)
        .UseWindowsService()
        .ConfigureServices((hostContext, services) =>
        {
            services.AddHostedService<YourWorkerService>();
        });


Build and Publish the worker service project and make sure MyWorkerService.exe is placed inside the publish folder. Then, Open the Command prompt with administrative privileges and execute the mentioned command lines.
sc.exe create MyWorkerService binpath=C:\MyWorkerService\MyWorkerService.exe
sc.exe start MyWorkerService


In case of any error, if you want to delete or stop a service, follow the command lines.
sc.exe delete MyWorkerService
sc.exe stop MyWorkerService


To ensure the smooth running of the worker service, open a service from the start of a window, check the name of the service (Example: MyWorkerService), and confirm the service is running.

Output

HostForLIFE ASP.NET Core Hosting

European Best, cheap and reliable ASP.NET hosting with instant activation. HostForLIFE.eu is #1 Recommended Windows and ASP.NET hosting in European Continent. With 99.99% Uptime Guaranteed of Relibility, Stability and Performace. HostForLIFE.eu security team is constantly monitoring the entire network for unusual behaviour. We deliver hosting solution including Shared hosting, Cloud hosting, Reseller hosting, Dedicated Servers, and IT as Service for companies of all size.


European ASP.NET Core Hosting - HostForLIFE :: Knowing How to Use.http Files in.NET 8

clock December 2, 2024 06:19 by author Peter

To improve HTTP request testing, Microsoft has added an exceptional power feature. This post will explain how to use a http file and provide an example of a REST API. It is appropriate for users of all skill levels, including novices, intermediates, and experts.

We will cover.

  • What is a .http file?
  • Advantages of .http files?
  • How to Create and Use .http files?
  • How to send a request using .http files?

Prerequisites

  • Visual Studio 2019 or a later version.
  • Basic understanding of REST API.

Let’s start with

What is a .http file?

Let me ask you a question, do you know how you test APIs before a .http file? The answer would be third-party tools like Postman, Swagger, Insomnia, etc.
Microsoft has now introduced the. http file for conveniently sending HTTP requests and testing APIs directly from Visual Studio or an Integrated Development Environment. This feature enables developers to write and execute HTTP requests directly within the code editor, simplifying testing and ensuring accuracy.

Advantages of .http files?

  • Effortless API Testing
  • Reusability
  • Increase development accuracy
  • Consistency
  • Seamless Workflow Integration

How to Create and Use .http files?
Let’s start by creating an "Asp. Net Core Web API" project for demonstration purposes.

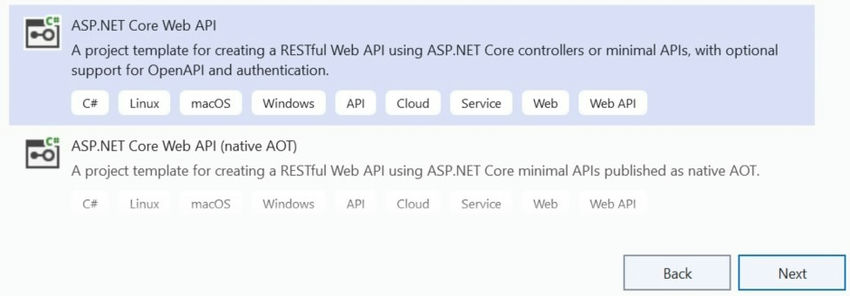
Step 1. Create an “Asp.Net Core Web Api” project by selecting the below template.
Step 2. Select “Additional Information” and click the “Create” button to create a .Net project.
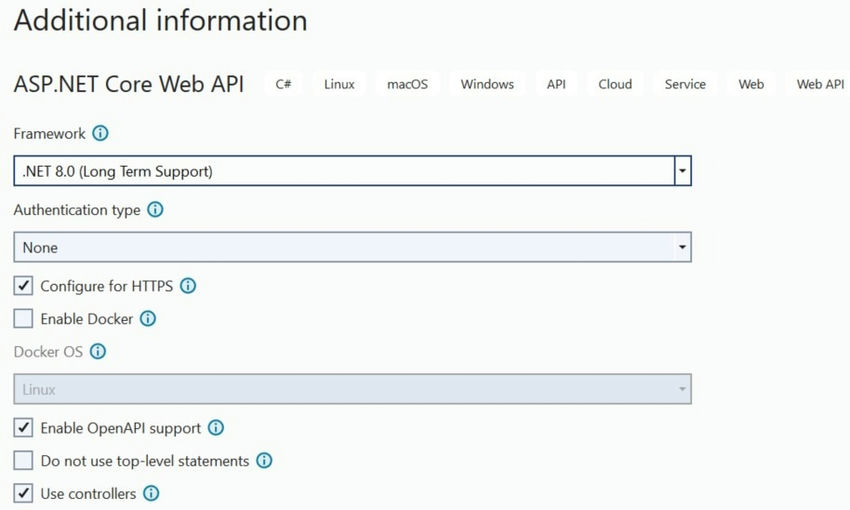
You have observed that we have chosen the check box “Enable OpenAPI support”. If this check box is selected, Visual Studio generates an ASP. The net core web API project is accompanied by a. http file.

Let’s keep this checked box checked for now.

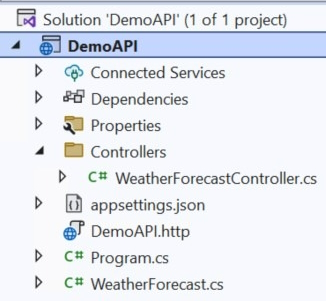
Step 3. The Asp.Net Core Web Api project was created successfully with weatherForcast Controller and DemoAPI.http file.
Let's open the weather forecast controller file.

WeatherForcastcontroller.cs
using Microsoft.AspNetCore.Mvc;
namespace DemoAPI.Controllers
{
    [ApiController]
    [Route("[controller]")]
    public class WeatherForecastController : ControllerBase
    {
        private static readonly string[] Summaries = new[]
        {
            "Freezing", "Bracing", "Chilly", "Cool", "Mild", "Warm", "Balmy", "Hot", "Sweltering", "Scorching"
        };
        private readonly ILogger<WeatherForecastController> _logger;
        public WeatherForecastController(ILogger<WeatherForecastController> logger)
        {
            _logger = logger;
        }
        [HttpGet(Name = "GetWeatherForecast")]
        public IEnumerable<WeatherForecast> Get()
        {
            return Enumerable.Range(1, 5).Select(index => new WeatherForecast
            {
                Date = DateOnly.FromDateTime(DateTime.Now.AddDays(index)),
                TemperatureC = Random.Shared.Next(-20, 55),
                Summary = Summaries[Random.Shared.Next(Summaries.Length)]
            })
            .ToArray();
        }
    }
}


DemoApi.http
@DemoAPI_HostAddress = https://localhost:7063
# Send request or Debug
GET {{DemoAPI_HostAddress}}/weatherforecast/
Accept: application/json
###


Nice, Visual Studio has created a .http file for the controller WealthForcast. You have observed that we have two links.
    “Send Request”: Send the request and open a new window with output. This will help to test the API,
    “Debug”: It will allow you to debug the api.

Step 4. Let’s click on the “Send Request” link and observe the output.
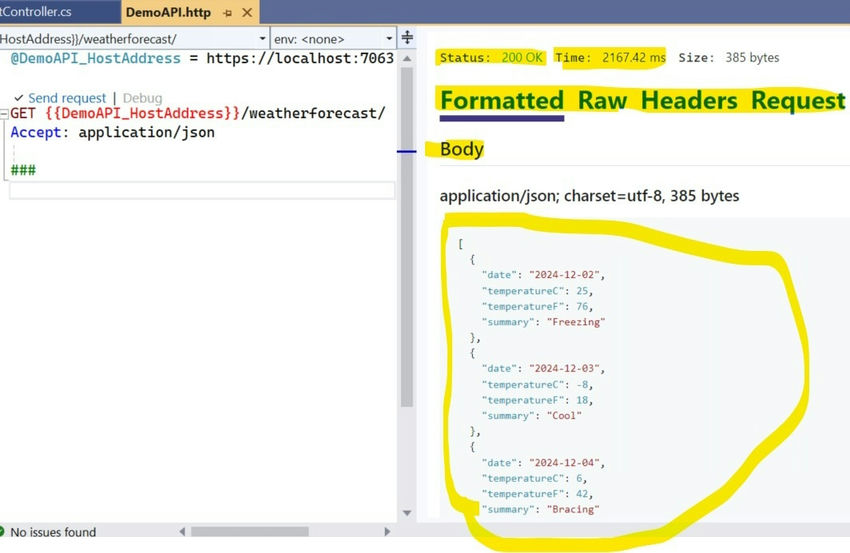
You can see the output with Header, Raw, Formatted, and request details. Let’s click on the Raw.
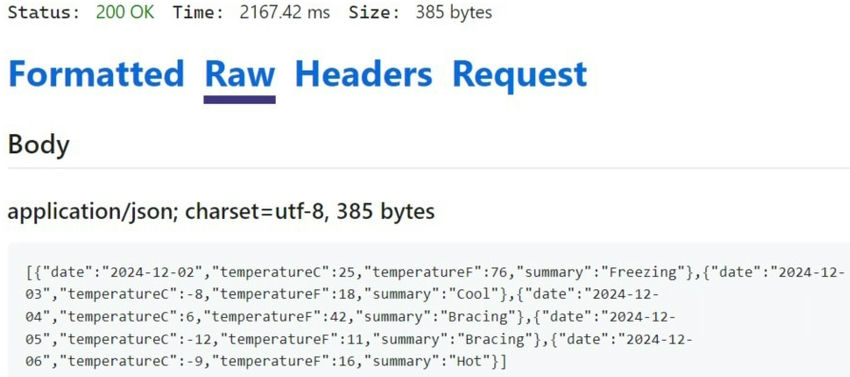

Now we can Raw details in JSON. It is nice and helpful. Isnt it?

Step 5. Now we will add a new endpoint and then create a .http file.

Please add the below code in the Wealthforcast. cs file.
[HttpGet("{ID}")]
public WeatherForecast Get(int ID)
{
    return new WeatherForecast
    {
        Date = DateOnly.FromDateTime(DateTime.Now.AddDays(ID)),
        TemperatureC = Random.Shared.Next(-20, 55),
        Summary = Summaries[Random.Shared.Next(Summaries.Length)]
    };
}


Step 6. Now we will add a new endpoint in the .http file.

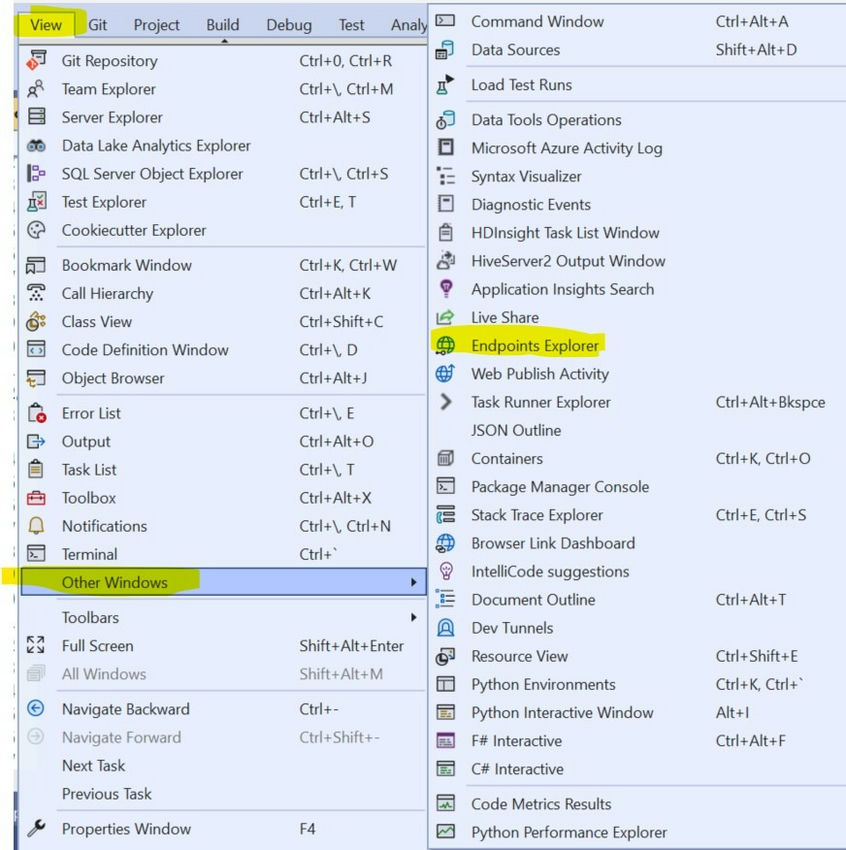
Microsoft has provided “Endpoints Explorer” to generate an endpoint in the .http file.

In the visual studio “View->OtherWindows->Endpoint Explorer”.

Step 7. Click on the “Endpoints Explorer” and click on “Generate Request”.
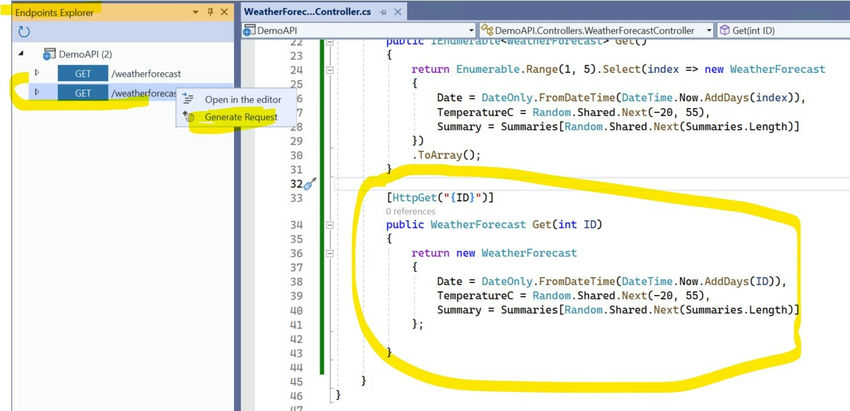
The file code below will be added in the “demo. http” file.
@DemoAPI_HostAddress = https://localhost:7063
# Send request for the default weather forecast
###
Send request | Debug
GET {{DemoAPI_HostAddress}}/weatherforecast/
Accept: application/json
###
# Send request for a specific weather forecast (ID = 0)
###
Send request | Debug
GET {{DemoAPI_HostAddress}}/weatherforecast/0
Accept: application/json
###


Output
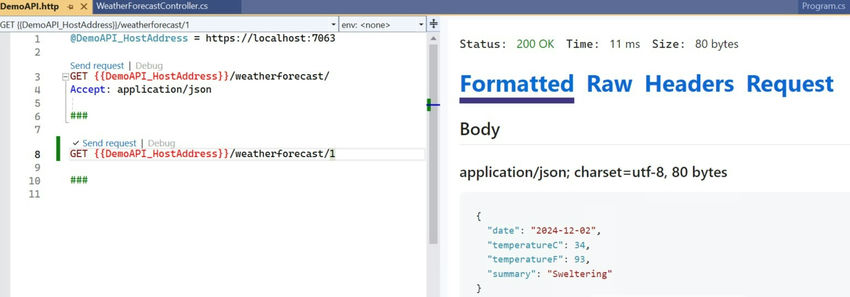
Similarity POST, PUT, and DELETE endpoints can be created.
That’s all for this article. Hope you learn and enjoy this article.

HostForLIFE ASP.NET Core Hosting

European Best, cheap and reliable ASP.NET hosting with instant activation. HostForLIFE.eu is #1 Recommended Windows and ASP.NET hosting in European Continent. With 99.99% Uptime Guaranteed of Relibility, Stability and Performace. HostForLIFE.eu security team is constantly monitoring the entire network for unusual behaviour. We deliver hosting solution including Shared hosting, Cloud hosting, Reseller hosting, Dedicated Servers, and IT as Service for companies of all size.


About HostForLIFE

HostForLIFE is European Windows Hosting Provider which focuses on Windows Platform only. We deliver on-demand hosting solutions including Shared hosting, Reseller Hosting, Cloud Hosting, Dedicated Servers, and IT as a Service for companies of all sizes.

We have offered the latest Windows 2019 Hosting, ASP.NET 5 Hosting, ASP.NET MVC 6 Hosting and SQL 2019 Hosting.


Month List

Tag cloud

Sign in