European ASP.NET 4.5 Hosting BLOG

BLOG about ASP.NET 4, ASP.NET 4.5 Hosting and Its Technology - Dedicated to European Windows Hosting Customer

European ASP.NET Core Hosting :: Options Pattern In .NET 6.0

clock March 28, 2022 08:09 by author Peter

Reading from configuration file is one of the most common requirements when it comes to software development. With options pattern in .NET this can be achieved in an elegant manner using the options interfaces. The various options interfaces exposed in .NET enables mapping configuration settings to strongly typed classes that can be accessed across various service lifetimes. In this article, we will explore the different ways to implement options pattern across transient, scoped, and singleton service lifetimes.
Setup

Create an ASP.NET WebAPI 6.0 app and add the following configuration setting in the appsettings.json file
"Units": {
  "Temp": "Celsius",
  "Distance": "Miles"
}

Create a UnitOptions class corresponding to the setting created in the previous step
public class UnitOptions
{
    public string Temp { get; set; } = String.Empty;
    public string Distance { get; set; } = String.Empty;
}


Bind the UnitOptions class to the corresponding section in appsettings.json by registering configuration instance in Program.cs (If you are using previous version of .NET, add the following line in Startup.cs)
builder.Services.Configure<UnitOptions>(builder.Configuration.GetSection("Units"));

IOptions
IOptions is singleton and hence can be used to read configuration data within any service lifetime. Being singleton, it cannot read changes to the configuration data after the app has started.

To demonstrate this let’s create a transient service to read the unit options from the configuration file using IOptions interface as follows:-

public interface ITransientService
{
    UnitOptions GetUnits();
}

public class TransientService : ITransientService
{
    private readonly UnitOptions _unitOptions;

    public TransientService(IOptions<UnitOptions> unitOptions)
    {
        _unitOptions = unitOptions.Value;
    }
    public UnitOptions GetUnits()
    {
        return _unitOptions;
    }
}


Add the transient service to DI container in Program.cs

builder.Services.AddTransient<ITransientService, TransientService>();

Hook the service to the controller
[Route("api/[controller]")]
[ApiController]
public class OptionsDemoController : ControllerBase
{
    private readonly ITransientService _transientService;

    public OptionsDemoController(TransientService transientService)
    {
        _transientService = transientService;
    }

    [HttpGet]
    [Route("/units/transient")]
    public IActionResult GetUnitsTransient() => Ok(_transientService.GetUnits());
}

Run the app and hit the controller action. You should be able to see the values being fetched from the configuration file.

While the app is still running, change the value of distance unit from ‘Miles’ to ‘Kilometres’ in the appsettings.json file and hit the same API controller action again. The response does not change. This is because IOptions cannot read changes to the config data while the app is still running.

Revert changes to the appsettings.json file before proceeding with next steps.

IOptionsSnapshot

IOptionsSnapshot is scoped and hence it can be used only with transient and scoped service lifetimes. Being scoped, it can recompute config data for each request.

Create a scoped (or transient) service with an injected IOptionsSnapshot instance as follows:-
public interface IScopedService
{
    UnitOptions GetUnits();
}


public class ScopedService : IScopedService
{
    private readonly UnitOptions _unitOptions;

    public ScopedService(IOptionsSnapshot<UnitOptions> unitOptions)
    {
        _unitOptions = unitOptions.Value;
    }

    public UnitOptions GetUnits()
    {
        return _unitOptions;
    }
}


Add the scoped service to DI container in Program.cs
builder.Services.AddScoped<IScopedService, ScopedService>();

Hook the service to the controller
[Route("api/[controller]")]
[ApiController]
public class OptionsDemoController : ControllerBase
{
    private readonly IScopedService _scopedService;
    private readonly ITransientService _transientService;

    public OptionsDemoController(ITransientService transientService, IScopedService scopedService)
    {
        _transientService = transientService;
        _scopedService = scopedService;
    }

    [HttpGet]
    [Route("/units/scoped")]
    public IActionResult GetUnitsScoped() => Ok(_scopedService.GetUnits());

    [HttpGet]
    [Route("/units/transient")]
    public IActionResult GetUnitsTransient() => Ok(_transientService.GetUnits());
}


Run the app and hit the controller action. You should be able to see the values being fetched from the configuration file.


While the app is still running, change the value of distance unit from ‘Miles’ to ‘Kilometres’ in the appsettings.json file and hit the same API controller action again. The response reflects the changes to the config data.

If you try to add IOptionsSnapshot to any singleton service, you would encounter a runtime exception because of the service lifetime mismatch.

Revert changes to the appsettings.json file before proceeding with next steps.

IOptionsMonitor

IOptionsMonitor is singleton and hence can be used to read configuration data in any service lifetime. However, as opposed to IOptions, it can retrieve current config data at any time.

Create a singleton service with an injected IOptionsMonitor instance as follows:-
public interface ISingletonService
{
    UnitOptions GetUnits();
}

public class SingletonService : ISingletonService
{
    private readonly IOptionsMonitor<UnitOptions> _unitOptions;

    public SingletonService(IOptionsMonitor<UnitOptions> unitOptions)
    {
        _unitOptions = unitOptions;
    }
    public UnitOptions GetUnits()
    {
        return _unitOptions.CurrentValue;
    }
}

Add the service to DI container in Program.cs
builder.Services.AddSingleton<ISingletonService, SingletonService>();

Hook the service to controller
[Route("api/[controller]")]
[ApiController]
public class OptionsDemoController : ControllerBase
{
    private readonly ITransientService _transientService;
    private readonly IScopedService _scopedService;
    private readonly ISingletonService _singletonService;

    public OptionsDemoController(ITransientService transientService, IScopedService scopedService, ISingletonService singletonService)
    {
        _transientService = transientService;
        _scopedService = scopedService;
        _singletonService = singletonService;
    }

    [HttpGet]
    [Route("/units/transient")]
    public IActionResult GetUnitsTransient() => Ok(_transientService.GetUnits());


    [HttpGet]
    [Route("/units/scoped")]
    public IActionResult GetUnitsScoped() => Ok(_scopedService.GetUnits());

    [HttpGet]
    [Route("/units/singleton")]
    public IActionResult GetUnitsSingleton() => Ok(_singletonService.GetUnits());
}

Run the app and hit the controller action. You should be able to see the values being fetched from the configuration file.


While the app is still running, change the value of distance unit from ‘Miles’ to ‘Kilometres’ in the appsettings.json file and hit the same API controller action again. The response reflects the changes to the config data.


The options pattern provides us with various options to read the config data using strongly types classes. Depending upon service lifetime and recomputation requirements of the config data, one can use IOptions, IOptionsSnapshot, and IOptionsMonitor interfaces to read config data. Prefer using the options pattern over other methods to read config data.

HostForLIFE.eu ASP.NET Core Hosting

European best, cheap and reliable ASP.NET hosting with instant activation. HostForLIFE.eu is #1 Recommended Windows and ASP.NET hosting in European Continent. With 99.99% Uptime Guaranteed of Relibility, Stability and Performace. HostForLIFE.eu security team is constantly monitoring the entire network for unusual behaviour. We deliver hosting solution including Shared hosting, Cloud hosting, Reseller hosting, Dedicated Servers, and IT as Service for companies of all size.


European ASP.NET Core Hosting :: Logging Application Block

clock March 25, 2022 07:42 by author Peter

First, we need to know what application blocks are. Application Blocks are reusable software components and are part of Microsoft's Enterprise Library. The enterprise library provides configurable features to manage crosscutting concerns like validation, logging, exception management, etc. Here I elaborate on one of the features of the Enterprise Library- Logging Application Block. One can use the Logging Application Block to log information to:

    Event logs
    A text file
    An email message
    A database
    A message queue
    Windows Management Instrumentation (WMI) event
    Customize the logging location

Create windows form application. Now add a reference to Enterprise Library Logging Application Block to the solution.

Now add a configuration file for configuring the log. Now edit it with the  Enterprise Library Configuration.

It opens a window. In that select Blocks -> Add Logging Settings

It creates default logging settings as follows:

It contains a category named "General", which is using an "Event Log Listener" with a "Text Formatter". For now, we can leave Special Categories. So, what all these are doing?
 
Let's understand it with an example. There may be some logs which you need to write in an event log and a text file, and for some log you need to mail also. So you create one category which writes all logs to the event log and text file, and another category for sending mail of only error logs. Then you have to create 3 listeners, for logging in event log, text file, and mailing. You can also define different formatters for different types of listeners. For example, you need a detailed log for logging in events log and precise log for mailing. All these settings are defined in the configuration. All you need to do is when you write a log just defines the category of the log and the rest is done by the application block.
 
Categories:
Category can filter the log entry and route it to different listeners. The filter can be based on the severity, i.e., Critical, Error, Warning, or Information.
 
Logging Target Listeners:
Different listeners can be defined here. We only need to do configuration and these listeners can write to event logs, a flat file, xml file, to the database, send mail etc.
 
Log Message formatters:
This is used to define a format in which the log is written. Text formatter is the default formatter, which writes all the information. For customizing the formatter, define a template.
 
A sample project was uploaded. This contains a general category that logs to event logs and a flat file using text formatter. And mail category which sends mail using mail formatter. And depending on the conditions it logs to general category, or sends mail, or can do both.
 
So now you can see a configuration section called "loggingConfiguration" in the app.config file.
 
This configuration section contains listeners, formatters, categorysources and specialSources. One can configure listener, formatter, categories here.
 
To write a log you just need to create a LogEntry and specify the category. Of category is not specified, log will be written to default category.
 
So, now you can see logging is so easy using Application blocks.

HostForLIFE.eu ASP.NET Core Hosting

European best, cheap and reliable ASP.NET hosting with instant activation. HostForLIFE.eu is #1 Recommended Windows and ASP.NET hosting in European Continent. With 99.99% Uptime Guaranteed of Relibility, Stability and Performace. HostForLIFE.eu security team is constantly monitoring the entire network for unusual behaviour. We deliver hosting solution including Shared hosting, Cloud hosting, Reseller hosting, Dedicated Servers, and IT as Service for companies of all size.


European ASP.NET Core Hosting :: Distributed Transactions with Web API across Application Domains

clock March 23, 2022 08:17 by author Peter

WCF uses the [TransactionFlow] attribute for transaction propagation. This article shows a possible solution to obtain the same behavior with WebAPI in order to enlist operations performed in different application domains, permitting participation of different processes in the same transaction.
 
Building the Sample
In order to enlist transactions belonging to different application domains and event different servers, we can rely on Distributed Transaction Coordinators (DTC).

When the application is hosted on different servers, in order to use the DTC, those servers must be on the same Network Domain. DTC needs bidirectional communication, in order to coordinate the principal transaction with other transactions. Violation this precondition end up with the following error message:

The MSDTC transaction manager was unable to push the transaction to the destination transaction manager due to communication problems. Possible causes are: a firewall is present and it doesn't have an exception for the MSDTC process, the two machines cannot find each other by their NetBIOS names, or the support for network transactions is not enabled for one of the two transaction managers. (Exception from HRESULT: 0x8004D02A).

To check this precondition you can simply ping one server from another and vice-versa.
 
The DTC must be enabled for network access. The settings used for this example are shown in the following image:


In the end, the DTC service must be running:

Description
With this example, I created a client WebAPI application working as a server. This endpoint exposes an action to save data posted from a client. The client, a console application, in addition, to call the WebAPI endpoint, perform an INSERT operation on its local database. Both those operations must be done in the same transaction, in order to commit or rollback all together.
 
Client application
The client application must initiate the transaction and then forward the transaction token to the WebAPI action method. To simplify this operation, I created an extension method on the HttpRequestMessage class that retrieves the transaction token from the ambient transaction and sets it as an HTTP header.
    public static class HttpRequestMessageExtension  
    {  
        public static void AddTransactionPropagationToken(this HttpRequestMessage request)  
        {  
            if (Transaction.Current != null)  
            {  
                var token = TransactionInterop.GetTransmitterPropagationToken(Transaction.Current);  
                request.Headers.Add("TransactionToken", Convert.ToBase64String(token));                  
            }  
        }  
    }


Of course, this method must be invoked before calling the WebAPI endpoint and within a transaction context. For this reason, the client application must initiate the main transaction,
    using (var scope = new TransactionScope())  
    {  
        // database operation done in an external app domain  
        using (var client = new HttpClient())  
        {  
            using (var request = new HttpRequestMessage(HttpMethod.Post, String.Format(ConfigurationManager.AppSettings["urlPost"], id)))  
            {  
                // forward transaction token  
                request.AddTransactionPropagationToken();  
                var response = client.SendAsync(request).Result;  
                response.EnsureSuccessStatusCode();  
            }  
        }  
      
        // database operation done in the client app domain  
        using (var connection = new SqlConnection(ConfigurationManager.ConnectionStrings["connectionStringClient"].ConnectionString))  
        {  
            connection.Open();  
            using (var command = new SqlCommand(String.Format("INSERT INTO [Table_A] ([Name], [CreatedOn]) VALUES ('{0}', GETDATE())", id), connection))  
            {  
                command.ExecuteNonQuery();  
            }  
        }  
          
        // Commit local and cross domain operations  
        scope.Complete();  
    }


WebAPI application
Server-side, I need to retrieve the transaction identifier and enroll the action method in the client transaction. I resolved it creating an action filter.
    public class EnlistToDistributedTransactionActionFilter : ActionFilterAttribute  
    {  
        private const string TransactionId = "TransactionToken";  
      
        /// <summary>  
        /// Retrieve a transaction propagation token, create a transaction scope and promote   
        /// the current transaction to a distributed transaction.  
        /// </summary>  
        /// <param name="actionContext">The action context.</param>  
        public override void OnActionExecuting(HttpActionContext actionContext)  
        {  
            if (actionContext.Request.Headers.Contains(TransactionId))  
            {  
                var values = actionContext.Request.Headers.GetValues(TransactionId);  
                if (values != null && values.Any())  
                {  
                    byte[] transactionToken = Convert.FromBase64String(values.FirstOrDefault());  
                    var transaction = TransactionInterop.GetTransactionFromTransmitterPropagationToken(transactionToken);  
                      
                    var transactionScope = new TransactionScope(transaction);  
      
                    actionContext.Request.Properties.Add(TransactionId, transactionScope);  
                }  
            }  
        }  
      
        /// <summary>  
        /// Rollback or commit transaction.  
        /// </summary>  
        /// <param name="actionExecutedContext">The action executed context.</param>  
        public override void OnActionExecuted(HttpActionExecutedContext actionExecutedContext)  
        {  
            if (actionExecutedContext.Request.Properties.Keys.Contains(TransactionId))  
            {  
                var transactionScope = actionExecutedContext.Request.Properties[TransactionId] as TransactionScope;  
      
                if (transactionScope != null)  
                {  
                    if (actionExecutedContext.Exception != null)  
                    {  
                        Transaction.Current.Rollback();  
                    }  
                    else  
                    {  
                        transactionScope.Complete();  
                    }  
      
                    transactionScope.Dispose();  
                    actionExecutedContext.Request.Properties[TransactionId] = null;  
                }  
            }  
        }  
    }


Now we can apply this filter on our action endpoint in order to participate in the caller transaction.
    [HttpPost]  
    [EnlistToDistributedTransactionActionFilter]  
    public HttpResponseMessage Post(string id)  
    {  
        using (var connection = new SqlConnection(ConfigurationManager.ConnectionStrings["connectionString"].ConnectionString))  
        {  
            connection.Open();  
      
            using (var command = connection.CreateCommand())  
            {  
                command.CommandText = String.Format("INSERT INTO [Table_1] ([Id], [CreatedOn]) VALUES ('{0}', GETDATE())", id);  
                command.ExecuteNonQuery();  
            }  
        }  
      
        var response = Request.CreateResponse(HttpStatusCode.Created);  
        response.Headers.Location = new Uri(Url.Link("DefaultApi", new { id = id }));  
        return response;  
    }


Source Code Files
Attached to this article, you can find a solution containing two projects: a client console application and a WebAPI application.
 
To try this solution, unzip the solution and deploy the WebAPI 2.0 application under IIS on server "A" with its own SQL Server instance. After that, install the console application on server "B" with its own SQL Server instance. As mentioned before, those servers must be in the same Network Domain.
 
The client application test four cases,
    Commit client and server
    Rollback client and server
    Exception server-side (resulting in a server and client rollback)
    Exception client-side (resulting in a server and client rollback)

When the client application starts, it asks you what kind of test do you want. In case of a positive commitment (0), a green message is reported, followed by a server call used to get all records inserted since now,


In negative cases (1,2,3), the resulting message will be in red, followed by a server call to retrieve all the records from the server DB to check that no new record was inserted.


European ASP.NET Core Hosting :: Writing Efficient Unit Test Cases with Moq and Bogus

clock March 22, 2022 10:56 by author Peter

Unit testing is very important for creating quality applications. We should make unit testing an important aspect of application development. These unit tests are written by developers. Further, after writing test cases, code coverage must be checked with tools such as SonarQube. A good pattern for writing test cases is Arrange-Act-Assert. It simply means writing test cases in 3 phases: Arrange the configurations, data, or connections that will be involved in test case writing; Act on the unit by invoking the method with required parameters; and Assert on the behavior to validate the scenarios. There is some pre-work required to make our code testable such as using Interfaces instead of actual class when referring from another class but we will not go into more depth in that topic.

Act and Assert is straightforward, they only require developers understanding of that component. Arrange part is the most complex as it requires setting up multiple things to run the test cases. This generally requires creating a dummy method implementation with test data (also known as Mocking) for executing the method and we end up hard-coding values, use random values or sometimes end up putting actual values to execute the test. We do not and should not actually invoke the data access layer for testing our business logic or presentation layers for unit testing. We must actually Mock the methods in the Arrange phase that interact with resources such as file system, database, cache server, etc. Bogus and Moq are very compatible with each other for writing efficient test cases. One will generate the data and the second will mock the method response with generated data.

What is Moq?
Moq is a library for generating Mocks of methods using LINQ. It removes the complexity of writing mock methods, setting up dependencies, and then creating the object. WIthout moq it will require writing a lot of repeated code to just generate the mock classes and methods. A simple example of Moq is,
var dataAccessMock = new Mock < IEmployeeDataAccess > ();
dataAccessMock.Setup(c => c.GetEmployees()).Returns(new List < Employee > {
    /*Employee objects*/ });
var employeeDataAccess = dataAccessMock.Object;

It’s nuget package is Moq, In csproj, <PackageReference Include="Moq" Version="4.17.2" />

What is Bogus?
Bogus is a library used to generate fake data in .NET. It uses fluent API to write rules for generating fake data. It has a lot of datasets available that we can reuse to generate test data. It can generate random email ids, locations, uuids, etc. It is a very good library for testing. Some use cases are as shown below like Person, Images, Lorem Ipsum, etc (Screenshot from Package Meta).


Sample code snippet for generating email ids data, it is very simple.

var emailIds = new Faker<string>().RuleFor(c => c, f => f.Person.Email).GenerateBetween(5,6);

It is available as  <PackageReference Include="Bogus" Version="34.0.1" />

Setup Requirements
    .NET 6
    Visual Studio 2022
    NUnit

Demo
Open NUnit Project and download Bogus and Moq Packages. For demo purposes, I have created a DataAccessLayer and BusinessLogicLayer project and it contains the EmployeeDataAccess interface and implementation and EmployeeBusinessLogicLayer interface and implementation. We are going to test the business logic layer by mocking the data access layer with Bogus to generate sample data and Moq to perform mocking.   

Our Project structure looks like this,

Now, in the Unit Test Project we will follow the code in setup.
private IEmployeeBusinessLogic employeeBusinessLogic;
[SetUp]
public void Setup() {
    //Arrange
    //Set Id to 0 that will be increased on every iteration by faker object id rule
    int id = 0;
    //Initialize the mock class and test employees class object
    var dataAccessMock = new Mock < IEmployeeDataAccess > ();
    var testEmployees = new Faker < Employee > ();
    //This contains the rules for generating the fake data.
    //It takes 2 parameters, First is property name of employee object and second is replacement value
    //The replacement value can be rule based or random data generated from Faker class, eg. f=>f.Person.FullName will generate a fake name
    testEmployees.RuleFor(x => x.Id, ++id).RuleFor(x => x.Name, f => f.Person.FullName).RuleFor(x => x.Location, f => f.Address.State()).RuleFor(x => x.EmailId, f => f.Internet.Email()).RuleFor(x => x.EmployeeId, Guid.NewGuid());
    //This will set the mock method with response generated from Bogus library
    dataAccessMock.Setup(c => c.GetEmployees()).Returns(testEmployees.GenerateBetween(1, 20));
    //This will assign the mock data access object to business logic constructor
    employeeBusinessLogic = new EmployeeBusinessLogic(dataAccessMock.Object);
}


Explanation
This code has all the logic to replace the data access with fake data that resembles the actual data thanks to Bogus library and Moq package that will implement the interface with mock response generated by Bogus library. I have added a line by line explanation of what is happening behind the scene.

Now, we will execute the test cases.
[Test]
public void GetEmployeesTest() {
    //Act
    var actual = employeeBusinessLogic.GetEmployees();
    //Asset
    Assert.Multiple(() => {
        Assert.IsNotNull(actual);
        Assert.Positive(actual.Count());
    });
}


Overall the Test Case class looks like this,
using Bogus;
using BusinessLogicLayer;
using DataAccessLayer;
using Entities;
using Moq;
using NUnit.Framework;
using System;
using System.Linq;
namespace NUnit.Test {
    public class EmployeeBusinessLogicUnitTests {
        private IEmployeeBusinessLogic employeeBusinessLogic;
        [SetUp]
        public void Setup() {
                //Arrange
                //Set Id to 0 that will be increased on every iteration by faker object id rule
                int id = 0;
                //Initialize the mock class and test employees class object
                var dataAccessMock = new Mock < IEmployeeDataAccess > ();
                var testEmployees = new Faker < Employee > ();
                //This contains the rules for generating the fake data.
                //It takes 2 parameters, First is property name of employee object and second is replacement value
                //The replacement value can be rule based or random data generated from Faker class, eg. f=>f.Person.FullName will generate a fake name
                testEmployees.RuleFor(x => x.Id, ++id).RuleFor(x => x.Name, f => f.Person.FullName).RuleFor(x => x.Location, f => f.Address.State()).RuleFor(x => x.EmailId, f => f.Internet.Email()).RuleFor(x => x.EmployeeId, Guid.NewGuid());
                //This will set the mock method with response generated from Bogus library
                dataAccessMock.Setup(c => c.GetEmployees()).Returns(testEmployees.GenerateBetween(1, 20));
                //This will assign the mock data access object to business logic constructor
                employeeBusinessLogic = new EmployeeBusinessLogic(dataAccessMock.Object);
            }
            [Test]
        public void GetEmployeesTest() {
            //Act
            var actual = employeeBusinessLogic.GetEmployees();
            //Asset
            Assert.Multiple(() => {
                Assert.IsNotNull(actual);
                Assert.Positive(actual.Count());
            });
        }
    }
}

That’s it! Thanks for reading. I have uploaded sample code for reference. Please feel free to drop your comments.

HostForLIFE.eu ASP.NET Core Hosting

European best, cheap and reliable ASP.NET hosting with instant activation. HostForLIFE.eu is #1 Recommended Windows and ASP.NET hosting in European Continent. With 99.99% Uptime Guaranteed of Relibility, Stability and Performace. HostForLIFE.eu security team is constantly monitoring the entire network for unusual behaviour. We deliver hosting solution including Shared hosting, Cloud hosting, Reseller hosting, Dedicated Servers, and IT as Service for companies of all size.


European ASP.NET Core Hosting :: Data and Business Layer, the New Way

clock March 21, 2022 10:05 by author Peter

Existing Patterns
Every enterprise application is backed by a persistent data store, typically a relational database. Object-oriented programming (OOP), on the other hand, is the mainstream for enterprise application development. Currently there are 3 patterns to develop business logic:

  • Transaction Script and Domain Model: The business logic is placed in-memory code and the database is used pretty much as a storage mechanism.
  • Logic in SQL: Business logic is placed in SQL queries such as stored procedure.

Each pattern has its own pros and cons, basically it's a tradeoff between programmability and performance. Most people go with the in-memory code way for better programmability, which requires an Object-Relational Mapping (ORM, O/RM, and O/R mapping tool), such as Entity Framework. Great efforts have been made to reconcile these two, however it's still The Vietnam of Computer Science, due to the misconceptions of SQL and OOP.
 
The Misconceptions
SQL is Obsolete
The origins of the SQL take us back to the 1970s. Since then, the IT world has changed, projects are much more complicated, but SQL stays - more or less - the same. It works, but it's not elegant for today's modern application development. Most ORM implementations, like Entity Framework, try to encapsulate the code needed to manipulate the data, so you don't use SQL anymore. Unfortunately, this is wrongheaded and will end up with Leaky Abstraction.
 
As coined by Joel Spolsky, the Law of Leaky Abstractions states:
  All non-trivial abstractions, to some degree, are leaky.
 
Apparently, RDBMS and SQL, being a fundamental of your application, is far from trivial. You can't expect to abstract it away - you have to live with it. Most ORM implementations provide native SQL execution because of this.
 
OOP/POCO Obsession

OOP, on the other hand, is modern and the mainstream of application development. It's so widely adopted by developers that many developers subconsciously believe OOP can solve all the problems. Moreover, many framework authors have the religion that any framework, if not support POCO, is not a good framework.
 
In fact, like any technology, OOP has its limitations too. The biggest one, IMO, is: OOP is limited to local process, it's not serialization/deserialization friendly. Each and every object is accessed via its reference (the address pointer), and the reference, together with the type metadata and compiled byte code (further reference to type descriptors, vtable, etc.), is private to local process. It's just too obvious to realize this. By nature, any serialized data is value type, which means:

  • To serialize/deserialize an object, a converter for the reference is needed, either implicitly or explicitly. ORM can be considered as the converter between objects and relational data.
  • As the object complexity grows, the complexity of the converter grows respectively. Particularly, the type metadata and compiled byte code (the behavior of the object, or the logic), are difficult or maybe impossible for the conversion - in the end, you need virtually the whole type runtime. That's why so many applications start with Domain Drive Design, but end up with Anemic Domain Model.
  • On the other hand, relational data model is very complex by nature, compares to other data format such as JSON. This adds another complexity to the converter. ORM, which is considered as the converter between objects and relational data, will sooner of later hit the wall.

That's the real problem of object-relational impedance mismatch, if you want to map between arbitrary objects (POCO) and relational data. Unfortunately, almost all ORM implementations are following this path, none of them can survive from this.
 
The New Way
When you're using relational database, implementing your business logic using SQL/stored procedure is the shortest path, therefore can have best performance. The cons lies in the code maintainability of SQL. On the other hand, implementing your business logic as in-memory code, has many advantages in terms of code maintainability, but may have performance issue in some cases, and most importantly, it will end up with object-relational impedance mismatch as described above. How can we get the best of both?
 
RDO.Data, an open source framework to handle data, is the answer to this question. You can write your business logic in both ways, as stored procedures alike or in-memory code, using C#/VB.Net, independent of your physical database. To achieve this, we're implementing relational schema and data into a comprehensive yet simple object model:


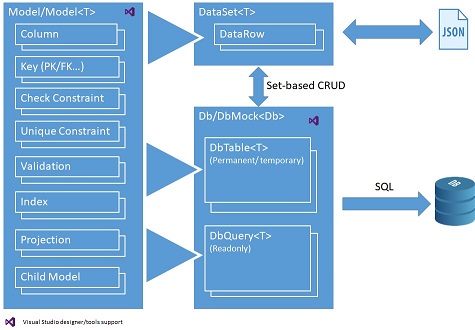
The following data objects are provided with rich set of properties, methods and events:

  • Model/Model<T>: Defines the meta data of model, and declarative business logic such as data constraints, automatic calculated field and validation, which can be consumed for both database and local in-memory code.
  • DataSet<T>: Stores hierarchical data locally and acts as domain model of your business logic. It can be conveniently exchanged with relational database in set-based operations (CRUD), or external system via JSON.
  • Db: Defines the database session, which contains:
    • DbTable<T>: Permanent database tables for data storage;
    • Instance methods of Db class to implement procedural business logic, using DataSet<T> objects as input/output. The business logic can be simple CRUD operations, or complex operation such as MRP calculation:
      • You can use DbQuery<T> objects to encapsulate data as reusable view, and/or temporary DbTable<T> objects to store intermediate result, to write stored procedure alike, set-based operations (CRUD) business logic.
      • On the other hand, DataSet<T> objects, in addition to be used as input/output of your procedural business logic, can also be used to write in-memory code to implement your business logic locally.
      • Since these objects are database agnostic, you can easily port your business logic into different relational databases.
  • DbMock<T>: Easily mock the database in an isolated, known state for testing.

The following is an example of business layer implementation, to deal with sales orders in AdventureWorksLT sample. Please note the example is just CRUD operations for simplicity, RDO.Data is capable of doing much more than it.
    public async Task<DataSet<SalesOrderInfo>> GetSalesOrderInfoAsync(_Int32 salesOrderID, CancellationToken ct = default(CancellationToken))  

    {  
        var result = CreateQuery((DbQueryBuilder builder, SalesOrderInfo _) =>  
        {  
            builder.From(SalesOrderHeader, out var o)  
                .LeftJoin(Customer, o.FK_Customer, out var c)  
                .LeftJoin(Address, o.FK_ShipToAddress, out var shipTo)  
                .LeftJoin(Address, o.FK_BillToAddress, out var billTo)  
                .AutoSelect()  
                .AutoSelect(c, _.Customer)  
                .AutoSelect(shipTo, _.ShipToAddress)  
                .AutoSelect(billTo, _.BillToAddress)  
                .Where(o.SalesOrderID == salesOrderID);  
        });  
      
        await result.CreateChildAsync(_ => _.SalesOrderDetails, (DbQueryBuilder builder, SalesOrderInfoDetail _) =>  
        {  
            builder.From(SalesOrderDetail, out var d)  
                .LeftJoin(Product, d.FK_Product, out var p)  
                .AutoSelect()  
                .AutoSelect(p, _.Product)  
                .OrderBy(d.SalesOrderDetailID);  
        }, ct);  
      
        return await result.ToDataSetAsync(ct);  
    }  
      
    public async Task<int?> CreateSalesOrderAsync(DataSet<SalesOrderInfo> salesOrders, CancellationToken ct)  
    {  
        await EnsureConnectionOpenAsync(ct);  
        using (var transaction = BeginTransaction())  
        {  
            salesOrders._.ResetRowIdentifiers();  
            await SalesOrderHeader.InsertAsync(salesOrders, true, ct);  
            var salesOrderDetails = salesOrders.GetChild(_ => _.SalesOrderDetails);  
            salesOrderDetails._.ResetRowIdentifiers();  
            await SalesOrderDetail.InsertAsync(salesOrderDetails, ct);  
      
            await transaction.CommitAsync(ct);  
            return salesOrders.Count > 0 ? salesOrders._.SalesOrderID[0] : null;  
        }  
    }  
      
    public async Task UpdateSalesOrderAsync(DataSet<SalesOrderInfo> salesOrders, CancellationToken ct)  
    {  
        await EnsureConnectionOpenAsync(ct);  
        using (var transaction = BeginTransaction())  
        {  
            salesOrders._.ResetRowIdentifiers();  
            await SalesOrderHeader.UpdateAsync(salesOrders, ct);  
            await SalesOrderDetail.DeleteAsync(salesOrders, (s, _) => s.Match(_.FK_SalesOrderHeader), ct);  
            var salesOrderDetails = salesOrders.GetChild(_ => _.SalesOrderDetails);  
            salesOrderDetails._.ResetRowIdentifiers();  
            await SalesOrderDetail.InsertAsync(salesOrderDetails, ct);  
      
            await transaction.CommitAsync(ct);  
        }  
    }  
      
    public Task<int> DeleteSalesOrderAsync(DataSet<SalesOrderHeader.Key> dataSet, CancellationToken ct)  
    {  
        return SalesOrderHeader.DeleteAsync(dataSet, (s, _) => s.Match(_), ct);  
    } 

The above code can be found in the downloadable source code, which is a fully featured WPF application using well known AdventureWorksLT sample database.

RDO.Data Features

  • Comprehensive hierarchical data support.
  • Rich declarative business logic support: constraints, automatic calculated filed, validations, etc, for both server side and client side.
  • Comprehensive inter-table join/lookup support.
  • Reusable view via DbQuery<T> objects.
  • Intermediate result store via temporary DbTable<T> objects.
  • Comprehensive JSON support, better performance because no reflection required.
  • Fully customizable data types and user-defined functions.
  • Built-in logging for database operations.
  • Extensive support for testing.
  • Rich design time tools support.
  • And much more...

Pros

  • Unified programming model for all scenarios. You have full control of your data and business layer, no magic black box.
  • Your data and business layer is best balanced for both programmability and performance. Rich set of data objects are provided, no more object-relational impedance mismatch.
  • Data and business layer testing is a first class citizen which can be performed easily - your application can be much more robust and adaptive to change.
  • Easy to use. The APIs are clean and intuitive, with rich design time tools support.
  • Rich feature and lightweight. The runtime DevZest.Data.dll is less than 500KB in size, whereas DevZest.Data.SqlServer is only 108KB in size, without any 3rd party dependency.
  • The rich metadata can be consumed conveniently by other layer of your application such as the presentation layer.

Cons

  • It's new. Although APIs are designed to be clean and intuitive, you or your team still need some time to get familiar with the framework. Particularly, your domain model objects are split into two parts: the Model/Model<T> objects and DataSet<T> objects. It's not complex, but you or your team may need some time to get used to it.
  • To best utilize RDO.Data, your team should be comfortable with SQL, at least to an intermediate level. This is one of those situations where you have to take into account the make up of your team - people do affect architectural decisions.
  • Although data objects are lightweight, there are some overhead comparisons to POCO objects, especially for the simplest scenarios. In terms of performance, It may get close to, but cannot beat, native stored procedure.

HostForLIFE.eu ASP.NET Core Hosting

European best, cheap and reliable ASP.NET hosting with instant activation. HostForLIFE.eu is #1 Recommended Windows and ASP.NET hosting in European Continent. With 99.99% Uptime Guaranteed of Relibility, Stability and Performace. HostForLIFE.eu security team is constantly monitoring the entire network for unusual behaviour. We deliver hosting solution including Shared hosting, Cloud hosting, Reseller hosting, Dedicated Servers, and IT as Service for companies of all size.


European ASP.NET SignalR Hosting - HostForLIFE :: How To Get List Of Connected Clients In SignalR?

clock March 18, 2022 07:33 by author Peter

I have not found any direct way to call. So, we need to write our own logic inside a method provided by SignalR Library.

There is a Hub class provided by the SignalR library.
 
In this class, we have 2 methods.

  • OnConnectedAsync()
  • OnDisconnectedAsync(Exception exception)

So, the OnConnectedAsync() method will add user and OnDisconnectedAsyn will disconnect a user because when any client gets connected, this OnConnectedAsync method gets called.

In the same way, when any client gets disconnected, then the OnDisconnectedAsync method is called.
 
So, let us see it by example.
 
Step 1
Here, I am going to define a class SignalRHub and inherit the Hub class that provides virtual method and add the Context.ConnectionId: It is a unique id generated by the SignalR HubCallerContext class.
    public class SignalRHub : Hub  
    {  
    public override Task OnConnected()  
    {  
    ConnectedUser.Ids.Add(Context.ConnectionId);  
    return base.OnConnected();  
    }  
    public override Task OnDisconnected()  
    {  
    ConnectedUser.Ids.Remove(Context.ConnectionId);  
    return base.OnDisconnected();  
    }  
    }  


Step 2
In this step, we need to define our class ConnectedUser with property Id that is used to Add/Remove when any client gets connected or disconnected.
 
Let us see this with an example.
    public static class ConnectedUser  
    {  
    public static List<string> Ids = new List<string>();  
    }  

Now, you will get the result of currently connected client using ConnectedUser.Ids.Count.
 
Note
As you see, here I am using a static class that will work fine when you have only one server, but when you will work on multiple servers, then it will not work as expected. In this case, you could use a cache server like Redis cache, SQL cache.


European ASP.NET Core Hosting :: Serialization

clock March 14, 2022 07:52 by author Peter

A - Introduction
Serialization is the process of converting an object into a stream of bytes to store the object or transmit it to memory, a database, or a file. Its main purpose is to save the state of an object in order to be able to recreate it when needed. The reverse process is called deserialization.

This is the structure of this article,

    A - Introduction
    B - How Serialization Works
    C - Uses for Serialization
    D - .NET Serialization Features
    E - Sample of the Serialization
        Binary and Soap Formatter
        JSON Serialization

B - How Serialization Works
The object is serialized to a stream that carries the data. The stream may also have information about the object's type, such as its version, culture, and assembly name. From that stream, the object can be stored in a database, a file, or memory.

C - Uses for Serialization
Serialization allows the developer to save the state of an object and re-create it as needed, providing storage of objects as well as data exchange. Through serialization, a developer can perform actions such as:

  • Sending the object to a remote application by using a web service
  • Passing an object from one domain to another
  • Passing an object through a firewall as a JSON or XML string
  • Maintaining security or user-specific information across applications

D - .NET Serialization Features

  • .NET features the following serialization technologies:
  • Binary serialization preserves type fidelity, which is useful for preserving the state of an object between different invocations of an application. For example, you can share an object between different applications by serializing it to the Clipboard. You can serialize an object to a stream, to a disk, to memory, over the network, and so forth. Remoting uses serialization to pass objects "by value" from one computer or application domain to another.
  • XML and SOAP serialization serializes only public properties and fields and does not preserve type fidelity. This is useful when you want to provide or consume data without restricting the application that uses the data. Because XML is an open standard, it is an attractive choice for sharing data across the Web. SOAP is likewise an open standard, which makes it an attractive choice.
  • JSON serialization serializes only public properties and does not preserve type fidelity. JSON is an open standard that is an attractive choice for sharing data across the web.

Note
For binary or XML serialization, you need:

  • The object to be serialized
  • Binary serialization can be dangerous. The BinaryFormatter.Deserialize method is never safe when used with untrusted input.


E - Samples of the Serialization
Binary and Soap Formatter
The following example demonstrates serialization of an object that is marked with the SerializableAttribute attribute. To use the BinaryFormatter instead of the SoapFormatter, uncomment the appropriate lines.
using System;
using System.IO;
using System.Runtime.Serialization;
using System.Runtime.Serialization.Formatters.Soap;
//using System.Runtime.Serialization.Formatters.Binary;

public class Test {
public static void Main()  {

  // Creates a new TestSimpleObject object.
  TestSimpleObject obj = new TestSimpleObject();

  Console.WriteLine("Before serialization the object contains: ");
  obj.Print();

  // Opens a file and serializes the object into it in binary format.
  Stream stream = File.Open("data.xml", FileMode.Create);
  SoapFormatter formatter = new SoapFormatter();

  //BinaryFormatter formatter = new BinaryFormatter();

  formatter.Serialize(stream, obj);
  stream.Close();

  // Empties obj.
  obj = null;

  // Opens file "data.xml" and deserializes the object from it.
  stream = File.Open("data.xml", FileMode.Open);
  formatter = new SoapFormatter();

  //formatter = new BinaryFormatter();

  obj = (TestSimpleObject)formatter.Deserialize(stream);
  stream.Close();

  Console.WriteLine("");
  Console.WriteLine("After deserialization the object contains: ");
  obj.Print();
}
}

// A test object that needs to be serialized.
[Serializable()]
public class TestSimpleObject  {

public int member1;
public string member2;
public string member3;
public double member4;

// A field that is not serialized.
[NonSerialized()] public string member5;

public TestSimpleObject() {

    member1 = 11;
    member2 = "hello";
    member3 = "hello";
    member4 = 3.14159265;
    member5 = "hello world!";
}

public void Print() {

    Console.WriteLine("member1 = '{0}'", member1);
    Console.WriteLine("member2 = '{0}'", member2);
    Console.WriteLine("member3 = '{0}'", member3);
    Console.WriteLine("member4 = '{0}'", member4);
    Console.WriteLine("member5 = '{0}'", member5);
}
}


The code is from Microsoft at SerializableAttribute Class (System).

Run the code
1, If we comment out Line 44, the Serializable Attribute, then we will get a SerializationException,

2, If you use SoapFormatter, you will get XML output,

3, If you use BinaryFormatter, you will get the binary output like this,

JSON Serialization:
// How to serialize and deserialize (marshal and unmarshal) JSON in .NET
// https://docs.microsoft.com/en-us/dotnet/standard/serialization/system-text-json-how-to?pivots=dotnet-6-0

using System;
using System.IO;
using System.Text.Json;

namespace SerializeToFile
{
    // A test object that needs to be serialized.
    [Serializable()]
    public class WeatherForecast
    {
        public DateTimeOffset Date { get; set; }
        public int TemperatureCelsius { get; set; }
        //public string? Summary { get; set; }
        public string Summary { get; set; }
    }

    public class Program
    {
        public static void Main()
        {
            var weatherForecast = new WeatherForecast
            {
                Date = DateTime.Parse("2019-08-01"),
                TemperatureCelsius = 25,
                Summary = "Hot"
            };

            string fileName = "WeatherForecast.json";
            string jsonString = JsonSerializer.Serialize(weatherForecast);
            File.WriteAllText(fileName, jsonString);

            Console.WriteLine(File.ReadAllText(fileName));
            Console.ReadLine();
        }
    }
}
// output:
//{"Date":"2019-08-01T00:00:00-07:00","TemperatureCelsius":25,"Summary":"Hot"}


The code is from Microsoft at How to serialize and deserialize JSON using C# - .NET.

Run the code,
4, You will get the JSON output like this,


European ASP.NET Core Hosting :: Differences Between Scoped, Transient, And Singleton Service

clock March 11, 2022 05:46 by author Peter

In this article, we will see the difference between AddScoped vs AddTransient vs AddSingleton in .net core.
Why we require

  • It defines the lifetime of object creation or a registration in the .net core with the help of Dependency Injection.
  • The DI Container has to decide whether to return a new object of the service or consume an existing instance.
  • The lifetime of the Service depends on how we instantiate the dependency.
  • We define the lifetime when we register the service.

Three types of lifetime and registration options

  • Scoped
  • Transient
  • Singleton

Scoped

  • In this service, with every HTTP request, we get a new instance.
  • The same instance is provided for the entire scope of that request. eg., if we have a couple of parameter in the controller, both object contains the same instance across the request
  • This is a better option when you want to maintain a state within a request.

services.AddScoped<IAuthService,AuthService>();

Transient
    A new service instance is created for each object in the HTTP request.
    This is a good approach for the multithreading approach because both objects are independent of one another.
    The instance is created every time they will use more memory and resources and can have a negative impact on performance
    Utilize for the lightweight service with little or no state.

services.AddTransient<ICronJobService,CronJobService>();

Singleton
    Only one service instance was created throughout the lifetime.
    Reused the same instance in future, wherever the service is required
    Since it's a single lifetime service creation, memory leaks in these services will build up over time.
    Also, it has memory efficient as they are created once reused everywhere.

services.AddSingleton<ILoggingService, LoggingService>();

When to use which Service
Singleton approach => We can use this for logging service, feature flag(to on and off module while deployment), and email service
Scoped approach => This is a better option when you want to maintain a state within a request.
Transient approach =>  Use this approach for the lightweight service with little or no state.

HostForLIFE.eu ASP.NET Core Hosting

European best, cheap and reliable ASP.NET hosting with instant activation. HostForLIFE.eu is #1 Recommended Windows and ASP.NET hosting in European Continent. With 99.99% Uptime Guaranteed of Relibility, Stability and Performace. HostForLIFE.eu security team is constantly monitoring the entire network for unusual behaviour. We deliver hosting solution including Shared hosting, Cloud hosting, Reseller hosting, Dedicated Servers, and IT as Service for companies of all size.


European ASP.NET Core Hosting :: Performance Comparison Using Three Different Methods for Joining Lists

clock March 8, 2022 06:46 by author Peter

Combining Lists comparing AddRange, Arrays and Concat
I had to combine two large lists, and was curious what the performance was of various methods. The 3 methods that came to mind was:
    Using AddRange
    Using an array to copy both lists into, then convert the array back to the final list.
    Using Linq's Concat extension method.

I was looking for the straight union of the two lists. No sorting, merging or filtering.

To compare the methods I had in mind, I decided to combine 2 huge lists and measure the time it took. That's not perfect, since it's a rare use-case, but performance tests are necessarily contrived in one dimension or other. Milliseconds and up are easier to compare than ticks, so I use a dataset that gets me in that range.

When it comes to measuring performance, I am a bit paranoid about compiler and run-time optimizations, and a collection with all zeroes strikes me as a good target to optimize for. So I add some guff to the collections before combining them.

I use the StopWatch class as time-taker. I don't like repeated start/stop calls, as it's easy to inadvertently get some code in between start and stop that was not part of the code to be measured. I isolated the StopWatch calls using an interface like this:
interface ITimedWorker
{
    string Label { get; }
    bool Check();
    void Work();
}


Then I can make a single measure with a method like this:
static void RunTimedOperation(ITimedWorker op)
{
    Stopwatch sw = new Stopwatch();

    Log("Starting {0}", op.Label);
    GC.Collect();
    sw.Start();
    op.Work();
    sw.Stop();
    if (!op.Check())
        Log("{0} failed its check", op.Label);
    Log("{0} finished in:\n\t{1:D2}:{2:D2}:{3:D2}:{4:D4}", op.Label, sw.Elapsed.Hours, sw.Elapsed.Minutes, sw.Elapsed.Seconds, sw.Elapsed.Milliseconds);
}

To get around garbage collection interference, I tried various ways to disable or discourage it during the actual combine operation I wanted to measure, but it did not work for the data sizes I was using. I found that inducing the collect just before the operation was enough to not trigger any collections where I didn't want them.


The test program is written to run either a single test or all three. When running all three tests, to alleviate the issues with garbage collection, the code picks pseudo-randomly which method to run first. It is an attempt to be fair to each of the three methods, since the garbage collector will be more likely to run in subsequent operations compared to the first one completed.

For the combining logic, I created a common base class for the three methods:
abstract class ListJoinerBase
{
    protected List<object> m_l1, m_l2, m_lCombined;
    private long m_goalCount;

    protected ListJoinerBase(List<object> l1, List<object> l2)
    {
        m_l1 = l1; m_l2 = l2;
        m_goalCount = m_l1.Count + m_l2.Count;
    }

    public abstract void Work();
    public bool Check()
    {
        Debug.Assert(m_lCombined.Count == m_goalCount);
        return m_lCombined.Count == m_goalCount;
    }
}


I checked correctness with the debugger. To minimize the chance of new errors getting introduced as code is added, I use a simple check method, which just verifies that the combined list is of the expected size.

Then remaining work was to add labels and implement the Work() method for the three specializations:
class ListJoinerArray : ListJoinerBase, ITimedWorker
{
    [...]
    public override void Work()
    {
        object[] combined = new object[m_l1.Count + m_l2.Count];

        m_l1.CopyTo(combined);
        m_l2.CopyTo(combined, m_l1.Count);
        m_lCombined = new List<object>(combined);
    }
}
class ListJoinerAddRange : ListJoinerBase, ITimedWorker
{
    [...]
    public override void Work()
    {
        m_lCombined = new List<object>();
        m_lCombined.AddRange(m_l1);
        m_lCombined.AddRange(m_l2);
    }
}
class ListJoinerConcat : ListJoinerBase, ITimedWorker
{
    [...]
    public override void Work()
    {
        m_lCombined = m_l1.Concat(m_l2).ToList();
    }
}

Results
The Array and AddRange methods were close, with an edge to Array copying. The Concat method was somewhat behind. The first two methods came in at 18-24 milliseconds for the data size I was using. The Concat method took 144-146 milliseconds. Based on this, I decided to use the array copying method. Before deciding yourself, I encourage you to download the program, play with the methods and add any others you want to compare with, and come to your own conclusions.

Appendix: Sample output from program
[usrdir]\source\repos\ListCombineDemo\results>..\bin\Release\ListCombineDemo.exe /all
Starting Join lists Using Concatenation
Join lists Using Concatenation finished in:
        00:00:00:0147
Starting Join lists Using Arrays
Join lists Using Arrays finished in:
        00:00:00:0018
Starting Join lists Using AddRange
Join lists Using AddRange finished in:
        00:00:00:0024

[usrdir]\source\repos\ListCombineDemo\results>..\bin\Release\ListCombineDemo.exe /all
Starting Join lists Using AddRange
Join lists Using AddRange finished in:
        00:00:00:0024
Starting Join lists Using Concatenation
Join lists Using Concatenation finished in:
        00:00:00:0140
Starting Join lists Using Arrays
Join lists Using Arrays finished in:
        00:00:00:0019

[usrdir]\source\repos\ListCombineDemo\results>..\bin\Release\ListCombineDemo.exe /random
Starting Join lists Using AddRange
Join lists Using AddRange finished in:
        00:00:00:0023

[usrdir]\source\repos\ListCombineDemo\results>..\bin\Release\ListCombineDemo.exe /concat
Starting Join lists Using Concatenation
Join lists Using Concatenation finished in:
        00:00:00:0145

[usrdir]\source\repos\ListCombineDemo\results>..\bin\Release\ListCombineDemo.exe /arrays
Starting Join lists Using Arrays
Join lists Using Arrays finished in:
        00:00:00:0020

Appendix: Some raw results in seconds

Method Seconds
Arrays 0.0021
Arrays 0.0019
Arrays 0.0019
Arrays 0.0018
Arrays 0.0019
Arrays 0.0019
Arrays 0.0019
Arrays 0.0018
Arrays 0.002
Arrays 0.0019
Arrays 0.0018
Concatenation 0.0145
Concatenation 0.0144
Concatenation 0.0146
Concatenation 0.0144
Concatenation 0.0145
Concatenation 0.0144
Concatenation 0.0145
Concatenation 0.0147
Concatenation 0.0144
AddRange 0.0022
AddRange 0.0021
AddRange 0.0021
AddRange 0.0022
AddRange 0.0022
AddRange 0.0022
AddRange 0.0027
AddRange 0.0025
AddRange 0.0024
AddRange 0.0025
AddRange 0.0023

HostForLIFE.eu ASP.NET Core Hosting

European best, cheap and reliable ASP.NET hosting with instant activation. HostForLIFE.eu is #1 Recommended Windows and ASP.NET hosting in European Continent. With 99.99% Uptime Guaranteed of Relibility, Stability and Performace. HostForLIFE.eu security team is constantly monitoring the entire network for unusual behaviour. We deliver hosting solution including Shared hosting, Cloud hosting, Reseller hosting, Dedicated Servers, and IT as Service for companies of all size.


European ASP.NET Core Hosting :: Using API Key Authentication To Secure ASP.NET Core Web API

clock March 7, 2022 07:34 by author Peter

API key authentication will keep a secure line between the API and clients, however, if you wish to have user authentication, go with token-based authentication, aka OAuth2.0. In this article, you will learn how to implement the API Key Authentication to secure the ASP.NET Core Web API by creating a middleware.
API Key Authentication

Step 1

Open Visual Studio Create or open a ASP.NET Core Web API Project, in my case I’m creating a new project with .NET 6.

Creating a new project

Select a template as shown in the below figure 


Step 2
Run the application and you will get swagger UI to access WeatherForecast API.   


public class ApiKeyMiddleware {
    private readonly RequestDelegate _next;
    private
    const string APIKEY = "XApiKey";
    public ApiKeyMiddleware(RequestDelegate next) {
        _next = next;
    }
    public async Task InvokeAsync(HttpContext context) {
        if (!context.Request.Headers.TryGetValue(APIKEY, out
                var extractedApiKey)) {
            context.Response.StatusCode = 401;
            await context.Response.WriteAsync("Api Key was not provided ");
            return;
        }
        var appSettings = context.RequestServices.GetRequiredService < IConfiguration > ();
        var apiKey = appSettings.GetValue < string > (APIKEY);
        if (!apiKey.Equals(extractedApiKey)) {
            context.Response.StatusCode = 401;
            await context.Response.WriteAsync("Unauthorized client");
            return;
        }
        await _next(context);
    }
}

The middleware will check the API key in the header and validate the key by extracting it from the header and compare with the key defined in code.

InvokeAsync method is defined in this middleware so that it will contain the main process, in our case, the main process will be to search and validate the ApiKey header name and value within the httpcontext request headers collection
if (!context.Request.Headers.TryGetValue(APIKEY, out
        var extractedApiKey)) {
    context.Response.StatusCode = 401;
    await context.Response.WriteAsync("Api Key was not provided ");
    return;
}


If there is no header with APIKEY it will return “Api Key was not provided”

Step 4
Open Program.cs file to register the middleware
app.UseMiddleware<ApiKeyMiddleware>();

Step 5
Open appsettings.json file and add an API Key
"XApiKey": "pgH7QzFHJx4w46fI~5Uzi4RvtTwlEXp"

Step 6
Run the application, and test the API using POSTMAN without passing the ApiKey in header, you will get “Api Key was not provided” message in payload, as shown in the below figure.


Passing wrong API Key

Providing correct API Key


HostForLIFE.eu ASP.NET Core Hosting

European best, cheap and reliable ASP.NET hosting with instant activation. HostForLIFE.eu is #1 Recommended Windows and ASP.NET hosting in European Continent. With 99.99% Uptime Guaranteed of Relibility, Stability and Performace. HostForLIFE.eu security team is constantly monitoring the entire network for unusual behaviour. We deliver hosting solution including Shared hosting, Cloud hosting, Reseller hosting, Dedicated Servers, and IT as Service for companies of all size.


About HostForLIFE

HostForLIFE is European Windows Hosting Provider which focuses on Windows Platform only. We deliver on-demand hosting solutions including Shared hosting, Reseller Hosting, Cloud Hosting, Dedicated Servers, and IT as a Service for companies of all sizes.

We have offered the latest Windows 2019 Hosting, ASP.NET 5 Hosting, ASP.NET MVC 6 Hosting and SQL 2019 Hosting.


Month List

Tag cloud

Sign in