This blog post will discuss how to use C# and ASP.NET Web Forms to create a secure SQL injection testing website. This project is perfect for implementing input sanitization, error handling, and parameterized queries as well as learning about fundamental SQL injection protection measures.
Technologies Used
- ASP.NET Web Forms (ASPX)
- C# (Code-Behind)
- SQL Server
- ADO.NET with SqlHelper (Application Block)
- Bootstrap 5 (Frontend UI)
Goal of This Application
- Provide a login form that is intentionally structured to test SQL injection patterns.
- Detect and block malicious inputs from both query string and form fields.
- Log all suspicious activity.
- Redirect users to a custom error page when SQL injection attempts are detected.
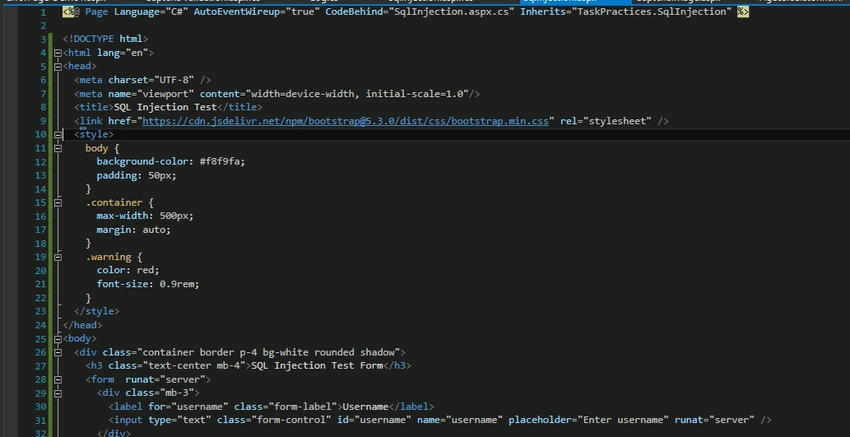
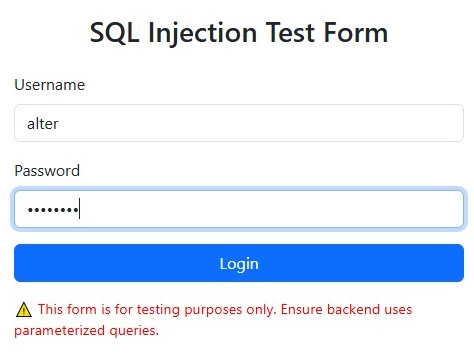
1. ASPX Page Code (Frontend Form)
<%@ Page Language="C#" AutoEventWireup="true" CodeBehind="SqlInjection.aspx.cs" Inherits="TaskPractices.SqlInjection" %>
<!DOCTYPE html>
<html lang="en">
<head>
<meta charset="UTF-8" />
<meta name="viewport" content="width=device-width, initial-scale=1.0" />
<title>SQL Injection Test</title>
<link href="https://cdn.jsdelivr.net/npm/[email protected]/dist/css/bootstrap.min.css" rel="stylesheet" />
<style>
body {
background-color: #f8f9fa;
padding: 50px;
}
.container {
max-width: 500px;
margin: auto;
}
.warning {
color: red;
font-size: 0.9rem;
}
</style>
</head>
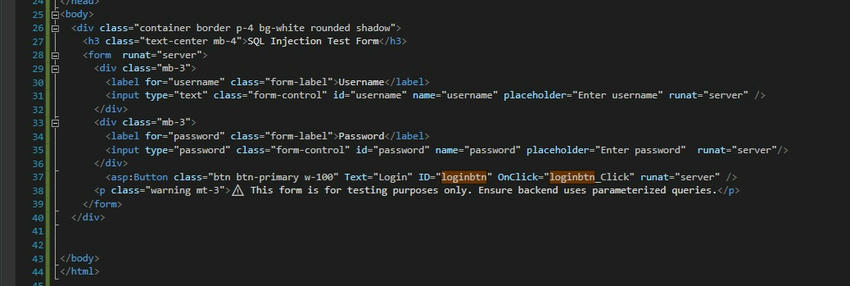
<body>
<div class="container border p-4 bg-white rounded shadow">
<h3 class="text-center mb-4">SQL Injection Test Form</h3>
<form runat="server">
<div class="mb-3">
<label for="username" class="form-label">Username</label>
<input type="text" class="form-control" id="username" name="username" placeholder="Enter username" runat="server" />
</div>
<div class="mb-3">
<label for="password" class="form-label">Password</label>
<input type="password" class="form-control" id="password" name="password" placeholder="Enter password" runat="server" />
</div>
<asp:Button class="btn btn-primary w-100" Text="Login" ID="loginbtn" OnClick="loginbtn_Click" runat="server" />
<p class="warning mt-3">
?? This form is for testing purposes only. Ensure backend uses parameterized queries.
</p>
</form>
</div>
</body>
</html>
2. Code-Behind: SQL Injection Detection and Login Logic
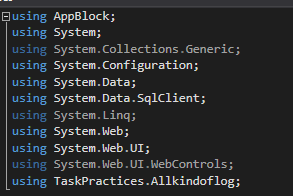
using AppBlock;
using System;
using System.Collections.Generic;
using System.Configuration;
using System.Data;
using System.Data.SqlClient;
using System.Linq;
using System.Web;
using System.Web.UI;
using System.Web.UI.WebControls;
using TaskPractices.Allkindoflog;
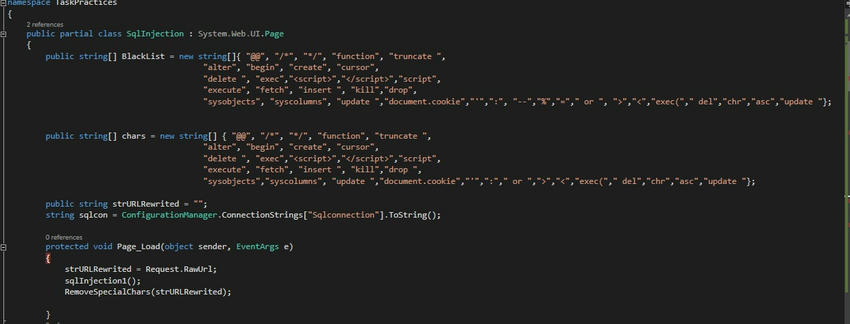
namespace TaskPractices
{
public partial class SqlInjection : System.Web.UI.Page
{
public string[] BlackList = new string[]
{
"@@", "/*", "*/", "function", "truncate ", "alter", "begin", "create", "cursor",
"delete ", "exec", "<script>", "</script>", "script", "execute", "fetch", "insert ",
"kill", "drop", "sysobjects", "syscolumns", "update ", "document.cookie", "'", ":",
"--", "%", "=", " or ", ">", "<", "exec(", " del", "chr", "asc", "update "
};
public string[] chars = new string[]
{
"@@", "/*", "*/", "function", "truncate ", "alter", "begin", "create", "cursor",
"delete ", "exec", "<script>", "</script>", "script", "execute", "fetch", "insert ",
"kill", "drop ", "sysobjects", "syscolumns", "update ", "document.cookie", "'", ":",
" or ", ">", "<", "exec(", " del", "chr", "asc", "update "
};
public string strURLRewrited = "";
string sqlcon = ConfigurationManager.ConnectionStrings["Sqlconnection"].ToString();
protected void Page_Load(object sender, EventArgs e)
{
strURLRewrited = Request.RawUrl;
sqlInjection1();
RemoveSpecialChars(strURLRewrited);
}
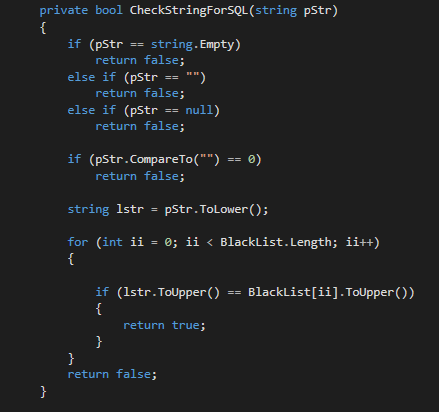
private bool CheckStringForSQL(string pStr)
{
if (string.IsNullOrEmpty(pStr) || pStr.CompareTo("") == 0)
return false;
string lstr = pStr.ToLower();
foreach (string item in BlackList)
{
if (lstr.ToUpper() == item.ToUpper())
return true;
}
return false;
}
public void sqlInjection1()
{
try
{
string ErrorPage = "/ErrorPage/ErrorPage-Demo1.aspx";
// Form data check
for (int i = 0; i < Request.Form.Count; i++)
{
if (CheckStringForSQL(Request.Form[i]))
{
Log.errorlog(Request.Form[i], strURLRewrited);
Response.Redirect(ErrorPage);
}
}
// Query string check
for (int i = 0; i < Request.QueryString.Count; i++)
{
if (CheckStringForSQL(Request.QueryString[i]))
{
Log.errorlog(Request.QueryString[i], strURLRewrited);
Response.Redirect(ErrorPage);
}
}
}
catch (Exception ex)
{
Response.Write(ex.Message);
}
}
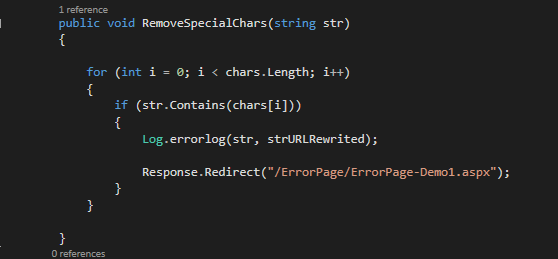
public void RemoveSpecialChars(string str)
{
foreach (string c in chars)
{
if (str.Contains(c))
{
Log.errorlog(str, strURLRewrited);
Response.Redirect("/ErrorPage/ErrorPage-Demo1.aspx");
}
}
}
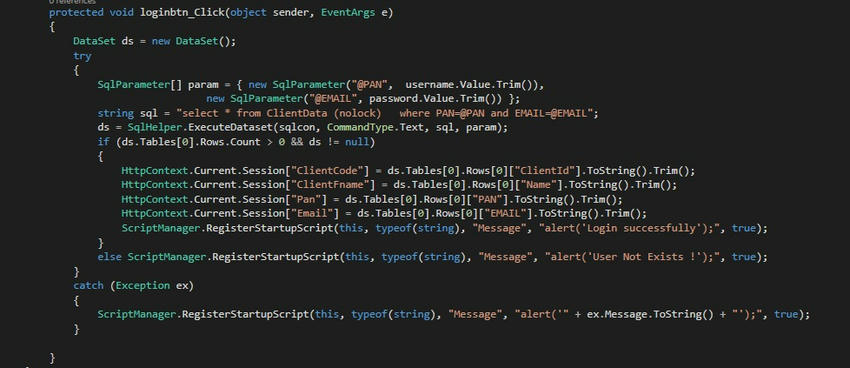
protected void loginbtn_Click(object sender, EventArgs e)
{
DataSet ds = new DataSet();
try
{
SqlParameter[] param = {
new SqlParameter("@PAN", username.Value.Trim()),
new SqlParameter("@EMAIL", password.Value.Trim())
};
string sql = "SELECT * FROM ClientData (NOLOCK) WHERE PAN=@PAN AND EMAIL=@EMAIL";
ds = SqlHelper.ExecuteDataset(sqlcon, CommandType.Text, sql, param);
if (ds != null && ds.Tables[0].Rows.Count > 0)
{
HttpContext.Current.Session["ClientCode"] = ds.Tables[0].Rows[0]["ClientId"].ToString().Trim();
HttpContext.Current.Session["ClientFname"] = ds.Tables[0].Rows[0]["Name"].ToString().Trim();
HttpContext.Current.Session["Pan"] = ds.Tables[0].Rows[0]["PAN"].ToString().Trim();
HttpContext.Current.Session["Email"] = ds.Tables[0].Rows[0]["EMAIL"].ToString().Trim();
ScriptManager.RegisterStartupScript(this, typeof(string), "Message", "alert('Login successfully');", true);
}
else
{
ScriptManager.RegisterStartupScript(this, typeof(string), "Message", "alert('User Not Exists !');", true);
}
}
catch (Exception ex)
{
ScriptManager.RegisterStartupScript(this, typeof(string), "Message", $"alert('{ex.Message}');", true);
}
}
}
}
Key Takeaways
- Always use parameterized queries instead of string concatenation to prevent SQL injection.
- Implement input sanitization and validation on both the server and client sides.
- Maintain a blacklist of harmful SQL keywords to filter user input.
- Redirect to custom error pages and log malicious attempts for analysis.
Improvements You Can Add
- Use a whitelist approach for known safe characters.
- Integrate logging with tools like ELMAH or Serilog.
- Use Stored Procedures instead of inline queries for extra safety.
- Replace hard-coded blacklists with centralized config-based filters.
Conclusion
This project helps demonstrate SQL injection defense in a hands-on way using ASP.NET. It’s a great way to test and validate your security practices while building safe and user-friendly forms. Would you like a downloadable PDF of this documentation?
European Best, cheap and reliable ASP.NET hosting with instant activation. HostForLIFE.eu is #1 Recommended Windows and ASP.NET hosting in European Continent. With 99.99% Uptime Guaranteed of Relibility, Stability and Performace. HostForLIFE.eu security team is constantly monitoring the entire network for unusual behaviour. We deliver hosting solution including Shared hosting, Cloud hosting, Reseller hosting, Dedicated Servers, and IT as Service for companies of all size.
