European ASP.NET 4.5 Hosting BLOG

BLOG about ASP.NET 4, ASP.NET 4.5 Hosting and Its Technology - Dedicated to European Windows Hosting Customer

European ASP.NET Core Hosting - HostForLIFE :: Rate Limiting In .NET 7.0

clock January 31, 2023 07:02 by author Peter

Rate limiting in .NET is a technique used to control the rate at which requests are made to a specific endpoint or service. It is typically used to prevent the overuse of resources or to implement a pay-per-use pricing model. Rate limiting can be implemented in various ways, such as using built-in libraries in the .NET framework or using third-party libraries and services.

In .NET 7.0, the rate limiting feature is implemented using System.Net.Http.RateLimiting library. This library allows developers to configure rate limits for specific endpoints and to handle requests that exceed the rate limit. The library provides a RateLimiter class that can be used to create and configure rate limit rules, and a RateLimitedHttpClient class that can be used to add rate limiting behavior to an HttpClient instance.

There are multiple combinations of rate limiting algorithms to handle the flow of requests. Microsoft has decided to present the below four algorithms in .NET 7.0.

Concurrency Limit

Concurrency limiter limits how many concurrent requests can access a resource. If your limit is 50, then 50 requests can access a resource at once and the 51st request will not be processed. Once the request is completed, the number of allowed requests increased to 1, when the second request is complete, the number increased to 2 and this will continue till the count reaches 50.

Token Bucket Limit
This algorithm limits the number of requests based on a defined amount of allowed requests. For an instance, assume that we have an application with an imaginary bucket. This bucket can hold 10 tokens and every two minutes 2 tokens are added to this bucket. If a user makes a request, it takes a token so we are left with 9. 3 more request comes in and each takes a token and leaving us with 6 tokens. After two minutes have passed, we get 2 new tokens. Now the bucket has 8 tokens. 8 requests come in and take the remaining tokens and leaving the bucket with 0 tokens. If another comes, it is not allowed to access the resource until the bucket fills with tokens.

Fixed Window Limit

The fixed window algorithm uses the concept of a window with an amount of time. The request limit will be applied within this window before we move to the next window. In this algorithm, when we move to the next window, the request limit will be reset back to the starting point. Assume that we have a window of 3 seconds and a request limit of 10. If the application receives 11 requests within 3 seconds, 10 requests will have access to the resource and the 11th request will be rejected. Once the 3 seconds have passed, the window and the request limit will be reset.

Sliding Window Limit
The sliding window algorithm is like the fixed window algorithm but with an addition of segments. A segment is nothing but it is a part of the window. Assume that we have a window of 2 hours and split it into 4 thirty minutes segments. There is a current segment index that will be pointing to the newest segment in the window. The incoming request will be going to the current segment. Every thirty minutes, the window slides by one segment. If there were any requests in the past window segment, these are now refreshed and the request limit gets increased by the requests count from the past segment.

Let us look at simple service.

The tools which I have used for this tutorial are.

    VS 2022 Community Edition
    .NET 7.0
    Swagger

Fixed Window
Let us make the below changes.
Include the library System.Threading.RateLimiting in Program.cs
using System.Threading.RateLimiting;

Then add the below lines of code to include the Fixed Window limiter.
//Window Rate Limiter
builder.Services.AddRateLimiter(options => {
    options.AddFixedWindowLimiter("Fixed", opt => {
        opt.Window = TimeSpan.FromSeconds(3);
        opt.PermitLimit = 3;
        //opt.QueueLimit = 2;
        //opt.QueueProcessingOrder = QueueProcessingOrder.OldestFirst;
    });
});


Add the below line of code as well in Program.cs
app.UseRateLimiter();

The entire code from Program.cs below
using Microsoft.AspNetCore.RateLimiting;
using System.Threading.RateLimiting;
var builder = WebApplication.CreateBuilder(args);
// Add services to the container.
builder.Services.AddControllers();
// Learn more about configuring Swagger/OpenAPI at https://aka.ms/aspnetcore/swashbuckle
builder.Services.AddEndpointsApiExplorer();
builder.Services.AddSwaggerGen();
//Window Rate Limiter
builder.Services.AddRateLimiter(options => {
    options.AddFixedWindowLimiter("Fixed", opt => {
        opt.Window = TimeSpan.FromSeconds(3);
        opt.PermitLimit = 3;
        //opt.QueueLimit = 2;
        //opt.QueueProcessingOrder = QueueProcessingOrder.OldestFirst;
    });
});
var app = builder.Build();
// Configure the HTTP request pipeline.
if (app.Environment.IsDevelopment()) {
    app.UseSwagger();
    app.UseSwaggerUI();
}
app.UseAuthorization();
app.MapControllers();
app.UseRateLimiter();
app.Run();


Now add the below decorator at the WeatherForecastController.cs class- class level
[EnableRateLimiting("Fixed")]

The entire code from WeatherForecastController.cs as below
using Microsoft.AspNetCore.Mvc;
using Microsoft.AspNetCore.RateLimiting;
namespace WeatherService.Controllers {
    [ApiController]
    [Route("api/[controller]")]
    [EnableRateLimiting("Fixed")]
    public class WeatherForecastController: ControllerBase {
        private static readonly string[] Summaries = new [] {
            "Freezing",
            "Bracing",
            "Chilly",
            "Cool",
            "Mild",
            "Warm",
            "Balmy",
            "Hot",
            "Sweltering",
            "Scorching"
        };
        private readonly ILogger < WeatherForecastController > _logger;
        public WeatherForecastController(ILogger < WeatherForecastController > logger) {
                _logger = logger;
            }
            [HttpGet(Name = "GetWeatherForecast")]
        public IEnumerable < WeatherForecast > Get() {
            return Enumerable.Range(1, 5).Select(index => new WeatherForecast {
                Date = DateOnly.FromDateTime(DateTime.Now.AddDays(index)),
                    TemperatureC = Random.Shared.Next(-20, 55),
                    Summary = Summaries[Random.Shared.Next(Summaries.Length)]
            }).ToArray();
        }
    }
}

As per the configuration, within 3 seconds, we can raise 3 requests.

Let us test the endpoint.

Please execute the endpoint consecutively four times, three requests would access the resource, when we raise the fourth request, it will be rejected.

Sliding Window
The below needs to be added to Program.cs
//Sliding Window Rate Limiter
options.AddSlidingWindowLimiter("Sliding", opt => {
    opt.Window = TimeSpan.FromSeconds(10);
    opt.PermitLimit = 4;
    opt.QueueLimit = 2;
    opt.QueueProcessingOrder = QueueProcessingOrder.OldestFirst;
    opt.SegmentsPerWindow = 2;
});


Token Bucket
The below code goes into Program.cs
//Token Bucket Rate Limiter
options.AddTokenBucketLimiter("Token", opt => {
    opt.TokenLimit = 4;
    opt.QueueLimit = 2;
    opt.QueueProcessingOrder = QueueProcessingOrder.OldestFirst;
    opt.ReplenishmentPeriod = TimeSpan.FromSeconds(10);
    opt.TokensPerPeriod = 4;
    opt.AutoReplenishment = true;
});


Concurrency Limiter
This algorithm is used to control the async requests. The below code changes will be added to Program.cs
//Concurrency Limiter
options.AddConcurrencyLimiter("Concurrency", opt => {
    opt.PermitLimit = 10;
    opt.QueueLimit = 2;
    opt.QueueProcessingOrder = QueueProcessingOrder.OldestFirst;
});

I have explained the four Rate Limiter algorithms introduced in .NET 7.0. I have tested the Fixed Window Algorithm. I leave the rest of the three algorithms to you to validate and provide your comments in the comment box below.

HostForLIFE.eu ASP.NET Core Hosting

European best, cheap and reliable ASP.NET hosting with instant activation. HostForLIFE.eu is #1 Recommended Windows and ASP.NET hosting in European Continent. With 99.99% Uptime Guaranteed of Relibility, Stability and Performace. HostForLIFE.eu security team is constantly monitoring the entire network for unusual behaviour. We deliver hosting solution including Shared hosting, Cloud hosting, Reseller hosting, Dedicated Servers, and IT as Service for companies of all size.


European ASP.NET Core Hosting - HostForLIFE :: Generation of CAPTCHA Image Using Generic Handler for Login Page

clock January 30, 2023 07:33 by author Peter

This article explains how to create a CAPTCHA image using a generic handler.

Required Tools

  • Visual Studio
  • SQL Server 2005

Step 1
Create a new solution and add an empty web project.

Step 2
Add a generic handler page (.ashx).

Step 3
Replace the ProcessRequest method implementation with the following code.
<%@ WebHandler Language="C#" Class="ghCaptcha" %>

using System;
using System.Web;
using System.IO;
using System.Web.SessionState;
using System.Drawing;
using System.Drawing.Imaging;

public class ghCaptcha : IHttpHandler, IReadOnlySessionState
{
    public void ProcessRequest(HttpContext context)
    {
        MemoryStream memStream = new MemoryStream();
        string phrase = Convert.ToString(context.Session["Captcha"]);

        //Generate an image from the text stored in session
        Bitmap CaptchaImg = new Bitmap(180, 60);
        Graphics Graphic = Graphics.FromImage(CaptchaImg);
        Graphic.TextRenderingHint = System.Drawing.Text.TextRenderingHint.AntiAlias;

        //Set height and width of captcha image
        Graphic.FillRectangle(new SolidBrush(Color.Blue), 0, 0, 180, 60);
        Graphic.DrawString(phrase, new Font("Calibri", 30), new SolidBrush(Color.White), 15, 15);
        CaptchaImg.Save(memStream, System.Drawing.Imaging.ImageFormat.Jpeg);
        byte[] imgBytes = memStream.GetBuffer();

        Graphic.Dispose();
        CaptchaImg.Dispose();
        memStream.Close();

        //write image
        context.Response.ContentType = "image/jpeg";
        context.Response.BinaryWrite(imgBytes);
    }

    public bool IsReusable
    {
        get
        {
            return false;
        }
    }
}


Step 4
Build the page and resolve the namespace.
Since the .ashx is a generic handler, it processes HTTP requests and doesn't write session values. So we need to inherit the class with IReadOnlySessionState as in the following.

The following namespaces are used.
using System;
using System.Web;
using System.IO;
using System.Web.SessionState;
using System.Drawing;
using System.Drawing.Imaging;


Step 5
Prepare the Login page; add a new page named Login. aspx and add the following .aspx script.
<form id="form1" runat="server">
    <h1>
        Login</h1>
    <table id="tblLogin" width="40%" border="0" cellpadding="0" cellspacing="4" style="background-color: #cecece;"
        align="center">
        <tbody>
            <tr>
                <td align="center">
                    <asp:Label ID="lblError" runat="server"></asp:Label>
                </td>
            </tr>
            <tr>
                <td width="30%" align="right">
                    User ID :
                </td>
                <td width="70%">
                    <asp:TextBox ID="txtLogin" runat="server" Width="175px" MaxLength="20" AutoCompleteType="Disabled"></asp:TextBox>
                </td>
            </tr>
            <tr>
                <td align="right">
                    Password :
                </td>
                <td>
                    <asp:TextBox ID="txtPassword" runat="server" Width="175px" MaxLength="20" AutoCompleteType="Disabled"
                        TextMode="Password"></asp:TextBox>
                </td>
            </tr>
            <tr>
                <td>
                </td>
                <td colspan="2" align="left">
                    <div>
                        <asp:Image ImageUrl="ghCaptcha.ashx" runat="server" ID="imgCaptcha" />
                    </div>
                </td>
            </tr>
            <tr>
                <td align="right">
                    Enter Code :
                </td>
                <td>
                    <asp:TextBox ID="txtCode" runat="server" Width="175px" MaxLength="5" AutoCompleteType="Disabled"></asp:TextBox>
                </td>
            </tr>
            <tr>
                <td colspan="2" align="center">
                    <asp:Button ID="btnLogin" runat="server" Text="Login" />
                </td>
            </tr>
        </tbody>
    </table>
    </form>


The page has the following controls:

Assign an ImageUrl property of an Image control as Path of the ghCaptcha.ashx file.

Step 6

The following is the code behind Login.aspx.cs.
#region " [ using ] "
using System;
using System.Web.UI;
#endregion

public partial class Login : System.Web.UI.Page
{
    protected void Page_Load(object sender, EventArgs e)
    {
        if (!Page.IsPostBack)
        {
            UpdateCaptchaText();
        }
    }

    #region " [ Button Event ] "
    protected void btnRefresh_Click(object sender, ImageClickEventArgs e)
    {
        UpdateCaptchaText();
    }


    protected void btnLogin_Click(object sender, EventArgs e)
    {

    }
    #endregion
    #region " [ Private Function ] "
    private void UpdateCaptchaText()
    {
        txtCode.Text = string.Empty;
        Random randNum = new Random();

        //Store the captcha text in session to validate
        Session["Captcha"] = randNum.Next(10000, 99999).ToString();
        imgCaptcha.ImageUrl = "~/ghCaptcha.ashx?" + Session["Captcha"];
    }
    #endregion
}

The value of Session["Captcha"] is updated in the Page_Load event of Login.aspx.cs and is accessed in the handler page and session code used to generate the CAPTCHA image.

Step 7

Build and run it.
The Login Page Visuals os as below.

Step 8
The following are enhancements (included in the source code download).
A Refresh button beside the CAPTCHA image for changing the CAPTCHA without a page postback


Page validation

HostForLIFE.eu ASP.NET Core Hosting

European best, cheap and reliable ASP.NET hosting with instant activation. HostForLIFE.eu is #1 Recommended Windows and ASP.NET hosting in European Continent. With 99.99% Uptime Guaranteed of Relibility, Stability and Performace. HostForLIFE.eu security team is constantly monitoring the entire network for unusual behaviour. We deliver hosting solution including Shared hosting, Cloud hosting, Reseller hosting, Dedicated Servers, and IT as Service for companies of all size.


European Blazor Hosting - HostForLIFE :: Ahead-Of-Time Compilation For Blazor WASM

clock January 25, 2023 07:20 by author Peter

Ahead-of-Time (AOT) compilation is a technique used in Blazor WebAssembly (WASM) to precompile C# code into machine code before it is executed by the browser. This technique is used to improve the startup time and performance of Blazor WASM applications.


The AOT compiler can be used to compile the entire application or just specific parts of it, such as frequently called methods. This can help to reduce the size of the deployed application and improve startup time. Additionally, the AOT compiler can also perform other optimizations, such as inlining and dead code elimination, to further improve performance.

AOT with Blazor WASM
When a Blazor WASM application is run in the browser, the C# code is first compiled to WebAssembly (WASM) bytecode using the Mono runtime. This bytecode is then interpreted by the browser's WebAssembly engine to execute the application. However, this interpretation process can be slow and result in poor performance. AOT compilation solves this problem by precompiling the C# code into machine code that can be executed directly by the browser's WebAssembly engine, without the need for interpretation.

AOT compilation is performed using the Mono runtime's Ahead-of-Time (AOT) compiler, which is a command-line tool that takes the C# code and generates machine code for the specific platform and architecture that the application will be running on. The generated machine code is then included as a binary file in the application's deployment package, which is loaded by the browser when the application is run.

Ahead-of-Time (AOT) compilation is a technique that is used to improve the performance of Blazor WebAssembly (WASM) applications by precompiling the C# code into machine code before it is executed by the browser. This technique is particularly useful in Blazor WASM because it allows the C# code to be executed directly by the browser's WebAssembly engine, rather than being interpreted by the Mono runtime. This can result in significant performance improvements, particularly for applications that have a lot of C# code or that are deployed over the internet.

The process of AOT compilation starts with the C# code that makes up the Blazor WASM application. This code is then passed through the Mono runtime's Ahead-of-Time (AOT) compiler, which generates machine code for the specific platform and architecture that the application will be running on. The generated machine code is then included as a binary file in the application's deployment package, which is loaded by the browser when the application is run.

One of the key advantages of AOT compilation is that it improves the startup time of Blazor WASM applications. This is because the compiled machine code can be executed directly by the browser's WebAssembly engine, without the need for interpretation. This can result in significant performance improvements, particularly for applications that have a lot of C# code or that are deployed over the internet.

Another advantage of AOT compilation is that it can help to reduce the size of the deployed application. This is because the AOT compiler can perform other optimizations, such as inlining and dead code elimination, which can reduce the size of the generated machine code. This can be beneficial for applications that are deployed over the internet, as it can reduce the amount of data that needs to be downloaded by the browser.

The AOT compiler can also be used to compile specific parts of the application, such as frequently called methods. This can help to further improve the performance of the application by reducing the amount of C# code that needs to be interpreted by the Mono runtime. Additionally, the AOT compiler can also perform other optimizations, such as inlining and dead code elimination, to further improve performance.

In addition to improving the performance of Blazor WASM applications, AOT compilation can also help to improve the security of the application. This is because the AOT compiler can perform additional security checks on the C# code, such as checking for buffer overflows and other types of security vulnerabilities. Additionally, the AOT compiler can also perform other optimizations, such as inlining and dead code elimination, to further improve security.

In summary, AOT compilation is a powerful technique that is used to improve the performance of Blazor WebAssembly (WASM) applications by precompiling the C# code into machine code before it is executed by the browser. This technique can result in significant performance improvements, particularly for applications that have a lot of C# code or that are deployed over the internet. Additionally, AOT compilation can also help to reduce the size of the deployed application and improve the security of the application.

How to integrate AOT in Blazor WASM
To add Ahead-of-Time (AOT) compilation to a Blazor WebAssembly (WASM) project, you will need to use the Mono runtime's Ahead-of-Time (AOT) compiler, which is a command-line tool that takes the C# code and generates machine code for the specific platform and architecture that the application will be running on.

Here is an example of how to use the AOT compiler to compile a Blazor WASM project:

Step 1. Make sure you have the latest version of the .NET Core SDK and the Mono runtime installed on your machine.
Step 2. Open the command prompt and navigate to the root directory of your Blazor WebAssembly project.
Step 3. Run the following command to install the AOT compiler package:

dotnet add package Mono.WebAssembly.Interop


Step 4. Open the Program.cs file of your project.
Step 5. In the Main method, after calling builder.Build().Run(), and add the following line:
builder.UseBlazorWebAssemblyAot();

Step 6. Run the following command to build your project with AOT compilation:
dotnet publish -r browser-wasm --self-contained true

Step 7. This will build your project with AOT compilation and place the output files in the "bin/Release/netstandard2.1/browser-wasm" folder.

Merits of using AOT

  • AOT (ahead-of-time) compilation in Blazor WebAssembly (WASM) provides several benefits, including improved performance, reduced download size, and increased security.
  • Improved Performance: AOT compilation results in faster startup times and improved runtime performance, as the code is already compiled and ready to be executed.
  • Reduced Download Size: AOT compilation reduces the size of the code that needs to be downloaded to the client, as the C# code is transformed into optimized machine code that is specific to the client's platform.
  • Increased Security: AOT compilation makes it more difficult for attackers to reverse-engineer or tamper with the application's code, as the C# code is transformed into machine code that is not easily readable or editable.
  • Reduced Startup Time: AOT compilation eliminates the need for the browser to perform Just-In-Time (JIT) compilation, reducing the time it takes for the application to start up.
  • Enhanced Debugging: AOT compilation makes it easier to debug the application, as the C# code is transformed into machine code that can be more easily correlated with the original code.
  • Better Memory Management: AOT compilation reduces the number of runtime checks and improves memory management.
  • Overall, AOT compilation can improve the overall user experience and increase the security of your Blazor WASM application.

Demerits

  • While AOT compilation in Blazor WebAssembly (WASM) has many benefits, it also has some drawbacks:
  • Increased Build Time: AOT compilation requires additional build time, as the C# code needs to be transformed into machine code for each platform and architecture. This can increase the time it takes to build and deploy the application.
  • Limited Flexibility: AOT compilation results in a more rigid application, as the code cannot be easily modified at runtime. This can make it more difficult to add new features or fix bugs.
  • Limited Platform Support: AOT compilation requires that the application be compiled for each specific platform and architecture. This can limit the number of platforms that the application can run on.
  • Limited Debugging: AOT compilation makes it more difficult to debug the application, as the machine code may not be easily correlated with the original C# code.
  • Reduced ability to optimize: AOT compilation doesn't give the opportunity to use JIT (Just in Time) compilation for optimizing the performance during runtime.
  • Harder to update: Since the application is precompiled, updating the application can be more complex and time-consuming.
  • It's important to consider the specific needs of your application before deciding whether or not to use AOT compilation. In some cases, the benefits may outweigh the drawbacks, while in other cases, the drawbacks may make AOT compilation less desirable.

In conclusion, AOT compilation in Blazor WebAssembly (WASM) provides several benefits, including improved performance, reduced download size, and increased security. However, it also has some drawbacks such as increased build time, limited flexibility, limited platform support, limited debugging, and harder to update. It's important to consider the specific needs of your application before deciding whether or not to use AOT compilation. If the application requires fast startup times, improved runtime performance, and increased security, AOT compilation may be a good choice. However, if the application requires the ability to easily modify the code at runtime, or the ability to run on a wide range of platforms, AOT compilation may not be the best choice.


European ASP.NET Core Hosting - HostForLIFE :: How To Configure Log4net In .NET 7 API?

clock January 16, 2023 06:54 by author Peter

In this article, I'm going to explain how we can configure log4net in a .NET 7 API project. Before we go deep dive into how to configure log4net, let's first understand why we need to configure log4net in our project. let's first discuss why we need log4net.

Why do we need Log4net?
When we need a production-level application or an efficient product that needs to be improved day by day, then the question is how we can achieve improvement. The answer is, "by knowing our mistakes ", because we can't improve if we don't know where we need improvement. In our application, these things are done very efficiently by a logging framework, now the question is what is the logging framework? the answer is,  "logging framework is responsible for logging errors and other information that we may need for improvement". The next question is there are a bunch of logging frameworks available logging why do we need log4net? the answer is, "log4net is one of the most efficient logging frameworks and is owned by apache". I think that the requirements are clear now, let's go forward to the next question how we can configure log4net in a .NET7 API.

Please follow these steps to configure log4net,

The project of some learners may have already been created but some people will be about to start so, Let's start from the beginning.

Step 1
Open visual studio, at least Visual Studio 2022 if you are going to implement it into.NET 7 API otherwise you can use a lower version, first, click on create a new project.

Step 2
Next, choose ASP.NET Core Web API as a project template and click on the next button.
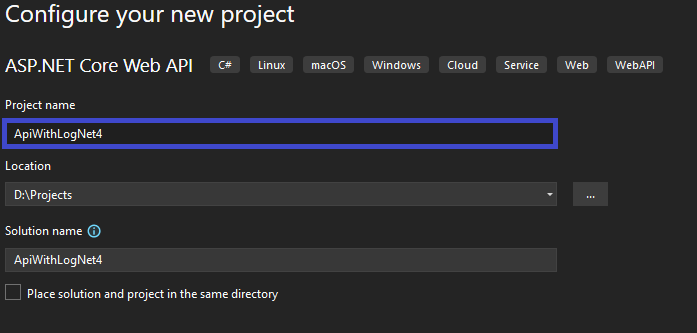
Step 3
Next, we see the configuration screen. Here you need to enter the project name and click on the next button.
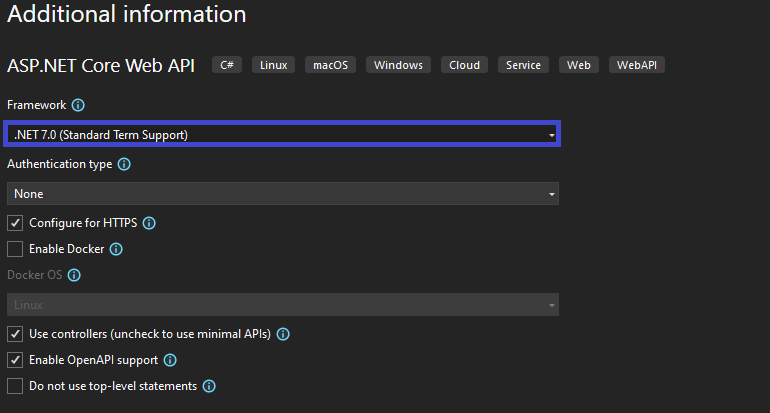
Step 4
Next, we need an additional information window. Here we need to choose the target framework of our application here I have chosen.NET 7.0 and click on the create button.
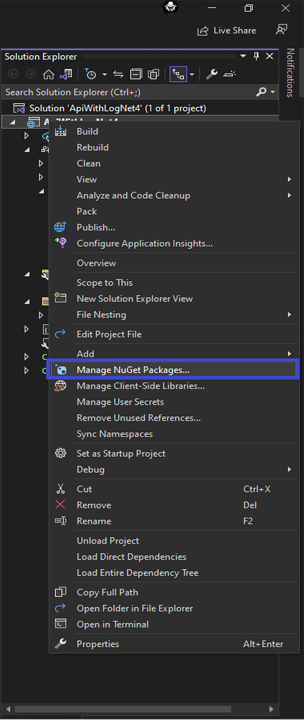

Step 5
Now our project template is ready with a weather forecast controller. First we need to install the log4net package in our project. People who have already created the project can start from here. To install log4net you need to open the NuGet package manager. To open the NuGet package manager right-click on the project name and click on the NuGet package Manager.

Step 6
Now just click on the browse button and type lo4net in the search box.

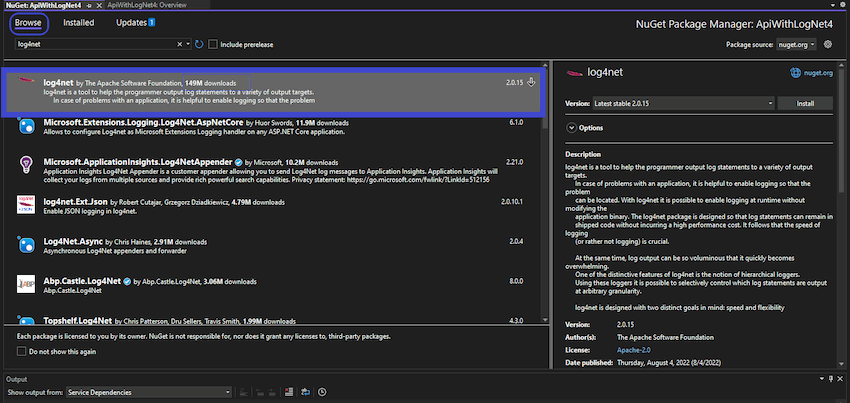
Here we can see that log4net has already 149M downloads as it is a popular logging framework. Now just tap on log4net and click on install, it will ask for permission and then will be installed in your project.

After installation, we need to configure it with our project. The main part of the configuration starts from here. log4net is not a .NET library so it'll not be configured automatically, we need to configure it manually. Here we need a configuration file containing that information of configuration like where you want to store your log, the name of your log file, and the format of your file, etc. To do all these configurations we need a configuration file, let's move to our next step.
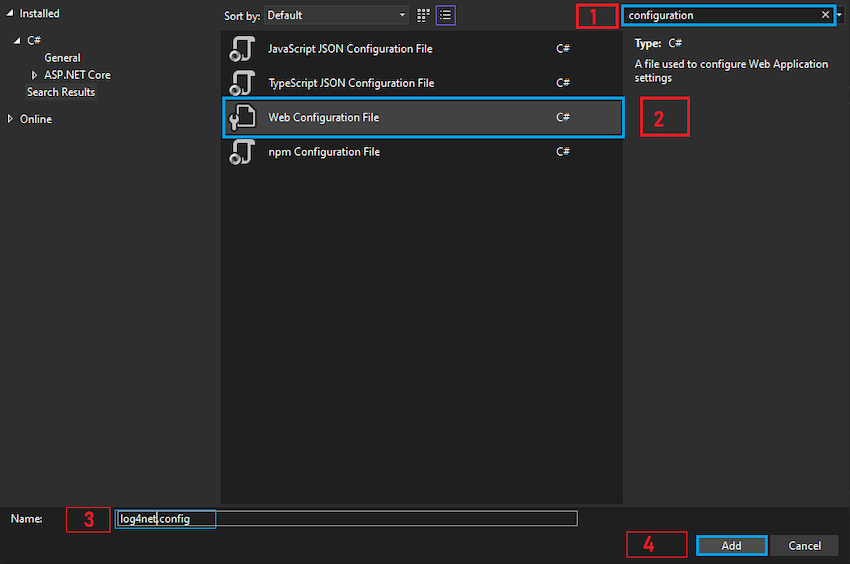
Step 7
Right-click on the project name and click on Add then click on New Item

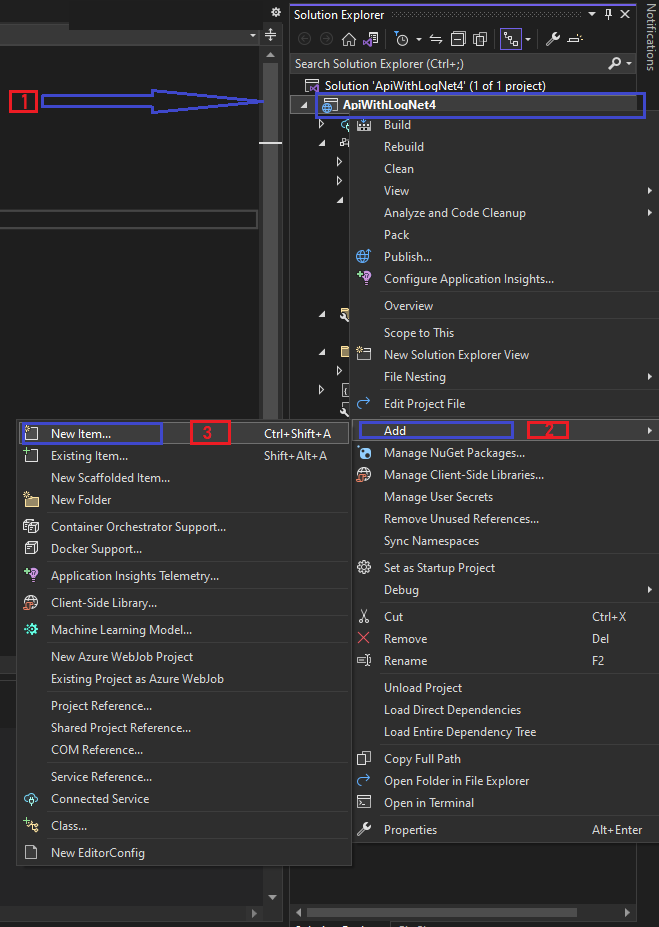
Then search for configuration and choose Web Configuration File and enter the file name then click on add button

Configure Log4net In .NET 7 API

Now we need to add configuration settings in this file let's move toward to next step.

Step 8
Here we add this code
<?xml version="1.0" encoding="utf-8" ?>
<configuration>
    <log4net>
        <appender name="RollingLogFileAppender"
                  type="log4net.Appender.RollingFileAppender">
            <lockingModel type="log4net.Appender.FileAppender+MinimalLock"/>
            <file value="location put here ie D:\TestLog\" />
            <datePattern value="yyyy-MM-dd.'txt'"/>
            <staticLogFileName value="false"/>
            <appendToFile value="true"/>
            <rollingStyle value="Date"/>
            <maxSizeRollBackups value="100"/>
            <maximumFileSize value="15MB"/>
            <layout type="log4net.Layout.PatternLayout">
                <conversionPattern
                    value="%date [%thread] %-5level App  %newline %message %newline %newline"/>
            </layout>
        </appender>
        <root>
            <level value="INFO"/>
            <appender-ref ref="RollingLogFileAppender"/>
        </root>
    </log4net>
</configuration>

In this code, I have defined the setting related to logging like file-name, file-location, RollingLogFileAppender, etc that are required. You can also define the size of your file as I have defined 15 MB.
<maximumFileSize value="15MB"/>

You can increase or decrease the file size depending on your requirement. Now most of the things are ready we just need to load these settings and use the logger.

Step 9
Now we need to load the .config file and log the exception and related information. I'm going to use the WeatherForecastController. I have created a method with the name private void LogError(string message) to load the .config file and log the error.
private  void LogError(string message)
{
    var logRepository = LogManager.GetRepository(Assembly.GetEntryAssembly());
    XmlConfigurator.Configure(logRepository, new FileInfo("log4net.config"));
    ILog _logger = LogManager.GetLogger(typeof(LoggerManager));
    _logger.Info(message);
}


Here you have to put the same name that you entered at the time of adding the configuration file
XmlConfigurator.Configure(logRepository, new FileInfo("log4net.config"));

like I have entered log4net.config. Now you just need to call this method and pass the exception. Here I have created an exception manually by adding a method private int div(int x). This method generates a divide by zero type exception

private int div(int x)
{
  return x / 0;
}


Now I have called this method under the try block and called that LogError method in the catch block, and it will log the exception
[HttpGet(Name = "GetWeatherForecast")]
public IEnumerable < WeatherForecast > Get() {
  try {
    int x = div(50);
    return Enumerable.Range(1, 5).Select(index =>new WeatherForecast {
      Date = DateOnly.FromDateTime(DateTime.Now.AddDays(index)),
      TemperatureC = Random.Shared.Next( - 20, 55),
      Summary = Summaries[Random.Shared.Next(Summaries.Length)]

    }).ToArray();
  }
  catch(Exception ex) {
    LogError(ex.Message);
    throw;
  }
}


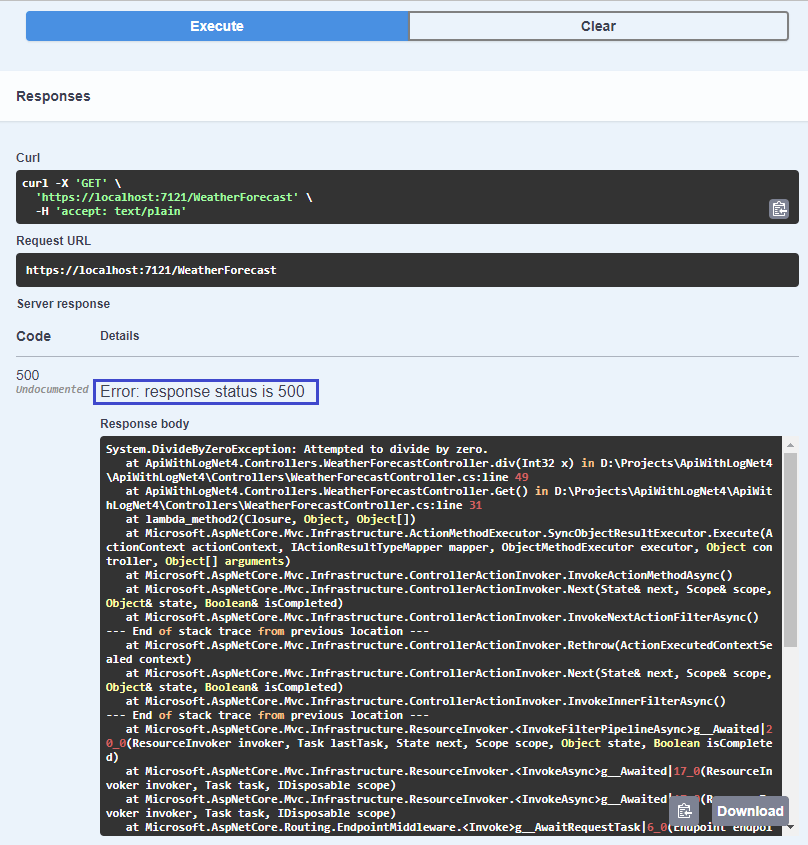
When we run the program and execute the following call we get an exception

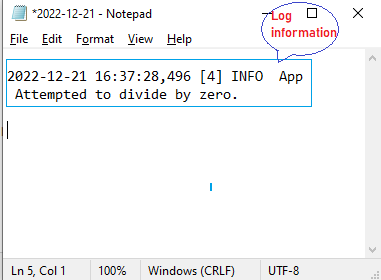
Now if we check our log file then the log message would be written with the given format, let's have a look


In this article, we have created a log4net-configured API project. This one was a normal project structure if you want to use it on your product then I would suggest creating an Interface and defining logging methods there and then using them in your project after implementation.

HostForLIFE.eu ASP.NET Core Hosting

European best, cheap and reliable ASP.NET hosting with instant activation. HostForLIFE.eu is #1 Recommended Windows and ASP.NET hosting in European Continent. With 99.99% Uptime Guaranteed of Relibility, Stability and Performace. HostForLIFE.eu security team is constantly monitoring the entire network for unusual behaviour. We deliver hosting solution including Shared hosting, Cloud hosting, Reseller hosting, Dedicated Servers, and IT as Service for companies of all size.


European ASP.NET Core Hosting - HostForLIFE :: Analyzers For ASP.NET Core In .NET 6

clock January 9, 2023 06:36 by author Peter

Analyzers are tools that analyze source code and provide feedback to developers in the form of warnings and suggestions for improvement. In ASP.NET Core, analyzers can help you identify and fix issues in your code before you deploy your application. In this article, we'll explore how to use analyzers in ASP.NET Core and provide some examples of how they can be used to improve your code.

Using Analyzers in ASP.NET Core
To use analyzers in ASP.NET Core, you first need to install the necessary NuGet packages. There are many NuGet packages available that contain analyzers for different purposes, such as security, performance, and best practices.

To install the NuGet packages for analyzers, you can use the following command,
dotnet add package Microsoft.AspNetCore.Mvc.Analyzers

Once you have installed the necessary NuGet packages, the analyzers will automatically run whenever you build your project. If the analyzers find any issues in your code, they will display warnings in the Error List window in Visual Studio.

Examples of Analyzers
Here are some examples of analyzers that you can use in ASP.NET Core,

Security Analyzers
The ASP.NET Core Security analyzers can help you identify potential security vulnerabilities in your code. For example, if you are using cookies to store sensitive information, the analyzer will warn you if you have not set the HttpOnly flag on the cookie. This flag prevents the cookie from being accessed by client-side script, which can help protect against cross-site scripting (XSS) attacks.

Here's an example of a warning generated by the Security analyzer,
warning ASP0005: It is recommended to set the 'HttpOnly' flag on cookies.

To fix this issue, you can set the HttpOnly flag on the cookie by using the following code,
Response.Cookies.Append("myCookie", "myValue", new CookieOptions { HttpOnly = true });

Performance Analyzers
The ASP.NET Core Performance analyzers can help you identify potential performance issues in your code. For example, if you are using the HttpClient class to make HTTP requests, the analyzer will warn you if you are not disposing of the HttpClient instance when you are finished with it.

Here's an example of a warning generated by the Performance analyzer,
warning ASP0006: 'HttpClient' should be disposed.
'HttpClient' is IDisposable and should be disposed before all references to it are lost.


To fix this issue, you can dispose of the HttpClient instance by using a using statement, like this,
using (var client = new HttpClient()){
    // Make the HTTP request
}


Here's an example of how you can use Microsoft.AspNetCore.Mvc.Analyzers analyzer to catch issues in a Razor view,
@model MyViewModel
@{
    ViewData["Title"] = "My Page";
}
<h1>@ViewData["Title"]</h1>
<p>Welcome to my page!</p>

In this example, the analyzer might report a suggestion to use the ViewBag property instead of ViewData, as ViewBag is a more convenient way to pass data from the controller to the view. The analyzer might also report a warning if you try to access an undefined key in the ViewData dictionary, such as ViewData["UnknownKey"].

Analyzers can be extremely useful for catching issues in your code as you write it, saving you time and effort in debugging and testing. There are many different analyzer packages available for ASP.NET Core, each with its own set of rules and checks. You can choose the analyzers that best fit your needs and enable them in your project to ensure the highest quality of your code.

I hope this helps you understand analyzers in ASP.NET Core in .NET 6 and how you can use them to improve the quality of your code. Let me know if you have any questions!

HostForLIFE.eu ASP.NET Core Hosting

European best, cheap and reliable ASP.NET hosting with instant activation. HostForLIFE.eu is #1 Recommended Windows and ASP.NET hosting in European Continent. With 99.99% Uptime Guaranteed of Relibility, Stability and Performace. HostForLIFE.eu security team is constantly monitoring the entire network for unusual behaviour. We deliver hosting solution including Shared hosting, Cloud hosting, Reseller hosting, Dedicated Servers, and IT as Service for companies of all size.


European ASP.NET Core Hosting - HostForLIFE :: Using Change Tokens In .NET 7

clock January 6, 2023 06:15 by author Peter

Change tokens are a helpful feature in .NET 7 for tracking changes to a particular resource or piece of data. This can be useful for implementing caching or for other scenarios where you want to be notified when a resource has been modified. In this article, we'll look at how to use change tokens in .NET 7.

Creating a Change Token in .NET 7
To use change tokens in .NET 7, you'll need to create a class that implements the IChangeToken interface. This class should track the resource or data you want to be notified about when it changes.

Here's an example of a MyChangeToken class that implements the IChangeToken interface:
class MyChangeToken: IChangeToken {
    private string _resource;
    private bool _hasChanged;
    public MyChangeToken(string resource) {
        _resource = resource;
    }
    public bool HasChanged => _hasChanged;
    public bool ActiveChangeCallbacks => true;
    public IDisposable RegisterChangeCallback(Action < object > callback, object state) {
        // Register the callback to be invoked when the change token is triggered.
        // You can store the callback and state in a list or dictionary to keep track of all registered callbacks.
        return new MyDisposable();
    }
    private class MyDisposable: IDisposable {
        public void Dispose() {
            // Remove the callback from the list or dictionary when the IDisposable is disposed.
        }
    }
}

In this example, the MyChangeToken class tracks a resource represented by a string. The HasChanged property returns a boolean value indicating whether the resource has been modified since the change token was created. The ActiveChangeCallbacks property should return true if the change token is currently tracking change callbacks, and false if it is not. The RegisterChangeCallback method registers a callback that will be invoked when the change token is triggered.

Creating a Change Token Instance
Once you've created a class that implements the IChangeToken interface, you can use ChangeToken.OnChange method to create a new change token instance. This method takes a delegate that returns an instance of the IChangeToken class, and an optional state object that will be passed to the change token's registered change callbacks.

Here's an example of how to create a new change token instance,
var changeToken = ChangeToken.OnChange(() => new MyChangeToken("my-resource"), null);

Checking if the Resource Has Changed
You can use the HasChanged property of the IChangeToken interface to check if the resource or data tracked by the change token has been modified since the change token was created.

Here's an example of how to check if the resource has changed,
if (changeToken.HasChanged){
    // The resource has changed.
}


Registering Change Callbacks
You can use the RegisterChangeCallback method of the IChangeToken interface to register a callback that will be invoked when the change token is triggered. This can be useful if you want to perform an action when the resource or data changes, rather than just being notified that it has changed.

Here's an example of how to register a change callback,
changeToken.RegisterChangeCallback((state) =>{
    // The resource has changed. This callback will be invoked when the change token is triggered.
}, null);


In this example, the change callback is a delegate that takes an object as a parameter. This object is the state object that was passed to the ChangeToken.OnChange method when the change token was created.

Note that the RegisterChangeCallback method returns an IDisposable object. You can call the Dispose method of this object to unregister the change callback.

Imagine that you have a web application that displays data from a remote API. The data is updated frequently, so you want to cache it to improve performance and reduce the number of requests made to the API. However, you also want to be notified when the data has been updated so that you can refresh the cache.

Here's how you could use change tokens to implement this behavior:
Create a Cache class that implements the IChangeToken interface. The Cache class should store the cached data and track whether it has been modified.
When the cache is created, use ChangeToken.OnChange method to create a new change token instance for the cache.

In the Cache class, implement the HasChanged property to return a boolean value indicating whether the cache has been modified. You can set this value to true whenever the cache is updated.

In the web application, use the HasChanged property of the change token to check if the cache has been modified. If it has, retrieve the updated data from the API and refresh the cache.

You can also use the RegisterChangeCallback method to register a callback that will be invoked when the cache is updated. This callback can be used to refresh the cache and update the data displayed in the web application.

Here's some sample code that demonstrates how this might look,
class Cache: IChangeToken {
    private object _data;
    private bool _hasChanged;
    public Cache() {
        ChangeToken = ChangeToken.OnChange(() => this, null);
    }
    public IChangeToken ChangeToken {
        get;
    }
    public bool HasChanged => _hasChanged;
    public bool ActiveChangeCallbacks => true;
    public IDisposable RegisterChangeCallback(Action < object > callback, object state) {
        // Register the callback to be invoked when the cache is updated.
        // You can store the callback and state in a list or dictionary to keep track of all registered callbacks.
        return new MyDisposable();
    }
    private class MyDisposable: IDisposable {
        public void Dispose() {
            // Remove the callback from the list or dictionary when the IDisposable is disposed.
        }
    }
    public void Update(object data) {
        _data = data;
        _hasChanged = true;
        // Invoke the registered change callbacks.
        // You can iterate through the list or dictionary of registered callbacks and invoke each one.
    }
}
// In the web application:
var cache = new Cache();
if (cache.ChangeToken.HasChanged) {
    // The cache has been updated. Retrieve the updated data from the API and refresh the cache.
    var data = GetDataFromApi();
    cache.Update(data);
}
cache.ChangeToken.RegisterChangeCallback((state) => {
    // The cache has been updated. Refresh the cache and update the data displayed in the web application.
    var data = GetDataFromApi();
    cache.Update(data);
    UpdateDataInWebApplication(data);
}, null);

Change tokens are a useful feature in .NET 7 for tracking changes to a particular resource or piece of data. You can use them to implement caching or other scenarios where you want to be notified when a resource has been modified. By creating a class that implements the IChangeToken interface, you can use the ChangeToken.OnChange method to create a new change token instance, and use the HasChanged property and RegisterChangeCallback method to track changes and register change callbacks.

HostForLIFE.eu ASP.NET Core Hosting

European best, cheap and reliable ASP.NET hosting with instant activation. HostForLIFE.eu is #1 Recommended Windows and ASP.NET hosting in European Continent. With 99.99% Uptime Guaranteed of Relibility, Stability and Performace. HostForLIFE.eu security team is constantly monitoring the entire network for unusual behaviour. We deliver hosting solution including Shared hosting, Cloud hosting, Reseller hosting, Dedicated Servers, and IT as Service for companies of all size.


European ASP.NET Core Hosting - HostForLIFE :: URL Rewriting Middleware In ASP.NET Core

clock January 5, 2023 08:39 by author Peter

URL rewriting is a process of modifying current request URL and pointing it to some other URL to complete the request. If you were creating an application that has pages /about-us and /teams but later after analyzing the site structure, you got a suggestion to move /teams page under /about-us so URL looks like /about-us/teams. After changing structure of your site, you need to redirect old URL /teams to new URL /about-us/teams. This is where URL rewriting is needed.

In this article, I will be discussing different solutions for implementing URL rewriting middleware in ASP.NET Core.

When is URL Rewriting Needed?

There may be various situations where you need URL rewriting in your application. Just an example, if SSL is installed for an application, then it can be accessed using both HTTP and HTTPS protocols. In both protocols, request goes for the same page, but SEO identifies them as separate page. Hence, you need URL rewriting to avoid duplicate tracking of the same page. Some of the scenarios that needs URL rewriting are listed below:

    When content is moved to a new page structure and still needs to catch old URL to new URL
    Switch from HTTP to HTTPS
    Switch the non www version to www or www version to non www version
    When there is a new domain and still want to redirect traffic from old domain to new
    Mapping URL querystrings to more SEO friendly URL

URL Rewrite vs Redirect
In the URL rewrite, client sees different URL in browser and server processed different URL. So, basically what we can say is, URL rewrite modifies the URL into server-side before it is fully processed. And this modified URL is not seen to the user’s browser. User only sees what they have requested.

Redirect is a process of sending a new request on the server. It changes URL in the user’s browser and processes a completely new request to the server. In redirect, the user request one URL, and that URL get redirected to a different URL and make a new request. This redirected new URL is visible to user’s browser.

With redirect you can use different status code also. Below table shows all the available status code for redirect


Different URL Rewriting Middleware
In this section, I will explain different ways of URL rewriting middleware with code example. I am not going to discuss about how to create new project in Visual Studio.

All the code example I have included in this section is based on Visual Studio 2022 and .NET 7.0.

Intercepting Incoming Request
The easiest way to do URL rewriting is to use of app.Use() inline middleware in Program.cs, intercept incoming requests, and rewrite them.

Here is the code that rewrites URL.
app.Use(async (context, next) => {
    var url = context.Request.Path.Value;
    if (url.Contains("/about")) {
        context.Request.Path = "/about-us";
    }
    await next();
});


This code intercepts all the incoming request and check if an incoming URL have /about or not. If the condition match, then user will get content of /about-us.

Here is a code example or URL redirect in a similar approach. In redirection, the difference is, redirection is a new request. So, you have to terminate the request in middleware.
app.Use(async (context, next) => {
    var url = context.Request.Path.Value;
    if (url.Contains("/introduction")) {
        context.Response.Redirect("/about-us");
        return;
    }
    await next();
});


ASP.NET Core Rewrite Middleware Module
ASP.NET Core rewrite Middleware module handles complex rewrite and redirect rules. This has the ability to set rewrite and redirect rules based on regEx. This is the most recommended way to use it.
Below code shows how rewrite and redirect can be done in ASP.NET Core Rewrite Middleware module.
var rewrite = new RewriteOptions()
    .AddRewrite("about", "about-us", true);
app.UseRewriter(rewrite);

var rewrite = new RewriteOptions()
    .AddRedirect("introduction", "about-us");
app.UseRewriter(rewrite);


And here is the code using regEx to rewrite incoming request.
var rewrite = new RewriteOptions()
    .AddRewrite(@"^product?id=(\d+)", "product/$1", true);
app.UseRewriter(rewrite);


var rewrite = new RewriteOptions()
    .AddRedirect("about/(.*)", "about-us/$1");
app.UseRewriter(rewrite);

IIS URL Rewrite Module

You can use AddIISUrlRewrite to use IIS URL Rewrite Module rule set. You have to store all the rules in a separate xml file and don’t forget to deploy them with your application.

Below code read the UrlRewrite.xml file from app root folder.
var options = new RewriteOptions()
    .AddIISUrlRewrite(app.Environment.ContentRootFileProvider, "UrlRewrite.xml");
app.UseRewriter(options);


And this is how UrlRewrite.xml is with rules. You can add all your rules in a single file.
<rewrite>
    <rules>
        <rule name="RedirectWwwToNonWww" stopProcessing="false">
            <match url="(.*)" />
            <conditions logicalGrouping="MatchAll" trackAllCaptures="false">
                   <add input="{HTTP_HOST}" pattern="^(www\.)(.*)$" />
            </conditions>
            <action type="Redirect" url="https://{C:2}{REQUEST_URI}" redirectType="Permanent" />
        </rule>

        <rule name="AboutPage" stopProcessing="true">
            <match url="^page/about" />
            <action type="Redirect" url="about-us" redirectType="Permanent" />
        </rule>
    </rules>
</rewrite>


If you have Apache web server then you can use AddApacheModRewrite instead of AddIISUrlRewrite. And you can place all your Apache mod_rewrite rules in a text file.

In this article, I discussed about different ways of implementing URL rewriting in ASP.NET Core. I also explained the importance of URL rewriting and different status codes that has to be used with URL redirect. I hope you will find this article helpful. If you have any suggestions, then please feel free to ask into the comment section.

HostForLIFE.eu ASP.NET Core Hosting

European best, cheap and reliable ASP.NET hosting with instant activation. HostForLIFE.eu is #1 Recommended Windows and ASP.NET hosting in European Continent. With 99.99% Uptime Guaranteed of Relibility, Stability and Performace. HostForLIFE.eu security team is constantly monitoring the entire network for unusual behaviour. We deliver hosting solution including Shared hosting, Cloud hosting, Reseller hosting, Dedicated Servers, and IT as Service for companies of all size.


About HostForLIFE

HostForLIFE is European Windows Hosting Provider which focuses on Windows Platform only. We deliver on-demand hosting solutions including Shared hosting, Reseller Hosting, Cloud Hosting, Dedicated Servers, and IT as a Service for companies of all sizes.

We have offered the latest Windows 2019 Hosting, ASP.NET 5 Hosting, ASP.NET MVC 6 Hosting and SQL 2019 Hosting.


Month List

Tag cloud

Sign in