European ASP.NET 4.5 Hosting BLOG

BLOG about ASP.NET 4, ASP.NET 4.5 Hosting and Its Technology - Dedicated to European Windows Hosting Customer

ASP.NET Core Hosting - HostForLIFE :: How to Create Your First Application With ASP.NET Core 3.1?

clock March 29, 2021 07:11 by author Peter

In this article, we will create our first ASP.NET Core application with the Visual Studio 2019 and .NET Core 3.1 version. This article is part of the ASP.NET Core series that I am going to start. In this series of articles, I will try to cover the basics as well as will create a demo application for the learning purpose.

What is ASP.NET Core?
ASP.NET Core is a framework for building modern web applications and services. It is part of .NET Core which is a cross-platform as well as an open-source framework. We said cross platforms means, we can develop and deploy the web application targeting several operating systems including Windows, Linux as well as macOS. Another feature that makes it popular are mentioned below,

  • Cross-Platform as well as Open Source.
  • Built-in support for the dependency injection (DI).
  • It also includes a built-in Web server i.e. Kestral. You can run your application directly with the Kestral or can host your application under IIS, Ngnix, Apache, etc.
  • Unified programming model for building the web as well as Web API (with the use of Controller as the base class).
  • Lightweight and high-performance modular request pipeline which is suitable for the modern cloud-based application.

For creating our first ASP.NET Core application, I am using Visual Studio 2019 with .NET core 3.1 Version.

Let’s Begin,

Open Visual Studio 2019 and click on Create a new project

On the next screen, select ASP.NET Core Web Application and click on the Next button

Configure your project name and the location where you want to create the application. Click on create button.


As It’s our first application, we are trying to make it as simple as possible. Select .Net Core and ASP.NET Core 3.1 Version (as I am going to use the same version in upcoming tutorials of this series). Select the Empty template (We can create ASP.NET Core API, ASP.NET Core Application with Razor Pages, ASP.NET Core MVC, etc. application with the ASP.NET .NET Core). Unselect the configure for HTTPS checkbox as we are trying to make it as simple as possible and SSL is not required for that. Click on create button.

Once the application is created you will see a screen like below.

Go to top navigation controls and run the Application on IIS Express as shown in the below image.

On clicking on IIS Express, You will see that the application is launched in the browser with a text as Hello World on the screen.

Now you might be confused about where this “Hello World” text is coming from. In order to understand that let’s open the startup.cs file from solution explorer. I have highlighted the line in the Configure method (Configure method is called during the runtime and used to configure the HTTP request pipeline. We will see more in detail about it when we cover Middleware use in ASP.NET Core web application)

Let’s change that text to something that you want to see on screen. For demonstration, I am changing it to “Hello World from IT Tutorials with Example”.

 
Build and run the application as we did in the above steps. The text which we changed is shown on the web browser.

Great! We have created our First Hello World Application with ASP.NET Core. In the next article, we will understand the basic file structure of the project that we have created. I hope you like it. Thanks.


ASP.NET Core 5.0.2 Hosting - HostForLIFE :: Upload And Download Multiple Files Using Web API

clock March 23, 2021 06:54 by author Peter

Today, we are going to cover uploading & downloading multiple files using ASP.Net Core 5.0 web API by a simple process.

 
Note
Since I have the latest .Net 5.0 installed on my machine I used this. This same technique works in .Net Core 3.1 and .Net Core 2.1 as well.
 
Begin with creating an empty web API project in visual studio and for target framework choose .Net 5.0.
 
No external packages were used in this project.
 
Create a Services folder and inside that create one FileService class and IFileService Interface in it.
 
We have used three methods in this FileService.cs

    UploadFile
    DownloadFile
    SizeConverter

Since we need a folder to store these uploading files, here we have added one more parameter to pass the folder name as a string where it will store all these files.
 
FileService.cs
    using Microsoft.AspNetCore.Hosting;  
    using Microsoft.AspNetCore.Http;  
    using System;  
    using System.Collections.Generic;  
    using System.IO;  
    using System.IO.Compression;  
    using System.Linq;  
    using System.Threading.Tasks;  
      
    namespace UploadandDownloadFiles.Services  
    {  
        public class FileService :IFileService  
        {  
            #region Property  
            private IHostingEnvironment _hostingEnvironment;  
            #endregion  
     
            #region Constructor  
            public FileService(IHostingEnvironment hostingEnvironment)  
            {  
                _hostingEnvironment = hostingEnvironment;  
            }  
            #endregion  
     
            #region Upload File  
            public void UploadFile(List<IFormFile> files, string subDirectory)  
            {  
                subDirectory = subDirectory ?? string.Empty;  
                var target = Path.Combine(_hostingEnvironment.ContentRootPath, subDirectory);  
      
                Directory.CreateDirectory(target);  
      
                files.ForEach(async file =>  
                {  
                    if (file.Length <= 0) return;  
                    var filePath = Path.Combine(target, file.FileName);  
                    using (var stream = new FileStream(filePath, FileMode.Create))  
                    {  
                        await file.CopyToAsync(stream);  
                    }  
                });  
            }  
            #endregion  
     
            #region Download File  
            public (string fileType, byte[] archiveData, string archiveName) DownloadFiles(string subDirectory)  
            {  
                var zipName = $"archive-{DateTime.Now.ToString("yyyy_MM_dd-HH_mm_ss")}.zip";  
      
                var files = Directory.GetFiles(Path.Combine(_hostingEnvironment.ContentRootPath, subDirectory)).ToList();  
      
                using (var memoryStream = new MemoryStream())  
                {  
                    using (var archive = new ZipArchive(memoryStream, ZipArchiveMode.Create, true))  
                    {  
                        files.ForEach(file =>  
                        {  
                            var theFile = archive.CreateEntry(file);  
                            using (var streamWriter = new StreamWriter(theFile.Open()))  
                            {  
                                streamWriter.Write(File.ReadAllText(file));  
                            }  
      
                        });  
                    }  
      
                    return ("application/zip", memoryStream.ToArray(), zipName);  
                }  
      
            }  
            #endregion  
     
            #region Size Converter  
            public string SizeConverter(long bytes)  
            {  
                var fileSize = new decimal(bytes);  
                var kilobyte = new decimal(1024);  
                var megabyte = new decimal(1024 * 1024);  
                var gigabyte = new decimal(1024 * 1024 * 1024);  
      
                switch (fileSize)  
                {  
                    case var _ when fileSize < kilobyte:  
                        return $"Less then 1KB";  
                    case var _ when fileSize < megabyte:  
                        return $"{Math.Round(fileSize / kilobyte, 0, MidpointRounding.AwayFromZero):##,###.##}KB";  
                    case var _ when fileSize < gigabyte:  
                        return $"{Math.Round(fileSize / megabyte, 2, MidpointRounding.AwayFromZero):##,###.##}MB";  
                    case var _ when fileSize >= gigabyte:  
                        return $"{Math.Round(fileSize / gigabyte, 2, MidpointRounding.AwayFromZero):##,###.##}GB";  
                    default:  
                        return "n/a";  
                }  
            }  
            #endregion  
      
        }  
    }  


SizeConverter function is used to get the actual size of our uploading files to the server.
 
IFileService.cs
    using Microsoft.AspNetCore.Http;  
    using System;  
    using System.Collections.Generic;  
    using System.Linq;  
    using System.Threading.Tasks;  
      
    namespace UploadandDownloadFiles.Services  
    {  
       public interface IFileService  
        {  
            void UploadFile(List<IFormFile> files, string subDirectory);  
            (string fileType, byte[] archiveData, string archiveName) DownloadFiles(string subDirectory);  
             string SizeConverter(long bytes);  
        }  
    }  


Let's add this service dependency in a startup.cs file
 
Startup.cs
    using Microsoft.AspNetCore.Builder;  
    using Microsoft.AspNetCore.Hosting;  
    using Microsoft.AspNetCore.HttpsPolicy;  
    using Microsoft.AspNetCore.Mvc;  
    using Microsoft.Extensions.Configuration;  
    using Microsoft.Extensions.DependencyInjection;  
    using Microsoft.Extensions.Hosting;  
    using Microsoft.Extensions.Logging;  
    using Microsoft.OpenApi.Models;  
    using System;  
    using System.Collections.Generic;  
    using System.Linq;  
    using System.Threading.Tasks;  
    using UploadandDownloadFiles.Services;  
      
    namespace UploadandDownloadFiles  
    {  
        public class Startup  
        {  
            public Startup(IConfiguration configuration)  
            {  
                Configuration = configuration;  
            }  
      
            public IConfiguration Configuration { get; }  
      
            // This method gets called by the runtime. Use this method to add services to the container.  
            public void ConfigureServices(IServiceCollection services)  
            {  
      
                services.AddControllers();  
                services.AddSwaggerGen(c =>  
                {  
                    c.SwaggerDoc("v1", new OpenApiInfo { Title = "UploadandDownloadFiles", Version = "v1" });  
                });  
      
                services.AddTransient<IFileService, FileService>();  
            }  
      
            // This method gets called by the runtime. Use this method to configure the HTTP request pipeline.  
            public void Configure(IApplicationBuilder app, IWebHostEnvironment env)  
            {  
                if (env.IsDevelopment())  
                {  
                    app.UseDeveloperExceptionPage();  
                    app.UseSwagger();  
                    app.UseSwaggerUI(c => c.SwaggerEndpoint("/swagger/v1/swagger.json", "UploadandDownloadFiles v1"));  
                }  
      
                app.UseHttpsRedirection();  
      
                app.UseRouting();  
      
                app.UseAuthorization();  
      
                app.UseEndpoints(endpoints =>  
                {  
                    endpoints.MapControllers();  
                });  
            }  
        }  
    }  

Create a FileController & now inject this IFileService using Constructor injection inside this FileController.
 
FileController.cs
    using Microsoft.AspNetCore.Hosting;  
    using Microsoft.AspNetCore.Http;  
    using Microsoft.AspNetCore.Mvc;  
    using System;  
    using System.Collections.Generic;  
    using System.ComponentModel.DataAnnotations;  
    using System.IO;  
    using System.Linq;  
    using System.Threading.Tasks;  
    using UploadandDownloadFiles.Services;  
      
    namespace UploadandDownloadFiles.Controllers  
    {  
        [Route("api/[controller]")]  
        [ApiController]  
        public class FileController : ControllerBase  
        {  
            #region Property  
            private readonly IFileService _fileService;  
            #endregion  
     
            #region Constructor  
            public FileController(IFileService fileService)  
            {  
                _fileService = fileService;  
            }  
            #endregion  
     
            #region Upload  
            [HttpPost(nameof(Upload))]  
            public IActionResult Upload([Required] List<IFormFile> formFiles, [Required] string subDirectory)  
            {  
                try  
                {  
                    _fileService.UploadFile(formFiles, subDirectory);  
      
                    return Ok(new { formFiles.Count, Size = _fileService.SizeConverter(formFiles.Sum(f => f.Length)) });  
                }  
                catch (Exception ex)  
                {  
                    return BadRequest(ex.Message);  
                }  
            }  
            #endregion  
     
            #region Download File  
            [HttpGet(nameof(Download))]  
            public IActionResult Download([Required]string subDirectory)  
            {  
      
                try  
                {  
                    var (fileType, archiveData, archiveName) = _fileService.DownloadFiles(subDirectory);  
      
                    return File(archiveData, fileType, archiveName);  
                }  
                catch (Exception ex)  
                {  
                    return BadRequest(ex.Message);  
                }  
      
            }  
            #endregion  
        }  
    }  

We can test our API's in both swagger and postman.

 
Here we see our two API's which we have created to upload and download, so let's test each of these individually.

 
Pass the folder name inside the subDirectory and add files below to save inside the server and under the folder name. In response we see the total count of our files and the actual size of our entire files.

 
Now will check with Download API. Since we have multiple files inside of our folder it will download as a Zip file where we need to extract that to check the files.


ASP.NET Core 5.0.2 Hosting - HostForLIFE :: How to Load 5 Million Records from CSV and Process Them In Under Three Seconds?

clock March 15, 2021 06:54 by author Peter

We have a scenario where we have to load 5 million records under 2 seconds from a CSV file using C#, then process it and return some processed records based on certain criteria too. This sounds like loading and processing may take more time but only if we do it in the wrong way.

This is what we will solve in the below code.
 
Let's dive in and do some processing ourselves. First download a file from the URL below, it is a sample Sales records CSV file with 5 million records.
http://eforexcel.com/wp/wp-content/uploads/2020/09/5m-Sales-Records.7z
 
Now we will do is load this CSV in our program and get the top ten sales records with maximum revenue in order.
    Stopwatch stopwatch = new Stopwatch();  
    stopwatch.Start();  
    //LOAD    
    //Created a temporary dataset to hold the records    
    List < Tuple < string, string, string >> listA = new List < Tuple < string, string, string >> ();  
    using(var reader = new StreamReader(@ "C:\Users\Lenovo\Desktop\5m Sales Records.csv")) {  
        while (!reader.EndOfStream) {  
            var line = reader.ReadLine();  
            var values = line.Split(',');  
            listA.Add(new Tuple < string, string, string > (values[0], values[1], values[11]));  
        }  
    }  
    //PROCESS    
    var top10HigestRevenueSalesRecords = from salesrec in listA.Skip(0).Take(10)  
    orderby salesrec.Item3  
    select salesrec;  
    //PRINT    
    foreach(var item in top10HigestRevenueSalesRecords) {  
        Console.WriteLine($ "{item.Item1} - {item.Item2} - {item.Item3}");  
    }  
    stopwatch.Stop();  
    Console.WriteLine($ "Time ellapsed {stopwatch.ElapsedMilliseconds/1000}");  
    Console.ReadLine();   

Now all three main steps in the process Load, Process, and Print were done in under 2 seconds.
 
Adding Parallel. For or Foreach does not either work much for this scenario, in fact, it will slow it down a bit with again a difference in nanoseconds which is not to be considered much.
 
We can improve it futher down to one second by using some custom Nuget packages  that decrease the downtime of loading large csv files.
    using LumenWorks.Framework.IO.Csv;  
    using(CsvReader csv = new CsvReader(new StreamReader(@ "C:\Users\Lenovo\Desktop\5m Sales Records.csv"), true)) {  
        while (csv.ReadNextRecord()) {  
            listA.Add(new Tuple < string, string, string > (csv[0], csv[1], csv[11]));  
        }  
    }   


Happy coding fellows.


ASP.NET Core 5.0.2 Hosting - HostForLIFE :: How To Use Postman With ASP.NET Core Web API Testing?

clock March 8, 2021 06:12 by author Peter

Manual Testing with Postman

If you are a developer, tester, or a manager, sometimes understanding various methods of API can be a challenge when building and consuming the application.

Generating good documentation and help pages for your Web API using Postman with .NET Core is as easy as making some HTTP calls.

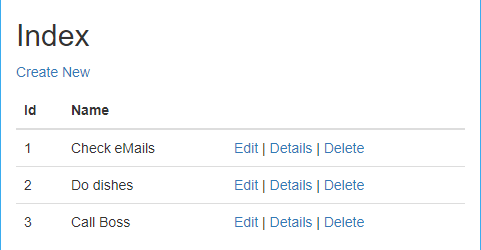
Let’s start downloading simple To-do projects from GitHub.
Download and run the below TodoMvcSolution

Download Postman

Postman is a Google Chrome application for testing API calls. You can download and install Postman from below web site.

Here are the APIs we can test -  Get, Post, Put and Delete for this application.


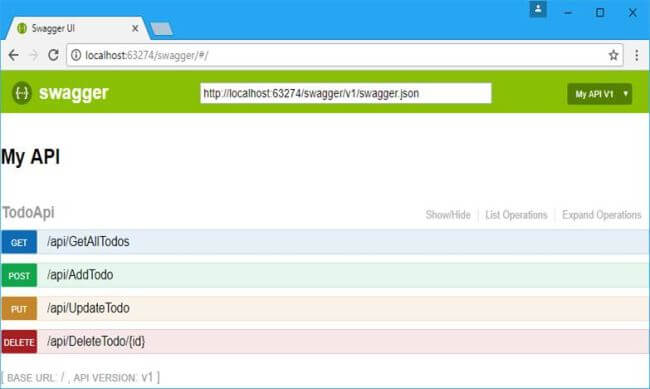
Here are the Web APIs we want to test.
    //Copyright 2017 (c) SmartIT. All rights reserved.  
    //By John Kocer  
    // This file is for Swagger test, this application does not use this file  
    using System.Collections.Generic;  
    using Microsoft.AspNetCore.Mvc;  
    using SmartIT.Employee.MockDB;   
      
    namespace TodoAngular.Ui.Controllers  
    {  
      [Produces("application/json")]  
      [Route("api/Todo")]  
      public class TodoApiController : Controller  
      {  
        TodoRepository _todoRepository = new TodoRepository();  
      
        [Route("~/api/GetAllTodos")]  
        [HttpGet]  
        public IEnumerable<SmartIT.Employee.MockDB.Todo> GetAllTodos()  
        {  
          return _todoRepository.GetAll();  
        }  
      
        [Route("~/api/AddTodo")]  
        [HttpPost]  
        public SmartIT.Employee.MockDB.Todo AddTodo([FromBody]SmartIT.Employee.MockDB.Todo item)  
        {  
          return _todoRepository.Add(item);  
        }  
      
        [Route("~/api/UpdateTodo")]  
        [HttpPut]  
        public SmartIT.Employee.MockDB.Todo UpdateTodo([FromBody]SmartIT.Employee.MockDB.Todo item)  
        {  
          return  _todoRepository.Update(item);  
        }  
      
        [Route("~/api/DeleteTodo/{id}")]  
        [HttpDelete]  
        public void Delete(int id)  
        {  
          var findTodo = _todoRepository.FindById(id);  
          if (findTodo != null)  
            _todoRepository.Delete(findTodo);  
        }  
      }  
    }

Note - Your local port number may be different than mine. Use your local port number.
 
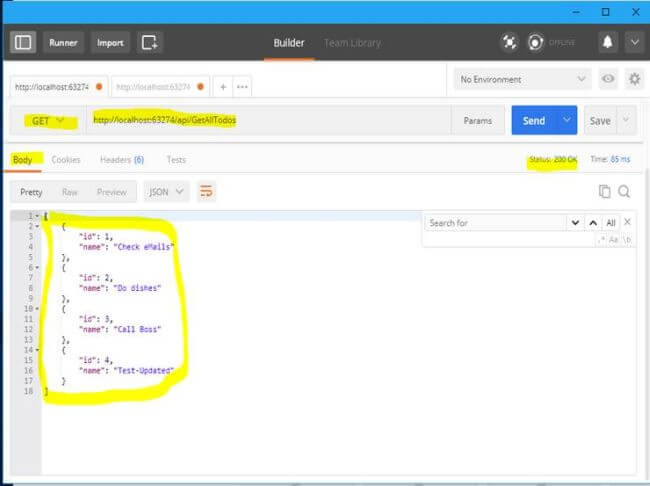
http://localhost:63274/api/GetAllTodos // GET
http://localhost:63274/api/AddTodo //POST
http://localhost:63274/api/UpdateTodo //PUT
http://localhost:63274/api/DeleteTodo/5 // DELETE
 
Testing GET with Postman
    Testing GET is very easy. First, we need to set HTTP Action from the drop-down list as GET.
    Then, we need to type or paste into the API URL box.
    Then, click the blue SEND button.

If the GET is successful, we see the status: 200 OK.

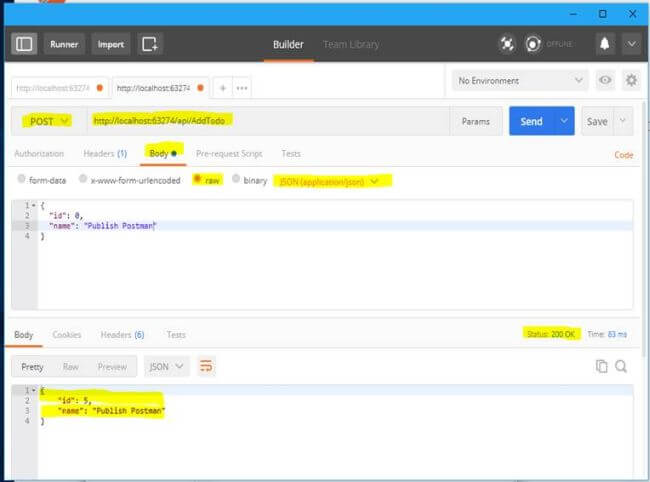
Testing POST with Postman
    First, we need to set Http Action from the dropdown list as POST.
    Then, we need to type or paste into the API URL box.
    AddTodo API accepts a Todo object in JSON format. We need to pass a new Todo JSON data.
    To pass JSON data we need to Select Body Tap.
    Select the Raw
    Select JSON(Application/JSON) as text format.
    Write or paste your Todo JSON data.
    Then, click the blue SEND button.

If the POST is successful, we see the status: 200 OK.
 
You will see Status:200 for success and the return value in the Return Body tab. We sent Publish Postman Todo item with id=0 and we received id=5 as result.

Testing PUT with Postman

    First, we need to set HTTP Action from the dropdown list as PUT.
    Then, we need to type or paste into the API URL.
    UpdateTodo API accepts a Todo object in JSON format. We need to pass an existing Todo JSON data.
    To pass JSON data we need to Select Body Tab
    Select the Raw format
    Select JSON(Application/JSON) as text format.
    Write or paste your Todo JSON
    Then click the blue SEND

If the PUT is successful, we see the status: 200 OK.


You will see Status:200 for success and the return value in the Return Body Tab. We sent Publish Postman Todo item with "name": "Publish Postman-In progress" and we receive an updated todo result.


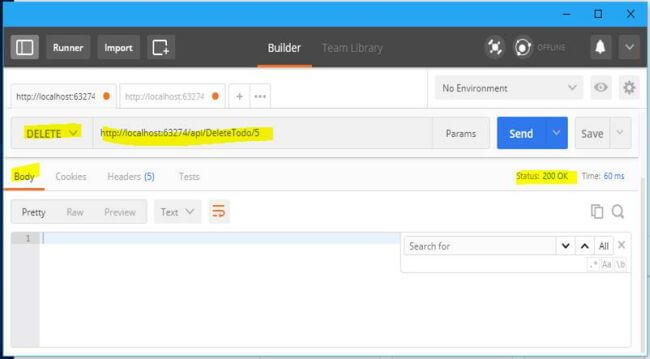
Testing DELETE with Postman

    First, we need to set Http Action from the dropdown list as DELETE.
    Then, we need to type or paste into the API URL box.
    DeleteTodo/5 API accepts an id on the  We need to pass an existing Todo with an Id value.
    Then, click the blue SEND button.

If the Delete is successful, we see the status: 200 OK.

HostForLIFE ASP.NET Core 5.0.2 Hosting
HostForLIFE is European Windows Hosting Provider which focuses on Windows Platform only. We deliver on-demand hosting solutions including Shared hosting, Reseller Hosting, Cloud Hosting, Dedicated Servers, and IT as a Service for companies of all sizes. We have customers from around the globe, spread across every continent. We serve the hosting needs of the business and professional, government and nonprofit, entertainment and personal use market segments.


ASP.NET Core 5.0.2 Hosting - HostForLIFE :: How To Implement Database Views Using Entity Framework (EF) Code First Approach?

clock March 1, 2021 06:32 by author Peter

There are several situations where your applications may need to display data by combining two or more tables, sometimes even more than 7-8 tables. In such a scenario, using Entity framework may result in a slow performance because we need to process by selecting data from a table, then run some loops from other tables.

However, the database itself has many features to handle the performance in these cases, such as stored procedures or creating views that are most recommended and result in better performance.
 
On the other hand, entity framework, open source ORM framework, is gaining huge popularity among the .net developer because of numerous advantages and speedup the coding as well as quite handy to control database directly form code.
 
In this article, I will show how to how to take the advantages of database views in entity framework and overcome the problems of complex joining/query by creating a view and handling those views in Entity framework.
 
Database view

A view is considered as a virtual table which is formed based on SQL statement of other tables. This can be considered as a real table; however, we cannot do commands like delete or update. In simple terms, it contains query to pull data from table(s). We generally use WHERE, FUNCTION and/or JOIN to tables to form a view.
 
We create views for query simplicity: we can write complex queries to select data from various tables and instead of writing those complex queries each time; we create views to use it like simple tables. Other advantages are performance improvements, data security and ease of use.
 
We can create view two ways (MS SQL server): SQL Script and Query Designer.
 
SQL Script Syntax
    CREATE VIEW view_name AS    
    SELECT column1, column2.....    
    FROM table_name    
    WHERE [condition];     

We can write complex queries using where, function, join etc. or you can even do union.
 
Query Designer
We can take advantages of query designer as shown,


We can add tables, add relations (auto relations based primarykey-foreignkey), modify alias as depicted in above diagram. There is option to modify query manually and check the results.
 
Handling Views in Entity Framework
We can utilize views in entity framework database first approach easily considering a model. However, in entity framework code first approach, we need to do tricks. If we create models of views then it will create tables of those views in add-migration and database update command.
 
Tricks
We can handle views in entity framework in two ways.
 
Option 1
Create a view combining multiple tables in the database manually and subsequently add an entity for the view. Finally, we can add ignore for the entity OnmodelCreating Entity builder, as shown below.
 
Sample Code
    protected override void OnModelCreating(ModelBuilder modelBuilder)    
    {    
      if (IsMigration)    
        modelBuilder.Ignore<ViewEntityName>();    
     ...    
    }   

With above trick, we can simply take advantages of entity model and ignore in migrations and database update in code first approach.
 
Option 2
Alternatively, you can create an extension or property for handling views in the database. In this option, we can create a view manually in the database then add an extension or property.
 
Sample Code
    //Property    
    class DBContext    
    {    
        public IQueryable<YourView> YourView     
        {    
            get    
            {    
                return this.Database.SqlQuery<YourView>("select * from dbo.ViewName");    
            }    
        }    
    }   


Extension
    static class DbContextExtensions    
    {    
        public static IQueryable<ViewNameModel>(this DbContext context)    
        {    
            return context.Database.SqlQuery<ViewNameModel>("select * from dbo.ViewName");    
        }    
    }  

We can build database context extension to handle view and use it in our solution with code first approach.
 
There are some other alternative methods as well, however, I prefer these options, as they are easy to implement.
 
Conclusion
In this article, we have learned how to implement database views in entity framework in code first approach and take advantages of those views to handle complex queries and overcome the problem of complex joining/query in entity framework. Database views is quite effective for complex queries in terms of performance, ease of use, data security and most importantly query simplicity.


HostForLIFE ASP.NET Core 5.0.2 Hosting
HostForLIFE is European Windows Hosting Provider which focuses on Windows Platform only. We deliver on-demand hosting solutions including Shared hosting, Reseller Hosting, Cloud Hosting, Dedicated Servers, and IT as a Service for companies of all sizes. We have customers from around the globe, spread across every continent. We serve the hosting needs of the business and professional, government and nonprofit, entertainment and personal use market segments.


About HostForLIFE

HostForLIFE is European Windows Hosting Provider which focuses on Windows Platform only. We deliver on-demand hosting solutions including Shared hosting, Reseller Hosting, Cloud Hosting, Dedicated Servers, and IT as a Service for companies of all sizes.

We have offered the latest Windows 2019 Hosting, ASP.NET 5 Hosting, ASP.NET MVC 6 Hosting and SQL 2019 Hosting.


Month List

Tag cloud

Sign in