November 21, 2022 08:05 by
 Peter
PeterWe will discuss minimal APIs in .NET Core 6, their purpose, and step-by-step implementation.
Minimal APIs Implementation using .NET Core 6
Step 1
Create a new .NET Core Web API
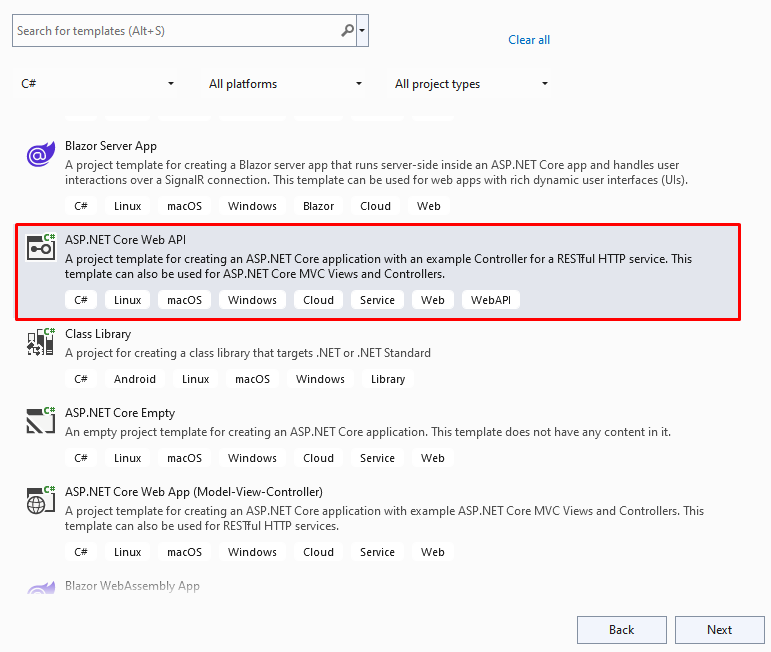
Step 2
Configure your project
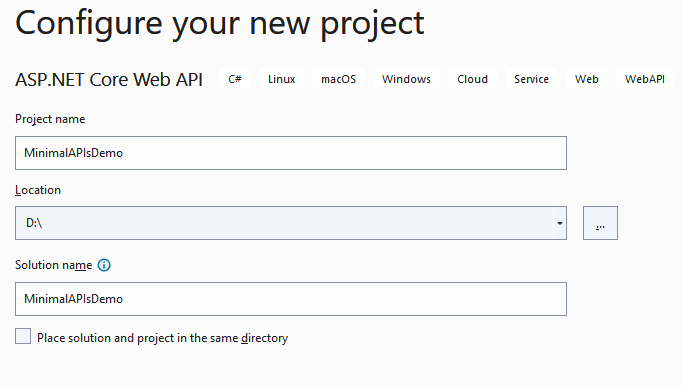
Step 3
Provide additional information as I showed below
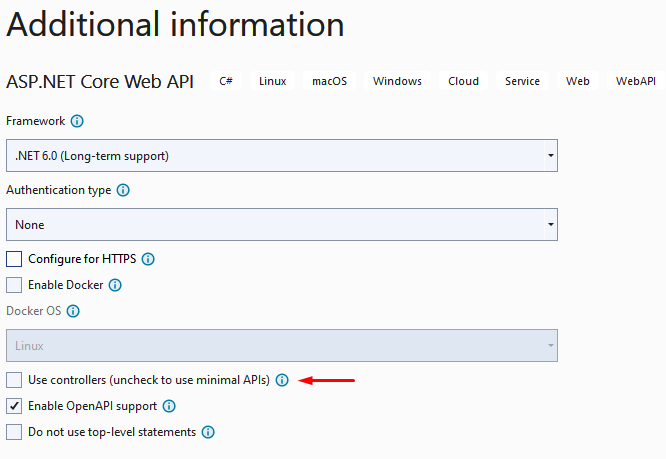
Step 4
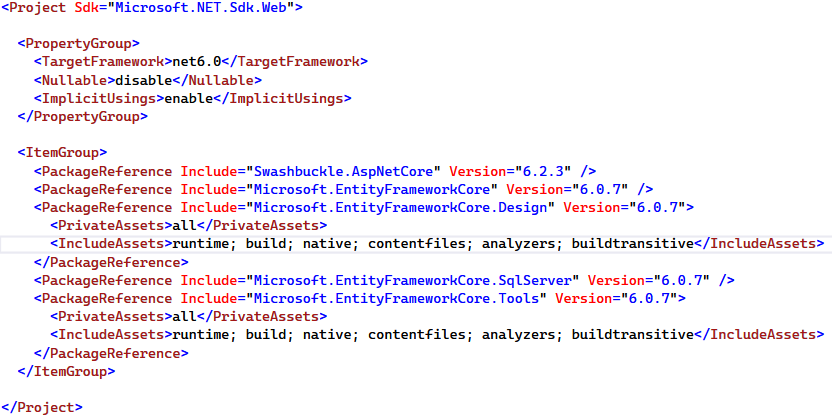
Install the following NuGet packages
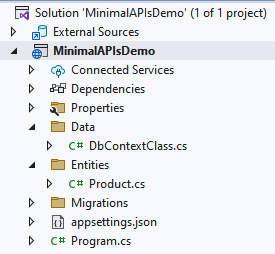
Project structure
Step 5
Create a Product class inside the entities folder
namespace MinimalAPIsDemo.Entities
{
public class Product
{
public int ProductId { get; set; }
public string ProductName { get; set; }
public string ProductDescription { get; set; }
public int ProductPrice { get; set; }
public int ProductStock { get; set; }
}
}
Step 6
Next, create DbContextClass inside the Data folder
using Microsoft.EntityFrameworkCore;
using MinimalAPIsDemo.Entities;
namespace MinimalAPIsDemo.Data
{
public class DbContextClass : DbContext
{
protected readonly IConfiguration Configuration;
public DbContextClass(IConfiguration configuration)
{
Configuration = configuration;
}
protected override void OnConfiguring(DbContextOptionsBuilder options)
{
options.UseSqlServer(Configuration.GetConnectionString("DefaultConnection"));
}
public DbSet<Product> Product { get; set; }
}
}
Step 7
Register the Db Context service in the DI container inside the Program class which is the entry point of our application
// Add services to the container.
builder.Services.AddDbContext<DbContextClass>();
Step 8
Add database connection string inside the app settings file
{
"Logging": {
"LogLevel": {
"Default": "Information",
"Microsoft.AspNetCore": "Warning"
}
},
"AllowedHosts": "*",
"ConnectionStrings": {
"DefaultConnection": "Data Source=DESKTOP;Initial Catalog=MinimalAPIDemo;User Id=sa;Password=database;"
}
}
Step 9
Later on, add different API endpoints inside the Program class with the help of Map and specified routing pattern as I showed below
using Microsoft.EntityFrameworkCore;
using MinimalAPIsDemo.Data;
using MinimalAPIsDemo.Entities;
var builder = WebApplication.CreateBuilder(args);
// Add services to the container.
builder.Services.AddDbContext<DbContextClass>();
// Learn more about configuring Swagger/OpenAPI at https://aka.ms/aspnetcore/swashbuckle
builder.Services.AddEndpointsApiExplorer();
builder.Services.AddSwaggerGen();
var app = builder.Build();
// Configure the HTTP request pipeline.
if (app.Environment.IsDevelopment())
{
app.UseSwagger();
app.UseSwaggerUI();
}
//get the list of product
app.MapGet("/productlist", async (DbContextClass dbContext) =>
{
var products = await dbContext.Product.ToListAsync();
if (products == null)
{
return Results.NoContent();
}
return Results.Ok(products);
});
//get product by id
app.MapGet("/getproductbyid", async (int id, DbContextClass dbContext) =>
{
var product = await dbContext.Product.FindAsync(id);
if (product == null)
{
return Results.NotFound();
}
return Results.Ok(product);
});
//create a new product
app.MapPost("/createproduct", async (Product product, DbContextClass dbContext) =>
{
var result = dbContext.Product.Add(product);
await dbContext.SaveChangesAsync();
return Results.Ok(result.Entity);
});
//update the product
app.MapPut("/updateproduct", async (Product product, DbContextClass dbContext) =>
{
var productDetail = await dbContext.Product.FindAsync(product.ProductId);
if (product == null)
{
return Results.NotFound();
}
productDetail.ProductName = product.ProductName;
productDetail.ProductDescription = product.ProductDescription;
productDetail.ProductPrice = product.ProductPrice;
productDetail.ProductStock = product.ProductStock;
await dbContext.SaveChangesAsync();
return Results.Ok(productDetail);
});
//delete the product by id
app.MapDelete("/deleteproduct/{id}", async (int id, DbContextClass dbContext) =>
{
var product = await dbContext.Product.FindAsync(id);
if (product == null)
{
return Results.NoContent();
}
dbContext.Product.Remove(product);
await dbContext.SaveChangesAsync();
return Results.Ok();
});
app.Run();
Step 10
Run the following entity framework command to create migration and update the database
add-migration "initial"
update-database
Step 11
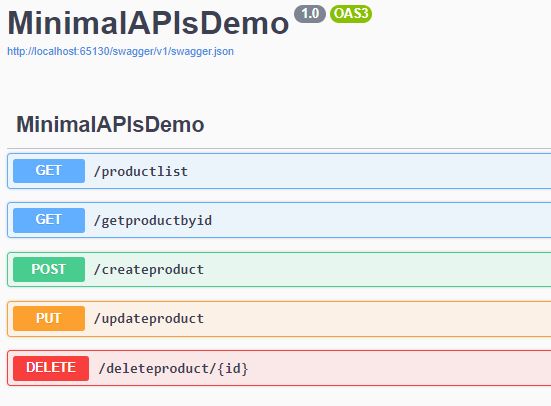
Finally, run your application
