
August 25, 2021 07:07 by
 Peter
Peteruthorization is a basic requirement while the application is used by multiple & multilevel users. While developing APIs, it's also important to provide basic authorization to handle security. Here we will see how to implement the authorization attribute in ASP. Net Core web API. This post will cover the basics of developing authorization attributes for both intermediate and experienced users.
Step 1 - Create Authorization Attribute Class
Create a class for handling the logic of the authorization process. Here I have assigned the class name "AuthAttribute". Assign TypeFilterAttribute to AuthAttribute class and create a constructor of the class. The constructor can contain parameters as per requirements. Here I have assigned two parameters to the constructor name as actionName and roleType.
public class AuthAttribute: TypeFilterAttribute {
public AuthAttribute(string actionName, string roleType): base(typeof(AuthorizeAction)) {
Arguments = new object[] {
actionName,
roleType
};
}
}
Step 2 - Create a class to handle the logic for an Authorization
Now, create a class for handling the logic for the authorization process.
public class AuthorizeAction: IAuthorizationFilter {
private readonly string _actionName;
private readonly string _roleType;
public AuthorizeAction(string actionName, string roleType) {
_actionName = actionName;
_roleType = roleType;
}
public void OnAuthorization(AuthorizationFilterContext context) {
string _roleType = context.HttpContext.Request?.Headers["role"].ToString();
switch (_actionName) {
case "Index":
if (!_roleType.Contains("admin")) context.Result = new JsonResult("Permission denined!");
break;
}
}
}
The authorization can get a role name in different ways. Here role name is passing in the header, so httpcontext will return us the role name from the header details. However, the action name will fetch from the action's attribute parameter which will be bind in the controller.
Step 3 - Assign Authorization Attribute to Action
Now, assign authorization attribute to action as per requirements. The attribute contains a parameter like rolename and actionname. So during the declaration of the authorization attribute with the action, it will require rolename and actionname as parameters.
[HttpGet]
[AuthAttribute("Index", "Admin")]
[Route("sample")]
Public async Task<IActionResult> Index()
{
return Ok("Action perform successfully!");
}
Here, I have created a simple action under the controller and assigned an authorization attribute to the action. Now, I have assigned the action name as "Index" and role type as "Admin". We can manage action names and role names based on application requirements.
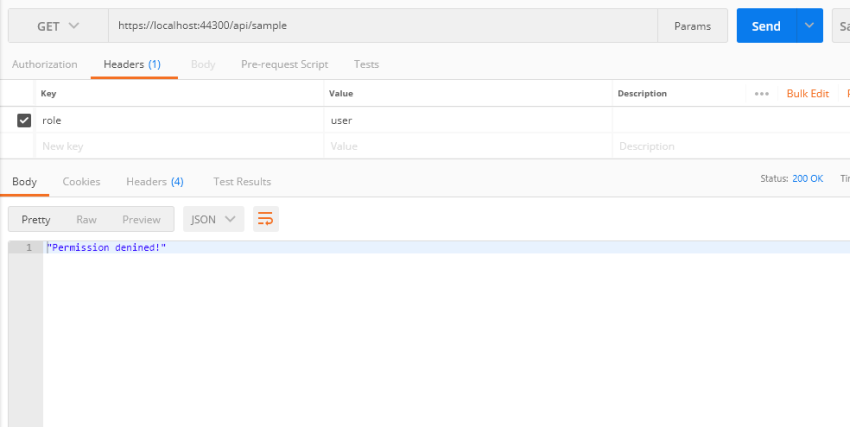
Step 4 - API call from the postman
Call API using postman with role name in the header.
Step 5 - Logic behind the process
When API call, first of all, it will redirect to the authorization process. The authorization will get the action name and role type in a parameter from the action. Roles which are passing in the parameter are eligible to access the action. And authorization process will check requesting role with eligible parameter roles, and if the condition will fulfill then the process will allow the user to access the action; otherwise, it will not allow the user to access or enter in action logic.
It's difficult to manage Authorization inside action's services while creating an Asp.Net Core web API. It's possible that an unauthorized person might gain access to the logic of the process if the logical criteria don't meet. As a result, if a user is prohibited from a specific process, that user will be unable to enter the action's logic. On the other side, if actions have any loopholes for managing logic, this technique can also make logic safe against unauthorized user access.
European best, cheap and reliable ASP.NET hosting with instant activation. HostForLIFE.eu is #1 Recommended Windows and ASP.NET hosting in European Continent. With 99.99% Uptime Guaranteed of Relibility, Stability and Performace. HostForLIFE.eu security team is constantly monitoring the entire network for unusual behaviour. We deliver hosting solution including Shared hosting, Cloud hosting, Reseller hosting, Dedicated Servers, and IT as Service for companies of all size.
