European ASP.NET 4.5 Hosting BLOG

BLOG about ASP.NET 4, ASP.NET 4.5 Hosting and Its Technology - Dedicated to European Windows Hosting Customer

European ASP.NET Core Hosting - HostForLIFE :: SRP (Single Responsibility Principle) in.NET Core

clock October 26, 2023 10:09 by author Peter

As a one-year developer, you've probably heard of the SOLID principles, which are a collection of five principles that promote clean, maintainable, and scalable code. The Single Responsibility Principle (SRP) is the most important of these concepts to understand and master. In this post, we'll describe SRP in layman's terms and present a simple.NET Core example to demonstrate its importance.

What exactly is SRP?
The Single Responsibility Principle (SRP) is the first letter in SOLID, and it emphasizes the need of keeping your code simple and well-organized. In a nutshell, SRP asserts that a class should have only one reason to modify. In other words, a class should only have one task or goal.

Consider real-world examples to help you understand this subject. Consider a simple kitchen equipment such as a toaster. Its primary function is to toast bread; it does not brew coffee or conduct any other unrelated duties. Similarly, classes in software development should have a single purpose.

What is the significance of SRP?
Readability: Classes having a single purpose are simpler to grasp for you and other developers, boosting code readability and maintainability.
Reusability: When a class excels at one task, it is more likely to be reusable in other parts of your application without producing unexpected side effects.
Smaller, more concentrated classes are easier to test. Specific tests for a class's single task can be written, making it easier to find and fix errors.

A Simplified.NET Core Example
Let's look at a simple.NET Core example to explain SRP. User Class. In this example, a User class is in charge of managing user-specific data such as name, email address, and age. This class's sole responsibility is to handle user data.

public class User
{
    public string Name { get; set; }
    public string Email { get; set; }
    public int Age { get; set; }

    public User(string name, string email, int age)
    {
        Name = name;
        Email = email;
        Age = age;
    }
}

Classification of NotificationServices
Then we make a NotificationService class. This class is in charge of sending user notifications. It may send emails, SMS messages, or other types of communication. The key point is that it only has one responsibility: handling notifications.

public class NotificationService
{
    public void SendEmail(User user, string message)
    {
        // Code to send an email notification
        Console.WriteLine($"Email sent to {user.Name}: {message}");
    }

    public void SendSMS(User user, string message)
    {
        // Code to send an SMS notification
        Console.WriteLine($"SMS sent to {user.Name}: {message}");
    }
}

In this example, the User class deals with user data, while the NotificationService class manages sending notifications. This clear separation of responsibilities aligns with the Single Responsibility Principle.

Using the Classes

Here's how you can use these classes in your application.

public class Program
{
    public static void Main()
    {
        var user = new User("
Peter", "Peter@hfl.eu", 30);
        var notificationService = new NotificationService();

        // Sending a notification to the user
        notificationService.SendEmail(user, "Hello, Peter! Don't forget about our meeting.");
        notificationService.SendSMS(user, "Reminder: Meeting today at 3 PM.");
    }
}

This example shows how to use the SRP to keep your code orderly, maintainable, and extensible. These concepts will assist a novice developer (fresher) in building more robust and scalable programs. With SRP, you'll be well on your way to being a more capable and efficient developer. Remember that in your journey as a software developer, simplicity and adherence to core principles such as SRP are critical to generating high-quality software.

HostForLIFE ASP.NET Core Hosting

European best, cheap and reliable ASP.NET hosting with instant activation. HostForLIFE.eu is #1 Recommended Windows and ASP.NET hosting in European Continent. With 99.99% Uptime Guaranteed of Relibility, Stability and Performace. HostForLIFE.eu security team is constantly monitoring the entire network for unusual behaviour. We deliver hosting solution including Shared hosting, Cloud hosting, Reseller hosting, Dedicated Servers, and IT as Service for companies of all size.


European ASP.NET Core Hosting :: ASP.NET Core 7.0 Document Viewer Capabilities

clock August 21, 2023 07:54 by author Peter

This post will show you how to use Visual Studio Community 2022 to construct a Document Viewer in an Asp.Net Core 7.0 application.

What exactly is GroupDocs.Viewer?

GroupDocs.Viewer is a document viewing and rendering package created by GroupDocs, a business that specializes in document manipulation and conversion APIs for.NET and Java. GroupDocs.Viewer is intended to assist developers in incorporating document viewing capabilities into their applications, allowing users to read a variety of documents right within the application's interface without the need to download or open them with other software.

Let's get started with the document viewer.
In _Layout.html, import the bootstrap 5 cdn.

Install the Nuget Package GroupDocs.Viewer

Make a fresh ASP.NET CORE MVC project.
DocumentViewer.Application is the name of the project.
In the DocumentViewer.Application project, add a new controller.

public class DocViewerController : Controller
{
    private readonly IHostingEnvironment _hostingEnvironment;
    private string projectRootPath;
    private string outputPath;
    private string storagePath;
    List<string> lstFiles;

    public DocViewerController(IHostingEnvironment hostingEnvironment)
    {
        _hostingEnvironment = hostingEnvironment;
        projectRootPath = _hostingEnvironment.ContentRootPath;
        outputPath = Path.Combine(projectRootPath, "wwwroot/Content");
        storagePath = Path.Combine(projectRootPath, "storage");
        lstFiles = new List<string>();
    }

    public IActionResult Index()
    {
        var files = Directory.GetFiles(storagePath);
        foreach (var file in files)
        {
            lstFiles.Add(Path.GetFileName(file));
        }
        ViewBag.lstFiles = lstFiles;
        return View();
    }
    [HttpPost]
    public IActionResult OnPost(string FileName)
    {
        int pageCount = 0;
        string imageFilesFolder = Path.Combine(outputPath, Path.GetFileName(FileName).Replace(".", "_"));
        if (!Directory.Exists(imageFilesFolder))
        {
            Directory.CreateDirectory(imageFilesFolder);
        }
        string imageFilesPath = Path.Combine(imageFilesFolder, "page-{0}.png");
        using (Viewer viewer = new Viewer(Path.Combine(storagePath, FileName)))
        {
            //Get document info
            ViewInfo info = viewer.GetViewInfo(ViewInfoOptions.ForPngView(false));
            pageCount = info.Pages.Count;
            //Set options and render document
            PngViewOptions options = new PngViewOptions(imageFilesPath);
            viewer.View(options);
        }
        return new JsonResult(pageCount);
    }
}

The method marked with the [HttpPost] tag, which indicates that it responds to HTTP POST requests, lies at the heart of this code. The method accepts a FileName parameter, which is the name of the uploaded file. The method returns an IActionResult, which allows for the return of many forms of replies, such as JSON, views, or redirects.

The code starts by creating a folder in which to save the created PNG images. The name of the folder is determined by the FileName option, with any dots in the filename replaced by underscores. If the folder does not already exist, the code uses the Directory to create it.The method CreateDirectory.

By combining the storage location and the FileName parameter, the using block is utilized to generate a Viewer object. This Viewer object is responsible for interacting with the document file.

For saving images, a PngViewOptions object is created and specified using the imageFilesPath pattern. The created choices are then passed to the View method of the viewer. This phase transforms the pages of the document as PNG images and saves them to the chosen folder.

The pageCount variable, which reflects the total number of pages in the document, is returned in the JSON response. The client or caller can utilize this JSON response to obtain this information.

Create an Index.cshtml file now.
In index.cshtml, we use an Ajax call.

@{
}


<script src="http://code.jquery.com/jquery-1.8.2.js"></script>
<script>
    function ViewDocument(file) {
        $("#loader").fadeIn();
        var data = { FileName: file };
        $.ajax({
            type: "POST",
            url: '/DocViewer/OnPost',
            data: data,
            dataType: "text"
        }).done(function (data) {
            var folderName = file.replace(".", "_");
            $("#content").empty();
            for (var i = 1; i <= data; i++) {
                $("#content").append("<img class='img-fluid' src='Content/" + folderName + "/page-" + i + ".png'/>");

            }
            $("#loader").fadeOut();
        })
    }
</script>
<script type="text/javascript">
    $(window).load(function () {
        $("#loader").fadeOut(1000);
    });
</script>
<div class="container">
    <div class="row">
        <div class="col-md-3">
            <div class="sidenav bg-light p-3">
                <div id="loader"></div>
                <h2 class="ps-3">Files</h2>
                @if (ViewBag.lstFiles != null)
                {
                    @foreach (string file in ViewBag.lstFiles)
                    {
                        <a href="#" onclick="ViewDocument('@file')" class="d-block">@file</a>
                    }
                }
            </div>
        </div>
        <div class="col-md-9">
            <h2>Preview</h2>
            <div id="content" class="border p-3"></div>
        </div>
    </div>
</div>


Output:
Image preview

Document file preview


GroupDocs.Viewer is a software development tool that offers APIs and libraries for viewing and visualizing different sorts of documents and files within applications. It enables developers to incorporate document viewing features into their apps without requiring users to install the native applications that generated those documents. The application supports a variety of document formats, including PDF, Microsoft Office (Word, Excel, PowerPoint), pictures, AutoCAD files, and others.


European ASP.NET Core Hosting :: How to Build Simple and Organized APIs in.NET 7 Using Minimal APIs and MapGroup() ?

clock August 16, 2023 09:19 by author Peter

The current version of Microsoft's popular cross-platform programming framework is.NET 7. Minimal APIs, a new technique to construct lightweight, quick, and simple APIs with just a few lines of code, is one of the new features introduced in.NET 7. In this post, we'll look at how to use Minimal APIs in.NET 7, as well as how to add MapGroup() to a static class.

What exactly are Minimal APIs?

Minimal APIs are a new type of API introduced in.NET 7, allowing developers to construct APIs with minimal overhead and optimal efficiency. They are lightweight and simple to use, with an emphasis on simplicity and ease of development.How to create a Minimal API in .NET 7?

Creating a Minimal API in .NET 7 is simple. Here’s an example of how to create a Minimal API that returns “Hello World!” when you make a GET request to the root URL:
var builder = WebApplication.CreateBuilder(args);
var app = builder.Build();
app.MapGet("/", () => "Hello World!");
app.Run();

In this example, we’ve used the WebApplication class to create a new Minimal API. We've then used the MapGet() method to map a GET request to the root URL ("/") and return "Hello World!".
Adding MapGroup() to a static class

MapGroup() allows you to group similar endpoints and apply shared middleware or configuration to them. To add MapGroup() to a static class, follow these steps:

1. Create a static class for your endpoints
public static class MyEndpoints
{
    public static void MapGroup(this IEndpointRouteBuilder endpoints)
    {
        endpoints.MapGet("/", Get).WithName("Get").WithOpenApi();

        endpoints.MapGet("/api/customers", GetCustomers).WithName("Customers").WithOpenApi();

        // Add more endpoints here
    }

    private static IResult Get()
    {
        return Results.Ok("Hello World!");
    }

    private static IResult GetCustomers()
    {
        return Results.Ok("List of customers");
    }
}


2. Add a MapGroup() call your endpoint configuration in the Startup class, and configure OpenAPI and Swagger services.
var builder = WebApplication.CreateBuilder(args);

// Add services to the container.
// Learn more about configuring Swagger/OpenAPI at https://aka.ms/aspnetcore/swashbuckle
builder.Services.AddEndpointsApiExplorer();
builder.Services.AddSwaggerGen();

var app = builder.Build();

// Configure the HTTP request pipeline.
if (app.Environment.IsDevelopment())
{
    app.UseSwagger();
    app.UseSwaggerUI();
}

app.UseHttpsRedirection();
app.MapGroup();
app.Run();


In this example, we’ve added a call to MapGroup() and passed in an empty string as the group prefix and the MapGroup() method from our MyEndpoints static class.

Now, all the endpoints defined in MyEndpoints the class will be grouped under the specified prefix, which in this case, is an empty string. You can add a different prefix to group endpoints together and use the same prefix in your middleware or configuration for all endpoints in the group.

With MapGroup(), you can create modular and organized APIs with shared middleware and configuration for groups of endpoints.

Minimal APIs in.NET 7 make it simple to write lightweight, quick APIs with only a few lines of code. You can group comparable endpoints and apply shared middleware or configuration to them by adding MapGroup() to a static class. You can use these characteristics to construct simple and organized APIs that are straightforward to design and maintain.


European ASP.NET Core Hosting :: How to Download Files in Zip Format in .NET Core Web API?

clock July 25, 2023 07:06 by author Peter

In many web applications, there arises a need to download multiple files as a single zip archive. This scenario is common when dealing with document management systems, exporting data, or providing bulk downloads. In this article, we will explore how to enable users to download files in a zip format from a .NET Core Web API.


Step 1. Setting up the .NET Core Web API project
Open Visual Studio and create a new .NET Core Web API project.
Configure the project as per your requirements, including selecting a target framework and naming the project.

Step 2. Adding Required NuGet Packages

Right-click on the project in the Solution Explorer and select "Manage NuGet Packages."
Search for and install the "System.IO.Compression" and "System.IO.Compression.FileSystem" packages. These packages provide the necessary classes to work with ZIP files.

Step 3. Creating the File Download Endpoint
Create a new controller (or you can use an existing one also) that will handle the file download in zip format. In this example, we'll create a simple controller named FileController.

Add a new action method with an appropriate route to handle the file download.

Code Example
#nullable disable

using Microsoft.AspNetCore.Mvc;
using System.IO.Compression;

namespace ZipDownload.Controllers {
[ApiController]
[Route("api/files")]
public class FilesController: ControllerBase {
private readonly IWebHostEnvironment _hostEnvironment;

public FilesController(IWebHostEnvironment hostEnvironment) {
  _hostEnvironment = hostEnvironment;
}

[HttpGet]
[Route("download-zip")]
public IActionResult DownloadFiles() {
  try {
    var folderPath = Path.Combine(_hostEnvironment.ContentRootPath, "FilesToDownload");

    // Ensure the folder exists
    if (!Directory.Exists(folderPath))
      return NotFound("Folder not found.");

    // Get a list of files in the folder
    var files = Directory.GetFiles(folderPath);

    if (files.Length == 0)
      return NotFound("No files found to download.");

    // Create a temporary memory stream to hold the zip archive
    using(var memoryStream = new MemoryStream()) {
      // Create a new zip archive
      using(var zipArchive = new ZipArchive(memoryStream, ZipArchiveMode.Create, true)) {
        foreach(var file in files) {
          var fileInfo = new FileInfo(file);

          // Create a new entry in the zip archive for each file
          var entry = zipArchive.CreateEntry(fileInfo.Name);

          // Write the file contents into the entry
          using(var entryStream = entry.Open())
          using(var fileStream = new FileStream(file, FileMode.Open, FileAccess.Read)) {
            fileStream.CopyTo(entryStream);
          }
        }
      }

      memoryStream.Seek(0, SeekOrigin.Begin);

      // Return the zip file as a byte array
      return File(memoryStream.ToArray(), "application/zip", "files.zip");
    }
  } catch (Exception ex) {
    return StatusCode(500, $ "An error occurred: {ex.Message}");
  }
}
}
}

In the above code, the IWebHostEnvironment is injected into the constructor via dependency injection. It provides information about the web hosting environment, such as the content root path.

 Inside the DownloadFiles method, the first step is to construct the path to the folder containing the files to be downloaded. It combines the content root path obtained from _hostEnvironment.ContentRootPath with the folder name "FilesToDownload"

It then checks if the folder exists. If the folder does not exist, it returns a 404 Not Found response with a corresponding error message. Next, it retrieves a list of files present in the folder using Directory.GetFiles(folderPath). If there are no files in the folder, it returns a 404 Not Found response with an appropriate message.

A temporary MemoryStream is created to hold the zip archive that will be generated. Within the using statement, a new ZipArchive is created using the MemoryStream and the ZipArchiveMode.Create mode.

The code then iterates over each file in the folder and performs the following steps:

  • Retrieves file information using FileInfo.
  • Creates a new entry in the zip archive with the file name using the zip archive.CreateEntry(fileInfo.Name).
  • Opens the entry stream and the file stream and copies the file contents into the entry using fileStream.CopyTo(entryStream).
  • After all the files are added to the zip archive, the MemoryStream is rewound to the beginning using memoryStream.Seek(0, SeekOrigin.Begin).
  • Finally, the zip archive is returned as a downloadable response by using the File method of the base controller class. It takes the byte array representation of the zip archive (memoryStream.ToArray()), the MIME type of the zip file ("application/zip"), and the desired file name ("files.zip") as parameters.

In case any exception occurs during the process, it catches the exception, and a 500 Internal Server Error response is returned with the corresponding error message.

Step 4. Testing the File Download Endpoint

  • Run the Web API project and navigate to the download endpoint URL in a web browser or use a tool like Postman.
  • Upon accessing the endpoint, the browser or tool should prompt the user to save the ZIP file.
  • After downloading and extracting the ZIP file, the user will find all the requested files within the folder structure specified during creation.


In this article, we explored how to enable file downloads in ZIP format using a .NET Core Web API. By leveraging the System.IO.Compression namespace, we were able to compress multiple files into a single ZIP file and return it to the client. This approach offers a convenient way to bundle and deliver multiple files efficiently, improving the user experience when downloading content from a web application.


European ASP.NET Core Hosting - HostForLIFE :: Razor In ASP.NET Core

clock April 13, 2023 07:16 by author Peter

Razor expressions are used to generate HTML content in views dynamically. Razor is a syntax for combining HTML markup with C# code to produce dynamic web pages. Razor expressions are enclosed in the @ symbol, including C# code, HTML markup, and another Razor-specific syntax. Razor expressions can perform conditional logic, loop over collections, display data, and format content.

Examples of Razor expressions,
1. Display a value
<p>The value of x is @x</p>

This expression uses the @ symbol to output the value of the x variable.

Perform a conditional check,
// Controller
public IActionResult Index() {
    bool isAdmin = true;
    return View(isAdmin);
}
// View
@model bool

@if (Model)
{
    <h1>Welcome Admin</h1>
}
else
{
    <h1>Welcome Guest</h1>
}

If the Model variable is true, the view will display an <h1> element with the "Welcome Admin" text. Otherwise, it will display an <h1> element with the "Welcome Guest" text. The value is True to show Welcome Admin in H1 Font.

2. List Data Bind in Table
// Model Class
public class ProductM {
    public int Id {
        get;
        set;
    }
    public string Name {
        get;
        set;
    }
    public string Description {
        get;
        set;
    }
    public decimal Price {
        get;
        set;
    }
}
// Controller
public ActionResult Product() {
    List < ProductM > products = new List < ProductM > {
        new ProductM {
            Id = 1, Name = "Laptop", Description = "Hp 5262 I5 ", Price = 55000
        },
        new ProductM {
            Id = 2, Name = "Laptop", Description = "Dell 52 I5 ", Price = 58000
        },
        new ProductM {
            Id = 3, Name = "Laptop", Description = "Lenovo 3", Price = 45000
        },
        new ProductM {
            Id = 4, Name = "Mobile", Description = "Nokia ", Price = 5000
        },
        new ProductM {
            Id = 5, Name = "Mobile", Description = "RealMe", Price = 58000
        },
        new ProductM {
            Id = 6, Name = "Mobile", Description = "MI", Price = 45000
        }
    };
    return View(products);
}
// View page


@using CSharpCornerTest.Models
@model List<ProductM>
@{
        ViewBag.Title = "Product";
}

<h2>Product</h2>

<table class="table table-striped">
    <thead>
        <tr>
            <th>ID</th>
            <th>Name</th>
            <th>Description</th>
            <th>Price</th>
        </tr>
    </thead>
    <tbody>
        @foreach (var product in Model)
        {
            <tr>
                <td>@product.Id</td>
                <td>@product.Name</td>
                <td>@product.Description</td>
                <td>@product.Price.ToString("C")</td>
            </tr>
        }
    </tbody>
</table>

3 . Perform a Switch Case
// View Page
@using CSharpCornerTest.Models
@model StatusM
@{
    ViewBag.Title = "StatusCode";
}

<style>
    span.badge.badge-primary {
        font-size: 48px;
        margin: -73px 0 0 139px;
    }
</style>

@switch (Model.Status)
{
    case "Open":
        <h1>Status :  </h1>
        <span class="badge badge-primary">Open</span>
        break;
    case "Closed":
        <span class="badge badge-secondary">Closed</span>
        break;
    default:
        <span class="badge badge-danger">Invalid</span>
        break;
}
// Class
public class StatusM {
    public string Status {
        get;
        set;
    }
}
// Controller
public ActionResult StatusCode() {
    var model = new StatusM {
        Status = "Open"
    };
    return View(model);
}


HostForLIFE ASP.NET Core Hosting

European best, cheap and reliable ASP.NET hosting with instant activation. HostForLIFE.eu is #1 Recommended Windows and ASP.NET hosting in European Continent. With 99.99% Uptime Guaranteed of Relibility, Stability and Performace. HostForLIFE.eu security team is constantly monitoring the entire network for unusual behaviour. We deliver hosting solution including Shared hosting, Cloud hosting, Reseller hosting, Dedicated Servers, and IT as Service for companies of all size.


European ASP.NET Core Hosting - HostForLIFE :: SOLID With .Net Core

clock March 28, 2023 07:25 by author Peter

This article will explain the SOLID principles, which one of those acronyms means alongside a practical example of an architectural problem that we could use in order to fix the problem.


What are the SOLID principles?
A SOLID principle is a group of 5 different design patterns whose main focus is to create loosely coupled architectures with a high level of maintainability. The name SOLID comes from the acronym of its five principles,
    S - Single Responsability Principle;
    O - Open-Closed Principle;
    L - Liskov Substitution Principle;
    I - Interface Segregation Principle;
    D - Dependency Inversion Principle.

If in your project you have the common problem to solve a bug and create two different bugs then you must start to think about using the SOLID principles in order to have a cleaner and more organized code, which does not break other features when you are working in a specific feature.

S - SRP - Single Responsibility Principle
"A class should have one, and only one, a reason to change."  (Robert C. Martin)

Avoiding Jack of all Trades' classes, the Single Responsibility Principle says that your class should have a single responsibility. This means that you should avoid, at all costs, having classes with multiple functionalities.

Imagine doing maintenance in a class with multiples functionalities, the risk of fixing one functionality but breaking other functionalities as a side-effect is extremely high. To overcome those kinds of situations you should apply the Single Responsibility Principle.

One great example of the Single Responsibility Principle being applied is the 3-tier projects architectures, where each tier is responsible only for their tasks. Ie.: the business layer is responsible to validate business logics where the repository layer is responsible to manipulate the database.


O - OCP - Open/Closed Principle
"A class is closed, since it may be compiled, stored in a library, baselined, and used by client classes. But it is also open, since any new class may use it as parent, adding new features. When a descendant class is defined, there is no need to change the original or to disturb its clients." (Bertrand Meyer)

The topic here is also to avoid Jack of All Trades' classes but in a different manner. The open-closed says that instead of modifying your base classes to add more features you should create a new class with those features, and this class will be inheriting the base class.

Imagine having a class that based on the input could go through one workflow or another workflow completely different, you will probably manage that with conditional statements.

Now, imagine when you need to do maintenance in one of those workflows. What is the risk of breaking, by mistake, the other ones?

The Open-Closed Principle says that you must have a base class that should not be modified to add new functionalities. Instead, you should have a new class inheriting the base class with those new functionalities. In this case, when you need to do maintenance in a specific workflow you are certain that will have no side effects in the others workflows.

L - LSP - Liskov Substitution Principle
"Subtypes must be substitutable for their base types." (Barbara Liskov)

The main point from the Liskov Substitution Principle is to create a base class in order to be inherited from its subtypes.

The Liskov Substitution Principle states that if we change our class for its base class we should not have different behaviour. Instead, if we change our subclasses by our base class without breaking the application because our base classes must behave in the same way as our subclasses. In this case, if we need to replace our subclasses for another subclass we would not need to refactor anything because it would be a simple substitution and everything would still be working the same.

I - ISP - Interface Segregation Principle
"No client should be forced to depend on methods it does not use." (Robert C. Martin)

This principle is not the best friend of laziness, it is the worst friend of those projects when you place all your needed contracts in a single place, with this we are not going to be able to reuse those interfaces or, even worse, we will not be using every method in the contract. Instead of creating an interface with many contracts on it, you should create as many interfaces as possible by grouping common behaviours.

The Interface Segregation Principle says that we should segregate interfaces in order to do not depend on interfaces with a contract that will not be implemented. We should have smaller interfaces and depend on more than one interface if needed.

D - DIP - Dependency Inversion Principle
"High-level modules should not depend upon low-level modules. Both should depend upon abstractions" (Robert C. Martin)

Here we have the best friend of loosely coupled applications and unit testing. If you have ever needed to replace one dependency and to do this you had to refactor every method that this dependency was being called then you should use the Dependency Inversion Principle.

The Dependency Inversion Principle says that our classes should not depend on low-level modules because this created a strong coupled application, making it very difficult to unit test and substitute dependencies. Instead, our classes should receive in their constructor the abstraction of their low-level dependencies, with this we may change our classes that implement the contract without breaking or needing to refactor the whole application. Also, we could easily mock our dependencies in order to create unit tests.

SOLID principles Practical Usage One-by-One
SRP - The Problem - Class that sum two numbers and log it
Here we have a problem that we can use the Single Responsability Principle to fix it. A class with two functionalities, the first is to sum two numbers and the second is to log this operation
class Problem
{
    public int Sum(int numberOne, int numberTwo)
    {
        int result = numberOne + numberTwo;
        LogCalculations("Sum Operation. Number one: " + numberOne + ", Number two: " + numberTwo + ". Result: " + result);
        return result;
    }

    private void LogCalculations(string message)
    {
        string path = Environment.GetFolderPath(Environment.SpecialFolder.Desktop) + @"\log.txt";
        using (StreamWriter sw = File.CreateText(path))
        {
            sw.WriteLine(message);
        }
    }
}


Applying the Single Responsibility Principle we would have two different classes:
class Solution
{
    public int Sum(int numberOne, int numberTwo)
    {
        int result = numberOne + numberTwo;
        Logging.Log("Sum Operation. Number one: " + numberOne + ", Number two: " + numberTwo + ". Result: " + result);
        return result;
    }
}
public static class Logging
{
    public static void Log(string message)
    {
        string path = Environment.GetFolderPath(Environment.SpecialFolder.Desktop) + @"\log.txt";
        using (StreamWriter sw = File.CreateText(path))
        {
            sw.WriteLine(message);
        }
    }
}


OCP - The Problem 1 - Class to do math calculations
In this class, we receive as input one enumeration with the operation type and return the result from this operation. If we need to add or modify one operation, we would need to modify the class.
public class MathCalculate
{
    public double Calculate(double numberA, double numberB, CalculationType calculationType)
    {
        double result = 0;
        switch (calculationType)
        {
            case CalculationType.addition:
                result = numberA + numberB;
                break;
            case CalculationType.multiplication:
                result = numberA * numberB;
                break;
            case CalculationType.subtraction:
                result = numberA - numberB;
                break;
            default:
                break;
        }
        return result;
    }
}

public enum CalculationType
{
    addition,
    multiplication,
    subtraction
}


Applying the Open-Closed Principle we would have a base class "Calculation" and each operation would be a new class, inheriting from this base class. If we need to add or modify a new operation, then we would need to work only in the class of this operation
public abstract class BaseCalculation
{
    public abstract double Calculate(double numberA, double numberB);
}

public class AdditionCalculation : BaseCalculation
{
    public override double Calculate(double numberA, double numberB)
    {
        return numberA + numberB;
    }
}
public class MultiplicationCalculation : BaseCalculation
{
    public override double Calculate(double numberA, double numberB)
    {
        return numberA * numberB;
    }
}

public class SubtractionCalculation : BaseCalculation
{
    public override double Calculate(double numberA, double numberB)
    {
        return numberA - numberB;
    }
}

public class DivisionCalculation : BaseCalculation
{
    public override double Calculate(double numberA, double numberB)
    {
        return numberA / numberB;
    }
}


OCP - The Problem 2 - Email sender with validations
If we need to add or modify the validations, we would need to modify the email sender class, risking to break the email sender functionality.
public class MailSender
{
    public void SendMail(string subject, string body, string recipient)
    {
        SmtpClient smtpClient = new SmtpClient("smtp.gmail.com")
        {
            Port = 587,
            Credentials = new NetworkCredential("email", "password"),
            EnableSsl = true,
        };

        //validate recipient's domain
        if (!recipient.ToString().EndsWith("@thiago.com"))
        {
            Console.WriteLine("Mail destinatary not in the domain");
            return;
        }

        //validate body
        if (string.IsNullOrEmpty(body))
        {
            Console.WriteLine("Mail body is empty.");
            return;
        }

        smtpClient.SendAsync("[email protected]", recipient, subject, body, null);
    }
}


Applying the open-closed principle to solve this problem we would have this email sender class receiving a list of validations. When we need to add or modify one of those validations would not be necessary to update the mail sender class:
public class MailClass
{
    public string Subject { get; set; }
    public string Body { get; set; }
    public string Recipient { get; set; }
}

public interface IValidation<T>
{
    bool Validate(T mail);
}


public class DomainValidation : IValidation<MailClass>
{
    public bool Validate(MailClass mail)
    {
        if (mail.Recipient.ToString().EndsWith("@thiago.com"))
            return false;

        return true;
    }
}
public class BodyValidation : IValidation<MailClass>
{
    public bool Validate(MailClass mail)
    {
        if (string.IsNullOrEmpty(mail.Body))
            return false;

        return true;
    }
}

public class Main
{
    public void SendMail(MailClass mailClass, List<IValidation<MailClass>> validations)
    {
        List<bool> validationsResult = new List<bool>();
        validations.ForEach(x => validationsResult.Add(x.Validate(mailClass)));

        if (!validationsResult.Any(x => !x))
        {
            SmtpClient smtpClient = new SmtpClient("smtp.gmail.com")
            {
                Port = 587,
                Credentials = new NetworkCredential("email", "password"),
                EnableSsl = true,
            };

            smtpClient.SendAsync("[email protected]", mailClass.Recipient, mailClass.Subject, mailClass.Body, null);
        };
    }
}


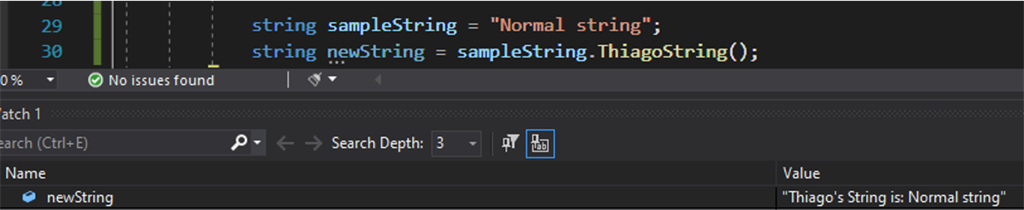
OCP - Extension Methods
We can also make usage of extension methods in order to extend objects without modifying their base behaviour. The following code extends the String object, adding this new method on it:
public static class SolutionThree
{
    public static string ThiagoString(this string normalString)
    {
        return "Thiago's String is: " + normalString;
    }
}

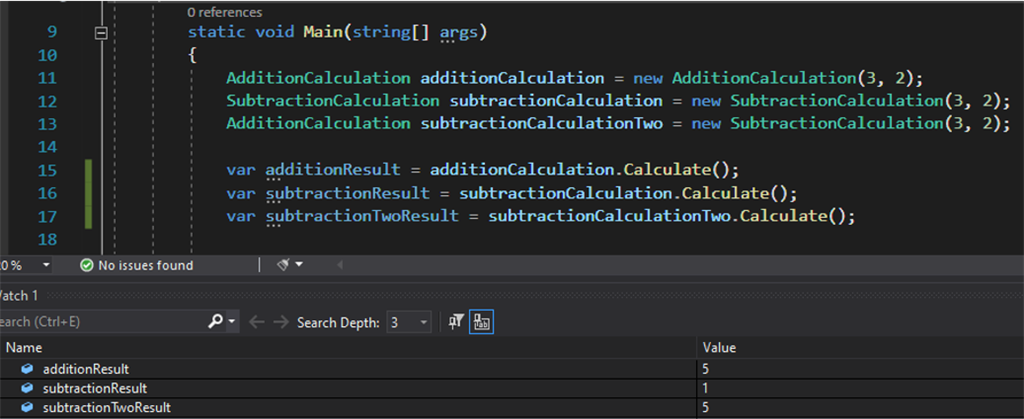
LSP - The Problem - Having a subtraction class inheriting from an addition class
In this example, we have an addition class working fine and then we extended it, wrongly, creating the subtraction class. If we replace the subtraction class with the base class (addition) our output will differ.
public class AdditionCalculation
{
    public AdditionCalculation(int numberA, int numberB)
    {
        this.NumberB = numberB;
        this.NumberA = numberA;
    }
    public int NumberA { get; set; }
    public int NumberB { get; set; }
    public virtual int Calculate()
    {
        return this.NumberA + NumberB;
    }
}
public class SubtractionCalculation : AdditionCalculation
{
    public SubtractionCalculation(int numberA, int numberB) : base(numberA, numberB)
    {
    }

    public new int Calculate()
    {
        return NumberA - NumberB;
    }
}

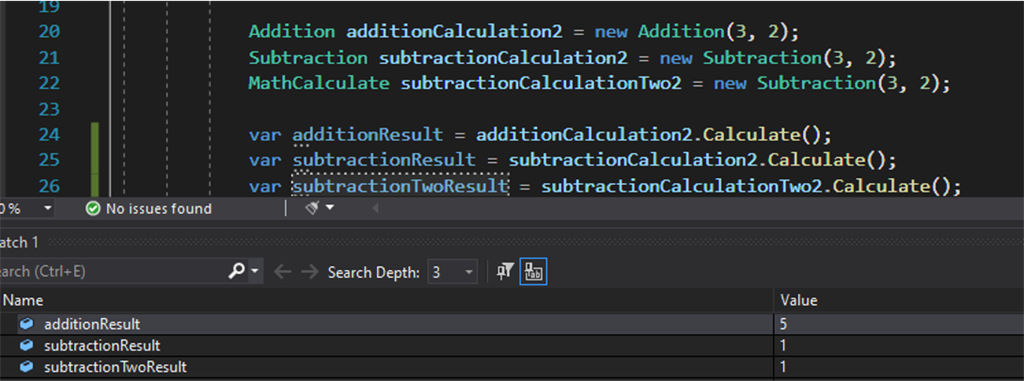
Applying the Liskov Substitution Principle to solve this problem we have a base class then we have the addition and subtraction classes inheriting from this base class. If we change our class with the base class our output is not going to be affected.
public abstract class MathCalculate
{
    public MathCalculate(int numberA, int numberB)
    {
        this.NumberB = numberB;
        this.NumberA = numberA;
    }
    public int NumberA { get; set; }
    public int NumberB { get; set; }

    public abstract int Calculate();
}
public class Addition : MathCalculate
{
    public Addition(int numberA, int numberB) : base(numberA, numberB)
    {
    }

    public override int Calculate()
    {
        return this.NumberA + NumberB;
    }
}
public class Subtraction : MathCalculate
{
    public Subtraction(int numberA, int numberB) : base(numberA, numberB)
    {
    }

    public override int Calculate()
    {
        return NumberA - NumberB;
    }
}

ISP - The Problem - A single interface for many type of classes
In this example, we have a single interface called IAnimal that is used for both Human and Whale classes. The problem is that not the whole contract fit both items because, as we all know, whales do not walk.
public interface IAnimal
{
    void Walk();
    void Breath();
    void Eat();
    void Argument();
}

public class Human : IAnimal
{
    public void Argument()
    {
        // Argumentation
    }

    public void Breath()
    {
        // Breathing
    }

    public void Eat()
    {
        // Eating
    }

    public void Walk()
    {
        // Walk
    }
}
public class Whale : IAnimal
{
    public void Argument()
    {
        // Argumentation
    }

    public void Breath()
    {
        // Breathing
    }

    public void Eat()
    {
        // Eating
    }

    public void Walk()
    {
        throw new NotImplementedException();
    }
}

Applying the Interface Segregation Principle we break the single interface in smaller interfaces with common methods and then we only use the interfaces that we need in our classes.
public interface IFeed {
    void Eat();
}

public interface IArgument
{
    void Argument();
}

public interface IGroundMoviment
{
    void Walk();
}
public interface IAirMoviment
{
    void Fly();
}
public interface IWaterMoviment
{
    void Swimm();
}

public class Human : IGroundMoviment, IArgument, IFeed
{
    public void Argument()
    {
        // Argument
    }

    public void Eat()
    {
        // Eat
    }

    public void Walk()
    {
        // Walk
    }
}
public class Whale : IWaterMoviment, IFeed
{
    public void Eat()
    {
        // Eat
    }

    public void Swimm()
    {
        // Swimm
    }
}


DIP - The Problem - Strong Coupled Application
In this example, we need to instantiate our dependency inside our method, creating a strong coupled application. If we want to replace this dependency we would need a lot of work, needing to change those dependencies at every method that is being used. Also, it is much more difficult to unit test this layer because it is much harder to mock this dependency.
public class BusinessLayer
{
    public void AddItem(int itemId)
    {
        RepositoryLayer repositoryLayer = new RepositoryLayer();
        if (!string.IsNullOrEmpty(repositoryLayer.GetItem(itemId)))
            repositoryLayer.Update();
        else
            repositoryLayer.Create();
    }
}
public class RepositoryLayer
{
    public void Create()
    {
        //save data into the Database
    }
    public void Delete()
    {
        //delete data from the Database
    }
    public void Update()
    {
        //update data in the Database
    }
    public string GetItem(int itemId)
    {
        //get item from the Database
        return "item";
    }
}

Applying the Dependency Inversion Principle, we receive the interface of our dependency in the class constructor. If we need to change the class that implements this dependency contract it would not be necessary to refactor any method where we use this dependency.
public class BusinessLayer
{
    private readonly IRepositoryLayer repositoryLayer;

    public BusinessLayer(IRepositoryLayer repositoryLayer)
    {
        this.repositoryLayer = repositoryLayer;
    }
    public void AddItem(int itemId)
    {
        if (!string.IsNullOrEmpty(repositoryLayer.GetItem(itemId)))
            repositoryLayer.Update();
        else
            repositoryLayer.Create();
    }
}
public interface IRepositoryLayer
{
    void Create();

    void Delete();

    void Update();

    string GetItem(int itemId);
}

Congratulations! You have successfully applied the SOLID principles using .Net Core.

HostForLIFE ASP.NET Core Hosting

European best, cheap and reliable ASP.NET hosting with instant activation. HostForLIFE.eu is #1 Recommended Windows and ASP.NET hosting in European Continent. With 99.99% Uptime Guaranteed of Relibility, Stability and Performace. HostForLIFE.eu security team is constantly monitoring the entire network for unusual behaviour. We deliver hosting solution including Shared hosting, Cloud hosting, Reseller hosting, Dedicated Servers, and IT as Service for companies of all size.


European ASP.NET Core Hosting - HostForLIFE :: Getting Specific YouTube Video using C# .NET and YouTube API

clock February 13, 2023 08:00 by author Peter

In this article, we will learn how to use the YouTube API to retrieve information about a specific video on YouTube, given its video ID. The process involves using Videos.List() method of the YouTubeService class to retrieve the information and specifying the video ID as a parameter.

In a previously published article [YouTube API Integration With C# .NET], we learned how to search for and retrieve a list of videos on YouTube using the YouTube API. The process involves installing the YouTube API client library, obtaining an API key, importing the necessary namespaces and libraries, initializing the YouTube service, and using the Search.List() method of the YouTubeService class to specify the search parameters.

Here is a step-by-step guide on how to use the Videos.List() method to retrieve information about a specific video using the YouTube API in C#:

Step 1. Prerequisites
To Install the YouTube API client library, obtaining an API key, importing the necessary namespaces and libraries, initializing the YouTube service, please see my previous article on [YouTube API Integration With C# .NET].

Step 2. Initialize the YouTubeService Class
The second step is to initialize the YouTubeService class. This class is responsible for making requests to the YouTube API and processing the responses. To initialize the class, you need to pass an instance of the BaseClientService. Initializer class to its constructor. This instance should contain your API key and the name of your application.
YouTubeService youtubeService = new YouTubeService(new BaseClientService.Initializer()
{
    ApiKey = "YOUR_API_KEY",
    ApplicationName = "YOUR_APPLICATION_NAME"
});


Step 3. Define the Video ID
Next, you need to define the video ID of the video you want to retrieve information about. You can find the video ID in the URL of the video. For example, if the URL of the video is https://www.youtube.com/watch?v=abcdefg", the video ID is "abcdefg".
string videoId = "VIDEO_ID";

Step 4. Prepare the Request
Use the Videos.List() method to retrieve information about a specific video. Pass the video ID to the method, and set the Part parameter to “snippet, contentDetails, statistics, status”.
VideosResource.ListRequest listRequest = youtubeService.Videos.List("snippet,contentDetails,statistics,status");
listRequest.Id = videoId;


If you pass the parameter "snippet, contentDetails, statistics, status" to the Part parameter of the Videos.List() method, the following information about the video will be returned:
    Snippet
    This includes information about the video's title, description, channel information, tags, and the video's publication date.
     
    ContentDetails
    This includes information about the video's duration, aspect ratio, definition, and dimensions.
     
    Statistics
    This includes information about the video's view count, like count, dislike count, comment count, and favourite count.
     
    Status
    This includes information about the video's upload status, privacy status, and license information.

Step 5. Execute the Request

Execute the request by calling the Execute() method of the listRequest object.
VideoListResponse response = listRequest.Execute();

Step 6. Access the Video Information
Finally, you can access the information about the video from the response object. You can use the response object to access information such as the video title, description, view count, and more.
foreach(var item in response.Items) {
    Console.WriteLine("Title: " + item.Snippet.Title);
    Console.WriteLine("Description: " + item.Snippet.Description);
    Console.WriteLine("View Count: " + item.Statistics.ViewCount);
}

Below is the complete code for getting a specific YouTube video:
using Google.Apis.YouTube.v3;
using Google.Apis.YouTube.v3.Data;
using Google.Apis.Services;
using System;
namespace YouTubeAPIDemo {
    class Program {
        static void Main(string[] args) {
            // Initialize the YouTubeService class
            YouTubeService youtubeService = new YouTubeService(new BaseClientService.Initializer() {
                ApiKey = "YOUR_API_KEY",
                    ApplicationName = "YOUR_APPLICATION_NAME"
            });
            // Define the video ID
            string videoId = "VIDEO_ID";
            // Prepare the request
            VideosResource.ListRequest listRequest = youtubeService.Videos.List("snippet,contentDetails,statistics,status");
            listRequest.Id = videoId;
            try {
                // Execute the request
                VideoListResponse response = listRequest.Execute();
                // Access the video information
                foreach(var item in response.Items) {
                    Console.WriteLine("Title: " + item.Snippet.Title);
                    Console.WriteLine("Description: " + item.Snippet.Description);
                    Console.WriteLine("View Count: " + item.Statistics.ViewCount);
                }
            } catch (Exception e) {
                // Log the error
                Console.WriteLine("An error occurred: " + e.Message);
            }
            Console.ReadLine();
        }
    }
}

Note
You should replace the placeholders "YOUR_API_KEY" and "YOUR_APPLICATION_NAME" with your actual API key and application name, and replace "VIDEO_ID" with the actual video ID of the video, you want to retrieve information about. So here we have seen a very basic example of how to get video details by Video ID.

In conclusion, YouTube API's Videos resource provides an efficient way for developers to access and retrieve information about videos.

You can explore more by clicking here to YouTube API documentation for the Video's resource. The Videos resource provides methods for retrieving information about videos on YouTube, including the video's metadata and status, as well as information about the channel that uploaded the video. The resource provides methods for retrieving specific videos by ID, as well as methods for retrieving a list of videos that match specific criteria. The documentation provides detailed information about the available parameters for each method, as well as information about the format of the returned data.

I hope you will find this article helpful. If you have any suggestions, then please feel free to ask in the comment section.

Thank you.

HostForLIFE.eu ASP.NET Core Hosting

European best, cheap and reliable ASP.NET hosting with instant activation. HostForLIFE.eu is #1 Recommended Windows and ASP.NET hosting in European Continent. With 99.99% Uptime Guaranteed of Relibility, Stability and Performace. HostForLIFE.eu security team is constantly monitoring the entire network for unusual behaviour. We deliver hosting solution including Shared hosting, Cloud hosting, Reseller hosting, Dedicated Servers, and IT as Service for companies of all size.


About HostForLIFE

HostForLIFE is European Windows Hosting Provider which focuses on Windows Platform only. We deliver on-demand hosting solutions including Shared hosting, Reseller Hosting, Cloud Hosting, Dedicated Servers, and IT as a Service for companies of all sizes.

We have offered the latest Windows 2019 Hosting, ASP.NET 5 Hosting, ASP.NET MVC 6 Hosting and SQL 2019 Hosting.


Month List

Tag cloud

Sign in