European ASP.NET 4.5 Hosting BLOG

BLOG about ASP.NET 4, ASP.NET 4.5 Hosting and Its Technology - Dedicated to European Windows Hosting Customer

European ASP.NET Core Hosting :: Upload/Download Bot Framework Composer Conversation/Chat

clock August 26, 2022 07:27 by author Peter

If you are working on Bot Framework Composer then challenging works you will find is about storing and retrieving conversation history.

Using Bot framework SDK, it is easy but complexity is there using composer.

While I was implementing, trust me I found very few articles and content to store/retrieve conversation.

Here I will mention all the points that can help you to preserve and download conversation history.

Pre-requisite

    Azure Portal access or Azurite

Step 1
Create a storage account in portal and create container

Step 2
Now, Follow some changes that are mentioned below,
<PackageReference Include="Microsoft.Bot.Builder.Azure.Blobs" Version="4.16.1" />

Add package to your project file,
public class Startup {
    private readonly BlobsTranscriptStore _blobTranscripts;
    public Startup(IConfiguration configuration) {
        Configuration = configuration;
        _blobTranscripts = new BlobsTranscriptStore(Configuration.GetValue < string > ("StorageConnectionString"), Configuration.GetValue < string > ("ContainerName"));
    }
    public void ConfigureServices(IServiceCollection services) {
        services.AddSingleton < ITranscriptStore > (_blobTranscripts);
        // Create the TranscriptLoggerMiddleware to log all activities to the TranscriptStore
        services.AddSingleton < IMiddleware, TranscriptLoggerMiddleware > (serviceProvider => {
            return new TranscriptLoggerMiddleware(_blobTranscripts);
        });
    }


Please note that add namespaces for above classes, I will leave up to you.

Now using above code, all your bot conversation starts storing on blob container.

Step 3
Now comes, the download of conversation part. Remember bot store JSON file for each of your message. so there will be lots of JSON get stored. To retrieve all transcript files of your conversation, you need channeled and conversationid.
var blobsTranscriptStore = new BlobsTranscriptStore("StorageConnectionString", "ContainerName");
string continutionToken = null;
List <IActivity> activitiesList = new List <IActivity> ();
do {
    var activities = await blobsTranscriptStore.GetTranscriptActivitiesAsync(ChannelId, ConversationId, continutionToken).ConfigureAwait(false);
    continutionToken = activities.ContinuationToken;
    activitiesList.AddRange(activities.Items);
} while (continutionToken != null);


Now you will find all conversation in activitiesList.

Step 4
Now you will find actual message in specific files by filtering using activity type.
foreach(Activity item in activities.Where(x => x.Type == ActivityTypes.Message).Cast<Activity> ()) {
    if (!string.IsNullOrEmpty(item.Text)) {
        Console.WriteLine($ "{item.Timestamp}   {item.From.Id} : {item.Text}");
    }
}


Now I will leave up to you whether you prepare text file or .csv file to store your conversation.

Definitely, you need to implement some of your logic here to get all messages. But I don't think it is too difficult.

Step 5

Now you can store this conversation file to blob storage again and allow it to download or you can directly allow user to download from here, the choice is your as per your requirement.

Hope the above article is helpful to you and you can customize this logic as my intention here is to provide you with core logic for this.

Keep learning, Keep Implementing.

HostForLIFE.eu ASP.NET Core Hosting

European best, cheap and reliable ASP.NET hosting with instant activation. HostForLIFE.eu is #1 Recommended Windows and ASP.NET hosting in European Continent. With 99.99% Uptime Guaranteed of Relibility, Stability and Performace. HostForLIFE.eu security team is constantly monitoring the entire network for unusual behaviour. We deliver hosting solution including Shared hosting, Cloud hosting, Reseller hosting, Dedicated Servers, and IT as Service for companies of all size.


European ASP.NET Core Hosting :: Creating QR Code In ASP.NET Core

clock August 24, 2022 09:37 by author Peter

Now a day's QR (Quick response) code becomes the internal part of our digital life. We will see a QR code on any E-tickets such as Stadium, air, bus, hotel booking. One of the best examples is India's UPI payment which is initiated by Indian PM Narendra Modi. You just have to scan the QR code to make the payment digital to the person’s bank account. This initiative is the very game changer since all the money comes to the bank and helped to stop the black money.

There are also many businesses generating the bar codes on E-Receipts to validate the authenticity of the receipt which can give the assurance that it's not been manipulated, which people did in the past simply editing and making false documents. There are many benefits using the QR code, the typical QR code will look like as follows.

Now in this article, we will learn how to generate a QR code using ASP.NET Core MVC. Let's learn step by step by creating an ASP.NET Core application.

Step 1: Create ASP.NET Core MVC Application
    Start then  All Programs and select "Microsoft Visual Studio 2019".
    Once the Visual Studio Opens, Then click on Continue Without Code.
    Then Go to Visual Studio Menu, click on File => New Project then choose ASP.NET Core Web App (Model-View-Controller) Project Template.
    Then define the project name, location of the project, Target Framework, then click on the create button.

The preceding steps will create the ASP.NET Core MVC application and solution explorer. It will look like as shown in the following image.

Delete the existing auto-generated code including controller and views for ease of understanding. We will add step by step while building the application.

Step 2: Add QRCoder Nuget Package Reference

The QRCoder is the open source pure C# library to generate the codes. The QRCoder supports the basic to custom and complex OR code generation, follow the following steps to add the Nuget package.

    Right click on the Solution Explorer, find Manage NuGet Package Manager and click on it
    After as shown into the image and type in search box "QRCoder"
    Select QRCoder as shown into the image
    Choose version of QRCoder library and click on install button

I hope you have followed the same steps and installed the QRCoder nuget package.

Step 3: Create the Model Class

Create the model class QRCodeModel by right clicking on the model folder to take the input text for QR code as shown in the following image.

Now open the QRCodeModel.cs class file and add the following code.

Step 4: Add the Controller
Create the Controller class by right clicking on the Controller folder as shown in the following image.

Now open the HomeController.cs file and add the following code.

using GeneratingQRCode.Models;
using Microsoft.AspNetCore.Mvc;
using QRCoder;
using System;
using System.Drawing;
using System.Drawing.Imaging;
using System.IO;

namespace GeneratingQRCode.Controllers
{
    public class HomeController : Controller
    {

        [HttpGet]
        public IActionResult CreateQRCode()
        {
            return View();
        }

        [HttpPost]
        public IActionResult CreateQRCode(QRCodeModel qRCode)
        {
            QRCodeGenerator QrGenerator = new QRCodeGenerator();
            QRCodeData QrCodeInfo = QrGenerator.CreateQrCode(qRCode.QRCodeText, QRCodeGenerator.ECCLevel.Q);
            QRCode QrCode = new QRCode(QrCodeInfo);
            Bitmap QrBitmap = QrCode.GetGraphic(60);
            byte[] BitmapArray = QrBitmap.BitmapToByteArray();
            string QrUri = string.Format("data:image/png;base64,{0}", Convert.ToBase64String(BitmapArray));
            ViewBag.QrCodeUri = QrUri;
            return View();
        }
    }

    //Extension method to convert Bitmap to Byte Array
    public static class BitmapExtension
    {
        public static byte[] BitmapToByteArray(this Bitmap bitmap)
        {
            using (MemoryStream ms = new MemoryStream())
            {
                bitmap.Save(ms, ImageFormat.Png);
                return ms.ToArray();
            }
        }
    }
}

Step 5: Create The View
Create the view with the name CreateQRCode using the model class QRCodeModel by right clicking on the view folder or right clicking in the controller class file as shown in the following image.

After clicking the Add button, it generates the view with the name CreateQRCode. Now open the CreateQRCode.cshtml file and replace the default generated code as follows:

CreateQRCode.cshtml

@model GeneratingQRCode.Models.QRCodeModel

@{
    ViewData["Title"] = "www.compilemode.com";
}
<hr />
<div class="row">
    <div class="col-md-4">
        <form asp-action="CreateQRCode">
            <div asp-validation-summary="ModelOnly" class="text-danger"></div>
            <div class="form-group">
                <label asp-for="QRCodeText" class="control-label"></label>
                <input asp-for="QRCodeText" class="form-control" />
                <span asp-validation-for="QRCodeText" class="text-danger"></span>
            </div>
            <div class="form-group">
                <input type="submit" value="Generate QR Code" class="btn btn-primary text-center" />
            </div>
            <div class="form-group">

                <img src="@ViewBag.QrCodeUri" class="img-thumbnail" />
            </div>
        </form>
    </div>
</div>
@section Scripts {
    @{await Html.RenderPartialAsync("_ValidationScriptsPartial");}
}

In the preceding code you see the image tag src Uri assigned with ViewBag, which we have set from the HomeController class.

Step 6: Configure the Routing
We have modified the auto-generated files, so we have to set the default routing so that when you run the application, then the default view can start in the browser. Now open the Startup.cs and set the default routing as per our controller and the created view as shown in the following image.

After adding all the required files and configuration, the Solution explorer of our created ASP.NET core application will look like as follows.

Step 7: Run the Application
Now press Keyboard F5 or Visual Studio run button to run the application. After running the application, the following screen will be shown in the browser. Enter the QR code text and click on the Generate QR code button, then it will generate the following code as in the following screenshot.

Demo


Step 8: Read the QR Code
Open your mobile phone QR code reader application and scan it, it will show the following text which we have entered during the QR code creation.

I hope, from all the above examples, you have learned how to generate a QR code using the ASP.NET Core. If you like it, share it with your friends, subscribe to the blog and YouTube channel for more such articles.


European ASP.NET Core Hosting :: Creating Custom Attributes In .NET

clock August 15, 2022 10:20 by author Peter

Today we will look at creating custom attributes in .NET. Attributes provide metadata for the elements in our code. These can then be read via reflection and used to handle different conditional logic. The process to create and use them is simple. We will work through an example.

The Process

We will create a custom attribute and apply it to two different classes. Please note that this can be applied to other artifacts as well. I am using Visual Studio 2022 community edition for this article.


We now add a new class for the attribute.


Once created, add the below code to it.
namespace CustomAttribute {
    [AttributeUsage(AttributeTargets.Class)]
    public class MyDotNetAttribute: Attribute {
        public string ? DataReport {
            get;
            set;
        }
    }
}

Using the Custom Attribute
We will now create two classes and apply the custom attribute to them.
namespace CustomAttribute {
    [MyDotNet(DataReport = "EmployeeData")]
    public class Employee {
        public int Id {
            get;
            set;
        }
        public string ? FirstName {
            get;
            set;
        }
        public string ? LastName {
            get;
            set;
        }
    }
}
namespace CustomAttribute {
    [MyDotNet(DataReport = "EmployeeSalaryData")]
    public class Salary {
        public int EmployeeId {
            get;
            set;
        }
        public double EmployeeSalary {
            get;
            set;
        }
    }
}


Finally, we will update the “Program.cs” file as below:
// Create instances for the Employee and Salary classes
using CustomAttribute;
var employee = new Employee {
    Id = 1, FirstName = "John", LastName = "Doe"
};
var salary = new Salary {
    EmployeeId = 1, EmployeeSalary = 5000.00
};
// Now suppose we want to extract all classes with Employee related Data using reflection to generate some report etc.
var value = GetAttributeValue(employee);
Console.WriteLine(value);
value = GetAttributeValue(salary);
Console.WriteLine(value);
string GetAttributeValue < T > (T className) {
    var value = "Blank";
    var myAttributes = (MyDotNetAttribute[]) className.GetType().GetCustomAttributes(typeof(MyDotNetAttribute), true);
    if (myAttributes.Length > 0) {
        var myAttribute = myAttributes[0];
        value = myAttribute.DataReport;
    }
    return value;
}


In the above code, we see that we are extracting the attribute value using reflection. We can than use these values to implement our application logic as required.

Running the code gives us the below result:

In this article, we looked at creating custom attributes in .NET using C#. These will help us to add metadata to our artifacts like classes etc. We can than read these custom attributes in our application code using reflection and apply different logic depending upon the value that is extracted.

HostForLIFE.eu ASP.NET Core Hosting

European best, cheap and reliable ASP.NET hosting with instant activation. HostForLIFE.eu is #1 Recommended Windows and ASP.NET hosting in European Continent. With 99.99% Uptime Guaranteed of Relibility, Stability and Performace. HostForLIFE.eu security team is constantly monitoring the entire network for unusual behaviour. We deliver hosting solution including Shared hosting, Cloud hosting, Reseller hosting, Dedicated Servers, and IT as Service for companies of all size.


European ASP.NET Core Hosting :: Advancements With Rate Limiting In .NET Core API

clock August 12, 2022 08:06 by author Peter

This is a series of two articles that will help you to learn about rate limiting and how can it be applied in a microservice or .net core API.

It will cover the following topics:
    What is Rate limiting? (Covered in the last article)
    Why do we use Rate limiting? (Covered in the last article)
    Real-world use-case of Rate limiting (Covered in the last article)
    Hands-on Lab – Create a WebAPI project and execute the API using swagger (Covered in the last article)
    Hands-on Lab – Implement Rate limiting using the AspNetCoreRateLimit Nuget Package (Covered in the last article)
    Difference between Rate Limiting and Throttling
    Hands-on Lab – Implement Rate limiting using a Custom Middleware

Difference between Rate Limiting and Throttling
    Rate-Limiting refers to the broader concept of restricting the request traffic to an API endpoint at any point in time.
    Throttling is a particular process of applying rate-limiting to an API endpoint.
    There are other ways an API endpoint can apply rate-limiting. One such way is the use of Request Queues. This process queues the incoming requests. It then serves them to the API endpoint at a rate that the API can process gracefully.
    However, in Throttling, the API endpoint presents the consumer with a status code to indicate the restriction to send any more requests within the specific time window. The client application can then retry after the time window passes

Hands-on Lab – Implement Rate limiting using a Custom Middleware

Steps to be followed:
    In the existing asp.net core API application created in the last article, let’s use an attribute to decorate the endpoint that we want to rate limit.
    Add an attribute class named LimitRequests. This attribute applies only to methods. The two properties in the attribute indicate the max requests allowed within a specific time window. The attribute approach gives us the flexibility to apply different rate-limiting configurations for different endpoints within the same API.

Let’s apply the LimitRequests decorator to our endpoint and configure it to allow a maximum of two requests for a window of 50 seconds. A third request within 50 seconds would not be allowed.

Now, implement a middleware using a distributed cache to store NumberOfRequestsCompletedSuccessfully and LastSuccessfulResponseTime. Using the values of the above parameter from the distributed cache and matching it with the attribute on API, return the valid response or HTTPResponse with HTTPStatusCode - 429.

Execute the application (Press F5) and execute the API from swagger for the first and second time. Look to the below screenshot:


Execute the API from swagger for the third time, and as you can see the below screenshot, the quota for API calls for that particular API has been exceeded.

This is how we implement rate limiting using Custom Middleware, along with the difference between throttling and rate limiting. In the series of two articles, we have covered both approaches to implementing rate limiting on .NET Core API. I've attached the source for your reference. I hope you see you again in the next article.

Happy learning!

HostForLIFE.eu ASP.NET Core Hosting

European best, cheap and reliable ASP.NET hosting with instant activation. HostForLIFE.eu is #1 Recommended Windows and ASP.NET hosting in European Continent. With 99.99% Uptime Guaranteed of Relibility, Stability and Performace. HostForLIFE.eu security team is constantly monitoring the entire network for unusual behaviour. We deliver hosting solution including Shared hosting, Cloud hosting, Reseller hosting, Dedicated Servers, and IT as Service for companies of all size.


European ASP.NET Core Hosting :: How To Upload Images In A Rich Text Editor?

clock August 8, 2022 07:25 by author Peter

In this article, I've used a web API for supporting databases and uploading images in a rich text editor.

What is a rich text editor?
The TinyMCE is a rich text editor that allows users to create user-formatted content within a user-friendly interface. The TinyMCE library is used for implementing a rich text editor in a project.

The TinyMCE rich text editor output is created in HTML. It includes tables, lists, images, text, and other elements, depending on your configuration. Users have complete control over the TinyMCE rich text editor, and we can extend its plugins, customizations, and functionality.
How to implement the rich text editor in a project

Step 1
To download the TinyMCE text editor from the TinyMCE official website.

Extract the TinyMCE folder and copy the TinyMCE folder under the js folder. Then, paste it into the js folder of the www root folder.


Step 2
Add the library into the layout file.
<script src="~/js/tinymce/tinymce.min.js" referrerpolicy="original"></script>

Step 3
Create a ViewEditor class from the ViewModels folder. In a class, we make properties.
namespace richtexteditorAPP.ViewModels
{
    public class ViewEditor
    {
        public Guid id { get; set; }
        public string title { get; set; }
        public string message { get; set; }
        public IFormFile editorimage { get; set; }
    }
}


C#

Step 4
Create a HttpHelper class from the logic folder. In this class, we create a PostData function to insert data into the database. In this function, we convert string data into JSON format and stored the response in the response message variable then return the result.
using Newtonsoft.Json;

namespace richtexteditorAPP.Logics
{
    public class HttpHelper
    {
        private readonly HttpClient _httpClient;
        public HttpHelper(HttpClient httpclient)
        {
            this._httpClient = httpclient;
        }
        public bool POSTData(object data, string url)
        {
            using (var content = new StringContent(JsonConvert.SerializeObject(data), System.Text.Encoding.UTF8, "application/json"))
            {
                HttpResponseMessage result = _httpClient.PostAsync(url, content).Result;
                if (result.IsSuccessStatusCode)
                    return true;
                string returnValue = result.Content.ReadAsStringAsync().Result;
                throw new Exception($"Failed to POST data: ({result.StatusCode}): {returnValue}");
            }
        }
    }
}


Step 5
Create a controller from the controller folder and in a controller, we call the Web API to upload an image. Here we create the HttpPost Add message method for calling the Web API Post method.

The TinyMceUpload function helps to post an image into the editor. The upload to the server method helps to store images in the database.
using Microsoft.AspNetCore.Mvc;
using richtexteditorAPP.Logics;
using richtexteditorAPP.Models;
using richtexteditorAPP.ViewModels;
using System.Text.Json;

namespace richtexteditorAPP.Controllers
{
    public class Editor : Controller
    {
        private readonly HttpClient httpClient;
        private readonly HttpHelper httphelper;
        public Microsoft.AspNetCore.Hosting.IHostingEnvironment hostingEnviroment { get; set; }
        public richtexteditorAPP.Models.Editor message { get; set; }
        public Editor(HttpClient _httpClient, HttpHelper _httphelper, Microsoft.AspNetCore.Hosting.IHostingEnvironment hostingEnviroment)
        {
            this.httpClient = _httpClient;
            this.httphelper = _httphelper;
            this.hostingEnviroment = hostingEnviroment;
        }

        public IActionResult AddMessage()
        {
            return View();
        }
        public IActionResult TinyMceUpload(IFormFile file)
        {
            var location = UploadImageToServer(file);
            return Json(new { location });

        }

        public string UploadImageToServer(IFormFile file)
        {
            var uniqueFileName = "";
            var fullFilePath = "";
            if (file != null)
            {
                var uploadfilepath = Path.Combine(hostingEnviroment.WebRootPath, "Images");
                uniqueFileName = Guid.NewGuid() + Path.GetExtension(file.FileName);
                fullFilePath = Path.Combine(uploadfilepath, uniqueFileName);
                file.CopyTo(new FileStream(fullFilePath, FileMode.Create));
            }
            return "/Images/" + uniqueFileName;
        }

        [HttpPost]
        public IActionResult AddMessage(ViewEditor p)
        {
            if (httphelper.POSTData(p, "https://localhost:7106/api/Editor"))
            {
                return RedirectToAction("Index");

            }
            return View();
        }
        public List<richtexteditorAPP.Models.Editor> Data { get; set; }
         public async Task<IActionResult> Index()
        {
            HttpResponseMessage responseMessage = httpClient.GetAsync("https://localhost:7106/api/Editor").Result;
            if (responseMessage.IsSuccessStatusCode)
            {
                var res = await responseMessage.Content.ReadAsStreamAsync();
                Data = await JsonSerializer.DeserializeAsync<List<richtexteditorAPP.Models.Editor>>(res);
            }
            return View(Data);
        }
    }
}


Step 6
Create a form with one input text and one text area, and add a script section at the end of the form.
<h2 style="margin-left:250px;">Add Message</h2>
<div class="container col-md-8">
<form enctype="multipart/form-data" method="post">
    <div class="mb-3">
    <label class="form-label">Title</label>
    <input type="text" name="title" id="title" class="form-control" >
   </div>
  <div class="mb-3">
    <label class="form-label">Message</label>
    <textarea name="message" id="message" class="form-control"></textarea>
  </div>
  <div class="btn-group" style="margin-top:20px;">
  <button type="submit" class="btn btn-primary">Post</button>
  </div>
</form>
</div>
@section Scripts{
    <script>
tinymce.init({
    selector: 'textarea#message',
    plugins: [
      'advlist', 'autolink', 'link', 'image', 'lists', 'charmap', 'preview', 'anchor', 'pagebreak',
      'searchreplace', 'wordcount', 'visualblocks', 'visualchars', 'code', 'fullscreen', 'insertdatetime',
      'media', 'table', 'emoticons', 'template', 'help'
    ],
    toolbar: 'undo redo | styles | bold italic | alignleft aligncenter alignright alignjustify | ' +
      'bullist numlist outdent indent | link image | print preview media fullscreen | ' +
      'forecolor backcolor emoticons | help',
    menu: {
      favs: { title: 'My Favorites', items: 'code visualaid | searchreplace | emoticons' }
    },
    menubar: 'favs file edit view insert format tools table help',
    content_css: 'css/content.css',
    images_upload_url: '/Editor/TinyMceUpload'
   });

</script>
}

In the script section, we call the TinyMCE text editor and also add plugins.


Output


The better advantage of a rich text editor is it allows to manipulate the text, images, list, tables, and others. It's easy to change the size of the image.

It's easy to set the alignment of items.

HostForLIFE.eu ASP.NET Core Hosting

European best, cheap and reliable ASP.NET hosting with instant activation. HostForLIFE.eu is #1 Recommended Windows and ASP.NET hosting in European Continent. With 99.99% Uptime Guaranteed of Relibility, Stability and Performace. HostForLIFE.eu security team is constantly monitoring the entire network for unusual behaviour. We deliver hosting solution including Shared hosting, Cloud hosting, Reseller hosting, Dedicated Servers, and IT as Service for companies of all size.


European ASP.NET Core Hosting :: Filtering In Datagridview In Vb.Net And Also In C#

clock August 3, 2022 10:04 by author Peter

In this article we will learn about how to filter data in datagridview. We can better understand this with an example.

Step 1
Create Windows Form with Textbox and DataGridView.

Step 2
In coding view, code as per the following code. Here, I give both code c# and vb.Net. You can choose as per your requirement(s).

Code as per Vb.Net
Imports System.Data.SqlClient

Public Class Form14
    Dim libconn As SqlConnection
    Dim daMain As SqlDataAdapter
    Dim dtMain As New DataSet
    Dim strQuery As String = ""
    Dim strConnectionString As String
    Dim otable As DataTable = New DataTable()

    Private Sub Form14_Load(sender As System.Object, e As System.EventArgs) Handles MyBase.Load
        load_data()
        DataGridView1.AllowUserToAddRows = False
        DataGridView1.AllowUserToDeleteRows = False
    End Sub

    Private Sub load_data()
        Connetion()
        daMain = New SqlDataAdapter("Select * From Employee", libconn)
        dtMain.Clear()
        daMain.Fill(dtMain)
        DataGridView1.DataSource = dtMain.Tables(0)
        libconn.Close()
        DataGridView1.ClearSelection()
        TextBox1.Text = ""
        otable = GetOriginalDataTable()
    End Sub

    Public Function Connetion()
        strConnectionString = "Data Source=UDAY-LAPTOP;Initial Catalog=sqldemo;Integrated Security=true"
        libconn = New SqlConnection
        libconn.ConnectionString = strConnectionString
        If libconn.State <> ConnectionState.Open Then
            Try
                libconn.Open()
            Catch conn_error As SqlException
                MsgBox(conn_error.Message)
                Connetion = False
            End Try
        End If
        Connetion = True
    End Function

    Private Function GetOriginalDataTable() As DataTable
        Dim dtable As DataTable = New DataTable()
        For Each col As DataGridViewColumn In DataGridView1.Columns
            dtable.Columns.Add(col.Name)
        Next
        For Each row As DataGridViewRow In DataGridView1.Rows

            Dim dRow As DataRow = dtable.NewRow()
            Dim flag As Integer = -1
            For Each cell As DataGridViewCell In row.Cells
                dRow(cell.ColumnIndex) = cell.Value
            Next
            dtable.Rows.Add(dRow)
        Next
        Return dtable
    End Function

    Private Function SearchGrid()
        Dim dtable As DataTable = New DataTable()
        If TextBox1.Text.Length > 0 And DataGridView1.RowCount = 0 Then
            DataGridView1.DataSource = otable
        End If
        If TextBox1.Text.Length = 0 Then
            DataGridView1.DataSource = Nothing
            DataGridView1.DataSource = otable
        Else
            For Each col As DataGridViewColumn In DataGridView1.Columns
                dtable.Columns.Add(col.Name)
            Next
            For Each row As DataGridViewRow In DataGridView1.Rows
                Dim dRow As DataRow = dtable.NewRow()
                Dim flag As Integer = -1
                For Each cell As DataGridViewCell In row.Cells
                    dRow(cell.ColumnIndex) = cell.Value
                    Dim str As String = cell.Value.ToString().ToLower()
                    Dim str1 As String = TextBox1.Text.ToLower()
                    If str.Contains(str1.ToString()) = True Then
                        flag = 1
                    End If
                Next
                If flag = 1 Then
                    dtable.Rows.Add(dRow)
                End If
            Next
            DataGridView1.DataSource = Nothing
            DataGridView1.DataSource = dtable
        End If
        SearchGrid = True
    End Function

    Private Function HighlightGrid()
        If TextBox1.Text.Length = 0 Then
            For n As Integer = 0 To (DataGridView1.Rows.Count) - 1
                For m As Integer = 0 To (DataGridView1.Rows(n).Cells.Count) - 1
                    DataGridView1.Rows(n).Cells(m).Style.BackColor = SystemColors.Control
                Next
            Next
        Else
            For n As Integer = 0 To (DataGridView1.Rows.Count) - 1
                For m As Integer = 0 To (DataGridView1.Rows(n).Cells.Count) - 1
                    Dim str As String = DataGridView1.Rows(n).Cells(m).Value.ToString().ToLower()
                    Dim str1 As String = TextBox1.Text.ToLower()
                    If str.Contains(str1.ToString()) = True Then
                        DataGridView1.Rows(n).Cells(m).Style.BackColor = Color.Yellow
                    Else
                        DataGridView1.Rows(n).Cells(m).Style.BackColor = SystemColors.Control
                    End If
                Next
            Next
        End If
        HighlightGrid = True
    End Function

    Private Sub TextBox1_KeyUp(sender As Object, e As System.Windows.Forms.KeyEventArgs) Handles TextBox1.KeyUp
        If e.KeyCode = Keys.Back Then
            DataGridView1.DataSource = otable
            SearchGrid()
            HighlightGrid()
            DataGridView1.ClearSelection()
        End If
    End Sub

    Private Sub TextBox1_TextChanged(sender As System.Object, e As System.EventArgs) Handles TextBox1.TextChanged
        SearchGrid()
        HighlightGrid()
        DataGridView1.ClearSelection()
    End Sub

End Class


ASP.NET (C#)
Code as per C#
using System.Data.SqlClient;

public class Form14
{
    private SqlConnection libconn;
    private SqlDataAdapter daMain;
    private DataSet dtMain = new DataSet();
    private string strQuery = "";
    private string strConnectionString;
    private DataTable otable = new DataTable();

    private void Form14_Load(System.Object sender, System.EventArgs e)
    {
        load_data();
        DataGridView1.AllowUserToAddRows = false;
        DataGridView1.AllowUserToDeleteRows = false;
    }

    private void load_data()
    {
        Connetion();
        daMain = new SqlDataAdapter("Select * From Employee", libconn);
        dtMain.Clear();
        daMain.Fill(dtMain);
        DataGridView1.DataSource = dtMain.Tables(0);
        libconn.Close();
        DataGridView1.ClearSelection();
        TextBox1.Text = "";
        otable = GetOriginalDataTable();
    }

    public void Connetion()
    {
        strConnectionString = "Data Source=UDAY-LAPTOP;Initial Catalog=sqldemo;Integrated Security=true";
        libconn = new SqlConnection();
        libconn.ConnectionString = strConnectionString;
        if (libconn.State != ConnectionState.Open)
        {
            try
            {
                libconn.Open();
            }
            catch (SqlException conn_error)
            {
                Interaction.MsgBox(conn_error.Message);
                Connetion = false;
            }
        }
        Connetion = true;
    }

    private DataTable GetOriginalDataTable()
    {
        DataTable dtable = new DataTable();
        foreach (DataGridViewColumn col in DataGridView1.Columns)
            dtable.Columns.Add(col.Name);
        foreach (DataGridViewRow row in DataGridView1.Rows)
        {
            DataRow dRow = dtable.NewRow();
            int flag = -1;
            foreach (DataGridViewCell cell in row.Cells)
                dRow(cell.ColumnIndex) = cell.Value;
            dtable.Rows.Add(dRow);
        }
        return dtable;
    }

    private void SearchGrid()
    {
        DataTable dtable = new DataTable();
        if (TextBox1.Text.Length > 0 & DataGridView1.RowCount == 0)
            DataGridView1.DataSource = otable;
        if (TextBox1.Text.Length == 0)
        {
            DataGridView1.DataSource = null;
            DataGridView1.DataSource = otable;
        }
        else
        {
            foreach (DataGridViewColumn col in DataGridView1.Columns)
                dtable.Columns.Add(col.Name);
            foreach (DataGridViewRow row in DataGridView1.Rows)
            {
                DataRow dRow = dtable.NewRow();
                int flag = -1;
                foreach (DataGridViewCell cell in row.Cells)
                {
                    dRow(cell.ColumnIndex) = cell.Value;
                    string str = cell.Value.ToString().ToLower();
                    string str1 = TextBox1.Text.ToLower();
                    if (str.Contains(str1.ToString()) == true)
                        flag = 1;
                }
                if (flag == 1)
                    dtable.Rows.Add(dRow);
            }
            DataGridView1.DataSource = null;
            DataGridView1.DataSource = dtable;
        }
        SearchGrid = true;
    }

    private void HighlightGrid()
    {
        if (TextBox1.Text.Length == 0)
        {
            for (int n = 0; n <= (DataGridView1.Rows.Count) - 1; n++)
            {
                for (int m = 0; m <= (DataGridView1.Rows(n).Cells.Count) - 1; m++)
                    DataGridView1.Rows(n).Cells(m).Style.BackColor = SystemColors.Control;
            }
        }
        else
            for (int n = 0; n <= (DataGridView1.Rows.Count) - 1; n++)
            {
                for (int m = 0; m <= (DataGridView1.Rows(n).Cells.Count) - 1; m++)
                {
                    string str = DataGridView1.Rows(n).Cells(m).Value.ToString().ToLower();
                    string str1 = TextBox1.Text.ToLower();
                    if (str.Contains(str1.ToString()) == true)
                        DataGridView1.Rows(n).Cells(m).Style.BackColor = Color.Yellow;
                    else
                        DataGridView1.Rows(n).Cells(m).Style.BackColor = SystemColors.Control;
                }
            }
        HighlightGrid = true;
    }

    private void TextBox1_KeyUp(object sender, System.Windows.Forms.KeyEventArgs e)
    {
        if (e.KeyCode == Keys.Back)
        {
            DataGridView1.DataSource = otable;
            SearchGrid();
            HighlightGrid();
            DataGridView1.ClearSelection();
        }
    }

    private void TextBox1_TextChanged(System.Object sender, System.EventArgs e)
    {
        SearchGrid();
        HighlightGrid();
        DataGridView1.ClearSelection();
    }
}


Output 1
When you run the application, by default all data will be loaded in datagridview as per the following:


Final Output
In Textbox, when I type IT, the following records will be filtered:

Final Output
In Textbox, when I type IT, the following records will be filtered:

HostForLIFE.eu ASP.NET Core Hosting

European best, cheap and reliable ASP.NET hosting with instant activation. HostForLIFE.eu is #1 Recommended Windows and ASP.NET hosting in European Continent. With 99.99% Uptime Guaranteed of Relibility, Stability and Performace. HostForLIFE.eu security team is constantly monitoring the entire network for unusual behaviour. We deliver hosting solution including Shared hosting, Cloud hosting, Reseller hosting, Dedicated Servers, and IT as Service for companies of all size.


European ASP.NET Core Hosting :: Creating Dynamic Checkbox Using C# In ASP.NET Web Forms

clock July 29, 2022 10:25 by author Peter

Creating dynamic elements means that user can generate checkbox on demand based on their input. In this short tutorial, we will learn how to create various functions to generate the checkbox.

We will mainly use 3 types of object: Checkbox list, text box, label, and button. All the related objects will be run at server.
First Scenario: User inputs number of checkbox that needs to be generated

In the ASP.NET web forms structure, we have two main parts: the front end part which house our HTML, CSS, and JS, and also the back end part which run our code in server. There are several web structures such as Single Page Application, MVP, etc. However, we first will use the traditional web forms (1 interface, 1 code behind) to keep our learning simple.

1. Accepting Input
To accept user input, we need a textbox object. Because the textbox will be load together with the page load, then we can directly write our object in the interface (.aspx) or using the drag and drop toolbox (to activate it you can use Ctrl+Alt+X)

Inside the asp:Content insert the textbox object. An object needs ID. We also tell our aspx that this textbox will be runat=”server”. Thus, we can gain control over it from our C# code. We also tell the aspx that our textbox has the AutoPostBack behavior which means that whenever the content is changed, the page will undergo a PostBack or “Reload”.

<p>Enter Number of Checkbox:<asp:TextBox ID="TextBox1" runat="server" AutoPostBack="true"></asp:TextBox><asp:Panel ID="PnlControl" runat="server">

ASP.NET (C#)

or

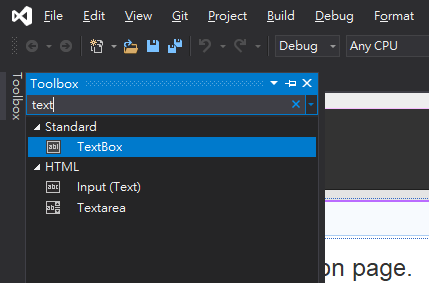
Searching the textbox object using toolbox (Ctrl+Alt+X)

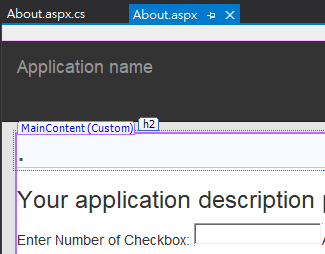
The interface design after drag and drops

We also need to put a Panel Control as a place to render our generated CheckBoxList.

2. Processing Input: (1) Page_Load and PostBack
After we set up the textbox, now user can input the number. As long as there are any changes to the textbox, our code will request a postback. And nothing happens!

In order to do something after the user input the number, we need to create a function that generates our checkboxlist every time the page is loaded.
As a rule of thumbs, Dynamically generated object needs to be regenerated every postback.
protected void Page_Load(object sender, EventArgs e) {
    if (Page.IsPostBack) {
        RecreateControls(TextBox1.Text);
    }
}

A void can be translated as “a function”, hence the code above is a function that runs every time the page is load due to user action such as postback request.

Inside this pageload function, we are going to check whether the page is postback or not by using the isPostBack method. Page is our object here. The isPostBack method is a boolean method that will return true or false value. If it is true, then we create the execute the function that will recreate our dynamic object, in this case our checkboxlist.

The reason why we need to check whether the page is postback or not is because we only want to generate the dynamic object (checkboxlist) only after the user changes any value in the input textbox. Therefore, when the user loads the page for the first time, our user only can see the default object that we have in the aspx interface (our HTML).

3. Processing Input: (2) Recreate dynamic objects

In order to create or recreate our dynamically generate checkbox, we will utilize checkboxlist as our object. Because we want to generate it dynamically, we cannot do the drag and drop method. Therefore inside the function that we already call in the page load, we need to manually instruct how to generate the checkbox inside our checkboxlist.
RecreateControls(TextBox1.Text);

This function will be able to accept a string input from our textbox by calling the .Text method.

Overview: Recreate checkbox list Object
The first step we need to do is to create and define a new object using CheckBoxList class. We give our new CheckBoxList variable name as genCBL and an ID of genCBL. Both things do not need necessarily to be the same. The variable names are used internally in the backend code, while the ID is the global identifier of our chechboxlist in the ASPX.
CheckBoxList genCBL = new CheckBoxList {ID = "genCBL"};

Same as textbox, every object needs to have its own properties and related behavior. In this case, we set the AutoPostBack behavior to be true.
genCBL.AutoPostBack = true;

Because Checkbox List is a collection of individual checkboxes, thus to produce the checkbox dynamically, we need to DataSource property. DataSource can accept list-type data. So we need to create a function that can supply a sorted list of keys and values.

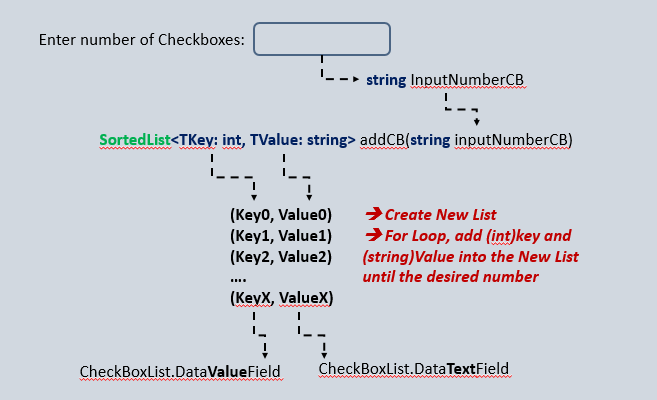
Flowchart of Generating the Data Source (list) for CheckBoxList

    Convert Numerical String to Int: Convert.ToInt32(int)
    Convert Int to String: .ToString()


We named the function above as addCB and return the value as SortedList<TKey: int, TValue: string>. Now, we instruct our CheckBoxList generator to take this value. The databind method forces our control to read the datasource (More about databinding).
genCBL.DataValueField = "Key";
genCBL.DataTextField = "Value";
genCBL.DataSource = addCB(inputNumCB);
//keep selected item
genCBL.DataBind();

After we attributed all the neccessary properties and behaviour, then we instruct the PanelControl to render it inside.
PnlControl.Controls.Add(genCBL);

4. Result: After the first PostBack

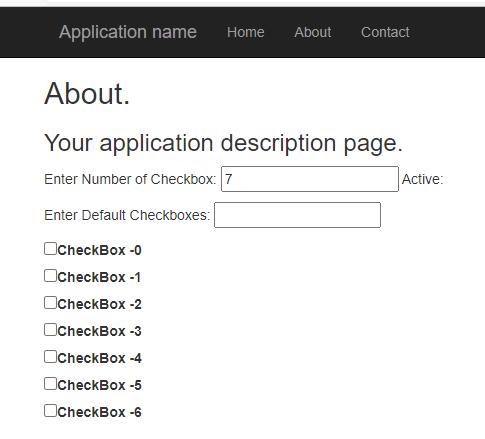
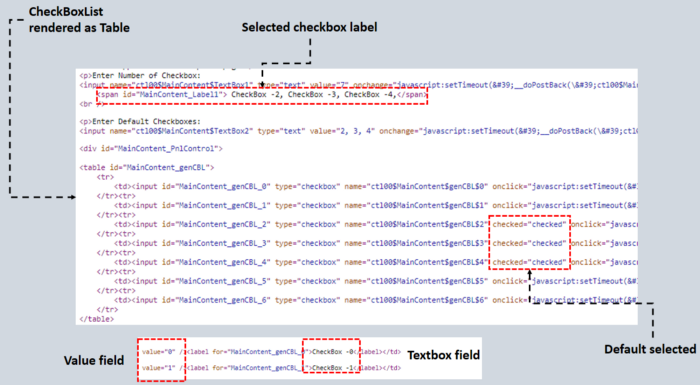
HTML output after running the code

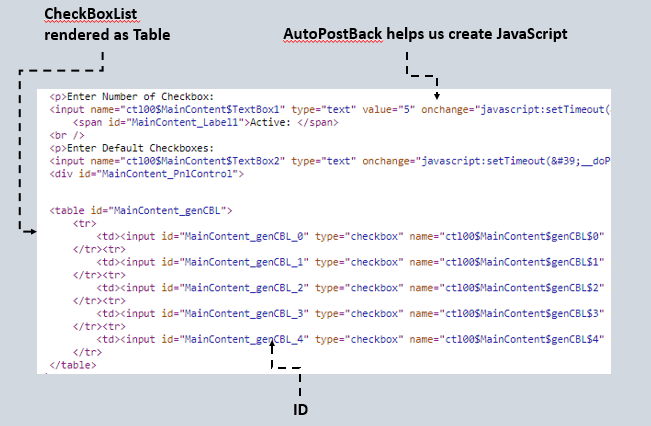
HTML source from the rendered ASPX
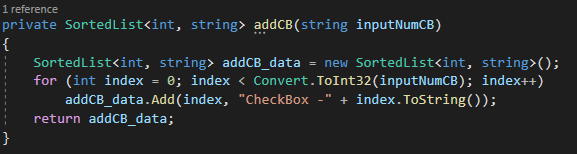
Code Overview
protected void Page_Load(object sender, EventArgs e) {
    if (Page.IsPostBack) {
        RecreateControls(TextBox1.Text);
    }
}
private SortedList < int, string > addCB(string inputNumCB) {
    SortedList < int, string > addCB_data = new SortedList < int, string > ();
    for (int index = 0; index < Convert.ToInt32(inputNumCB); index++) addCB_data.Add(index, "CheckBox -" + index.ToString());
    return addCB_data;
}
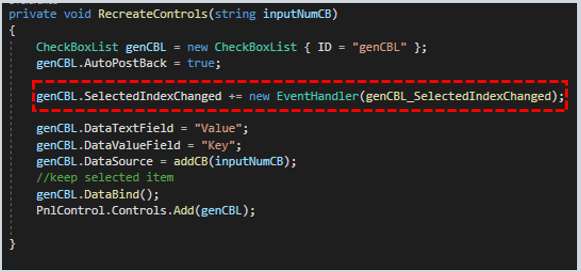
private void RecreateControls(string inputNumCB) {
    CheckBoxList genCBL = new CheckBoxList {
        ID = "genCBL"
    };
    genCBL.AutoPostBack = true;
    genCBL.DataTextField = "Value";
    genCBL.DataValueField = "Key";
    genCBL.DataSource = addCB(inputNumCB);
    genCBL.DataBind();
    PnlControl.Controls.Add(genCBL);
}


Second Scenario: Shows selected checkbox after user click

In this scenario, we want to know which checkbox is already clicked or selected by the user. Thus, we need a way to check whether each checkbox is selected, then we show the results. We will utilize label object to show the results. We also set the label to runat server, so we can manipulate it from code behind.
<p>Enter Number of Checkbox:
<asp:TextBox ID="TextBox1" runat="server" AutoPostBack="true"></asp:TextBox>
<asp:Label ID="Label1" runat="server" Text="Active: "></asp:Label>

We want that each time user does something with our previous CheckBoxList the results will auto-update. We can create new handler to implement this scheme by calling the .SelectedIndexChange method. Inside the Recreate CheckBoxList function instruct our object to recognize new handler, in this case, I name it genCBL_SelectedIndexChange.
genCBL.SelectedIndexChanged += new EventHandler(genCBL_SelectedIndexChanged);

After adding the new handler, we need to declare our handling function or what it needs to do when the CBL change.


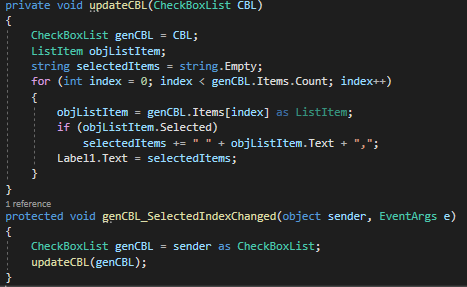
Create function to update the Label based on CBL changed (user click)

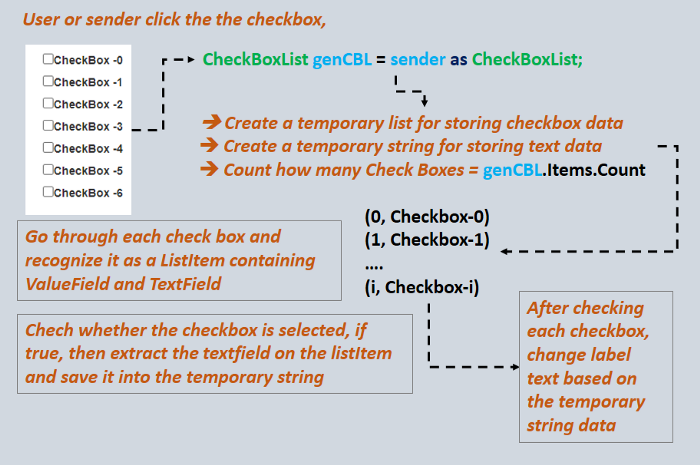
Flowchart of the SelectedIndexChanged handler


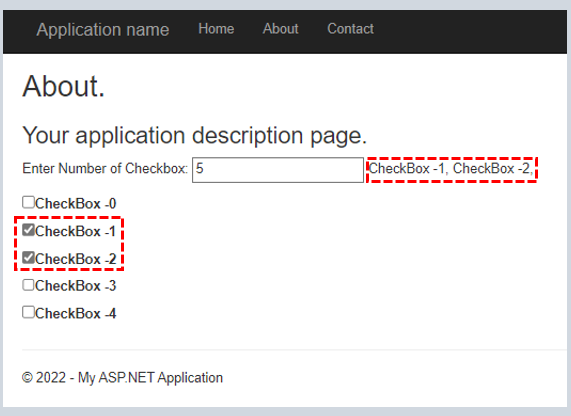
Already selected checkbox will be showed on the label’s text
Third Scenario: Adding default selected/checked checkbox

The last scenario will be involved cases like default preferences from previous data or when you want to make it stays selected despite its changes. Therefore, we need input or a previous state that can tell our function to auto-select the checkbox. To facilitate this, we can extract value from the database or provide another textbox as an input method.
<asp:TextBox ID="TextBox2" runat="server" AutoPostBack="true" Font-Italic="True"></asp:TextBox>

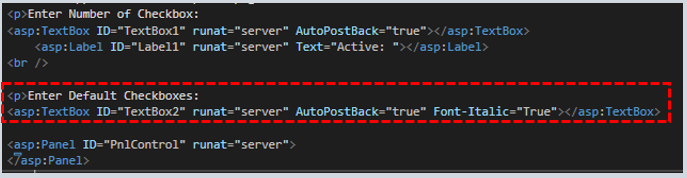
Adding new input for taking default selected textbox
After that, we can insert new instructions in our previous updateCBL function. We want to check whether each checkbox is a member of the supplied default value. If true, then we make the checkbox status to be selected and add the textfield to our label.


If the index is the same as any default value, then make it selected. The problem now is how to check whether the current index checkbox is contained within any default value. Thus, we need a function that returns a boolean value.


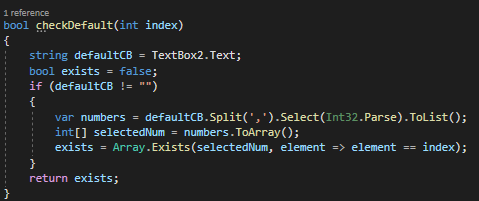
A function that takes our index as a parameter and checks whether it “exists” within the default value
This function mainly utilizes two major tools: Parser and Array. First, we extract the string text from our textbox. Then, we split the string by the comma separator. Therefore, we need to make sure that the user also understands what kind of format they should input. After splitting, we try to parse the string number into an int and if it succeeds, we put it in the list. We change the list into an array type so that we can easily use the .Exist method to compare the int from parameter and the int on the default array. We then return it as true or false.

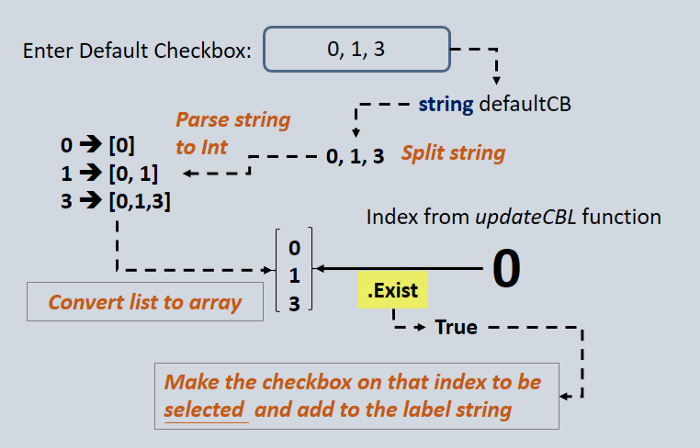
Flowchart for the default checkbox function
After that don’t forget to make this function runs when the textbox change. We can create a new handler to find our CheckBoxList by its ID then do update on it.
<asp:TextBox ID="TextBox2" runat="server" AutoPostBack="true" Font-Italic="True" OnTextChanged="TextBox2_TextChanged"></asp:TextBox>

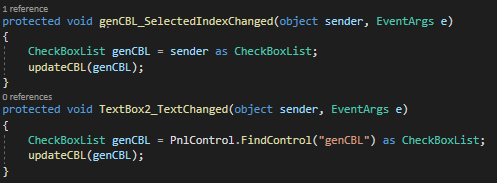
Updating whenever the checkbox is clicked, or the text box value changes


Final Rendered Result on browser


In this tutorial, we successfully create a dynamic checkbox using three different scenarios. We utilize several C# tools such as array, parser, covert, etc. We also learn how to generate objects and what kind of properties or behavior we can attribute to them. In the future, this simple tutorial can become a starting point for coding web app using C# and also a nice and simple gateway to understanding relating structure and functionality around the C# web forms. Thank you and enjoy learning!

HostForLIFE.eu ASP.NET Core Hosting

European best, cheap and reliable ASP.NET hosting with instant activation. HostForLIFE.eu is #1 Recommended Windows and ASP.NET hosting in European Continent. With 99.99% Uptime Guaranteed of Relibility, Stability and Performace. HostForLIFE.eu security team is constantly monitoring the entire network for unusual behaviour. We deliver hosting solution including Shared hosting, Cloud hosting, Reseller hosting, Dedicated Servers, and IT as Service for companies of all size.


European ASP.NET Core Hosting :: ASP.NET Core 6.0 Middleware

clock July 26, 2022 08:00 by author Peter

Middleware is a component that is assembled into an application pipeline to handle requests and responses. Middleware is linked one after the other, so each gets to choose whether to pass the request to the next middleware and work before and after the next component in the pipeline.

Middleware:
    Sits between the requestor and the target.
    Can directly modify the response.
    Can log things.
    Can use the data within the request to generate the response.

Take look at the diagram below:

ASP.NET 6.0 implements a pipeline consisting of a series of middleware classes.

  • Requests filter down the pipeline until they reach a point where the middleware class creates a response.
  • Responses filter back through the middleware in reverse order until they reach the requestor.

Middleware is a great place to do the following:
    Authorization
    Authentication
    Diagnostics
    Error handling and logging

Each middleware consists of a request delegate. This is a specific kind of object in .NET that can pass execution control to the next object. Let us create a simple Web API project. For this tutorial I’m using the tools below:
    Visual Studio Community Edition 2022 (64-bit) – Preview (Version 17.3.0 Preview 4.0)
    .NET 6.0
    Minimal Web API
    Swagger

Please find the program.cs file part of the minimal API:
var builder = WebApplication.CreateBuilder(args);
// Add services to the container.
// Learn more about configuring Swagger/OpenAPI at https://aka.ms/aspnetcore/swashbuckle
builder.Services.AddEndpointsApiExplorer();
builder.Services.AddSwaggerGen();
var app = builder.Build();
// Configure the HTTP request pipeline.
if (app.Environment.IsDevelopment()) {
    app.UseSwagger();
    app.UseSwaggerUI();
}
//I have commented out the below codes as we are going to check Use(), Map() and Run()
/* var summaries = new[]
{
    "Freezing", "Bracing", "Chilly", "Cool", "Mild", "Warm", "Balmy", "Hot", "Sweltering", "Scorching"
};
app.MapGet("/weatherforecast", () =>
{
    var forecast = Enumerable.Range(1, 5).Select(index =>
        new WeatherForecast
        (
            DateTime.Now.AddDays(index),
            Random.Shared.Next(-20, 55),
            summaries[Random.Shared.Next(summaries.Length)]
        ))
        .ToArray();
    return forecast;
})
.WithName("GetWeatherForecast"); */
app.Run();
/*internal record WeatherForecast(DateTime Date, int TemperatureC, string? Summary)
{
    public int TemperatureF => 32 + (int)(TemperatureC / 0.5556);

} */


If we run this project, you should get the below output.

Now let's create simple middleware that will return “Hello Readers!” as response. In Program.cs, we add a new middleware using Run() method like below. We normally call it inline middleware.
// Configure the HTTP request pipeline.
if (app.Environment.IsDevelopment()) {
    app.Run(async context => {
        await context.Response.WriteAsync("Hello Readers!");
    });
    app.UseSwagger();
    app.UseSwaggerUI();
}


Run the application. You should get the below output:

While going through each line of code in Program.cs, generally we identify which parts of the code are considered middleware by looking at the methods used to add them to the pipeline. Those methods are Run(), Use() and Map().

Let's look at each method to understand the usage and differences between them.
Run()

This method only receives only context parameter and doesn’t know about the next middleware. These delegates are usually known as terminal delegates because they terminate or end the middleware pipeline.

Let us add another delegate as below and see how it behaves:
// Configure the HTTP request pipeline.
if (app.Environment.IsDevelopment()) {
    app.Run(async context => {
        await context.Response.WriteAsync("Hello Readers!");
    });
    app.Run(async context => {
        await context.Response.WriteAsync("We are learning Middlware!");
    });
    app.UseSwagger();
    app.UseSwaggerUI();
}


Go head and run the application. You should get the below output:

The second delegate didn’t invoke here because the first one terminated the pipeline.
Use()

The whole idea behind middleware is to link one after another. Let us take a look at the Use() method, which helps us to chain the delegates one after the other.

This method will accept two parameters, context and next. Let us create a inline middleware using the Use() method:
// Configure the HTTP request pipeline.
if (app.Environment.IsDevelopment()) {
    app.Use(async (context, next) => {
        await context.Response.WriteAsync($ "Before Request {Environment.NewLine}");
        await next();
        await context.Response.WriteAsync($ "After Request {Environment.NewLine}");
    });
    app.Run(async context => {
        await context.Response.WriteAsync($ "Hello Readers!{Environment.NewLine}");
    });
    app.UseSwagger();
    app.UseSwaggerUI();
}


The output is given below:

This will show us that the middleware has been changed, one after another. Here, the await next() triggered the next middleware, which was implemented using the method Run().

Notes:
    Don’t call next.invoke after the response has been sent to client.
    Writing to the response body after calling next may cause a protocol violation.
    Writing to the response body after calling next may cause the body format

Map()
Map extensions are used for branching the pipeline. Map extensions branch the request pipeline based on matching the given request path. If the request path starts with the given path, the branch is executed.

Let us see two middleware, as below:
// Configure the HTTP request pipeline.
if (app.Environment.IsDevelopment()) {
    app.UseSwagger();
    app.UseSwaggerUI();
}
app.Map("/BranchOne", MapBranchOne);
app.Map("/BranchTwo", MapBranchTwo);
app.Run();
static void MapBranchOne(IApplicationBuilder app) {
    app.Run(async context => {
        await context.Response.WriteAsync("You are on Branch One!");
    });
}
static void MapBranchTwo(IApplicationBuilder app) {
    app.Run(async context => {
        await context.Response.WriteAsync("You are on Branch Two!");
    });
}


The output should be as below:
http://localhost:1233/branchone

http://localhost:1234/branchtwo


We have covered the basics of middleware. In the upcoming tutorial, I will be covering custom middleware. Thank you for reading my article. Please leave your comments in the comment box below.

HostForLIFE.eu ASP.NET Core Hosting

European best, cheap and reliable ASP.NET hosting with instant activation. HostForLIFE.eu is #1 Recommended Windows and ASP.NET hosting in European Continent. With 99.99% Uptime Guaranteed of Relibility, Stability and Performace. HostForLIFE.eu security team is constantly monitoring the entire network for unusual behaviour. We deliver hosting solution including Shared hosting, Cloud hosting, Reseller hosting, Dedicated Servers, and IT as Service for companies of all size.


ASP.NET Core Hosting - HostForLIFE :: Testing The Exception Thrown In NUnit C#

clock July 25, 2022 10:11 by author Peter

In this article, we will learn how to test the exception thrown by the test code using NUnit in .Net. While doing Unit testing, we write test cases for every possible positive as well as the negative scenario. In several test cases, there might be a situation or condition which throws an exception. In order to test those scenarios, we have to use Asset.Throws method. Asset.Throws attempts to invoke a code snippet represented as a delegate in order to verify that it throws a particular exception.

For demonstration, I already created a sample application “BankingApp” which is basically a .Net Core Class Library project.

A Test project named “BankingApp.Test” is also added to the Solution. I am using NUnit for writing the Unit Test case. In the Account.cs class, I have a parameterized constructor and two methods in which one is for adding the amount i.e. depositAmount() method, and another for checking the balance amount (i.e. checkBalanceAmount() method). In case the amount to be deposited is either zero or less than that, an exception (ArgumentException) will be thrown.

In AccountTest.cs file, I have written a test case in which the amount to be deposited is “-100” i.e. less than zero.

Now, let’s run the test case from the Test Explorer.

On running the test case, an Argument exception with a message i.e., “Amount to be deposit must be greater than zero” is thrown.

Let’s use the Assert.Throws() method and pass method as a delegate which is throwing the exception. In our case, it is depositAmount(). Assert.Throws require the exact type of exception which can be thrown. It returns the exception as well. With StringAssert.Contains() method, we can verify the expected exception text with the actual exception text.

Now run the test case. You can see that our test case is passed. In this example, we verified that on passing the deposit amount 0 or less than zero, an exception is properly thrown to the user.

HostForLIFE.eu ASP.NET Core Hosting

European best, cheap and reliable ASP.NET hosting with instant activation. HostForLIFE.eu is #1 Recommended Windows and ASP.NET hosting in European Continent. With 99.99% Uptime Guaranteed of Relibility, Stability and Performace. HostForLIFE.eu security team is constantly monitoring the entire network for unusual behaviour. We deliver hosting solution including Shared hosting, Cloud hosting, Reseller hosting, Dedicated Servers, and IT as Service for companies of all size.


European ASP.NET Core Hosting :: Feature Flags In ASP.NET Core

clock July 19, 2022 08:17 by author Peter

Feature flags allow toggling multiple features of an application without having to redeploy the application. One or more feature flags can be defined declaratively as part of the application’s config file that can control feature availability. Feature flag is part of a broader concept of feature management. Feature management provides additional functionality like filtering feature availability based on user groups, devices etc., caching feature flags and managing their states. In this article, we will focus on implementing feature flags using ASP.NET Core feature management package.

Setup
Consider you have a simple ASP.NET 6 MVC application for creating a todo list. To keep this article focused on the subject, I will omit the steps for creating such application. Typically, the application would be capable of adding new todo items to a list of todos and displaying them on the screen.

To work with ASP.NET Core feature management, add Microsoft.FeatureManagement.AspNetCore nuget package to the application. Add the feature management service to the application inside Program.cs
using Microsoft.FeatureManagement;

namespace FeatureFlagDemo;

public class Program
{
    public static void Main(string[] args)
    {
        var builder = WebApplication.CreateBuilder(args);
        // Add services to the container.
        ...
        builder.Services.AddFeatureManagement();
        ...
        var app = builder.Build();
        ...
    }
}


Adding feature flags to the configuration
We will expose two feature flags – one for enabling edit of the todo item and another for enabling delete of the todo item. Add the feature flags to the appsettings.json file under FeatureManagement section as follows
{
  "Logging": {
    "LogLevel": {
      "Default": "Information",
      "Microsoft.AspNetCore": "Warning"
    }
  },
  "FeatureManagement": {
    "Edit": false,
    "Delete": false
  },
  "AllowedHosts": "*"
}


Note both the features are disabled in the configuration file.

FeatureGate attribute
To enable the feature flags at controller or action level, we can use the FeatureGate attribute as shown below.
[HttpGet]
[FeatureGate("Edit")]
public ActionResult Edit(int id)
{
    ...
}

[HttpPost]
[FeatureGate("Edit")]
[ValidateAntiForgeryToken]
public ActionResult Edit(int id, TodoItem todoItem)
{
    ...
}


Applying the attribute for all actions related to the Edit feature will ensure that the actions are available only when the Edit feature flag is enabled.

Add similar code for handling Delete feature.
[HttpGet]
[FeatureGate("Delete")]
public ActionResult Delete(int id)
{
    ...
}

[HttpPost]
[FeatureGate("Delete")]
[ValidateAntiForgeryToken]
public ActionResult Delete(int id, TodoItem todoItem)
{
    ...
}


Note: Part of code is omitted for brevity and to remain focused on the topic. In production scenarios, consider appropriate measures for implementing the feature including security, performance etc.
<feature> tag helper

The <feature> tag can be used to conditionally render text on razor views depending upon the state of feature flags. Import the feature management tag helpers inside the _ViewImports.cshtml file.
@using FeatureFlagDemo
@using FeatureFlagDemo.Models
@addTagHelper *, Microsoft.AspNetCore.Mvc.TagHelpers
@addTagHelper *, Microsoft.FeatureManagement.AspNetCore


Inside razor view, use the <feature> tag as follows to conditionally render Edit and Delete options based on the state of their respective feature flags.
<feature name="Edit"><a asp-action="Edit" asp-route-id="@item.Id">Edit</a></feature>
<feature name="Delete"><a asp-action="Delete" asp-route-id="@item.Id">Delete</a></feature>


Toggling feature flags and testing
Initially both the feature flags are disabled. Upon running the application, none of the Actions (Edit / Delete) are visible on the razor view.

Enable Edit feature by toggling the Edit feature flag in the appsettings.json file
{
  "Logging": {
    "LogLevel": {
      "Default": "Information",
      "Microsoft.AspNetCore": "Warning"
    }
  },
  "FeatureManagement": {
    "Edit": true,
    "Delete": false
  },
  "AllowedHosts": "*"
}


Refresh the page and you should be able to see Edit feature enabled. Upon clicking edit link you can also confirm that the actions related to edit feature are being executed as per the implementation.

Enable Delete feature by toggling the Delete feature flag in the appsettings.json file
{
  "Logging": {
    "LogLevel": {
      "Default": "Information",
      "Microsoft.AspNetCore": "Warning"
    }
  },
  "FeatureManagement": {
    "Edit": true,
    "Delete": true
  },
  "AllowedHosts": "*"
}


Refresh the page and you should be able to see Delete feature enabled. Upon clicking delete link you can also confirm that the actions related to delete feature are being executed as per the implementation.

HostForLIFE.eu ASP.NET Core Hosting

European best, cheap and reliable ASP.NET hosting with instant activation. HostForLIFE.eu is #1 Recommended Windows and ASP.NET hosting in European Continent. With 99.99% Uptime Guaranteed of Relibility, Stability and Performace. HostForLIFE.eu security team is constantly monitoring the entire network for unusual behaviour. We deliver hosting solution including Shared hosting, Cloud hosting, Reseller hosting, Dedicated Servers, and IT as Service for companies of all size.


About HostForLIFE

HostForLIFE is European Windows Hosting Provider which focuses on Windows Platform only. We deliver on-demand hosting solutions including Shared hosting, Reseller Hosting, Cloud Hosting, Dedicated Servers, and IT as a Service for companies of all sizes.

We have offered the latest Windows 2019 Hosting, ASP.NET 5 Hosting, ASP.NET MVC 6 Hosting and SQL 2019 Hosting.


Month List

Tag cloud

Sign in