Creating dynamic elements means that user can generate checkbox on demand based on their input. In this short tutorial, we will learn how to create various functions to generate the checkbox.
We will mainly use 3 types of object: Checkbox list, text box, label, and button. All the related objects will be run at server.
First Scenario: User inputs number of checkbox that needs to be generated
In the ASP.NET web forms structure, we have two main parts: the front end part which house our HTML, CSS, and JS, and also the back end part which run our code in server. There are several web structures such as Single Page Application, MVP, etc. However, we first will use the traditional web forms (1 interface, 1 code behind) to keep our learning simple.
1. Accepting Input
To accept user input, we need a textbox object. Because the textbox will be load together with the page load, then we can directly write our object in the interface (.aspx) or using the drag and drop toolbox (to activate it you can use Ctrl+Alt+X)
Inside the asp:Content insert the textbox object. An object needs ID. We also tell our aspx that this textbox will be runat=”server”. Thus, we can gain control over it from our C# code. We also tell the aspx that our textbox has the AutoPostBack behavior which means that whenever the content is changed, the page will undergo a PostBack or “Reload”.
<p>Enter Number of Checkbox:<asp:TextBox ID="TextBox1" runat="server" AutoPostBack="true"></asp:TextBox><asp:Panel ID="PnlControl" runat="server">
ASP.NET (C#)
or
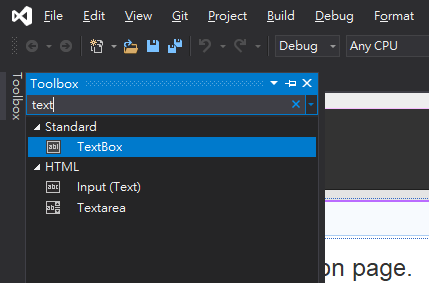

Searching the textbox object using toolbox (Ctrl+Alt+X)
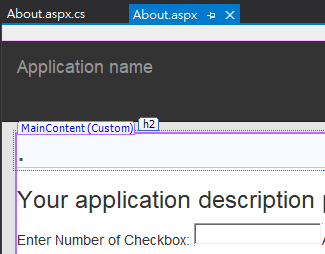
The interface design after drag and drops
We also need to put a Panel Control as a place to render our generated CheckBoxList.
2. Processing Input: (1) Page_Load and PostBack
After we set up the textbox, now user can input the number. As long as there are any changes to the textbox, our code will request a postback. And nothing happens!
In order to do something after the user input the number, we need to create a function that generates our checkboxlist every time the page is loaded.
As a rule of thumbs, Dynamically generated object needs to be regenerated every postback.
protected void Page_Load(object sender, EventArgs e) {
if (Page.IsPostBack) {
RecreateControls(TextBox1.Text);
}
}
A void can be translated as “a function”, hence the code above is a function that runs every time the page is load due to user action such as postback request.
Inside this pageload function, we are going to check whether the page is postback or not by using the isPostBack method. Page is our object here. The isPostBack method is a boolean method that will return true or false value. If it is true, then we create the execute the function that will recreate our dynamic object, in this case our checkboxlist.
The reason why we need to check whether the page is postback or not is because we only want to generate the dynamic object (checkboxlist) only after the user changes any value in the input textbox. Therefore, when the user loads the page for the first time, our user only can see the default object that we have in the aspx interface (our HTML).
3. Processing Input: (2) Recreate dynamic objects
In order to create or recreate our dynamically generate checkbox, we will utilize checkboxlist as our object. Because we want to generate it dynamically, we cannot do the drag and drop method. Therefore inside the function that we already call in the page load, we need to manually instruct how to generate the checkbox inside our checkboxlist.
RecreateControls(TextBox1.Text);
This function will be able to accept a string input from our textbox by calling the .Text method.
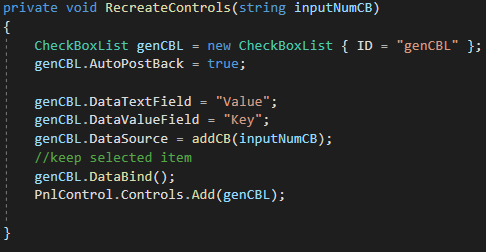
Overview: Recreate checkbox list Object
The first step we need to do is to create and define a new object using CheckBoxList class. We give our new CheckBoxList variable name as genCBL and an ID of genCBL. Both things do not need necessarily to be the same. The variable names are used internally in the backend code, while the ID is the global identifier of our chechboxlist in the ASPX.
CheckBoxList genCBL = new CheckBoxList {ID = "genCBL"};
Same as textbox, every object needs to have its own properties and related behavior. In this case, we set the AutoPostBack behavior to be true.
genCBL.AutoPostBack = true;
Because Checkbox List is a collection of individual checkboxes, thus to produce the checkbox dynamically, we need to DataSource property. DataSource can accept list-type data. So we need to create a function that can supply a sorted list of keys and values.
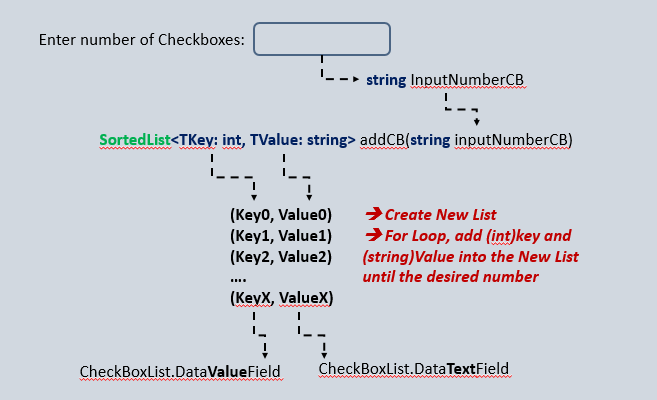
Flowchart of Generating the Data Source (list) for CheckBoxList

Convert Numerical String to Int: Convert.ToInt32(int)
Convert Int to String: .ToString()
We named the function above as addCB and return the value as SortedList<TKey: int, TValue: string>. Now, we instruct our CheckBoxList generator to take this value. The databind method forces our control to read the datasource (More about databinding).
genCBL.DataValueField = "Key";
genCBL.DataTextField = "Value";
genCBL.DataSource = addCB(inputNumCB);
//keep selected item
genCBL.DataBind();
After we attributed all the neccessary properties and behaviour, then we instruct the PanelControl to render it inside.
PnlControl.Controls.Add(genCBL);
4. Result: After the first PostBack
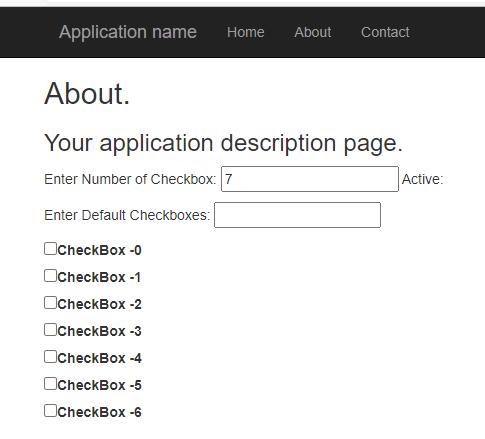
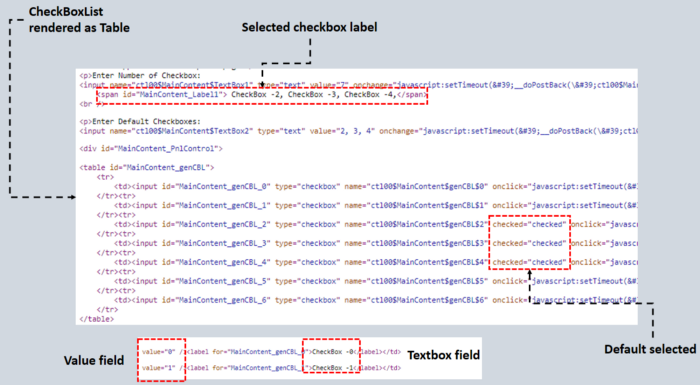
HTML output after running the code
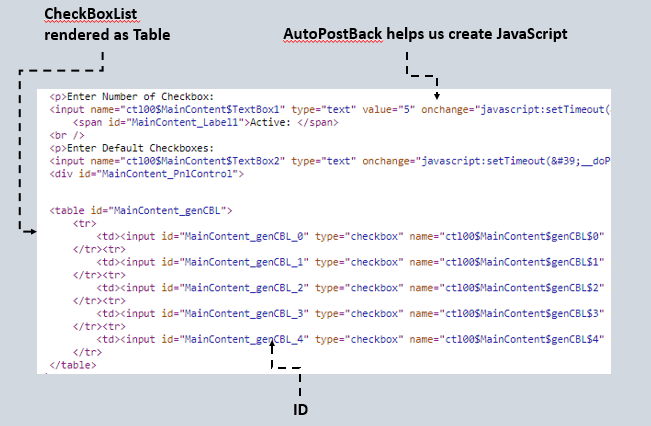
HTML source from the rendered ASPX
Code Overview
protected void Page_Load(object sender, EventArgs e) {
if (Page.IsPostBack) {
RecreateControls(TextBox1.Text);
}
}
private SortedList < int, string > addCB(string inputNumCB) {
SortedList < int, string > addCB_data = new SortedList < int, string > ();
for (int index = 0; index < Convert.ToInt32(inputNumCB); index++) addCB_data.Add(index, "CheckBox -" + index.ToString());
return addCB_data;
}
private void RecreateControls(string inputNumCB) {
CheckBoxList genCBL = new CheckBoxList {
ID = "genCBL"
};
genCBL.AutoPostBack = true;
genCBL.DataTextField = "Value";
genCBL.DataValueField = "Key";
genCBL.DataSource = addCB(inputNumCB);
genCBL.DataBind();
PnlControl.Controls.Add(genCBL);
}
Second Scenario: Shows selected checkbox after user click
In this scenario, we want to know which checkbox is already clicked or selected by the user. Thus, we need a way to check whether each checkbox is selected, then we show the results. We will utilize label object to show the results. We also set the label to runat server, so we can manipulate it from code behind.
<p>Enter Number of Checkbox:
<asp:TextBox ID="TextBox1" runat="server" AutoPostBack="true"></asp:TextBox>
<asp:Label ID="Label1" runat="server" Text="Active: "></asp:Label>
We want that each time user does something with our previous CheckBoxList the results will auto-update. We can create new handler to implement this scheme by calling the .SelectedIndexChange method. Inside the Recreate CheckBoxList function instruct our object to recognize new handler, in this case, I name it genCBL_SelectedIndexChange.
genCBL.SelectedIndexChanged += new EventHandler(genCBL_SelectedIndexChanged);
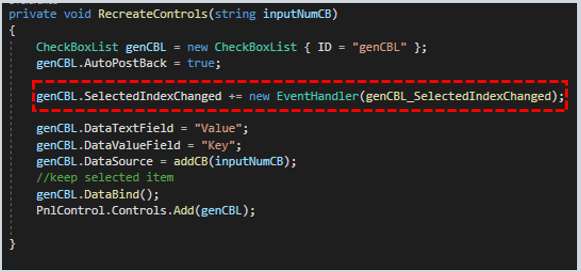
After adding the new handler, we need to declare our handling function or what it needs to do when the CBL change.
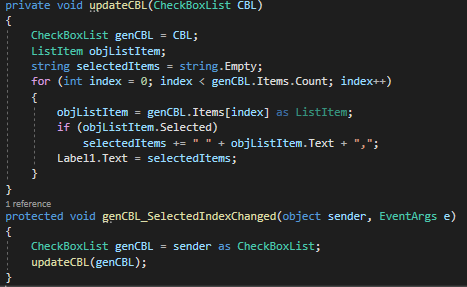
Create function to update the Label based on CBL changed (user click)
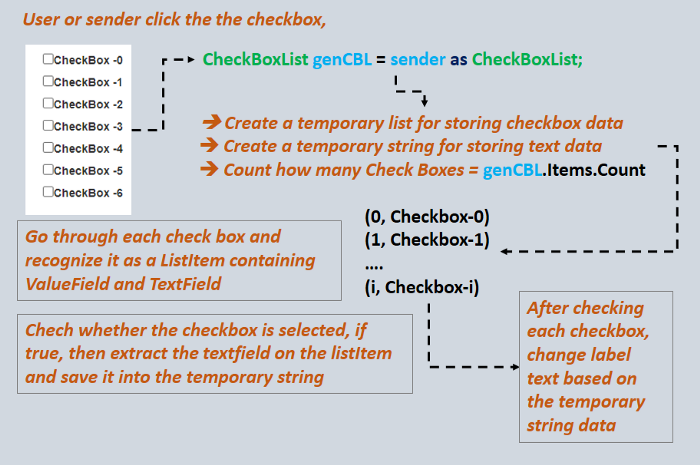
Flowchart of the SelectedIndexChanged handler
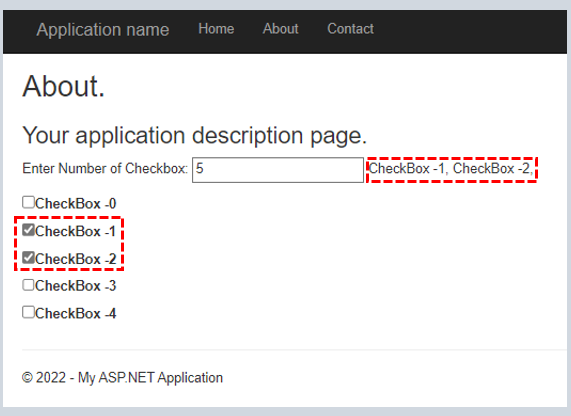
Already selected checkbox will be showed on the label’s text
Third Scenario: Adding default selected/checked checkbox
The last scenario will be involved cases like default preferences from previous data or when you want to make it stays selected despite its changes. Therefore, we need input or a previous state that can tell our function to auto-select the checkbox. To facilitate this, we can extract value from the database or provide another textbox as an input method.
<asp:TextBox ID="TextBox2" runat="server" AutoPostBack="true" Font-Italic="True"></asp:TextBox>

Adding new input for taking default selected textbox
After that, we can insert new instructions in our previous updateCBL function. We want to check whether each checkbox is a member of the supplied default value. If true, then we make the checkbox status to be selected and add the textfield to our label.
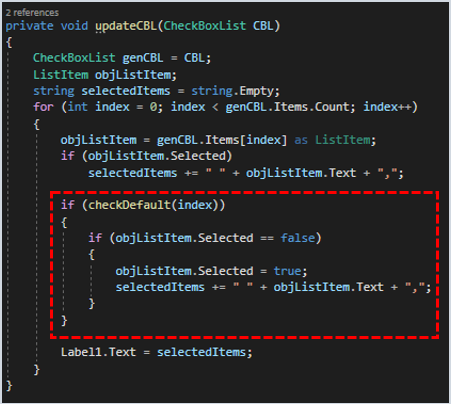
If the index is the same as any default value, then make it selected. The problem now is how to check whether the current index checkbox is contained within any default value. Thus, we need a function that returns a boolean value.
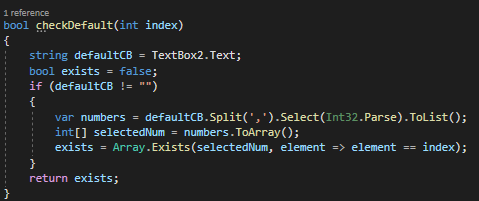
A function that takes our index as a parameter and checks whether it “exists” within the default value
This function mainly utilizes two major tools: Parser and Array. First, we extract the string text from our textbox. Then, we split the string by the comma separator. Therefore, we need to make sure that the user also understands what kind of format they should input. After splitting, we try to parse the string number into an int and if it succeeds, we put it in the list. We change the list into an array type so that we can easily use the .Exist method to compare the int from parameter and the int on the default array. We then return it as true or false.
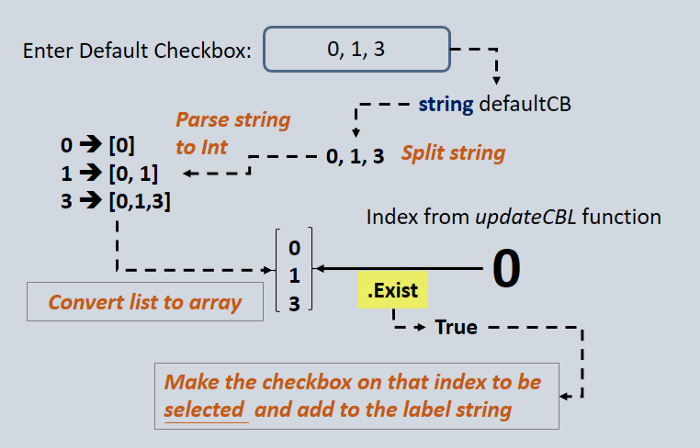
Flowchart for the default checkbox function
After that don’t forget to make this function runs when the textbox change. We can create a new handler to find our CheckBoxList by its ID then do update on it.
<asp:TextBox ID="TextBox2" runat="server" AutoPostBack="true" Font-Italic="True" OnTextChanged="TextBox2_TextChanged"></asp:TextBox>
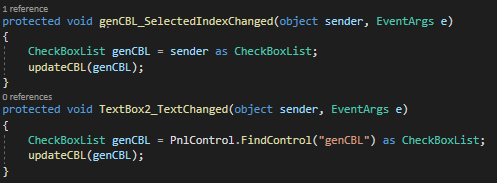
Updating whenever the checkbox is clicked, or the text box value changes
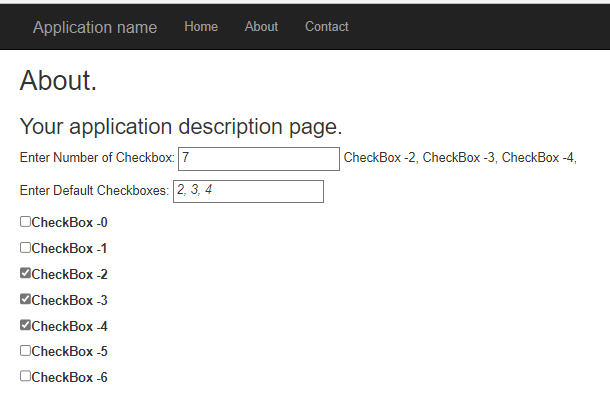
Final Rendered Result on browser
In this tutorial, we successfully create a dynamic checkbox using three different scenarios. We utilize several C# tools such as array, parser, covert, etc. We also learn how to generate objects and what kind of properties or behavior we can attribute to them. In the future, this simple tutorial can become a starting point for coding web app using C# and also a nice and simple gateway to understanding relating structure and functionality around the C# web forms. Thank you and enjoy learning!
European best, cheap and reliable ASP.NET hosting with instant activation. HostForLIFE.eu is #1 Recommended Windows and ASP.NET hosting in European Continent. With 99.99% Uptime Guaranteed of Relibility, Stability and Performace. HostForLIFE.eu security team is constantly monitoring the entire network for unusual behaviour. We deliver hosting solution including Shared hosting, Cloud hosting, Reseller hosting, Dedicated Servers, and IT as Service for companies of all size.
