In this article, we are going to see what is AutoMapper in .NET core, what problems it solves, how to use AutoMapper, AutoMapper ForMember method, AutoMapper ReverseMap method, and Conditional Mappings.

What is AutoMapper?
AutoMapper is a simple C# library that transforms one object type to another object type, which means, it’s a mapper between two objects. AutoMapper is the convention-based object to object mapper. It maps the properties of two different objects by transforming the input object of one type to the output object of another type.
How to add AutoMapper?
The first step is to install the corresponding NuGet package in the Package Manager console, using the command “Install-Package Automapper.Extensions.Microsoft.DependencyInjection”. This command will install all AutoMapper Packages.
The next step configures the AutoMapper services into our application. Open startup.cs class file, add “services.AddAutoMapper(typeof(Startup))” in configure services method.
Now the AutoMapper Package was installed and configured in our project.
How to use Automapper?
Let's take a new user model class, this class will have several properties.
Public class User {
Public int Id {
get;
set;
}
Public string FirstName {
get;
set;
}
Public string LastName {
get;
set;
}
Public string Email {
get;
set;
}
Public string Address {
get;
set;
}
Public int Age {
get;
set;
}
}
Let’s create a new user view model class, and display the user information,
Public class UserViewModel {
Public string FirstName {
get;
set;
}
Public string LastName {
get;
set;
}
Public string Email {
get;
set;
}
}
Now let’s see how to convert our domain object to a view model. By using the concept called Profiles, we can organize our mapping configurations.
Let’s create a new user profile class, in this class, we can create the mapping configuration inside the constructor.
Public class UserProfile: Profile // this class inherits from AutoMapper profile class
{
CreateMap < User, UserViewModel > ();
}
So, basically, we create the mapping from our User domain object to the UserViewModel. That’s it.
As soon as our application starts AutoMapper service will scan the application and look for classes that inherit from the profile class and load their mapping configurations.
Now, let’s create new controller with the name UserController,
Public class UserController: controller {
Private readonly IMapper _mapper;
Public UserController(IMapper mapper) {
_mapper = mapper;
}
Public IActionResult Index() {
var userInfo = GetUserInfo();
var userViewModel = _mapper.map < UserViewModel > (userInfo);
return View(userViewModel);
}
Private static User GetUserInfo() {
Return new User {
Id = 1,
FirstName = “John”,
LastName = “Smith”,
Email = “john.smith @gmail.com”
}
}
}
Now if we run the application (localhost:5001/user), we can see the below result,
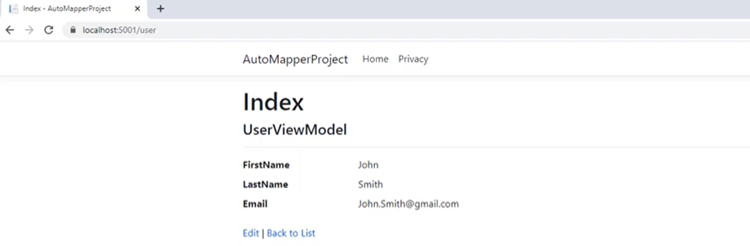
That’s all, our AutoMapper was successfully converting from the User domain model object to the UserViewModel object. Very simple isn’t it?
But if we have different property names in our source object and destination object ??
Here comes the ForMember Method concept.
Let’s modify the property names in the above userviewmodel class,
Public class UserViewModel {
Public string FName {
get;
set;
} // previously FirstName
Public string LName {
get;
set;
} // previously LastName
Public string Email {
get;
set;
}
}
So, now we must map user FirstName to FName and user LastName to LName, to make this work we have to change the mapping in the UserProfile class file.
Public class UserProfile : Profile // this class inherits from AutoMapper profile class
{
CreateMap<User, UserViewModel>()
.ForMember(dest =>
dest.Fname,
opt => opt.MapFrom(src => src.FirstName))
.ForMember(dest =>
dest.Lname,
opt => opt.MapFrom(src => src.LastName));
}
Above, we customized the configuration for individual members, we can use the ForMember method which has the destination member parameter of type expression and member options parameter of type action.
So far we have only looked at one-directional mapping, which means if we have two types, typeA, and typeB then we only map type A to type B.
But by using automatic Reverse mapping (using ReverseMap method), it’s possible to achieve Bi-Directional mapping.
Public class UserProfile : Profile // this class inherits from AutoMapper profile class
{
CreateMap<User, UserViewModel>()
.ForMember(dest =>
dest.Fname,
opt => opt.MapFrom(src => src.FirstName))
.ForMember(dest =>
dest.Lname,
opt => opt.MapFrom(src => src.LastName))
.ReverseMap();
}
Once the reverse map is configured, we can map back from destination to source type.
UserController.cs
Public IActionResult Index() {
var userInfo = GetUserInfo();
var userViewModel = _mapper.map < UserViewModel > (userInfo);
var userViewModelReverse = _mapper.map < Userl > (userViewModel); // Bi-directional Mapping
return View(userViewModel);
}
AutoMapper allows you to add Conditional Mapping to properties that must be met before that property will be mapped.
Public class UserProfile : Profile // this class inherits from AutoMapper profile class
{
CreateMap<User, UserViewModel>()
.ForMember(dest =>
dest.Fname,
opt => opt.MapFrom(src => src.FirstName))
.ForMember(dest =>
dest.Lname,
opt => opt.MapFrom(src => src.LastName))
.ForMember(dest =>
dest.IsAdult,
opt => opt.Condition (src => src.Age > 18 ? true:false))
.ReverseMap();
}
In the above example, the IsAdult property value is based on the condition of Age > 18.
In this article, we have seen what is AutoMapper, how to install and Configure, AutoMapper ForMember method, AutoMapper ReverseMap method, and Conditional Mappings.
Also, AutoMapper provides so many other features to simplify complex mappings. You can check the complete AutoMapper documentation. I hope this article will help you to understand the AutoMapper in ASP.NET Core.