European ASP.NET 4.5 Hosting BLOG

BLOG about ASP.NET 4, ASP.NET 4.5 Hosting and Its Technology - Dedicated to European Windows Hosting Customer

European ASP.NET Hosting - France :: How to Improve your ASP.NET Web API Performance

clock February 24, 2015 08:46 by author Scott

In this article, I will share about how to improve your ASP.NET Web API performance

1. Use fastest JSON serializer

JSON serialization  can affect overall performance of ASP.NET Web API significantly. A year and a half I have switched from JSON.NET serializer on one of my project to ServiceStack.Text .

2. Use other formats if possible (protocol buffer, message pack)

If you can use other formats like Protocol Buffers or MessagePack in your project instead of JSON do it.

You will get huge performance benefits not only because Protocol Buffers serializer is faster, but because format is smaller than JSON which will result in smaller and faster responses.

3. Implement compression

Use GZIP or Deflate compression on your ASP.NET Web API.

Compression is an easy and effective way to reduce the size of packages and increase the speed.

4. Use Caching

If it makes sense, use output caching on your Web API methods. For example, if a lot of users accessing same response that will change maybe once a day.

5. Implement async on methods of Web API

Using asynchronous Web API services can increase the number of concurrent HTTP requests Web API can handle.

Implementation is simple. The operation is simply marked with the async keyword and the return type is changed to Task.

[HttpGet] 
public async Task OperationAsync() 
{  
    await Task.Delay(2000); 
}

6. Use classic ADO.NET if possible

Hand coded ADO.NET is still the fastest way to get data from database. If the performance of Web API is really important for you, don’t use ORMs.

Please just see this table performance below

The Dapper and the hand-written fetch code are very fast, as expected, all ORMs are slower than those three.

LLBLGen with resultset caching is very fast, but it fetches the resultset once and then re-materializes the objects from memory.

Hope above tutorial help you.


European ASP.NET Hosting - Germany :: How to Fix - The specified string is not in the form required for an e-mail address

clock July 10, 2014 09:08 by author Scott

Hello, in this post, I will describe short tutorial about how to solve The specified string is not in the form required for an e-mail address. I found many people find this error on forums. Here is the error message:
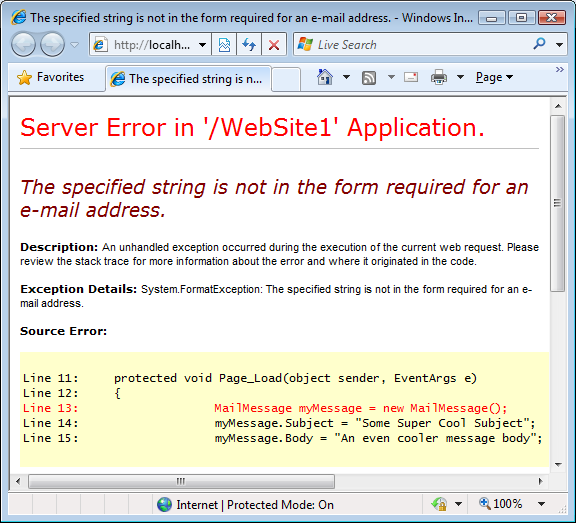
As you can see above, that is the error message that you might find. So, what’s the problem?

OK, the problem in this case is not from the page itself, but it comes from your web.config file. This configuration file has a <system.net /> element that enables you to store information about the mail server and the from account. I will give you 2 examples below how it will crash your page:

<system.net>
  <mailSettings>
    <smtp from="you.yourprovider.com">
      <network host="smtp.yourprovider.com"/>
    </smtp>
  </mailSettings>
</system.net>

Please see the missing @ symbol in the mail address. And other error may come from incorrect encoded angled brackets, see this:

<system.net>
  <mailSettings>
    <smtp from="Your Name &lt;[email protected]">
      <network host="smtp.yourprovider.com"/>
    </smtp>
  </mailSettings>
</system.net>

This from attributes has an opening < character (encoded as &lt;) but lacks the closing > bracket. To avoid the error, make sure the e-mail address in the from attribute has a valid syntax and uses the right angled brackets (if you use both a name and an e-mail address) like this:

<system.net>
  <mailSettings>
    <smtp from="Your Name &lt;[email protected]&gt;">
      <network host="smtp.yourprovider.com"/>
    </smtp>
  </mailSettings>
</system.net>

If you are curious why your code crashed, then you can use Reflector and take a look in the class’s constructor code:

public MailMessage()
{
  this.body = string.Empty;
  this.message = new Message();
  if (Logging.On)
  {
    Logging.Associate(Logging.Web, this, this.message);
  }
  string from = SmtpClient.MailConfiguration.Smtp.From;
  if ((from != null) && (from.Length > 0))
  {
    this.message.From = new MailAddress(from);
  }
}

Here you can see that the code uses the (internal and static) MailConfiguration property of the SmtpClient class that in turn provides access to the From name and address. This name and address value is then passed into the constructor of the MailAddress class which performs the actual validation using its private ParseValue method.

Choosing Best ASP.NET Hosting with HostForLIFE.eu

We know that it is quite hard to find good asp.net hosting in Europe. Why you need to choose us to be your hosting partner?


HostForLIFE.eu is awarded Top No#1 SPOTLIGHT Recommended Hosting Partner by Microsoft (see www.microsoft.com/web/hosting/HostingProvider/Details/953). Our service is ranked the highest top #1 spot in several European countries, such as: Germany, Italy, Netherlands, France, Belgium, United Kingdom, Sweden, Finland, Switzerland and other European countries.


European ASP.NET Hosting - Amsterdam :: Tips to Populate Or Bind DropDownList With JQuery And XML In Asp.Net

clock July 8, 2013 11:32 by author Scott

In this example i'm explaining How To Populate Or Bind DropDownList With JQuery And XML In Asp.Net.

Add jquery library reference in head section and place one dropdown on the page.

Add one list item with select as it's value.

   1:  <asp:DropDownList ID="DropDownList1" runat="server">
   2:  <asp:ListItem>Select</asp:ListItem>
   3:  </asp:DropDownList>
   4:   
   5:  <asp:Label ID="Label1" runat="server" Text=""/>


Following is the Cities.xml file i'm using to bind dropdownlist using jquery.

01<!--?xml version="1.0" encoding="utf-8" ?-->
02<cities>
03  <city>
04    <name>New York</name>
05    <id>1</id>
06  </city>
07    <city>
08    <name>Washington</name>
09      <id>2</id>
10  </city>
11  <city>
12    <name>Chicago</name>
13    <id>3</id>
14  </city>
15  <city>
16    <name>Seattle</name>
17    <id>4</id>
18  </city>
19</cities>

Add this script in head section of page.

01<script src="jquery-1.7.2.min.js" type="text/javascript"></script>  
02<script type="text/javascript">
03$(document).ready(function()
04{
05  $.ajax(
06  {
07    type: "GET",
08    url: "Cities.xml",
09    dataType: "xml",
10    success: function(xml)
11    {
12      var dropDown = $('#<%=DropDownList1.ClientID %>');
13      $(xml).find('City').each(function()
14      {
15        var name = $(this).find('name').text();
16        var id = $(this).find('id').text();
17        dropDown.append($("<option></option>").val(id).html(name));
18      });
19      dropDown.children(":first").text("--Select--").attr("selected", true);
20    }
21  });
22  $('#<%=DropDownList1.ClientID %>').change(function()
23  {
24  var ddl = $('#<%=DropDownList1.ClientID %>');
25  var selectedText = $('#<%=DropDownList1.ClientID %> option:selected').text();
26  var selectedValue = $('#<%=DropDownList1.ClientID %>').val();
27  document.getElementById('Label1').innerHTML = "You selected " + selectedText + " With id " + selectedValue;
28  });
29});
30</script>

Build and run the code.


About HostForLIFE

HostForLIFE is European Windows Hosting Provider which focuses on Windows Platform only. We deliver on-demand hosting solutions including Shared hosting, Reseller Hosting, Cloud Hosting, Dedicated Servers, and IT as a Service for companies of all sizes.

We have offered the latest Windows 2019 Hosting, ASP.NET 5 Hosting, ASP.NET MVC 6 Hosting and SQL 2019 Hosting.


Month List

Tag cloud

Sign in