European ASP.NET 4.5 Hosting BLOG

BLOG about ASP.NET 4, ASP.NET 4.5 Hosting and Its Technology - Dedicated to European Windows Hosting Customer

European ASP.NET 4.5 Hosting - Amsterdam :: Model Binding with Dropdown List in ASP.NET 4.5

clock December 20, 2013 05:32 by author Administrator

ASP.NET 4.5 Preview introduces new model binding for  ASP.NET web forms. The concept of model binding was first introduced with ASP.NET MVC and now it has incorporated with ASP.NET Web Forms. You can easily perform any CURD operation with any sort of data controls using any data access technology like Entity Framework,  ADO.NET, LINQ to SQL Etc.  In this post I am going talk about how you can bind the data with ASP.NET DropdownList using new Model Binding features.

Let’s say we have a speaker database and we wants to bind the name of the speakers with the DropDownList.  First placed an ASP.NET Dropdown control with the page  and set the “DataTextField” and “DataValueField” properties.

We can set the  ddlName.DataSource to specifying the data source from the code behind and bind the data with dropdpwnlist, but  in this case from the code behind to providing the data source.

Now, instead of specifying the DataSource, we will be setting the Dropdownlists SelectMethod property to point a method GetSpeakerNames() within the code-behind file.

Select method is expected to return us result of type IQueryable<TYPE>. Here is GetSpeakerName() method is defined as follows.

So, Instead of specifying the data source we are specifying the SelectMethod, which return the IQueryable type of Speaker object. Run the application, you will find the names binded with dropdown list. Hope this helps !


European ASP.NET 4.5 Hosting - Amsterdam :: Tutorial Customize ASP.NET 4.5 Membership

clock December 17, 2013 10:29 by author Patrick

The ASP.NET MVC 4 Internet template adds some new, very useful features which are built on top of SimpleMembership. These changes add some great features, like a much simpler and extensible membership API and support for OAuth. However, the new account management features require SimpleMembership and won't work against existing ASP.NET Membership Providers. I'll start with a summary of top things you need to know, then dig into a lot more detail.

Summary:

  • SimpleMembership has been designed as a replacement for the previous ASP.NET Role and Membership provider system
  • SimpleMembership solves common problems developers ran into with the Membership provider system and was designed for modern user / membership / storage need
  • SimpleMembership integrates with the previous membership system, but you can't use a MembershipProvider with SimpleMembership
  • The new ASP.NET MVC 4 Internet application template AccountController requires SimpleMembership and is not compatible with previous MembershipProviders
  • You can continue to use existing ASP.NET Role and Membership providers in ASP.NET 4.5 and ASP.NET MVC 4 - just not with the ASP.NET MVC 4 AccountController
  • The existing ASP.NET Role and Membership provider system remains supported, as it is part of the ASP.NET core
  • ASP.NET 4.5 Web Forms does not use SimpleMembership; it implements OAuth on top of ASP.NET Membership
  • The ASP.NET Web Site Administration Tool (WSAT) is not compatible with SimpleMembership

The following is the result of a few conversations with Erik Porter (PM for ASP.NET MVC) to make sure I had some the overall details straight, combined with a lot of time digging around in ILSpy and Visual Studio's assembly browsing tools.

SimpleMembership: The future of membership for ASP.NET
The ASP.NET Membership system was introduced with ASP.NET 2.0 back in 2005. It was designed to solve common site membership requirements at the time, which generally involved username / password based registration and profile storage in SQL Server. It was designed with a few extensibility mechanisms - notably a provider system (which allowed you override some specifics like backing storage) and the ability to store additional profile information (although the additional  profile information was packed into a single column which usually required access through the API). While it's sometimes frustrating to work with, it's held up for seven years - probably since it handles the main use case (username / password based membership in a SQL Server database) smoothly and can be adapted to most other needs (again, often frustrating, but it can work).

The ASP.NET Web Pages and WebMatrix efforts allowed the team an opportunity to take a new look at a lot of things - e.g. the Razor syntax started with ASP.NET Web Pages, not ASP.NET MVC. The ASP.NET Web Pages team designed SimpleMembership to (wait for it) simplify the task of dealing with membership. As Matthew Osborn said in his post Using SimpleMembership With ASP.NET WebPages:
With the introduction of ASP.NET WebPages and the WebMatrix stack our team has really be focusing on making things simpler for the developer. Based on a lot of customer feedback one of the areas that we wanted to improve was the built in security in ASP.NET. So with this release we took that time to create a new built in (and default for ASP.NET WebPages) security provider. I say provider because the new stuff is still built on the existing ASP.NET framework. So what do we call this new hotness that we have created? Well, none other than SimpleMembership. SimpleMembership is an umbrella term for both SimpleMembership and SimpleRoles.

Part of simplifying membership involved fixing some common problems with ASP.NET Membership.

Problems with ASP.NET Membership
ASP.NET Membership was very obviously designed around a set of assumptions:

  • Users and user information would most likely be stored in a full SQL Server database or in Active Directory
  • User and profile information would be optimized around a set of common attributes (UserName, Password, IsApproved, CreationDate, Comment, Role membership...) and other user profile information would be accessed through a profile provider

Some problems fall out of these assumptions.
Requires Full SQL Server for default case
The default, and most fully featured providers ASP.NET Membership providers (SQL Membership Provider, SQL Role Provider, SQL Profile Provider) require full SQL Server. They depend on stored procedure support, and they rely on SQL Server cache dependencies, they depend on agents for clean up and maintenance. So the main SQL Server based providers don't work well on SQL Server CE, won't work out of the box on SQL Azure, etc.

Custom Membership Providers have to work with a SQL-Server-centric API
If you want to work with another database or other membership storage system, you need to to inherit from the provider base classes and override a bunch of methods which are tightly focused on storing a MembershipUser in a relational database. It can be done (and you can often find pretty good ones that have already been written), but it's a good amount of work and often leaves you with ugly code that has a bunch of System.NotImplementedException fun since there are a lot of methods that just don't apply.

Designed around a specific view of users, roles and profilesThe existing providers are focused on traditional membership - a user has a username and a password, some specific roles on the site (e.g. administrator, premium user), and may have some additional "nice to have" optional information that can be accessed via an API in your application.
This doesn't fit well with some modern usage patterns:

  • In OAuth and OpenID, the user doesn't have a password
  • Often these kinds of scenarios map better to user claims or rights instead of monolithic user roles
  • For many sites, profile or other non-traditional information is very important and needs to come from somewhere other than an API call that maps to a database blob

What would work a lot better here is a system in which you were able to define your users, rights, and other attributes however you wanted and the membership system worked with your model - not the other way around.

Requires specific schema, overflow in blob columns
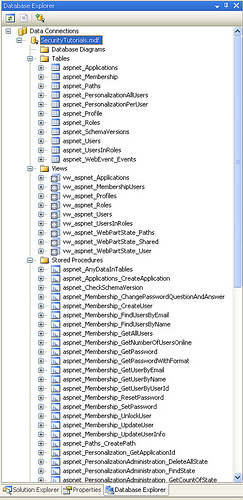

Update: This schema has been improved a lot with Universal Providers. The views and stored procedures have been removed, and the tables are simplified.
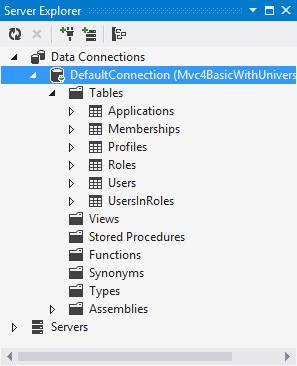
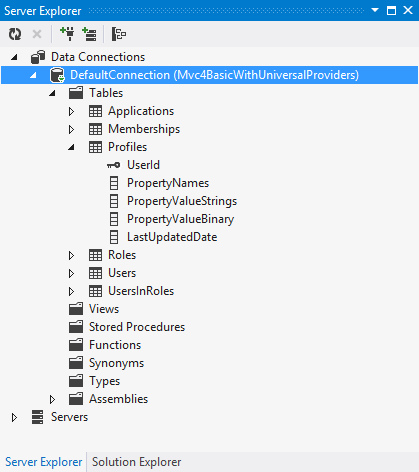
SimpleMembership as a better membership system
As you might have guessed, SimpleMembership was designed to address the above problems.

Then we point SimpleMemberhip at that table with a one-liner:
WebSecurity.InitializeDatabaseFile("SecurityDemo.sdf", "Users", "UserID", "Username", true);

Broaden database support to the whole SQL Server family
While SimpleMembership is not database agnostic, it works across the SQL Server family. It continues to support full SQL Server, but it also works with SQL Azure, SQL Server CE, SQL Server Express, and LocalDB. Everything's implemented as SQL calls rather than requiring stored procedures, views, agents, and change notifications.

Note that SimpleMembership still requires some flavor of SQL Server - it won't work with MySQL, NoSQL databases, etc. You can take a look at the code in WebMatrix.WebData.dll using a tool like ILSpy if you'd like to see why - there are places where SQL Server specific SQL statements are being executed, especially when creating and initializing tables. It seems like you might be able to work with another database if you created the tables separately, but I haven't tried it and it's not supported at this point.

Easy to with Entity Framework Code First
The problem with with ASP.NET Membership's system for storing additional account information is that it's the gate keeper. That means you're stuck with its schema and accessing profile information through its API.

SimpleMembership flips that around by allowing you to use any table as a user store. That means you're in control of the user profile information, and you can access it however you'd like - it's just data. Let's look at a practical based on the AccountModel.cs class in an ASP.NET MVC 4 Internet project. Here I'm adding a Birthday property to the UserProfile class.

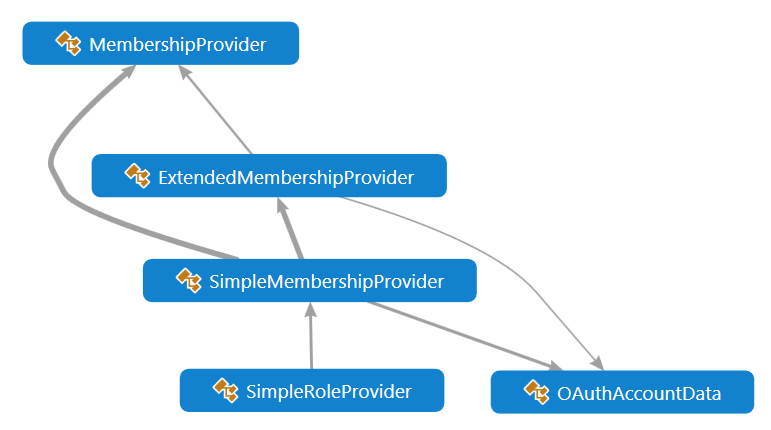
How SimpleMembership integrates with ASP.NET MembershipOkay, enough sales pitch (and hopefully background) on why things have changed. How does this affect you? Let's start with a diagram to show the relationship (note: I've simplified by removing a few classes to show the important relationships):
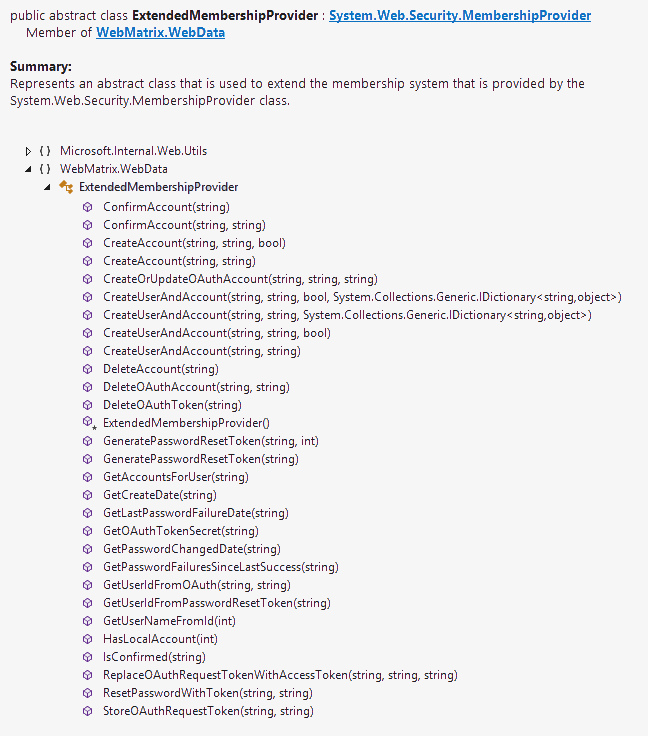
So SimpleMembershipProvider is an implementaiton of an ExtendedMembershipProvider, which inherits from MembershipProvider and adds some other account / OAuth related things. Here's what ExtendedMembershipProvider adds to MembershipProvider:
Membership in the ASP.NET 4.5 project template
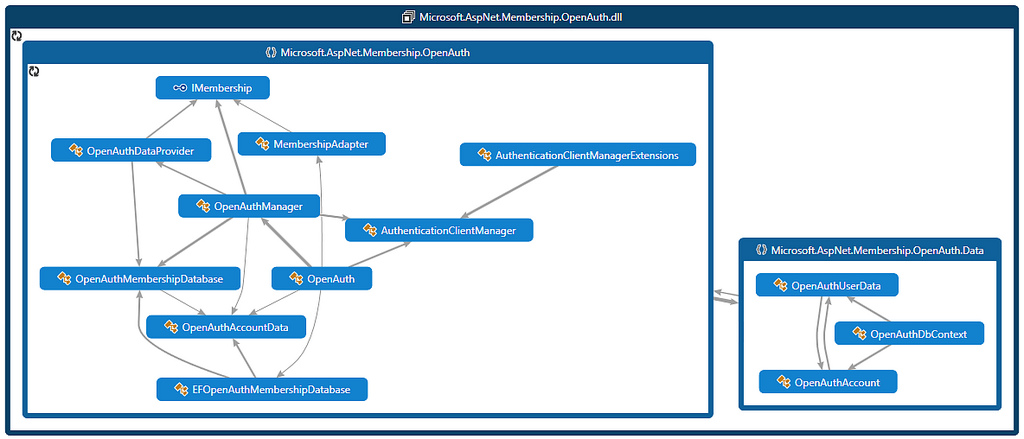
ASP.NET 4.5 Web Forms took a different approach which builds off ASP.NET Membership. Instead of using the WebMatrix security assemblies, Web Forms uses Microsoft.AspNet.Membership.OpenAuth assembly. I'm no expert on this, but from a bit of time in ILSpy and Visual Studio's (very pretty) dependency graphs, this uses a Membership Adapter to save OAuth data into an EF managed database while still running on top of ASP.NET Membership.
How does this fit in with Universal Providers (System.Web.Providers)?
Just to summarize:

  • Universal Providers are intended for cases where you have an existing ASP.NET Membership Provider and you want to use it with another SQL Server database backend (other than SQL Server). It doesn't require agents to handle expired session cleanup and other background tasks, it piggybacks these tasks on other calls.
  • Universal Providers are not really, strictly speaking, universal - at least to my way of thinking. They only work with databases in the SQL Server family.
  • Universal Providers do not work with Simple Membership.
  • The Universal Providers packages include some web config transforms which you would normally want when you're using them.


European ASP.NET 4.5 Hosting :: Key HTML Editor Features ASP.NET 4.5

clock December 12, 2013 07:32 by author Patrick

We will be go through the key HTML editor features introduced in ASP.NET 4.5. Automatic Renaming of the matching tag. In ASP.NET 4.5, we have a very productive feature where matching tags are automatically renamed when we change the opening tag.

Consider the following code in HTML side

Now in earlier versions of ASP.NET if I had to make a change in the starting tag then I had to manually update the end tag too. However, with ASP.NET 4.5, you will see that if you update the starting tag then the end tag will also update automatically.

Please see the following image for more details.

Extract to User Control

The ASP.NET 4.5 desiners have developed a very unique and productive feature where at any point of time, we can change code present in a web form to a user control.
Consider I have a web form containing TextBoxes for userName and Password for authentication. While working on this page, we found that we need this user name and password authentication in various modules of the project.


With this said, ASP.NET 4.5 provides us the great feature where we must simply select the code and we can change that selected code to a User Control; see:

Smart Task in HTML Editor

One of the productive features added to ASP.NET a few years back was the addition of a smart task. On the click of the smart available on the control, you can accomplish some of the common tasks on that control.


Now with ASP.NET 4.5, we have the same feature while working on the HTML side. Hence, we don't need to go to design mode to use this feature.

If you click on the line present under "a" , this would open up the smart task for that control.

You will see that you can perform all the common tasks for that control.

Code Snippets in HTML

With ASP.NET 4.5, we have code snippets available in HTML. If you want to add audio or video to you page then you simply must type video on HTML and press TAB twice. You will see that full audio / video control is available, mentioning all the common properties.

Event Handler generation

Before the release of ASP.NET 4.5, if we must create any event handler for any control then we either must double-click on that control, that will generate an event for that control or define the event in the properties of that control. However, with ASP.NET 4.56 we have a new property added in the control, where we can generate an event for the control at the HTML side and we don't need to switch to design mode.

Clicking on "Create New Event" will create a default event for that control; however we can provide any name of that event and you would see that Visual Studio will then automatically generate the appropriate server side event handler within your code behind file for you.

Hope this article of mine has been helpful in giving some knowledge of the new features of ASP.NET 4.5.


European ASP.NET 4.5 Hosting - HostForLIFE.eu :: Friendly URLs in ASP.NET 4.5 Web Forms

clock November 27, 2013 06:10 by author Scott

In the recent update of ASP.NET, Microsoft released support for Friendly URLs in ASP.NET Web Forms. It is based on the concept of Routing. But, we don’t need to deal with route table to manually add the routes to be mapped. URLs of the site will be automatically made friendly after invoking when the application starts.

To get started using the Friendly URLs, we need to install the NuGet Package Microsoft.AspNet.FriendlyUrls. The package is not stable yet, so we need to search it in pre-release packages.

This package adds following files to the web application:

  • Microsoft.AspNet.FriendlyUrls assembly – Contains required set of classes and interfaces
  • Site.Mobile.Master – Master page for mobile devices
  • ViewSwitcher.ascx – A user control that can be used to switch views from desktop view to Mobile view and vice versa

Once Visual Studio finishes installing the NuGet package, a read me file will be popped up. This file contains the steps to be followed to enable Friendly URLs on your site. All you have to do is, call the EnableFriendlyUrls extension method of RouteTable in RegisterRoutes method of RouteConfig class. This method is defined in Microsoft.AspNet.FriendlyUrls namespace.

routes.EnableFriendlyUrls();

And make sure that the RegisterRoutes method is called in Application_Start event of Global.asax:

RouteConfig.RegisterRoutes(RouteTable.Routes);

Now run the application and check URL on the address bar of your browser.

And the magic happened! As we see here, the URL doesn’t contain extension of the page.

Note: You don’t have to install NuGet package and apply the above settings if you have installed ASP.NET and Web Tools 2012.2. These changes are built into the ASP.NET web application template in the new template.

If you are using default ASP.NET 4.5 Web application template, you can invoke the Login (which resides in Account folder) page using:

http://mysite/Account/Login

You can link any page that resides in a folder using the same convention.

Hyperlinks to the pages can be replaced with the friendly convention.

<a id="loginLink" runat="server" href="~/Account/Login">Log in</a>

Data can be passed to a page using segments. Href method of FriendlyUrl class can be used for this purpose:

<a href="<%: FriendlyUrl.Href("~/BookDetails","AspNet") %>">ASP.NET</a>

This hyperlink forms the following URL:

http://mysite/BookDetails/AspNet

This data can be displayed on the page in any mark-up element. To display the topic of book sent through the above URL in a span element, we have to get the value from the segment as shown below:

<span><%: Request.GetFriendlyUrlSegments()[0].ToString() %></span>

Also, this value can be passed as a parameter to a method used for Model Binding as shown below:

public IQueryable<Customer> GetBooks([FriendlyUrlSegments]string topic)
{
    var selectedBooks = context.Books.Where(c => c.BookName.Contains(topic));
    return selectedBooks;
}

Remember that, if you are navigating to the page ListBooks.aspx with following URL,

http://mysite/ListBooks/Book/AspNet

then the parameter marked with FriendlyUrlSegments will hold the value Book/AspNet. So, this should be handled with care.


European ASP.NET 4.5 Hosting - HostForLIFE.eu :: Websockets with ASP.NET 4.5 and Visual Studio 2012

clock November 14, 2013 07:09 by author Scott

Web applications are becoming increasingly sophisticated and it is common to need to communicate with various services.

There are a number of options to accomplish this task with probably the most popular being to continually poll a server with XHR requests. Other alternatives exist that delay disconnections. These can be tricky to implement and don’t scale well (sometimes worse than polling as they keep a connection open) so aren’t used as much.

HTTP isn’t really an ideal protocol for performing frequent requests as:

- It’s not optimized for speed
- It utilizes a lot of bandwidth for every request with various headers etc sent with every request
- To keep an application up to date many requests must be sent
- Provides limited cross domain support (relying on workarounds such as JSONP
- Firewalls & proxys sometimes buffer streaming/long polling solutions increasing latency
- Long polling & streaming solutions are not very scalable

WebSockets are a new technology that attempts to resolve some of these limitations by:

- Sending the minimum amount of data necessary
- Making more efficient usage of bandwidth
- Providing cross domain support
- Still operating over HTTP so it can transverse firewalls and proxies
- Works with some load balancers (TCP l4)
- Provides support for binary data (note some JavaScript implementations don’t currently support this)

When would web sockets be a suitable protocol for your application?

You might want to consider using web sockets in the following scenarios:

- Games
- Real time data
- Chat applications
- News tickers

There is a nice set of demos at: http://www.html5rocks.com/en/tutorials/websockets/basics/ and an interesting article that compares a Web Sockets and polling solution in terms of latency & throughput at http://websocket.org/quantum.html.

Websockets pitfalls

Websockets is a relatively new protocol that has already undergone a number of versions as various issues are addressed. This is important as support across browsers varies.

At the time of writing Websockets (in some form) can be used by the following browsers (check caniuse.com for the most up to date info):

- IE10
- Chrome 13+
- Firefox 7
- Safari 5+
- Opera 11+

Earlier implementations of websockets had some security issues so your connections may work but are not secure (Firefox disabled support in Firefox 4 & 5 for this reason).

The other issue that you may encounter is that some older proxy servers don’t support the http upgrade system that websockets uses to connect so some clients may be unable to connect.

.net 4.5 Web Socket Support

.net 4.5 introduces a number of APIs for working with web sockets. If you find you need more control than the ASP.net API’s offers then look into WCF as that has also been updated.

Before we begin there are a couple of requirements for using ASP.net web sockets API:

- Application must be hosted on IIS 8 (available only with some version of Windows 8 – please note currently IIS Express currently does not work)
- Web Sockets protocol feature installed (IIS option)
- .net 4.5
- A compatible browser on the client (IE10 or Chrome will 18 work fine at time of writing)
- It would help if your Chinese birth animal was the horse

Currently Microsoft have no plans to release Websockets support for earlier versions of IIS so if you plan to run it on Windows Server 2008 then you are going to have to look at other options such ashttp://superwebsocket.codeplex.com/.

You could also look at the SignalR library from Microsoft which is designed for developing async applications and provides WebSockets (and fallback) support: https://github.com/SignalR/SignalR/wiki/WebSockets.

Example

Ok I am going to assume that you are already working with some version of Windows 8 that has IIS & ASP.net 4.5 installed. The other thing we are going to need to do is make sure IIS has the Web Sockets Protocol feature installed (this is in the add/remove programs bit):

First create a new empty ASP.net project called WebSockets

Add the Nuget package Microsoft.Websockets

Pull down the latest jQuery library and put it in a scripts directory (I am using 1.7.2) – note jQuery isn’t necessary it just saves a bit of tedious event and manipulation code.

Now add a file called index.htm and enter the following code:

<!doctype html>
<head>
<script src="Scripts/jquery-1.7.2.min.js" type="text/javascript"></script>
<script type="text/javascript">
$(document).ready(function () {
var name = prompt('what is your name?:');
var url = 'ws://' + window.location.hostname + window.location.pathname.replace('index.htm', 'ws.ashx') + '?name=' + name;
alert('Connecting to: ' + url);
ws = new WebSocket(url);
ws.onopen = function () {
$('#messages').prepend('Connected <br/>');
$('#cmdSend').click(function () {
ws.send($('#txtMessage').val());
$('#txtMessage').val('');
});
}
ws.onmessage = function (e) {
$('#chatMessages').prepend(e.data + '<br/>');
};
$('#cmdLeave').click(function () {
ws.close();
});
ws.onclose = function () {
$('#chatMessages').prepend('Closed <br/>');
};
ws.onerror = function (e) {
$('#chatMessages').prepend('Oops something went wront <br/>');
};
});
</script>
</head>
<body>
<input id="txtMessage" />
<input id="cmdSend" type="button" value="Send" />
<input id="cmdLeave" type="button" value="Leave" />
<br />
<div id="chatMessages" />
</body>
</html>

We need to create an http handler so add a new generic handler to the project called ws.ashx and enter the following code:

using System;
using System.Collections.Generic;
using System.Linq;
using System.Web;
using Microsoft.Web.WebSockets;
namespace WebSockets
{
public class WSHttpHandler : IHttpHandler
{
public void ProcessRequest(HttpContext context)
{
if (context.IsWebSocketRequest)
context.AcceptWebSocketRequest(new TestWebSocketHandler());
}
public bool IsReusable
{
get
{
return false;
}
}
}
}

Finally we need to create something to handle the websocket connection (TestWebSocketHandler that is created in the AcceptWebSocketRequest method).

Create a new class called TestWebSocketHandler and enter the following code:

using System;
using System.Collections.Generic;
using System.Linq;
using System.Threading;
using System.Web;
using Microsoft.Web.WebSockets;
namespace WebSockets
{
public class TestWebSocketHandler : WebSocketHandler
{
private static WebSocketCollection clients = new WebSocketCollection();
private string name;
public override void OnOpen()
{
this.name = this.WebSocketContext.QueryString["name"];
clients.Add(this);
clients.Broadcast(name + " has connected.");
}
public override void OnMessage(string message)
{
clients.Broadcast(string.Format("{0} said: {1}", name, message));
}
public override void OnClose()
{
clients.Remove(this);
clients.Broadcast(string.Format("{0} has gone away.", name));
}
}
}

That’s all you need so now compile the project and run it in a compatible browser (IE10 or the latest Chrome will do fine) making sure you are hosting your project from IIS (project properties if you are not).

Once you have run it up you will be prompted to provide a name, then an alert box will indicate the end point of your application (ws://localhost/.. – note the secure https version is wss://).

Now open up a different browser and you should find you can via websockets!


European ASP.NET 4.5 Hosting - Amsterdam :: Change Session Timeout in ASP.NET

clock July 1, 2013 11:53 by author Scott

You’re trying to increase session timeout on your ASP.NET site? In this tutorial, I will gonna talk about this issue. But, if you use shared hosting, you cant use session as it will impact to other clients site.

ASP.NET

Usually, the first and easiest thing to do is just change the configuration/system.web/sessionState@timeout value to something like “90″.  This should mean that you’d like your users’ sessions to be persisted until a 90 minute window of idle time has elapsed.

<configuration>
  <system.web>
  ...
   <sessionState timeout="90" />
  ...
 </system.web>
</configuration>

Hmm… Not only about change on your code, but please check this application pool timeout on your IIS setting.

Ensure this value is set to the timeout of your session, at a minimum, to ensure that all sessions persist for the entire session timeout period.

The reason that these two values are dependent on one another is because the session information is actually stored within the worker process of the application pool. That is to say, if the worker process is shutdown or killed for any reason, the session information will be lost.

Session Storage Mode

There are the modes of storing the session information:

  • InProc (or In Process) – Default – Stores session information within the IIS worker process
  • StateServer – Stores session information in a separate process (the ASP.NET state service)
  • SQLServer – Stores session information in a SQL database

The only mode that is vulnerable to losing session information on a worker process is when the state is stored in the worker process. Both StateServer and SQLServer modes are not affected by worker process resets. Likewise, StateServer and SQLServer modes are the only options when it is necessary to share session state across more than a single IIS server.

For more information about these modes, check out MSDN.

ASP

There’s two ways to change the session timeout when you’re dealing with classic ASP.

You can set it at the application level, or programmatically, which means that the value can be different within the application.

Since it doesn’t specifically state that the setting is for classic ASP, it may be confusing to know that the value is in: Application Properties -> Configuration… -> Options -> Enable session state.

It’s as simple as updating this value, and the session timeout for your entire classic ASP application is changed!

Programmatically

You can also use modify the Session.Timeout property at runtime to affect the timeout period of the session. One popular location to put this piece of code is in the global.asa file.

<script language="VBScript" runat="Server">
Sub Session_OnStart
 Session.Timeout = 90
End Sub
</SCRIPT>

Hope this tutorial helpful. 


European ASP.NET 4.5 Hosting - Amsterdam :: ASP.Net 4.5 Strongly Typed Data Controls and Visual Studio 2012

clock June 25, 2013 06:46 by author Scott

In this post I will show you one of great features in ASP.NET 4.5, it is called Strongly Typed Data controls in ASP.NET 4.5.

I will be demonstrating with a hands-on example on Strongly Typed Data controls and how we can have Intellisense and compile type checking using this new feature.

I assume you have downloaded VS 2012 (Express edition will do).I have also downloaded and installed AdventureWorksLT2012 database.You can download this database from the codeplex website.

I will be creating a simple website without using this feature. Then I will show you what the problem is without using this feature.

1) Launch VS 2012. Create a new ASP.Net Web Forms Site. Choose C# as the development language.Give an appropriate name to your site.

2) Now we will add a data access layer to our site in order to fetch some data to the user interface.I will use EF database first approach.

3) Add a new item in your project, an ADO.Net Entity Data Model. I have named it AdventureWorksLT.edmx.Then we will create the model from the database and click Next.Create a new connection by specifying the SQL Server instance and the database name and click OK.Then click Next in the wizard.In the next screen of the wizard select only the Customer table from the database and hit Finish.You will see the Customer entity in the Entity Designer. 

4) Add a new web form to your site.Name is Customer.aspx.We will add a new web server control a GridView that will get the data from the database through EF.

This is the code for the web server control.I am using the Bind syntax.We are using strings to represent the property names (FirstName,LastName).

<asp:GridView ID="GridView1" runat="server" AutoGenerateColumns="false">

            <Columns>
                <asp:TemplateField HeaderText="FirstName">
                   
                    <ItemTemplate>
                        <asp:Label ID="lblName" runat="server" Text='<%# Bind("FirstName") %>'></asp:Label>
                    </ItemTemplate>
               
               </asp:TemplateField>
               
               <asp:TemplateField HeaderText="LastName">
                   

                     <ItemTemplate>
    <asp:Label ID="lbName" runat="server" Text='<%# Bind("LastName")
%>'></asp:Label>
                    </ItemTemplate>

                </asp:TemplateField>

            </Columns>

        </asp:GridView>

5) In the Page_Load event handling routine of the Customer.aspx page type the following code

        AdventureWorks2012Entities ctx = new AdventureWorks2012Entities();

        var query = from cust in ctx.Customers
     
        select new {cust.FirstName,cust.LastName};

        GridView1.DataSource = query.ToList();

        GridView1.DataBind();

6)  Build and Run the application. You will see the data appearing on the page.

7) Now let's do a simple typo.Replace the following line

<asp:Label ID="lbName" runat="server" Text='<%# Bind("LastName") %>'></asp:Label>

with this

<asp:Label ID="lbName" runat="server" Text='<%# Bind("LLastName") %>'></asp:Label>

Build your site. It will compile. The compiler does not know anything . Guess where you will get the exception, at runtime.Run your site and you will get an exception.

8) Let's rewrite the code in the Customers.aspx page.

        <asp:GridView ID="GridView1" runat="server" AutoGenerateColumns="false" ItemType="AdventureWorks2012Entities.Customer">

            <Columns>
                <asp:TemplateField HeaderText="FirstName">

                    <ItemTemplate>
                        <asp:Label ID="lblName" runat="server" Text='<%# Item.FirstName %>'></asp:Label>
                    </ItemTemplate>

                </asp:TemplateField>
                <asp:TemplateField HeaderText="LastName">

                    <ItemTemplate>
                        <asp:Label ID="lbName" runat="server" Text='<%# Item.LastName %>'></asp:Label>
                    </ItemTemplate>

                </asp:TemplateField>

            </Columns>

        </asp:GridView>

Now we can tell our application what type of data the control will be bound to using the ItemType 

ItemType="AdventureWorks2012Entities.Customer"

Now we need to alter the code in the template. Have a look at those 2 lines 

  <asp:Label ID="lblName" runat="server" Text='<%# Item.FirstName %>'></asp:Label>
  <asp:Label ID="lbName" runat="server" Text='<%# Item.LastName %>'></asp:Label> 

Now we have compile type checking and Intellisense in our sample application.As we type the compiler informs us if it recognizes the property. This is a great enhancement since I do not want to face exceptions on runtime because of typos. 

9) Build and run your application again. The sample application works fine.


European ASP.NET 4.5 Hosting - Amsterdam :: Creating Security System for ASP.NET 4.5

clock June 18, 2013 06:23 by author Scott

First, you noticed you were assigning users to roles that gave them more access than they needed. So you started tailoring roles more specifically and ended up with roles with one user in them. (And at that point, why bother with roles at all?) Finally, you started creating very targeted roles and assigning multiple roles to each user.

That final strategy is moving you to claims-based security: each role really represents a kind of claim. One role says the user is a manager, another that the user is in the Western division, a third that the user can authorize expenditures up to $10,000. The Microsoft .NET Framework 4.5 supports claims-based security directly, but you can create an equivalent system in ASP.NET 4 (either in MVC, Web Forms or Web API) without much trouble.

The first step is to create an object that implements the IPrincipal interface and has properties for the data (claims) that you'll use to authorize requests. A class that implements IPrincipal has to have a property called Identity that returns a GenericIdentity object (which provides the user's name) and a method called IsInRole method that returns True if a user is assigned to a specific role. The user object in Listing 1 does all of that and adds three additional properties (Division, Job and ApprovalLevel).

Listing 1. A custom user object.

Public Class PHVUser
  Implements IPrincipal

  Dim _gi As GenericIdentity
  Dim _roles As New List(Of String)

  Public Sub New(Name As String, Optional Roles As String = "")
    _gi = New GenericIdentity(Name)
    If Roles <> "" And Roles <> String.Empty Then
      For Each rol In Roles.Split(",").
        Select(Function(r) r.Trim()).ToArray
        _roles.Add(rol)
      Next
    End If

  End Sub

  Public Property Division As String
  Public Property Job As String
  Public Property ApprovalLevel As Integer

  Public ReadOnly Property Identity _
    As IIdentity Implements IPrincipal.Identity
    Get
      Return _gi
    End Get
  End Property

  Public Function IsInRole(role As String) _
    As Boolean Implements IPrincipal.IsInRole
    If _roles.Contains(role) Then
      Return True
    Else
      Return False
    End If
  End Function
End Class

To create a user object for a user named "Peter" who's assigned to the roles manager and clerk, you'd use this code:

usr = New PHVUser("Scott", "manager, clark")

Replacing the User

Now you have to get ASP.NET to use your security object. ASP.NET looks for its IPrincipal object in the CurrentPrincipal object of the Thread class and the User property of HttpContext.Current. If you put your object in there, ASP.NET will use it for its default user name and roles authorization.

To get your IPrincipal object into those two spots, you need to create an HTTP module (a class that implements the IHttpModule and IDisposable events) and add it to your site's processing pipeline. ASP.NET will fire the PostAuthenticateRequest event on your module whenever a request comes in to your site. You need to wire up a method to that event in your module's Init event to create and insert your object.

The class begins like this (I've omitted some code that implements the IDisposable interface that Visual Studio will generate for you):

Public Class PHVAuthHttp
  Implements IHttpModule, IDisposable

  Public Sub Init(context As HttpApplication) _
    Implements IHttpModule.Init
    AddHandler context.PostAuthenticateRequest,
      New EventHandler(AddressOf ReplaceUser)
  End Sub

In your method, you need to find out who the current user is so you can create your IPrincipal object for that user. When a user successfully gets through Forms Authentication, they're given a cookie with their name (and some other information) encrypted inside of it. You can grab that cookie and decrypt it like this:

Private Shared Sub ReplaceUser(sender As Object,
                               e As EventArgs)
  Dim authCookie As HttpCookie
  authCookie = HttpContext.Current.Request.Cookies.
               Get(FormsAuthentication.FormsCookieName)
  If authCookie IsNot Nothing Then
    Dim tkt As FormsAuthenticationTicket
    tkt = FormsAuthentication.Decrypt(authCookie.Value)

After you check that everything has worked, you can use the user's name to retrieve information about the user, and create your IPrincipal object and set your properties on it before putting it where ASP.NET will look for it:

If tkt.Name IsNot Nothing AndAlso
   tkt.Name <> String.Empty AndAlso
   tkt.Name <> "" Then
     // ... Retrieve user information into a variable called emp ...
     Threading.Thread.CurrentPrincipal = New PHVUser(tkt.Name) With
                        {.Region = emp.Region,
                         .Job = emp.Job,
                         .ApprovalLevel = 10000}
     HttpContext.Current.User = Threading.Thread.CurrentPrincipal
End If

Because you're doing this on every request, it would be a good idea to put the user's information (my emp variable in the previous example) in ASP.NET Cache and look for it there before going to the database to retrieve it.

Finally, you need to get ASP.NET to use your HTTP module by adding a modules element to your web.config file inside the system.webServer element. Inside the modules element put an add tag. You can set the name attribute to anything you want, but the type attribute must be set to the full name for your class (namespace and class name) followed by the name of the DLL it's in:

<modules>
  <add name="PHVAuth" type="PHVProj.PHVAuthHttp, PHVProj" />
</modules>

Testing Authorization

You can now test for your user's claims in your own code:

Dim usr As PHVUser = TryCast(HttpContext.Current.User, PHVUser)
If usr IsNot Nothing AndAlso
   usr.Region = "West" AndAlso
   usr.ApprovalLevel = 10000 Then

If you're working in ASP.NET MVC you can also create a custom Authorize filter that checks your user. Listing 2 shows an Authorize filter that checks a user's Region and works well in an asynchronous world. You could add it to a method like this:

<DivisionAuthAttribute(Region="West")>

Listing 2. An Authorize filter that checks a user's Region.

<AttributeUsage(AttributeTargets.Class Or AttributeTargets.Method)>
Public Class DivisionAuthAttribute
  Inherits AuthorizeAttribute

  Private Const IS_AUTHORIZED As String = "isAuthorized"
  Private RedirectUrl As String = "~/Error/Unauthorized"

  Public Property Division As String

  Protected Overrides Function AuthorizeCore(
    httpContext As Web.HttpContextBase) As Boolean
    Dim IsAuthorized As Boolean = False
    Dim us As UserSecurity = TryCast(httpContext.User, PHVUser)
    If us IsNot Nothing AndAlso
      Me.Division <> String.Empty AndAlso
      us.Division = Me.Division Then
        httpContext.Items.Add(IS_AUTHORIZED, IsAuthorized)
        Return True
    End If

    httpContext.Items.Add(IS_AUTHORIZED, IsAuthorized)
    Return False
  End Function

  Public Overrides Sub OnAuthorization(
    filterContext As Web.Mvc.AuthorizationContext)
    MyBase.OnAuthorization(filterContext)
    Dim IsAuthorized As Boolean
    If filterContext.HttpContext.Items(IS_AUTHORIZED) _
      IsNot Nothing Then
      IsAuthorized = Convert.ToBoolean(
        filterContext.HttpContext.Items(IS_AUTHORIZED))
    Else
      IsAuthorized = False
    End If
    If IsAuthorized = False AndAlso
       filterContext.RequestContext.HttpContext.
         User.Identity.IsAuthenticated Then
      filterContext.Result = New RedirectResult(RedirectUrl)
    End If
  End Sub
End Class

You can now extend your user object to encompass any information about your user that you need to authorize requests.


European ASP.NET 4.5 Hosting - Amsterdam :: Creating Custom Value Provider in ASP.NET 4.5

clock May 30, 2013 07:46 by author Scott

With ASP.NET 4.5, ASP.NET introduced model binding for web forms as well. Model binding helps to simplify code focused data access logic within web forms.

Here in this post, we will see how we can create our own custom value provider. We will also examine inbuilt class of ASP.NET 4.5 model binding framework which can be useful in creating custom value provider more easily with focused approach.

Before we look into actual interfaces and classes, let us examine few basics of model binding framework. All model binding framework and corresponding classes are resides in System.Web.ModelBinding namespace which is newly introduced with ASP.NET 4.5. For any value provider to work with model binder it requires two components one is implementation of value provider which reads data from request and forward it to model binder and other one is value provider source attribute which expose the actual value provider instance. Have a look at below code snippet here QueryStringAttribute is value provider source attribute which expose object of QueryStringValueProvider so model binder can use it to fetch data.

public IQueryable<Blog> SelectMethod([QueryString]int? id)

Creating Value Provider Source Attribute

To create custom value provider attribute we can derive Attribute class and implement IValueProviderSource interface as displayed in below code snippet.

public class CustomValueProviderAttribute : Attribute, IValueProviderSource
{
    public IValueProvider GetValueProvider(ModelBindingExecutionContext modelBindingExecutionContext)
    {
        return new CustomValueProvider(modelBindingExecutionContext);
    }
}

Here we can have access of ModelBindingExecutionContext and we can pass same to value provider if it is required. Through ModelBindingExecutionContext we can also have access of HttpContextBase and ModelStateDictionary.

Creating Value Provider

Same way we can create Custom Value Provider by implementing IValueProvider interface. Below code snippet shows pseudo code for the same.

public class CustomValueProvider : IValueProvider
{
    ModelBindingExecutionContext _modelBindingExecutionContext;

    public CustomValueProvider(ModelBindingExecutionContext modelBindingExecutionContext)
    {
        this._modelBindingExecutionContext = modelBindingExecutionContext;
    } 

    public bool ContainsPrefix(string prefix)
    {
        // validate if requested key is exist or not
    } 

    public ValueProviderResult GetValue(string key)
    {
        // return ValueProviderResult object we
        // can use ModelBindingExecutionContext
        // to access request data
    }
}

Once we are ready we can use created value provider as

SelectMethod([CustomValueProvider]int? id, [CustomValueProvider]string name)

As noted earlier, there are few inbuilt classes in ASP.NET 4.5 model binding framework which give more focused control over custom business logic. Here we will also examine one of its which is SimpleValueProvider. Here we will examine how we can focus on core logic and leaving other responsibility on core framework.

public class CustomValueProvider : SimpleValueProvider
{
    public CustomValueProvider(ModelBindingExecutionContext modelBindingExecutionContext)
        : base(modelBindingExecutionContext)
    {
    } 

    protected override object FetchValue(string key)
    {
        // here we can access this.ModelBindingExecutionContext
        // and can look into request data. Once we fetch requested
        // data we just need to return actual value for e.g.           
        return "dotnetExpertGuide.com";
        // NOTE: WE ARE NOT RETURNING ValueProviderResult INSTANCE
    }
}

Earlier with IValueProvider, we had to check if requested key exist or not and if it is then instantiating ValueProviderResult and return it. While with SimpleValueProvider we only need to return actual value of requested key or null incase if it does not exist rest will be taken care by SimpleValueProvider class. Another such framework class is NameValueCollectionValueProvider which act as a base class to create value provider from name value collection. Here I am not demonstrating it. I am leaving it for reader :).

SimpleValueProvider and ASP.NET MVC

Can’t we have/introduce SimpleValueProvider class for MVC in upcoming version?

ModelStateDictionary

Once model binding is done for parameter it is added to ModelStateDictionary dictionary along with its value. For e.g.

SelectMethod([CustomValueProvider]int? id, [CustomValueProvider]string name)

In above code once model binding is done for parameter id, it is added to ModelStateDictionary and it is accessible in rest of the parameter model binding i.e. parameter name here.


European ASP.NET 4.5 Hosting - Amsterdam :: Revisiting IBundleTransform ASP.NET 4.5 and MVC 4

clock May 13, 2013 10:12 by author Scott

Web optimization frameworks include two defaults transform type JsMinify and CssMinify which is used by ScriptBundle and StyleBundle respectively. However we can create our own custom transform type to processe references as per our need. To create custom transform type, we need to create class which implements IBundleTransform interface.

IBundleTransform interface define a method named Process which process bundle response. In developer preview version, Process method had only one parameter of type BundleResponse, however onwards RC release, Process method introduced one more parameter of type BundleContext. In this post, we will see how we can utilize this additional parameter while creating our custom transform type.

BundleContext

As name suggest, with BundleContext, we can get information about bundles which could include existing bundle information, bundle url, HTTP context for bundle, etc. Following is the list of all property of BundleContext.

- BundleContext.BundleCollection : We can get collection of all bundles including default and custom bundle in application through this property.

- BundleContext.BundleVirtualPath : This property expose virtual bundle url i.e. ~/bundles/MyBundle.

- BundleContext.HttpContext : This property is type of HttpContextBase, and we can have access of HTTP context through this property. This is very much useful property when we are creating transform type which generate dynamic response. For e.g. we can access query string parameter passed to bundle url (~/bundles/MyBundle?id=123) through this property (context.HttpContext.Request.QueryString["id"]) and we can use it to create dynamic bundle response.

- BundleContext.UseServerCache : Default value of this property is true. It means only first request to bundle url will be intercepted by transform types and once response is generated it will be stored in server cache and further request to bundle url will be served from server cache without processing it. This will help to reduce bundle processing time and to increase performance. If we set BundleContext.UseServerCache to false then all request will be processed by transform type this is only necessary when bundle url are generating dynamic response. See detailed walkthrough later in this post showing how to use this property in accordance with BundleResponse.Cacheability.

- BundleContext.EnableInstrumentation : Default value of this property is false. This is used for tracing and analysis purpose. We can check value of this property and can write tracing code accordingly. We can also set true to this property to enable instrumentation for further lifecycle of Web optimization frameworks for current bundle request.

BundleResponse

Now let us recall BundleResponse parameter from old post. BundleResponse is used to retrieve list of files included in bundle so we can process it and generate response for bundle. As BundleResponse is used to generate response of bundles, it needs to take care of two primary properties of generated response. One is response content type and another one is HTTP Cache-Control header. So BundleResponse also expose properties for the same. Following is the list of all properties in BundleResponse class.

- BundleResponse.Files : This is IEnumerable collection of files which is included in bundle. We can iterate through this collection and process file content to generate bundle response.

- BundleResponse.ContentType : Through this property, we can set content type for bundle so that browser can render it appropriately. Default content type "text/html".

- BundleResponse.Cacheability : We can use this property to set Cache-Control HTTP header of bundled response. Default value of this property is Public.

- BundleResponse.Content : Anything which we set as a value of this property, that content will be sent back to browser as a response of bundle.

Following is the complete code which shows how to create custom transform type and how we can use it with bundling.

public class CustomTransformType : IBundleTransform
{
    public void Process(BundleContext context, BundleResponse response)
    {
        string strBundleResponse = string.Empty;
        foreach (FileInfo file in response.Files)
        {
            // PROCESS FILE CONTENT
        }
        response.Content = strBundleResponse;
    }


Bundle myBundle = new Bundle("~/bundles/MyBundle", new CustomTransformType());
myBundle.Include("~/path/to/file");
bundles.Add(myBundle);

Bundle and truly dynamic response

As we noted earlier, we can set BundleContext.UseServerCache to false in order to process all bundle request and generate dynamic response. Let try to simulate this by small walkthrough and see it works or we need to take care any additional parameter.

public void Process(BundleContext context, BundleResponse response)

{
    context.UseServerCache = false;
    response.Content = DateTime.Now.ToString();
}


We are returning current date time with UseServerCache set to false. Now try to hit bundle url multiple times by pressing F5. Oops… it seems it has processed bundle response only first time. Let dig more into this, open another browser and hit same url… ahmm it seems it has processed bundle response one more time… again press F5 multiple times…bad luck

As we can see, it seems (read again it seems) it is processing bundle response only first time for separate client (is it really? nop). Nop this is not the case. In fact this is how client deals with it due to HTTP cache control header. Confused? See response header of bundle url to get more information.

As we noted earlier default value of BundleResponse.Cacheability is Public. So even if we have set BundleContext.UseServerCache to false then also due to Expires response header and Public Cache-Control header client is not sending request back to server. So in this case we need to also set BundleResponse.Cacheability to NoCache. We can also set it to Private but in some client we need to press Ctrl + F5 to refresh bundle response.

public void Process(BundleContext context, BundleResponse response)
{
    context.UseServerCache = false;
    response.Cacheability = HttpCacheability.NoCache;
    response.Content = DateTime.Now.ToString();
}

After setting BundleResponse.Cacheability to NoCache try to refresh bundle url again now it is re generating bundle response on each request.


About HostForLIFE

HostForLIFE is European Windows Hosting Provider which focuses on Windows Platform only. We deliver on-demand hosting solutions including Shared hosting, Reseller Hosting, Cloud Hosting, Dedicated Servers, and IT as a Service for companies of all sizes.

We have offered the latest Windows 2019 Hosting, ASP.NET 5 Hosting, ASP.NET MVC 6 Hosting and SQL 2019 Hosting.


Month List

Tag cloud

Sign in