European ASP.NET 4.5 Hosting BLOG

BLOG about ASP.NET 4, ASP.NET 4.5 Hosting and Its Technology - Dedicated to European Windows Hosting Customer

ASP.NET Core 5.0.2 Hosting - HostForLIFE :: .NET Batch Processing With Directory.EnumerateFiles

clock April 19, 2021 06:50 by author Peter

In case one wants to retrieve files from catalog Directory.GetFiles is a simple answer sufficient for most scenarios. However, when you deal with a large amount of data you might need more advanced techniques.

Example
Let’s assume you have a big data solution and you need to process a directory that contains 200000 files. For each file, you extract some basic info
public record FileProcessingDto  
{  
    public string FullPath { get; set; }  
    public long Size { get; set; }  
    public string FileNameWithoutExtension { get; set; }  
    public string Hash { get; internal set; }  
}  


Note how we conveniently use novel C# 9 record types for our DTO here.

After that, we send extracted info for further processing. Let’s emulate it with the following snippet
public class FileProcessingService  
{  
    public Task Process(IReadOnlyCollection<FileProcessingDto> files, CancellationToken cancellationToken = default)  
    {  
        files.Select(p =>  
        {  
            Console.WriteLine($"Processing {p.FileNameWithoutExtension} located at {p.FullPath} of size {p.Size} bytes");  
            return p;  
        });  
 
        return Task.Delay(TimeSpan.FromMilliseconds(20), cancellationToken);  
    }  
}  


Now the final piece is extracting info and calling the service
public class Worker  
{  
    public const string Path = @"path to 200k files";  
    private readonly FileProcessingService _processingService;  
 
    public Worker()  
    {  
        _processingService = new FileProcessingService();  
    }  
 
    private string CalculateHash(string file)  
    {  
        using (var md5Instance = MD5.Create())  
        {  
            using (var stream = File.OpenRead(file))  
            {  
                var hashResult = md5Instance.ComputeHash(stream);  
                return BitConverter.ToString(hashResult)  
                    .Replace("-", "", StringComparison.OrdinalIgnoreCase)  
                    .ToLowerInvariant();  
            }  
        }  
    }  
 
    private FileProcessingDto MapToDto(string file)  
    {  
        var fileInfo = new FileInfo(file);  
        return new FileProcessingDto()  
        {  
            FullPath = file,  
            Size = fileInfo.Length,  
            FileNameWithoutExtension = fileInfo.Name,  
            Hash = CalculateHash(file)  
        };  
    }  
 
    public Task DoWork()  
    {  
        var files = Directory.GetFiles(Path)  
            .Select(p => MapToDto(p))  
            .ToList();  
 
        return _processingService.Process(files);  
    }  
}  

Note that here we act in a naive fashion and extract all files via Directory.GetFiles(Path) in one take.

However, once you run this code via
await new Worker().DoWork()  

you’ll notice that results are far from satisfying and the application is consuming memory extensively.

Directory.EnumerateFiles to the rescue

The thing with Directory.EnumerateFiles is that it returns IEnumerable<string> thus allowing us to fetch collection items one by one. This in turn prevents us from excessive use of memory while loading huge amounts of data at once.

Still, as you may have noticed FileProcessingService.Process has delay coded in it (sort of I/O operation we emulate with simple delay). In a real-world scenario, this might be a call to an external HTTP-endpoint or work with the storage. This brings us to the conclusion that calling FileProcessingService.Process 200 000 times might be inefficient.

That’s why we’re going to load reasonable batches of data into memory at once.

The reworked code looks as follows
public class WorkerImproved  
{  
    //omitted for brevity  
 
    public async Task DoWork()  
    {  
        const int batchSize = 10000;  
        var files = Directory.EnumerateFiles(Path);  
        var count = 0;  
        var filesToProcess = new List<FileProcessingDto>(batchSize);  
 
        foreach (var file in files)  
        {  
            count++;  
            filesToProcess.Add(MapToDto(file));  
            if (count == batchSize)  
            {  
                await _processingService.Process(filesToProcess);  
                count = 0;  
                filesToProcess.Clear();  
            }  
 
        }  
        if (filesToProcess.Any())  
        {  
            await _processingService.Process(filesToProcess);  
        }  
    }  
}  

Here we enumerate collection with foreach and once we reach the size of the batch we process it and flush the collection. The only interesting moment here is to call service one last time after we exit the loop in order to flush remaining items.

Evaluation
Results produced by Benchmark.NET are pretty convincing

Few words on batch processing
In this article we took a glance at the common pattern in software engineering. Batches of reasonable amount help us to beat both I/O penalty of working in an item-by-item fashion and excessive memory consumption of loading all items in memory at once.
 
As a rule, you should strive for using batch APIs when doing I/O operations for multiple items. And once the number of items becomes high you should think about splitting these items into batches.
 
Few words on return types
Quite often when dealing with codebases I see code similar to the following
    public IEnumerable<int> Numbers => new List<int> { 1, 2, 3 };  

I would argue that this code violates Postel’s principle and the thing that follows from it is that as a consumer of a property I have can’t figure out whether I can enumerate items one by one or if they are just loaded at once in memory.
 
This is a reason I suggest being more specific about return type i.e.
    public IList<int> Numbers => new List<int> { 1, 2, 3 };  

Batching is a nice technique that allows you to handle big amounts of data gracefully. Directory.EnumerateFiles is the API that allows you to organize batch processing for the directory with a large number of files.


ASP.NET Core 5.0.2 Hosting - HostForLIFE :: Unit Testing Using XUnit And MOQ In ASP.NET Core

clock April 14, 2021 09:51 by author Peter

Writing unit tests can be difficult, time-consuming, and slow when you can't isolate the classes you want to test from the rest of the system. In this course, Mocking in .NET Core Unit Tests with Moq: Getting Started, you'll learn how to create mocks and use them as dependencies to the classes you want to test. First, you'll discover how to configure mocked methods and properties to return specific values. Next, you'll cover how to perform behavior/interaction testing. Finally, you'll explore how to set up mocked exceptions and events. When you're finished with this course, you'll have the necessary knowledge to use Moq to unit test your classes in isolation by creating and using mock objects.


Setup the Project
Let's create a sample web API Project with basic crud operations using EF Core code first approach.

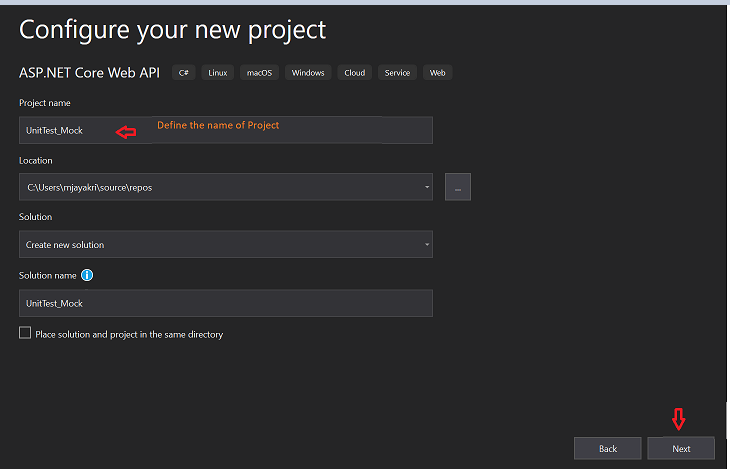
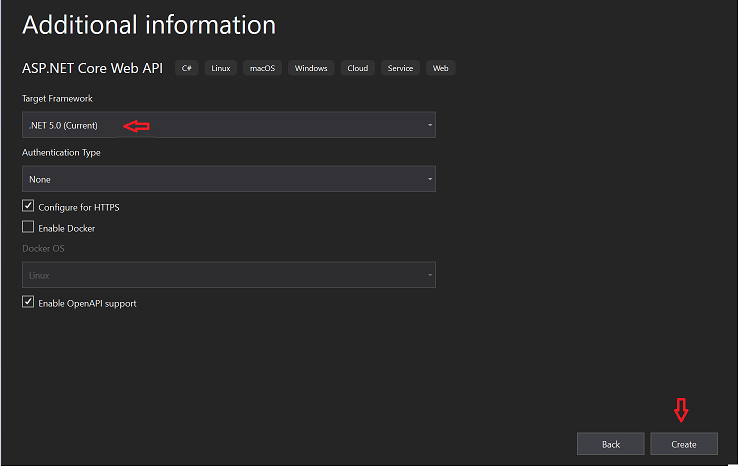
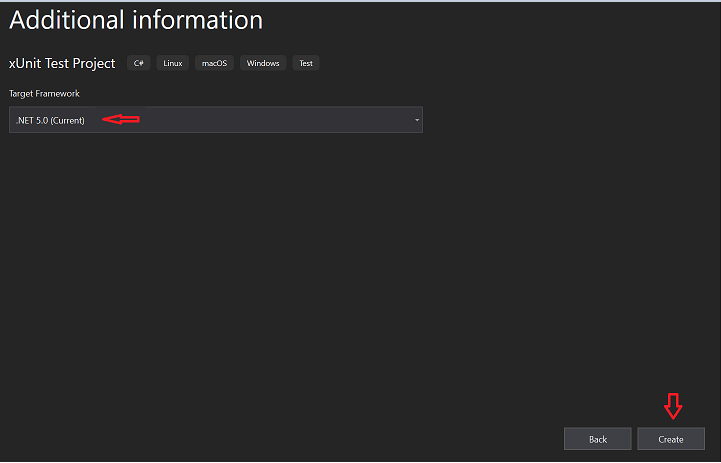
Since .Net 5.0 installed on my machine so that I am going with the latest template we can choose what version we are comfortable with.

Create the Model Folder and inside will configure the Model class and DbContext for the EntityFramework Core Code First approach setup.
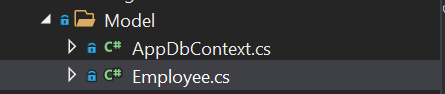

Employee.cs
    using System;  
    using System.Collections.Generic;  
    using System.ComponentModel.DataAnnotations;  
    using System.Linq;  
    using System.Threading.Tasks;  
      
    namespace UnitTest_Mock.Model  
    {  
        public class Employee  
        {  
            [Key]  
            public int Id { get; set; }  
            public string Name { get; set; }  
            public string Desgination { get; set; }  
        }  
    }  

 AppDbContext.cs
    using Microsoft.EntityFrameworkCore;  
    using System;  
    using System.Collections.Generic;  
    using System.Linq;  
    using System.Threading.Tasks;  
      
    namespace UnitTest_Mock.Model  
    {  
        public partial class AppDbContext : DbContext  
        {  
            public AppDbContext(DbContextOptions<AppDbContext> options) : base(options)  
            {  
      
            }  
            public DbSet<Employee> Employees { get; set; }  
        }  
    }  

Let's set up the connection string to perform the code first operations.

appsettings.json
    {  
      "Logging": {  
        "LogLevel": {  
          "Default": "Information",  
          "Microsoft": "Warning",  
          "Microsoft.Hosting.Lifetime": "Information"  
        }  
      },  
      "AllowedHosts": "*",  
      "ConnectionStrings": {  
        "myconn": "server=Your server name; database=UnitTest;Trusted_Connection=True;"  
      }  
    }  


 Startup.cs
    using Microsoft.AspNetCore.Builder;  
    using Microsoft.AspNetCore.Hosting;  
    using Microsoft.AspNetCore.HttpsPolicy;  
    using Microsoft.AspNetCore.Mvc;  
    using Microsoft.EntityFrameworkCore;  
    using Microsoft.Extensions.Configuration;  
    using Microsoft.Extensions.DependencyInjection;  
    using Microsoft.Extensions.Hosting;  
    using Microsoft.Extensions.Logging;  
    using Microsoft.OpenApi.Models;  
    using System;  
    using System.Collections.Generic;  
    using System.Linq;  
    using System.Threading.Tasks;  
    using UnitTest_Mock.Model;  
    using UnitTest_Mock.Services;  
      
    namespace UnitTest_Mock  
    {  
        public class Startup  
        {  
            public Startup(IConfiguration configuration)  
            {  
                Configuration = configuration;  
            }  
      
            public IConfiguration Configuration { get; }  
      
            // This method gets called by the runtime. Use this method to add services to the container.  
            public void ConfigureServices(IServiceCollection services)  
            {  
      
                services.AddControllers();  
                services.AddSwaggerGen(c =>  
                {  
                    c.SwaggerDoc("v1", new OpenApiInfo { Title = "UnitTest_Mock", Version = "v1" });  
                });  
                #region Connection String  
                services.AddDbContext<AppDbContext>(item => item.UseSqlServer(Configuration.GetConnectionString("myconn")));  
                #endregion  
                services.AddScoped<IEmployeeService, EmployeeService>();  
            }  
      
            // This method gets called by the runtime. Use this method to configure the HTTP request pipeline.  
            public void Configure(IApplicationBuilder app, IWebHostEnvironment env)  
            {  
                if (env.IsDevelopment())  
                {  
                    app.UseDeveloperExceptionPage();  
                    app.UseSwagger();  
                    app.UseSwaggerUI(c => c.SwaggerEndpoint("/swagger/v1/swagger.json", "UnitTest_Mock v1"));  
                }  
      
                app.UseHttpsRedirection();  
      
                app.UseRouting();  
      
                app.UseAuthorization();  
      
                app.UseEndpoints(endpoints =>  
                {  
                    endpoints.MapControllers();  
                });  
            }  
        }  
    }  


Create the tables by using the below commands in the console.
 
Step 1
 
To create a migration script

    PM> Add-Migration 'Initial'  

Step 2
 
To execute the script in SQL Db

    PM> update-database  

Create a Services folder where we perform our business logic for all the operations.

EmployeeService.cs
    using System;  
    using System.Collections.Generic;  
    using System.Linq;  
    using System.Threading.Tasks;  
    using UnitTest_Mock.Model;  
    using Microsoft.EntityFrameworkCore;  
      
    namespace UnitTest_Mock.Services  
    {  
        public class EmployeeService : IEmployeeService  
        {  
            #region Property  
            private readonly AppDbContext _appDbContext;  
            #endregion  
     
            #region Constructor  
            public EmployeeService(AppDbContext appDbContext)  
            {  
                _appDbContext = appDbContext;  
            }  
            #endregion  
      
            public async Task<string> GetEmployeebyId(int EmpID)  
            {  
                var name = await _appDbContext.Employees.Where(c=>c.Id == EmpID).Select(d=> d.Name).FirstOrDefaultAsync();  
                return name;  
            }  
      
            public async Task<Employee> GetEmployeeDetails(int EmpID)  
            {  
                var emp = await _appDbContext.Employees.FirstOrDefaultAsync(c => c.Id == EmpID);  
                return emp;  
            }  
        }  
    }  


IEmployeeService.cs
    using System;  
    using System.Collections.Generic;  
    using System.Linq;  
    using System.Threading.Tasks;  
    using UnitTest_Mock.Model;  
      
    namespace UnitTest_Mock.Services  
    {  
       public interface IEmployeeService  
        {  
            Task<string> GetEmployeebyId(int EmpID);  
            Task<Employee> GetEmployeeDetails(int EmpID);  
        }  
    }  


Define these services in Startup. cs file which I have already highlighted in the above-mentioned startup.cs file.
 
Create API methods for those services in the controller class.
 
EmployeeController.cs
    using Microsoft.AspNetCore.Mvc;  
    using System;  
    using System.Collections.Generic;  
    using System.Linq;  
    using System.Threading.Tasks;  
    using UnitTest_Mock.Model;  
    using UnitTest_Mock.Services;  
      
    namespace UnitTest_Mock.Controllers  
    {  
        [Route("api/[controller]")]  
        [ApiController]  
        public class EmployeeController : ControllerBase  
        {  
            #region Property  
            private readonly IEmployeeService _employeeService;  
            #endregion  
     
            #region Constructor  
            public EmployeeController(IEmployeeService employeeService)  
            {  
                _employeeService = employeeService;  
            }  
            #endregion  
      
            [HttpGet(nameof(GetEmployeeById))]  
            public async Task<string> GetEmployeeById(int EmpID)  
            {  
                var result = await _employeeService.GetEmployeebyId(EmpID);  
                return result;  
            }  
            [HttpGet(nameof(GetEmployeeDetails))]  
            public async Task<Employee> GetEmployeeDetails(int EmpID)  
            {  
                var result = await _employeeService.GetEmployeeDetails(EmpID);  
                return result;  
            }  
      
        }  
    }   


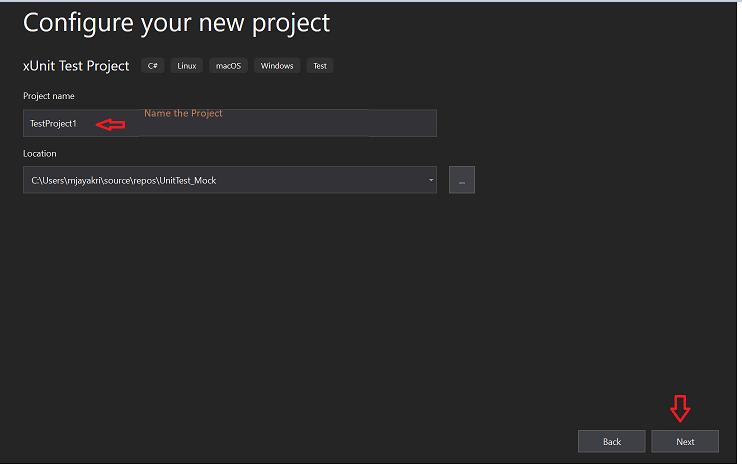
Let us create another testing project inside this solution project where we can write test cases for those functions
    Right-click on the Solution
    Click on Add - New project
    Search for X-Unit Test project.

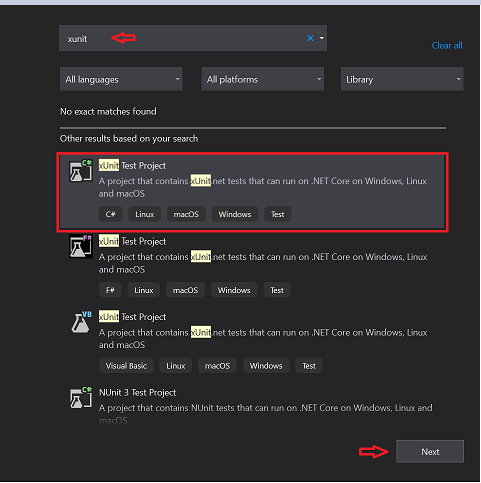
Choose the target framework same as where we have used in our API project.


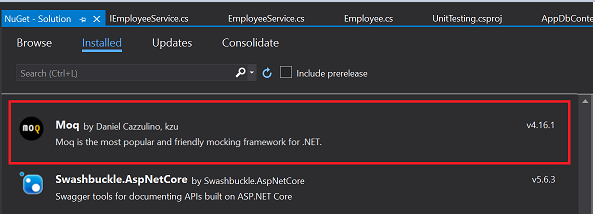
Install the Moq package inside this unit test project.


Create a class inside this Test project to define all our respective test cases but before that, we have to insert data into the table which we have created. Open the SQL Server and insert dummy data to the employee table.
 
EmployeeTest.cs
    using Moq;  
    using UnitTest_Mock.Controllers;  
    using UnitTest_Mock.Model;  
    using UnitTest_Mock.Services;  
    using Xunit;  
      
    namespace UnitTesting  
    {  
       public class EmployeeTest  
        {  
            #region Property  
            public Mock<IEmployeeService> mock = new Mock<IEmployeeService>();  
            #endregion  
      
            [Fact]  
            public async void GetEmployeebyId()  
            {  
                mock.Setup(p => p.GetEmployeebyId(1)).ReturnsAsync("JK");  
                EmployeeController emp = new EmployeeController(mock.Object);  
                string result = await emp.GetEmployeeById(1);  
                Assert.Equal("JK", result);  
            }  
            [Fact]  
            public async void GetEmployeeDetails()  
            {  
                var employeeDTO = new Employee()  
                {  
                    Id = 1,  
                    Name = "JK",  
                    Desgination = "SDE"  
                };  
                mock.Setup(p => p.GetEmployeeDetails(1)).ReturnsAsync(employeeDTO);  
                EmployeeController emp = new EmployeeController(mock.Object);  
                var result = await emp.GetEmployeeDetails(1);  
                Assert.True(employeeDTO.Equals(result));  
            }  
        }  
    }  


setting up the mock for our API business services under the controller level to check the result and compare with user-defined values.
 
we can debug the test cases to check the output in running mode.
 
Run all the test cases to verify whether they are passed or failed.
    Click on View in the Top left
    Click on Test explorer.

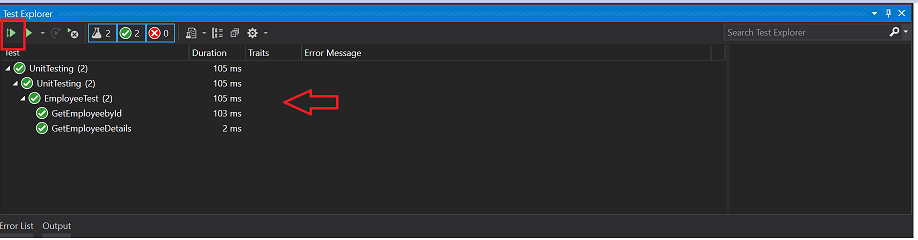
In the above image, we can see all our test cases are passed and their time duration as well. Hope this article helps you in understanding unit testing using the Mock object.


ASP.NET Core 5.0.2 Hosting - HostForLIFE :: Upload And Download Multiple Files Using Web API

clock March 23, 2021 06:54 by author Peter

Today, we are going to cover uploading & downloading multiple files using ASP.Net Core 5.0 web API by a simple process.

 
Note
Since I have the latest .Net 5.0 installed on my machine I used this. This same technique works in .Net Core 3.1 and .Net Core 2.1 as well.
 
Begin with creating an empty web API project in visual studio and for target framework choose .Net 5.0.
 
No external packages were used in this project.
 
Create a Services folder and inside that create one FileService class and IFileService Interface in it.
 
We have used three methods in this FileService.cs

    UploadFile
    DownloadFile
    SizeConverter

Since we need a folder to store these uploading files, here we have added one more parameter to pass the folder name as a string where it will store all these files.
 
FileService.cs
    using Microsoft.AspNetCore.Hosting;  
    using Microsoft.AspNetCore.Http;  
    using System;  
    using System.Collections.Generic;  
    using System.IO;  
    using System.IO.Compression;  
    using System.Linq;  
    using System.Threading.Tasks;  
      
    namespace UploadandDownloadFiles.Services  
    {  
        public class FileService :IFileService  
        {  
            #region Property  
            private IHostingEnvironment _hostingEnvironment;  
            #endregion  
     
            #region Constructor  
            public FileService(IHostingEnvironment hostingEnvironment)  
            {  
                _hostingEnvironment = hostingEnvironment;  
            }  
            #endregion  
     
            #region Upload File  
            public void UploadFile(List<IFormFile> files, string subDirectory)  
            {  
                subDirectory = subDirectory ?? string.Empty;  
                var target = Path.Combine(_hostingEnvironment.ContentRootPath, subDirectory);  
      
                Directory.CreateDirectory(target);  
      
                files.ForEach(async file =>  
                {  
                    if (file.Length <= 0) return;  
                    var filePath = Path.Combine(target, file.FileName);  
                    using (var stream = new FileStream(filePath, FileMode.Create))  
                    {  
                        await file.CopyToAsync(stream);  
                    }  
                });  
            }  
            #endregion  
     
            #region Download File  
            public (string fileType, byte[] archiveData, string archiveName) DownloadFiles(string subDirectory)  
            {  
                var zipName = $"archive-{DateTime.Now.ToString("yyyy_MM_dd-HH_mm_ss")}.zip";  
      
                var files = Directory.GetFiles(Path.Combine(_hostingEnvironment.ContentRootPath, subDirectory)).ToList();  
      
                using (var memoryStream = new MemoryStream())  
                {  
                    using (var archive = new ZipArchive(memoryStream, ZipArchiveMode.Create, true))  
                    {  
                        files.ForEach(file =>  
                        {  
                            var theFile = archive.CreateEntry(file);  
                            using (var streamWriter = new StreamWriter(theFile.Open()))  
                            {  
                                streamWriter.Write(File.ReadAllText(file));  
                            }  
      
                        });  
                    }  
      
                    return ("application/zip", memoryStream.ToArray(), zipName);  
                }  
      
            }  
            #endregion  
     
            #region Size Converter  
            public string SizeConverter(long bytes)  
            {  
                var fileSize = new decimal(bytes);  
                var kilobyte = new decimal(1024);  
                var megabyte = new decimal(1024 * 1024);  
                var gigabyte = new decimal(1024 * 1024 * 1024);  
      
                switch (fileSize)  
                {  
                    case var _ when fileSize < kilobyte:  
                        return $"Less then 1KB";  
                    case var _ when fileSize < megabyte:  
                        return $"{Math.Round(fileSize / kilobyte, 0, MidpointRounding.AwayFromZero):##,###.##}KB";  
                    case var _ when fileSize < gigabyte:  
                        return $"{Math.Round(fileSize / megabyte, 2, MidpointRounding.AwayFromZero):##,###.##}MB";  
                    case var _ when fileSize >= gigabyte:  
                        return $"{Math.Round(fileSize / gigabyte, 2, MidpointRounding.AwayFromZero):##,###.##}GB";  
                    default:  
                        return "n/a";  
                }  
            }  
            #endregion  
      
        }  
    }  


SizeConverter function is used to get the actual size of our uploading files to the server.
 
IFileService.cs
    using Microsoft.AspNetCore.Http;  
    using System;  
    using System.Collections.Generic;  
    using System.Linq;  
    using System.Threading.Tasks;  
      
    namespace UploadandDownloadFiles.Services  
    {  
       public interface IFileService  
        {  
            void UploadFile(List<IFormFile> files, string subDirectory);  
            (string fileType, byte[] archiveData, string archiveName) DownloadFiles(string subDirectory);  
             string SizeConverter(long bytes);  
        }  
    }  


Let's add this service dependency in a startup.cs file
 
Startup.cs
    using Microsoft.AspNetCore.Builder;  
    using Microsoft.AspNetCore.Hosting;  
    using Microsoft.AspNetCore.HttpsPolicy;  
    using Microsoft.AspNetCore.Mvc;  
    using Microsoft.Extensions.Configuration;  
    using Microsoft.Extensions.DependencyInjection;  
    using Microsoft.Extensions.Hosting;  
    using Microsoft.Extensions.Logging;  
    using Microsoft.OpenApi.Models;  
    using System;  
    using System.Collections.Generic;  
    using System.Linq;  
    using System.Threading.Tasks;  
    using UploadandDownloadFiles.Services;  
      
    namespace UploadandDownloadFiles  
    {  
        public class Startup  
        {  
            public Startup(IConfiguration configuration)  
            {  
                Configuration = configuration;  
            }  
      
            public IConfiguration Configuration { get; }  
      
            // This method gets called by the runtime. Use this method to add services to the container.  
            public void ConfigureServices(IServiceCollection services)  
            {  
      
                services.AddControllers();  
                services.AddSwaggerGen(c =>  
                {  
                    c.SwaggerDoc("v1", new OpenApiInfo { Title = "UploadandDownloadFiles", Version = "v1" });  
                });  
      
                services.AddTransient<IFileService, FileService>();  
            }  
      
            // This method gets called by the runtime. Use this method to configure the HTTP request pipeline.  
            public void Configure(IApplicationBuilder app, IWebHostEnvironment env)  
            {  
                if (env.IsDevelopment())  
                {  
                    app.UseDeveloperExceptionPage();  
                    app.UseSwagger();  
                    app.UseSwaggerUI(c => c.SwaggerEndpoint("/swagger/v1/swagger.json", "UploadandDownloadFiles v1"));  
                }  
      
                app.UseHttpsRedirection();  
      
                app.UseRouting();  
      
                app.UseAuthorization();  
      
                app.UseEndpoints(endpoints =>  
                {  
                    endpoints.MapControllers();  
                });  
            }  
        }  
    }  

Create a FileController & now inject this IFileService using Constructor injection inside this FileController.
 
FileController.cs
    using Microsoft.AspNetCore.Hosting;  
    using Microsoft.AspNetCore.Http;  
    using Microsoft.AspNetCore.Mvc;  
    using System;  
    using System.Collections.Generic;  
    using System.ComponentModel.DataAnnotations;  
    using System.IO;  
    using System.Linq;  
    using System.Threading.Tasks;  
    using UploadandDownloadFiles.Services;  
      
    namespace UploadandDownloadFiles.Controllers  
    {  
        [Route("api/[controller]")]  
        [ApiController]  
        public class FileController : ControllerBase  
        {  
            #region Property  
            private readonly IFileService _fileService;  
            #endregion  
     
            #region Constructor  
            public FileController(IFileService fileService)  
            {  
                _fileService = fileService;  
            }  
            #endregion  
     
            #region Upload  
            [HttpPost(nameof(Upload))]  
            public IActionResult Upload([Required] List<IFormFile> formFiles, [Required] string subDirectory)  
            {  
                try  
                {  
                    _fileService.UploadFile(formFiles, subDirectory);  
      
                    return Ok(new { formFiles.Count, Size = _fileService.SizeConverter(formFiles.Sum(f => f.Length)) });  
                }  
                catch (Exception ex)  
                {  
                    return BadRequest(ex.Message);  
                }  
            }  
            #endregion  
     
            #region Download File  
            [HttpGet(nameof(Download))]  
            public IActionResult Download([Required]string subDirectory)  
            {  
      
                try  
                {  
                    var (fileType, archiveData, archiveName) = _fileService.DownloadFiles(subDirectory);  
      
                    return File(archiveData, fileType, archiveName);  
                }  
                catch (Exception ex)  
                {  
                    return BadRequest(ex.Message);  
                }  
      
            }  
            #endregion  
        }  
    }  

We can test our API's in both swagger and postman.

 
Here we see our two API's which we have created to upload and download, so let's test each of these individually.

 
Pass the folder name inside the subDirectory and add files below to save inside the server and under the folder name. In response we see the total count of our files and the actual size of our entire files.

 
Now will check with Download API. Since we have multiple files inside of our folder it will download as a Zip file where we need to extract that to check the files.


ASP.NET Core 5.0.2 Hosting - HostForLIFE :: How to Load 5 Million Records from CSV and Process Them In Under Three Seconds?

clock March 15, 2021 06:54 by author Peter

We have a scenario where we have to load 5 million records under 2 seconds from a CSV file using C#, then process it and return some processed records based on certain criteria too. This sounds like loading and processing may take more time but only if we do it in the wrong way.

This is what we will solve in the below code.
 
Let's dive in and do some processing ourselves. First download a file from the URL below, it is a sample Sales records CSV file with 5 million records.
http://eforexcel.com/wp/wp-content/uploads/2020/09/5m-Sales-Records.7z
 
Now we will do is load this CSV in our program and get the top ten sales records with maximum revenue in order.
    Stopwatch stopwatch = new Stopwatch();  
    stopwatch.Start();  
    //LOAD    
    //Created a temporary dataset to hold the records    
    List < Tuple < string, string, string >> listA = new List < Tuple < string, string, string >> ();  
    using(var reader = new StreamReader(@ "C:\Users\Lenovo\Desktop\5m Sales Records.csv")) {  
        while (!reader.EndOfStream) {  
            var line = reader.ReadLine();  
            var values = line.Split(',');  
            listA.Add(new Tuple < string, string, string > (values[0], values[1], values[11]));  
        }  
    }  
    //PROCESS    
    var top10HigestRevenueSalesRecords = from salesrec in listA.Skip(0).Take(10)  
    orderby salesrec.Item3  
    select salesrec;  
    //PRINT    
    foreach(var item in top10HigestRevenueSalesRecords) {  
        Console.WriteLine($ "{item.Item1} - {item.Item2} - {item.Item3}");  
    }  
    stopwatch.Stop();  
    Console.WriteLine($ "Time ellapsed {stopwatch.ElapsedMilliseconds/1000}");  
    Console.ReadLine();   

Now all three main steps in the process Load, Process, and Print were done in under 2 seconds.
 
Adding Parallel. For or Foreach does not either work much for this scenario, in fact, it will slow it down a bit with again a difference in nanoseconds which is not to be considered much.
 
We can improve it futher down to one second by using some custom Nuget packages  that decrease the downtime of loading large csv files.
    using LumenWorks.Framework.IO.Csv;  
    using(CsvReader csv = new CsvReader(new StreamReader(@ "C:\Users\Lenovo\Desktop\5m Sales Records.csv"), true)) {  
        while (csv.ReadNextRecord()) {  
            listA.Add(new Tuple < string, string, string > (csv[0], csv[1], csv[11]));  
        }  
    }   


Happy coding fellows.


ASP.NET Core 5.0.2 Hosting - HostForLIFE :: How To Use Postman With ASP.NET Core Web API Testing?

clock March 8, 2021 06:12 by author Peter

Manual Testing with Postman

If you are a developer, tester, or a manager, sometimes understanding various methods of API can be a challenge when building and consuming the application.

Generating good documentation and help pages for your Web API using Postman with .NET Core is as easy as making some HTTP calls.

Let’s start downloading simple To-do projects from GitHub.
Download and run the below TodoMvcSolution

Download Postman

Postman is a Google Chrome application for testing API calls. You can download and install Postman from below web site.

Here are the APIs we can test -  Get, Post, Put and Delete for this application.


Here are the Web APIs we want to test.
    //Copyright 2017 (c) SmartIT. All rights reserved.  
    //By John Kocer  
    // This file is for Swagger test, this application does not use this file  
    using System.Collections.Generic;  
    using Microsoft.AspNetCore.Mvc;  
    using SmartIT.Employee.MockDB;   
      
    namespace TodoAngular.Ui.Controllers  
    {  
      [Produces("application/json")]  
      [Route("api/Todo")]  
      public class TodoApiController : Controller  
      {  
        TodoRepository _todoRepository = new TodoRepository();  
      
        [Route("~/api/GetAllTodos")]  
        [HttpGet]  
        public IEnumerable<SmartIT.Employee.MockDB.Todo> GetAllTodos()  
        {  
          return _todoRepository.GetAll();  
        }  
      
        [Route("~/api/AddTodo")]  
        [HttpPost]  
        public SmartIT.Employee.MockDB.Todo AddTodo([FromBody]SmartIT.Employee.MockDB.Todo item)  
        {  
          return _todoRepository.Add(item);  
        }  
      
        [Route("~/api/UpdateTodo")]  
        [HttpPut]  
        public SmartIT.Employee.MockDB.Todo UpdateTodo([FromBody]SmartIT.Employee.MockDB.Todo item)  
        {  
          return  _todoRepository.Update(item);  
        }  
      
        [Route("~/api/DeleteTodo/{id}")]  
        [HttpDelete]  
        public void Delete(int id)  
        {  
          var findTodo = _todoRepository.FindById(id);  
          if (findTodo != null)  
            _todoRepository.Delete(findTodo);  
        }  
      }  
    }

Note - Your local port number may be different than mine. Use your local port number.
 
http://localhost:63274/api/GetAllTodos // GET
http://localhost:63274/api/AddTodo //POST
http://localhost:63274/api/UpdateTodo //PUT
http://localhost:63274/api/DeleteTodo/5 // DELETE
 
Testing GET with Postman
    Testing GET is very easy. First, we need to set HTTP Action from the drop-down list as GET.
    Then, we need to type or paste into the API URL box.
    Then, click the blue SEND button.

If the GET is successful, we see the status: 200 OK.

Testing POST with Postman
    First, we need to set Http Action from the dropdown list as POST.
    Then, we need to type or paste into the API URL box.
    AddTodo API accepts a Todo object in JSON format. We need to pass a new Todo JSON data.
    To pass JSON data we need to Select Body Tap.
    Select the Raw
    Select JSON(Application/JSON) as text format.
    Write or paste your Todo JSON data.
    Then, click the blue SEND button.

If the POST is successful, we see the status: 200 OK.
 
You will see Status:200 for success and the return value in the Return Body tab. We sent Publish Postman Todo item with id=0 and we received id=5 as result.

Testing PUT with Postman

    First, we need to set HTTP Action from the dropdown list as PUT.
    Then, we need to type or paste into the API URL.
    UpdateTodo API accepts a Todo object in JSON format. We need to pass an existing Todo JSON data.
    To pass JSON data we need to Select Body Tab
    Select the Raw format
    Select JSON(Application/JSON) as text format.
    Write or paste your Todo JSON
    Then click the blue SEND

If the PUT is successful, we see the status: 200 OK.


You will see Status:200 for success and the return value in the Return Body Tab. We sent Publish Postman Todo item with "name": "Publish Postman-In progress" and we receive an updated todo result.


Testing DELETE with Postman

    First, we need to set Http Action from the dropdown list as DELETE.
    Then, we need to type or paste into the API URL box.
    DeleteTodo/5 API accepts an id on the  We need to pass an existing Todo with an Id value.
    Then, click the blue SEND button.

If the Delete is successful, we see the status: 200 OK.

HostForLIFE ASP.NET Core 5.0.2 Hosting
HostForLIFE is European Windows Hosting Provider which focuses on Windows Platform only. We deliver on-demand hosting solutions including Shared hosting, Reseller Hosting, Cloud Hosting, Dedicated Servers, and IT as a Service for companies of all sizes. We have customers from around the globe, spread across every continent. We serve the hosting needs of the business and professional, government and nonprofit, entertainment and personal use market segments.


ASP.NET Core 5.0.2 Hosting - HostForLIFE :: How To Implement Database Views Using Entity Framework (EF) Code First Approach?

clock March 1, 2021 06:32 by author Peter

There are several situations where your applications may need to display data by combining two or more tables, sometimes even more than 7-8 tables. In such a scenario, using Entity framework may result in a slow performance because we need to process by selecting data from a table, then run some loops from other tables.

However, the database itself has many features to handle the performance in these cases, such as stored procedures or creating views that are most recommended and result in better performance.
 
On the other hand, entity framework, open source ORM framework, is gaining huge popularity among the .net developer because of numerous advantages and speedup the coding as well as quite handy to control database directly form code.
 
In this article, I will show how to how to take the advantages of database views in entity framework and overcome the problems of complex joining/query by creating a view and handling those views in Entity framework.
 
Database view

A view is considered as a virtual table which is formed based on SQL statement of other tables. This can be considered as a real table; however, we cannot do commands like delete or update. In simple terms, it contains query to pull data from table(s). We generally use WHERE, FUNCTION and/or JOIN to tables to form a view.
 
We create views for query simplicity: we can write complex queries to select data from various tables and instead of writing those complex queries each time; we create views to use it like simple tables. Other advantages are performance improvements, data security and ease of use.
 
We can create view two ways (MS SQL server): SQL Script and Query Designer.
 
SQL Script Syntax
    CREATE VIEW view_name AS    
    SELECT column1, column2.....    
    FROM table_name    
    WHERE [condition];     

We can write complex queries using where, function, join etc. or you can even do union.
 
Query Designer
We can take advantages of query designer as shown,


We can add tables, add relations (auto relations based primarykey-foreignkey), modify alias as depicted in above diagram. There is option to modify query manually and check the results.
 
Handling Views in Entity Framework
We can utilize views in entity framework database first approach easily considering a model. However, in entity framework code first approach, we need to do tricks. If we create models of views then it will create tables of those views in add-migration and database update command.
 
Tricks
We can handle views in entity framework in two ways.
 
Option 1
Create a view combining multiple tables in the database manually and subsequently add an entity for the view. Finally, we can add ignore for the entity OnmodelCreating Entity builder, as shown below.
 
Sample Code
    protected override void OnModelCreating(ModelBuilder modelBuilder)    
    {    
      if (IsMigration)    
        modelBuilder.Ignore<ViewEntityName>();    
     ...    
    }   

With above trick, we can simply take advantages of entity model and ignore in migrations and database update in code first approach.
 
Option 2
Alternatively, you can create an extension or property for handling views in the database. In this option, we can create a view manually in the database then add an extension or property.
 
Sample Code
    //Property    
    class DBContext    
    {    
        public IQueryable<YourView> YourView     
        {    
            get    
            {    
                return this.Database.SqlQuery<YourView>("select * from dbo.ViewName");    
            }    
        }    
    }   


Extension
    static class DbContextExtensions    
    {    
        public static IQueryable<ViewNameModel>(this DbContext context)    
        {    
            return context.Database.SqlQuery<ViewNameModel>("select * from dbo.ViewName");    
        }    
    }  

We can build database context extension to handle view and use it in our solution with code first approach.
 
There are some other alternative methods as well, however, I prefer these options, as they are easy to implement.
 
Conclusion
In this article, we have learned how to implement database views in entity framework in code first approach and take advantages of those views to handle complex queries and overcome the problem of complex joining/query in entity framework. Database views is quite effective for complex queries in terms of performance, ease of use, data security and most importantly query simplicity.


HostForLIFE ASP.NET Core 5.0.2 Hosting
HostForLIFE is European Windows Hosting Provider which focuses on Windows Platform only. We deliver on-demand hosting solutions including Shared hosting, Reseller Hosting, Cloud Hosting, Dedicated Servers, and IT as a Service for companies of all sizes. We have customers from around the globe, spread across every continent. We serve the hosting needs of the business and professional, government and nonprofit, entertainment and personal use market segments.


ASP.NET Core 5.0.2 Hosting - HostForLIFE :: How To Encrypt an AppSettings Key In Web.config?

clock February 22, 2021 06:20 by author Peter

Sometimes we come across a scenario where we need to encrypt a sensitive key in appSettings section in Web.config file. This blog demonstrates the  steps to encrypt a key and read the respective key in an ASP.NET application.

I have an appsettings key that is being called from .NET application. Before we are encrypting appsettings key in web.config.


Step 1 - Adding a section in configSections in web.config
    <configSections>
    <section name="secureAppSettings" type="System.Configuration.NameValueSectionHandler, System, Version=4.0.0.0, Culture=neutral, PublicKeyToken=b77a5c561934e089" />
    </configSections


Step 2 - Add secureAppSettings section under configuration
    <secureAppSettings>
    <add key="Password" value="XXXXXXXX"/>
    </secureAppSettings>

How To Encrypt a AppSettings Key In Web.config
Step 3 - Execute command from command prompt to encrypt secureAppSettings section
Open command prompt and execute the below commands.

cd C:\Windows\Microsoft.NET\Framework\v4.0.30319
aspnet_regiis.exe -pef "secureAppSettings" "your application web config path" -prov "DataProtectionConfigurationProvider"

After execution of the above command, secure app settings section encrypted as below.


Step 4 - Accessing appsettings key from .NET code
To access the encrypted key value in code, we can write it like below.
    using System.Collections.Specialized;

    var passwordValue = "";
    var section = System.Web.Configuration.WebConfigurationManager.GetSection("secureAppSettings") as NameValueCollection;
    if (section != null && section["Password"] != null)
    {
    passwordValue = section["Password"];
    }

Excellent! We successfully encrypted to a key in appsettings in web.config. Similarly, we can do the same steps while deploying a Web application to IIS.

HostForLIFE ASP.NET 3.1.9 Hosting
HostForLIFE is European Windows Hosting Provider which focuses on Windows Platform only. We deliver on-demand hosting solutions including Shared hosting, Reseller Hosting, Cloud Hosting, Dedicated Servers, and IT as a Service for companies of all sizes. We have customers from around the globe, spread across every continent. We serve the hosting needs of the business and professional, government and nonprofit, entertainment and personal use market segments.


About HostForLIFE

HostForLIFE is European Windows Hosting Provider which focuses on Windows Platform only. We deliver on-demand hosting solutions including Shared hosting, Reseller Hosting, Cloud Hosting, Dedicated Servers, and IT as a Service for companies of all sizes.

We have offered the latest Windows 2019 Hosting, ASP.NET 5 Hosting, ASP.NET MVC 6 Hosting and SQL 2019 Hosting.


Month List

Tag cloud

Sign in