The way we create applications is evolving as a result of the convergence of artificial intelligence (AI) and contemporary software development. Microsoft continues to provide developers with tools and frameworks that make it simple to integrate AI capabilities into robust, scalable applications with the introduction of.NET 9.
We'll examine how.NET 9 facilitates AI-driven development in this post, with an emphasis on machine learning models and a demonstration of an intelligent sentiment analysis API project with sample code.
Why Develop AI with.NET 9?
Better performance, enhanced support for cloud-native apps, and an improved ecosystem that excels at AI workloads are just a few of the fantastic new features in.NET 9. It's an excellent option for creating intelligent, high-performance programs because of its extremely straightforward APIs, improved AOT (Ahead-of-Time) compilation, and improved container integration. Additionally, developers can include AI directly into their.NET solutions thanks to libraries like ML.NET and compatibility with well-known AI frameworks like TensorFlow and ONNX.
Setting the Stage: Tools and Prerequisites
To follow along, you’ll need,
- Visual Studio or VS Code with .NET 9 SDK: Install the latest version from the official Microsoft site, for coding and debugging. I will be using VS Code for the demo project.
- ML.NET: A machine learning framework for .NET (install via NuGet: Microsoft.ML).
- A Basic Understanding of ASP.NET Core: For building the API.
Project Overview: Sentiment Analysis API
Let’s build a simple ASP.NET Core Web API that uses ML.NET to do sentiment analysis on text submitted by users. The API will predict if a text expresses positive or negative sentiment, which is a great starting point for AI-driven apps.
Step 1. Setting Up the Project
Create a new ASP.NET Core Web API project.
dotnet new webapi -n dotnet9SentimentApi -f net9.0
cd dotnet9SentimentApi
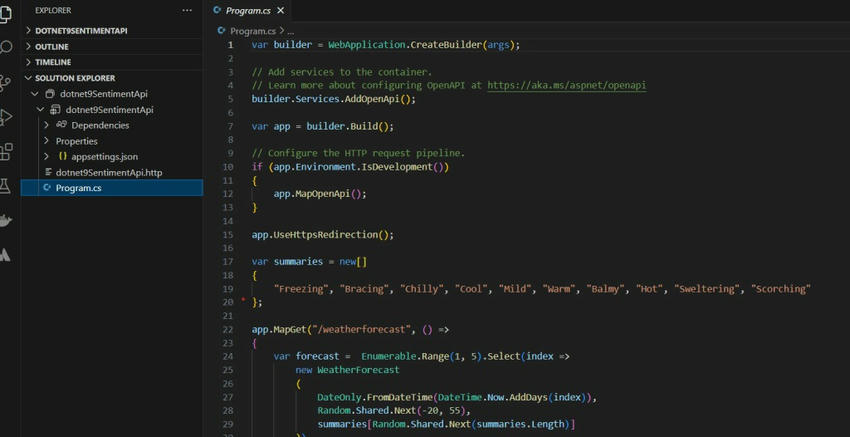
Open the folder in VS Code. The project should be as shown below.
Let’s add the ML.NET NuGet package.
You can either run the command or do it from VS code UI as illustrated below.
dotnet add package Microsoft.ML
Step 2. Define the Data Models
Create a folder named Models and add two classes: SentimentData and SentimentPrediction.
SentimentData.cs: Represents the input data for the model.
namespace dotnet9SentimentApi.Models;
public record SentimentData
{
public string Text { get; set; } = string.Empty;
}
SentimentPrediction.cs: Represents the model’s output.
namespace dotnet9SentimentApi.Models;
public record SentimentPrediction
{
public bool Prediction { get; set; } // True = Positive, False = Negative
public float Probability { get; set; }
}
Step 3. Training a Simple Sentiment Model with ML.NET
For simplicity, we’ll use a pre-trained model approach here, but ML.NET allows you to train your own model with a dataset. Create a SentimentModelTrainer.cs class in a Services folder to simulate model setup:
To train the model with your own data.
private void TrainModel()
{
// Simulated training data (in practice, load from a file or database)
var data = BuildTrainingData();
var dataView = _mlContext.Data.LoadFromEnumerable(data);
// Enhanced pipeline with text preprocessing
var pipeline = _mlContext.Transforms.Text.FeaturizeText("Features", new Microsoft.ML.Transforms.Text.TextFeaturizingEstimator.Options
{
WordFeatureExtractor = new Microsoft.ML.Transforms.Text.WordBagEstimator.Options(),
StopWordsRemoverOptions = new Microsoft.ML.Transforms.Text.StopWordsRemovingEstimator.Options()
}, nameof(SentimentTrainingData.Text))
.Append(_mlContext.BinaryClassification.Trainers.LbfgsLogisticRegression(labelColumnName: nameof(SentimentTrainingData.Sentiment)));
// Train the model
_model = pipeline.Fit(dataView);
// Optional: Save the model for reuse
_mlContext.Model.Save(_model, dataView.Schema, "sentiment_model.zip");
}
Note. In a real-world scenario, you’d train with a larger dataset (e.g., from a CSV file) and save the model using _mlContext.Model.Save().
Complete SentimentModelTrainer.cs class
using System;
using dotnet9SentimentApi.Models;
using Microsoft.ML;
namespace dotnet9SentimentApi.Services;
public class SentimentModelTrainer
{
private readonly MLContext _mlContext;
private ITransformer _model;
public SentimentModelTrainer()
{
_mlContext = new MLContext();
TrainModel();
}
private void TrainModel()
{
// Simulated training data (in practice, load from a file or database)
var data = BuildTrainingData();
var dataView = _mlContext.Data.LoadFromEnumerable(data);
// Enhanced pipeline with text preprocessing
var pipeline = _mlContext.Transforms.Text.FeaturizeText("Features", new Microsoft.ML.Transforms.Text.TextFeaturizingEstimator.Options
{
WordFeatureExtractor = new Microsoft.ML.Transforms.Text.WordBagEstimator.Options(),
StopWordsRemoverOptions = new Microsoft.ML.Transforms.Text.StopWordsRemovingEstimator.Options()
}, nameof(SentimentTrainingData.Text))
.Append(_mlContext.BinaryClassification.Trainers.LbfgsLogisticRegression(labelColumnName: nameof(SentimentTrainingData.Sentiment)));
// Train the model
_model = pipeline.Fit(dataView);
// Optional: Save the model for reuse
_mlContext.Model.Save(_model, dataView.Schema, "sentiment_model.zip");
}
public SentimentPrediction Predict(string text)
{
var predictionEngine = _mlContext.Model.CreatePredictionEngine<SentimentData, SentimentPrediction>(_model);
return predictionEngine.Predict(new SentimentData { Text = text });
}
//build training data
private List<SentimentTrainingData> BuildTrainingData()
{
return new List<SentimentTrainingData>
{
new() { Text = "I love this product!", Sentiment = true },
new() { Text = "This is terrible.", Sentiment = false },
new() { Text = "The weather is nice!", Sentiment = true },
new() { Text = "Horrible service, never again.", Sentiment = false },
new() { Text = "Absolutely fantastic experience!", Sentiment = true },
new() { Text = "It’s a complete disaster.", Sentiment = false },
new() { Text = "I’m so happy with this!", Sentiment = true },
new() { Text = "Disappointing and awful.", Sentiment = false },
new() { Text = "I’m so impressed!", Sentiment = true },
new() { Text = "I’m never coming back.", Sentiment = false },
new() { Text = "I’m so excited!", Sentiment = true },
new() { Text = "I’m so disappointed.", Sentiment = false },
new() { Text = "I’m so pleased with this!", Sentiment = true },
new() { Text = "I’m so upset.", Sentiment = false },
new() { Text = "I’m so satisfied with this!", Sentiment = true },
new() { Text = "I’m so angry.", Sentiment = false },
new() { Text = "I’m so grateful for this!", Sentiment = true },
new() { Text = "I’m so annoyed.", Sentiment = false },
new() { Text = "I’m so thankful for this!", Sentiment = true }
};
}
}
public record SentimentTrainingData
{
public string Text { get; set; } = string.Empty;
public bool Sentiment { get; set; }
}
Step 4. Build the API Controller
Create a SentimentController in the Controllers folder.
using dotnet9SentimentApi.Models;
using dotnet9SentimentApi.Services;
using Microsoft.AspNetCore.Http;
using Microsoft.AspNetCore.Mvc;
namespace dotnet9SentimentApi.Controllers
{
[Route("api/[controller]")]
[ApiController]
public class SentimentController : ControllerBase
{
private readonly SentimentModelTrainer _modelTrainer;
public SentimentController(SentimentModelTrainer modelTrainer)
{
_modelTrainer = modelTrainer;
}
[HttpPost("analyze")]
public ActionResult<SentimentPrediction> AnalyzeSentiment([FromBody] SentimentData input)
{
if (string.IsNullOrEmpty(input.Text))
return BadRequest("Text cannot be empty.");
var prediction = _modelTrainer.Predict(input.Text);
return Ok(new { Sentiment = prediction.Prediction ? "Positive" : "Negative", Confidence = prediction.Probability });
}
}
}
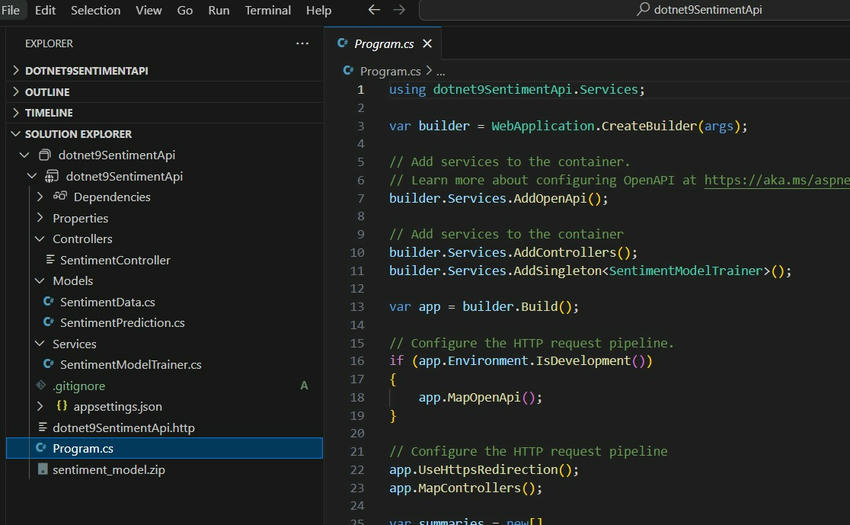
Step 5. Register Services in the Program.cs
Update Program.cs to use minimal APIs and register the service.
// Add services to the container
builder.Services.AddControllers();
builder.Services.AddSingleton<SentimentModelTrainer>();
// Configure the HTTP request pipeline
app.UseHttpsRedirection();
app.MapControllers();
Complete the code for the Program.cs
using dotnet9SentimentApi.Services;
var builder = WebApplication.CreateBuilder(args);
// Add services to the container.
// Learn more about configuring OpenAPI at https://aka.ms/aspnet/openapi
builder.Services.AddOpenApi();
// Add services to the container
builder.Services.AddControllers();
builder.Services.AddSingleton<SentimentModelTrainer>();
var app = builder.Build();
// Configure the HTTP request pipeline.
if (app.Environment.IsDevelopment())
{
app.MapOpenApi();
}
// Configure the HTTP request pipeline
app.UseHttpsRedirection();
app.MapControllers();
app.Run();
Our solution is ready to test.
The folder structure looks as shown below.
Test the API
dotnet run
You can use Postman to test the API or HTTP file in VS Code. I will test using VS Code .http file.
@dotnet9SentimentApi_HostAddress = http://localhost:5288
# post analyze sentiment
POST {{dotnet9SentimentApi_HostAddress}}/api/sentiment/analyze
Content-Type: application/json
{
"text": "I am not happy with the result!"
}
###
The result is shown below
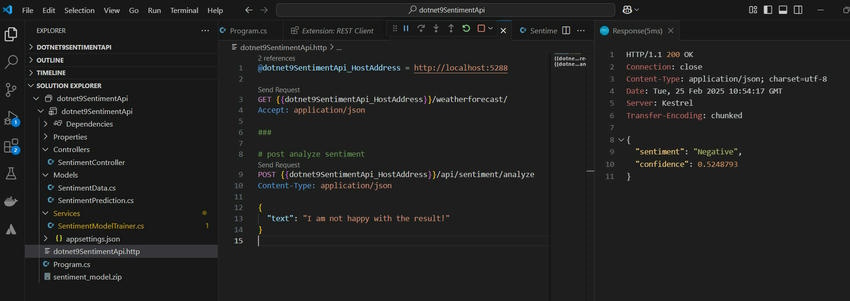
The result is not as expected – indicates an issue with the sentiment analysis model’s training or configuration. Given the tiny dataset and simplistic setup in the original sample, the model isn’t learning meaningful patterns.
However, we can improve the result with more training data and testing.
Enhancing the Project
Scalability: Deploy to Azure with container support for cloud-native scaling.
Model Accuracy: Use a real dataset (e.g., IMDB reviews) and train with more sophisticated algorithms like FastTree.
Performance: Cache predictions for frequently analyzed text using MemoryCache.
Integration: Extend with Azure Cognitive Services or TensorFlow.NET for advanced AI capabilities.
European Best, cheap and reliable ASP.NET hosting with instant activation. HostForLIFE.eu is #1 Recommended Windows and ASP.NET hosting in European Continent. With 99.99% Uptime Guaranteed of Relibility, Stability and Performace. HostForLIFE.eu security team is constantly monitoring the entire network for unusual behaviour. We deliver hosting solution including Shared hosting, Cloud hosting, Reseller hosting, Dedicated Servers, and IT as Service for companies of all size.
