This tutorial will use React JS web forms and the.NET Core Web API to develop a prototype product application backend. Additionally, we will use Docker and Kubernetes to containerize the same process.
Example of a Product Application: Web API for Backend (.NET Core)
First, create a new Web API for Product Management using.NET Core.
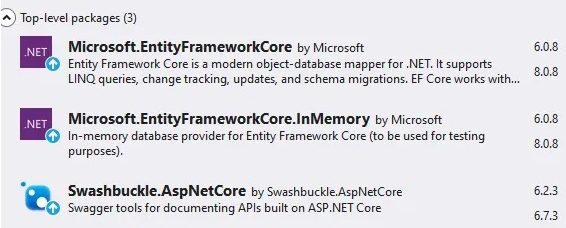
Step 2: Install the NuGet packages listed below, which are for the in-memory database.
Step 3. Add the product class inside the entities folder.
namespace ProductManagementAPI.Entities
{
public class Product
{
public int Id { get; set; }
public string Name { get; set; }
public decimal Price { get; set; }
}
}
Step 4. Create an AppDbContext class inside the data folder with an in-memory connection and a DB set property.
using Microsoft.EntityFrameworkCore;
using ProductManagementAPI.Entities;
namespace ProductManagementAPI.Data
{
public class AppDbContext : DbContext
{
public DbSet<Product> Products { get; set; }
public AppDbContext(DbContextOptions<AppDbContext> options)
: base(options)
{
}
protected override void OnConfiguring(DbContextOptionsBuilder optionsBuilder)
{
// This check prevents configuring the DbContext if options are already provided
if (!optionsBuilder.IsConfigured)
{
// Configure the in-memory database here, if needed
optionsBuilder.UseInMemoryDatabase("InMemoryDb");
}
}
protected override void OnModelCreating(ModelBuilder modelBuilder)
{
// Optionally configure entity mappings here
}
}
}
Step 5. Add a product repository inside the repositories folder.
IProductRepository
using ProductManagementAPI.Entities;
namespace ProductManagementAPI.Repositories
{
public interface IProductRepository
{
Task<List<Product>> GetAllProductsAsync();
Task<Product> GetProductByIdAsync(int id);
Task AddProductAsync(Product product);
Task UpdateProductAsync(Product product);
Task DeleteProductAsync(int id);
}
}
ProductRepository
using Microsoft.EntityFrameworkCore;
using ProductManagementAPI.Data;
using ProductManagementAPI.Entities;
namespace ProductManagementAPI.Repositories
{
public class ProductRepository : IProductRepository
{
private readonly AppDbContext _context;
public ProductRepository(AppDbContext context)
{
_context = context;
}
public async Task<List<Product>> GetAllProductsAsync()
{
return await _context.Products.ToListAsync();
}
public async Task<Product> GetProductByIdAsync(int id)
{
return await _context.Products
.AsNoTracking()
.FirstOrDefaultAsync(p => p.Id == id);
}
public async Task AddProductAsync(Product product)
{
if (product == null)
{
throw new ArgumentNullException(nameof(product));
}
_context.Products.Add(product);
await _context.SaveChangesAsync();
}
public async Task UpdateProductAsync(Product product)
{
if (product == null)
{
throw new ArgumentNullException(nameof(product));
}
_context.Entry(product).State = EntityState.Modified;
await _context.SaveChangesAsync();
}
public async Task DeleteProductAsync(int id)
{
var product = await _context.Products.FindAsync(id);
if (product == null)
{
throw new KeyNotFoundException("Product not found.");
}
_context.Products.Remove(product);
await _context.SaveChangesAsync();
}
}
}
Step 6. Create a new product controller with different action methods that we used to perform different operations using our front-end application after invoking the same.
using Microsoft.AspNetCore.Mvc;
using ProductManagementAPI.Entities;
using ProductManagementAPI.Repositories;
namespace ProductManagementAPI.Controllers
{
[ApiController]
[Route("api/[controller]")]
public class ProductsController : ControllerBase
{
private readonly IProductRepository _repository;
public ProductsController(IProductRepository repository)
{
_repository = repository;
}
[HttpGet]
public async Task<IActionResult> GetAllProducts()
{
var products = await _repository.GetAllProductsAsync();
return Ok(products); // Returns only the list of products
}
[HttpGet("{id}")]
public async Task<IActionResult> GetProductById(int id)
{
var product = await _repository.GetProductByIdAsync(id);
if (product == null)
{
return NotFound();
}
return Ok(product); // Returns only the product data
}
[HttpPost]
public async Task<IActionResult> AddProduct([FromBody] Product product)
{
if (product == null)
{
return BadRequest();
}
await _repository.AddProductAsync(product);
return CreatedAtAction(nameof(GetProductById), new { id = product.Id }, product);
}
[HttpPut("{id}")]
public async Task<IActionResult> UpdateProduct(int id, [FromBody] Product product)
{
if (product == null || id != product.Id)
{
return BadRequest();
}
await _repository.UpdateProductAsync(product);
return NoContent();
}
[HttpDelete("{id}")]
public async Task<IActionResult> DeleteProduct(int id)
{
await _repository.DeleteProductAsync(id);
return NoContent();
}
}
}
Step 7. Register our services inside the service container and configure the middleware.
using Microsoft.EntityFrameworkCore;
using Microsoft.Extensions.Options;
using ProductManagementAPI.Data;
using ProductManagementAPI.Repositories;
var builder = WebApplication.CreateBuilder(args);
// Add services to the container.
builder.Services.AddScoped<IProductRepository, ProductRepository>();
builder.Services.AddDbContext<AppDbContext>();
builder.Services.AddCors(options => {
options.AddPolicy("CORSPolicy", builder => builder.AllowAnyOrigin().AllowAnyMethod().AllowAnyHeader());
});
// Configure in-memory database
builder.Services.AddDbContext<AppDbContext>(options =>
options.UseInMemoryDatabase("InMemoryDb"));
builder.Services.AddControllers();
// Learn more about configuring Swagger/OpenAPI at https://aka.ms/aspnetcore/swashbuckle
builder.Services.AddEndpointsApiExplorer();
builder.Services.AddSwaggerGen();
var app = builder.Build();
// Configure the HTTP request pipeline.
app.UseCors("CORSPolicy");
app.UseSwagger();
app.UseSwaggerUI();
app.UseHttpsRedirection();
app.UseAuthorization();
app.MapControllers();
app.Run();
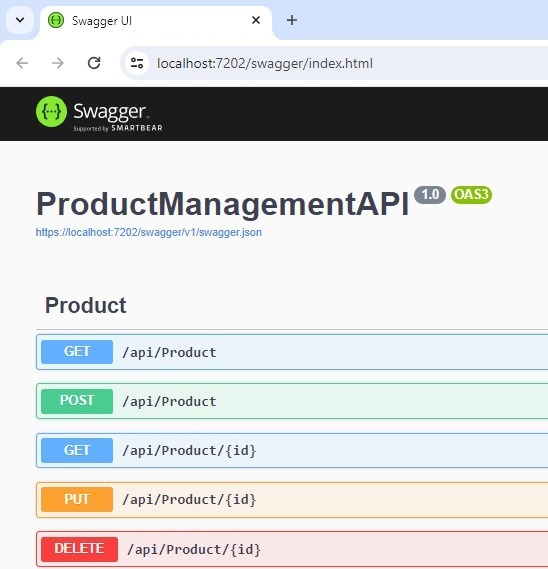
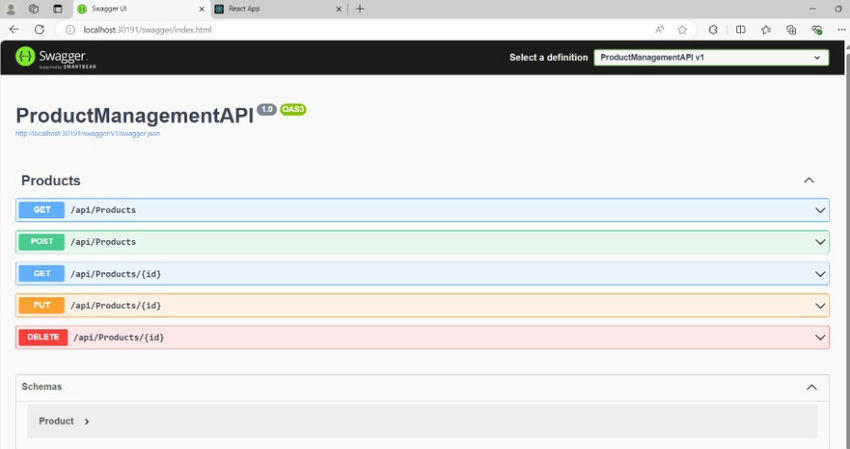
Step 8. Finally, run the application and use Swagger UI to execute different API endpoints.
Sample Product Application: Frontend (React JS)
Let’s create a client application using React JS and consume the above API endpoints within it.
Step 1. Create a new React JS application with the help of the following command.
npx create-react-app react-netcore-crud-app
Step 2. Navigate to your project directory.
cd react-netcore-crud-app
Step 3. Install Axios to consume and hit backend API and bootstrap for designing purposes.
npm install axios
npm install bootstrap
npm install axios
npm install bootstrap
Step 4. Add the following components and services.
Product list component
// src/components/ProductList/ProductList.js
import React, { useState, useEffect } from 'react';
import ProductListItem from './ProductListItem';
import productService from '../../services/productService';
const ProductList = () => {
const [products, setProducts] = useState([]);
useEffect(() => {
fetchProducts();
}, []);
const fetchProducts = async () => {
try {
const productsData = await productService.getAllProducts();
setProducts(productsData);
} catch (error) {
console.error('Error fetching products:', error);
}
};
const handleDelete = async (id) => {
try {
await productService.deleteProduct(id);
fetchProducts(); // Refresh product list
} catch (error) {
console.error('Error deleting product:', error);
}
};
const handleEdit = () => {
fetchProducts(); // Refresh product list after editing
};
return (
<div className="container">
<h2 className="my-4">Product List</h2>
<ul className="list-group">
{Array.isArray(products) && products.length > 0 ? (
products.map(product => (
<ProductListItem key={product.id} product={product} onDelete={() => handleDelete(product.id)} onEdit={handleEdit} />
))
) : (
<p>No products available</p>
)}
</ul>
</div>
);
};
export default ProductList;
Product list item component
// src/components/ProductList/ProductListItem.js
import React, { useState } from 'react';
import productService from '../../services/productService';
const ProductListItem = ({ product, onDelete, onEdit }) => {
const [isEditing, setIsEditing] = useState(false);
const [editedName, setEditedName] = useState(product.name);
const [editedPrice, setEditedPrice] = useState(product.price);
const handleEdit = async () => {
setIsEditing(true);
};
const handleSave = async () => {
const editedProduct = { ...product, name: editedName, price: parseFloat(editedPrice) };
try {
await productService.updateProduct(product.id, editedProduct);
setIsEditing(false);
onEdit(); // Refresh product list
} catch (error) {
console.error('Error updating product:', error);
}
};
const handleCancel = () => {
setIsEditing(false);
// Reset edited values
setEditedName(product.name);
setEditedPrice(product.price);
};
return (
<li className="list-group-item">
{isEditing ? (
<div className="row">
<div className="col">
<input type="text" className="form-control" value={editedName} onChange={e => setEditedName(e.target.value)} required />
</div>
<div className="col">
<input type="number" className="form-control" value={editedPrice} onChange={e => setEditedPrice(e.target.value)} required />
</div>
<div className="col-auto">
<button className="btn btn-success me-2" onClick={handleSave}>Save</button>
<button className="btn btn-secondary" onClick={handleCancel}>Cancel</button>
</div>
</div>
) : (
<div className="d-flex justify-content-between align-items-center">
<span>{product.name} - ${product.price}</span>
<div>
<button className="btn btn-danger me-2" onClick={onDelete}>Delete</button>
<button className="btn btn-primary" onClick={handleEdit}>Edit</button>
</div>
</div>
)}
</li>
);
};
export default ProductListItem;
Product service
// src/services/productService.js
import axios from 'axios';
const baseURL = 'https://localhost:7202/api/products';
const productService = {
getAllProducts: async () => {
try {
const response = await axios.get(
baseURL,
{
timeout: 3000,
headers: {
Accept: 'application/json',
},
},
);
return response.data;
} catch (err) {
if (err.code === 'ECONNABORTED') {
console.log('The request timed out.');
} else {
console.log(err);
}
}
},
addProduct: async (product) => {
const response = await axios.post(baseURL, product);
return response.data;
},
deleteProduct: async (id) => {
const response = await axios.delete(`${baseURL}/${id}`);
return response.data;
},
updateProduct: async (id, product) => {
const response = await axios.put(`${baseURL}/${id}`, product);
return response.data;
}
};
export default productService;
App component
// src/App.js
import React, { useState } from 'react';
import ProductList from './components/ProductList/ProductList';
import ProductForm from './components/ProductForm/ProductForm';
function App() {
const [refresh, setRefresh] = useState(false);
const handleProductAdded = () => {
setRefresh(!refresh); // Toggle refresh state to trigger re-render
};
return (
<div>
<ProductList key={refresh} />
<ProductForm onProductAdded={handleProductAdded} />
</div>
);
}
export default App;
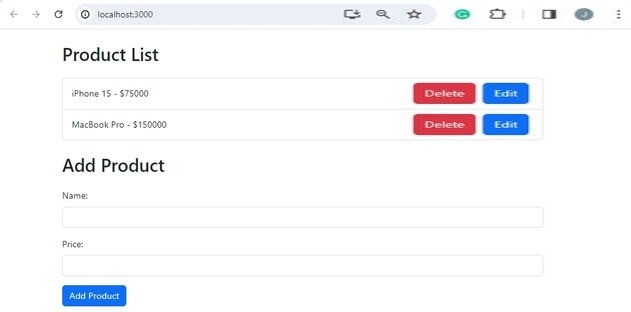
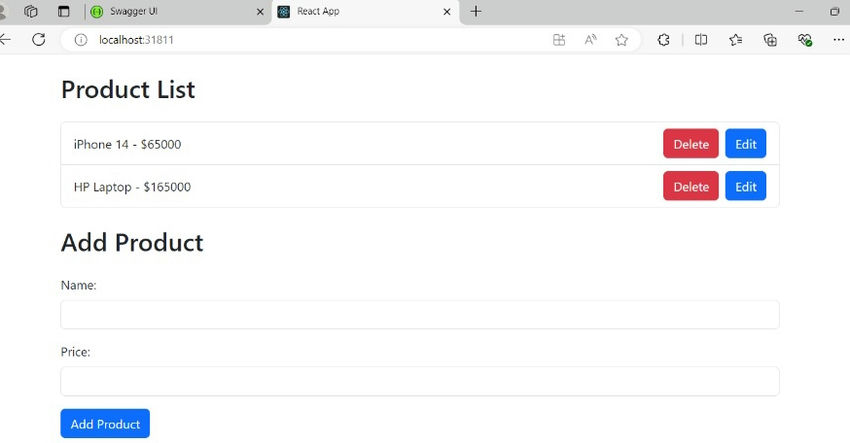
Step 5. Run the application using the following command and perform the different CRUD operations with the help of the same.
Docker Files for Application
Docker file for backend application (.NET Core).
# Use the official .NET Core SDK as a parent image
FROM mcr.microsoft.com/dotnet/sdk:6.0 AS build
WORKDIR /app
# Copy the project file and restore any dependencies (use .csproj for the project name)
COPY *.csproj ./
RUN dotnet restore
# Copy the rest of the application code
COPY . .
# Publish the application
RUN dotnet publish -c Release -o out
# Build the runtime image
FROM mcr.microsoft.com/dotnet/aspnet:6.0 AS runtime
WORKDIR /app
COPY --from=build /app/out ./
# Expose the port your application will run on
EXPOSE 80
# Start the application
ENTRYPOINT ["dotnet", "ProductManagementAPI.dll"]
- Line 1-2: Uses the official .NET Core SDK image (mcr.microsoft.com/dotnet/sdk:6.0) as a base.
- Line 4: Sets the working directory to /app.
- Line 6-7: Copies the project file(s) (*.csproj) into the container.
- Line 8: Runs dotnet restore to restore dependencies specified in the project file(s).
- Line 10-11: Copies the rest of the application code into the container.
- Line 13-14: Publishes the application in Release configuration (dotnet publish -c Release -o out), outputting to the out directory.
- Line 16-17: Uses the official .NET Core ASP.NET runtime image (mcr.microsoft.com/dotnet/aspnet:6.0) as a base.
- Line 19-20: Sets the working directory to /app and Copies the published output from the build stage (from /app/out) into the /app directory of the runtime stage.
- Line 22-23: Exposes port 80 to allow external access to the application.
- Line 25-26: Specifies dotnet ProductManagementAPI.dll as the entry point command to start the application.
Docker file for frontend application (React JS).
FROM node:16-alpine
WORKDIR /app
COPY . .
RUN npm install
RUN npm run build
EXPOSE 3000
CMD ["npm", "start"]
- Line 1: specifies the base image, using Node.js version 18.
- Line 2: sets /app as the working directory for subsequent commands.
- Line 3: Copies the contents of your local directory into the container's working directory.
- Line 4: Installs the project dependencies inside the container.
- Line 5: Build the production version of your React app.
- Line 6: This exposes port 3000, which is where the application will run.
- Line 7: The command starts the React application using serve to serve the build folder.
Next, modify your backend hard-coded URL in the product service.
// src/services/productService.js
import axios from 'axios';
//const baseURL = 'https://localhost:31912/api/products';
const baseURL = process.env.REACT_APP_API_URL;
const productService = {
getAllProducts: async () => {
try {
const response = await axios.get(
baseURL,
{
timeout: 3000,
headers: {
Accept: 'application/json',
},
},
);
return response.data;
} catch (err) {
if (err.code === 'ECONNABORTED') {
console.log('The request timed out.');
} else {
console.log(err);
}
}
},
addProduct: async (product) => {
const response = await axios.post(baseURL, product);
return response.data;
},
deleteProduct: async (id) => {
const response = await axios.delete(`${baseURL}/${id}`);
return response.data;
},
updateProduct: async (id, product) => {
const response = await axios.put(`${baseURL}/${id}`, product);
return response.data;
}
};
export default productService;
Containerize the front-end and back-end application
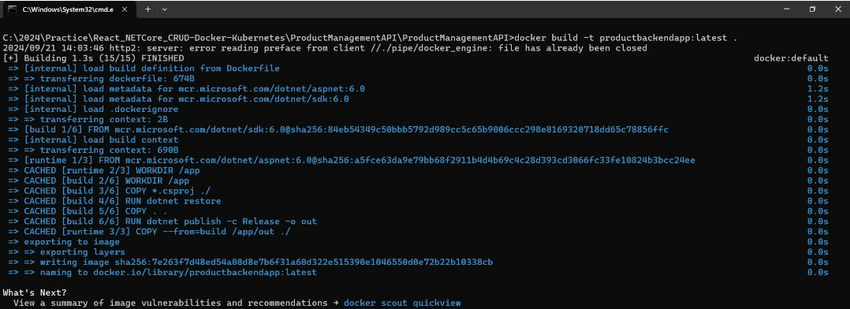
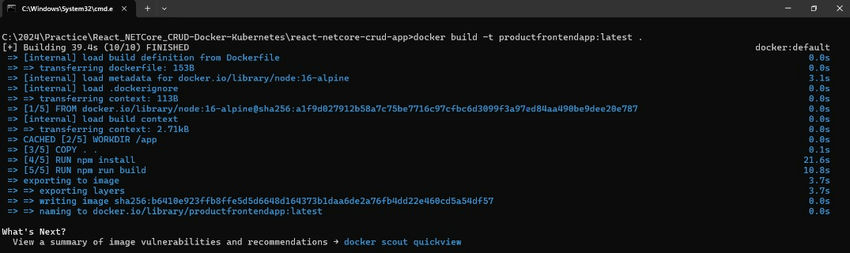
Step 1. Build the docker images
docker build -t productbackendapp:latest .
docker build -t productfrontendapp:latest .
Step 2. Create a deployment and service YAML files for the backend application.
deployment.yml
apiVersion: apps/v1
kind: Deployment
metadata:
name: product-management-api
labels:
app: product-management-api
spec:
replicas: 1
selector:
matchLabels:
app: product-management-api
template:
metadata:
labels:
app: product-management-api
spec:
containers:
- name: product-management-api
image: productbackendapp:latest
imagePullPolicy: Never
ports:
- containerPort: 80
service.yml
apiVersion: v1
kind: Service
metadata:
name: product-management-api-service
labels:
app: product-management-api
spec:
type: NodePort
ports:
- protocol: TCP
port: 80
targetPort: 80
selector:
app: product-management-api
Step 3. Create deployment, service, and backend-config map YAML files for the frontend application.
deployment.yml
apiVersion: apps/v1
kind: Deployment
metadata:
name: react-client-deployment
spec:
replicas: 1
selector:
matchLabels:
app: react-client
template:
metadata:
labels:
app: react-client
spec:
containers:
- name: react-client
image: productfrontendapp:latest
imagePullPolicy: Never
ports:
- containerPort: 3000
env:
- name: REACT_APP_API_URL
valueFrom:
configMapKeyRef:
name: backend-config
key: REACT_APP_API_URL
service.yml
apiVersion: v1
kind: Service
metadata:
name: react-client-service
spec:
selector:
app: react-client
ports:
- protocol: TCP
port: 80
targetPort: 3000
type: NodePort
backend-configmap.yml
apiVersion: v1
kind: ConfigMap
metadata:
name: backend-config
data:
REACT_APP_API_URL: "http://localhost:30191/api/products"
Step 4. Apply all the above files one by one using kubectl commands. (Note: make sure Kubernetes is running on your system with docker daemon.)
kubectl apply -f deployment.yml
kubectl apply -f service.yml
kubectl apply -f backend-configmap.yml
Step 5. Verify the deployment, services, pods, and config map are up and running or not with the help of kubectl commands.
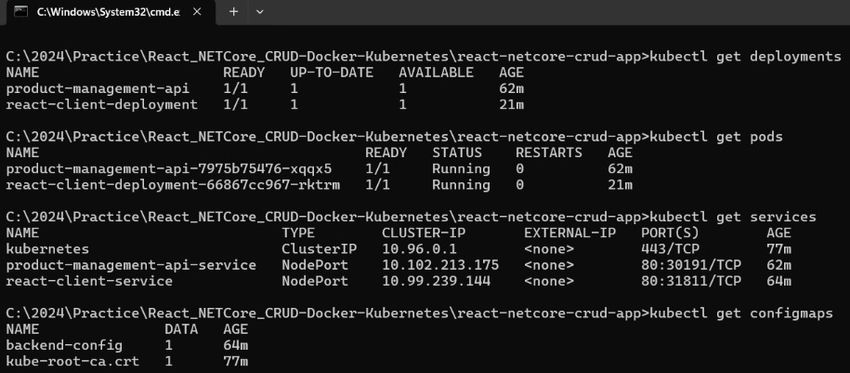
Step 6. Hit the backend and frontend product application using services.
Conclusion
In this article, we created a product management backend application using .NET Core with different API endpoints that are required to perform CRUD operations. Later on, we created the front-end application using React JS and consumed the back-end application inside the same with the help of Axios. Also, we containerized both applications with the help of Docker and Kubernetes.
European Best, cheap and reliable ASP.NET hosting with instant activation. HostForLIFE.eu is #1 Recommended Windows and ASP.NET hosting in European Continent. With 99.99% Uptime Guaranteed of Relibility, Stability and Performace. HostForLIFE.eu security team is constantly monitoring the entire network for unusual behaviour. We deliver hosting solution including Shared hosting, Cloud hosting, Reseller hosting, Dedicated Servers, and IT as Service for companies of all size.
