In this article, you will learn about how to send push notifications to android devices using FCM from .Net Core Web API. You will also learn how to create a Firebase project and get Server Key and Sender ID step by step. Our main focus is how to handle send notification functionality on the API side.
What is FCM?
Firebase Cloud Messaging (FCM) is a free cloud service from Google that allows users to send notifications and messages to users.
It is a cross-platform messaging solution. You can send notifications and messages across a variety of platforms, including Android, iOS and web applications.
Create Firebase Project
Go to Firebase Console.
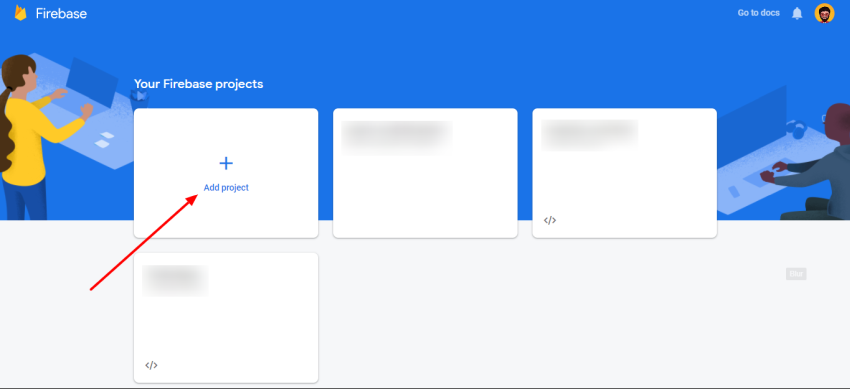
Follow the steps to set up the project.
After adding the project to the Firebase, add App to the same project.
Send Push Notification To Android Device From .Net Core Web API
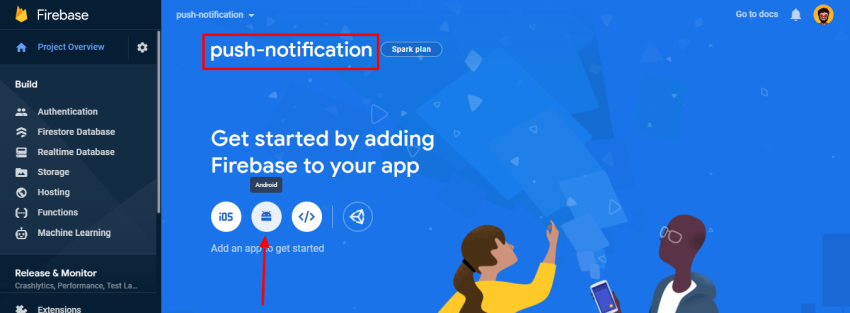
Enter package name, app name, and SHA-1 key of your Android Studio project. Follow all the steps to complete the add Firebase to your Android app. If you face any problem, you can refer to Add Firebase to your Android Project.
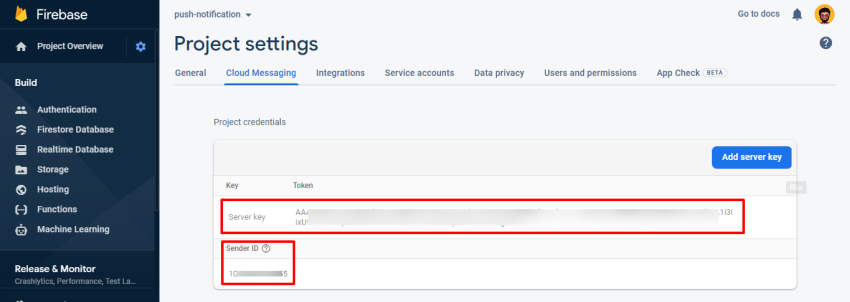
Get FCM Sender ID & Server Key
Click on the “Gear” icon and access “Project settings”.
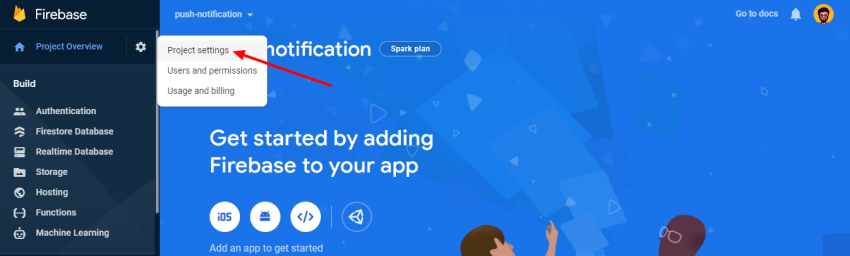
Go to the “Cloud Messaging” section and you will have access to the Sender ID and Server Key. We will use it later in the API.
For setting up a Firebase Cloud Messaging client app on Android and getting FCM registration token or device token please refer to this Set up an Android client.
How to send FCM push notification from an ASP.NET Core Web API project.
What CorePush Package?
It’s very Lightweight .NET Core Push Notifications for Android and iOS. I used it in my project to send Firebase Android and Apple iOS push notifications. In this article just I focus on sending push notifications on Android devices Useful links,
- NuGet package
- Documentation
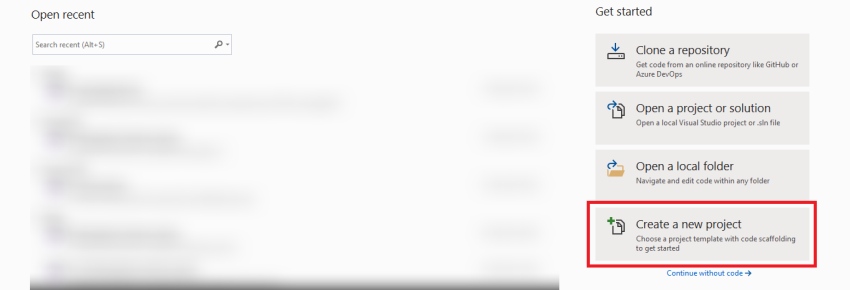
Step 1 – Create Project
Open Visual Studio click on “Create a new project”.
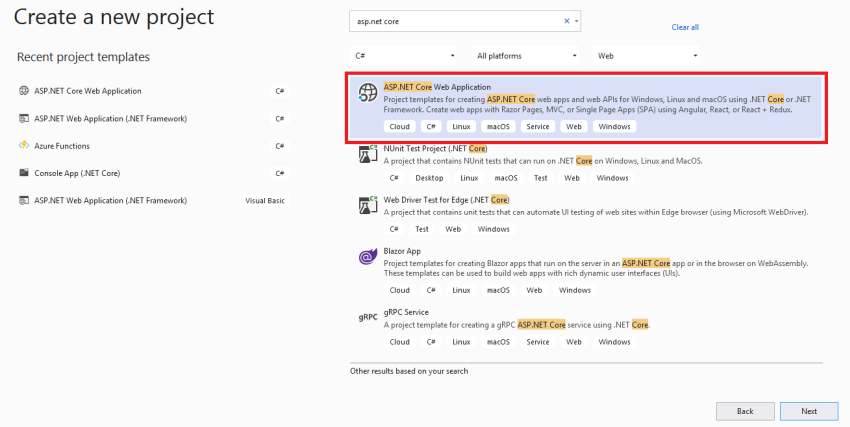
Select ASP.NET Core Web Application option.
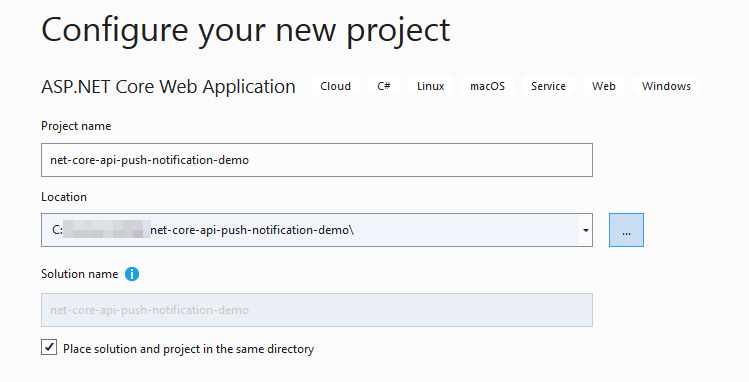
Add Project name and Solution name.
Select the “API” option with “.NET Core” and “ASP.NET Core 3.1” to create ASP.NET API.
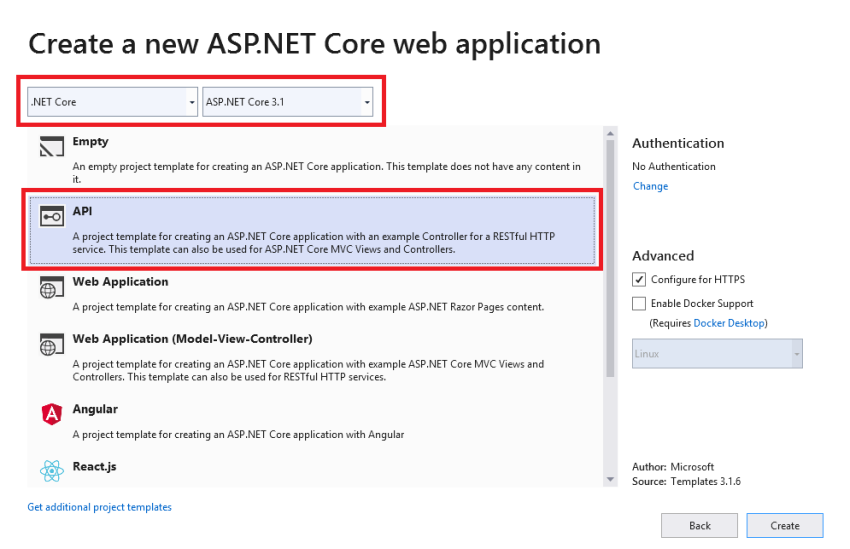
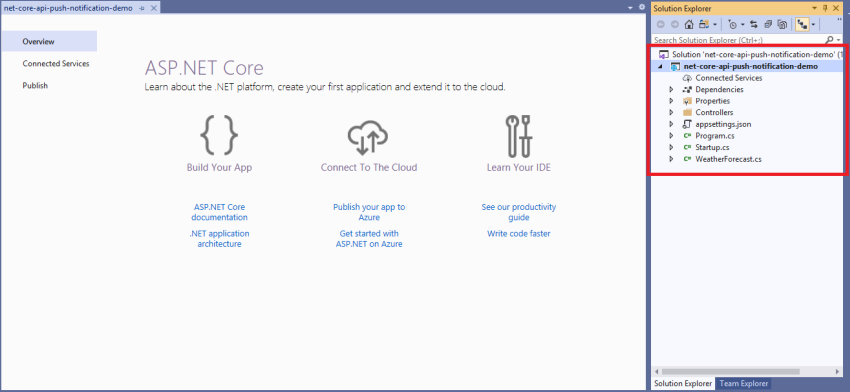
You can see the default folder structure.
Step 2 – Install NuGet Packages
Open Package Manager Console
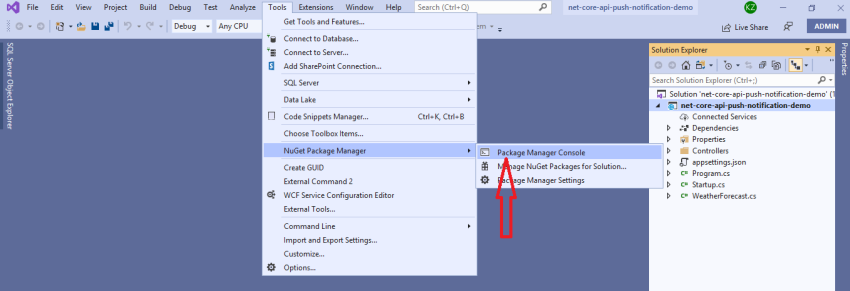
And run the below commands one by one:
- Install-Package CorePush
- Install-Package Newtonsoft.Json
- Install-Package Swashbuckle.AspNetCore

Step 3 – Create Models for the controller
Now, create a directory with name Models and add the following files
- ResponseModel.cs
- NotificationModel.cs
- FcmNotificationSetting.cs
ResponseModel.cs will contain definitions for response models.
NotificationModel.cs will contain definitions for notification and google notification model
FcmNotificationSetting.cs will contain definitions for FCM notification settings.
Code for ResponseModel.cs file,
using Newtonsoft.Json;
namespace net_core_api_push_notification_demo.Models
{
public class ResponseModel
{
[JsonProperty("isSuccess")]
public bool IsSuccess { get; set; }
[JsonProperty("message")]
public string Message { get; set; }
}
}
Code for NotificationModel.cs file,
using Newtonsoft.Json;
namespace net_core_api_push_notification_demo.Models
{
public class NotificationModel
{
[JsonProperty("deviceId")]
public string DeviceId { get; set; }
[JsonProperty("isAndroiodDevice")]
public bool IsAndroiodDevice { get; set; }
[JsonProperty("title")]
public string Title { get; set; }
[JsonProperty("body")]
public string Body { get; set; }
}
public class GoogleNotification
{
public class DataPayload
{
[JsonProperty("title")]
public string Title { get; set; }
[JsonProperty("body")]
public string Body { get; set; }
}
[JsonProperty("priority")]
public string Priority { get; set; } = "high";
[JsonProperty("data")]
public DataPayload Data { get; set; }
[JsonProperty("notification")]
public DataPayload Notification { get; set; }
}
}
Code for FcmNotificationSetting.cs file,
namespace net_core_api_push_notification_demo.Models
{
public class FcmNotificationSetting
{
public string SenderId { get; set; }
public string ServerKey { get; set; }
}
}
Step 4 – Update appsettings.Development.json file
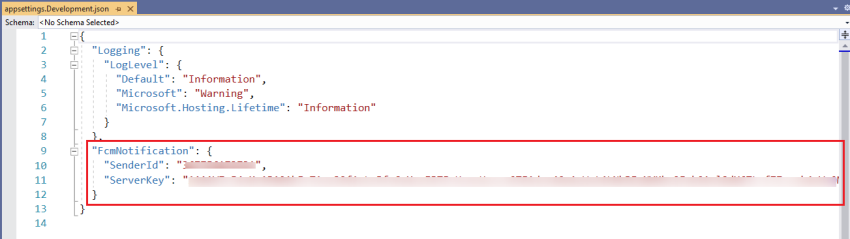
Code for appsettings.Development.json file,
{
"Logging": {
"LogLevel": {
"Default": "Information",
"Microsoft": "Warning",
"Microsoft.Hosting.Lifetime": "Information"
}
},
"FcmNotification": {
"SenderId": "*SENDER_ID*",
"ServerKey": "*SERVER_KEY*"
}
}
Replace *SENDER_ID* with your sender Id.
Replace *SERVER_KEY* with your server key.
Which we have found from the Cloud Messaging section of Firebase project settings.
Step 5 – Create Service
Now, create a directory with the name Services and add the following file.
Code for NotificationService.cs file,
using CorePush.Google;
using Microsoft.Extensions.Options;
using net_core_api_push_notification_demo.Models;
using System;
using System.Net.Http;
using System.Net.Http.Headers;
using System.Threading.Tasks;
using static net_core_api_push_notification_demo.Models.GoogleNotification;
namespace net_core_api_push_notification_demo.Services
{
public interface INotificationService
{
Task<ResponseModel> SendNotification(NotificationModel notificationModel);
}
public class NotificationService : INotificationService
{
private readonly FcmNotificationSetting _fcmNotificationSetting;
public NotificationService(IOptions<FcmNotificationSetting> settings)
{
_fcmNotificationSetting = settings.Value;
}
public async Task<ResponseModel> SendNotification(NotificationModel notificationModel)
{
ResponseModel response = new ResponseModel();
try
{
if (notificationModel.IsAndroiodDevice)
{
/* FCM Sender (Android Device) */
FcmSettings settings = new FcmSettings()
{
SenderId = _fcmNotificationSetting.SenderId,
ServerKey = _fcmNotificationSetting.ServerKey
};
HttpClient httpClient = new HttpClient();
string authorizationKey = string.Format("keyy={0}", settings.ServerKey);
string deviceToken = notificationModel.DeviceId;
httpClient.DefaultRequestHeaders.TryAddWithoutValidation("Authorization", authorizationKey);
httpClient.DefaultRequestHeaders.Accept
.Add(new MediaTypeWithQualityHeaderValue("application/json"));
DataPayload dataPayload = new DataPayload();
dataPayload.Title = notificationModel.Title;
dataPayload.Body = notificationModel.Body;
GoogleNotification notification = new GoogleNotification();
notification.Data = dataPayload;
notification.Notification = dataPayload;
var fcm = new FcmSender(settings, httpClient);
var fcmSendResponse = await fcm.SendAsync(deviceToken, notification);
if (fcmSendResponse.IsSuccess()) {
response.IsSuccess = true;
response.Message = "Notification sent successfully";
return response;
} else {
response.IsSuccess = false;
response.Message = fcmSendResponse.Results[0].Error;
return response;
}
}
else {
/* Code here for APN Sender (iOS Device) */
//var apn = new ApnSender(apnSettings, httpClient);
//await apn.SendAsync(notification, deviceToken);
}
return response;
}
catch (Exception ex) {
response.IsSuccess = false;
response.Message = "Something went wrong";
return response;
}
}
}
}
Step 6 – Update Startup.cs file
Code for Startup.cs file,
using CorePush.Apple;
using CorePush.Google;
using Microsoft.AspNetCore.Builder;
using Microsoft.AspNetCore.Hosting;
using Microsoft.Extensions.Configuration;
using Microsoft.Extensions.DependencyInjection;
using Microsoft.Extensions.Hosting;
using Microsoft.OpenApi.Models;
using net_core_api_push_notification_demo.Models;
using net_core_api_push_notification_demo.Services;
namespace net_core_api_push_notification_demo
{
public class Startup
{
public Startup(IConfiguration configuration)
{
Configuration = configuration;
}
public IConfiguration Configuration { get; }
// This method gets called by the runtime. Use this method to add services to the container.
public void ConfigureServices(IServiceCollection services)
{
services.AddControllers();
services.AddTransient<INotificationService, NotificationService>();
services.AddHttpClient<FcmSender>();
services.AddHttpClient<ApnSender>();
// Configure strongly typed settings objects
var appSettingsSection = Configuration.GetSection("FcmNotification");
services.Configure<FcmNotificationSetting>(appSettingsSection);
// Register the swagger generator
services.AddSwaggerGen(c => {
c.SwaggerDoc(name: "V1", new OpenApiInfo { Title = "My API", Version = "V1" });
});
}
// This method gets called by the runtime. Use this method to configure the HTTP request pipeline.
public void Configure(IApplicationBuilder app, IWebHostEnvironment env)
{
if (env.IsDevelopment()) {
app.UseDeveloperExceptionPage();
}
// Enable middleware to serve generated Swagger as a JSON endpoint
app.UseSwagger();
// Enable the SwaggerUI
app.UseSwaggerUI(c => {
c.SwaggerEndpoint(url: "/swagger/V1/swagger.json", name: "My API V1");
});
app.UseHttpsRedirection();
app.UseRouting();
app.UseAuthorization();
app.UseEndpoints(endpoints => {
endpoints.MapControllers();
});
}
}
}
Step 7 – Add Controller
Now, add the NotificationController.cs file in the Controllers folder
Code for NotificationController.cs file,
using System.Threading.Tasks;
using Microsoft.AspNetCore.Mvc;
using net_core_api_push_notification_demo.Models;
using net_core_api_push_notification_demo.Services;
namespace net_core_api_push_notification_demo.Controllers
{
[Route("api/notification")]
[ApiController]
public class NotificationController : ControllerBase
{
private readonly INotificationService _notificationService;
public NotificationController(INotificationService notificationService)
{
_notificationService = notificationService;
}
[Route("send")]
[HttpPost]
public async Task<IActionResult> SendNotification(NotificationModel notificationModel)
{
var result = await _notificationService.SendNotification(notificationModel);
return Ok(result);
}
}
}
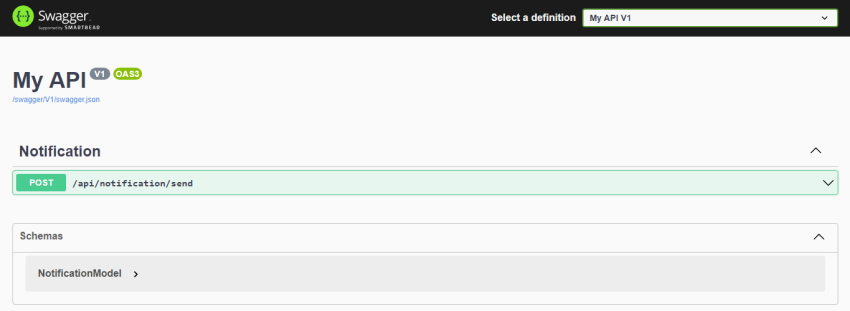
Step 8 – Running Web API
Now, press F5 to start debugging the Web API project, if everything is OK, we’ll get the following output in the browser.
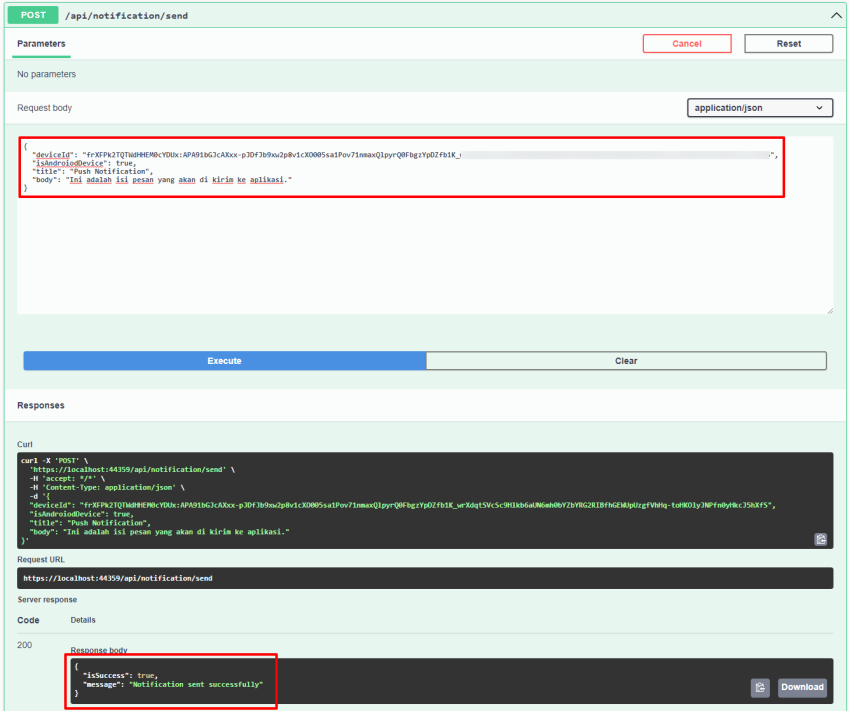
Now, we will call the send notification API and check whether the notification is sent or not. As per the below screenshot, enter all properties details and hit the Execute button. If everything is fine, then the value of isSuccess property is true and the value of the message property is “Notification sent successfully”.
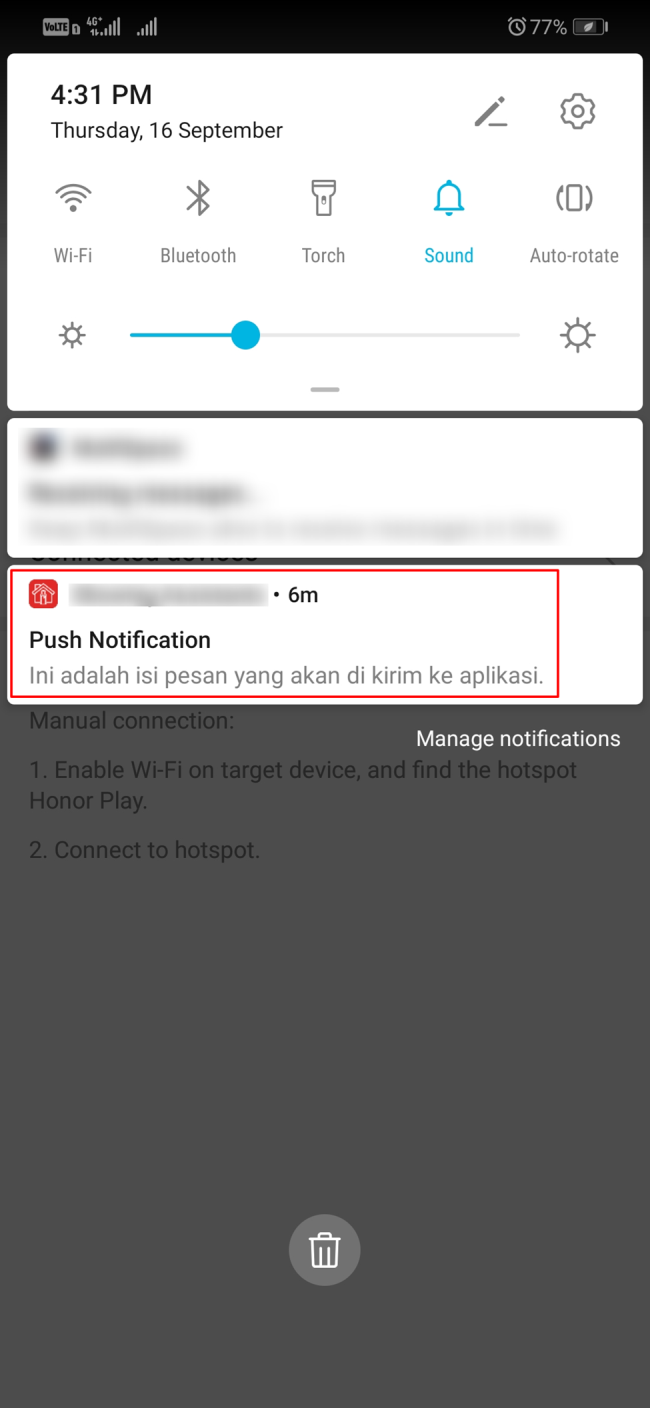
Wow, here is the notification!