Generally, when we are using any uptime monitoring systems or load balancers, these systems will keep monitoring the health of the application and based on its health condition it will decide to send the request to serve it. For this earlier, we use to create a special endpoint where it will return any error message or code to indicate the health of the API/service.

Following is the sample, an endpoint /health where it verifying the database connection and returns the result accordingly.
[Route("health")]
public ActionResult Health()
{
using (var connection = new SqlConnection(_connectionString))
{
try
{
connection.Open();
}
catch (SqlException)
{
return new HttpStatusCodeResult(503, "Database connection is unhealthy");
}
}
return new EmptyResult();
}
When we ran the application with endpoint /health, it will display an empty message with 200 status code and 503 status code when there is any connectivity issue while connecting to the database.
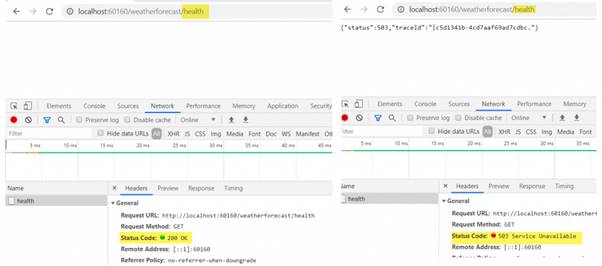
Now, based on these resulted status codes, monitoring systems can take appropriate actions like removing this particular services instance from its list of healthy services so that no requests will be redirected to it until it becomes healthy (in our case, when database connectivity issue resolves).
We need to keep adding more external resource health checks accordingly.
Since .NET Core 2.2, we no need to add a special controller for health check endpoint, instead, the framework itself providing Health Check services as follows.
NuGet Package
You have to install following NuGet package
Install-Package Microsoft.Extensions.Diagnostics.HealthChecks
Once the package is installed, we need to add the following lines at ConfigureServices() and Configure() methods in Startup.cs file.
public void ConfigureServices(IServiceCollection services)
{
services.AddHealthChecks();
}
public void Configure(IApplicationBuilder app, IWebHostEnvironment env)
{
app.UseHealthChecks("/Health");
}
As observed, we are providing the endpoint name in Configure() method. These lines of code will enable a dynamic endpoint "/Health" and display either Healthy/UnHealthy results based on its health state.
But, where can we write our custom logic to replicate the above? Yes, we have many features to customize our needs from logic to display results.
Adding Custom Logic
We can perform in two ways the following are those.
Option 1
In ConfigureServices method,
public void ConfigureServices(IServiceCollection services) {
services.AddHealthChecks()
.AddCheck("sql", () => {
using(var connection = new SqlConnection(_connectionString)) {
try {
connection.Open();
} catch (SqlException) {
return HealthCheckResult.Unhealthy();
}
}
return HealthCheckResult.Healthy();
});
}
Here, we can use an anonymous method to write the custom logic using AddCheck() method. This will expect a HealthCheckResult object as a result. This object will contain 3 options,
Healthy
Unhealthy
Degraded
Based on the result we need to return appropriately so that runtime will return the status code accordingly. For example, in the above code, if database connection passes it will return a 200 status code (Healthy) and 503 status code (Unhealthy) if failed.
Option 2 - In a separate class
The class should implement an IHealthCheck interface and implement CheckHealthAsync() method as follows,
public class DatabaseHealthCheck: IHealthCheck {
public Task < HealthCheckResult > CheckHealthAsync(HealthCheckContext context, CancellationToken cancellationToken =
default) {
using(var connection = new SqlConnection(_connectionString)) {
try {
connection.Open();
} catch (SqlException) {
return HealthCheckResult.Healthy();
}
}
return HealthCheckResult.Healthy();
}
}
Once we created the class, we need to mention this class in ConfigureServices() method using AddTask<T> method as follows by giving some valid unique names.
public void ConfigureServices(IServiceCollection services)
{
services.AddControllers();
services.AddHealthChecks()
.AddCheck<DatabaseHealthCheck>("sql");
}
Now, our code is clean and we can add any number of Health Tasks as above and it will be run in the order how we declared here.
Custom Status Code
As discussed above, by default it will send 200 status code if we return Healthy and 503 for Unhealthy. The Healthcheck service even provides scope for us to change this default behavior by providing custom status code using its options object as follows.
var options = new HealthCheckOptions();
options.ResultStatusCodes[HealthStatus.Unhealthy] = 420;
app.UseHealthChecks("/Health", options);
In this example, I replace the status code for the Unhealthy state with 420.
Custom Response
The beauty of this tool is, we can even customize our output for more clear detailed information about each Health check task. This will be very useful in case we have multiple health check tasks to analyze which task made the complete service heath status to Unhealthy.
We can achieve this via HealthCheckOptions ResponseWriter property.
public void Configure(IApplicationBuilder app, IWebHostEnvironment env) {
app.UseHealthChecks("/Health", new Microsoft.AspNetCore.Diagnostics.HealthChecks.HealthCheckOptions() {
ResponseWriter = CustomResponseWriter
});
}
private static Task CustomResponseWriter(HttpContext context, HealthReport healthReport) {
context.Response.ContentType = "application/json";
var result = JsonConvert.SerializeObject(new {
status = healthReport.Status.ToString(),
errors = healthReport.Entries.Select(e => new {
key = e.Key, value = e.Value.Status.ToString()
})
});
return context.Response.WriteAsync(result);
}
Now, the above code will display the result in JSON format will all the tasks information. Here, Key represents the Task name we have given (in our case "sql") and value is either Healthy/Unhealthy.
Health Check UI
We can even see the health check results on-screen visually by installing the following NuGet package
Install-Package AspNetCore.HealthChecks.UI
Once installed need to call respective service methods in ConfigureServices() and Configure() methods accordingly.
public void ConfigureServices(IServiceCollection services)
{
services.AddHealthChecksUI();
}
public void Configure(IApplicationBuilder app, IHostingEnvironment env)
{
app.UseHealthChecksUI();
}
Once configured, you can run the application and point to /healthchecks-ui endpoint which display a UI as follows,
