European ASP.NET 4.5 Hosting BLOG

BLOG about ASP.NET 4, ASP.NET 4.5 Hosting and Its Technology - Dedicated to European Windows Hosting Customer

ASP.NET Hosting with Toronto Data Center - HostForLIFE.eu :: How To Convert A Password Into Complicated

clock October 27, 2015 00:22 by author Rebecca

In this tutorial, we will show you how to convert a password into complicated in ASP.NET. We will ise SHA1 or MD5 algorithm to work around for converting your password into complicated.

Follow these steps to make your password seems complicated in ASP.NET:

Step 1

Open Visual Studio and create an empty website. Give it a suitable name for example: [hashpass_demo].

Step 2

 In Solution Explorer you will get your empty website, then add a Web Form by going like this:

  • Right Click
  • Add New Item, then Web Form. Name it hashpass_demo.aspx.

Step 3

Now mcreate some design for your application by going to hashpass_demo.aspx and try the code like this:

    <%@ Page Language="C#" AutoEventWireup="true" CodeFile="Default.aspx.cs" Inherits="_Default" %> 
     
    <!DOCTYPE html PUBLIC "-//W3C//DTD XHTML 1.0 Transitional//EN" "http://www.w3.org/TR/xhtml1/DTD/xhtml1-transitional.dtd"> 
     
    <html xmlns="http://www.w3.org/1999/xhtml"> 
    <head runat="server"> 
        <title></title> 
        <style type="text/css"> 
            .style1 
            { 
                width: 258px; 
            } 
            .style2 
            { 
                width: 239px; 
            } 
        </style> 
    </head> 
    <body> 
        <form id="form1" runat="server"> 
        <div> 
         
            <table style="width:100%;"> 
                <tr> 
                    <td class="style1"> 
                        Enter Your Username:</td> 
                    <td class="style2"> 
                        <asp:TextBox ID="TextBox1" runat="server"></asp:TextBox> 
                    </td> 
                    <td> 
                        <asp:Label ID="Label2" runat="server"></asp:Label> 
                    </td> 
                </tr> 
                <tr> 
                    <td class="style1"> 
                        Enter Your Password:  
                    </td> 
                    <td class="style2"> 
                        <asp:TextBox ID="TextBox2" runat="server" TextMode="Password"></asp:TextBox> 
                    </td> 
                    <td> 
                        <asp:Label ID="Label1" runat="server"></asp:Label> 
                    </td> 
                </tr> 
                <tr> 
                    <td class="style1"> 
                         </td> 
                    <td class="style2"> 
                         </td> 
                    <td> 
                         </td> 
                </tr> 
                <tr> 
                    <td class="style1"> 
                         </td> 
                    <td class="style2"> 
                        <asp:Button ID="Button1" runat="server" onclick="Button1_Click" Text="Submit" /> 
                    </td> 
                    <td> 
                         </td> 
                </tr> 
            </table> 
         
        </div> 
        </form> 
    </body> 
    </html> 

Your design will look like following picture snippet:

Step 4

Now it’s time for server side coding so that our application starts working. Open your hashpass_demo.aspx.cs file and code it like below:

    using System; 
    using System.Collections.Generic; 
    using System.Linq; 
    using System.Web; 
    using System.Web.UI; 
    using System.Web.UI.WebControls; 
    using System.Web.Security; 
     
    public partial class _Default : System.Web.UI.Page 
    { 
        protected void Page_Load(object sender, EventArgs e) 
        { 
     
        } 
        protected void Button1_Click(object sender, EventArgs e) 
        { 
            string securepass = FormsAuthentication.HashPasswordForStoringInConfigFile(TextBox2.Text, "MD5"); 
            Label2.Text = "Your Username is-" + TextBox1.Text; 
            Label1.Text = "Your HashPassword is-" + securepass; 
            Label2.ForeColor = System.Drawing.Color.ForestGreen; 
            Label1.ForeColor = System.Drawing.Color.ForestGreen; 
       
        } 
    } 

Here is the output:

Good luck!

HostForLIFE.eu ASP.NET 4.6 Hosting
HostForLIFE.eu is European Windows Hosting Provider which focuses on Windows Platform only. We deliver on-demand hosting solutions including Shared hosting, Reseller Hosting, Cloud Hosting, Dedicated Servers, and IT as a Service for companies of all sizes. We have customers from around the globe, spread across every continent. We serve the hosting needs of the business and professional, government and nonprofit, entertainment and personal use market segments. 


ASP.NET 4.6 Hosting Germany - HostForLIFE.eu :: How to Use C# to Track an IP Address

clock October 5, 2015 18:25 by author Rebecca

In this tutorial, you will learn how to track an IP address in ASP.NET using C#.

In ASP.NET it is also very easy to find IP address no matter whether user is behind the proxy or not, you can easily track the user in ASP.NET. So let's have a look over the following code:

    //To get the ip address of the machine and not the proxy use the following code      
                string strIPAddress = Request.UserHostAddress.ToString(); 
                strIPAddress = Request.ServerVariables["HTTP_X_FORWARDED_FOR"]; 
     
                if (strIPAddress == null || strIPAddress == "") 
                { 
                    strIPAddress = Request.ServerVariables["REMOTE_ADDR"].ToString(); 
                } 

That's it! Easy right?

HostForLIFE.eu ASP.NET 4.6 Hosting
HostForLIFE.eu is European Windows Hosting Provider which focuses on Windows Platform only. We deliver on-demand hosting solutions including Shared hosting, Reseller Hosting, Cloud Hosting, Dedicated Servers, and IT as a Service for companies of all sizes. We have customers from around the globe, spread across every continent. We serve the hosting needs of the business and professional, government and nonprofit, entertainment and personal use market segments. 


ASP.NET 4.6 Hosting Portugal - HostForLIFE.eu :: How to Use Script to Disable Auto Fill TextBoxes in Some Browsers

clock September 26, 2015 12:59 by author Rebecca

Recent's browsers like Chrome, Firefox, Internet Explorer and Safari has functionality of auto complete values in TextBoxes. If you have enabled this features in browser, every time you start to enter value in TextBox you get a drop down of prefilled values in that TextBox. This feature of browser can be disabled by the programming for a specific web form like payment form and other confidential information form of a web application.

In chrome browser, you can enable auto-fill as shown below:

Step 1

Then you will have a below form for online payment of product by credit card or debit card then it is mandatory to stop auto complete functionality of browser so that browser doesn’t save the confidential information of a customer’s credit card or debit card.


Step 2


Then, you can turn off auto-fill for your complete form by setting autocomplete attribute value to off as shown below:

<form id="Form1" method="post" runat="server" autocomplete="off">

 .

 .

</form>

Step 3

You can also turn off auto-fill for a particular TextBox by setting autocomplete attribute value to off as shown below:

<asp:TextBox Runat="server" ID="txtConfidential" autocomplete="off"></asp:TextBox>

Step 4

And you can also do this from code behind also like as:

txtConfidential.Attributes.Add("autocomplete", "off");

After doing one of above code you will see that there is no auto-fill.


HostForLIFE.eu ASP.NET 4.6 Hosting
HostForLIFE.eu is European Windows Hosting Provider which focuses on Windows Platform only. We deliver on-demand hosting solutions including Shared hosting, Reseller Hosting, Cloud Hosting, Dedicated Servers, and IT as a Service for companies of all sizes. We have customers from around the globe, spread across every continent. We serve the hosting needs of the business and professional, government and nonprofit, entertainment and personal use market segments.


ASP.NET 4.6 Hosting UK - HostForLIFE.eu :: How to Use ASP.NET to Populate AJAX Control

clock September 17, 2015 12:03 by author Rebecca

The DynamicPopulate Control in the ASP.NET AJAX can call a page method and fill the resulting value in the target control on the page without a page refresh. The method call returns a form of  HTML string that is inserted as a child of the target element. The AJAX controls  work automatically. While it's possible to call (_doPostBack()) from JavaScript to trigger for a partial update. When  we use the ASP.NET DropDownList control, ASP.NET will verify that the items in the list are the same items the list contained when the page was rendered. Since we are adding items on the client side, a postback results in an ASP.NET validation error. This postback validation is designed to prevent users from editing your web pages and trying to submit invalid data. You can disable this validation but, for our purposes, it's simpler just to use a <select> tag.

Step 1

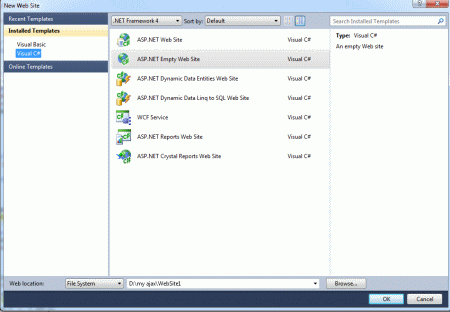
Open Visual Studio, Go to File->New->WebSite and Select ASP.NET Empty WebSite:
Step 2

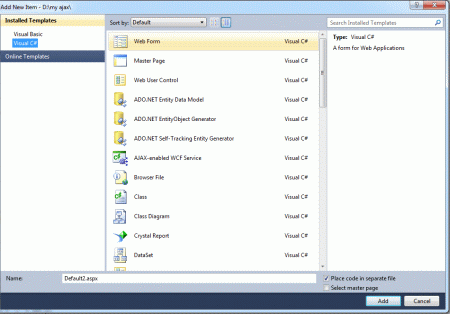
  • Go to Solution Explorer and right-click.
  • Select Add->New Item.
  • Select WebForm.
  • Default.aspx page open

Step 3

Go to Default.aspx page and click on the [Design] option and drag control from Toolbox. Then, drag Panel control, Label, Button, Drop List control, ScriptManager control.

Step 4

The page contain a button with the ID PopList. The onclick attribute of this attribute calls the PopulateList() JavaScript function.

JavaScript Function

<title>my ajax application</title>
<style type="text/css">
        body
        {
            font-family: @BatangChe
            font-size: small;
            color: #555555;
        }
    </style>
    <script type="text/javascript">
        function PopulateList() {
            PageMethods.GetListData(1, OnPopulateList);
        }
        function OnPopulateList(list) {
            var dropList = document.getElementById('DropList');
            for (i = 1; i < 10; i++) {
                var option = document.createElement('OPTION');
                option.text = list[i].text;
                option.value = list[i].value;
                dropList.options.add(option);
            }
        }
    </script>

Step 5

Go to Default.aspx[Source] option and define the condition EnablePageMethod is "True" with ScriptManager and write a code:

<form id="form1" runat="server" style="background-color: #330D1E">
    <div>
        <asp:ScriptManager ID="ScriptManager1" runat="server" EnablePageMethods="True">
        </asp:ScriptManager>
        <p style="background-color: #2FC8D0">
        </p>
        <p style="background-color: #C0D1AF">
           How to populate control in ajax
        </p>
        <p style="background-color: #B8C9C9">
            <input id="PopList" type="button" value="Populate List"
                onclick="PopulateList();" style="background-color: #A5DCBD" />
        </p>
        <p style="background-color: #784847">
            <select id="DropList" name="DropListName"
                style="width: 200px; background-color: #B3CEC6;">
            </select>
        </p>
        <p style="background-color: #808080">
            <asp:Button ID="btnSubmit" runat="server" Text="Submit" />
        </p>
        <p style="background-color: #9A96E9">
            <asp:Label ID="lblSubmitValue" runat="server" BackColor="#FFFFCC"
                BorderWidth="15px"></asp:Label>
        </p>
    </div>
    </form>

Step 6

Now we create List Data Class. The data returns a list of objects for this class. The class consist two member Text, Value.

public class ListData
        {
            public string text { get; set; }
            public int value { get; set; }
        }

Step 7

Now we define the method for Client Side JavaScript and method return the data (List Data object):

public static IEnumerable<ListData> GetListData(int arg)
        {
            List<ListData> list = new List<ListData>();
            for (int i = 0; i < 100; i++)
                list.Add(new ListData()
                {
                    text = String.Format("List Item {0}", i),
                    value = i
                });
            return list;
        }

Step 8

The collection represents the raw values being posted to the page of List Data Items. Then these data items consist of the following namespace are use it.

using System.Collections.Generic;

Step 9

Now go to the Default.aspx.cs file; write code for the method to be called from client-side JavaScript:

using System;
using System.Collections.Generic;
using System.Linq;
using System.Web;
using System.Web.UI;
using System.Web.UI.WebControls;
public partial class _Default : System.Web.UI.Page
{
        protected void Page_Load(object sender, EventArgs e)
        {
            if (Request.Form["DropListName"] != null)
                lblSubmitValue.Text = String.Format("Submitted Value: \"{0}\"",
                    Request.Form["DropListName"]);
        }
        public class ListData
        {
            public string text { get; set; }
            public int value { get; set; }
        }
        [System.Web.Services.WebMethod]
        [System.Web.Script.Services.ScriptMethod]
        public static IEnumerable<ListData> GetListData(int arg)
        {
            List<ListData> list = new List<ListData>();
            for (int i = 0; i < 100; i++)
                list.Add(new ListData()
                {
                    text = String.Format("List Item {0}", i),
                    value = i
                });
            return list;
        }
    }

Step 10

Now run the application pressing F5.
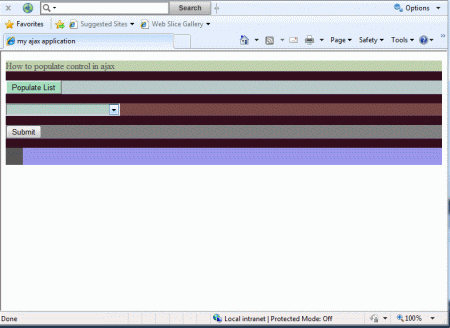
This page demonstrate how to dynamically populate a control using AJAX.

Step 11

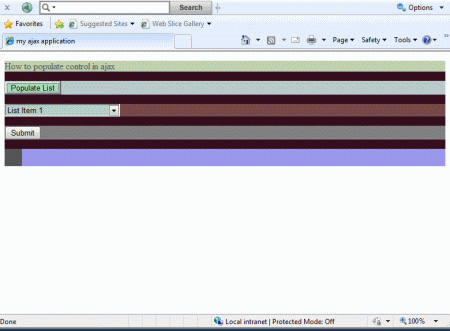
Click on the populate list button to populate the dropdown list.
Step 12

Now click on the Submit button to submit the selected value back to the server.
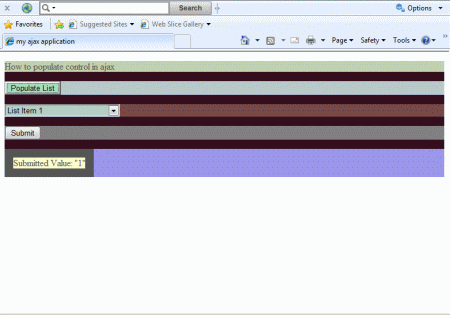
Step 13

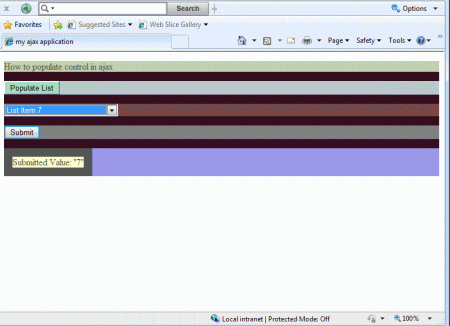
Now, you will change the dropdown list item and click on the submit button to again submit the selected value back to the server.
HostForLIFE.eu ASP.NET 4.6 Hosting
HostForLIFE.eu is European Windows Hosting Provider which focuses on Windows Platform only. We deliver on-demand hosting solutions including Shared hosting, Reseller Hosting, Cloud Hosting, Dedicated Servers, and IT as a Service for companies of all sizes. We have customers from around the globe, spread across every continent. We serve the hosting needs of the business and professional, government and nonprofit, entertainment and personal use market segments.


ASP.NET 4.6 Hosting - HostForLIFE.eu :: How to Use ASP.NET and C# to Show First & Last Day in a Month

clock September 7, 2015 09:17 by author Rebecca

In this post, I'm going to show you how calculate the first day and last day of a month for one of the project. The method that I'm using is very simple.

Here is the code:

DateTime today = DateTime.Now; //current date

DateTime firstDay = today.AddDays(-(today.Day - 1)); //first day

today = today.AddMonths(1);
DateTime lastDay = today.AddDays(-(today.Day)); //last day

The Explanation

The Calculation of First Day

DateTime firstDay = today.AddDays(-(today.Day - 1));

Here I'm using the AddDays method which can add given number of days to the current date. Using today.Day I'm extracting the current date day as integer value, which is 21 in my example. The tricky part here is that I'm adding with the AddDays method total of 21-1 = 20 and using the minus sign, it's getting 20 days back (instead of 20 days forward).

The Calculation of the Last Day

today = today.AddMonths(1);
DateTime lastDay = today.AddDays(-(today.Day)); //last day

With today = today.AddMonths(1) I'm adding one month plus to the current date.
Before adding, for example the today value was {21-07-2015 17:27:50} - after adding +1 month, the today value is {21-08-2015 17:27:50}.
Then, with the last line, the trick is very similar to the firstDayDate calculation, we only go in minus to the number of days got from the today.Day integer value. We do not add today.Day-1 here because if you do, you will get the first day of the next month (so you know one more thing now, how to get the first day of the next month).
The lastDay value will be 31-07-2015 17:27:50

HostForLIFE.eu ASP.NET 4.6 Hosting
HostForLIFE.eu is European Windows Hosting Provider which focuses on Windows Platform only. We deliver on-demand hosting solutions including Shared hosting, Reseller Hosting, Cloud Hosting, Dedicated Servers, and IT as a Service for companies of all sizes. We have customers from around the globe, spread across every continent. We serve the hosting needs of the business and professional, government and nonprofit, entertainment and personal use market segments.


ASP.NET 4.6 Hosting - HostForLIFE.eu :: How to Use C# to Create AJAX Confirm Button Extension

clock August 31, 2015 09:03 by author Rebecca

In this tutorial, we will learn how to create and use an AJAX Confirm Button Extender using C#. This button can be used to warn people of what a button does once they press it. This control is used in lots of websites and it is easy to setup and use.

Step 1

Let's we create the form:

1. Start by Creating a new Web Form and naming it “Default.aspx”
2. Create a Button and a Label on the form named “Button1″ and “Label1″
3. Add an AJAX Script Manager to the Form so that you can use AJAX Controls:

<html xmlns="http://www.w3.org/1999/xhtml">
<head runat="server">
    <title></title>
</head>
<body>
    <form id="form1" runat="server">
    <div>
   
        <br />
        <asp:ScriptManager ID="ScriptManager1" runat="server">
        </asp:ScriptManager>
        <br />
        <asp:UpdatePanel ID="UpdatePanel1" runat="server">
            <ContentTemplate>
                <asp:Label ID="Label1" runat="server" Text="Label"></asp:Label>
                <br />
                <br />
                <asp:Button ID="Button1" runat="server" onclick="Button1_Click" Text="Button" />
                <asp:ConfirmButtonExtender ID="Button1_ConfirmButtonExtender" runat="server"
                    ConfirmText="Click OK to make the Label say OK or click Cancel to Cancel the Operation"
                    Enabled="True" TargetControlID="Button1">
                </asp:ConfirmButtonExtender>
            </ContentTemplate>
        </asp:UpdatePanel>
   
    </div>
    </form>
</body>
</html>


4. Add the Confirm Button Extender to the button by clicking the Smart tag and selecting Add Extender
5. Now the Web Form is complete, but it is not ready to be run yet. You must create the code behind.

Step 2

1. Double click on the Button Control in the Design View to open up the Code window.
2. Enter the Code Below, this code would normally make the Label say OK every time you click the button, however the code in the front end only lets it run once you confirm.
3. Once this code is in you can go ahead and run the project and see how it works:

protected void Button1_Click(object sender, EventArgs e)
        {
           
            Label1.Text = "you clicked OK";
        }

Happy coding!

HostForLIFE.eu ASP.NET 4.6 Hosting
HostForLIFE.eu is European Windows Hosting Provider which focuses on Windows Platform only. We deliver on-demand hosting solutions including Shared hosting, Reseller Hosting, Cloud Hosting, Dedicated Servers, and IT as a Service for companies of all sizes. We have customers from around the globe, spread across every continent. We serve the hosting needs of the business and professional, government and nonprofit, entertainment and personal use market segments.


ASP.NET 4.6 Hosting - HostForLIFE.eu :: How to Use jQuery to Show Row's Number in ASP.NET GridView

clock August 21, 2015 06:17 by author Rebecca

In this article, I will explain how to get the total count of the number of rows in ASP.NET GridView and also how to get the count of the number of all rows except the First (Header) row in ASP.Net GridView using jQuery.

HTML Markup

 The following HTML Markup consists of an ASP.NET GridView with three BoundField columns and a Button to get count (number) of rows in ASP.NET GridView using jQuery:

<asp:GridView ID="GridView1" runat="server" AutoGenerateColumns="false">
    <Columns>
        <asp:BoundField DataField="Id" HeaderText="Customer Id" ItemStyle-Width="90" />
        <asp:BoundField DataField="Name" HeaderText="Name" ItemStyle-Width="120" />
        <asp:BoundField DataField="Country" HeaderText="Country" ItemStyle-Width="100" />
    </Columns>
</asp:GridView>
<br />
<br />

<asp:Button ID="btnGetCount" Text="Count Rows" runat="server" />

NameSpaces

You will need to import the following namespace.

C#
using System.Data;
 
VB.Net
Imports System.Data

Binding the ASP.NET GridView Control

The GridView is populated with a dynamic DataTable with some dummy data inside the Page Load event.

C#

protected void Page_Load(object sender, EventArgs e)
{
    if (!this.IsPostBack)
    {
        DataTable dt = new DataTable();
        dt.Columns.AddRange(new DataColumn[3] { new DataColumn("Id"), new DataColumn("Name"), new DataColumn("Country") });
        dt.Rows.Add(1, "1", "United States");
        dt.Rows.Add(2, "2", "India");
        dt.Rows.Add(3, "3", "France");
        dt.Rows.Add(4, "4r", "Russia");
        GridView1.DataSource = dt;
        GridView1.DataBind();
    }

VB.Net

Protected Sub Page_Load(sender As Object, e As EventArgs) Handles Me.Load
    If Not Me.IsPostBack Then
        Dim dt As New DataTable()
        dt.Columns.AddRange(New DataColumn(2) {New DataColumn("Id"), New DataColumn("Name"), New DataColumn("Country")})
        dt.Rows.Add(1, "1", "United States")
        dt.Rows.Add(2, "2", "India")
        dt.Rows.Add(3, "3", "France")
        dt.Rows.Add(4, "4", "Russia")
        GridView1.DataSource = dt
        GridView1.DataBind()
    End If
End Sub

How to Get Row's Number in ASP.NET Gridview using jQuery

Inside the document ready event handler, the Button has been assigned a jQuery click event handler. When the Button is clicked, the total count of the number of rows and the count of the number of all rows except the First (Header) row in ASP.NET GridView is determined using jQuery.

The total count of the number of rows in ASP.NET GridView is determined by selecting all the HTML TR elements using jQuery. he count of the number of all rows except the First (Header) row in ASP.NET GridView is determined by selecting only those HTML TR elements which contain HTML TD (Cell) element and skipping all the HTML TR elements which contain HTML TH (Header Cell) element.

<script type="text/javascript" src="http://ajax.googleapis.com/ajax/libs/jquery/1.8.3/jquery.min.js"></script>
<script type="text/javascript">
    $(function () {
        $("[id*=btnGetCount]").click(function () {
            var totalRowCount = $("[id*=GridView1] tr").length;
            var rowCount = $("[id*=GridView1] td").closest("tr").length;
            var message = "Total Row Count: " + totalRowCount;
            message += "\nRow Count: " + rowCount;
            alert(message);
            return false;
        });
    });
</script>

HostForLIFE.eu ASP.NET 4.6 Hosting
HostForLIFE.eu is European Windows Hosting Provider which focuses on Windows Platform only. We deliver on-demand hosting solutions including Shared hosting, Reseller Hosting, Cloud Hosting, Dedicated Servers, and IT as a Service for companies of all sizes. We have customers from around the globe, spread across every continent. We serve the hosting needs of the business and professional, government and nonprofit, entertainment and personal use market segments.


ASP.NET 4.6 Hosting - HostForLIFE.eu :: Best Regular Expressions to Validate Email Address

clock August 14, 2015 07:12 by author Rebecca

Email address are the means of communication with people around the world. While processing forms email address validation plays an important. Proper email validation strengthen our contact list, ban spamming and protect us from robot form filling (Form AutoFill).

Here we are going to design a regular expression pattern to validate email address which will check to make sure an e-mail address is a valid address, and in proper format means containing an username, at sign (@), and valid hostname. For example, [email protected] is valid, but SPAM@badhost is invalid. Most of email service provides limit the use of literals for email address creation. Only letters (a-z,A-Z), numbers (0-9), hyphens (-), underscore (_) and periods (.) are allowed and no special characters are accepted. You can add or remove any literals to your regular expression.

Regular Expression Pattern

^([a-zA-Z0-9_\-\.]+)@[a-z0-9-]+(\.[a-z0-9-]+)*(\.[a-z]{2,3})$
email with IP -
^([a-zA-Z0-9_\-\.]+)@(([a-z0-9-]+(\.[a-z0-9-]+)*(\.[a-z]{2,3}))|(([01]?\d\d?|2[0-4]\d|25[0-5])\.){3}([01]?\d\d?|25[0-5]|2[0-4]\d))$

A description of the regular expression:

1]: A numbered capture group. [[a-zA-Z0-9_\-\.]+]
Any character in this class: [a-zA-Z0-9_\-\.], one or more repetitions
@
Any character in this class: [a-z0-9-], one or more repetitions
[2]: A numbered capture group. [\.[a-z0-9-]+], any number of repetitions
\.[a-z0-9-]+
Literal .
Any character in this class: [a-z0-9-], one or more repetitions
[3]: A numbered capture group. [\.[a-z]{2,3}]
\.[a-z]{2,3}
Literal .
Any character in this class: [a-z], between 2 and 3 repetitions

Sucessful Matches:
[email protected]
[email protected]
[email protected]
email with IP
[email protected]
[email protected]

How It Works:
This regular expression will check for valid email address in which Only letters (a-z,A-Z), numbers (0-9), hyphens (-), underscore (_) and periods (.) are allowed and no special characters are accepted. Here we are going to search three group and @ sign.

First first group will check valid conbination of characters (a-z,A-Z), numbers (0-9), hyphens (-), underscore (_) and periods (.) followed by "@". Then we check for host name(tipsntracks,yahoo, google etc) and host type(.com, .biz, .co.in etc)

ASP.NET

<%@ Page Language="VB" AutoEventWireup="false" CodeFile="Default.aspx.vb" Inherits="_Default" %>
<!DOCTYPE html PUBLIC "-//W3C//DTD XHTML 1.0 Transitional//EN" "http://www.w3.org/TR/xhtml1/DTD/xhtml1-transitional.dtd">
<html xmlns="http://www.w3.org/1999/xhtml">
<head runat="server">
<title>U.S. Social Security Numbers</title>
</head>
<body>
<form id="form1" runat="server">
<div>
<span>Valid Format: 123-45-6789</span><br />
<asp:TextBox id="txtInput" runat="server"></asp:TextBox><br />
<asp:RegularExpressionValidator Id="vldRejex" RunAt="server" ControlToValidate="txtInput" ErrorMessage="Please enter a valid email address" ValidationExpression="^([a-zA-Z0-9_\-\.]+)@[a-z0-9-]+(\.[a-z0-9-]+)*(\.[a-z]{2,3})$">
</asp:RegularExpressionValidator><br />
<asp:Button Id="btnSubmit" RunAt="server" CausesValidation="True" Text="Submit"></asp:Button>
</div>
</form>
</body>
</html>

C#.NET

//use System.Text.RegularExpressions befour using this function
public bool vldEmail(string emlAddress)
{
//create Regular Expression Match pattern object
Regex myRegex = new Regex("^([a-zA-Z0-9_\\-\\.]+)@[a-z0-9-]+(\\.[a-z0-9-]+)*(\\.[a-z]{2,3})$");
//boolean variable to hold the status
bool isValid = false;
if (string.IsNullOrEmpty(emlAddress))
{
isValid = false;
}
else
{
isValid = myRegex.IsMatch(emlAddress);
}
//return the results
return isValid;
}

VB.NET

‘Imports System.Text.RegularExpressions befour using this function
Public Function vldEmail(ByVal emlAddress As String) As Boolean
‘create Regular Expression Match pattern object
Dim myRegex As New Regex("^([a-zA-Z0-9_\-\.]+)@[a-z0-9-]+(\.[a-z0-9-]+)*(\.[a-z]{2,3})$")
‘boolean variable to hold the status
Dim isValid As Boolean = False
If emlAddress = "" Then
isValid = False
Else
isValid = myRegex.IsMatch(emlAddress)
End If
‘return the results
Return isValid
End Function

HostForLIFE.eu ASP.NET 4.6 Hosting
HostForLIFE.eu is European Windows Hosting Provider which focuses on Windows Platform only. We deliver on-demand hosting solutions including Shared hosting, Reseller Hosting, Cloud Hosting, Dedicated Servers, and IT as a Service for companies of all sizes. We have customers from around the globe, spread across every continent. We serve the hosting needs of the business and professional, government and nonprofit, entertainment and personal use market segments.


ASP.NET 4.6 Hosting - HostForLIFE.eu :: How to Use ASP.NET and C# to Send Email with Template

clock August 12, 2015 05:55 by author Rebecca

When bulding professional web applications, there can be so many emails to be sent to users and writing the templates for each of this email inside code is not a good move. Here we can use email templates. First create a folder some where in your application directory as "MailTemplates" or some other suitable name. Now create a text file or html file for template.

In this example, we are creating a sample template named welcome.htm:

Hi, <%=name%>

This is a sample mail template for demonstrating usage of email templates in asp.net

<a href="<%=url%>">Click here to read the article</a>
<a href="<%=rooturl%>">http://example.com/</a>

Now, we are creating an email utility for preparing and sending emails:

public static void SendMail(string fromAddress, string toAddress, string subject, string body)
       {
           using (MailMessage mail = BuildMessageWith(fromAddress, toAddress.Replace(',', ';'), subject, body))
           {
               SendMail(mail);
           }
       }
       public static void SendMail(MailMessage mail)
       {
           try
           {
               SmtpClient smtp = new SmtpClient("your smtp host",port);
               smtp.Send(mail);
           }
           catch (Exception e)
           {
            
           }
       }
       //build a mail message
       private static MailMessage BuildMessageWith(string fromAddress, string toAddress, string subject, string body)
       {
           MailMessage message = new MailMessage
           {
               Sender = new MailAddress(Settings.WebMasterEmail), // on Behave of When From differs
               From = new MailAddress(fromAddress),
               Subject = subject,
               Body = body,
               IsBodyHtml = true,
           };

           string[] tos = toAddress.Split(';');

           foreach (string to in tos)
           {

               message.To.Add(new MailAddress(to));
           }

           return message;
       }
    // read the text in template file and return it as a string
       private static string ReadFileFrom(string templateName)
       {
           string filePath = System.Web.HttpContext.Current.Server.MapPath("~/MailTemplates/"+templateName);

           string body = File.ReadAllText(filePath);

           return body;
       }
       // get the template body, cache it and return the text
       private static string GetMailBodyOfTemplate(string templateName)
       {
           string cacheKey = string.Concat("mailTemplate:", templateName);
           string body;
           body = (string)System.Web.HttpContext.Current.Cache[cacheKey];
           if (string.IsNullOrEmpty(body))
           {
               //read template file text
               body = ReadFileFrom(templateName);

               if (!string.IsNullOrEmpty(body))
               {
                   System.Web.HttpContext.Current.Cache.Insert(cacheKey,body, null,DateTime.Now.AddHours(1),System.Web.Caching.Cache.NoSlidingExpiration);
               }
           }

           return body;
       }
       // replace the tokens in template body with corresponding values
       private static string PrepareMailBodyWith(string templateName, params string[] pairs)
       {
           string body = GetMailBodyOfTemplate(templateName);

           for (var i = 0; i < pairs.Length; i += 2)
           {
               body = body.Replace("<%={0}%>".FormatWith(pairs[i]), pairs[i + 1]);
           }
           return body;
       }
 public static string FormatWith(this string target, params object[] args)
        {
            return string.Format(Constants.CurrentCulture, target, args);
        }

Now let's send the email:

string subject = "Welcome";
string body = PrepareMailBodyWith("welcome.htm", "name", "Anoop", "url", "http://waytocoding.blogspot.com/","rooturl","http://waytocoding.blogspot.com/");
SendMail("[email protected]", "[email protected]", subject, body);

HostForLIFE.eu ASP.NET 4.6 Hosting
HostForLIFE.eu is European Windows Hosting Provider which focuses on Windows Platform only. We deliver on-demand hosting solutions including Shared hosting, Reseller Hosting, Cloud Hosting, Dedicated Servers, and IT as a Service for companies of all sizes. We have customers from around the globe, spread across every continent. We serve the hosting needs of the business and professional, government and nonprofit, entertainment and personal use market segments.


ASP.NET Hosting UK - HostForLIFE.eu :: How to Use HTML5 to Detect Online Status of ASP.NET Website

clock June 18, 2015 05:54 by author Rebecca

Html 5 being the fore runner in the Web technology today has offered a lot of benefit and enhancements that will make life of a developer easier than even before. One of such enhancement belongs to the support of offline data storage inside browser cache.  The offline data storage enhances the UI Experience of the end user by providing rich api to read local storage. HTML 5 supports the features that was never present before and you needed to rely on those events only using 3rd party plugins. Say for instance, you have a requirement to continue using your web application even though there is no availability of Internet. In this tutorial, I will show you how easily you can detect whether the site is running in online or offline mode.

Step 1

First, let us add a code:

var addEvent = (function () {
  if (document.addEventListener) {
    return function (el, type, fn) {
      if (el && el.nodeName || el === window) {
        el.addEventListener(type, fn, false);
      } else if (el && el.length) {
        for (var i = 0; i < el.length; i++) {
          addEvent(el[i], type, fn);
        }
      }
    };
  } else {
    return function (el, type, fn) {
      if (el && el.nodeName || el === window) {
        el.attachEvent('on' + type, function () { return fn.call(el, window.event); });
      } else if (el && el.length) {
        for (var i = 0; i < el.length; i++) {
          addEvent(el[i], type, fn);
        }
      }
    };
  }
})();

You should already  know there are browser compatibility issues as most of the browser still lacks standardization. The document.addEventListener works in most of the browsers except IE. So to handle this, you have to bypass the availability the eventhandler.

Step 2

Now to invoke the event we call:

addEvent(window, 'online', online);
addEvent(window, 'offline', online);
online({ type: 'ready' });

So basically, here you trap the online and offline events of the Window object using either using attachEvent or addEventListener to show the online or offline status. Lets take a look on the event handler:

function online(event) {
document.getElementById('status').innerHTML = navigator.onLine ? 'online' : 'offline';
}

So in the code you can easily detect using the network status of the browser using navigat0r.onLine, such that when it returns true, that means client is online or else otherwise.

Here are the steps to sumarize:

  1. Add event listener to window.online / offline events
  2. Use navigator.onLine to detect whether the application is in online state.
  3. Do adjust your logic according to that.

The code works in most of the modern browsers. Happy coding :)

HostForLIFE.eu ASP.NET 5 Hosting
HostForLIFE.eu is European Windows Hosting Provider which focuses on Windows Platform only. We deliver on-demand hosting solutions including Shared hosting, Reseller Hosting, Cloud Hosting, Dedicated Servers, and IT as a Service for companies of all sizes. We have customers from around the globe, spread across every continent. We serve the hosting needs of the business and professional, government and nonprofit, entertainment and personal use market segments.


About HostForLIFE

HostForLIFE is European Windows Hosting Provider which focuses on Windows Platform only. We deliver on-demand hosting solutions including Shared hosting, Reseller Hosting, Cloud Hosting, Dedicated Servers, and IT as a Service for companies of all sizes.

We have offered the latest Windows 2019 Hosting, ASP.NET 5 Hosting, ASP.NET MVC 6 Hosting and SQL 2019 Hosting.


Month List

Tag cloud

Sign in