European ASP.NET 4.5 Hosting BLOG

BLOG about ASP.NET 4, ASP.NET 4.5 Hosting and Its Technology - Dedicated to European Windows Hosting Customer

ASP.NET 5 Hosting - HostForLIFE.eu :: Recursive FindControl & Extension Methods

clock February 17, 2016 21:20 by author Peter

Here's a really short and easy little bit of code that has the potential to be slightly of a time-saver. The FindControl method of the control class is used to find a specific child control of a given parent, searching by ID. This method, however, does not search the control hierarchy recursively: it searches the direct children of the specified parent control only. While writing a recursive version of this method is trivial, a rather nice way to make the technique reusable is to implement it as an extension method. Here's how it can be done:

//search the children
foreach (Control child in control.Controls)
{
    ctrl = FindControlRecursive(child, id);
    if (ctrl != null) break;
}
}

return ctrl;
}

}
}


And to call it:
using System;
using System.Collections.Generic;
using System.Linq;
using System.Web;
using System.Web.UI;
using Boo.Web.UI.Extensions;

namespace MyWebApp
{
public partial class WebForm1 : System.Web.UI.Page

{
    public void Page_Load(object sender, EventArgs e)
    {
       //call the recursive FindControl method
        Control ctrl = this.FindControlRecursive("my_control_id");
    }
}
}


Now, don't forget to import the namespace within which the extensions method class is declared- or a compilation error will not long follow. Now, all you need to do is import this same namespace for any pages/user controls/custom controls which need to use the recursive control search and you're good to go.

Doing it this way is of course logically no different to creating a static method in a util class, and passing both the parent control and the ID of the child control you want to find to it, but considering how commonly this functionality is required, it's nice to be able to tack it onto the control class itself, and extension methods provide an elegant way to accomplish this.

HostForLIFE.eu ASP.NET 4.6 Hosting
HostForLIFE.eu is European Windows Hosting Provider which focuses on Windows Platform only. We deliver on-demand hosting solutions including Shared hosting, Reseller Hosting, Cloud Hosting, Dedicated Servers, and IT as a Service for companies of all sizes. We have customers from around the globe, spread across every continent. We serve the hosting needs of the business and professional, government and nonprofit, entertainment and personal use market segments. 


ASP.NET 5 Hosting - HostForLIFE.eu :: How to Verify if The Remote Files Exist or Not in ASP.NET 5?

clock July 31, 2015 07:43 by author Peter

Hi, In this post let me explain you about how to verify if  the remote files exist or not in ASP.NET 5.  Sometimes we need to verify if a file exists remotely such as javascript or image file.  Suppose you are in server(xxx.com) and you want to check a file in another server(xxxxxx.com) - in this case it will be helpful. And now, write the following code snippet.

Using HTTPWebRequest:
private bool RemoteFileExistsUsingHTTP(string url)
{
try
{
 //Creating the HttpWebRequest
 HttpWebRequest request = WebRequest.Create(url) as HttpWebRequest;
 //Setting the Request method HEAD, you can also use GET too.
  request.Method = "HEAD";

  //Getting the Web Response
  HttpWebResponse response = request.GetResponse() as HttpWebResponse;

  //Returns TURE if the Status code == 200
  return (response.StatusCode == HttpStatusCode.OK);
}
catch
{
//Any exception will returns false.
return false;
}
}


Using WebClient:
private bool RemoteFileExistsUsingClient(string url)
{
bool result = false;
using (WebClient client = new WebClient())
{
try
{
    Stream stream = client.OpenRead(url);
    if (stream != null)
    {
           result = true;
    }
    else
    {
           result = false;
    }
}
catch
{
 result = false;
}
}
return result;
}

Call Method:
RemoteFileExistsUsingHTTP("http://localhost:16868/JavaScript1.js");

Don't confuse here as a result of it absolutely was implemented in 2 ways. continually use HttpWebRequest class over WebClient because of the following reasons:
1. WebClient internally calls HttpWebRequest
2. HttpWebRequest has a lot of options (credential, method) as compared to Webclient

HostForLIFE.eu ASP.NET 5 Hosting
HostForLIFE.eu is European Windows Hosting Provider which focuses on Windows Platform only. We deliver on-demand hosting solutions including Shared hosting, Reseller Hosting, Cloud Hosting, Dedicated Servers, and IT as a Service for companies of all sizes. We have customers from around the globe, spread across every continent. We serve the hosting needs of the business and professional, government and nonprofit, entertainment and personal use market segments.


ASP.NET 5 Hosting Russia - HostForLIFE.eu :: How to Create QR Code Generator with ASP.NET 5?

clock July 9, 2015 11:42 by author Peter

In this post, I will explain you about how to create QR Code Generator with ASP.NET 5. Though there are several solutions for QR Code generation in ASP.NET 5, all of it needs referring to third party dlls. however there's a really simple alternative through that we can create a QR code generator in ASP.Net within minutes without relating any third party dlls. Let's produce a ASP.Net web application with a text box, image control and Button with the following code
<asp:TextBox runat="server" ID="txtData"></asp:TextBox> 
   <asp:Button runat="server" ID="btnClickMe" Text="Click Me" OnClick="btnClickMe_Click" /> 
<br /> 
<asp:Image runat="server" ID="ImgQrCode" Height="160" Width="160" /> 

Now, in the button click event, generate the URL for the API with the data entered in the text box and size of the image control and set it to the image control's image URL property. Write the following code:
protected void btnClickMe_Click(object sender, EventArgs e) 

   ImgQrCode.ImageUrl = "https://chart.googleapis.com/chart?   cht=qr&chl=" + WebUtility.HtmlEncode(txtData.Text) + "&choe=UTF-8&chs=" + ImgQrCode.Height.ToString().Replace("px", "") + "x" + ImgQrCode.Width.ToString().Replace("px", ""); 


And here is the output:

I hope this tutorial works for you!

HostForLIFE.eu ASP.NET 5 Hosting
HostForLIFE.eu is European Windows Hosting Provider which focuses on Windows Platform only. We deliver on-demand hosting solutions including Shared hosting, Reseller Hosting, Cloud Hosting, Dedicated Servers, and IT as a Service for companies of all sizes. We have customers from around the globe, spread across every continent. We serve the hosting needs of the business and professional, government and nonprofit, entertainment and personal use market segments.


ASP.NET 5 Hosting Russia - HostForLIFE.eu :: Bind the empty Grid with Header and Footer when no data in GridView

clock July 3, 2015 11:33 by author Peter

In this example, I will tell you how to  Bind the empty Grid with Header and Footer when no data in GridView and binding the grid using XML data and performing CURD operations on XML file.

First create a new project one your Visual Basic Studio and then write the following code:
using System; 
using System.Collections.Generic; 
using System.Data; 
using System.Linq; 
using System.Web; 
using System.Web.UI; 
using System.Web.UI.WebControls; 
using System.Xml; 
namespace OvidMDSample  

public partial class Home: System.Web.UI.Page  

private const string xmlFilePath = "~/XML/HiddenPagesList.xml"; 
public string domainUrl = HttpContext.Current.Request.Url.Authority; 
protected void Page_Load(object sender, EventArgs e)  

if (!IsPostBack) 

    BindHiddenPages(); 


private void BindHiddenPages()  

DataSet ds = new DataSet(); 
ds.ReadXml(Server.MapPath(xmlFilePath)); 
if (ds != null && ds.HasChanges()) 

    grdHiddenPages.DataSource = ds; 
    grdHiddenPages.DataBind(); 
}  
else  

    DataTable dt = new DataTable(); 
    dt.Columns.Add("ID"); 
    dt.Columns.Add("PageName"); 
    dt.Columns.Add("Description"); 
    dt.Columns.Add("PageUrl"); 
    dt.Columns.Add("Address"); 
    dt.Rows.Add(0, string.Empty, string.Empty, string.Empty); 
    grdHiddenPages.DataSource = dt; 
    grdHiddenPages.DataBind(); 
    grdHiddenPages.Rows[0].Visible = false; 
    // grdHiddenPages.DataBind(); 


HostForLIFE.eu ASP.NET 5 Hosting
HostForLIFE.eu is European Windows Hosting Provider which focuses on Windows Platform only. We deliver on-demand hosting solutions including Shared hosting, Reseller Hosting, Cloud Hosting, Dedicated Servers, and IT as a Service for companies of all sizes. We have customers from around the globe, spread across every continent. We serve the hosting needs of the business and professional, government and nonprofit, entertainment and personal use market segments.


ASP.NET 5 Hosting Russia - HostForLIFE.eu :: Saving the Selected Data of Radio Button List with ASP.NET 5

clock June 30, 2015 08:38 by author Peter

We create some true or false questions so the user can provide their answer and on a button click the solution are going to be saved to a database. Open your Visual Studio and build an empty web site, provide a suitable name (RadioButtonList_demo). In solution explorer you get your empty web site, add a web form and SQL database as in the following

For web Form:
RadioButtonList_demo (your empty website) then right-click then choose Add New Item -> internet type. Name it RadioButtonList_demo.aspx.

For SQL Server database:
RadioButtonList_demo (your empty website) then right-click then choose Add New Item -> SQL Server database. (Add the database within the App_Data_folder.) In Server explorer, click on your database (Database.mdf) then choose Tables ->Add New Table. create the table like this:

This table is for saving the data of the radio button list, I mean in this table we will get the user's answer of true and false questions. Open your RadioButtonList_demo.aspx file from Solution Explorer and start the design of you're application. Here is the code:
<%@ Page Language="C#" AutoEventWireup="true" CodeFile="Default.aspx.cs" Inherits="_Default" %> 
<!DOCTYPE html PUBLIC "-//W3C//DTD XHTML 1.0 Transitional//EN" "http://www.w3.org/TR/xhtml1/DTD/xhtml1-transitional.dtd"> 
<html xmlns="http://www.w3.org/1999/xhtml"> 
<head runat="server"> 
<title></title> 
<style type="text/css"> 
.style1 

width: 211px; 

.style2 

width: 224px; 

.style3 

width: 224px; 
font-weight: bold; 
text-decoration: underline; 

.style4 

width: 211px; 
font-weight: bold; 
text-decoration: underline; 

</style> 
</head> 
<body> 
<form id="form1" runat="server"> 
<div> 

</div> 
<table style="width:100%;"> 
<tr> 
<td class="style4"> 
    </td> 
<td class="style3"> 
    Please Answer these Questions</td> 
<td> 
     </td> 
</tr> 
<tr> 
<td class="style1"> 
     </td> 
<td class="style2"> 
     </td> 
<td> 
     </td> 
</tr> 
<tr> 
<td class="style1"> 
    <asp:Label ID="Label7" runat="server"  
        Text="Is Earth is the only planet in the universe??"></asp:Label> 
</td> 
<td class="style2"> 
    <asp:RadioButtonList ID="RadioButtonList1" runat="server" DataTextField="ans"  
        DataValueField="ans"> 
        <asp:ListItem>True</asp:ListItem> 
        <asp:ListItem>False</asp:ListItem> 
    </asp:RadioButtonList> 
</td> 
<td> 
     </td> 
</tr> 
<tr> 
<td class="style1"> 
    <asp:Label ID="Label5" runat="server" Text="Is Moon is our Natural Satellite?"></asp:Label> 
</td> 
<td class="style2"> 
    <asp:RadioButtonList ID="RadioButtonList2" runat="server" DataTextField="ans1"  
        DataValueField="ans1"> 
        <asp:ListItem>True</asp:ListItem> 
        <asp:ListItem>False</asp:ListItem> 
    </asp:RadioButtonList> 
</td> 
<td> 
     </td> 
</tr> 
<tr> 
<td class="style1"> 
    <asp:Label ID="Label6" runat="server"  
        Text="Earth is having Rings like Saturn have ?"></asp:Label> 
</td> 
<td class="style2"> 
    <asp:RadioButtonList ID="RadioButtonList3" runat="server" DataTextField="ans2"  
        DataValueField="ans2"> 
        <asp:ListItem>True</asp:ListItem> 
        <asp:ListItem>False</asp:ListItem> 
    </asp:RadioButtonList> 
</td> 
<td> 
     </td> 
</tr> 
<tr> 
<td class="style1"> 
     </td> 
<td class="style2"> 
     </td> 
<td> 
     </td> 
</tr> 
<tr> 
<td class="style1"> 
     </td> 
<td class="style2"> 
<asp:Button ID="Button1" runat="server" onclick="Button1_Click" Text="Submit your answer" /> 
</td> 
<td> 
    <asp:Label ID="lbmsg" runat="server"></asp:Label> 
</td> 
</tr> 
<tr> 
<td class="style1"> 
     </td> 
<td class="style2"> 
     </td> 
<td> 
     </td> 
</tr> 
</table> 
</form> 
</body> 
</html> 

And here is the output:


Finally open your RadioButtonList_demo.aspx.cs file to write the code, for making the list box like we assume. Here is the code:
using System; 
using System.Collections.Generic; 
using System.Linq; 
using System.Web; 
using System.Web.UI; 
using System.Web.UI.WebControls; 
using System.Data; 
using System.Data.SqlClient; 
public partial class _Default : System.Web.UI.Page 

protected void Page_Load(object sender, EventArgs e) 


protected void Button1_Click(object sender, EventArgs e) 

SqlConnection con = new SqlConnection(@"Data Source=.\SQLEXPRESS;AttachDbFilename=|DataDirectory|\Database.mdf;Integrated Security=True;User Instance=True"); 
SqlCommand cmd = new SqlCommand("insert into tbl_data (ans,ans1,ans2) values (@ans,@ans1,@ans2)", con); 
cmd.Parameters.AddWithValue("ans", RadioButtonList1.SelectedItem.Text); 
cmd.Parameters.AddWithValue("ans1", RadioButtonList2.SelectedItem.Text); 
cmd.Parameters.AddWithValue("ans2", RadioButtonList3.SelectedItem.Text); 

con.Open(); 
int i = cmd.ExecuteNonQuery(); 
con.Close(); 

if (i != 0) 

lbmsg.Text = "Your Answer Submitted Succesfully"; 
lbmsg.ForeColor = System.Drawing.Color.ForestGreen; 

else 

lbmsg.Text = "Some Problem Occured"; 
lbmsg.ForeColor = System.Drawing.Color.Red;             


Output:

HostForLIFE.eu ASP.NET 5 Hosting
HostForLIFE.eu is European Windows Hosting Provider which focuses on Windows Platform only. We deliver on-demand hosting solutions including Shared hosting, Reseller Hosting, Cloud Hosting, Dedicated Servers, and IT as a Service for companies of all sizes. We have customers from around the globe, spread across every continent. We serve the hosting needs of the business and professional, government and nonprofit, entertainment and personal use market segments.


ASP.NET 5 Hosting - HostForLIFE.eu :: How to Highlight Dates in Calendar with ASP.NET?

clock June 26, 2015 08:48 by author Peter

In this article, I explained how to How to Highlight Dates in Calendar with ASP.NET. First step create new ASP.NET Empty web Application provides it to that means full name. Now, Add new webfrom to your project. Then drag and drop Calendar on your design page. Now. add two properties WeekendDayStyle-BackColor="Yellow", WeekendDayStyle-ForeColor="Black" to your calender control as shown below and run your application.

<asp:Calendar ID="Calendar1" runat="server" 
WeekendDayStyle-BackColor="Yellow" 
WeekendDayStyle-ForeColor="Green" ></asp:Calendar> 

And here is the output:

You can achieve the same by using (OnDayRender event) code as mentioned below. Remove WeekendDayStyle-BackColor="Yellow", WeekendDayStyle-ForeColor="Green" from Calender control.
Here is the .aspx code
<asp:Calendar ID="Calendar1" runat="server" OnDayRender="Calendar1_DayRender"></asp:Calendar> 

CodeBehind:
protected void Calendar1_DayRender(object sender, DayRenderEventArgs e) 
{  
if (e.Day.IsWeekend) 

  e.Cell.BackColor = System.Drawing.Color.Yellow; 
  e.Cell.ForeColor = System.Drawing.Color.Green;  


If you wish to spotlight on 'Monday' write the subsequent code in Calendar1_DayRender event. It highlights the the desired day dates.
if (e.Day.Date.DayOfWeek == DayOfWeek.Monday)  

e.Cell.BackColor = System.Drawing.Color.Yellow; 
e.Cell.ForeColor = System.Drawing.Color.Green;  
}

HostForLIFE.eu ASP.NET 5 Hosting
HostForLIFE.eu is European Windows Hosting Provider which focuses on Windows Platform only. We deliver on-demand hosting solutions including Shared hosting, Reseller Hosting, Cloud Hosting, Dedicated Servers, and IT as a Service for companies of all sizes. We have customers from around the globe, spread across every continent. We serve the hosting needs of the business and professional, government and nonprofit, entertainment and personal use market segments.


ASP.NET 5 Hosting - HostForLIFE.eu :: Learn How to Uncover Silent Validation

clock June 22, 2015 07:52 by author Peter

ASP.NET validation is incredibly helpful and permits developers to confirm data is correct before it gets sent to a data store. Validation can run either on the client side or on the server side and each have their advantages and disadvantages. MVC and Webforms handle validation slightly otherwise and i will not get into those differences during this article. Instead, i'd prefer to explain some best practices and suggestions for you once implementing ASP.NET validation.

Bind Validation To HTML elements
To implement validation, you initially add an HTML element to a page, then a validation element points to it HTML part. In MVC, you'd write one thing like this for a model field known as Name.

<div class="editor-field col-md-10"> 
    <div class="col-md-6"> 
        @Html.TextBoxFor(model => model.Name, new { @class = "form-control" }) 
    </div> 
    <div class="col-md-6"> 
        @Html.ValidationMessageFor(model => model.Name) 
    </div> 
</div> 


In Webforms, write the following code:
<asp:DropDownList ID="Name" runat="server" AutoPostBack="true" FriendlyName="Option:" 
AddBlankRowToList="false" DisplayBlankRowText="False" CausesValidation="true"> 
<asp:ListItem Text="Option 1" Value="1"></asp:ListItem> 
<asp:ListItem Selected="True" Text="Option 2" Value="2"></asp:ListItem>
</asp:DropDownList> 
<asp:CustomValidator ID="valCheck" ControlToValidate="Name" Display="Static" runat="server" ForeColor="red" 
ErrorMessage="Validation Error Message" SetFocusOnError="True" 
OnServerValidate="CheckForAccess" /> 

This ends up in HTML elements with attributes that may enable the client-side validation framework to execute.

Check For Validation Errors On Postback
Whereas validation ought to run on the client-side before the form is submitted to the server, it's still a good observe to see for errors on the server. There are variety of reasons for this, however the most reason should be that the client is an unknown quantity. There are completely different browsers, JavaScript will be disabled, developer tools enable people to change HTML and thus may result in unexpected data being denote. So, check your validation before you start process your type data on the server. And it's as simple as wrapping your server-side logic in a single code block.

MVC
[HttpPost] 
[ValidateAntiForgeryToken] 
public ActionResult Edit(ViewModel model) 

if (ModelState.IsValid()) 

    // your code to process the form 
}  
else 

    ModelState.AddModelError(String.Empty, "Meaningful Error message); 
    return View(model); 

return RedirectToAction("Index"); 


Webforms
protected void Page_Load(object sender, EventArgs e) 

if (IsPostback) 

    if (!IsValid) 
    { 
        // validation failed. Do something 
        return; 
    } 
     
    // do your form processing here because validation is valid 
}  
else  

    // non-postback 

Do one thing useful with your Validation Errors
If you discover that validation errors have gotten through to your server, you would like to capture them and show them to the user. a quick way that I even have found to try and do this is with a loop using the validator collection and look for errors. There are variety of things you will do like add the error messages to the Validation summary box at the top of your form, write to an audit log or build them seem in a dialog box.

foreach (IValidator aValidator in this.Validators) 

if (!aValidator.IsValid) 

    Response.Write("<br />" + aValidator.ErrorMessage); 


Validation is a critical part of form submission and should be used to it's full potential.

HostForLIFE.eu ASP.NET 5 Hosting
HostForLIFE.eu is European Windows Hosting Provider which focuses on Windows Platform only. We deliver on-demand hosting solutions including Shared hosting, Reseller Hosting, Cloud Hosting, Dedicated Servers, and IT as a Service for companies of all sizes. We have customers from around the globe, spread across every continent. We serve the hosting needs of the business and professional, government and nonprofit, entertainment and personal use market segments.


ASP.NET Hosting UK - HostForLIFE.eu :: Create the Databound Controls in ASP.NET

clock June 19, 2015 07:00 by author Peter

In this article we'll study about Databound Controls in ASP.NET. Databound controls are used to display data to the end-user inside the web applications and victimisation databound controls permits you to control the info inside the web applications very simply. Databound controls are bound to the DataSource property. Databound controls area unit composite controls that combine other ASP.NET Controls like Text boxes, Radio buttons, Buttons and so on.

Frequently used Databound controls:

  • Repeater
  • DataList
  • GridView
  • List View
  • Form View
  • Repeater

Employee.aspx
<%@ Page Language="C#" AutoEventWireup="true" CodeFile="DataReapterDemo.aspx.cs" Inherits="DataReapterDemo" %> 
<!DOCTYPE html PUBLIC "-//W3C//DTD XHTML 1.0 Transitional//EN" "http://www.w3.org/TR/xhtml1/DTD/xhtml1-transitional.dtd"> 
<html 
xmlns="http://www.w3.org/1999/xhtml"> 
<head runat="server"> 
<title></title> 
<style> 
tr { 
height:40px; 

</style> 
</head> 
<body> 
<form id="form1" runat="server"> 
<div> 
<center> 
<div style="  border: 2px solid red;text-align: left;border-radius: 2px;Padding-top: 3px;background-color: Lime;width: 500px;border-radius: 8px;font-size: 20px;"> 
<asp:Repeater ID="rp1" runat="server"> 
<HeaderTemplate> 
<table  style="width:500px;padding-top:0px;Background-color:Gold" > 
<tr> 
    <td style="font-size: 26px; 
text-align: center; 
height: 48px;"> 
        <asp:Label ID="lblhdr" runat="server" Text = "Student Profile"></asp:Label> 
    </td> 
</tr> 
</table> 
</HeaderTemplate> 
<ItemTemplate> 
<table style="width:500px;"> 
<tr> 
    <td> 
        <asp:Label ID="lblempid1" runat="server" Text="Employee ID:"></asp:Label> 
    </td> 
    <td> 
        <asp:Label ID="lblempid2" runat="server" Text='<%# Eval("EmpId") %>'> 
        </asp:Label> 
    </td> 
    <td rowspan="5"> 
        <asp:Image ID="img1" runat="server" Width="100px" ImageUrl= ' 
            <%#"~/images/" + Eval("EmpImage")   %>'/> 
        </td> 
    </tr> 
    <tr> 
        <td> 
            <asp:Label ID="lblempname1" runat="server" Text="Employee Name"></asp:Label> 
        </td> 
        <td> 
            <asp:Label ID="lblempname2" runat="server" Text='<%# Eval("EmpName") %>'> 
            </asp:Label> 
        </td> 
    </tr> 
    <tr> 
        <td> 
            <asp:Label  ID="lblempemailId1" runat="server" Text="Employee EmailId"></asp:Label> 
        </td> 
        <td> 
            <asp:Label ID="lblempemailId2" runat="server" Text='<%# Eval("EmpEmailId") %>'> 
            </asp:Label> 
        </td> 
    </tr> 
    <tr> 
        <td> 
            <asp:Label ID="lblempmob1" runat="server" Text="Mobile Number"></asp:Label> 
        </td> 
        <td> 
            <asp:Label ID="lblempmob2" runat="server" Text='<%# Eval("EmpMobileNum") %>'> 
            </asp:Label> 
        </td> 
    </tr> 
    <tr> 
        <td> 
            <asp:Label ID="lblempgen1" runat="server" Text="Gender"></asp:Label> 
        </td> 
        <td> 
            <asp:Label ID="lblempgen2" runat="server" Text='<%# Eval("EmpGender") %>'> 
            </asp:Label> 
        </td> 
    </tr> 
</table> 
</ItemTemplate> 
<FooterTemplate> 
<table> 
    <tr> 
        <td>    
        @Peter
        </td> 
    </tr> 
</table> 
</FooterTemplate> 
</asp:Repeater> 
</div> 
</center> 
</div> 
</form> 
</body> 
</html>  

Employee.aspx.cs

using System;   
using System.Web;   
using System.Web.UI;   
using System.Web.UI.WebControls;   

using System.Data.SqlClient;   
using System.Data;   
using System.Web.Configuration;   

public partial class DataReapterDemo : System.Web.UI.Page   
{   
SqlConnection con = new SqlConnection(WebConfigurationManager.ConnectionStrings["myconnection"].ConnectionString);   
protected void Page_Load(object sender, EventArgs e)   
  {   
if (!IsPostBack)   
{   
Bind();   
}    }   

public void Bind()   
{   
SqlCommand cmd = new SqlCommand("select * from Employee where EmpId = 1200",con);   
SqlDataAdapter da = new SqlDataAdapter(cmd);   
DataSet ds = new DataSet();   
da.Fill(ds, "Employee");   
rp1.DataSource = ds.Tables[0];   
rp1.DataBind();   

}   
}    
  

HostForLIFE.eu ASP.NET 5 Hosting
HostForLIFE.eu is European Windows Hosting Provider which focuses on Windows Platform only. We deliver on-demand hosting solutions including Shared hosting, Reseller Hosting, Cloud Hosting, Dedicated Servers, and IT as a Service for companies of all sizes. We have customers from around the globe, spread across every continent. We serve the hosting needs of the business and professional, government and nonprofit, entertainment and personal use market segments.


ASP.NET Hosting UK - HostForLIFE.eu :: How to Use HTML5 to Detect Online Status of ASP.NET Website

clock June 18, 2015 05:54 by author Rebecca

Html 5 being the fore runner in the Web technology today has offered a lot of benefit and enhancements that will make life of a developer easier than even before. One of such enhancement belongs to the support of offline data storage inside browser cache.  The offline data storage enhances the UI Experience of the end user by providing rich api to read local storage. HTML 5 supports the features that was never present before and you needed to rely on those events only using 3rd party plugins. Say for instance, you have a requirement to continue using your web application even though there is no availability of Internet. In this tutorial, I will show you how easily you can detect whether the site is running in online or offline mode.

Step 1

First, let us add a code:

var addEvent = (function () {
  if (document.addEventListener) {
    return function (el, type, fn) {
      if (el && el.nodeName || el === window) {
        el.addEventListener(type, fn, false);
      } else if (el && el.length) {
        for (var i = 0; i < el.length; i++) {
          addEvent(el[i], type, fn);
        }
      }
    };
  } else {
    return function (el, type, fn) {
      if (el && el.nodeName || el === window) {
        el.attachEvent('on' + type, function () { return fn.call(el, window.event); });
      } else if (el && el.length) {
        for (var i = 0; i < el.length; i++) {
          addEvent(el[i], type, fn);
        }
      }
    };
  }
})();

You should already  know there are browser compatibility issues as most of the browser still lacks standardization. The document.addEventListener works in most of the browsers except IE. So to handle this, you have to bypass the availability the eventhandler.

Step 2

Now to invoke the event we call:

addEvent(window, 'online', online);
addEvent(window, 'offline', online);
online({ type: 'ready' });

So basically, here you trap the online and offline events of the Window object using either using attachEvent or addEventListener to show the online or offline status. Lets take a look on the event handler:

function online(event) {
document.getElementById('status').innerHTML = navigator.onLine ? 'online' : 'offline';
}

So in the code you can easily detect using the network status of the browser using navigat0r.onLine, such that when it returns true, that means client is online or else otherwise.

Here are the steps to sumarize:

  1. Add event listener to window.online / offline events
  2. Use navigator.onLine to detect whether the application is in online state.
  3. Do adjust your logic according to that.

The code works in most of the modern browsers. Happy coding :)

HostForLIFE.eu ASP.NET 5 Hosting
HostForLIFE.eu is European Windows Hosting Provider which focuses on Windows Platform only. We deliver on-demand hosting solutions including Shared hosting, Reseller Hosting, Cloud Hosting, Dedicated Servers, and IT as a Service for companies of all sizes. We have customers from around the globe, spread across every continent. We serve the hosting needs of the business and professional, government and nonprofit, entertainment and personal use market segments.


ASP.NET Hosting France - HostForLIFE.eu :: How to Create Charts in ASP.NET

clock June 11, 2015 05:56 by author Rebecca

Graphs and charts are important tools for the analysis of data. In this tutorial, you will look at how to represent data in terms of a bar chart and pie chart. To make this possible, we need the latest rendition of Microsoft's Graphics Device Interface (GDI+).

Scenarios to draw bar and pie charts

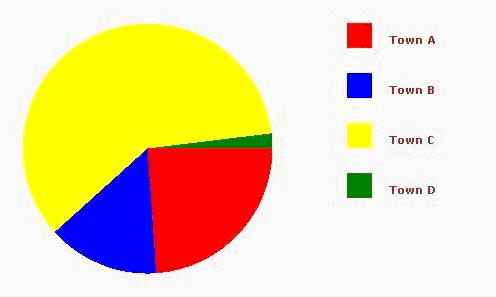
In this bar and pie chart example, it will represent the data of a fictitious country having 4 towns; namely: Town A, Town B, Town C and Town D. Their population will be modeled in terms of graphs and charts. The figures are given below:

Town    Population
  A       1,000,000
  B        600,000
  C       2,500,000
  D        800,000

Then, the bar chart should be outputted like this:
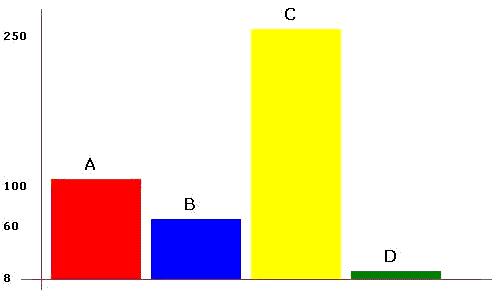
And the pie chart should be outputted like below:
Useful classes

Below are some of the useful classes that will be used to achieve what you want:

The Bitmap class

In windows application, you would have output graphical contents to one of the windows. Whereas in ASP.NET, there are no window. Fortunately, there is a class that can act as the drawing surface and that is the Bitmap class.

As any drawing surface has a width and a height, so does the Bitmap object. So, when we will create a Bitmap object, we will pass in a width and a height as parameters in the constructors. Moreover, we have to specify “Pixel Format Argument” which means whether the pixel format should be 24-bits RGB color, 32-bits RGB color, GDI-colors etc. In short the following code will do the work.

Dim Image As New Bitmap(500, 300, PixelFormat.Format32bppRgb)

The Graphics Class

Once you have created the Bitmap object, you need to obtain a Graphics object that references that Bitmap object. The following code will do the job.

' Get the graphics context for the bitmap.
Dim g As Graphics = Graphics.FromImage(Image)

The x vs. y coordinates system is illustrated in the figure below:

The Drawer

Now that you have a surface to draw, as you may have guessed, you will need a pen or brush to draw. To create a pen, a few properties of the pen should be specified; like the color of the pen and the width of the pen..

' Create a pen for drawing
Dim redPen As New Pen(Color.Red, 10)
 
' Create a blue brush
Dim blueBrush As New SolidBrush(Color.Blue)

Useful methods for drawing

Now that we have a set of drawing tools at our disposal, the graphics class also has a set of interesting methods to simplify our work for drawing objects like: circles, rectangles, text and the list goes on.

For this tutorial, you will be using the following self explanatory methods:

  • Clear ( ): Cleans the graphics object (Pretty much like cleaning the whiteboard)
  • DrawString ( ): For outputting text
  • FillPie ( ): Draw a pie slice (useful for pie chart)
  • FillRectangle ( ): Draws a rectangle (useful for bar charts)
  • DrawLine ( ): Draws a line 

The above methods may be overloaded, so we used the names only. It is left to you as an option to explore how the overloaded methods.

How to Code the Chart Generator functions

Step 1

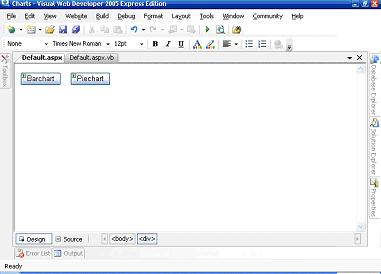
First of all create 2 buttons and label them Barchart and Piechart as shown in the figure below:

Step 2

Next, we shall declare some variables for the Bitmap object, Graphics object, population values, town names and the color representing each town. The code is as follows:

'   Variables declaration
Private myImage As Bitmap
Private g As Graphics
Private p() As Integer = {1000000, 600000, 2500000, 80000}
Private towns() As String = {"A", "B", "C", "D"}

Private myBrushes(4) As Brush

Next, in our Page_Load event, we will call a function that will create objects from the Bitmap and Graphics classes. We should also create the brushes that will be used for drawing the charts. The code snippet below does the job:

' Create an in-memory bitmap where you will draw the image.
' The Bitmap is 300 pixels wide and 200 pixels high.
myImage = New Bitmap(500, 300, PixelFormat.Format32bppRgb)
 
' Get the graphics context for the bitmap.
g = Graphics.FromImage(myImage)
 
'   Create the brushes for drawing
myBrushes(0) = New SolidBrush(Color.Red)
myBrushes(1) = New SolidBrush(Color.Blue)
myBrushes(2) = New SolidBrush(Color.Yellow)

myBrushes(3) = New SolidBrush(Color.Green)

Step 3

The bar charts have to be placed in a manner that we could draw the axes and label them as well. So, we declare an interval variable that will space the bar charts.

'   Variables declaration
Dim i As Integer
Dim xInterval As Integer = 100
Dim width As Integer = 90
Dim height As Integer
Dim blackBrush As New SolidBrush(Color.Black)
 
For i = 0 To p.Length - 1
    height = (p(i) \ 10000) '   divide by 10000 to adjust barchart to height of Bitmap
 
    '   Draws the bar chart using specific colours
    g.FillRectangle(myBrushes(i), xInterval * i + 50, 280 - height, width, height)
 
    '   label the barcharts
    g.DrawString(towns(i), New Font("Verdana", 12, FontStyle.Bold), Brushes.Black, xInterval * i + 50 + (width / 3), 280 - height - 25)
 
    '   Draw the scale
    g.DrawString(height, New Font("Verdana", 8, FontStyle.Bold), Brushes.Black, 0, 280 - height)
 
    '   Draw the axes
    g.DrawLine(Pens.Brown, 40, 10, 40, 290)         '   y-axis
    g.DrawLine(Pens.Brown, 20, 280, 490, 280)       '   x-axis
Next

The above code has only to be linked with the Click event of the “Barchart” button that was placed ok the page before. We have to keep track of the total angle so far and add the current angle produced by population[i] and use the FillPie method to draw the piechart.

Step 4

Next, to draw the pie chart, we make use of the following code:

'   Variables declaration
Dim i As Integer
Dim total As Integer
Dim percentage As Double
Dim angleSoFar As Double = 0.0
 
'   Caculates the total
For i = 0 To p.Length - 1
    total += p(i)
Next
 
'   Draws the pie chart
For i = 0 To p.Length - 1
    percentage = p(i) / total * 360
 
    g.FillPie(myBrushes(i), 25, 25, 250, 250, CInt(angleSoFar), CInt(percentage))
 
    angleSoFar += percentage
 
    '   Draws the lengend
    g.FillRectangle(myBrushes(i), 350, 25 + (i * 50), 25, 25)
 
    '   Label the towns
    g.DrawString("Town " & towns(i), New Font("Verdana", 8, FontStyle.Bold), Brushes.Brown, 390, 25 + (i * 50) + 10)
Next

The above code has to be linked with the Piechart Button's Click event.

Step 5

Now that we have the methods required to draw the charts, we should now output them on the browser. The piece of code below simply outputs the chart:

' Render the image to the HTML output stream.
myImage.Save(Response.OutputStream, _
System.Drawing.Imaging.ImageFormat.Jpeg)

Remember that myImage is the Bitmap object that we created earlier. Now, you can play around with the set of methods to produce other drawings or to improve the classes. You can also explore the rich set of methods and classes that the .NET framework provides you for producing drawings.

HostForLIFE.eu ASP.NET 5 Hosting
HostForLIFE.eu is European Windows Hosting Provider which focuses on Windows Platform only. We deliver on-demand hosting solutions including Shared hosting, Reseller Hosting, Cloud Hosting, Dedicated Servers, and IT as a Service for companies of all sizes. We have customers from around the globe, spread across every continent. We serve the hosting needs of the business and professional, government and nonprofit, entertainment and personal use market segments.


About HostForLIFE

HostForLIFE is European Windows Hosting Provider which focuses on Windows Platform only. We deliver on-demand hosting solutions including Shared hosting, Reseller Hosting, Cloud Hosting, Dedicated Servers, and IT as a Service for companies of all sizes.

We have offered the latest Windows 2019 Hosting, ASP.NET 5 Hosting, ASP.NET MVC 6 Hosting and SQL 2019 Hosting.


Month List

Tag cloud

Sign in