In this part of the article, we learn how to create .Net Core API for the KendoUI Curd Operations. Also here we learn the multilayer architecture of .Net Core API.
Preconditions
Basic knowledge of Angular CLI
Basic knowledge of Dot Net core
Basic knowledge of SQL server
Bootstrap
Node.js
V.S. Code,Visual Studio
We cover the below things
Create Dot Net Core API
Create Angular application
Angular Routing
Kendo UI setup
Bind KendoUI grid
Add this script to the database to create table.
Create Database KendoUIDb
CREATE TABLE [dbo].[Users](
[UserId] [int] primary key IDENTITY(1,1) NOT NULL,
[UserName] [nvarchar](56) NOT NULL,
[FullName] [nvarchar](200) NULL,
[EmailId] [nvarchar](200) NULL,
[Contactno] [nvarchar](10) NULL,
[Password] [nvarchar](200) NULL,
[Createdby] [int] NULL,
[CreatedDate] [datetime] NULL,
[Status] [bit] NULL,
[imagename] [varchar](100) NULL
)
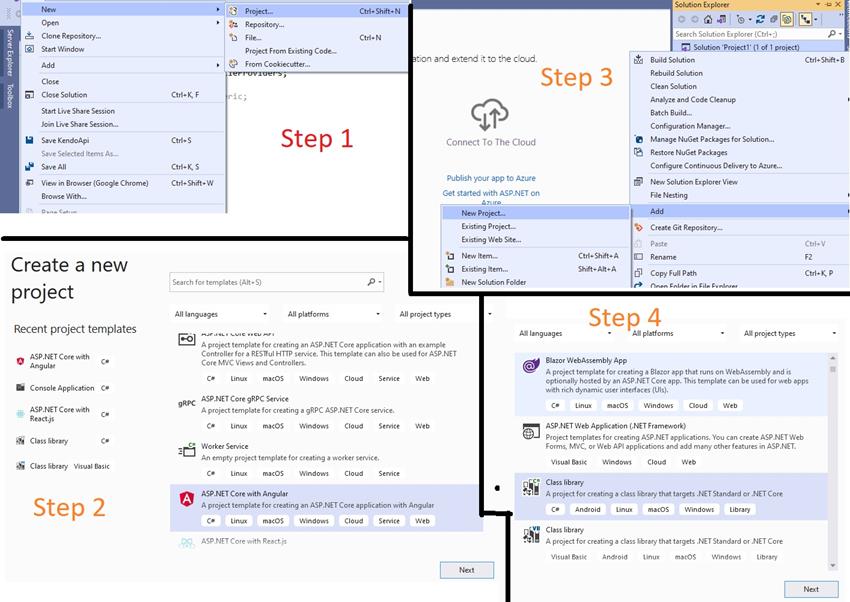
Now let's create a .Net API Project in visual studio using the following steps.
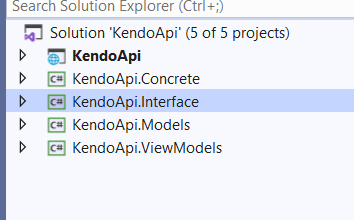
We have to create four libraries mentioned in the below image.
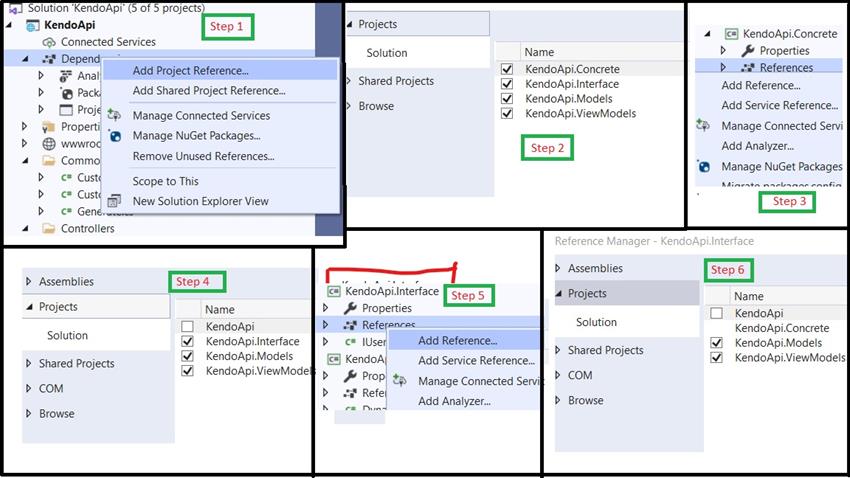
Now we add the references of project for interconnect.
Now we will create the following files according to the below images.

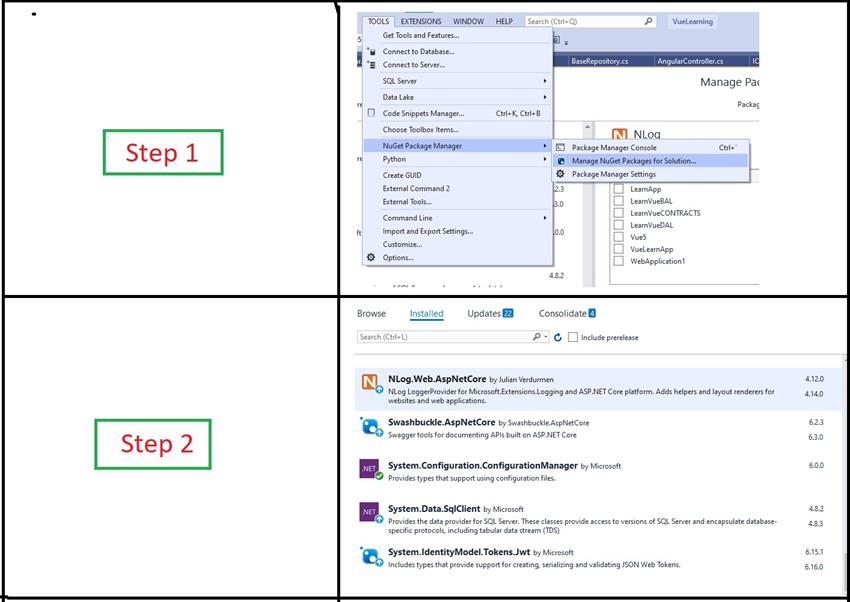
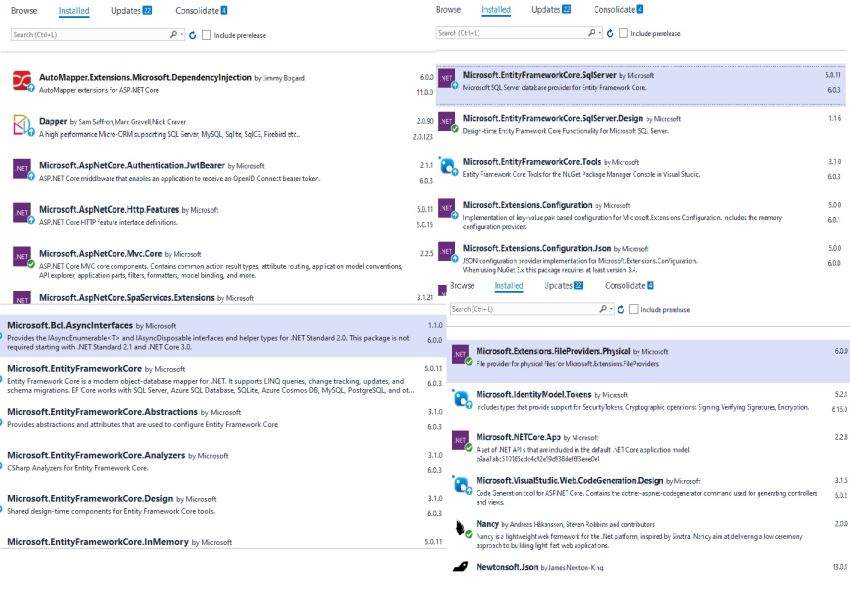
Now add the following packages from nuget package manager.
Now add the below code in the Custom.cs file.
using Microsoft.AspNetCore.Hosting;
using Microsoft.Extensions.FileProviders;
using System;
using System.Collections.Generic;
using System.IO;
using System.Linq;
using System.Threading.Tasks;
using KendoApi.ViewModels;
namespace KendoApi.Common {
public class Custom {
public static string UploadImage(UsersViewModel users, IHostingEnvironment _environment, string routePath = "") {
string filesName = "";
if (users.file != null) {
//Getting FileName
var fileName = Path.GetFileName(users.file.FileName);
//Assigning Unique Filename (Guid)
var myUniqueFileName = Convert.ToString(Guid.NewGuid());
//Getting file Extension
var fileExtension = Path.GetExtension(fileName);
// concatenating FileName + FileExtension
var newFileName = String.Concat(myUniqueFileName, fileExtension);
filesName = newFileName;
// Combines two strings into a path.
var filepath = new PhysicalFileProvider(Path.Combine(Directory.GetCurrentDirectory(), "wwwroot", "Images")).Root + $ @ "\{newFileName}";
using(FileStream fs = System.IO.File.Create(filepath)) {
users.file.CopyTo(fs);
fs.Flush();
}
} else {
if (users.imagename == null) {
filesName = "";
} else {
filesName = users.imagename != "" ? users.imagename.Replace("http://" + routePath + "/images/", "") : null;
}
}
return filesName;
}
}
}
Now add the below code in the CustomExceptionFilterAttribute.cs file.
using System;
using System.Collections.Generic;
using System.Globalization;
using System.IO;
using System.Linq;
using System.Threading.Tasks;
using Microsoft.AspNetCore.Hosting;
using Microsoft.AspNetCore.Mvc;
using Microsoft.AspNetCore.Mvc.Filters;
using Microsoft.AspNetCore.Routing;
namespace KendoApi.Common {
public class CustomExceptionFilterAttribute: ExceptionFilterAttribute {
private readonly IHostingEnvironment _hostingEnvironment;
public CustomExceptionFilterAttribute(IHostingEnvironment hostingEnvironment) {
_hostingEnvironment = hostingEnvironment;
}
public override void OnException(ExceptionContext context) {
string strLogText = "";
Exception ex = context.Exception;
context.ExceptionHandled = true;
var objClass = context;
strLogText += "Message ---\n{0}" + ex.Message;
if (context.HttpContext.Request.Headers["x-requested-with"] == "XMLHttpRequest") {
strLogText += Environment.NewLine + ".Net Error ---\n{0}" + "Check MVC Ajax Code For Error";
}
strLogText += Environment.NewLine + "Source ---\n{0}" + ex.Source;
strLogText += Environment.NewLine + "StackTrace ---\n{0}" + ex.StackTrace;
strLogText += Environment.NewLine + "TargetSite ---\n{0}" + ex.TargetSite;
if (ex.InnerException != null) {
strLogText += Environment.NewLine + "Inner Exception is {0}" + ex.InnerException;
//error prone
}
if (ex.HelpLink != null) {
strLogText += Environment.NewLine + "HelpLink ---\n{0}" + ex.HelpLink; //error prone
}
StreamWriter log;
string timestamp = DateTime.Now.ToString("d-MMMM-yyyy", new CultureInfo("en-GB"));
string errorFolder = Path.Combine(_hostingEnvironment.WebRootPath, "ErrorLog");
if (!System.IO.Directory.Exists(errorFolder)) {
System.IO.Directory.CreateDirectory(errorFolder);
}
// ReSharper disable once ConvertIfStatementToConditionalTernaryExpression
if (!File.Exists($ @ "{errorFolder}\Log_{timestamp}.txt")) {
log = new StreamWriter($ @ "{errorFolder}\Log_{timestamp}.txt");
} else {
log = File.AppendText($ @ "{errorFolder}\Log_{timestamp}.txt");
}
var controllerName = (string) context.RouteData.Values["controller"];
var actionName = (string) context.RouteData.Values["action"];
// Write to the file:
log.WriteLine(Environment.NewLine + DateTime.Now);
log.WriteLine("------------------------------------------------------------------------------------------------");
log.WriteLine("Controller Name :- " + controllerName);
log.WriteLine("Action Method Name :- " + actionName);
log.WriteLine("------------------------------------------------------------------------------------------------");
log.WriteLine(objClass);
log.WriteLine(strLogText);
log.WriteLine();
// Close the stream:
log.Close();
if (!_hostingEnvironment.IsDevelopment()) {
// do nothing
return;
}
var result = new RedirectToRouteResult(new RouteValueDictionary {
{
"controller",
"Errorview"
}, {
"action",
"Error"
}
});
// TODO: Pass additional detailed data via ViewData
context.Result = result;
}
}
}
Now add the below code in the UserController.cs file.
using System;
using System.Collections.Generic;
using System.Linq;
using System.Net;
using System.Net.Http;
using System.Security.Claims;
using System.Threading.Tasks;
using Microsoft.AspNetCore.Authorization;
using Microsoft.AspNetCore.Http;
using Microsoft.AspNetCore.Mvc;
using Newtonsoft.Json;
using KendoApi.Common;
using KendoApi.Interface;
using KendoApi.Models;
using KendoApi.ViewModels;
using System.Web;
using Microsoft.AspNetCore.Hosting;
using System.IO;
using Newtonsoft.Json;
using Newtonsoft.Json.Linq;
using AutoMapper;
namespace KendoApi.Controllers {
//[Authorize]
[Route("api/[controller]")]
[ApiController]
public class UserController: ControllerBase {
private readonly IUsers _users;
private readonly IHostingEnvironment _environment;
private readonly IHttpContextAccessor _httpContextAccessor;
public UserController(IUsers users, IHostingEnvironment environment, IHttpContextAccessor httpContextAccessor) {
_users = users;
_environment = environment;
_httpContextAccessor = httpContextAccessor;
}
// GET: api/User
[HttpGet]
public IEnumerable < Users > Get() {
var path = _httpContextAccessor.HttpContext.Request.Host.ToString();
var UserData = _users.GetAllUsers(path);
return UserData;
}
// GET: api/User/5
[HttpGet]
[Route("GetByUserName")]
public Users GetByUserName(string username = "") {
var path = _httpContextAccessor.HttpContext.Request.Host.ToString();
var UserData = _users.GetByUserName(username, path);
return UserData;
}
// GET: api/User/5
[HttpGet("{id}", Name = "GetUsers")]
public Users Get(int id) {
var UserData = _users.GetUsersbyId(id);
var password = EncryptionLibrary.DecryptText(UserData.Password);
return UserData;
}
[HttpPost]
public IActionResult Post([FromForm] UsersViewModel users) {
var path = _httpContextAccessor.HttpContext.Request.Host.ToString();
var Result = Custom.UploadImage(users, _environment, path);
string imagepath = "http://" + path + "/images/";
var _rootPath = _environment.WebRootPath;
if (ModelState.IsValid) {
if (_users.CheckUsersExits(users.UserName)) {
var response = new HttpResponseModel() {
StatusCode = (int) HttpStatusCode.Conflict,
data = ""
};
return Ok(response);
} else {
var userId = this.User.FindFirstValue(ClaimTypes.Name);
var tempUsers = AutoMapper.Mapper.Map < Users > (users);
tempUsers.UserName = users.UserName;
tempUsers.imagename = users.file != null ? users.file.FileName : "";
tempUsers.CreatedDate = DateTime.Now;
tempUsers.imagename = Result;
tempUsers.Createdby = Convert.ToInt32(userId);
tempUsers.Password = EncryptionLibrary.EncryptText(users.Password);
_users.InsertUsers(tempUsers);
var response = new HttpResponseModel() {
StatusCode = (int) HttpStatusCode.OK,
data = imagepath + tempUsers.imagename
};
return Ok(response);
}
} else {
var Results = ModelState.Values.ToList()[0].Errors.Count().ToString();
var response = new HttpResponseModel() {
StatusCode = (int) HttpStatusCode.BadRequest,
data = ""
};
return Ok(Results);
}
}
// PUT: api/User/5
[HttpPut("{id}")]
public IActionResult Put(int id, [FromForm] UsersViewModel users) {
if (ModelState.IsValid) {
var path = _httpContextAccessor.HttpContext.Request.Host.ToString();
string imagepath = "http://" + path + "/images/";
var Result = Custom.UploadImage(users, _environment, path);
users.Password = EncryptionLibrary.EncryptText(users.Password);
var tempUsers = AutoMapper.Mapper.Map < Users > (users);
tempUsers.UserId = id;
tempUsers.CreatedDate = DateTime.Now;
tempUsers.imagename = Result;
_users.UpdateUsers(tempUsers);
var response = new HttpResponseModel() {
StatusCode = (int)(HttpStatusCode.OK),
data = imagepath + tempUsers.imagename
};
return Ok(response);
} else {
var response = new HttpResponseModel() {
StatusCode = (int) HttpStatusCode.BadRequest,
data = ""
};
return Ok(response);
}
}
// DELETE: api/ApiWithActions/5
[HttpDelete("{id}")]
public HttpResponseMessage Delete(int id) {
var result = _users.DeleteUsers(id);
if (result) {
var response = new HttpResponseMessage() {
StatusCode = HttpStatusCode.OK
};
return response;
} else {
var response = new HttpResponseMessage() {
StatusCode = HttpStatusCode.BadRequest
};
return response;
}
}
}
}
Now add the below code in the MappingProfile.cs file.
using System;
using System.Collections.Generic;
using System.Linq;
using System.Threading.Tasks;
using AutoMapper;
using KendoApi.Models;
using KendoApi.ViewModels;
namespace KendoApi.Mappings
{
public class MappingProfile : Profile
{
public MappingProfile()
{
CreateMap<UsersViewModel, Users>()
.ForMember(dest => dest.UserName, opt => opt.MapFrom(src => src.UserName))
.ForMember(dest => dest.Contactno, opt => opt.MapFrom(src => src.Contactno))
.ForMember(dest => dest.EmailId, opt => opt.MapFrom(src => src.EmailId))
.ForMember(dest => dest.FullName, opt => opt.MapFrom(src => src.FullName))
.ForMember(dest => dest.Password, opt => opt.MapFrom(src => src.Password))
.ForMember(dest => dest.UserId, opt => opt.MapFrom(src => src.Id))
.ForMember(dest => dest.Status, opt => opt.MapFrom(src => src.Status));
}
}
}
Now add the below code in the AppSettings.cs file.
using System;
using System.Collections.Generic;
using System.Linq;
using System.Threading.Tasks;
namespace KendoApi.Models {
public class AppSettings {
public string Secret {
get;
set;
}
}
}
Now add the below code in the AppSettings.cs file.
{
"AppSettings": {
"Secret": "6XJCIEJO41PQZNWJC4RR"
},
"Logging": {
"LogLevel": {
"Default": "Warning"
}
},
"AllowedHosts": "*",
"ConnectionStrings": {
"DatabaseConnection": "Data Source=DESKTOP-13P092J\\SA; UID=sa; Password=sa123;Database=KendoUIDb;"
}
}
Now add the below code in the Startup.cs file.
using System;
using System.Collections.Generic;
using System.Linq;
using System.Text;
using System.Threading.Tasks;
using AutoMapper;
using Microsoft.AspNetCore.Authentication.JwtBearer;
using Microsoft.AspNetCore.Builder;
using Microsoft.AspNetCore.Hosting;
using Microsoft.AspNetCore.Http;
using Microsoft.AspNetCore.Http.Features;
using Microsoft.AspNetCore.Mvc;
using Microsoft.AspNetCore.Mvc.Infrastructure;
using Microsoft.AspNetCore.Mvc.Routing;
using Microsoft.EntityFrameworkCore;
using Microsoft.Extensions.Configuration;
using Microsoft.Extensions.DependencyInjection;
using Microsoft.IdentityModel.Tokens;
using KendoApi.Common;
using KendoApi.Concrete;
using KendoApi.Interface;
using KendoApi.Mappings;
using KendoApi.Models;
namespace KendoApi {
public class Startup {
public Startup(IConfiguration configuration) {
Configuration = configuration;
}
public IConfiguration Configuration {
get;
}
// This method gets called by the runtime. Use this method to add services to the container.
public void ConfigureServices(IServiceCollection services) {
services.Configure < CookiePolicyOptions > (options => {
// This lambda determines whether user consent for non-essential cookies is needed for a given request.
options.CheckConsentNeeded = context => true;
options.MinimumSameSitePolicy = SameSiteMode.None;
});
#region MyRegion
var connection = Configuration.GetConnectionString("DatabaseConnection");
services.AddDbContext < DatabaseContext > (options => options.UseSqlServer(connection, b => b.UseRowNumberForPaging()));
var appSettingsSection = Configuration.GetSection("AppSettings");
services.Configure < AppSettings > (appSettingsSection);
// configure jwt authentication
var appSettings = appSettingsSection.Get < AppSettings > ();
var key = Encoding.ASCII.GetBytes(appSettings.Secret);
services.AddAuthentication(x => {
x.DefaultAuthenticateScheme = JwtBearerDefaults.AuthenticationScheme;
x.DefaultChallengeScheme = JwtBearerDefaults.AuthenticationScheme;
}).AddJwtBearer(x => {
x.RequireHttpsMetadata = false;
x.SaveToken = true;
x.TokenValidationParameters = new TokenValidationParameters {
ValidateIssuerSigningKey = true,
IssuerSigningKey = new SymmetricSecurityKey(key),
ValidateIssuer = false,
ValidateAudience = false
};
});
services.AddSingleton < IConfiguration > (Configuration);
services.AddTransient < IUsers, UsersConcrete > ();
services.AddSingleton < IActionContextAccessor, ActionContextAccessor > ();
services.AddScoped < IUrlHelper > (implementationFactory => {
var actionContext = implementationFactory.GetService < IActionContextAccessor > ().ActionContext;
return new UrlHelper(actionContext);
});
#endregion
services.AddSingleton < IHttpContextAccessor, HttpContextAccessor > ();
services.AddHttpContextAccessor();
// Start Registering and Initializing AutoMapper
Mapper.Initialize(cfg => cfg.AddProfile < MappingProfile > ());
services.AddAutoMapper();
// End Registering and Initializing AutoMapper
services.Configure < FormOptions > (options => {
options.ValueCountLimit = 200; //default 1024
options.ValueLengthLimit = 1024 * 1024 * 100; //not recommended value
options.MultipartBodyLengthLimit = long.MaxValue; //not recommended value
});
services.AddMvc(options => {
options.Filters.Add(typeof(CustomExceptionFilterAttribute));
}).SetCompatibilityVersion(CompatibilityVersion.Version_2_1).AddJsonOptions(options => {
options.SerializerSettings.ContractResolver = new Newtonsoft.Json.Serialization.DefaultContractResolver();
});
services.AddCors(options => {
options.AddPolicy("CorsPolicy", builder => builder.AllowAnyOrigin().AllowAnyMethod().AllowAnyHeader().AllowCredentials().WithExposedHeaders("X-Pagination"));
});
}
// This method gets called by the runtime. Use this method to configure the HTTP request pipeline.
public void Configure(IApplicationBuilder app, IHostingEnvironment env) {
if (env.IsDevelopment()) {
app.UseDeveloperExceptionPage();
} else {
app.UseExceptionHandler("/Home/Error");
}
app.UseStaticFiles();
app.UseCookiePolicy();
app.UseAuthentication();
app.UseCors("CorsPolicy");
app.UseMvc(routes => {
routes.MapRoute(name: "default", template: "{controller=Home}/{action=Index}/{id?}");
});
}
}
}
Now add the below code in the DatabaseContext.cs file.
using System;
using System.Collections.Generic;
using System.Linq;
using System.Text;
using System.Threading.Tasks;
using Microsoft.EntityFrameworkCore;
using KendoApi.Models;
namespace KendoApi.Concrete {
public class DatabaseContext: DbContext {
public DatabaseContext(DbContextOptions < DatabaseContext > options): base(options) {}
public DbSet < Users > Users {
get;
set;
}
}
}
Now add the below code in the UsersConcrete.cs file.
using System;
using System.Collections.Generic;
using KendoApi.Models;
using KendoApi.ViewModels;
namespace KendoApi.Interface {
public interface IUsers {
bool InsertUsers(Users user);
bool CheckUsersExits(string username);
Users GetUsersbyId(int userid);
bool DeleteUsers(int userid);
bool UpdateUsers(Users role);
List < Users > GetAllUsers(string rootpath = "");
bool AuthenticateUsers(string username, string password);
Users GetByUserName(string username, string rootpath);
}
}
Now add the below code in the Users.cs file.
using System;
using System.Collections.Generic;
using System.ComponentModel.DataAnnotations;
using System.ComponentModel.DataAnnotations.Schema;
using System.Linq;
using System.Text;
using System.Threading.Tasks;
namespace KendoApi.Models {
[Table("Users")]
public class Users {
[Key]
public int UserId {
get;
set;
}
public string UserName {
get;
set;
}
public string FullName {
get;
set;
}
public string EmailId {
get;
set;
}
public string Contactno {
get;
set;
}
public string Password {
get;
set;
}
public int ? Createdby {
get;
set;
}
public string imagename {
get;
set;
}
public DateTime ? CreatedDate {
get;
set;
}
public bool Status {
get;
set;
}
}
}
Now add the below code in the HttpResponseModel.cs file.
using Microsoft.AspNetCore.Http;
using System;
using System.Collections.Generic;
using System.ComponentModel.DataAnnotations;
using System.ComponentModel.DataAnnotations.Schema;
using System.Linq;
using System.Text;
using System.Threading.Tasks;
namespace KendoApi.ViewModels {
public class HttpResponseModel {
public string data {
get;
set;
}
public int StatusCode {
get;
set;
}
}
}
Now add the below code in the UsersViewModel.cs file.
using Microsoft.AspNetCore.Http;
using System;
using System.Collections.Generic;
using System.ComponentModel.DataAnnotations;
using System.ComponentModel.DataAnnotations.Schema;
using System.Linq;
using System.Text;
using System.Threading.Tasks;
namespace KendoApi.ViewModels {
public class UsersViewModel {
public int Id {
get;
set;
}
public int UserId {
get;
set;
}
//[Required]
public string UserName {
get;
set;
}
// [Required]
public string FullName {
get;
set;
}
// [Required]
public string EmailId {
get;
set;
}
// [Required]
public string Contactno {
get;
set;
}
// [Required]
public string Password {
get;
set;
}
public bool Status {
get;
set;
}
[NotMapped]
public IFormFile file {
get;
set;
}
public string imagename {
get;
set;
}
// public List<IFormFile> files { get; set; }
}
}
We have completed the API part, now in the next part we will work on binding the KendoUI Grid with API.
Summary
In this article, we learned how to create .Net core multilayer architecture for API with curd operations.